An attachment is an object that becomes part of a LabVantage SDI (System Data Item). These attachments are usually files but could also be a URL, photograph, drawing, plain or rich text. Most maintenance pages will include a detail element allowing you to add, edit, or view these attachments. Additional administration and configuration details for attachments is available here.
Adding or Editing Attachments |
|
|
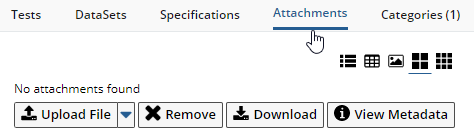
Begin by editing the SDI to which you plan to add an attachment. The example here shows a Sample maintenance page with no existing attachments. This detail element will appear near the bottom of the maintenance page.
Mechanics |
|
The attachment Element
is configured by default to allow you to add Attachments using the "Upload File"
button. "Upload File" initiates a "File" Attachment
based on the current configuration in the Attachment
Policy.
Dropdown options provide options for uploading different Attachment Types, which can also be configured by the attachment Element and restricted by the Attachment Policy.
|

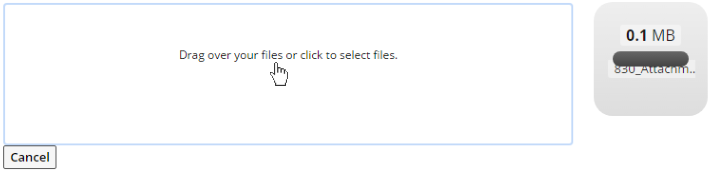
Select files by drag-and-drop or by clicking in the rectangle (below left). File upload progress is then displayed using a thumbnail (below right). If the upload malfunctions, an "X" is displayed on the progress thumbnail, and you can hover over it to see the error message. If an error occurs, you can "Cancel" the upload operation.
|
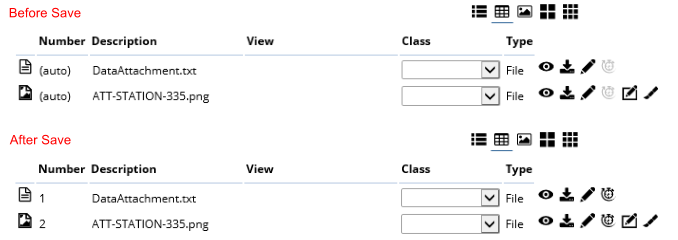
When upload is complete, the new Attachments are shown in the View. However, these Attachments are not yet saved in the database's SDIAttachment table, and are therefore identified by an (auto) Attachment Number as shown below. They are stored in a temporary area until the Maintenance page is saved, at which time an Attachment Number is assigned.
|
The "Remove" and "Download" buttons provide the following functionality:
|
Clicking "Remove" flags selected Attachments for deletion.
The deletion does not occur until the Maintenance page is saved.
The "Download" button exhibits the following behavior:
|
Views |
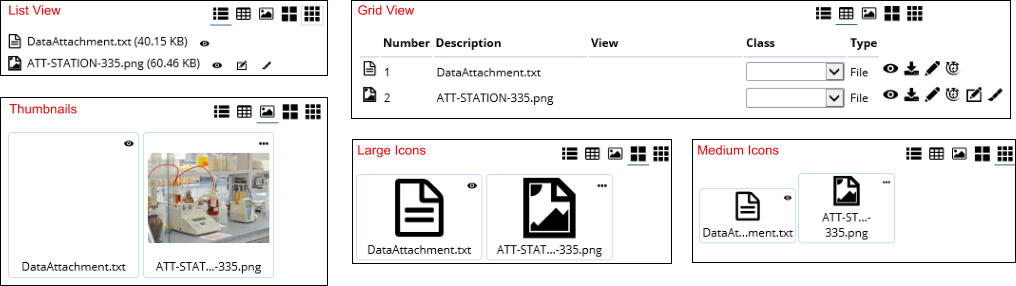
Views are presented in order of the Attachment Number in the SDIAttachment table:
| • | "List View" shows a simple textual list of the Attachments. |
| • | "Grid View" shows an editable grid of the Attachment columns. The columns are configured by the "Columns" collection in the attachment Element. |
| • | "Thumbnails" shows thumbnail views of the Attachments that are approximately 140x155 pixels. The View icon in the upper right corner downloads the Attachment for viewing. |
| • | "Large Icons" and "Medium Icons" show icons that are approximately 52x62 and 26x32 pixels, respectively. |
|
In "Grid View", you can edit columns that are defined in the attachment Element (providing the Mode for the column is editable). When editing, changes are not saved until the Maintenance page is saved. Grid View also provides access to four action icons:
| Icon | Description | ||||||||||||
|
View Attachment |
This applies only to "File" Types (whether Stored By Reference or not). This downloads the selected file for viewing (useful for viewing before the Attachment is saved). | ||||||||||||
|
Download Attachment |
This applies only to "File" Types (whether Stored By Reference or not). This actually downloads the selected file (there is no immediate view). This also lets you download the temporarily uploaded file before the Attachment is saved. | ||||||||||||
|
Re-Upload or Edit Attachment |
This functionality depends on the Attachment Type:
If this icon is disabled, the stored Attachment is not editable. This can be configured by:
Attachments are always editable until the Maintenance page is saved. They can be edited further depending on the value of the "Content Editable" property as described above. Note that using "Download Attachment" and Edit Attachment" is an easy and quick way to download your file, modify it, then re-upload a new version. |
||||||||||||
|
View Audit History |
Shows the audit history and previous versions of the Attachment. This is applicable only to saved Attachments. | ||||||||||||
| Edit Image |
See Image Editing and Drawing Tools. | ||||||||||||
| Draw On Image |
See Image Editing and Drawing Tools. | ||||||||||||
|
Revert |
See Image Editing and Drawing Tools. | ||||||||||||

Hash check failure |
If a red fingerprint icon has appeared for the attachment, this indicates that the hash value stored with the attachment is no longer valid. This could be an indication that the file has been changed without creating a new version through LIMS. For example, if someone was able to change the attachment after LabVantage stored it to the repository, this will cause the hash check to fail. Any file with an invalid hash check cannot be viewed through LabVantage. Any user who has been granted the proper role can click this icon. You are then presented with the option to reset the hash. The dialouge asks, "Are you sure you want to reset the hash check on the corrupt attachment?" Possible responses are Yes, No, or Cancel. If Yes is clicked, LabVantage will regenerate the hash value for this file thus allowing all users to view and download the attachment. |
Note that "Grid View" also lets you change the "Attachment Class" (referred to as "Class" in the view). "Attachment Class" is a Reference Type. You can create Reference Values for the Attachment Class, then associate a group of Attachments to each Reference Value. This simplifies Attachment identification through the URL. For example, you can view the SOP class of Sample Attachments through a URL such as:
rc?command=ViewAttachment&sdcid=Sample&keyid1=S-110131-00001&attachmentclass=SOP
Using the Attachment Policy you can optionally manage Attachments by Attachment Class. For example, you can specify whether or not an Attachment is editable (as noted above), restrict the type of files that can be uploaded, and determine how to handle copied Attachments based on Attachment class. When you attempt to add an Attachment that does not meet the criteria defined in the Attachment Policy, an error is generated.
Photos |
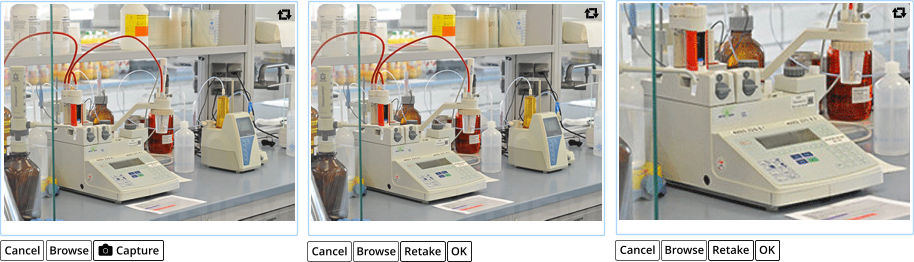
"Take Photo" provides the capability to take photos and save them as Attachments. This menu selection appears only if "File" Attachment Types and the image format (JPG or PNG) are allowed. These are controlled by the Attachment Policy → Attachment Types (for files) and File Location Policy → Attachment Excludes (for images). Image editing tools are also provided.
If the native camera is available and is not blocked (such as Chrome blocking an invalid HTTPS connection), the camera renders the phtographic image. If the browser cannot launch the camera, you are limited to browsing for images (similar to a file upload).
This defaults to the user-facing camera or the first camera found. If using a phone or tablet with a rear camera, you can use the arrow icon in top right of the photo to reverse the viewing direction.
Click "Capture" to take a photo (below left). "Retake" returns to the live camera stream (below center) and lets you retake the photo (below right). "Browse" lets you browse for image files. "OK" uploads the photo.
|
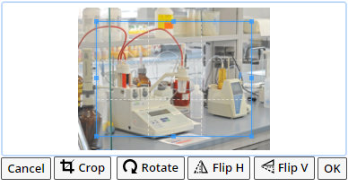
Image Editing and Drawing Tools |
|
|
|
|
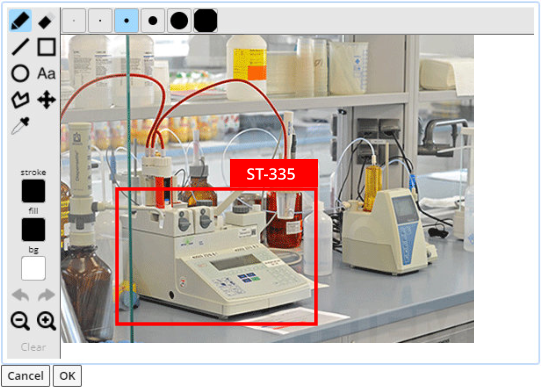
Clicking the "Draw On Image" icon lets you draw on an image using a self-explanatory drawing tool (below left). The "Add Drawing" menu item lets you add drawings as Attachments using the same tool (below right). |
|
|

|
|
Clicking the "Revert" icon lets you roll back any changes you have made to the image and revert to the original image as it was before editing, even after the Attachment has been saved. This is accomplished by holding information about the orginal file and its changes in a temporary file. When converted into an SDIAttachment record, this information is stored with the Attachment (blob or file) in SDIAttachment.AttachmentClob. The orignal information can therefore be obtained from the clob and pushed back into the blob or filesystem along with changes. |
For example, if you rotate the image and click "OK", the modified image is saved in the temporary record with the orginal image. The "Revert" icon is then shown. Clicking "Revert" issues a prompt to confirm that you want to revert and to lose editing changes. Clicking "Yes" reverses the changes and reverts to the original uploaded image.
|
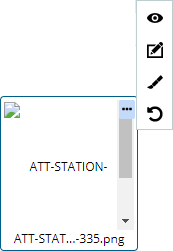
Clicking or mousing over the ellipsis shows the same View, Edit, Draw, and (if applicable) Revert icons as in Grid View. |
Attachment Revisions |
|
|
Attachments feature a lightweight content management process of their own.
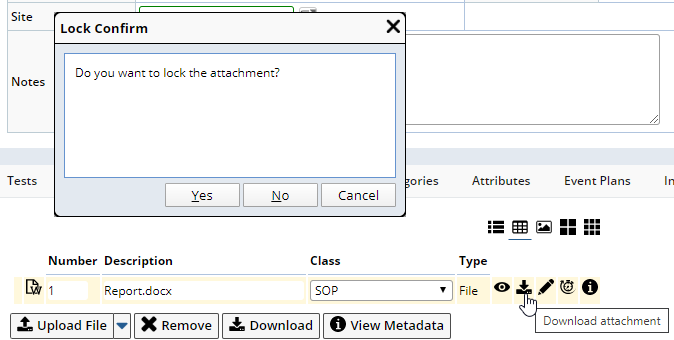
| Description | Example |
| Download and Lock: When downloading an attachment, the system will provide a confirmation dialog to prompt if you wish to lock the attachment. If yes, then the attachment will be placed into the "Locked" status. An icon on the attachment (shown in grid view) will indicate it is in the locked state. Other users will still be able to download and view the attachments which are locked. The lock prevents those other users from editing the locked attachment until the lock is cleared. |
|
| Lock/Unlock Restriction: In the Attachment Policy, the rules provide support for attachment content versioning. If this is enabled, the role required for attachment revisioning is also specified in the policy. The default (empty) means anyone can revision an attachment. If a user does not have the role set to allow revisioning then the lock and unlock options are not available. If an attachment does not have the rule to allow revisioning (set by the repository), then the lock and unlock icons are not shown. If the rule is set to not allow revisioning but the role is set, then the role setting is overridden. |

|
|
Cancelling Lock: |

|
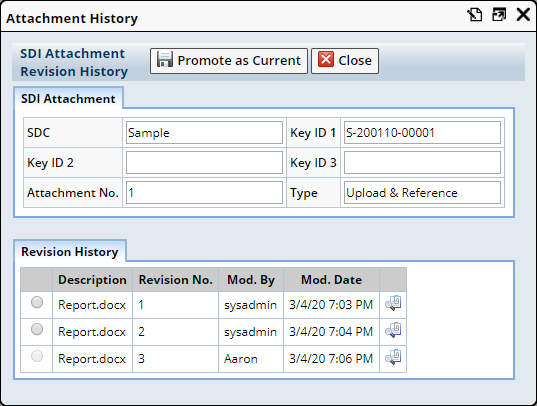
| Viewing Version History: The policy rule setting to allow revisioning will hide or show this icon. If the attachment does not allow revisioning or is the current user is not permitted by role, no icon is available. |

|
| Reverting an Attachment: Only those users with the User Role for Attachment Revisioning (set in the policy) can revert an attachment to an older version. Choose any version through the radio button. When you click "Promote as Current", the chosen version is copied to make the next higher version. |
|