Content |
||||||||||||||||
|
Introduction |
|
|
|
Collectors are a component of the Scientific Data Management module. As introduced in the SDMS Collectors help topic, a Collector can run internal to the LabVantage application, or in a distributed deployment on various nodes of your network. This document describes how to install and upgrade external collectors. Internal collectors require no additional install or upgrade steps. The general steps are:
|
Installing an External Collector |
|
|
Before you begin, review your SDMSPolicy. There are three properties that must contain valid paths. These are grouped as "External Collector Installer Defaults". Any code you have written for a custom Collector Type must be in the path specified by your policy. Other defaults from the policy can be adjusted as necessary. See The Download Install Dialog below for those options.
There are two pathways to adding a Collector. One avenue is through the SDMS Collectors Dashboard. Another option is through the Lab Admin site map. Navigate your menus to Lab Admin > SDMS > SDMS Dashboard.
- Add or edit a Collector (example of editing is in step 6)
- Make sure the "Internal or External" radio selector is set to External
- Continue making all your settings as described in SDMS Collectors help topic
- Save
- Return to the SDMS Collectors Dashboard if you have just added the Collector
- Edit your newly created Collector

- Click Install

The Download Installer Dialog |
The installer will ask you to enter some property values for this Collector. Each value can be populated with a default from the SDMS Policy. If you have not already created a token for an SDMS Collector, the Token list will be empty. See the Tokens help topic.

| Field | Description |
| Platform | The operating system where the collector will be running. Choose Windows or UNIX. |
| Token | A selectable list of Authentication Tokens that you have previously created for SDMS Collectors. |
| External URL | Defaults to the URL of your LabVantage application server and is taken from your SDMS Policy settings. Syntax is http:// (or https://) [LIMS_host]:[optional_port]/[application_name]/sc |
| Java Options | Choose bundle to export the JDK being used by LabVantage. Or you can use a local path by identifying that path or by using the path in your Collector host's environment. |
| Logging Options |
Log Level: Filters messages sent to the console according to their log levels. Log levels supported are (from minimal to max level) None, Fatal, Error, Warn, Status, Info and Debug. Max Size: The log file can be set to roll when the file reaches a specified size in Mb. Max Files: After this number of log files has been generated, the oldest is deleted before creating a new log file. |
| Wrapper JVM Checks |
Yes enables the detection of deadlocks. If detected, the system can send you an email. See below. |
| Wrapper Email Notifications |
Log Detailed Information: Yes will send log detailed information at the INFO level each time an email is sent. SMTP Host: The Wrapper will attempt to connect to this email host. SMTP Port: The port number of your SMTP host when sending email. Subject: Configures the subject of the email. Sender: Specifies the from address of the email. Recipient(s): Specifies the recipient(s) of the emails. When more than one email is specified, they must be separated by a semicolon (;) |
|
Enable Event Specific Email Yes or No for each |
Send email when wrapper starts. |
|
Specify custom mail content |
JVM restart email body: Specifies the email body to be sent when JVM restart event occurs. |
Click OK to begin the download.
Installing an External Collector on Windows |
When you configure your external collector, you have the choice of deploying on a Windows or UNIX platform. For a Windows platform, you will get a ‘zip’ file. This section addresses Windows. You will need to sign into your Windows desktop as an Administrator in order to complete these steps. We will see how to deploy an external collector on UNIX separately.
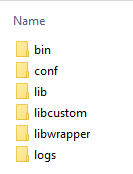
- On the target system, the downloaded zip file can now be unzipped into its target folder. The path you choose can be any of your preference. We do not recommend using a path that contains spaces such as "Program Files". Your folder contents should look like this:
- The ‘bin’ directory contains the bat files (shown below).

- To install the collector as a Windows service, double click on ‘Install Service – SDMS Collector.bat’. This will create a Service called "LabVantage SDMS Collector - [Collector ID]" where [Collector ID] is the name of your Collector in LIMS. For an example, see step 8 below.
- Start the service by running the ‘Start Service – SDMS Collector.bat’. At this stage, the collector will start running. In case there is an error while starting the collector, there will be a ‘Failed to start the service’ message in the command window. This may occur if LabVantage cannot be reached on the specified URL and your direct Collector does not allow a temporary indirect capture. If everything is fine, the service is started and the info will be published in logs/wrapper.logs. If ‘Log level’ is set as ‘Info’ while downloading the zip in download installer dialog, messages will appear immediately. If not, no messages will appear until a message of your specified severity is encountered.
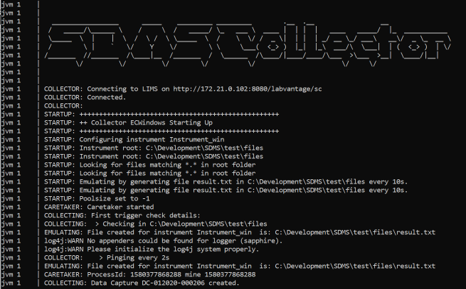
- To confirm the collector is running correctly, you can execute the ‘Run Console SDMS Collector.bat’. In the image below, you can see that the collector is running. For long-term use, you should start the collector as a Service instead of running in console mode. If running in console mode, this window must always remain active.
- Press Ctrl+C twice to stop the Collector from running in console mode.
- Open your Windows Services panel. You can do this through your Windows Start menu and type "Services".
- Observe a service has been added similar to this image below.
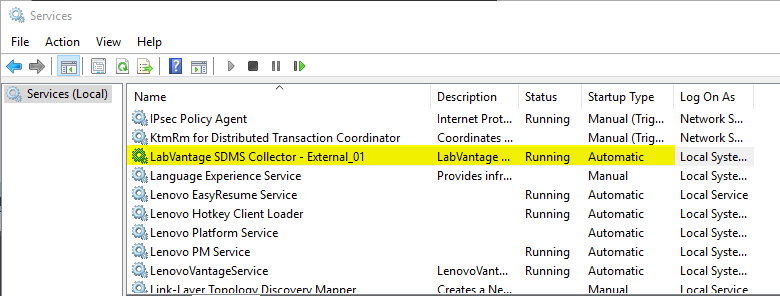
- If the Status of your Collector Service is not "Running", you can start it from here. Notice that the Startup Type is 'Automatic' which means any time your system reboots, the Collector will start up automatically.
Your installation is complete. Keep in mind the bin directory which contains scripts for stopping and uninstalling the service should that be necessary. Refer to the logs directory for any errors.
Installing an External Collector on UNIX |
When you configure your external collector, you have the choice of deploying on a UNIX platform. For UNIX, you will get a 'tar.gz' file when you perform the download steps above. This section addresses UNIX. To perform the install, sign in as the user 'root'.
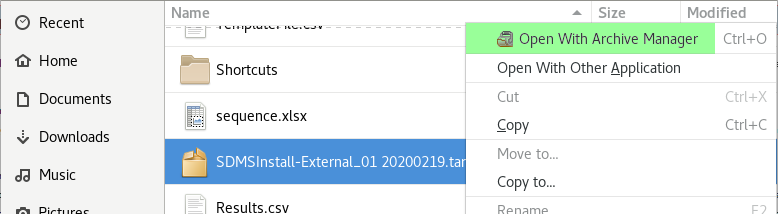
- On the target system, the downloaded .gz file can now be uncompressed into its target folder. The path you choose can be any of your preference. One option with LINUX is to right-click the file and extract using Archive Manager.
- At this point, you might consider giving read/write/execute permissions to other users or groups in the directory where you have extracted the files. In the below example, the contents were placed in /opt/labvantagehome80/SDMS/externalcollector_01. Changing permissions may be especially necessary if you have bundled the JDK JRE with this installer or if you want to run the daemon as an account that does not have root permissions. Example:
chmod 770 -R ./

You might consider changing the owner to a group for the purposes of letting other user(s) start and stop the daemon. Example chown :usergroup -R ./
- Change your directory to the bin directory. Example:

- To install the collector as a UNIX daemon/service, issue the command ‘bash SDMSCollector install’. Please note that in order to execute any bash command we should be inside the bin directory as shown in the image.
- To start the collector as a UNIX daemon, use the command ‘bash SDMSCollector start’ inside the bin directory as shown in the image. To view the info regarding the execution of collector look inside ‘logs\wrapper.log’ file.
- To stop the collector, use the command 'bash SDMSCollector stop'.
- To confirm the collector is running correctly, you can run in console mode. Use the command ‘bash SDMSCollector console’. To stop the collector use CTRL+C. You may want to start the collector once again using 'bash SDMSCollector start' if you wish to leave it running at this time.
Your installation is now complete. If you ever need to uninstall the collector, use the command ‘bash SDMSCollector remove’.
Upgrading an External Collector |
|
|
The SDMS Collectors Dashboard will signal the need for an upgrade or a reboot. This applies to both internal and external collectors and is triggered if there are any configuration changes made to the collector or any if its instruments. This includes when a collector has a list of custom jar files that differ from the list in the install-image (sdmscollector/custom/lib). It also checks the contents of the custom wrapper-custom.conf. When the build on the collector’s sapphire.jar differs from the server’s sapphire.jar also requires an upgrade. The dashboards will let you know if a runtime or a full upgrade is needed.
There are two modes for upgrading an external collector. These are Automatic and full manual. You are eligible for an automatic upgrade in these situations:
- You have added a new custom Collector Type to the external Collector.
- You have applied a LIMS maintenance release. For example, you have upgraded from LabVantage 8.5.0 to 8.5.1.
- You have made configuration changes to the Collector. This is more like a reboot.
An automatic upgrade is easier and simpler since everything is carried out from within the LIMS browser application. The external Collector will upgrade using the instructions you send.
A full upgrade is required when you have performed a major upgrade of LabVantage. For example, you have gone from LabVantage 8.5 to LabVantage 8.6. In some cases, a patch could also trigger a full upgrade. You will perform a partial re-install of the external collector. The only thing that might not change here are the configuration settings.
In automatic mode, you can choose to upgrade just the custom JAR files you added to your Collector. Or you can upgrade the sapphire.jar and any custom JARs.
Auto Upgrade of an External Collector |
If your upgrade is eligible for an Automatic Upgrade, clicking the Upgrade button from the Collectors Dashboard will present these options:
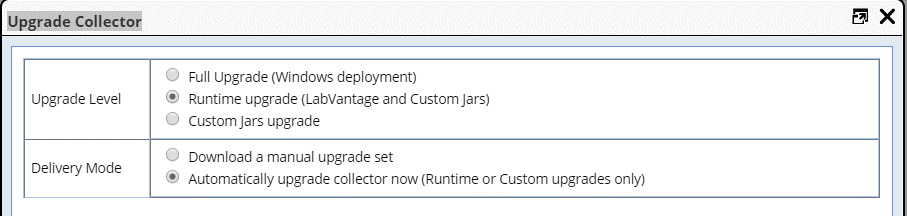
Download upgrade set if you need to perform a full upgrade and manually replace the contents in each directory. Automatically deliver to the target and Auto-upgrade will run immediately.
Manual Upgrade of an External Collector on Windows |
In manual mode, you will need to create an 'upgrade' directory inside the collector's home directory and unzip the content of the upgrade zip into your upgrade directory.
- Stop the service by executing the ‘Stop Service – SDMS Collector.bat’ from inside bin directory within collector’s home directory.
- Take a copy of the current contents of your bin, conf, lib, libcustom, and libwrapper folders and place them into the /upgrade/backup directory. Use this as a restore point if something fails.
- Manually copy/paste or replace the contents from your upgrade/bin, conf, lib, jre (in case we have deployed the collector using bundled open jdk), libcustom and libwrapper into the collector’s home directory.
- Start the service by executing ‘Start Service – SDMS Collector.bat’ from inside bin directory within the collector’s home directory.
- The upgrade is complete.
Manual Upgrade of an External Collector on UNIX |
Unless otherwise permitted, you may need to perform these steps as the user: root. In manual mode, you will need to create an 'upgrade' directory inside the collector's home directory and uncompress the content of the upgrade .gz into your upgrade directory.
- Stop the daemon by executing the ‘bash SDMSCollector stop’ command from inside bin directory within collector’s home directory.
- Take a copy of the current contents of your bin, conf, lib, libcustom, and libwrapper directories and place them into the /upgrade/backup directory. Use this as a restore point if something fails.
- Manually copy/paste or replace the contents from your upgrade/bin, conf, lib, jre (in case we have deployed the collector using bundled open jdk), libcustom and libwrapper into the collector’s home directory. In some cases, it may be necessary to reset permissions on these directories. Use chmod -R 770 ./
- Start the collector by executing ‘bash SDMSCollector start’ from inside bin directory within the collector’s home directory.
- The upgrade is complete.