Overview |
|
|
This document covers some advanced topics regarding Worksheets.
Using Repeating Sections to Make a Grid |
|
|
When a fixed Form layout is not required, using table rows as repeating Sections can help in situations such as when the number of Parameters is variable.
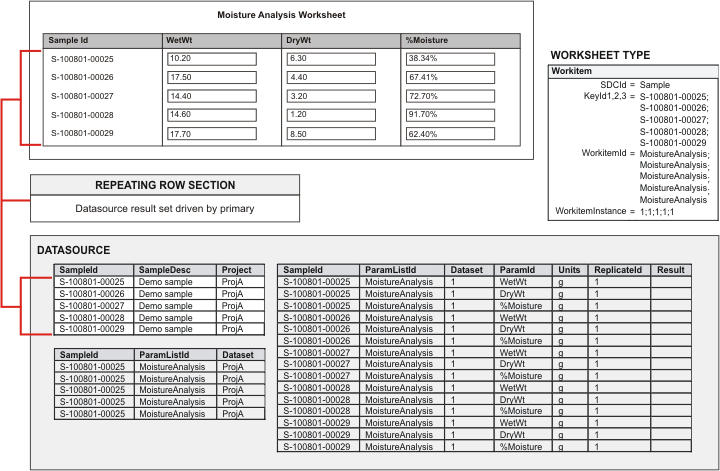
The rows (repeating Sections) are created by iterating over one of the Datasource result sets ("dataitem" is the default result set). As shown below, a table row is created for each row in the Datasource result set. The Datasource result set is derived from the Field binding. The example below is setup such that the Field binding displays a dataitem column for the "ParamId" column. This means that a table row is generated on the Form for each row in the dataitem result set.

Table columns are Fields with Datasource Binding properties set to match the column data in the Datasource result set (below). Putting Fields in a repeating row Section lets you display multiple rows from a Datasource result set. Fields in repeating row Sections generally require fewer binding properties, but such properties can be used as filters.

This example shows how to create a basic Worksheet Form with repeating Sections.
Use this Example Data that is provided with LabVantage:
| • | "Moisture Analysis" Test Method. |
| • | "Moisture Analysis" Specification: Add this to the "Moisture Analysis" Test Method. |
Create a Form Definition. Set these Worksheet-specific options in the Form Definition as described in Creating a Worksheet Form:
| • | Add a new Worksheet Form:
|
In the Form Builder, create text fields in the Worksheet Form as shown:

|
Set these Datasource Binding properties for each Field (as described in Field Binding):
| Field | Datasource Binding Properties | ||||||
|
Param Id |
|
||||||
|
Value |
|
||||||
|
Units |
|
||||||
|
%Moisture |
|
||||||
|
Spec |
|
Make the row containing the Fields a Section, then set these Section properties:
| Behavior | |||
|
| Datasource Binding Properties | |||
|
Create the Worksheet using one of the methods described in Creating Worksheets: Workitem. Note that you must set the "Create Worksheet Rule" for the "Moisture Analysis" Test Method, and you must add the "Moisture Analysis" Specification to the Test Method.

|
Multiple Items per Worksheet |
|
|
Loading one item per Worksheet means that during Worksheet creation, data for only one Workitem, Data Set, or SDI is loaded into the Datasource. The Datasource therefore receives a single set of keys as its input. As a result, the Datasource contains multiple dataset records for the same Parameter. The Datasource may therefore also contain multiple primary records.
It follows that Worksheets must also be able to handle multiple items. For example, if you must show multiple Samples with each Sample's Test Method, you could show this as a grid grouped by Sample: |  |
Another example would be to split Preparation and Procedure Data Sets in a Test Method:

You can configure a Worksheet to handle multiple items by using repeating Sections to group data (such as grouping Tests by Sample):
The Datasource can then discriminate each Parameter in the Test Method relevant to each Sample:

You can create Worksheets with multiple items when:
| • | Adding a Test or Data Set to multiple Samples. |
| • | Assigning multiple Data Sets to a User. |
| • | Manually generating Worksheets for multiple Workitems or Data Sets. |
| • | Passing multiple Workitems, Data Sets, or SDIs into the CreateWorksheet Action. |
Section repeaters (as Section properties) define multiple Sections that are generated when the Worksheet is created. If all Fields are bound to the same Datasource result set, this property is implicit and need not be defined. You must define it when Fields in the same repeating Section are bound to different Datasource result sets.
In general, Section Repeater result set is the "master" table in the relationship among result sets. To provide matching, keys from the Section Repeater result set are inherited by the "child" result sets.
LabVantage ships with several excellent examples of Worksheet Forms containing repeating Sections. Have a look at these:
| Example | Description |
| AssayParamByReps | DataSet Worksheet Type with a grid for a generalized Assay Test. Replicates are rendered in rows, Parameters in columns. |
| AssayRepsByNameParam | Same example with Parameters in rows and Replicates in columns. |
Binding Fields to Multiple Data Records |
| |
Most Field bindings map a Field to a specific row and column in the database. For example, a data entry Field maps the Field to a specific SDIDataItem record, and a Sample description maps to the SampleDesc column in the primary result set.
However, if you consider the Sample grid of the MoistureAnalysis Test in Using Repeating Sections to Make a Grid, you might want to associate something with the Test Method (such as an Instrument), but do not want to add it to each Sample on each row. You would probably want to add a single Instrument Field outside of the table and enter it only once. Then, it would be best if the "Save" operation updates the Data Set record (in SDIData) for each Sample with the common Instrument... in other words, you would want the Instrument field to be bound to multiple records.
The Worksheet creation process automatically binds to multiple records if more than one record is found during the binding... unless the result set is dataitem or dataspec, which must result in a unique binding.
As an example, you could add an Instrument Field outside of the table, with the DataSource Binding properties "AutoSave Dataset" and the Column Id = s_instrument. This will save the Instrument in each Data Set.

Multiple Matching Rows |
| |
"Multiple matching" occurs when Datasource Binding properties do not resolve to a unique row in the Datasource result set. If this is not your intent, add binding properties to resolve the issue. Multiple matching is not permitted for dataitem and dataspec result sets.
Multiple matching may also be due to multiple Data Sets for a Test associated with a Sample. You can resolve this by specifying required Data Set Number, or using the [max] keyword as the dataset binding property (this will use the latest dataset).
When showing a Specification Limit whenn multiple Specifications are associated with a Test, you can specify the Specification Id and Version as a bind property, or use the [first] or [last] keyword (this will use the first or last Specification in the list of Specifications.
Add Replicate |
| |
"Add Replicate" functionality can be done in any Worksheet Type. It is not supported in Double Data Entry Forms.
The Form must be designed to support the additional Replicates being displayed and bound on the Form. Form-based layouts require that additional Fields be defined. Use the "Bind Error" property to hide/disable the Field when a Replicate does not yet exist for the Field. Grid-based layouts with repeating Sections should automatically regenerate with the new Replicates as new rows.
Add Replicate can be done only on Worksheets in a "Pending" or "Draft" state.
Access Add Replicate functionality with a JavaScript API call (typically from a user-defined button):
| Function | Decription |
addReplicate() | Uses the current Field with 1 Replicate. |
| addReplicate( replicates, fieldid, instance ) | Lets you choose the Field with multiple Replicates. |
The Field must be bound to a dataitem record. Data already entered on Form need not be saved and will be brought forward to the regenerated Worksheet. After an AddReplicate() call, the Worksheet is saved in its current state.
LabVantage ships with these examples using Add Replicate:
| Example | Description |
| AssayParamByReps | DataSet Worksheet Type with a grid for a generalized Assay Test. Replicates are rendered in rows, Parameters in columns. |
| AssayRepsByNameParam | Same example with Parameters in rows and Replicates in columns. |
| GeneralDataset | DataSet Worksheet with a grid supporting AddReplicate(). |
| GeneralWorkitem | Workitem Worksheet with a grid supporting AddReplicate(). |
Customizing the Display Expression for Specifications |
| |
The default expression for the "Display Spec Value" Binding Mode (see Binding Keys) assumes a selected Spec Limit Type and uses the Groovy expression:
spec['" + expression + "'].operator1 + spec['" + expression + "'].value1 + ' ' +
spec['" + expression + "'].operator2 + spec['" + expression + "'].value2
where
expression = the selected Spec Limit Type.
spec = "map of maps" containing all Specification Limits for the Specification. The map also contains all column values for the Specification, e.g., spec.specdesc returns the Specification description.
Use the Groovy editor to change the expression. For example:
spec.specid + '(v' + spec.specversionid + ') - Lower: ' +
spec['Lower OutOfSpec'].operator1 + spec['Lower OutOfSpec'].value1 + ' ' +
spec['Lower OutOfSpec'].operator2 + spec['Lower OutOfSpec'].value2 + ' In Spec: ' +
spec['InSpec'].operator1 + spec['InSpec'].value1 + ' ' + spec['InSpec'].operator2 +
spec['InSpec'].value2 + ' Upper: ' + spec['Upper OutOfSpec'].operator1 +
spec['Upper OutOfSpec'].value1 + ' ' + spec['Upper OutOfSpec'].operator2 +
spec['Upper OutOfSpec'].value2
Generates:
MA(v1) - Lower: <0.1 In Spec: >=0.1 <=0.5 Upper: >0.9
Note the use of spec['Lower OutOfSpec'] to reference the map of Lower OutOfSpec limits. This is required because the Limit Type has a space in the Id. With no space in the Id, Groovy allows spec.InSpec.value1.
SDI Worksheets |
| |
In general, SDI Worksheets always require a customized approach. As stated in the SDI Workitem Type description, you must create these using the CreateWorksheet Action.
Multiple result sets are available when creating the Worksheet, thus requiring more bind properties. The result sets are restricted to primary, dataset, dataitem, dataspec, and datarelation.
Here is an example of the Worksheet Form you might create:
 |
| Field | Datasource Binding Properties | |||||||||
Sample Id |
| |||||||||
| Param List Id |
| |||||||||
| Param Id |
| |||||||||
| Replicate Id |
| |||||||||
| Value |
|
A typical application would be to add a button to the advancedtoolbar Element on a Sample List page to call this Action, with the Action set to generate the Worksheet based on the Worksheet Form:
| Property | Values | ||||||||||||||||||||||||||||||||||||||||||
| Buttons |
|
Adhoc Worksheets |
| |
Adhoc Worksheets provide an alternate, customizable mechanism for creating and using Worksheets. They are not linked into the OOB LabVantage configuration. Datasources must be manually defined and configured. Values for Datasource properties can be hardcoded or driven by other Fields on the Form. Adhoc Worksheets support custom processing rules (Action Block Editor and Groovy) and AutoSave. Worksheets must be created in the eForm Manager.
These are the fundamental differences between Adhoc Worksheet Forms and Context-Driven Worksheet Forms:
| • | Adhoc Worksheet Forms require that you create your own Datasource. |
| • | Documents based on Adhoc Worksheet Forms must be created in the eForm Manager. |
| • | No automatic processing is provided with Adhoc Worksheets. You must define your own. |
Here is a simple example that uses example data provided with LabVantage.
| 1. | Create a Worksheet Form, but do not specify a Worksheet Type in the Form Definition. |
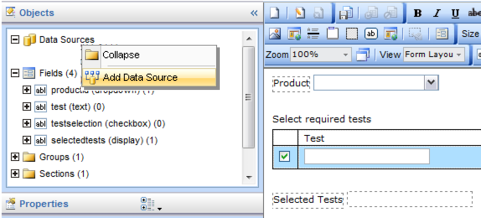
| 2. | In the Form Builder, create a dropdown Field for selecting Sample SDIs, and three Text fields to enter data for the MoistureAnalysis Parameter List that is provided with the example data (below): |

| 3. | Create a new Datasource by right-clicking the Datasources Object, selecting New Datasource, and naming the Datasource when prompted (above). |
| 4. | Set these properties for the Fields and Datasource (note that values for "Id" are arbitrary): |
|
|
The Groovy script for KeyId 1 List will populate the Datasource with data for the Sample selected in the "SampleId" dropdown. | ||||||||||||||||||||||||||||||||||||||||||||||||||||||||
|
|
| 5. | Save the Form, then open it in the eForm Manager. |
| 6. | You must create the Worksheet in the eForm Manager. Do this by clicking "Create". This creates a new Document from the Adhoc Worksheet Form: |

| 7. | If you want to create a new Document based on the Adhoc Worksheet Form, click "New": |

| The new Document is loaded into the eForm Manager: |

QC Batches |
| |
QCBatch Worksheets represent the Samples and data associated with a QC Batch. As stated in the QCBatch Workitem Type description, three Datasources are required to handle data: one each for the QC Batch, QC Batch Items, and QC Sample Types. In other words, a much richer set of data are required than for the other Worksheet Types (below).

Because multiple Datasources are used, mapping between Section Fields and the Datasource must be explicit. By contrast, mapping to a single Datasource (when using other Worksheet Types) is implicit.
All Fields in a Section bind to data in the same Datasource, i.e., the Section Datasource. You cannot mix Fields or Section repeaters from different Datasources.
Although these Worksheets appear to be a composite of 3 separate Worksheets, Field binding and AutoSave are supported for each Datasource.
Fortunately, LabVantage ships with an excellent example of a QC Batch Worksheet Form. Look at this example Worksheet Form:
| Example | Description |
| PreciousMetalQCBatch | QCBatch example for the Precious Metals Assay. |
Consumables Integration |
| |
Changing Consumable Lots updates Calculations involving Consumable attributes. Consumable records must exist before the Worksheet is created (Consumable details are automatically copied down to the SDIDataRelation table during AddDataSet). This Binding Mode uses the UseReagent Action.
LabVantage ships with these examples that integrate Consumable Management with Worksheets:
| Example | Description |
| GeneralDataset | DataSet Worksheet with a grid supporting AddReplicate(). |
| Titration | DataSet Worksheet specific to the Titration ParameterList. |
SQL Datasources |
| |
SQL Datasources let you use a SQL query to populate the Datasource. You can use these with Worksheet Forms and non-Worksheet Forms.
To create a SQL Datasource:
| 1. | Create a Form but do not specify a Worksheet Type in the Form Definition. |
| 2. | Create a new Datasource by right-clicking the Datasources Object, selecting New Datasource, and naming the Datasource when prompted (below). |
| 3. | In the Datasource properties, set the Type to SQL. As an example, setting
these Datasource properties populates Fields with Workitems when a Product
with the associated Workitems is selected the "producttests"
dropdown Field:
|