Content |
|||||||||||||
|
Introduction |
|
|
WAP Activities are managed in the "Manage Work" page. This page can be opened from these areas:
|
|
Lab Admin → Planning → "Show Plan" button.
This shows all work in the Plan currently being created in the Work Assignment page. |
|
|
|
Lab Admin → Planning → Testing Labs → "Manage
Work" button.
This shows all work being done in the selected Testing Lab. |
|
|
|
Lab Admin → Planning → Work Areas → "Manage
Work" button.
This shows all work being done in the selected Work Area. |
|
|
|
Lab Admin → Planning → Lab Users → "Manage Work"
button.
This shows all work being done by the selected User. If that User is a member of a Work Area, you will see the Work Area as well because a User can work on Activities assigned to him, and can also work on anything assigned to a Work Area of which he is a member. |
|
|
|
Lab Admin → Planning → Lab Instruments → "Manage
Work" button.
This shows all work being done by the selected Instrument and Work Areas of which the Instrument is a member. |
|
|
|
User Profile Menu → View My Work.
This is the same page as Planning → Lab Users → "Manage Work" button. |
|
|
|
LIMS → Tests → Manage Data Sets → "Manage Work
" button.
This opens the page for the selected Data Sets. |
|
|
|
LIMS → Tests → Manage Tests → "Manage Work "
button.
This opens the page for the selected Tests. |
|
|
|
LIMS → Samples → Manage → "Manage Work "
button.
This opens the page for the selected Samples. |
Manage Work Page |
|
|
Overview |
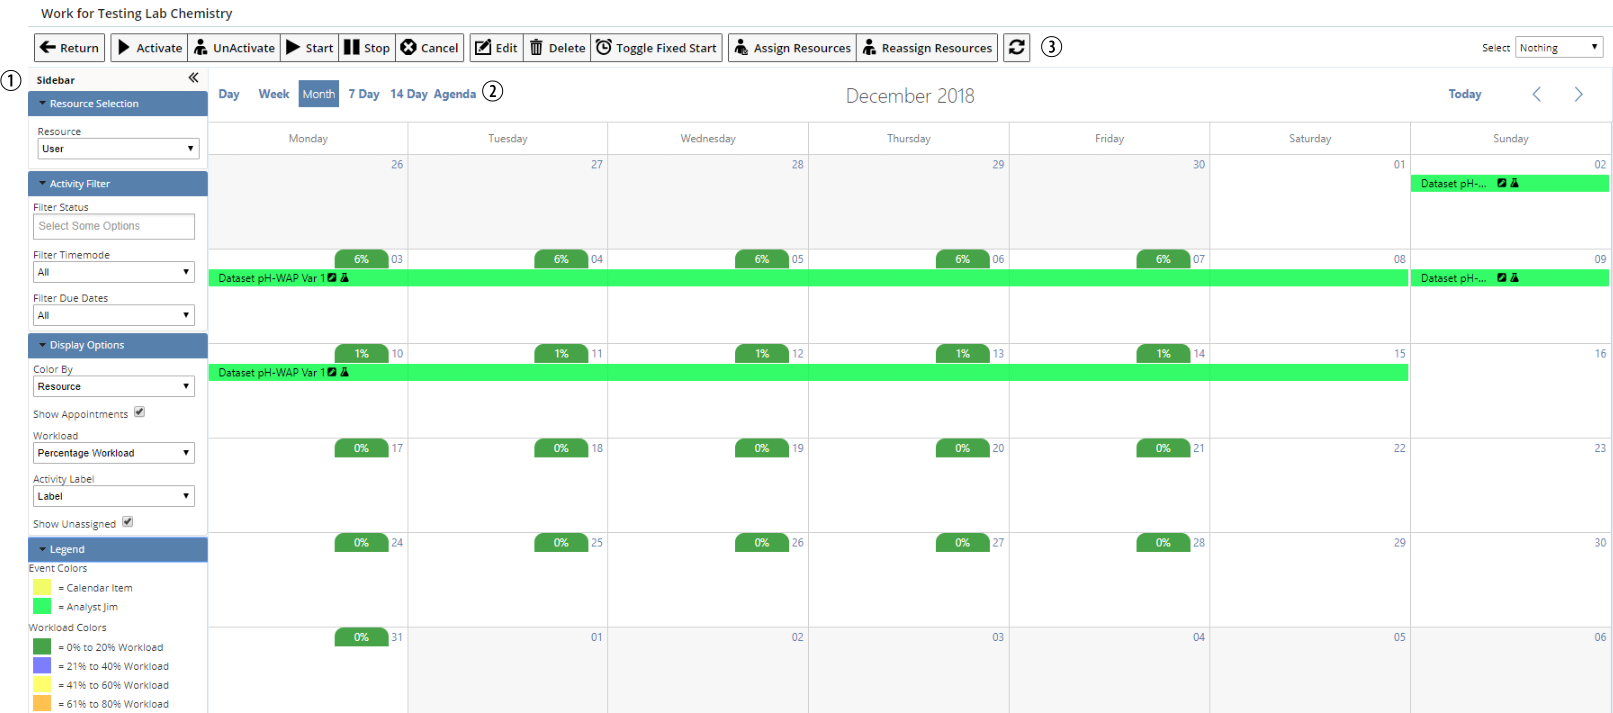
The Manage Work page contains a Sidebar (1) to manage page content, a Calendar (2) similar to the Work Assignment page, and a Toolbar (3) of operations.
 |
Activation Modes |
The Manage Work page has two "Activation Modes" (modes of operation): "Resource-Centric" and "Activity-Centric". Each of these is designed to work with Activities based on the context chosen to retrieve the Activities.
Resource-Centric |
In Resource-Centric mode, you define the Resources. The page shows Activities (if any) for those Resources. You can pass in a parent TestingDepartmentId, one or more Users, one or more Instruments, or a Work Area (of Instruments or Analysts):
| Name | Shows: | Example Usage |
| By Testing Lab | All Analyst Resources and their assigned Activities for Testing Labs. | [pageurl]&testingdepartment=xxx&resourcetype=User
[pageurl]&testingdepartment=xxx&resourcetype=Instrument |
| By User | User Resources and their assigned Work Areas and all Activities. | [pageurl]&sdcid=User&keyid1=a;b;c |
| By Instrument | Instrument Resources and all Activities assigned to those Resources. | [pageurl]&sdcid=Instrument&keyid1=a;b;c |
| By WorkArea | User Resources for Work Areas and all Activities for that Work Area and its Users. | [pageurl]&sdcid=Department&keyid1=a
[pageurl]&sdcid=Department&keyid1=a&resourcetype=User |
Activity-Centric |
In Activity-Centric mode, you select Activities. The page show Resources needed for those Activities (including Resources distributed among multiple Work Areas).
| Name | Shows: | Example Usage |
| By Department | All Activities by Department. The Activities are displayed according to any Resources of the selected Resource Type found for those Activities. | [pageurl]&testingdepartment=xxx&sdcid=LV_Activity&resourcetype=User
[pageurl]&testingdepartment=xxx&sdcid=LV_Activity&resourcetype=Instrument |
| By Activity Id | Activities displayed by the selected Resource Type. | [pageurl]&sdcid=LV_Activity&keyid1=a;b;c&resourcetype=User
[pageurl]&sdcid=LV_Activity&keyid1=a;b;c&resourcetype=Instrument |
| By querywhere | Activities that meet the where clause. The Activities are displayed by the selected Resource Type. | [pageurl]&sdcid=LV_Activity&activitywhere=abcde&resourcetype=User
[pageurl]&sdcid=LV_Activity&activitywhere=abcde&resourcetype=Instrument |
| By Activity Context | Activities that have the Activity context SDCId and the Activity context KeyId1 provided. The Activities are displayed based on the selected Resource Type. | [pageurl]&sdcid=LV_Activity&contextsdcid=a&contextkeyid1=b&resourcetype=User
[pageurl]&sdcid=LV_Activity&contextsdcid=a&contextkeyid1=b&resourcetype=Instrument |
| By Work Context | Activities that have the work context SDCId and the work context KeyId1 provided. The Activities are displayed based on the selected Resource Type. | [pageurl]&sdcid=LV_Activity&worksdcid=a&workkeyid1=b&resourcetype=User
[pageurl]&sdcid=LV_Activity&worksdcid=a&workkeyid1=b&resourcetype=User |
Note that:
| • | The Sample List page uses ActivityId. There is an icon that shows if the Sample is in an Activity. Clicking it opens the Manage Work page, passing in the ActivityId. |
| • | An example of Activity context would be to pass in a BatchId or WorkSDIId, then show all Activities for that Batch or Sample. |
| • | An example of work context would be to pass in a WorkSDIId, then show all Activities for that Sample. |
Sidebar |
The Sidebar offers these features:
|
|

Toolbar |
Activity Life Cycle |
The Toolbar buttons operate within the Activity Life Cycle.
| Activity Status | Description |
| Draft | Default status when the Activity is first created. This represents a plan that is a "work in progress", as additional work or Resources may still be assigned. |
| Activated | The Activity definition is complete. The assigned Resources and planned start date have been pushed down to the LIMS. |
| In Progress | Work in the LIMS has started (such as results have been entered). |
| Complete | Work in the LIMS has been completed. |
| Cancelled | The Activity has been cancelled. Work in the Activity may be eligible for re-planning. |
Note that an Activity will move to "In Progress" automatically once it detects that work in the LIMS has started. However, before an Analyst has entered any data, two hours of preparatory work might need to be done. Therefore, an Analyst can manually move an Activity to "In Progress".
If an Activity is deemed to be complete when the work in the LIMS is complete, an "Auto Complete" rule is provided to allow that to occur. However, if there is typically additional work that needs to be performed after the work in the LIMS is complete (such as cleaning the instrument, writing a report, disposing the Sample), then "Auto Complete" may not be desired. The User may be expected to manually "Stop" the Activity instead.
Toolbar Operations |
Toolbar operations executed by buttons move the Activity through its life cycle. Most toolbar buttons operate on selected Activities. To select an Activity, click on the Activity to toggle selection (click once to select, click again to de-select), or use the "Select" dropdown (on the far right of the page) to select multiple Activities of a certain type.
| Button and Link to Details | Brief Description |
| Activate | Pushes assigned Resources and Planned Start Dates down to the LIMS. |
| UnActivate | Resets assigned Resources and puts the status of the Activity back to Draft. |
| Start | Starts work on the Activity, indicating that work on the Activity has begun. |
| Stop | Stops work on the Activity, indicating that work on the Activity has been completed. |
| Cancel | Cancels the Activity. All Work SDIs are available to be put into another Activity. |
| Edit | Opens the Activity Maintenance page. |
| Delete | Deletes the Activity. All Work SDIs are available to be put into another Activity. |
| Toggle Fixed Start | Sets the Activity to start on a specific date rather than a date range. |
| Assign Resources | Navigates to the Work Assignment page. |
| Reassign Resources | Flushes all assignments and navigates to the Work Assignment page. |
Activate |
These prerequisites must be met in order to Activate an Activity:
| • | The Status of the Activity must be "Draft". |
| • | All required Resources must be assigned. |
When an Activity is Activated, the following events occur:
| • | The Planned Start Date (PlannedStartDt) of the Activity is pushed down to the Work SDI. See Notes below. |
| • | The PlannedStartDt is synchronized across the Sample-Test-DataSet hierarchy (if necessary). |
| • | The assigned Analyst (or Work Area) is pushed into the Work SDIs (as if doing the assignment manually or doing auto-assign in the LIMS). |
| • | The assigned Instruments are pushed into the SDIWorkItemRelation, SDIDataRelation, or SDIData tables (as applicable). |
| NOTE: | PlannedStartDt (Planned Start Date) is a column in all Work SDIs (Sample, SDIWorkItem, SDIData). Activating pushes this date down into the Work SDIs in that Activity. |
| NOTE: | Because the Sample, Test, and Data Set all have their own Planned Start Date, those dates are kept synchronized across the hierarchy. For example, suppose you have a Sample with 2 Tests and you Activate the first Test, which has a planned start date of Wednesday. Once you do that, that date is rolled up into the Sample. So the Sample has to start on Wednesday. This also rolls down into the Data Sets, so they need to start on Wednesday as well. If you now Activate the second Test's Activity, and that work needs to start on Tuesday, that second Test will start on Tuesday (as will its Data Sets) and the Sample will be brought forward to Tuesday as well. So the first Test stays at Wednesday, but the Sample has to show the earliest Planned Start Date for all of its children. |
| NOTE: | If addtional Work SDIs are added to an Activity that
has already been Activated (or is In Progress), those new Work SDIs will
pick up the Planned Start Date for the Activity but the Resources on that
work will not automatically get stamped over. The Activity can be "Re-Activated"
if this function is required. Essentially:
|
UnActivate |
This prerequisite must be met in order to UnActivate an Activity:
| • | The Status of the Activity must be "Activated". |
When an Activity is Activated, the following events occur:
| • | The PlannedStartDt of the Work SDIs is set to null. |
| • | The PlannedStateDt is synchronized across the Sample-Test-DataSet hierarchy (if necessary). |
| • | The assigned Analyst (or Work Area) for the Work SDIs is set to null. |
| • | The assigned Instruments in the SDIWorkItemRelation, SDIDataRelation, or SDIData tables (as applicable) are set to null. |
| NOTE: | UnActivating lets you go back into "Draft" Status before the work is started. After the work has started, it is too late to UnActivate. |
Start |
These prerequisites must be met in order to Start an Activity:
| • | The Status of the Activity must not be "Cancelled" or "In Progress". |
| • | If the Activity is Complete, we are effectively "Re-Starting" the Activity. This exhibits the specific behavior described below. Re-Starting is not permitted if the Activity will immediately Auto Complete. |
When an Activity is Started, the following events occur:
| • | If the Status of the Activity is "Draft", it is fist Activated (by copy-down to the LIMS). |
| • | The Actual Start Date (ActualStartDt) is set to "Now". |
When an Activity is Re-Started, the following events occur:
| • | The ActualStartDt is NOT updated. |
| • | The Actual End Date (ActualEndDt) is set to null. |
| NOTE: | ActualStartDt (Actual Start Date) and ActualEndDt (Actual End Date) are columns in the Activity table that persist the actual start and end dates of the Activity. |
Stop |
This prerequisite must be met in order to Stop (Complete) an Activity:
| • | The Status of the Activity must not be "Cancelled". |
When an Activity is Completed, the following events occur:
| • | The ActualEndDt is set to "Now". |
| • | If so defined by the Activity Class, an Activity will Auto-Complete after ALL Work SDIs are either "Complete" or "Cancelled". |
Cancel |
This prerequisite must be met in order to Cancel an Activity:
| • | The Status of the Activity must not be "Completed". |
When an Activity is Cancelled, the following event occurs:
| • | All Work SDIs that were in the Activity return to a WAPStatus of "Pending", making them available to be added to another Activity. Note that all LIMS assignments remain intact, as "Cancelling" is not "UnActivating". |
| NOTE: | Cancelling an Activity simply deletes the Activity, but the work is still there and available for use by another Activity. If you want to cancel the work, do that in the LIMS. |
| NOTE: |
When a Work SDI is Cancelled in the LIMS, the following events occur:
If the Work SDI is subsequently UnCancelled, the following events occur:
|
Edit |
The "Edit" button launches the Activity Maintenance page with minimal editing capability.
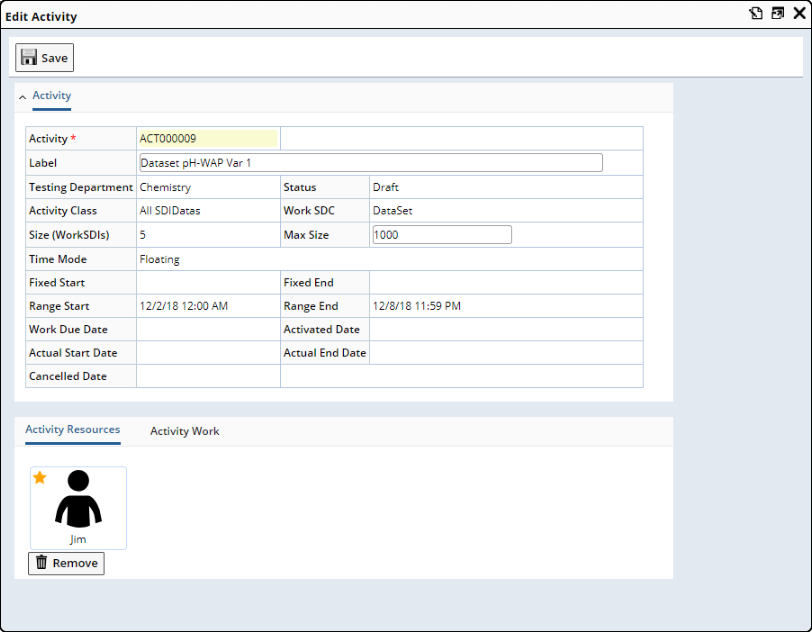 |
This is an SDI Maintenance page with the following specialized items:
| • | Automatically generated ActivityId and Activity Label. |
| • | Identifier of the Testing Department. |
| • | Activity Class and Work SDC. |
| • | Activity Size and Max Activity Size. |
| • | Start and End dates when the work is expected to occur. |
| • | Activity Status (life cycle) and key dates. |
The "Activity Work" detail contains:
| • | List of Work SDIs for the Activity. |
| • | WAPStatus ("Status"). |
The "Activity Resource" detail contains:
| • | Users. |
| • | Instruments (and Instrument Type / Model). |
| • | Calculated duration for each Resource. This is not shown in the example screen above (it will differ per Resource). |
Delete |
This prerequisite must be met in order to Delete an Activity:
| • | The Status of the Activity must not be "Completed". |
When an Activity is Deleted, the following event occurs:
| • | All Work SDIs that were in the Activity return to a WAPStatus of "Pending", making them available to be added to another Activity. Note that all LIMS assignments remain intact. |
| NOTE: | Deleting simply deletes the Activity, but the work is still there and available for use by another Activity. If you want to delete the work, do that in the LIMS. |
Toggle Fixed Start |
Activities can have two "Time Modes" chosen when the Activity was created:
| • | Fixed The Activity has a fixed start time (with a calculated end time based on the longest resource duration) |
| • |
Floating The Activity has a start/end Range of dates within which the activity is expected to be completed For a Floating Activity (which always has a range), we have the option of also specifying a fixed start and end |
"Toggle Fixed Start" toggles between these Time Modes. For example:
| 1. | The planner creates an Activity for Jim with a floating range of Monday to Friday of next week. | |
| 2. | Jim opens his Manage Work page to organize his week and decides to get the work done on Wednesday. | |
| 3. | He clicks the "Toggle Fixed Start" to fix the start date and drags it to the desired date (Wednesday). |
Here is a worked example:
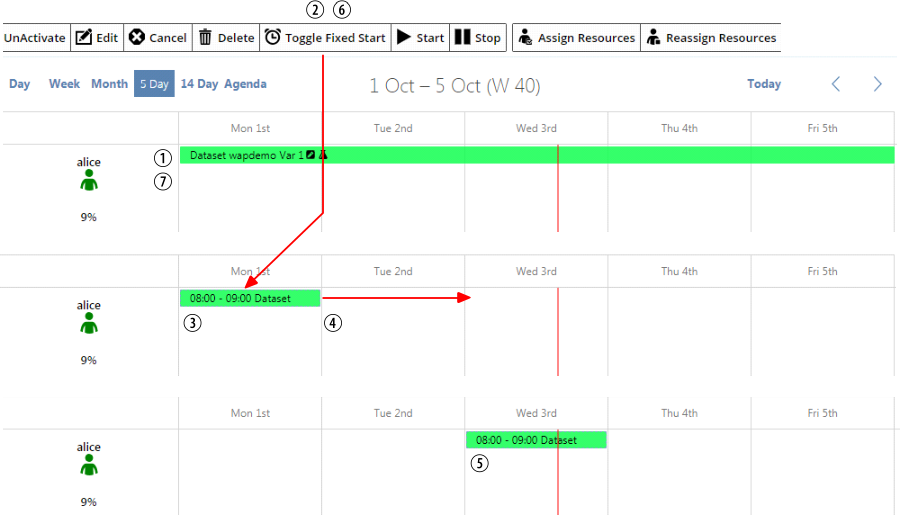 |
| 1. | We start with Alice having a floating Activity that must be completed this week. It requires 1 hour of work. | |
| 2. | Alice selects the Activity and clicks "Toggle Fixed Start". | |
| 3. | The Activity is set to start at 8 a.m. (from Core Hours) on the first day of the displayed range. | |
| 4. | Alice can then drag the Activity to the chosen day. | |
| 5. | This results in a Floating Activity, but with a specific start date. | |
| 6. | Alice clicks "Toggle Fixed Start" to remove the fixed dates and return it back to the original range (shown in 7). |
Assign Resources and Reassign Resources |
When an Activity is first created, not all of the required Resources may have been assigned. In this case, selecting such an Activity and clicking "Assign Resources" takes that Activity to the Work Assignment page. If the assignment must be redone, clicking "Reassign Resources" flushes all Resources before taking the Activity to the Work Assignment page. Following is a worked example.
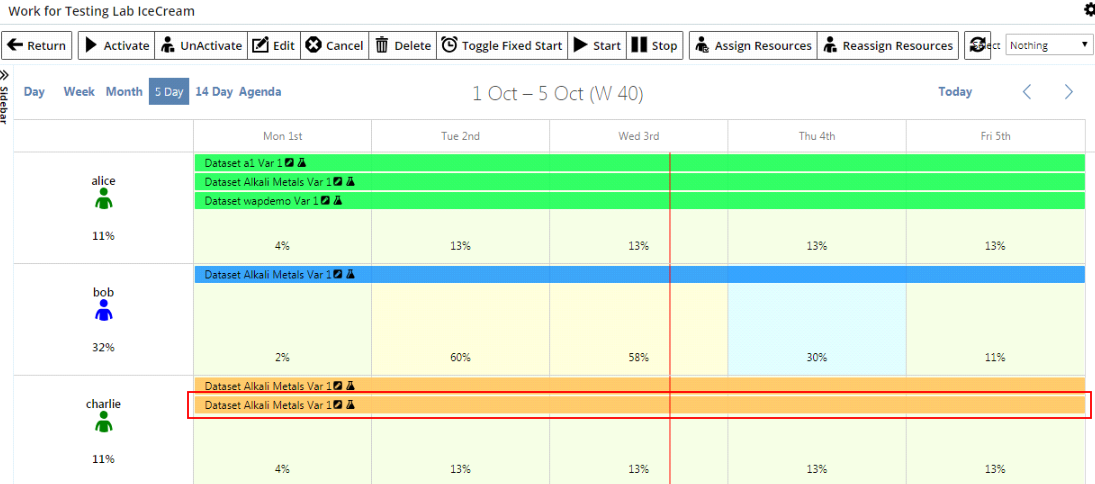
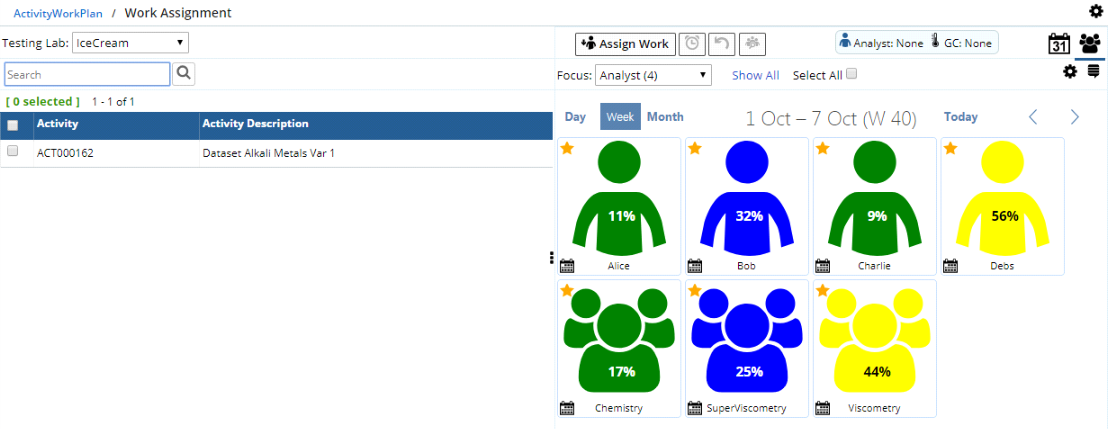
Given the Activities shown below for our Testing Lab, select the bottom Activity and click "Reassign Resources".
 |
If we do that, Charlie is removed as the assigned Analyst (any Instruments would also be removed) and the Activity is passed to the Work Assignment page. Note that the Work SDIs in the left frame is now an actual Activity.
 |
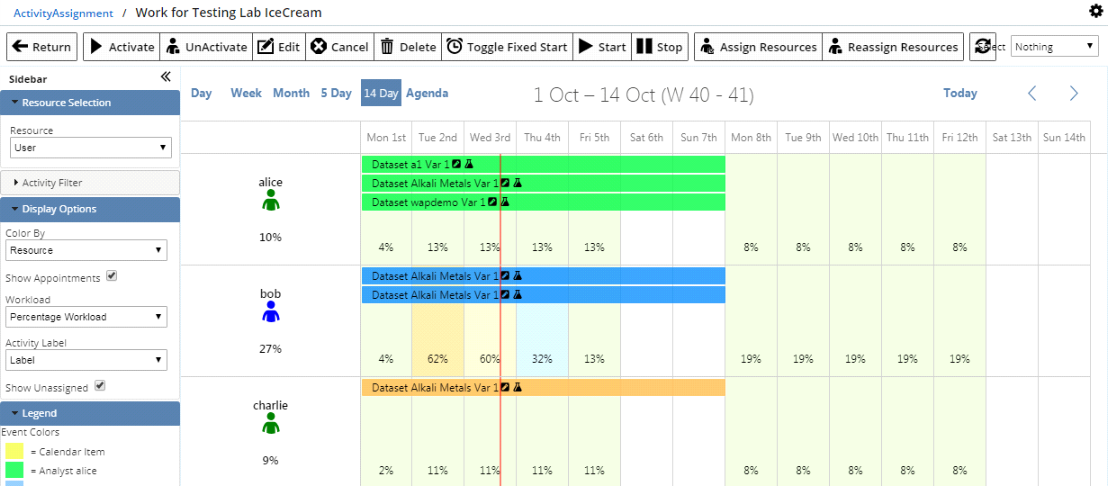
If we return to the Manage Work page, note that the Activity is on an "Unassigned" row in the timeline. This row can be shown or hidden using the "Show Unassigned" display option.
 |
The Activity can now be dragged onto the row for a different Resource (in this case Bob). Note that any Activity can be reassigned this way, i.e., by simply dragging to a different Resource.
 |