Content |
||||||||||||
|
Introduction |
|
|
As demonstrated in Introduction to Work Assignment and Planning, the Work Assignment page is where you assign work to Resources. This page can be opened from these areas:
|
|
Lab Admin → Planning → Plan Work. | |
|
|
Lab Admin → Planning → Testing Labs → "Plan Work" button. | |
|
|
LIMS → Tests → Manage Data Sets → "Plan Work
" button.
This opens the page for the selected Data Sets. |
|
|
|
LIMS → Tests → Manage Tests → "Plan Work "
button.
This opens the page for the selected Tests. |
|
|
|
LIMS → Samples → Manage → "Plan Work "
button.
This opens the page for the selected Samples. |
Work Assignment Page |
|
|
Overview |
As demonstrated in Introduction to Work Assignment and Planning, the left frame lists the Work SDIs that require planning and (subsequently) can be put into a Plan. The right frame contains Resources in the Testing Lab, since the Work Assignment page allows planning for a single specific Testing Lab. Work SDIs selected in the left frame can be assigned to Resource in the right frame. Note that a Resource can be an Analyst (or Work Area of Analysts) or Instrument (or Work Area of Instruments).
 |
| Item | Link to Description | Item | Link to Description | |
| 1 | Testing Lab Selector | 8 | Date Navigation Bar | |
| 2 | Plannable Work Selector | 9 | Display Options and Key | |
| 3 | Work SDI List | 10 | Recent Activities | |
| 4 | Resource Bar | 11 | Page Controls | |
| 5 | Resource Selectors | 12 | Assign Work | |
| 6 | Resource Icons | 13 | Show Plan | |
| 7 | View Selector |
Testing Lab Selector |
The Testing Lab selector is a dropdown that specifies the single Testing Lab for which work will be planned. The dropdown content depends on your point of entry:
| • | If the page is accessed from Lab Admin → Planning → Plan Work, the dropdown shows all Testing Labs to which the planner belongs. Choosing one shows all Work SDIs and Resources in that Testing Lab. This is a good choice if you plan for multiple Testing Labs. |
| • | If the page is accessed from the Testing Lab List, this defaults to the selected Testing Lab and does not let you choose any other. |
| NOTE: | You must be logged in as a member of a Testing Lab in order to see it in the dropdown. If the dropdown is empty, you are not logged in as a member of any Testing Labs. |
Plannable Work Selector |
The "Plannable Work" selector is a dropdown that contains logical groups of pending work. Each group is defined by an "Activity Class". The primary functions of Activity Classes are to:
| • | Break down all plannable work into manageable groups. Work SDIs can appear in "Plannable Work" only if their WAPStatus is "Pending" and they are in the selected Testing Lab. The WAP policy provides additional filtering by defining query from and query where clauses to retrieve a subset of plannable work. This prevents laboratories that plan thousands of tests several months in advance from seeing thousands of Work SDIs in a single list. |
| • | Determine how the work is presented by defining columns, grouping, and sorting of the WorkSDI list. Query Categories are also provided to limit additional Queries that are available. Labels can also be defined to help identify each Activity. This is useful if you are creating work for specific SDCs such as Batches or Tests, where it is helpful to have the BatchId or WorkItemId in the Label. |
| • | Define business rules that govern Activity behavior (such as automatically completing the Activity when the work is done in the LIMS). |
The ActivityAssignment Page Type (on which the WAP Assignment page is based) also contains a "Hide Activity Classes With Zero" property that hides an Activity Class with a zero quantity (such as Request Samples (0)), thus allowing you to see only Activity Classes that define work in need of planning.
Activity Classes are defined in the WAP Policy. Many predefined Activity Classes are provided, but you can define new ones for work such as "High Priority Samples".
Work SDI List |
As demonstrated in Introduction to Work Assignment and Planning, the Work SDI List shows work that can be assigned. It is defined in the WAP Policy using properties similar to SDI List pages throughout the system.
As you select Work SDIs, the system checks to make certain each is compatible and can be put into the same Activity (as decribed in Introduction to WAP → Master Data → Planning Levels and WAP Resources), and shows the maximum duration for Resources in the bottom left of the screen.
A preview at the bottom left of the screen shows a work duration estimate, which indicates the time required to perform the work. As shown in WAP Resources, each Resource has a "Duration Rule" (such as "1 hour for 5 Tests"). As you select Work SDIs, that rule is executed to provide the preview.
Resource Bar |
The Resource Bar is shown whenever Work SDIs are selected. This indicates the Resources required to perform the work (taken from the Master Data Resource requirements), Resources (if any) selected for each requirement, and the date (or date range) on which the work will be assigned. Note that the date/range reflects the date selected in the page body, so changing the date/range in the page body changes the date/range in the Resource Bar.
Resource Selectors |
The "Focus" dropdown lists Resource Types defined in the Master Data. Selecting a Resource Type from here shows the available Resources. The Resource Icon for the selected Resource is highlighted in blue and displayed in the Resource Bar. Note that clicking a Resource in the Resource Bar shows only that Resource.
Multiple Resources can be selected using Ctrl-click and Shift-click operations. "Select All" selects all Resources. It is not possible to select multiple Work Areas. Multiple Resource selection is discussed further in Assign Work.
Resource Icons |
 |
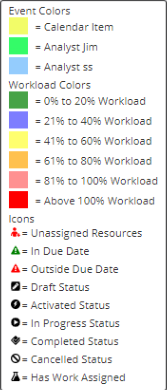
Each Resource icon shows the Resource's "Percentage Workload" (sometimes displayed as "Percent Load"). This is the percentage of the Resource's time that has been consumed for the selected date range. This is further discussed in Percentage Workload Calculation. The color of the icon reflects the percentage workload on the Resource for the time frame you are currently viewing. The Color and Icon Legend shows colors for specific ranges.
| 1. | The gold star in the left corner of a Resource icon indicates that
this is a "Suggested Resource". Note that the Resources presented
depend on the Work SDIs currently selected (as defined by the Master Data).
In order for a User to be a Suggested Resource, all of the following must be true:
In order for an Instrument to be a Suggested Resource, all of the following must be true:
If there is reason to choose a Resource other than the Suggested Resource, the "Show All" link lets you do this by showing all Users, Instruments, and Work Areas in the Testing Lab. In the case of Instruments, Instruments of the correct Type and Model are also shown. |
||||||||||||||
| 2. | Clicking the Calendar icon loads the Resource's Calendar to view Appointments and Activities. This is the same effect as using the Calendar View Selector. | ||||||||||||||
| 3. | Hovering over the percentage number shows an Info icon. Clicking the info icon opens a dialog that shows how the Percentage Workload was calculated. This is discussed in Percentage Workload Calculation. This feature works anywhere in WAP where you see a percentage number for a Resource. |
The examples below show how various Resources are rendered.
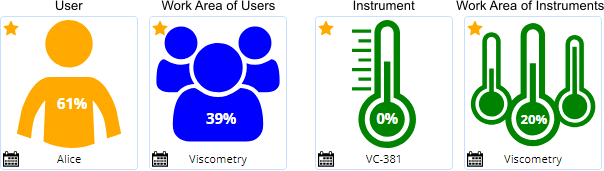 |
View Selector |
The View Selector icons in the upper right corner let you toggle between Calendar View and Resource View.
| Icon | Description |
|
|
Calendar View
Shows the Calendar of the selected Resource. |
|
|
Resource View
Shows the Resource icons. |
Also note that the Percentage Workload displayed for the Resource is calculated over the selected time range (discussed in Percentage Workload Calculation).
Date Navigation Bar |
The Date Navigation Bar lets you choose the time frame over which work will be assigned. Use "Focus" (1) to select the Resource Type. Use the Resource dropdown (2) to select the Resource. Use the arrows (3) to step through available Resources.
 |
Available display modes are described below.
Day |
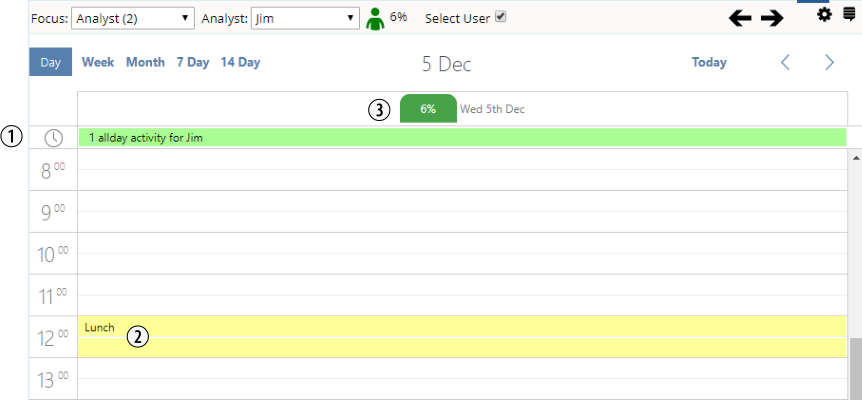
Day mode can show:
| 1. | Appointments and Activities for the entire day. |
| 2. | Partial-day Appointments and Activities scheduled to the hour or minute. |
| 3. | Workload for the selected Resource on the currently selected day (discussed in Percentage Workload Calculation) |
Use the < > arrows to step through days.
|
The Resource bar shows selected day, which is the day work will be assigned.
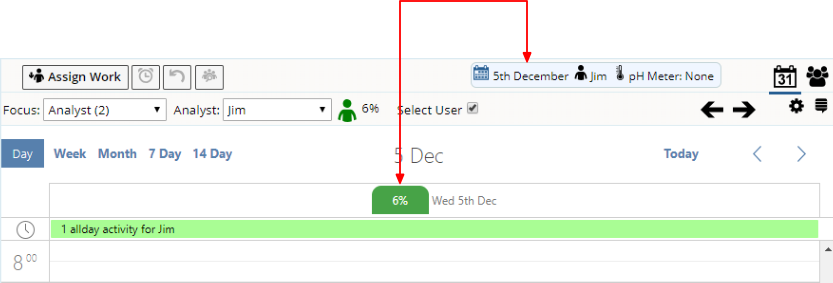
|
You can drag-select a time period, which is reflected in the Resource Bar.
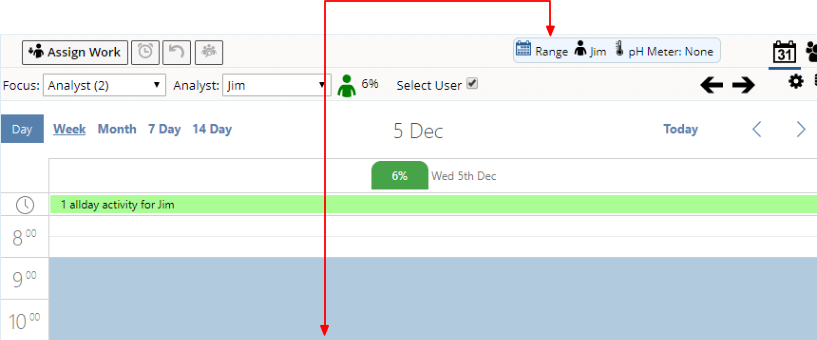
|
Week |
Week mode can show:
| 1. | Appointments and Activities for entire days or multiple days. |
| 2. | Partial-day Appointments and Activities scheduled to the hour or minute. |
| 3. | Workload for the selected Resource on each day (discussed in Percentage Workload Calculation). |
Use the < > arrows to step through weeks.
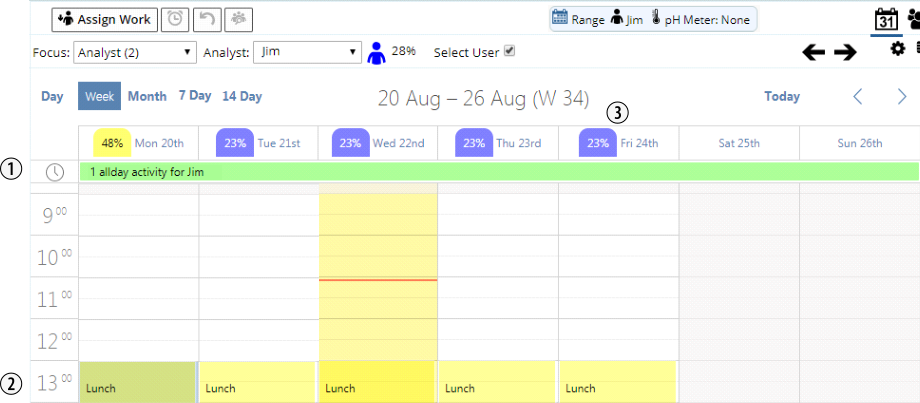
|
If you want to assign work across a range of days (such as sometime on Tuesday, Wednesday, or Thursday), Ctrl-click or Shift-click the columns (1), or drag across those days.
|
Month |
The Percentage Workload is shown for each day. The Toolbar shows Percentage Workload for the entire month. Shift-click allows multi-day assignment (sometime within that range ), or you can drag a bar across to select multiple days (shown in the second image below).
You can also select across months. For example, you can click September 9th, go to October, then Shift-click Oct 9th.

|
|
7 Day and 14 Day |
These are useful when you do not need to view Appointments and Activities down to the hour. Viewing multiple Resources can result in a busy screen. It is therefore best to view them in the 5 Day or 14 Day View.
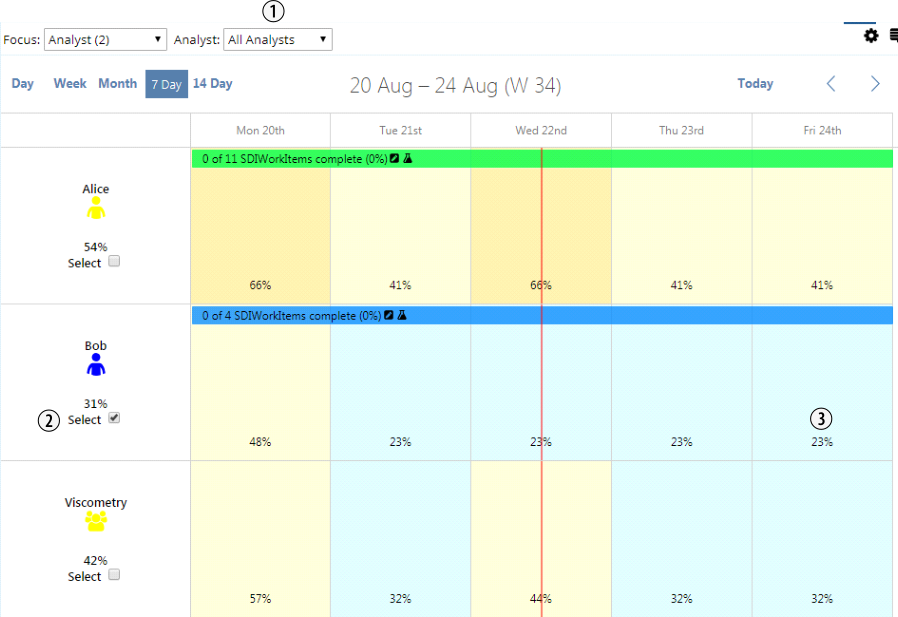
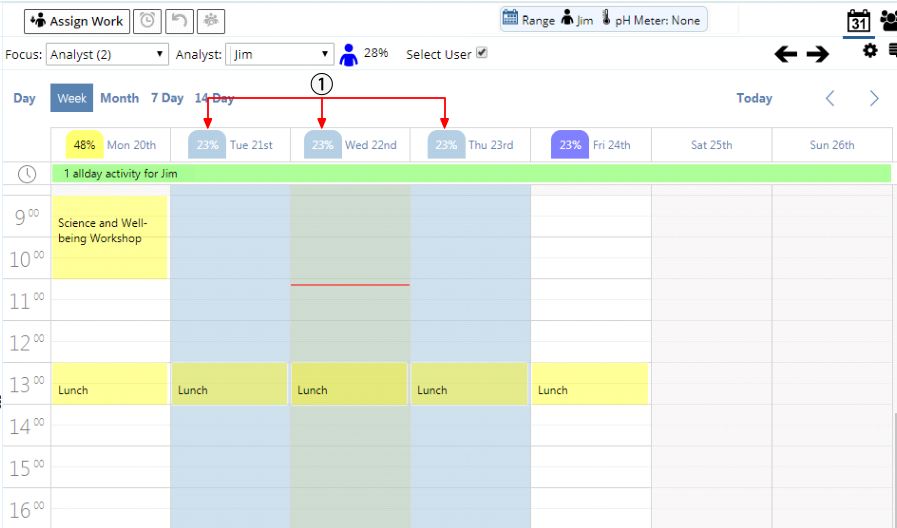
|
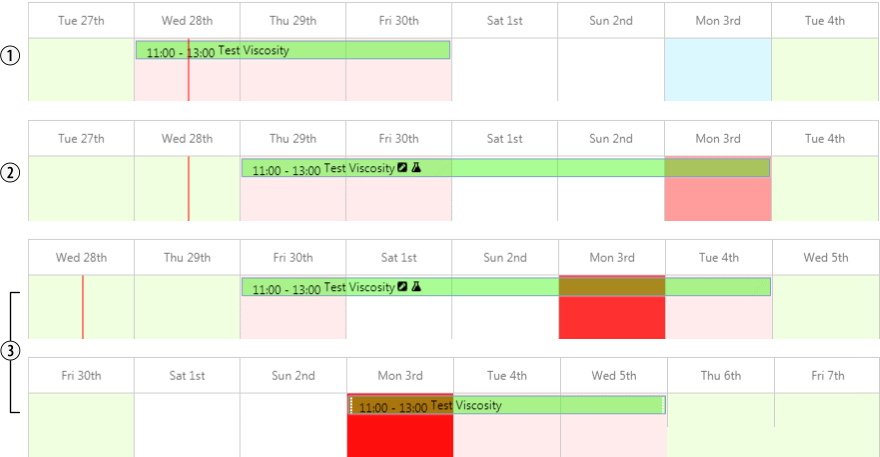
These views let you drag Activities vertically to reassign or horizontally to reschedule. For example, you can move an entire bar up or down, or drag from the right to shorten a bar or drag left and right to do the work earlier or later. You can also drag a bar across to select a date range for the work (outlined in red below).
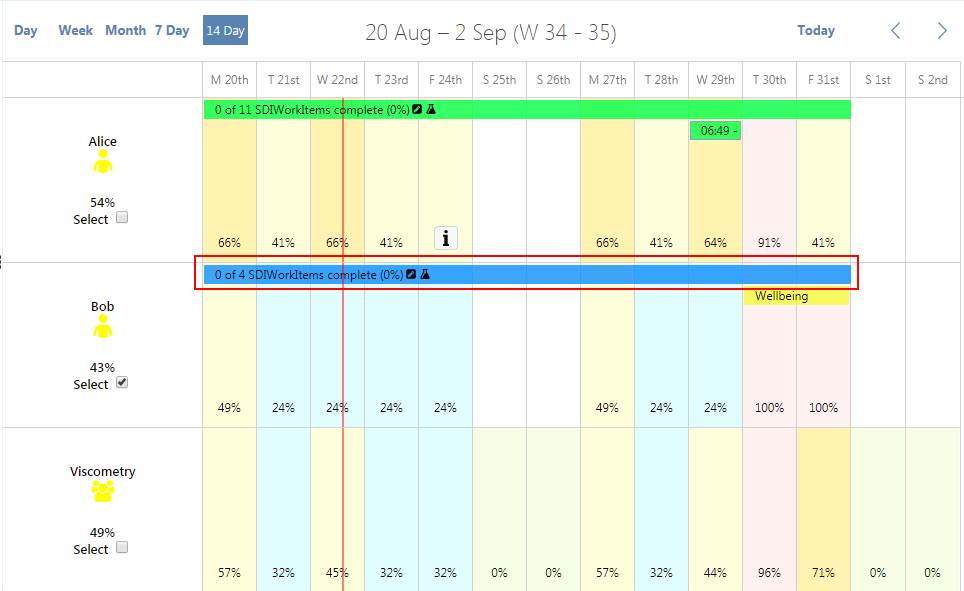
|
The Resource Selectors allow viewing Calendars of multiple Resources in the same view.
The "Select" checkbox (1) is shown for the Users and the Work Area. When you check this, then click "Assign Work", the work is assigned to the selected Resource for the selected time frame.
Percentage Workload is shown for each Resource on each day and is recalculated as you change Activities (discussed in Percentage Workload Calculation). In the example below, (2) shows increased load on the first week, while (3) shows decreased load on the second week.
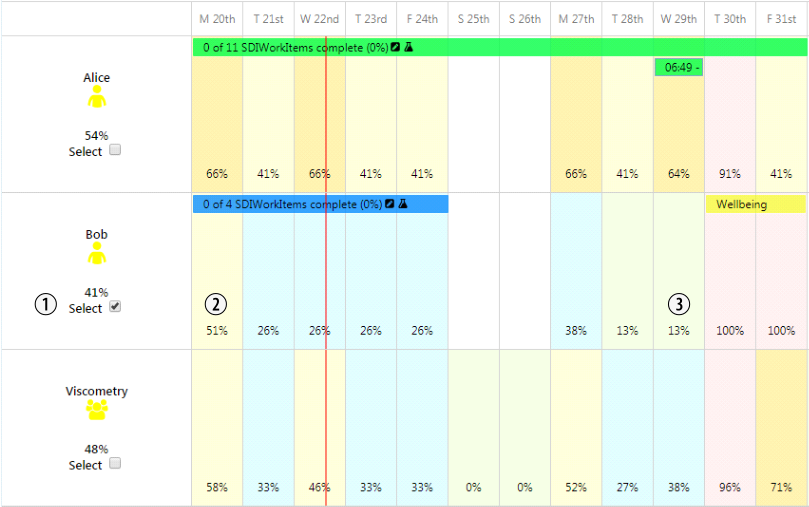
|
Operations |
"Operations" let you jump from an Activity to one or more SDI List pages. This is configurable using the "Operations" collection in the WAP Policy.
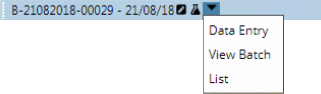
|
Display Options and Legend |
|
|
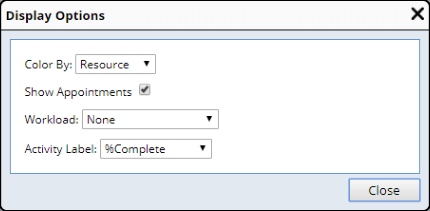
Display Options can be chosen by clicking the gear icon. These let you control how information is presented, particularly when in Calendar View. |
|
| Option | Description | |
| Color By | This lets you adjust the color of an Activity based on different criteria. Changing this update the Color Key with your changes. | |
| Show Appointments | This lets you hide Appointments to view a cleaner screen. | |
| Workload | In Calendar View, this lets you show Percentage Workload for a Resource, the Resource's Available Time, or neither of these. | |
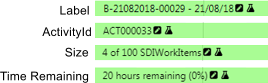
| Activity Label |
This determines what is rendered in the Activity (as in the examples
below).
|
Recent Activities |
While you remain on the Assignment page, the system will remember a list of the recent Activities you created. If draft Activities exist, these buttons are provided:
| Icon | Description |
|
|
View Recent Activities
Lets you view the list of recent Activities. There is an option to view or delete any of them. When deleting, remember that this is just a draft Activity, so after deleting the work you assigned, it will reappear on the left again and you can start over. |
|
|
Delete Activity
Deletes the most recently created Activity (the last one you created). You can keep clicking undo and undo each change, but only for the duration of the session. Once you leave the page, the undo stack is cleared. |
|
|
View Recent Activites in Plan
Lets you view the list of recent Activities on a Manage Work page. This lets you see all recent Activities on one big page. |
|
|
Edit Selected Activity
Lets you edit the selected Activity. An example use would be manually changing the start time for fixed Activities. |
Page Controls |
The following page controls are available.
| Icon | Description |
|
|
Refresh
Refreshes the Work SDI List. |
|
|
Return
Returns to the previous page. |
Assign Work |
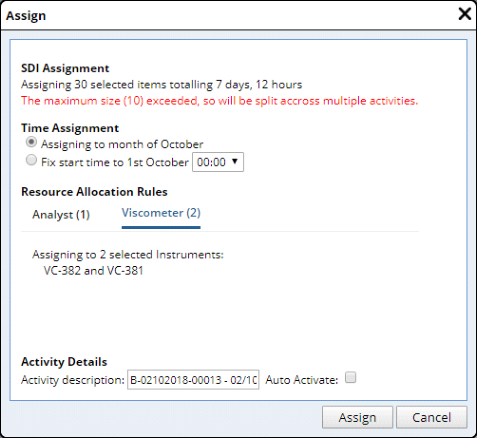
As demonstrated in Introduction to Work Assignment and Planning, the Assign dialog is shown after you click "Assign Work" and before the Activity is created. This dialog shows a summary of what is about to happen:
 |
| Item | Description | ||||
| SDI Assignment | If the number of selected Work SDIs exceeds the Max Activity
Size, the system generates multiple Activities as necessary (see Max
Activity Size).
If multiple Resources are selected, the system divides the Work SDIs evenly among the Resources, then adjusts the Max Activity Size if required. Note that you can choose multiple Resources for only one Resource Type. In the example shown above, 4 Activities will be created: Activity 1: VC-382 Size=10 Activity 2: VC-382 Size=5 Activity 3: VC-381 Size=10 Activity 4: VC-381 Size=5 Note that there is a difference between assigning work to 2 Resources (381 and 382) and assigning work to a Work Area of Resources. When assigning to two Resources, half the work goes to one, half to the other. When assigning to Work Area, all the work goes into one Activity. It is not divided, and we do not worry about assigning someone to do it, as someone else will decide that later.
|
||||
| Time Assignment | Lets you specify if the Activity will be "Floating"
or "Fixed":
|
||||
| Resource Allocation Rules | Shows the chosen Resources. Red indicates a missing Resource. | ||||
| Activity Details | This is a default label that was created based on the rule, but you can change it here. | ||||
| Auto Activate | Checking the "Auto Activate" checkbox automatically Activates the Activity and synchronizes it to the LIMS immediately after assigning the work (clicking the "Assign" button as shown in Assign Work and Create Activities). |
Clicking "Assign" generates a single Activity with the following caveats:
| • | When assigning a Fixed Start Date, the End Date is calculated as an offset from the Start Date, using the longest duration for the Activity Resources. For example, assume an Activity has two Resource requirements: A User who is required for 2 hours and and Instrument that is required for 6 hours. The End Date will be offset 6 hours from the Start Date. |
| • | The work hours for the Resource with the longest time duration are
honored when calculating the End Date. This includes skipping over non-working
days.
If no specific Resource has been assigned to the Activity, the work hours of the Testing Lab are used. |
| • | Appointments or other Activities assigned to the Resource are ignored in the End Date calculation. |
For example, suppose a User works 9:00 a.m. to 5:00 p.m. Monday through Friday. In this case:
| • | 4 hours of work starting 10:00 a.m. Monday will finish 2:00 p.m. Monday. |
| • | 4 hours of work starting 3:00 p.m. Monday will finish 11:00 a.m. Tuesday. |
| • | 4 hours of work starting 3:00 p.m. Friday will finish 11:00 a.m. the following Monday. |
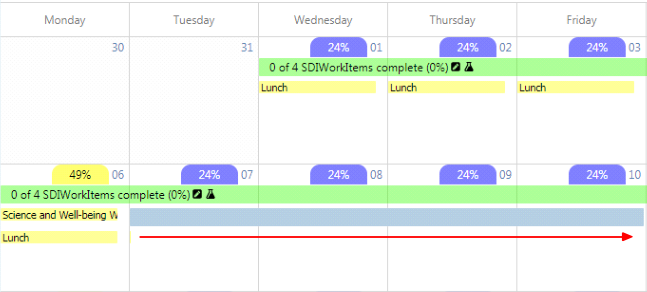
Here is another example:
| 1. | There is a fixed Activity that is planned from 11 a.m. Wednesday to 1 p.m. Friday. The duration is 18 hours (6 hours on Wednesday + 8 hours on Thursday + 4 hours on Friday). The User works from 9 a.m. to 5 p.m. | |
| 2. | If work is started a day later, it will end at 1 p.m. on Monday. It will not end on Saturday because the User does not work on Saturday. | |
| 3. | The effect is shown as you move into the next week. |
 |
Show Plan |
Opens the Manage Work page. This lets you work with the Plan.
Percentage Workload Calculation |
|
|
Calculation of a Resource's Percentage Workload takes into account several factors.
At a high level, the formula for a Resource's availability on a given day is:
[Core Hours] - [time for Calendar Appointments] - [time assigned to Activites]
In reality, the formula is more complex, as it must to take into account:
| • | Days when the User is not working. |
| • | Appointments that require a partial day, entire day, or multiple days. |
| • | Floating Activities, in which case work is not scheduled for a specific day. For example: The duration may be 5 hours, but work may be scheduled to occur any time Monday through Friday (assuming 1 hour per day). |
| • | Calculations for Work Areas (such as groups of Users). Consider that work can be assigned to a User in a Work Area or to the Work Area itself. Also, Users can rotate through Work Areas, so capacity for work fluctuates over time. |
| • | What are the "Core Hours" for an Instrument? For example, if an Instrument is used for a full working day (9 a.m. to 5 p.m.), does that indicate 100% utilization or only 33%? |
| • | Percentage Workload may be displayed for single days or date ranges. |
The following examples demonstrate several load calculation scenarios. These are shown in the Workload Information dialog that opens when you click the Info icon.
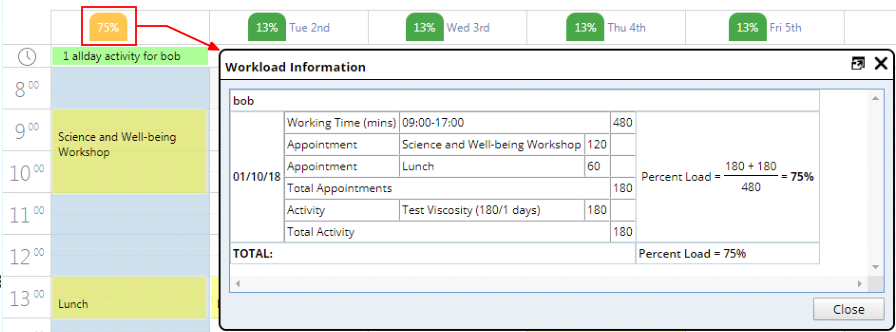
| 1. | On Monday, Bob works a total of 480 minutes, 180 of which reflect two
Appointments. He also has a 180-minute Activity on that day. Bob is therefore
75% busy on Monday.
|
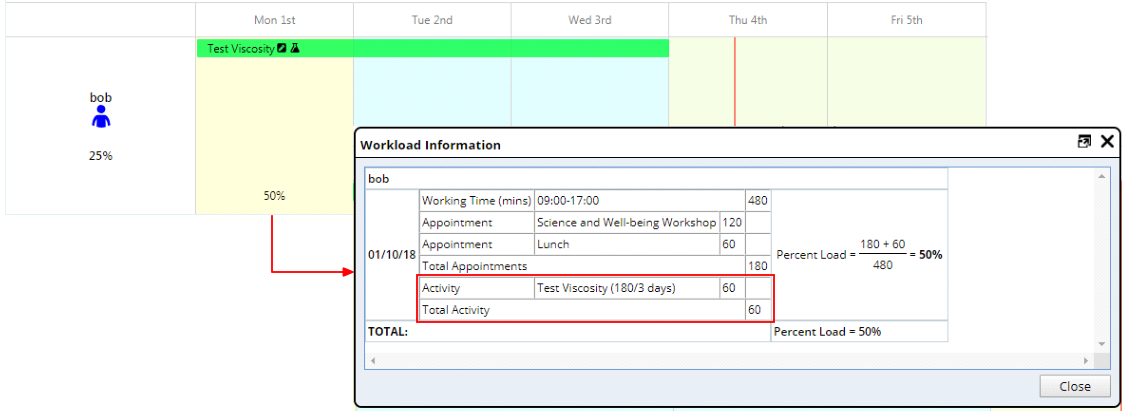
| 2. | We now expand the Activity range to occur over 3 days instead of one.
Bob still works 480 minutes and has 180 minutes of Appointments. However,
because the Activity can occur at any time over a 3 day period, only 1/3
the total activity time is allocated to Monday.
Note that this is the same set of conditions as the previous example, but it is spread over 3 days. Moday is therefore only 1/3 of the total Activity time.
|
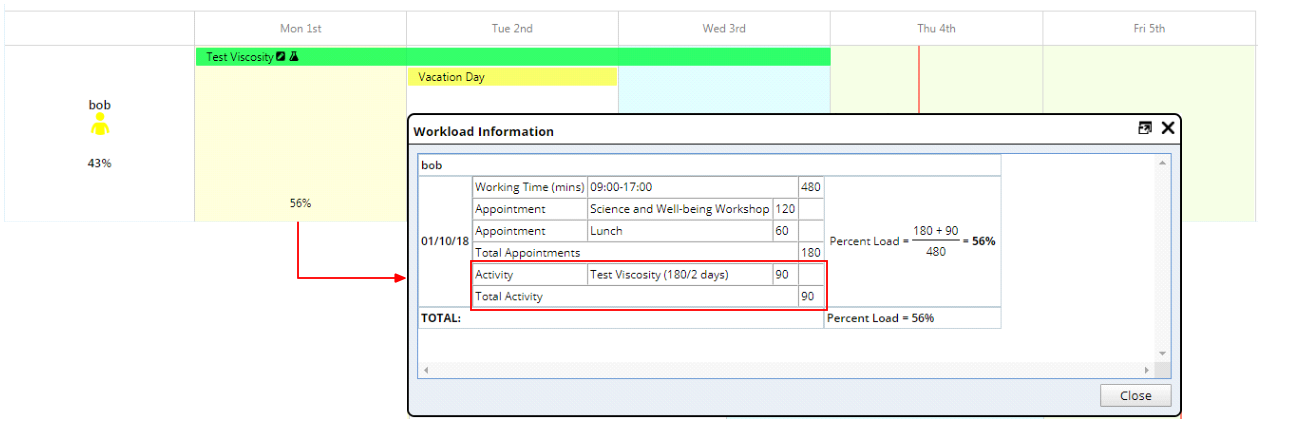
| 3. | Bob then takes Tuesday as a vacation day. Even though the Activity
range is 3 days, a full-day Appointment is treated as a non-working day.
Therefore, the Activity must be completed over 2 days. The result is that
1/2 the total Activity time is allocated to Monday.
|
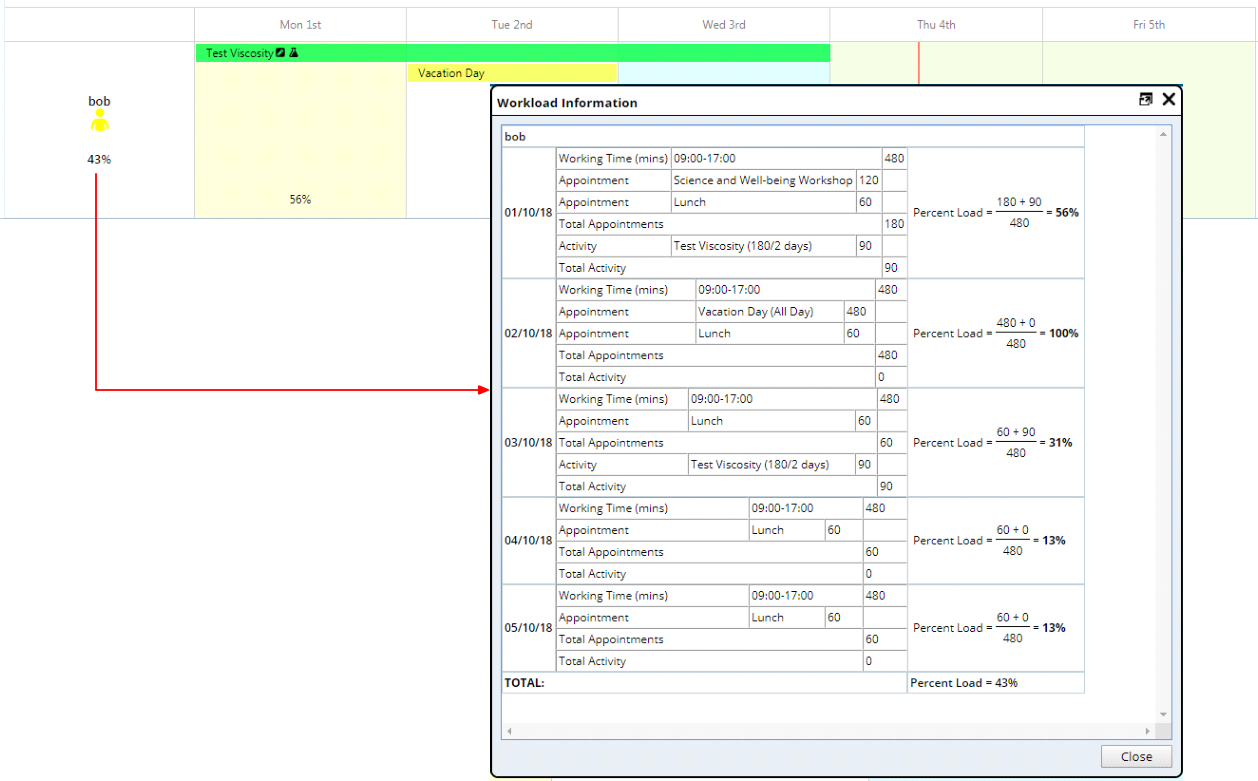
| 4. |
The Workload Information dialog can also be used to see how multi-day
loads are calculated. This example shows a 5-day timeline. Bob is 43%
loaded over the course of the week. Note that Tuesday is 100% because
Bob is on vacation. The lost time is spread over Monday and Wednesday.
|
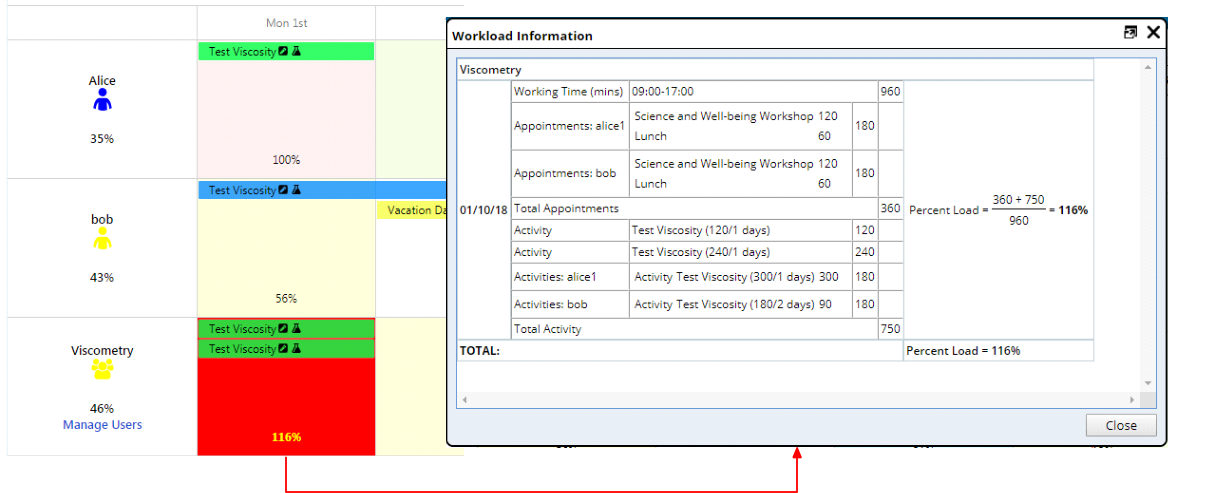
| 5. | The Workload Information dialog can also show how Work Area loads are
calculated. In this example, the "Viscometry" Work Area has
two members (Alice and Bob). In addition to Bob and Alice having been
assigned Activities, the Work Area itself also has two Activities assigned
to it. This shows there is likely a problem in Viscometry on Monday, as
it is 116% loaded. The calculation shows how the percentage load for the
Work Area is calculated based on the percentage load of the members of
the Work Area.
The planner can use this to correct the situation by doing things such as assign the work to a different day, click "Manage Users" and rotate Charlie through the Viscometry Work Area on Monday, and so on. To determine how the 116% was calculated, you can click the "116%" link.
|