Content |
|||||||||||||||||
|
Introduction |
|
|
| NOTE: | WAP makes extensive use of Department hierarchies and Calendars. It is therefore recommended that you become familiar with the concepts described in Departments and Calendars. |
Work Assignment and Planning (WAP) allows laboratory managers to create and visualize a plan that defines:
|
|
Work to be done in the laboratory.
Work in the laboratory typically involves testing. WAP allows testing to be planned at the Sample, Test (SDIWorkitem), and Data Set (SDIData) level. Special provision is also made for WorkOrders defined by certain Schedule Tasks. |
|
|
|
Resources assigned to do the work.
Resources can be Analysts (Users) and Instruments. Although work can be assigned without using WAP (as decribed in Assigning Analysts, Work Areas, and Instruments to SDIs), WAP lets you assign work using Calendars to provide enhanced visualization of time-based assignment. |
|
|
|
Time allotted each Resource to do the work.
Work assignment is time-based for each Resource, e.g., "One hour is allotted for each Analyst to test each Sample". |
As a starting point, it is important to note that:
| • | Work is planned on a Calendar based on Core Hours, Appointments, and available days (see Calendars). |
| • | Planned work is put into "Activities". An Activity is a block of work to be performed by one or more Resources at some specified time. |
| • | Work is planned one Testing Lab at a time (see Departments). The job of the planner is to associate work that resides in the Testing Lab with Resources that are available in that Testing Lab. This is a key requirement of WAP, i.e., the work to be planned and the Resources needed to do the work must be members of a Testing Lab. |
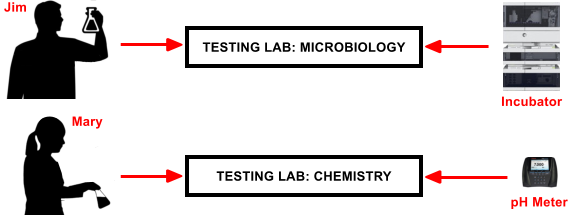
The significance of Testing Labs is illustrated in the example below. A given Sample may have Bacteria tests that are done by Jim in the MicroBiology Testing Lab, and pH tests that are done by Mary in the Chemistry Testing Lab. Each Testing Lab would have its own plan that defines work assignment and planning for Resources in that specific Testing Lab.
 |
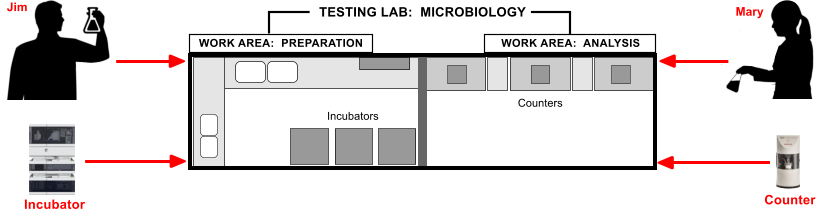
Resources can also be grouped into Work Areas in various ways. In the example below, the MicroBiology Testing Lab has separate Work Areas for Preparation and (Procedural) Analysis. Work can be assigned to Resources in each.
 |
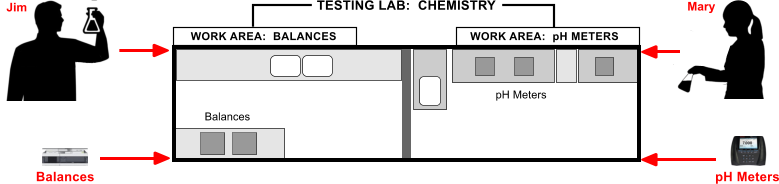
Work Areas can also be useful in defining groups of similar Resources in a Testing Lab. As shown in the example below, the Chemistry Testing Lab has Work Areas for Balances and pH Meters. When assigning work to Instruments, the planner may not care which specific Instrument is used, so the work can be assigned to a Work Area and the Analyst can decide which Instrument to use when the time comes. A planner can similarly assign work to a group (Work Area) of Analysts rather than a specific Analyst.
|
Master Data |
|
|
Overview |
Master Data defines key information that defines how the work will be planned using WAP. First of all, Master Data defines if the work will be planned using WAP. If so, Master Data then defines these details required to assign and plan the work:
| • | The Testing Lab (and optionally the Work Area) in which the work will be done. For example, Bacteria tests are done in the MicroBiology Testing Lab, but pH tests are done in the Chemistry Testing Lab. |
| • | Resources required to do the work. For example, the Master Data can define that one Analyst and one Instrument will be required for pH testing. |
| • | Time required by each Resource to do the work. For example, the Master Data can specify that one hour of the Analyst's time and two hours of the Instrument's time are required for each pH test. |
| • | Other optional details that can help define the work (such as the preferred Resource for the work and the maximum number of Activities). |
Example |
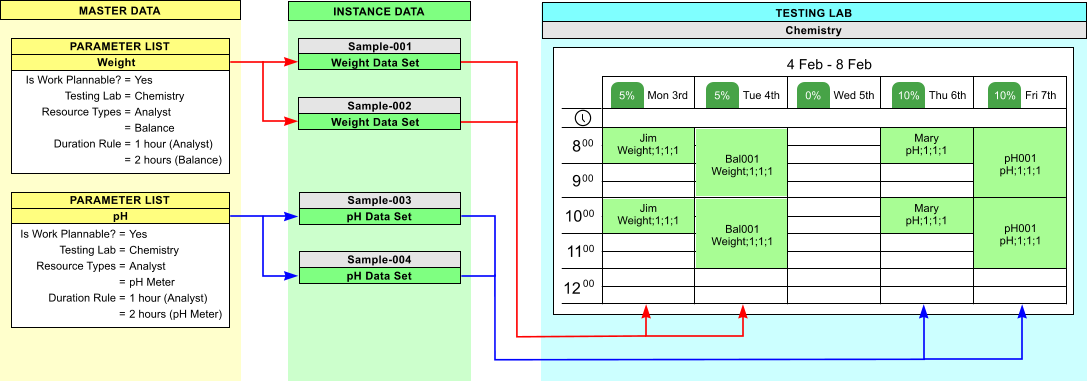
There are many ways to assign work using WAP (as described in WAP Resources). To provide a simple high-level introduction, the example below shows the basic principle of how work can be assigned. For simplicity, this example uses Parameter Lists as the Master Data objects.
| 1. | The Weight and pH Parameter Lists are flagged as "plannable", indicating that the work can be planned using WAP. | |
| 2. | Weight and pH testing are done in the Chemistry Testing Lab. | |
| 3. | Each "Weight" Data Set will be tested by an Analyst who will be using a Balance. Each Data Set will require one hour of the Analyst's time, and two hours of the Balance's time (this is the "Duration Rule"). | |
| 4. | Each "pH" Data Set will be tested by an Analyst who will be using a pH Meter. Each Data Set will require one hour of the Analyst's time, and two hours of the pH Meter's time. | |
| 5. | Each block of planned work can then be seen as an Activity on the Calendar. A representative rendering is shown below for illustrative purposes. |
Note that:
| • | The Master Data defines "Resource Types" and not specific Resources. When assigning the work, the planner chooses the specific Analyst (Jim and Mary) and the specific Instrument (Bal001 and pH001). |
| • | The system calculates the resulting percentage of current workload based on the Resource's available time (during Core Hours and minus Appointments, as shown in Calendars). |
 |
Summary of Master Data Objects |
"Work SDIs" are the SDIs that require planning and (subsequently) can be put into an Activity. All Work SDIs put into an Activity must belong to the same SDC.
Test Method |
Test Methods can be planned "By WorkItem" (actually a Test). In this case, the Test and its Data Sets are assigned to the chosen Resources. This is configured in the Test Method Maintenance page.
 |
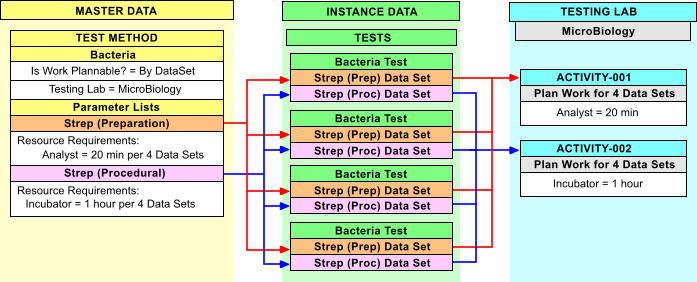
Test Methods can also be planned "By DataSet". In this case, Data Sets of selected Parameter Lists are assigned to the chosen Resources. Work Areas can be specified in the same manner as the "By Test" option.
In the example below, the Preparation Data Sets are assigned to an Analyst, while the Procedural Data Sets are assigned to an Incubator. This is discussed further in WAP Resources and WAP Assignment.
 |
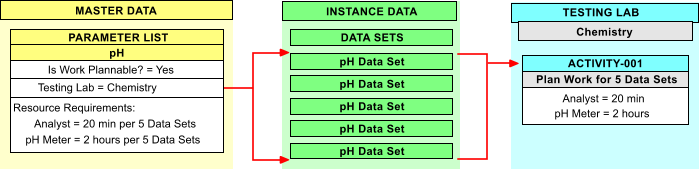
Parameter List |
When Parameter Lists are made "Plannable", all Data Sets of the Parameter List are assigned to the chosen Resources. This is configured in the Parameter List Maintenance page.
 |
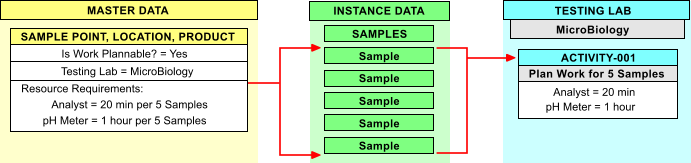
Sample Point, Location, and Product |
When Sample Points, Locations, or Products are made "Plannable", Samples associated with the Master Data object are assigned. This is configured in the Sample Point, Location, and Product Maintenance pages.
The order of precedence is the same as Master Data Copy Down. Sample Point, Location, and Product are checked in that order. The first plannable Master Data object is used.
 |
| NOTE: | Although not considered "Master Data" by definition, certain ScheduleTasks can also define Resources required for a Testing Lab or Work Area. These definitions are passed to WorkOrders. For example, Instruments can have their own Calendars to show when they are not available. Time such as Instrument maintenance can be scheduled by a WorkOrder based on the SDICertification Schedule Task. This is covered in Advanced Topics. |
Planning Levels |
In principle, any of the specified Master Data objects can be "plannable". However, you must carefully consider how you want to plan. For example, it makes no sense to assign a Sample to Jim on Wednesday, assign the Sample's Data Sets to Mary on Thursday, then assign Alice to prep the Sample on Friday.
WAP therefore enforces the following rule regarding planning at different levels of Master Data:
You cannot plan at different levels of Master Data within a single SDI.
Here are some examples of how this rule is enforced:
| • | If you plan at the Sample level, you cannot separately plan a Test or Data Set of that Sample. |
| • | If you plan at the Test level, you cannot separately plan a Data Set of that Test. |
| • | Suppose you want to plan at the Sample level (driven by Product Master Data). Even if Test Method and Parameter List Master Data are "plannable", the Sample's Tests and Data Sets will not be. This is because the Sample itself is "plannable". You can plan at the Sample level, the Test level, or the Data Set level. However, you cannot mix these levels when planning. |
| • | Assume a "Steroid" Product is marked "plannable" at the Sample level, and a plannable "Coating" Test is run on the Steroid. In this case, the Master Data is allowed to contradict itself because the planning rule is not resolved until you create the Sample and the "Coating" Test. The planning rule for this scenario would be: When you created the Sample, the Product was set to plan at the Sample Level. The Sample therefore had a WAPStatus of "Pending". When you add the "Coating" Test, even though it is set to plan at the Test level, the system does not allow that to happen because the Sample itself is already "plannable". |
| NOTE: | Resource Requirements must also be considered, as they must be compatible in order to be placed into the same Activity. This is described in WAP Resources. |
WAPStatus |
With regard to Master Data, WAP requires that a minimum of two columns be set in the Instance Data: WAPStatus and TestingDepartmentId.
| • | Note the "Is Work Plannable?" flag for each Master
Data object. This sets the WAPStatus column in the Instance Data object:
|
||||||||||
| • | Note the "Testing Lab" value for each Master Data object. This sets the TestingDepartmentId column in the Instance Data object. |
Additionally, when a Plan is "Activated", the Planned Start Date for the Activity is pushed from WAP to the PlannedStartDt column in the Instance Data object.
Simple Walkthrough |
|
|
Overview |
Following is a simple example that uses a Parameter List as the Master Data object and a single Analyst (User) as the Resource to show the minimum setup required to execute a basic WAP assignment and planning scenario. This is provided solely to demonstrate the simplest possible high-level view of the overall assignment and planning process, plus introduce the WAP user interfaces. More detailed coverage is provided in the Related Documents.
Create Plannable Work |
Begin by setting up the Department and Master Data object, then creating some plannable work.
Create Resources |
Create two new Users "Jim" and "Mary". To simplify matters, grant all Roles to each User and allow access to all modules.
Create Testing Lab |
Create a new Department "Chemistry" and make it a Testing Lab.
In the Department Users detail, assign yourself, Jim, and Mary to the Testing Lab. Note that you are assigning yourself because you must belong to the Testing Lab in order to plan work in it.
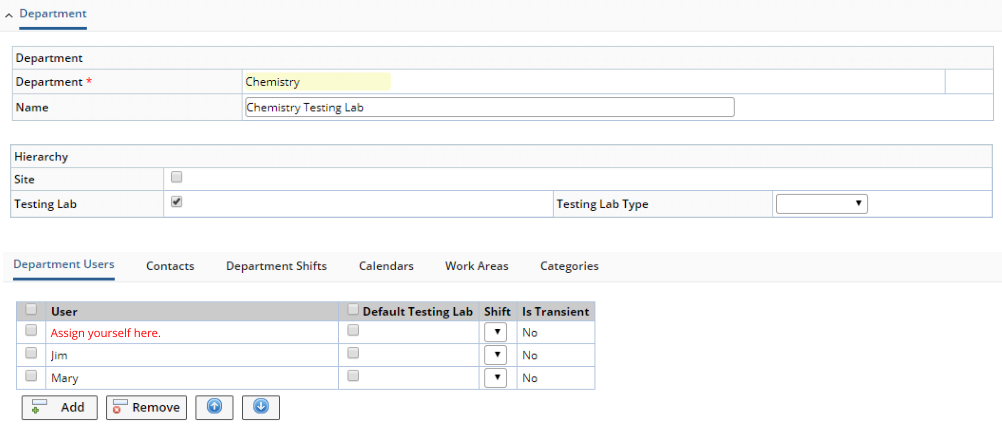 |
| NOTE: | For the purposes of this example, the "Default Testing Lab" does not need to be checked. This is described in Department Users. |
Create Plannable Master Data Object |
Create a Parameter List "pH-WAP" and add a "pH" Parameter to it. If you installed example data, you can use a copy of the example pH. Setup the Parameter List as follows:
| 1. | Set "Is Work Plannable" to "Yes". | |||||
| 2. | Choose the "Chemistry" Testing Lab you created. | |||||
| 3. |
In the "Resource Planning" detail:
|
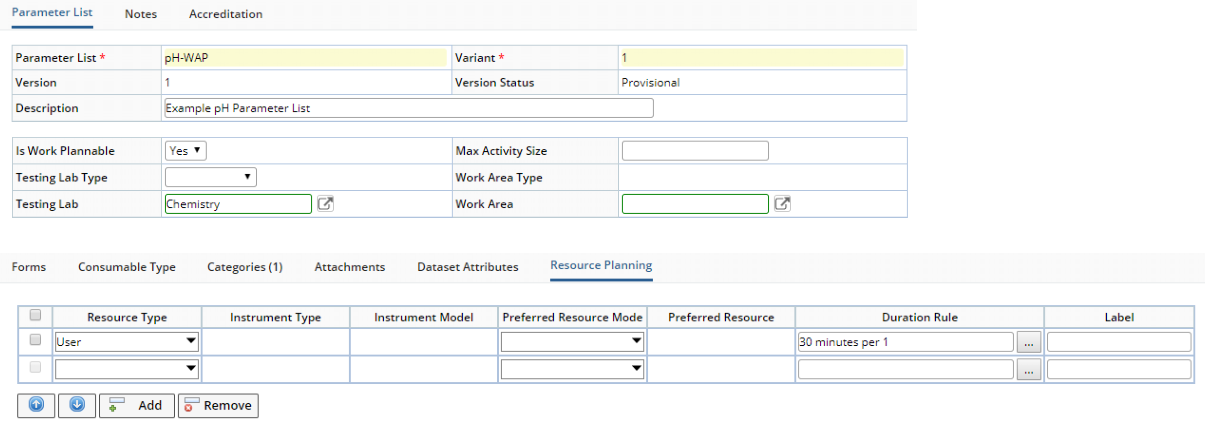 |
Create Samples |
Create 10 Samples and add your "pH-WAP" Parameter List to each Sample.
The "Is Work Plannable" flag and the "Testing Lab" are copied from the Master Data (pH-WAP Parameter List) to the Instance Data (pH-WAP Data Sets). Because "Is Work Plannable" = "Yes", the Data Sets have a WAPStatus of "Pending" indicating they are waiting to be planned.
The Resource Types and Duration Rules are not copied-down. They stay on the Master Data object and will be used only when you assign the work in the next section.
Assign Work and Create Activities |
Planning and assignment is done in the Work Assignment page. This is where you assign work to Resources.
Open the Work Assignment page at Lab Admin → Planning → Plan Work.
The Work Assignment page allows planning for a single specific Testing Lab.
The left frame lists the Work SDIs that require planning and (subsequently) can be put into a plan. The right frame contains Resources in the Testing Lab that are available to perform the selected work. You will be selecting Work SDIs in the left frame and assigning them to the Resource in the right frame. Note that a Resource can be an Analyst (or Work Area of Analysts) or Instrument (or Work Area of Instruments).
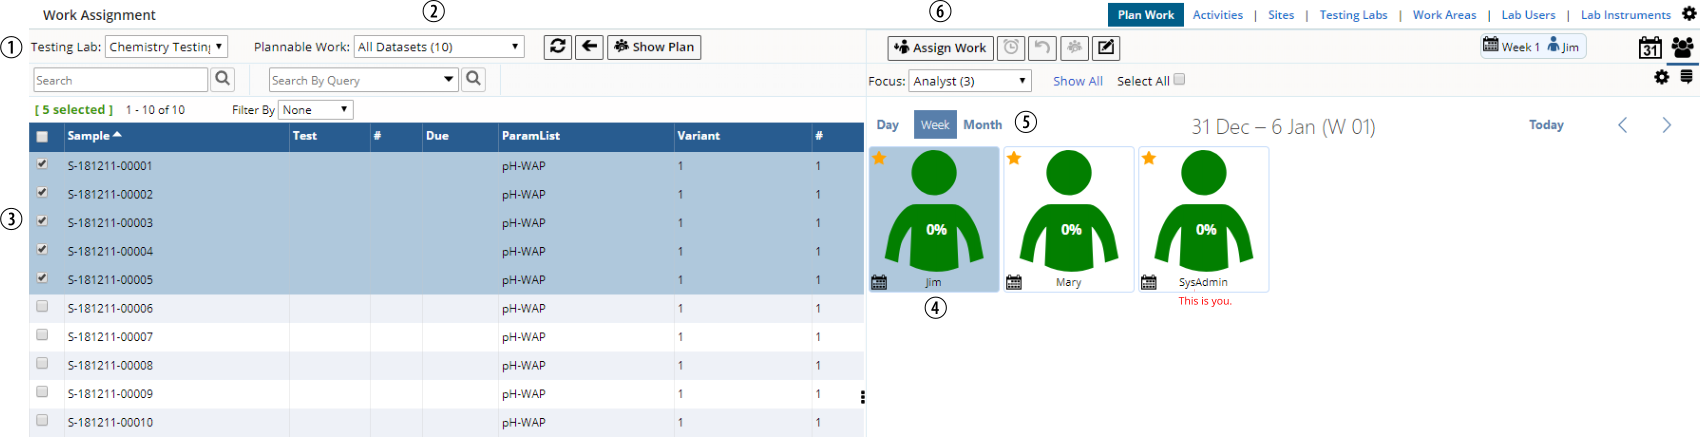 |
| 1. | From the "Testing Lab" dropdown, choose the "Chemistry" Testing Lab you created. | ||
| 2. | From the "Plannable Work" dropdown, choose the "All Datasets (10)" Query. This shows all 10 Samples you created with their associated Data Set (Instance Data from the Parameter List). | ||
| 3. | In the left frame, select five Samples to assign. | ||
| 4. | In the right frame, select "Jim" as the Analyst to whom the work will be assigned. | ||
| 5. | For this example, select "Week". Work will be assigned to the timeframe selected here and shown in header. | ||
| 6. | Click the "Assign Work" button. The Assign dialog opens to
show details concerning the Activity (some of which you can change). For
simplicity, leave the "Time Assignment" at its default. This
will assign the Activity to be performed at some time during the selected
week. Note that you can also fix the start time to begin on a specific
day and time.
|
||
| 6. | Click the "Assign" button. |
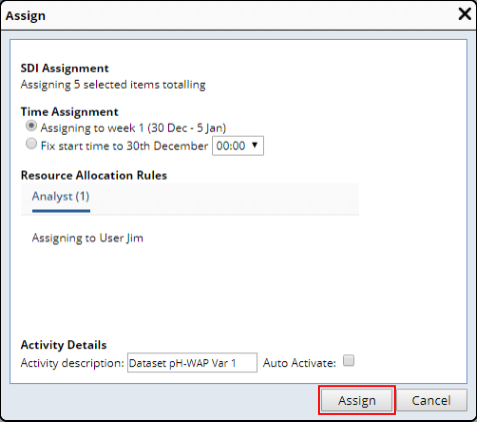
The selected Samples (with their Data Sets) are assigned to the selected Resource, and consequently no longer appear in the left frame. An "Activity" is created.
 |
The Resource icons show how busy each Resource is within a timeframe. Jim's work now consumes 6% of this available time.
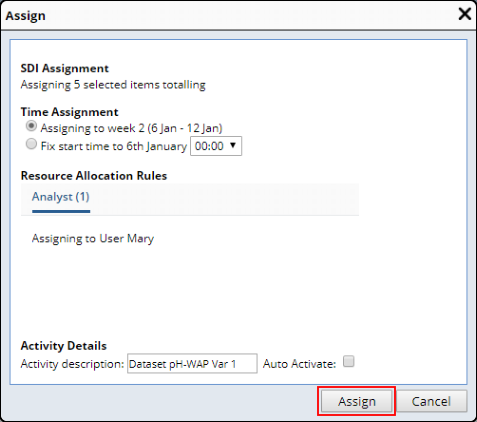
In a similar manner, we will now assign the remaining work to Mary on the following week.
Select Mary as the Analyst, use the < > toolbar buttons to advance to the next week, select the remaining 5 Samples, then click "Assign Work".
 |
Click "Assign".
 |
In this example, we have assigned all plannable work (all 10 Data Sets). Both frames are therefore now empty.
 |
Activate the Activities |
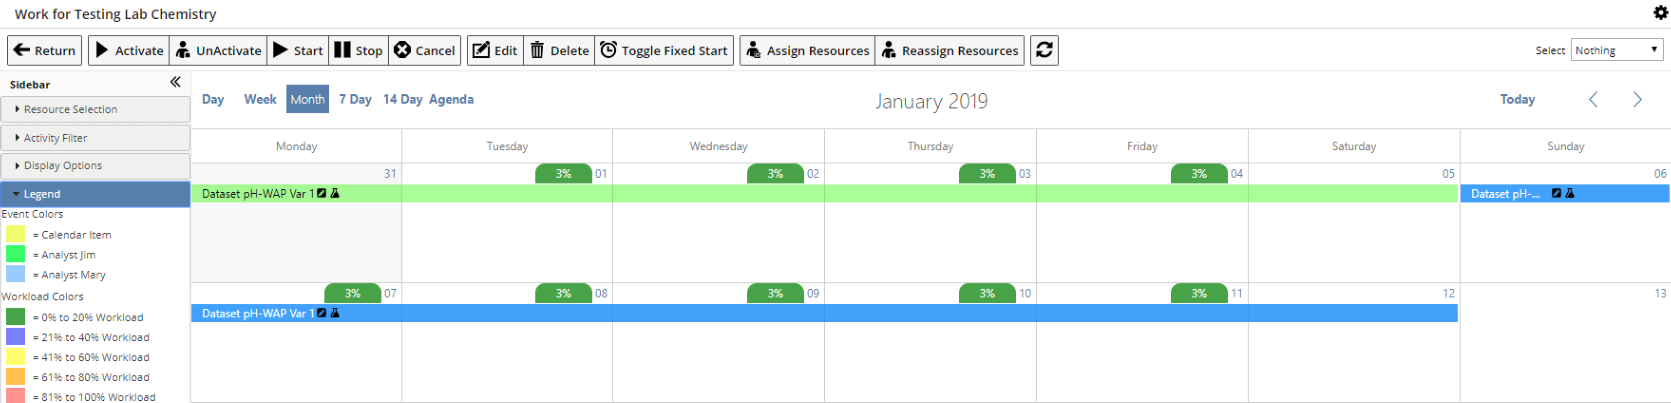
Now that all of the work is planned, click "Show Plan". This opens the Manage Work page (labeled "Work for Testing Lab [TESTINGLABID]"), which shows the Draft Activities you have just created. Each Activity is color-coded as shown in the Legend.
| NOTE: | This has been setup as a simple demonstration of the WAP interfaces. In the reality of planning work in an operational laboratory, the Calendar would reflect the Testing Lab's Core Hours and the Analyst's Appointments. Detailed information concerning this page is provided in WAP Activities. |
An Activity contains a roll-up from the LIMS to identify the status of the Activity (such as In Progress, Completed, Cancelled). This allows you to track the percentage of the Activity that is complete (such as zero out of four Tests are now complete) so when you are looking at the plan in progress, you can keep track of the work. At this time, the Activity is currently in "Draft" status. You are just creating the plan, and nothing has actually been assigned yet, so you can adjust your plan (add more work, delete Activities, etc.) and track progress. This offers several different views of the plan, such as "Month" to show the Activities in the monthly Calendar view. Activities can overlap in time, thus allowing an Activity to utilize all available time.
 |
You will now Activate Jim's Activity. Select Jim's Activity (it will turn pale blue), then click "Activate". Confirm the Activation in the dialog.
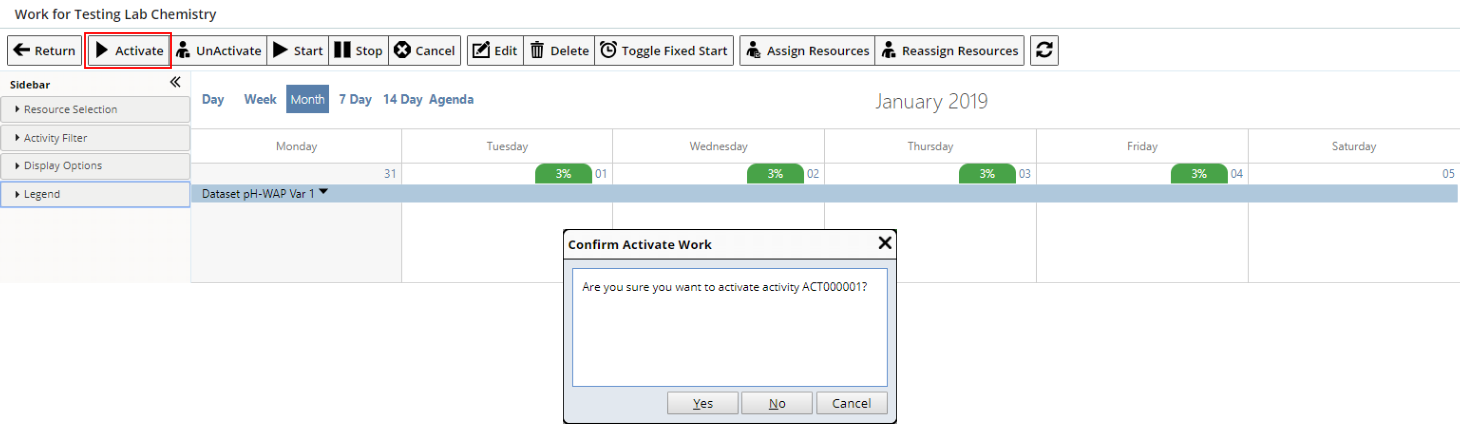 |
Activation pushes the plan, assigned Resources, and Planned Start Date from WAP down to the LIMS, thus allowing Jim to know the work that has been assigned to him. Following Activation, Draft Activities are removed from the plan.
You can activate Mary's Activity in a similar manner.
Manage the Work in the LIMS |
Now that an Activity has been created, Jim and Mary can perform the work using either of the options described below. Jim is used as an example, but the same applies to Mary.
Option 1: View My Work |
Login as Jim and click "View My Work" in the User Profile menu.
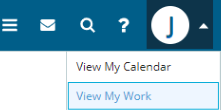 |
This opens the Manage Work page showing a Calendar view of Activites assigned only to Jim, as each User will see only his/her own work from "View My Work". Jim can use the dropdown Operations on the Activity to jump straight to the Data Entry page. When Jim enters and saves his first result, the Activity will automatically start (known as "Auto Start"). You can also use the toolbar buttons in the Manage Work page to Start/Stop Activities, as well as perform other Activity management functions.
 |
Option 2: Work in the LIMS |
Login as Jim and go to the Data Set List page. The Data Sets have been assigned to Jim with the corresponding Planned Start Date, which is shown when hovering over the Calendar icon at the far right of each row (1). Jim can do Data Entry on selected Data Sets from here (2). When Jim enters and saves his first result in the Data Entry page, the Activity will automatically start.
 |
Also note that "Manage Work" and "Plan Work" buttons are provided to open the Work Assignment and Manage Work pages for the selected items.
Roll-Up from LIMS to WAP |
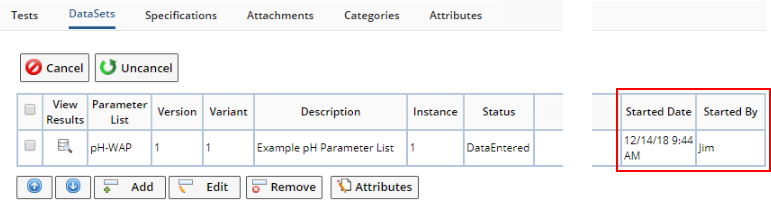
As work is completed, information is rolled-up from the LIMS back to WAP to show percent complete and time remaining on the Manage Work page. The Data Sets detail on the Sample Maintenance page shows when Jim began entering data.
 |
Related Documents |
|
|
The WAP concepts introduced above are detailed in these additional documents:
|
|
WAP Resources |
|
Departments | |||
|
|
WAP Assignment |
|
Calendars | |||
|
|
WAP Activities |
|
ActivityAssignment Page Type | |||
|
|
WAP Advanced Topics |
|
ActivityWork Page Type | |||
|
|
WAP Policy |