Purpose |
|
|
|
Location |
A Location can be used to identify a location from which a Sample may be taken. A Location can contain another Location as a child, and/or a Sample Point, thus creating a Location Hierarchy. Locations in the Location Hierarchy are identified using Reference Types such as (Building, Floor, Room, Table). Once defined, the entire Location Hierarchy is visible using the Location Navigator. Here you can easily view and manage each Location including any Excursions that may have occurred within an associated Location or Sample Point.
The Scheduler is used to define Schedule Plans for Locations, and Sample Points within that Location.
The Sample Monitoring Module uses Locations and Sample Points (and the Schedule Plans defined within) to generate Monitor Samples. See the Sample Monitoring Overview for more information.
Add a Location |
|
|
To add a Location navigate to Lab Admin → Process → Locations. The Location list page displays.
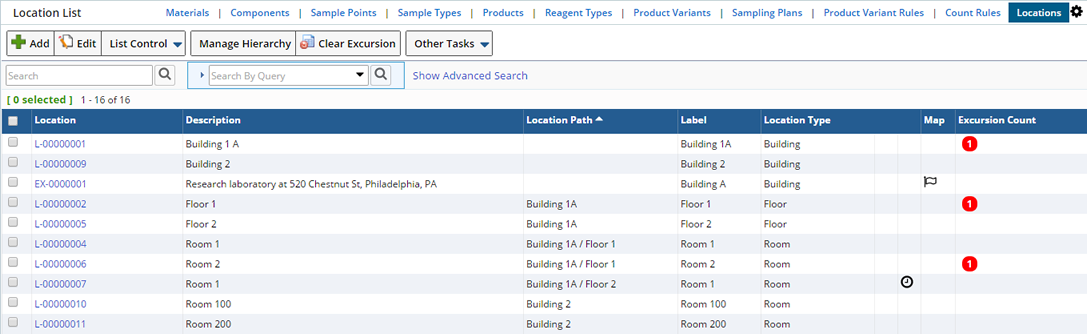
| Column | Description |
| Location | Automatically generated identifier for the Location. |
| Description | Description of the Location. |
| Location Path | Locations can be included within a Location Hierarchy. The Location Path identifies parent levels of the Location. |
| Label | Identifying Label for the Location. |
| Location Type | Reference Type identifying the type of Location. |
|
|
Active Schedule Plan Items. Hovering over the icon indicates the number of active Schedule Plan Items for this Location. |
|
|
Provides a link to an image map of the Location. Clicking the icon opens the Image Map. |
|
|
Displays an Excursion icon. The count identifies the number of Locations or Sample Points from which a Sample was taken, that has a failed Specification. |
Choose to "Add" a new Location or "Edit" existing Locations. Clicking "Add" opens the Add Location page.
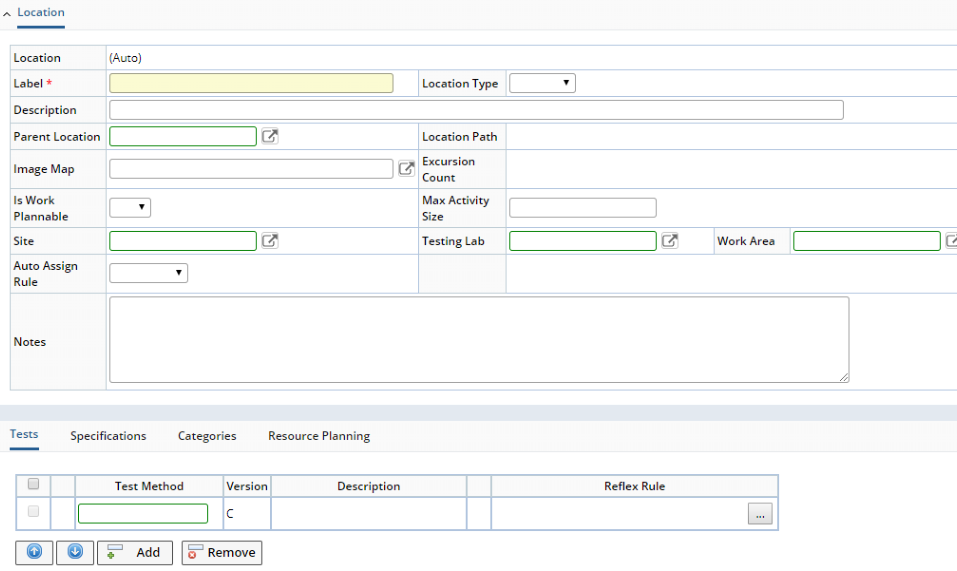
Define general information about the Location.
| Field | Description |
| Location | Automatically generated identifier of the Location. |
| Label | Label that identifies the Location. |
| Location Type | Reference Type defining the Type of Location. |
| Description | Description of the Location. |
| Parent Location | If this Location is in another Location, use the lookup to select the Parent Location. |
| Location Path | Location path to identify the level of this Location within the Location Hierarchy. |
| Image Map | Image map associated with this Location. See Image Map for more information. |
| Excursion Count | As Samples are tested, those that fall outside specified limits are flagged with an Excursion. The Excursion Count displays a number indicating how many excursions exist against this Location. |
| Is Work Plannable | Used with the WAP module. See Introduction to Work Assignment and Planning (WAP). |
| Max Activity Size | Used with the WAP module. See Max Activity Size. This is available when "Is Work Plannable" is "Yes". |
| Site | Site associated with this Location (see Departments). |
| Testing Lab | Testing Lab associated with this Location (see Departments). |
| Work Area | Work Area associated with this Location (see Departments).
If you choose a Testing Lab, the Work Area lookup shows only Work Areas in that Testing Lab. If you choose a Work Area, the "Testing Lab" is automatically populated with the Parent Testing Lab for the Work Area. |
| Auto Assign Rule | See Assigning Analysts, Work Areas, and Instruments to SDIs. |
| Auto Assign Analyst | See Assigning Analysts, Work Areas, and Instruments to SDIs. |
| Notes | Descriptive text. |
Upon saving, the detail tabs display.
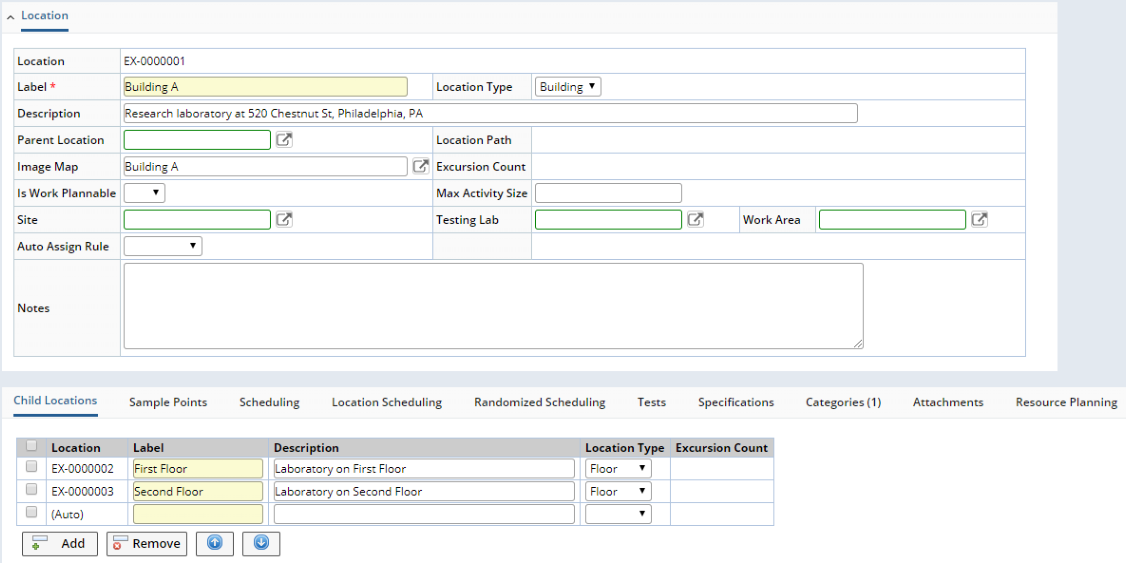
Child Locations |
This detail defines Child Locations for this Location.

| Field | Description |
| Location | Automatically generated identifier of the Child Location. |
| Label | Label to identify the Location. |
| Description | Description of the Location. |
| Location Type | Reference Type identifying the type of Location. |
| Excursion Count | As Samples are tested, those that fall outside specified limits are flagged with an Excursion. Any excursions against the Child Location display here. |
"Add" or "Remove" child locations using the Child Locations detail. Adding a Child Location adds a new Location record that displays in the Location List. The Location Path identifies the new Location as a Child.
Sample Points |
Add Sample Points to include as a Source when defining a Schedule for this Location. Click "Add" to enter a Sample Point.

Enter an identifying Label for the Sample Point and a Description. Choose to create a Link between the Sample Point and this Location.
If you expect there will be multiple Samples needed from the same Sample Point (such as when monitoring Personnel in a room or multiple chairs) enter an Instance Count. This is useful when there may be 5 people in the room at a given time and you would like to collect a Sample from all of them without defining each as an individual Sample Point. An Instance (or a duplicate of the Sample Point) will be created according to the count, and a Sample will be generated for each. In this example the Sample Point is "Person" and it is expected that there will be 5 people in Room 1. The Scheduler will repeat the Schedule 5 times (according to the count), creating 5 Samples. See Personnel Monitoring for more information.

Scheduling |
This detail displays all Schedule Plan Items defined for the Location Hierarchy. Selecting a Level lists the Schedule Plan Items defined for that Level. Schedule Plan Items are typically defined at the bottom levels of the Location Hierarchy. Choose to make changes to these Schedule Plans, add an existing Schedule Plan or add a new Schedule Plan.
 Click "Add" to add a new Schedule Plan Item for the selected Location or Sample Point. "Add Plan" opens the Add Schedule Plan page where you can define a new Schedule Plan.
You can also edit associated Schedule Plans by selecting the Plan and clicking "Edit Plan". The Edit Schedule Plan page displays where you can make changes.
See Scheduler Interface for more information about adding and managing a Schedule Plan and Schedule Plan Items.
Location Scheduling |
This detail defines general Location based Schedules. Use this schedule to generate Samples for a Location in addition to the Schedule Plan defined in the Scheduling detail. You might want to collect an air sample in Room 1 but would prefer not to include it in the Schedule Plan defined in the Scheduling detail.

Any existing Schedule Plans based on the Sample Points associated with this Location display. Highlighting a lower level displays only Schedule Plan Items associated with that level and below. Choose to make changes to these Schedule Plans, add an existing Schedule Plan or add a new Schedule Plan. See Scheduler Interface for more information about adding and managing a Schedule Plan.
Randomized Scheduling |
This detail creates a Randomized Schedule for this Location. The tasks and properties are the same as the Location Schedule, but the Source is Randomized.

In the Randomization field choose:
| Option | Description |
| None | No Randomization of Source will occur. |
| Random | The Source is selected randomly every time. |
| Rolling Random | The Source is selected so that every Source is used before starting the cycle again. |
Sample Points associated with this Location will be randomly selected (either Random or Rolling Random), as the Source, each time the Schedule Plan Item is executed.
Tests |
This detail defines any Tests to be performed on Samples generated for this Location.
Tests are copied down from here (the Location itself), or from Schedule Plan Items defined for this Location. See the Scheduler Interface for more information.
Tests are copied down to Samples according to the Copy Down Policy.
Specifications |
This detail defines any Specifications to be included on Samples generated for this Location. Note that you can also apply "Reflex Rules" (see Test Methods → Rules → Reflex Rules).
Specifications and defined limits are used to determine whether or not an Excursion has occurred. If so, the Sample Point and all Locations above are flagged. An Excursion Count is visible throughout the Location Hierarchy for all parent Locations.
Specifications are copied down to Samples according to the Copy Down Policy.
Deep Copy |
Should you need to create a copy of a Location "Deep Copy" allows you to choose whether or not to copy all Schedule Plan Items defined for the Sample Point. From the Location List page within the List Control menu choose "Deep Copy". The Deep Copy dialog displays.

| Field | Description |
| Copy Child Locations | Choose "Yes" to copy Child Locations to the new Location. |
| Copy Sample Points | Choose "Yes" to copy Sample Points to the new Location. |
| Copy Schedule Plan Items | Choose "Yes" to copy Schedule Plan Items to the new Location. |
| New Label | Enter a label to identify the new Location. |
Resource Planning |
This is used with the WAP module. See WAP Resources.
Include an Image Map |
|
|
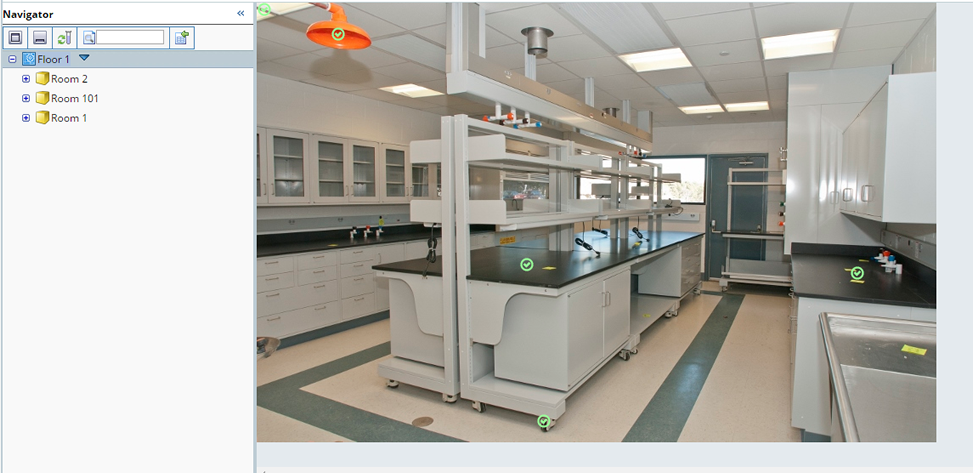
You can include an Image that allows you to visually represent Locations and Sample Points with a picture, such as a building floor plan or a picture of a lab. Using the Image Map Gizmo define an image and associate various hotspots with Locations or Sample Points defined in LabVantage. As Monitor Samples are generated and tested the Samples and results are associated with the Image hotspots, thus allowing you to view the picture of the location and any Excursions directly on the picture. From a Parent Location, you can drill into any Child Locations to visualize that location. You can also drill in to the actual Sample list page to better manage Samples flagged with an Excursion.
Associate an Image Map with a Location on the Location maintenance page.
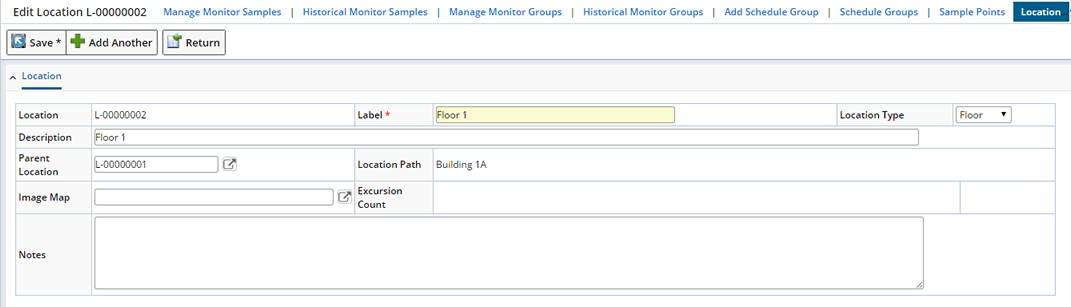
Use the lookup in the "Image Map" field to display a list of Image Map Gizmos, select the image you want to include and "Save". Return to the Location List page, select the Location and click "Manage Hierarchy".
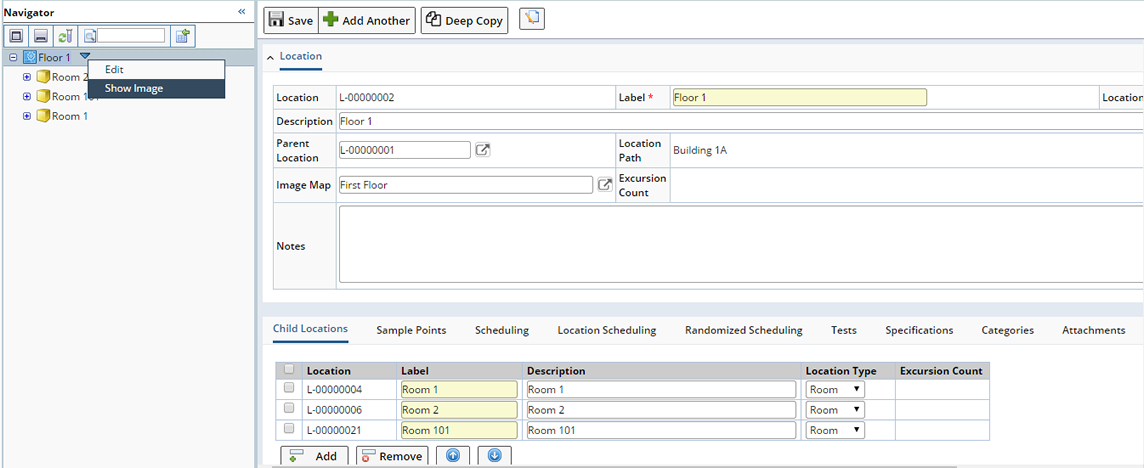
In the dropdown menu for the Location (Floor 1), click "Show Image". The image displays in the right pane. Hovering over the image highlights any hotspots.
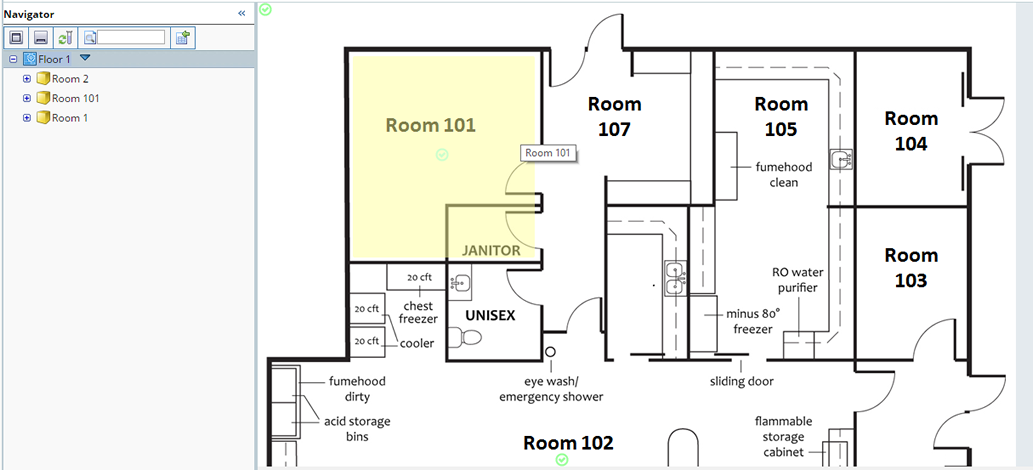
Clicking the hotspot (Room 101) displays the associated Child Location.
When defining the Image Map Gizmo include the following:
| Option | Description |
| Source Keyid1 | Lookup this Location SDI. |
| Image Details, Image Source | Either reference the image file here, or reference as an Attachment. |
| Hotspots | Enumerate different hotspots for each Child Location or Sample Point. |
| Label | Specify the Label, and the Link SDC Keyid1. |
Managing Excursions From an Image Map |
As Excursions occur you can see them within the images using the Navigator. The Excursion icon with count will display in the hotspots for Parent Locations and Sample Points. Here a Sample associated with Sample Point Counter 1 has a failed Specification. The Excursion displays at the parent level Image Map.
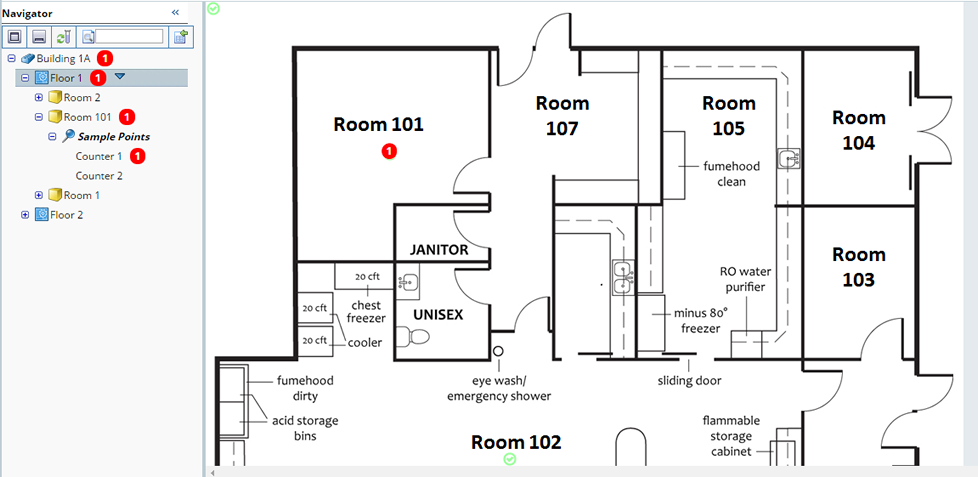
Clicking the Excursion icon drills down to the image for Counter 1 where the Excursion icon displays in the picture associated with Counter 1.

Clicking the hot spot for Counter 1 displays the Monitor Sample list page in the right pane listing all Samples associated with the select Location or Sample Point.
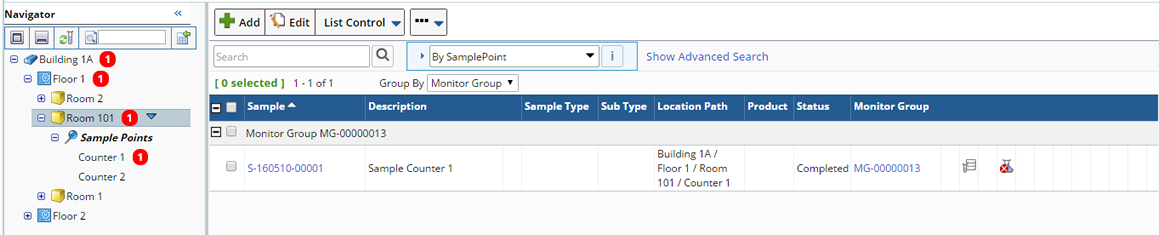
Note that the Specification icon indicates the specification failure. View the Sample by clicking the Sample Id hyperlink.
Clearing Excursions |
As you address the issue, you can manually clear the Excursion from the Location or Sample Point here in the Location Hierarchy, or from the Location or Sample Point list page. See Clearing Excursions in the Location Hierarchy for details.