Introduction
| Top |
|
Overview |
Content |
|||||||||||
|
Introduction |
|
|
Sample Monitoring is a licensed module that uses the Scheduler to schedule sampling of an "environment".
| NOTE: | Sample Monitoring requires a site-wide license (not unlimited or by count), as the Scheduler has no current User context. When the Scheduler runs, it will create Monitor Groups only if and when the license allows Sample Monitoring. |
This document assumes you are familiar with the Scheduler.
Sample Monitoring ensures the cleanliness of manufacturing or testing facilities. This type of sampling is typically performed when facilities, equipment or individuals, are subject to contamination. Regular sampling of the environment can help prevent contamination of a product, or false analysis. "Outside" monitoring such as air or groundwater, or "Process" monitoring such as pumps or valves are other use cases for the Sample Monitoring Module.
Sample Monitoring uses Schedule Plans to generate Samples for defined locations and specific Sample Points. Defining Locations and Sample Points within a Location Hierarchy (such as a table within a room on the first first floor within a building) allows you to view and manage the entire environment easily using the Navigator. You can then view and manage Schedules and generated Samples from the Navigator.
Samples can be managed together as a group, logically grouping generated Samples according to Location and/or time-based rules. Monitor Groups have a lifecycle dependent upon rules defined and the status of Samples within the Group.
You can Receive and perform Data Entry on Monitor Samples from within the Location Hierarchy. Tests and Specifications can be added to each Sample. Should any Samples fall outside specified limits an Excursion occurs and is displayed through all affected levels of the Location Hierarchy.
Define the following for creating and managing Monitor Samples.
| • | Define the different types of locations you might Sample, such as a facility, building, room within the building, or sink within the room creating a Location and Sample Point Hierarchy. |
| • | Define the Location Hierarchy including parent and child Locations and Sample Points to represent each level of the Location Hierarchy. Sample Points are the specific spot from which Samples are taken. |
| • | Include Image Maps that provide a graphical representation of the Location. Drill down to into child levels of the environment using these images. |
| • | Define a Schedule Plan including Schedule Plan Items within a Location or Sample Point that will generate Monitor Samples according to the defined schedule. |
| • | The Scheduler will generate Monitoring specific Samples called Monitor Samples. Optionally you can add or remove Monitor Samples as needed for a given Location or Sample Point. |
| • | Identify Monitor Groups to logically group generated Monitor Samples. Use the Monitor Group Policy to define rules that determine how groups are created and into which group a Sample is added as it is generated. Groups are created according to time-based and location based rules such as all "Sink" Samples taken between 7:00 am on Monday, through 5:00 pm on Tuesday. |
| • | Choose to monitor personnel by creating a "Person" Sample Point. Define a count of individuals, or sample requirements per "Person". The Schedule will be repeated according to the count and Samples will be created for each. |
| • | Define Specification Limits to ensure that Samples data fall within expected limits. An Excursion flag is associated with Samples that fall outside specified limits. Excursion icons display visually throughout Sample Monitoring to alert you to Samples with failed Specifications. |
| • | Schedule Groups allow you to create an arbitrary set of Schedule Plan Items that allow you to monitor certain Sample Points on an Adhoc basis. |
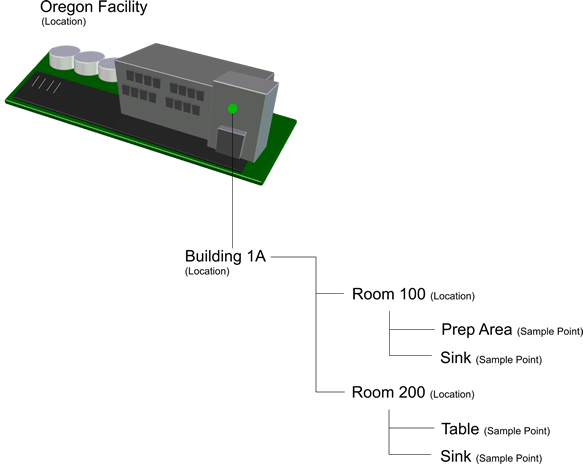
The following illustration provides an example of how you might structure and manage your Location Hierarchy.
Master Data Setup |
|
|
Before using Sample Monitoring consider defining the following Master Data items.
Define these system-level attributes:
| • | Reference Types to identify the different types of Locations for which you want to create Monitor Samples. |
| • | Predefined Schedule Plans to be added to a Location or Sample Point. |
| • | Monitor Group creation and release rules using the Monitor Group Policy. |
Define Laboratory level information.
| • | Tests and Specifications used to test Monitor Samples. |
| • | Locations to represent the various places you need to Monitor. For each Location define a Schedule Plan for generating Monitor Samples. |
| • | Sample Points represent a more specific point within a Location from which to take a Sample, such as a sink or counter. Use Sample Points to define personnel monitoring. |