Required Reading |
|
|
|
Scheduler Interface |
Content |
||||||||||||||||||||||||||
|
Required Reading |
|
|
Please read Scheduler Principles before proceeding. You must know this information before attempting to use the interface.
Introduction |
|
|
The Scheduler Interface provides a graphical means for defining and viewing a Schedule Plan. The Schedule Plan is displayed in a hierarchy format (Node) which can include Folders, used to group Plan Items, or Plan Items defined directly within the Plan. Your organization will choose to allow manual definition of this hierarchy, or provide a pre-defined hierarchy to use when Plans are added. When adding a new Schedule Plan choose either:
| • | Managed
Managed Schedule Plans are pre-defined Plan structures or hierarchies. This option helps to promote consistency when adding Schedule Plans. The pre-defined hierarchy defaults into the Plan providing an established Node Hierarchy. Plan Items can then be added and are displayed within the pre-defined structure. See Schedule Plan Policy for more information about defining Managed Schedule Plans. |
| • | Scheduler (Un-managed)
When creating a new Schedule Plan only the Plan itself will be defined. You can then manually add Folders and Plan Items. |
Once the Hierarchy is defined, Plan Items can be added at each level, and are displayed within the Node Hierarchy. Using the Node Hierarchy you can manage Plan Items either individually or as a group when Folders are used. Easily Stop or Start a Plan, view scheduled Events for a Plan Item and view or edit tests.
Node Hierarchy |
|
|
Following are examples of the Node Hierarchy.
Scheduler, the Node Hierarchy will initially contain only the Plan itself to which you can manually add Folders and Plan Items.

Managed, choose the pre-defined (Policy Node) Schedule Plan when adding the Plan, the Hierarchy displays with all the pre-defined levels.

Once the hierarchy is in place add Plan Items at either the Plan level itself or within Folders.
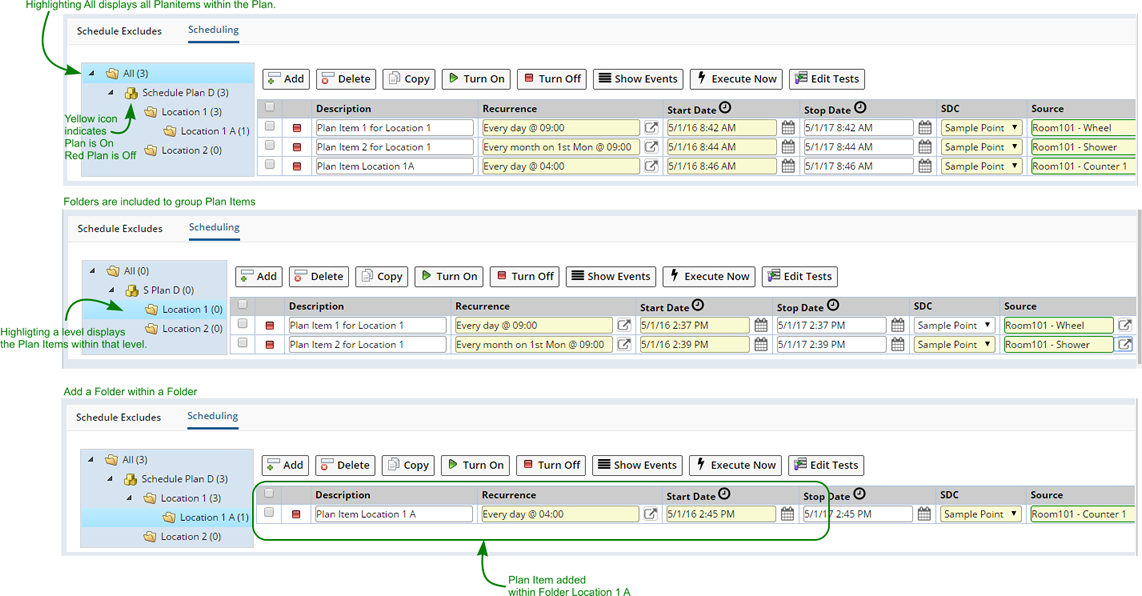
The following illustration shows each level and how Plan Items are displayed within the Node Hierarchy.
The following sections describe how to create a Schedule Plan, manually create Folders, and add Plan Items. See Schedule Plan Policy for information about pre-defining Managed Schedule Plans.
To Create a Schedule Plan navigate to System Admin → Scheduling & Events → Schedule Plans. The Schedule Plan List page displays.
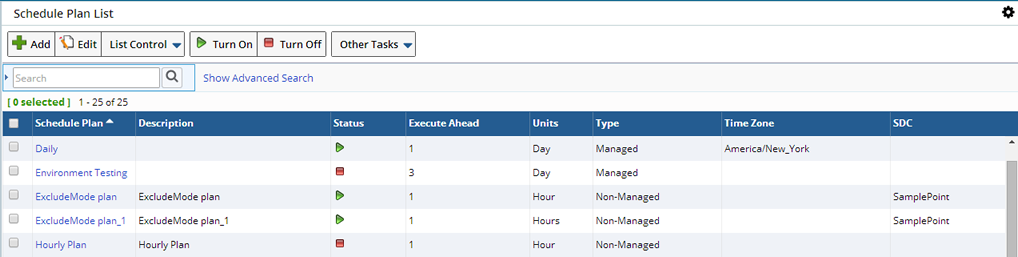
Here you can "Add" new plans or "Edit" existing Plans. You can also turn a Schedule Plan On or Off from the list page.
Click "Add", the Add Schedule Plan page displays.
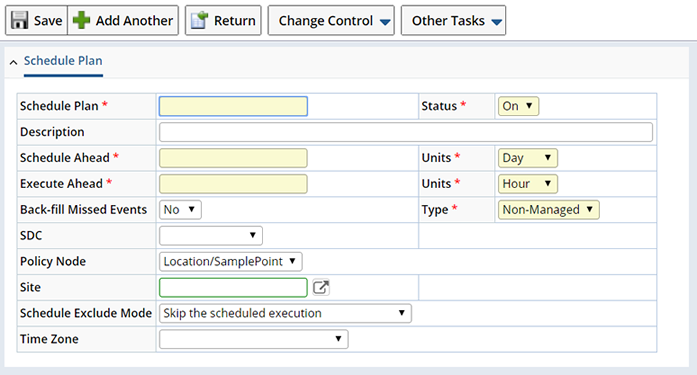
Define general information about the Plan.
| Fields | Description | ||||||||||
| Schedule Plan | A unique identifier for this Plan. | ||||||||||
| Description | A description of the Plan. | ||||||||||
| Status | Whether the Plan is On (running, Tasks will be created) or Off, existing events are cleared and no new events are created. | ||||||||||
| Schedule Ahead Units |
The number, and Units such as 7 Days, ahead of the scheduled date to create the Event. See Scheduler Mechanics for more information. |
||||||||||
| Execute Ahead Units |
The number, and Units such as 1 Day, ahead of the scheduled date the Event can be executed. See Scheduler Mechanics for more information. | ||||||||||
| Back Fill Missed Events | Whether or not the Scheduler should back fill missed Events.
|
||||||||||
| Type | Choose to have the Plan Hierarchy created automatically based on a pre-defined Policy Node or create the hierarchy manually.
|
||||||||||
| SDC | SDC is defined at the Plan Item level. SDC at the Plan level remains for backward compatibility. | ||||||||||
| Policy Node | When "Type" is "Managed",
choose a pre-defined Node Hierarchy. Using a pre-defined Policy Node hierarchy ensures a consistent structure
for Schedule Plans.
The pre-defined hierarchy is added to the Schedule Plan. As you add Plan Items they are automatically placed in the correct level according to the predefined Plan. Node Hierarchies are defined in Schedule Plan Policy. To make Policy Nodes available in the dropdown you must configure the Schedule Plan Maintenance page with the new Node. |
||||||||||
| Site | Provides a link to the Site department. The Site department calendar will always be used as the base calendar for Schedule Excludes. | ||||||||||
| Schedule Exclude Mode | Only applies if one or more Schedule Exclude calendars are attached to the plan. Determines when the Task should be run if the original date was excluded.
|
||||||||||
| Timezone | Optional time zone for schedule definitions. This time zone is applied to recurrence, Start Date and Stop Date of Schedule Plan Items. If no time zone is selected then the plan defaults to the system time zone. |
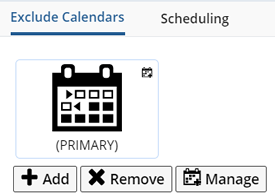
Schedule Excludes |
Upon clicking "Save", the Exclude Calendars detail displays. The "Site" field on the Schedule Plan maintenance page provides a link to the Site's Calendars. The Site department calendar will always be used as the base calendar for Schedule Excludes. In addition, extra shared calendars can be added to a Schedule Plan as exclusion calendars. Select the Calendar and click "Manage" to manage Calendar details.
Scheduling Tab |
Upon clicking "Save" the Scheduling detail displays. Here you can add Folders and Plan Items to create the Schedule Plan.

Initially, in the Node Hierarchy, you will see the top node which represents the entire Schedule Plan, in the next level, the Schedule Plan itself. Depending on the value in the "Status" field, the Schedule Plan icon is either Yellow (On) or Red (Off). Before you begin to define your Schedule Plan see Plan Items Sources Folders and Plans for a discussion about organizing your Schedule Plan.
Creating Folders (Un-Managed Plans) |
|
|
Folders help organize Plan Items within a Schedule Plan. If you would prefer to add Plan Items directly to the Plan level see Creating Plan Items.
Folders are always added to the node you have selected in the Schedule Plan. To add a Folder, right click the Plan to display the "Add Folder" option, hover over and click "Add Folder", then select from a list of options.
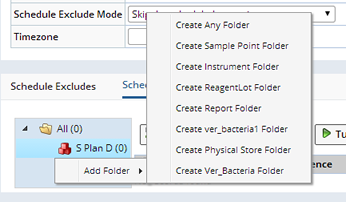
Choose to "Create Any Folder" meaning the Plan Item can be associated with any SDC. You are prompted to enter a name for the Folder.

Choose to associate the Folder with an SDC. Any Plan Items added within this Folder will be associated with the selected SDC. Clicking the SDC you want to associate with the Folder opens a Lookup where you can select the specific SDI as the Source. As you add Plan Items within this Folder the SDC and Source (SDI) default and can not be changed.
In the following example the first Folder in S Plan D was created using "Create Any Folder". When you click "Add" to add a Plan Item within that Folder, no SDC or Source information default.

A second Folder is created using "Create Sample Point Folder". After clicking "Create Sample Point Folder" you are presented with a Lookup where you can choose an SDI as the Source for this Folder.
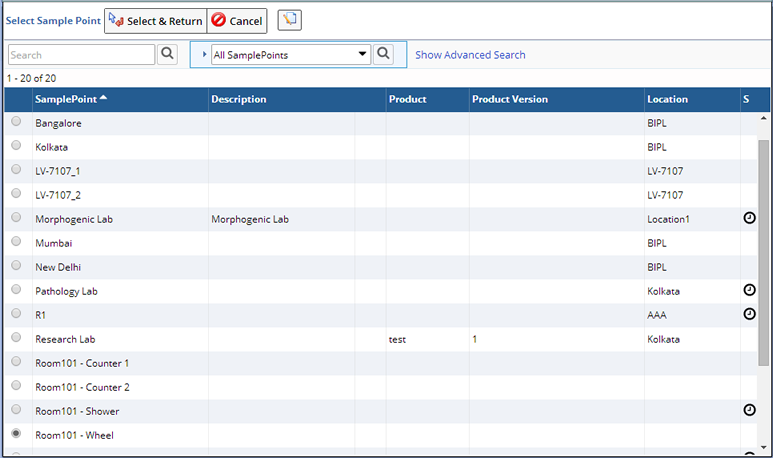
Select an SDI and click "Select & Return". The new Folder is created. When you click "Add" to add a Plan Item within the Folder, the SDC and Source default.

Creating Plan Items |
|
|
Whether directly added on the Plan or within a Folder the process is the same.
With the Plan (or Folder) highlighted, click "Add", the fields of the Plan Item display.
Note: When adding Plan Items to Managed Plans you simply click "Add" and define the Plan Item. The Plan Item is then placed within the hierarchy according to the pre-defined Plan.

Define the details of this Plan Item.
| Fields | Description | ||||||||||||||||||||||||||
| Description | Description of the Plan Item. | ||||||||||||||||||||||||||
| Recurrence | Determines the frequency of Events for this Plan Item. If this value is changed, all Events that have not been executed will be removed and new ones created. This should be remembered if you have manually created new Events or moved existing ones (can be done in the Event Calendar). All rule times are defined in the Schedule Plan time zone time. Click the lookup to open the Schedule Rule dialog. Note that as you make selections, the Schedule is stated clearly at the bottom of the dialog. 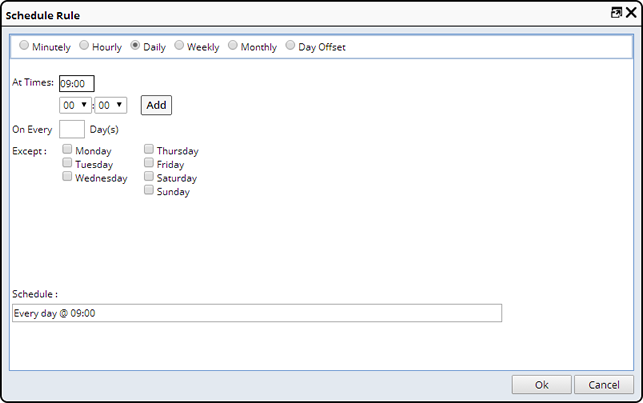 Choose any of the following:
|
||||||||||||||||||||||||||
| Start Date | The Start Date for this Plan Item. | ||||||||||||||||||||||||||
| Stop Date | Optionally define a Stop date for this Plan Item. |
||||||||||||||||||||||||||
| SDC | Set the Source SDC of this Plan Item. "Sample Point" is configured as the Source OOB for process scheduling, and "Instrument" for Instrument Certification scheduling. In order for an SDC to be available in the drop down list the "May be Scheduled Flag" must be set to "Yes". This can be set in SDC definition. The SDC field is locked if the Plan Item is within a folder that has an SDC defined. Hover your mouse over a folder to see an SDC association. | ||||||||||||||||||||||||||
| Source | The Source for this Plan Item. A Source might be defined as a Well from which you would take a water Sample. See the discussion Plan Items Sources Folders and Plans for more information about Sources. When adding a Plan Item to a Folder in which a Source was defined, the Source is automatically added to the Plan Item from the Folder and cannot be changed. If the selected folder does not have a Source assigned, the Source can be manually selected using the lookup after selecting an SDC. The Source can be randomly selected when a Location, and associated Sample Points (Sources) are defined. The Sample Point Source is randomly selected as each Event is executed. See Randomized Scheduling for more information. |
||||||||||||||||||||||||||
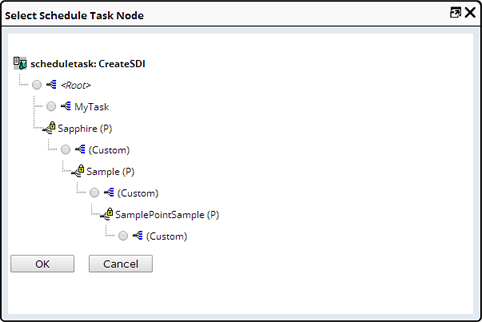
| Recurring Task | The Task to perform when the Scheduled Plan Item executes. The list of Tasks is determined by the SDC chosen, you are presented with Tasks associated with that SDC. For example, you might choose a Sample Point as the SDC, associated with the Sample Point SDC are tasks such as "Create an SDI" or "Add Sample". See Scheduled Tasks for more information about Tasks. |
||||||||||||||||||||||||||
| Recurring Task Details | Depending on the Recurring Task specified, choose the details of the Task.
|
||||||||||||||||||||||||||
|
|
Hover over the calendar icon to display information about which time zone the Events are in, the Next Scheduling Due, Last Scheduled and Scheduled to dates. |
Merge Scheduled Testing |
Using the Sample Template "Add Sample Using Template (Merge)" you can schedule multiple tests and multiple timepoint frequencies. LabVantage works out how many distinct samples are required for each scheduled timepoint.
For example, if you schedule a sample to be taken hourly for 24 hours, and tests are assigned as follows:
| Test | Frequency |
| A | Hourly |
| B | Every 6 hours at 6:00 and 12:00 |
| C | Daily at noon |
All 24 scheduled samples will have test A, 4 of the samples also have test B, and the noon sample will also have test C.
Implementation is based on the templates. In this example there would be three different templates defined. The Task will take care of combining the Samples so that only one Sample will be created for each unique time point. See the Advanced Create SDI Task for information about configuring this option.
Conditional Execution |
LabVantage supports the ability to configure Conditional Logic that can be used to switch to alternate Schedules.
For example:
| • | In production, when a manufacturing room is dormant, define a different schedule to be followed while the room is dormant. |
| • | When an excursion has occurred, often the scheduling frequency is increased to allow for tighter monitoring. |
See the Advanced Create SDI Task for information about configuring this option.
Managing a Schedule Plan |
|
|
Toolbar |
Use the Toolbar to Manage the Schedule Plan.
![]()
With the Plan Item you want to manage selected, choose to do any of the following operations below.
Adding or Deleting a Plan Item |
Choose to add a new Plan Item, the Plan Item will be added for the currently selected Plan or Folder.
Delete a Plan Item.
Copying an Existing Plan Item |
Copies the selected Plan Item, the new copy is initially set to "OFF".
You will be asked if you want to share Recurring task details. Modifying shared details will change the details of both parent and copy.
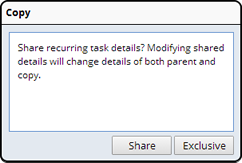
Choose to "Share" new details, or keep the any changes "Exclusive" to the new Plan.
Moving a Plan Item |
Schedule Plan Items can be moved to a different Folder provided the Folder to be moved from does not reference an SDI (created using "Create Any Folder").
Select the Plan Item you want to move and click "Move". The Move Plan Item dialog displays. Select the Folder to which you want to move the Plan Item.
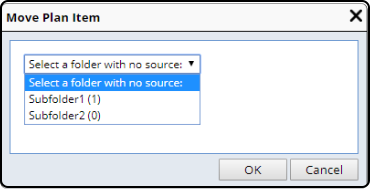
| NOTE: | Move is only available for Un-Managed Schedule Plans. |
Turning Schedules On or Off |
You have several options for controlling the Schedules that are running at a given time. Choose to switch Schedules On or Off at the following levels.
| • | Schedule Plan Level At the Plan level choose "On" or "Off" in the Status field. See Creating Plans for details. This effects the entire Plan. Any Plan Items set individually will either run or not run according to the value defined here. |
| • | Folder Level Choose to turn all Plan Items within a Folder On or Off. |
| • | Plan Item Level
Turn an individual Plan Item On or Off. |
Plans and Plan Items are marked with icons as either On ![]() or Off
or Off ![]() .
.
Turning the Plan Item "Off" removes all unexecuted Events including any that were manually moved.
Status field in the Add Schedule Plan or Edit Schedule Plan pages. You can change this value at any time.
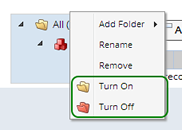
In the Node hierarchy select the Folder you want to turn On or Off. Right click, the Folder menu displays.
Choose either On or Off. Folders that are "On" display as yellow, "Off" are red in the Node hierarchy.
Choose to turn off a Plan Item at any level by selecting the Plan Item (checkbox) and clicking the "Turn On" or "Turn Off" button on the Toolbar.

Showing Events for a Plan Item |
Shows the Events for the selected Plan or Plan Items in either a Calendar View or a List View.
Executing Adhoc Events |
You have three options for executing Events from the Calendar view. Using the "Execute" button choose to:
| Option | Description |
| Execute Now | Immediately executes the event with the original event date, however the event will not be executed when the original execute date arrives. |
| Additional execution | Creates and executes the Event immediately, a new adhoc event is added with the original event date. |
| Additional execution with given event date | Creates and executes immediately a new adhoc event with a given event date. |
Adhoc executions are shown in the calendar with the Adhoc icon ![]() .
.
Viewing and Editing Tests Associated with a Plan Item |
View and edit the tests associated with the selected item(s) (applies only for items using the new task).
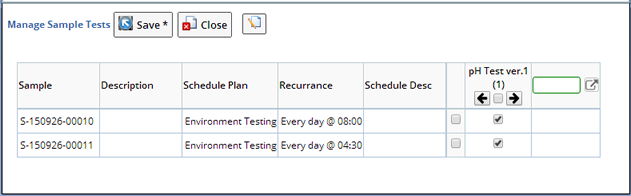
Use the many to many page to add or remove Tests for Sample. Using the lookup add new tests.
Defining Schedules Outside of the Scheduler |
|
|
Add or edit Schedule Plans for the following:
| • | Instrument Certification
Define Certification Schedules for performing regular Instrument Certification or maintenance. |
| • | Product
Schedules associated with a Product (defined in the Sample Template) are displayed on the Product Maintenance page. |
| • | Location
Choose to define a Schedule Plan for a particular Location. When defining a Schedule for a Location you can choose to Randomize the Source for Scheduled Events. The Source will be Randomly selected from a list of Sample Points associated with the Location. |
| • | Sample Point
Add, view and manage Schedule Plans associated with a Sample Point. |