Overview
| Top |
|
Instrument Certification |
Content |
||||||||||||||||||||||||||||||||||||
|
Overview |
|
|
Instrument Certification allows you to establish Calibration and Maintenance requirements for Instruments and their Parts. Regular Calibration and Maintenance can be scheduled and, based on successful completion, may be used to determine whether or not the Instrument is available for use.
A Certification process can be established based on date and time, the amount of time an Instrument has been in use and optionally by evaluating Certification Samples. A Certification Schedule allows you to schedule regular Calibration and Maintenance. The Certification Schedule automatically initiates a Workorder requesting calibration or maintenance on the Instrument. If calibration or maintenance is not completed in the allotted time (as defined by the Schedule) the Instrument (or Part) will become Unavailable.
Before defining an Instrument or Parts you may want to define Instrument Types and Models. Defining these categories helps organize the Instruments you define and allows you to establish Certification Schedules that default to any Instruments associated with a particular Instrument Model. See Instruments for detailed Information.
LES Worksheet Generation can also be generated based on Instrument Models and Instrument Types.
Defining Instrument Types and Models |
|
|
Before adding Instruments you may want to identify and define Instrument Types (such as pH Meter or Balance) and Instrument Model (the manufacturer's specific model of the Instrument Type). As your organization will likely have many of each Type and Model, grouping Instruments will give you easier access to a specific Instrument. At the Model level you can also define a Certification Schedule that will default to all Instruments added with that Model.
You must define Instrument Types (LabAdmin → Certifications and Resources → Instrument Types) before Instrument Models (LabAdmin → Certifications and Resources → Instrument Models). See Simple Instruments for information about defining Instrument Types and Models.
Adding Instruments |
|
|
Add Instruments using the Instrument List page. You can access this at LabAdmin → Certifications and Resources → Instruments or LIMS → Instrument Certification → Instruments.

|
Clicking"Add" opens the Add Instrument page.
Instrument Tab |
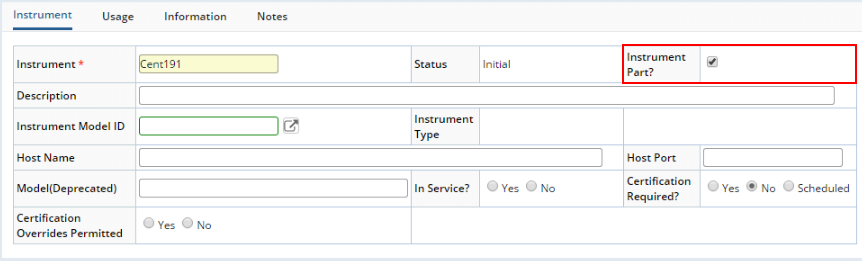
Use the Instrument tab to define the Instrument, identify Host information, and determine a Certification process. Here you can also take an Instrument in or out of Service.

|
| Field | Description | ||||||||
| Instrument | Unique identifier for the Instrument. | ||||||||
| Description | Description of the Instrument. | ||||||||
| Status | Instrument Status. When created, Instruments have a status of "Initial". Once an Instrument is made available (either using a Certification process or manually), the Status changes to "Available". See Instrument Availablity for more information. | ||||||||
| Instrument Part? | When checked, the Instrument is "Part" of another Instrument, and the "Part" tab (where you can associate Parts with Instruments) is not displayed. | ||||||||
| Instrument Model ID | Unique identifier of the Instrument Model. | ||||||||
| Instrument Type | Type of Instrument. Each Instrument Model is defined as an Instrument Type. | ||||||||
| Host Name | IP address of the device. Leave this blank to run the Instrument in Simulation Mode. See Simple Instruments for detailed infomation about defining Host and Port. | ||||||||
| Host Port | Port on which the Instrument listens. Leave this blank to run the Instrument in Simulation Mode. | ||||||||
| Model (Deprecated) | Model number (if you are not defining Instrument Models). | ||||||||
| In Service? | Determines whether or not the Instrument is currently In Service. | ||||||||
| Certification Required? | Specifies whether or not Instrument Certification is required.
|
||||||||
| Certification Overrides Permitted | Specifies whether or not Instrument Certification can be overridden. |
Usage Tab |
The Usage tab defines how to track an Instrument's use. The Certification Schedule considers these values when determining when to initiate calibration or maintenance of the Instrument. See Instrument Use and Certification Schedule for information about how use is determined.

|
| Field | Description |
| Track Usage? | Check this box if you want to track the Instrument's usage. Doing so allows you to schedule Certifications based on how often or how long an Instrument has been used. |
| Total Usage Count | Displays the number of times the Instrument has been used. The Usage Count increments by one each time Data Entry is performed on a Data Set (and the Instrument has been assigned to that Data Set), or when an Instrument Reading is taken. This option is available only if you choose to Track Usage. |
| Total Usage Time (Hours) | Displays the total hours the Instrument has been in use. The time in hours is determined by the Default Usage Time per Use (Minutes) multiplied by the Total Usage Count. |
| Track and Schedule by Time | Check this box if you want to Track Usage and Schedule regular Calibration and Maintenance by the amount of time an Instrument has been in service. See Adding Certification Schedule for information about how this value is used by the Certification Schedule. This option is available only if you choose to Track Usage. |
| Default Usage Time per Use (Minutes) | The typical time an Instrument is in use each time it is
used. Entering a Default Usage Time of 30 minutes means that each time an
Instrument is used, it is typically used for 30 minutes. For example, if
an Instrument has been used 2 times with a Default Use Time of 30 minutes,
the Total Usage Time (Hours) is 1 (30 minutes x 2 uses).
A Default Usage Time is also defined as a parameter for the Workorder Task. The value you define here (at the Instrument level) is considered only when a Default Usage Time is not defined on the Parameter List. See Parameter Lists for more information. |
| Auto detect Usage on | Determines when an Instrument is considered to be used. Choose either Simple Instrument Reading or Data Set Entry. When the specified method is used to enter data collected from the Instrument, the Usage Counts will update. |
Information Tab |
Defines specific information about the Instrument.

|
| Field | Description |
| Serial Number | Manufacturer's Serial Number. |
| Purchase Date | Date the Instrument was purchased. |
| Cost | Cost of the Instrument. |
| Service Contract? | Whether or not a Service Contract is required. |
| Location | Specifies where the device is located (such as in a laboratory or a doctor's office). |
Additionally, you can define notes related to the Instrument in the Notes tab, as well as add Categories.
Options after Saving an Instrument |
The detail tabs that are displayed afer saving the Instrument depend on decisions you make in the Instrument tab.
| Field | Decision | Detail Tabs | ||||||||||||
| Instrument Part? | No Not Checked |
The Instrument is not a Part of another Instrument. The
Part tab is displayed, where you can associate Parts to the Instrument.
Clicking the "Add" button opens the Select Instrument window where
you can select the Instrument Part(s) you want to add. See Instrument
Parts for more information.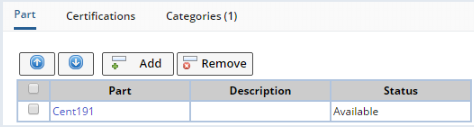 |
||||||||||||
| Yes Checked |
The Instrument is a Part. The Part tab does not display. | |||||||||||||
| Certification Required | Yes | The Certifications tab becomes available. Choose this option
if you want to keep track of Instrument Certification without automatically
generating Workorders. Define a manual Certification to be completed by
a certain date, which can be extended by a grace period. You can add only
one Certification.
|
||||||||||||
| No Certification | No Certification is Required. The Certification tabs will not be displayed. The Instrument is Available. | |||||||||||||
| Scheduled | Allows you to Plan regular Certification and Maintenance as defined by a Certification Schedule. See Adding a Certification Schedule for more information. |
Instrument Parts |
|
|
An Instrument Part is an Instrument that is "Part" of another Instrument. For example, some laboratory instruments record columns of data that are actually used to reference different instruments. Each column has its own Calibration and Maintenance history. These component parts can be defined as Instrument Parts. Once you have added an Instrument and its Parts, you can associate multiple Instrument Parts with one Instrument. You can define a Certification process for Instrument Parts.
Defining Instrument Parts |
Define Instrument Parts in the same way you define an Instrument at LIMS → Instrument Certification → Instruments. Check the Instrument Part box.
|
Once you save the Instrument Part, you can define a Certification process. See Options after Saving Instrument for more detailed information.
Instrument Parts with Track Usage "ON" can only be associated with an Instrument whose "Track Usage" is also "ON". For example a Part whose Track Usage is "ON" cannot be associated with an Instrument whose Track Usage is "OFF". Parts with Track Usage "OFF" can be associated with any instrument (with Track Usage "ON" or "OFF").
If for any reason an Instrument Part becomes Unavailable, the associated Instrument will also become Unavailable. You must manually return the Instrument to "Available" when the Instrument Part becomes Available.
Adding a Certification Schedule |
|
|
Implementing a Certification Schedule allows you to schedule regular Instrument Calibration and Maintenance. Schedules can be defined by date/time or based on an Instrument's use. At the scheduled time, Workorders are generated. The Workorders require some action be taken to Calibrate or Maintain the Instrument. The Instrument can be Available or Unavailable depending on completion of these actions. You will also have the option to include Samples during Instrument testing.
Add a Certification Schedule in two ways:
| • | By Instrument Model: Defining a Certification Schedule at the level of the Instrument Model defines a Certification Schedule for all Instruments (and Parts) associated with that Instrument Model. You have the option to change or delete the Schedule at the Instrument level. |
| • | By Instrument: When adding an Instrument, you can add a Certification Schedule for just that Instrument or its Parts. You can also change or delete a Certification Schedule that may have defaulted from the Model. See Adding a Certification Schedule. |
Note that before adding a Certification Schedule, you must first add a Schedule Plan and related Tasks. These Tasks determine what needs to be done to the Instrument in order to complete the Workorder. The Tasks will be available in the Task field when adding a Certification Schedule using the Scheduler.
LIMS → Instrument Certification → Instruments
To add a Certification Schedule, choose "Scheduled" in the Certification Required field. "Save" the Instrument. The Certification Schedule Tab becomes available.
Certification Schedule Tab |
In the Certification Schedule tab, define a schedule for Certifying Instruments (see Scheduled Tasks).
Define information about what
to test and when.
See Managing a Schedule Plan for more information about managing the Schedule Plan.
The Icon indicates whether the Schedule is on  or
off
or
off  .
.
Lookup and select a predefined Schedule Plan. See Managing a Schedule Plan for more information.
Select the Time Zone within which this Plan will be executed.
Describe the Plan Item.
Clicking the Lookup Icon opens the Edit Schedule window. Following are the options depending on the frequency you choose:
| Field | Description |
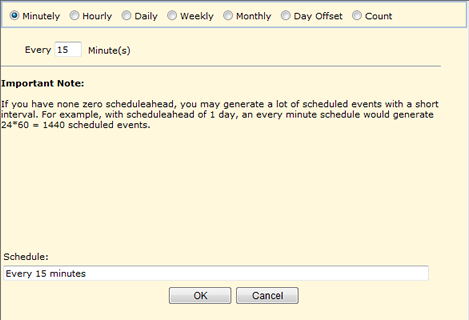
| Minutely | Determine the schedule by minutes. In this example the
scheduled Certification will take place Every 15 minutes.
The Schedule: Field will change as you make selections in the window. Clicking "OK" adds the rule to the Certification Schedule. |
| Hourly |
Determine the schedule by hours. In this example the scheduled Certification
will take place Every 2 hours.
|
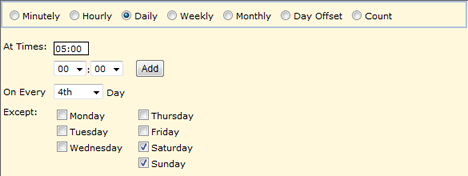
| Daily | Determine a Daily schedule. Select the time of day (choose
a time and click "Add" to schedule multiple tests per day),
whether to skip to certain days, and any days to exclude. In this example
the calibration or maintenance will be performed Every 4th day except
Sat,Sun @ 05:00. You can add multiple times by choosing a time and cliking
the "Add" button.
|
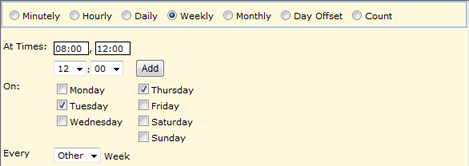
| Weekly | Determine a weekly schedule. You can add multiple times
by choosing a time and cliking the "Add" button. Select the
day(s) of the week to perform the test and choose to test every 1st,
Other, 3rd, or 4th week. In the example below calibration or maintenance
will be performed every 2nd week on Tue,Thu @ 08:00 and 12:00.
|
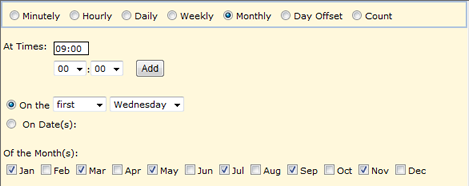
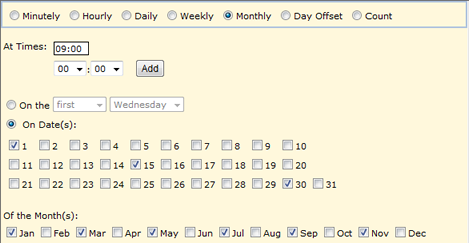
| Monthly | When defining a Monthly schedule you have two options:
Monthly by Day or Monthly by Date.
Monthly by Day: Choose a time of day, on the "first, second, third, fourth, fifth or last", day "monday through Sunday" of the week for the months of "January through December". In this example calibration or maintenance will be scheduled on every Jan,Mar,May,Jul,Sep,Nov on 1st Wed @ 09:00
Monthly by Date: In this example calibration or maintenance will be scheduled on every Mar,May,Nov on 1st,15th,30th @ 09:00
|
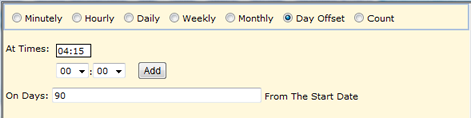
| Day Offset | Schedule calibration or maintenance at a certain time
in a specified number of days from the start date of the Certification
Schedule. In this example the calibration or maintenance will be performed
90 days from the Start Date of the Certification Process on Day 90 @
04:15.
|
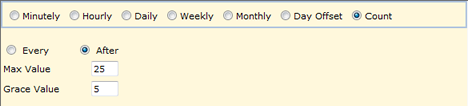
| Count | The Count option uses the Usage information to determine
scheduling (see Adding Instruments → Usage Tab
for details about establishing usage information). In this example, calibration
or maintenance must be performed after 25 + 5 uses. The Workorder will be
generated after 25 uses but the Instrument will not be made Unavailable
until after the grace period when the count reaches 30.
To schedule calibration after a certain amount of Instrument use, enter the amount of time (Max Value) in minutes. The Scheduler will use the Current Count value to determine when to schedule Certification. The Current Count value is determined by multiplying the count (number of times the Instrument has been used) by the Default Usage Time Per Use (minutes). See Current Count for more information. |
Specify the date to begin using the Certification Schedule. Click the calendar icon to choose the date from a calendar.
Specify the date the Certification Schedule expires. Click the calendar icon to choose the date from a calendar.
Select the Task to perform when the Scheduled Plan Item executes. The list of Tasks is determined by the Tasks associated with the Instrument SDC. See Scheduled Tasks for more information about Tasks.
![]() Clicking
the Task Node icon opens the Choose A Task window.
Clicking
the Task Node icon opens the Choose A Task window.

In the dropdown, choose the Task to perform. In the example above, the Task is SDICertification.
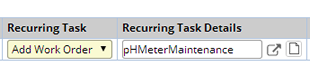
Choose the Workorder Task to perform when Scheduled. In the example below, "pHMeterMaintenance" has been selected.
Clicking the "OK" button adds the Task to the Schedule. You can choose only one Task.
A default Task can be defined for the TaskNode.
![]() Clicking the Edit Task icon opens the Edit Task Properties window. Here you can further define the Workorder and add Certification Samples.
Clicking the Edit Task icon opens the Edit Task Properties window. Here you can further define the Workorder and add Certification Samples.
See Certification Samples for detailed infomation about adding Certification Samples. See Workorders for detailed information about defining Workorders.
The Calendar icon at the far right of the Certification Schedule displays information about the Schedule.
| Column | Description |
| Current Count | Usage Count (in minutes) for the Instrument (number of uses multiplied by the Default Usage Time). See Usage Tab for details about usage. If in the Usage tab you chose to "Track and Schedule by Time", the Certification Schedule uses this count combined with the Schedule Rule to determine when to initiate a Workorder. When the required count is reached, a Workorder is generated. Once the Workorder is complete, the Count goes back to 0 if the Schedule Rule is "After Max Value + Grace Period" or subtracted by the Max Value if the Schedule Rule is "Every Max Value + Grace Period". See the Count Schedule Rule for more information. |
| Next Schedule | Determines when the Scheduler will generate the next Workorder. |
| Scheduled To | Last Workorder that is currently scheduled. |
| Last Scheduled | Determines when the most recent Workorder was generated. |
Configuring the Certification Schedule Tab |
The Certification Schedule tab is Configured by the planitemmanager Element.
Certification Samples |
|
|
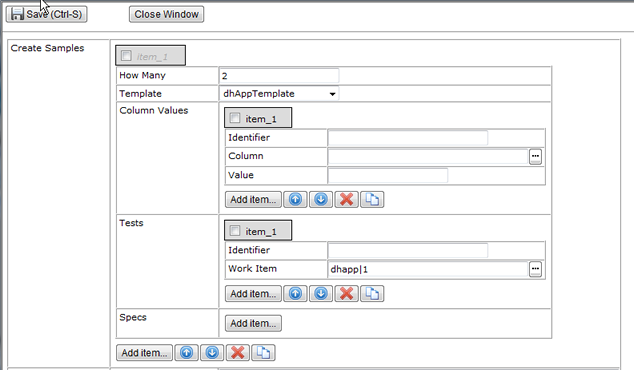
When Certifying an Instrument, you can include Instrument Samples, Tests and
Specifications. These Samples are considered during the Certification process
to determine whether or not the Instrument is available for use. Certification
Samples are added to a Workorder Task by Clicking the Edit Task icon![]() in
the Certification Schedule tab. Define the number of Samples to create, choose
a Sample Template, and (if desired) include Tests and Specifications for each
Sample. Use the "Add Item" button to add additional Tests and Specifications.
in
the Certification Schedule tab. Define the number of Samples to create, choose
a Sample Template, and (if desired) include Tests and Specifications for each
Sample. Use the "Add Item" button to add additional Tests and Specifications.
| Field | Description |
| How Many | Number of Samples to create. |
| Template | Sample Template to use. |
| Column Values | Columns that further define the Certification Sample. See CreateSDI Scheduled Task for detailed information about defining Column Values. |
| Tests | Test Methods associated with the new Samples. |
| Specs | Specifications associated with the new Samples. |
The Edit Task icon displays as "filled in" ![]() when
changes have been made to the Task.
when
changes have been made to the Task.
Viewing and Managing Certification Samples |
View and manage Certification Samples on the following Pages:
| • | Manage Certification Samples |
| • | Review Certification Samples |
| • | All Certification Samples |
At the LIMS → Instrument Certification → Manage Certification Samples tramstop, you will see all Samples associated with an Instrument that have a Status of Initial or InProgress. After selecting the Sample, you can perform Data Entry, Reject, and Approve Samples, as well as View associated Data Sets.

|
| Column | Description |
| Sample | Unique identifier for the Sample. Clicking the Sample displays the View Samples window where you can view Sample details. |
| Description | Description of the Sample. |
| Status | Status of the Sample (Initial, Received, InProgress, Reviewed, Rejected, Cancelled). |
| Instrument Id | Instrument with which the Sample is associated. |
| WorkOrder | Workorder with which the Sample is associated. Clicking the Workorder displays the Workorder List page, where you can view details about the Workorder. |
From the Sample List you can select the Sample and do the following:
| Button | Description |
| Edit | Make changes to the selected Samples. |
| View | View Sample details. |
| DataEntry | Perform Data Entry for the selected Samples. |
| Reject | Reject the Sample. If you Reject a Certification Sample, you can still Accept the Workorder and complete the Certification process. |
| Approval | Approve Tests associated with the Sample. See Approve Tests for more information. |
| View Datasets | View Data Sets associated with the Sample. |
Displays all Certification Samples that have been Reviewed and are Completed.

|
| Column | Description |
| Sample | Unique identifier for the Sample. Clicking the Sample displays the View Samples window where you can view Sample details. |
| Description | Description of the Sample. |
| Status | Status of the Sample (Initial, Received, InProgress, Reviewed, Rejected, Cancelled). |
| Instrument Id | Instrument with which the sample is associated. |
| Icons | When Tests and Specs are associated with the Sample, the
 Tests
Icon displays. Clicking the Icon opens the Grid with Params Samples and
Specs window where you can view Data Entry for the sample. Tests
Icon displays. Clicking the Icon opens the Grid with Params Samples and
Specs window where you can view Data Entry for the sample. |
| WorkOrder | The Workorder with which the Sample is associated. Clicking the Workorder displays the Workorder List page, where you can view details about the Workorder. |
From the Sample List you can select the Sample and do the following:
| Button | Description |
| View | View Sample details. |
| View Data | View the Data Entry page for the selected Samples. |
| Review | Allows you to Review the completed Samples. You can also modify the Reviewed Samples if needed. |
| View Datasets | View Data Sets associated with the Sample. |
Here you will see a list of all Certification Samples associated with Workorders and Instruments.

|
When Samples are added to a Certification, they must be Reviewed and Completed before Workorders can be Accepted and the Instrument can be Certified.
Certification Workorders |
|
|
Overview |
Certification Workorders are generated when all criteria defined in a Certification Schedule is met, or an Adhoc Certification is executed. LabVantage generates a Workorder Task for the desired Certification process. This "Task" or Workorder must be completed within the defined time period (including any defined Grace Period) in order for the Instrument to remain Available.
In the Certification Schedule tab, click the Edit Task Properties icon to define the Workorder that will be generated.
You can view Certification Workorders associated with a specific Instrument on the Edit Instrument page or on the following List pages:
| • | Pending Certifications |
| • | All Certifications |
Defining the Workorder |
Workorders are created by the SDICertification
Schedule Task. This Task is configured by clicking the Edit Task Properties
icon![]() at the far right of the "Recurring Task Details" field on the "Certification
Schedule" tab.
at the far right of the "Recurring Task Details" field on the "Certification
Schedule" tab.
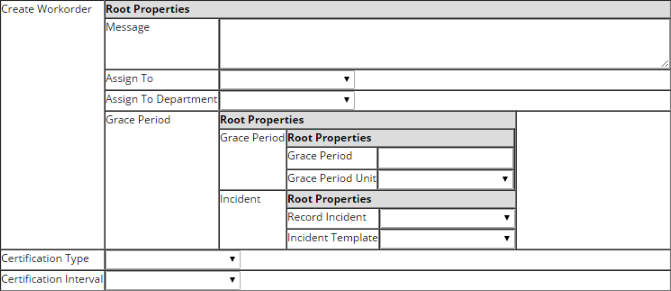
The "Create Workorder" property collection (example shown below) defines messages that describe the Workorder, Users and Departments to whom the Workorder is assigned, Grace Periods, and Incidents that can be recorded. Certification Types and and Certification Intervals further define calibration and maintenance events. See the SDICertification Schedule Task for the most recent details concerning these properties.
In the Certification Schedule tab on the Edit Instrument page, click the Edit
Task Properties icon![]() to define details about the Workorder.
to define details about the Workorder.
| Field | Description | ||||||
| Message | Message that describes the Workorder. | ||||||
| Assign To | User to whom the Workorder is assigned. | ||||||
| Assign To Department | Department to which the Workorder is assigned. | ||||||
| Grace Period |
|
||||||
| Incident |
|
||||||
| Certification Type | Certification Type (Calibration or Maintenance). | ||||||
| Certification Interval | Reference Type that defines the Schedule Plan Item for Calibration or Maintenance (see Scheduler Interface). |
The Workorder tab on the Edit Instrument page lists all Pending Workorders for the Instrument.

|
| Column | Description |
| Workorder | Identifies the Workorder. The Workorder identifier is automatically generated. |
| Message | Message describing the Workorder, as defined in the Edit Task Properties window. |
| Status | Current Status of the Workorder (Pending, Complete, Cancelled). |
| Assigned To | User to which the Workorder is assigned. |
| Due Date | Date by which the Workorder must be Complete. |
| Grace Period Exception | When a Workorder is found to be outside the defined Grace Period, the workorder.outsidegraceperiodflag is set to "Y" by the InstCertMonitor Task. This "exception" causes the Instrument Status to become "Unavailable". |
| Adhoc? | Determines whether or not this is an Adhoc Workorder. An Adhoc Workorder is generated by the "Execute Once" button on the Certification Schedule tab. |
| Certification Type | Displays the Certification Type (Maintenance or Certification). Clicking Certification Type displays the Workorder List, where you can see the History of Workorders for the Instrument. |
| Samples | Displays the number of Certification Samples associated with the Workorder. Clicking the "Number" of Samples opens the Sample List page to display all Samples for the Workorder. |
Completing Certification Workorders |
Once all Calibration or Maintenance has been completed for the Instrument and all associated Samples have been Reviewed and Completed, you can Accept the Workorder and Complete the Certification process.
From LIMS → Instruments → Pending Certifications, you can View, Edit, Accept, Reject or Cancel pending Workorders on the Workorder List page.

Select a Workorder and do any of the following:
| Button | Description |
| Edit | Edits the Workorder. |
| Accept | Accepting the Workorder completes the Certification process.
If your Certification Schedule is based on Count, the Count returns to 0
if the Schedule Rule is "After Max Value + Grace Period"
or subtracted by the Max Value if the Schedule Rule is "Every
Max Value + Grace Period". All associated Certification Samples must
be Complete before the Workorder can be Accepted.
Note that if a Sample is Reviewed and Rejected, LabVantage issues a warning, but you can choose to continue and accept the Workorder. |
| Reject | Rejects the Workorder. Unless another Certification is pending or the Grace Period has not yet been exceeded, the Instrument will become Unavailable until another Certification is generated (either Manually, Scheduled or by Adhoc execution of the Schedule) and Completed. If Samples are Reviewed and Accepted, you can still reject the Workorder. |
| Cancel | Cancels the Workorder. Cancel the Workorder if you do not want a scheduled Certification to be executed. Or cancel an incorrectly initiated Adhoc Workorder. If a scheduled Certification is canceled, the Instrument will become Unavailable at its regularly scheduled date. |
From the Workorder List, you can View and Edit the Workorder by clicking the
Workorder ID and View Pending Samples by clicking the ![]() icon.
icon.
| Column | Description |
| Workorder | Automatically generated number identifying the Workorder. Clicking the Workorder opens the View Workorder window where you can view details. |
| Status | Status of the Workorder (Pending, Complete, Cancelled). |
| Assigned To | User to whom this Workorder is assigned. |
| Assigned Department | Department to which the Workorder is assigned |
| Due Date | Date by which the Workorder must be completed. |
| Certification Samples |
|
| Past Grace Period? | Indicates whether or not the Workorder has passed the defined
Grace Period. If so, the following icon appears |
| Certification Type | Type of Certification being performed. |
| Instrument ID | Identifier of the Instrument for which the Workorder is pending. |
Once all Certification Samples (if any) are complete and the Calibration or Maintenance has been performed, the Workorder can be Accepted (Approved). Select a Workorder from the list and click the "Accept" button. The Acceptance Note dialog opens. Enter a note regarding the Workorder Acceptance.
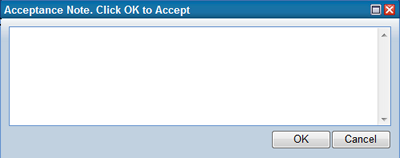
Cliking "OK" approves the Workorder and completes the Certification process.
Once the Workorder is complete, the Certification Schedule Current Count field returns to 0 if the Schedule Rule is "After Max Value + Grace Period" or subtracted by the Max Value if the Schedule Rule is "Every Max Value + Grace Period" if Instrument Usage is being Tracked.
Note that the Sample Status is independent of the Workorder Status. If Samples are Reviewed and Accepted, you may reject the Workorder. If a sample is Reviewed and Rejected, LabVantage issues a warning, but you can choose to continue and Accept the Workorder.
Viewing all Certification Workorders |
The Workorder List page shows all Certification Workorders.

LES Worksheets |
LES Worksheet Generation can be generated on the Instrument Certification Workorders that are created by the SDICertification Schedule Task. In general:
| 1. | The Instrument Model or Instrument Type is configured to generate the LES Worksheet. |
| 2. | The SDICertification Schedule Task for the Schedule Plan Item defines the "Create Workorder", "Certification Type", and "Certification Interval" properties for generating the Workorder. "Certification Interval" is used to define the Schedule Plan Item. |
| 3. | The LES Worksheet is generated on the Workorder according to the chosen generation rules dictating how the LES Worksheet is created and assigned. |
For more information, see LES Worksheet Generation.
Instrument Use and Certification Schedule |
|
|
An Instrument is considered "used" when either Data Entry has been performed on a Data Set or a reading from the Instrument is taken (Simple Instrument Reading). Either of those actions equals one use. Instrument Use is considered by the Certification Schedule when generating Workorders for the Certification process. Each time the Instrument is used, Usage counters are updated. The Schedule Rule is then compared to the Usage Count to determine when the Instrument needs to be tested or maintained.
Using an Instrument |
Workorders are initiated based on Instrument use either by Data Entry or Instrument Reading.
 icon to read data from the instrument. This opens the Instrument Connection window.
See Simple
Instruments Data Entry Interface for detailed information.
icon to read data from the instrument. This opens the Instrument Connection window.
See Simple
Instruments Data Entry Interface for detailed information.
Samples are logged in and associated with a Data Set. You must assign the Instrument to the Data Set. Find and select the Samples you want to assign to the Instrument on the Dataset List page (LIMS → Tests → Manage Datasets).
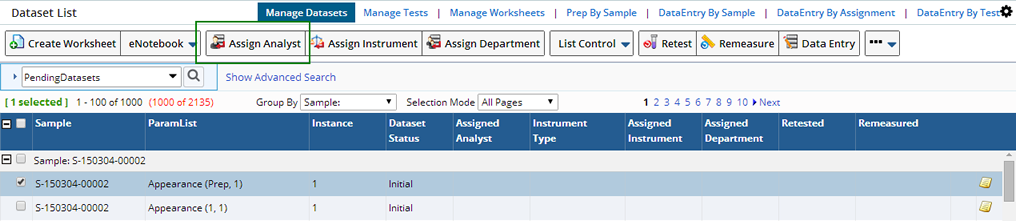
Clicking the Assign Instrument button opens the Select Instrument window.
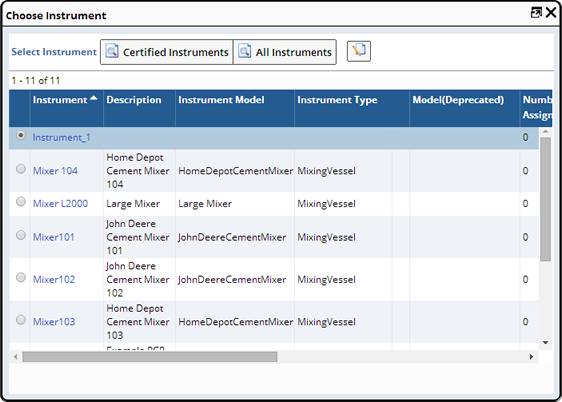
Click the Instrument you want to assign to the Samples. The selected Instrument is shown in the Assigned Instrument Column of the Data Set List.
The Instrument is now associated with the Dataset and Sample.
Once Data Entry is performed for the Sample, the Instrument's Total Use Count will increment by 1. The Current Count field in the Edit Instrument page Certification Schedule tab will increment by 1 times the Default Usage Time (the length of time the Instrument is typically used per use). For example, if Default Usage Time is 5 minutes, each time the Instrument is used the Current Count will increment by 5. This equals the total time the instrument has been used since the last Certification. Once the Workorder is complete the Count returns to 0 if the Schedule Rule is "After Max Value + Grace Period" or subtracted by the Max Value if the Schedule Rule is "Every Max Value + Grace Period".
Managing Instrument Certifications |
| |
Once you have added Instruments and defined a Certification Process you can easily manage all Certification components from the Instrument List page at LIMS → Instrument Certification → Instruments.
| Button | Description |
| Add | Adds a new Instrument (see Adding Instruments). |
| Edit | Edits the Instrument. See Adding Instruments for detailed information about fields and tabs. |
| Copy | Makes one or more copies of the selected Instrument. |
| View | Allows Instrument details to be viewed. |
| Make Available | Manually makes the Instrument Available. The User must have the Instrument Manager Role to manually change an Instrument's Status. |
| Make Unavailable | Manually makes the Instrument Unavailable. The User must have the Instrument Manager Role to manually change an Instrument's Status. |
| Instrument Status | Opens the InstrumentStatus OOB Report. This Report does
not require any parameters to execute. The PDF simply opens in a new window.
|
| Certification Expirations | Opens the InstrumentCertExpire OOB Report. A parameter window opens in which you can specify the End Date (defaults to Today's date) as a parameter. The PDF then opens. |
![]()
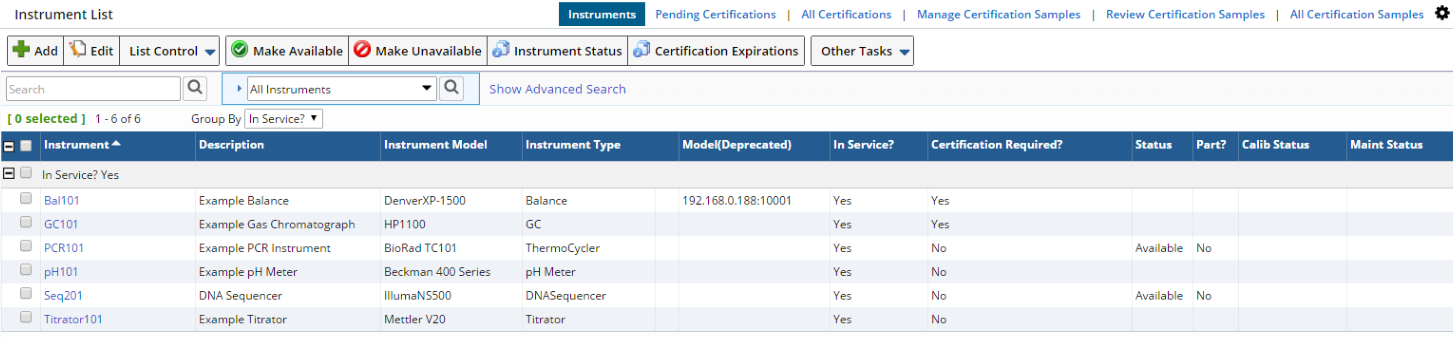
Columns on the Instrument List page:
| Column | Description |
| Instrument | Unique identifer if the Instrument. |
| Description | Description of the Instrument. |
| Instrument Model | Model with which this Instrument is associated. See Instrument Models for detailed information about associating Instruments with Models. |
| Instrument Type | Type of Instrument. See Instrument Types for detailed information about associating Instruments with Instrument Types. |
| Model (Deprecated) | Manually entered Model number. |
| In Service? | Determines whether or not the Instrument is currently In Service. |
| Certification Required? | Determines whether or not a Certification is required. If "No", no Certification is required. If "Yes", a one-time manual Certification by date is required. If "Scheduled", a Certification Schedule has been defined initiating regular Calibration and Maintenance Workorders. |
| Status | Status of the Instrument (Initial, Available, Unavailable). |
| Calib Status | Status of the Calibration (as defined by the Scheduled Task). Indicates that the Calibration Certification is Late. |
| Maint Status | Status of the Maintenance (as defined by the Scheduled Task). Indicates that the Maintenance Certification is Late. |
Edit Instruments Page |
Selecting an Instrument from the Instrument List and clicking "Edit" opens the Edit Instruments page, where you can make changes to the Instrument, its Usage, the Certification process, and associate Instrument Parts.

See Adding Instruments for a description of each field and tab.
| Button | Description |
| Save | Saves any changes made to the Instrument. |
| Add Another | Adds a new Instrument (see Adding Instruments). |
| Return to List | Returns to the Instrument List page. |
| Test Connection | Tests the connection to a Simple Instrument. See Simple Instruments for detailed information about connecting to and Testing a Simple Instrument. |
| Reset Usage | Resets all Usage Counts. See Usage Tab for more information about Usage counts. |
| Make Available | Manually makes the Instrument Available. The User must have the Instrument Manager Role to manually change an Instrument's Status. |
| Make Unavailable | Manually makes the Instrument Unavailable. The User must have the Instrument Manager Role to manually change an Instrument's Status. |
Instrument Availability |
| |
Instrument Availability depends on successful completion of a Certification process. It can also be controlled Manually. Following is a description of when the Status of an Instrument will change.
| Instrument | Certification Required | Process | Status | |||
| Add New | No | Available | ||||
| Yes Initial | Make Instrument Available Manually. You will be reminded that a Certification is required and asked whether or not to continue. | Available | ||||
| Scheduled Initial | Make Available Manually | Available | ||||
| Adhoc Certification Schedule | Workorder Generated | Compled on time | Available | |||
| Not Completed on time, exceeds Grace Period | Unavailable | |||||
| Certification Schedule | Instrument Usage Time or Date Met | Workorder Generated | Completed on time | Available | ||
| Not Completed on time, exceeds Grace Period | Unavailable | |||||
Following are other instances in which an Instrument might become Unavailable.
| Change | Result |
| Manually made Unavailable | An Instrument or Part becomes Unavailable. The User must have the Instrument Manager Role to Manually change an Instrument's Status. |
| Unavailable Instrument Part is added to Instrument | All Instrument Parts associated with an Instrument must be Available for the Instrument to be Available. If not, the Instrument will become Unavailable until all Parts become Available. |
| Associated Instrument Part becomes Unavailable | If an associated Part becomes Unavailable, the Instrument also becomes Unavailable. You must manually return the Instrument to Available when the Part becomes Available. |
| A Workorder is Rejected | A Workorder is Rejected and the Certification process did not complete. If there are no pending Workorders for the Instrument, it will become Unavailable when the Scheduled Due Date and any Grace Period is reached. |