Data Entry pages let Users manually enter and modify existing data. Be advised
that the processes of entering data and modifiying existing data are dependent
upon the configuration of these areas of LabVantage functionality and the
business rules established by those configurations:
| Level of Functionality |
Relevant Topics |
Parameter List
(Data Set/Data Item/Replicate) |
|
|
|
|
|
| Transformations and Calculations |
|
|
|
|
|
| Assignment and Certification |
|
|
|
|
|
Data Entry Page
(preconfigured OOB) |
|
|
|
|
|
Data Entry pages can also report data sent from instruments (see Simple
Instruments).
This section describes preconfigured (OOB) Data Entry pages available with
LabVantage. These pages are based on the DataEntryGridDetail
Page Type, which serves as a container for the gwtdataentrygrid
Element. Data Entry pages are used as the inside page for pages based
on the DataEntry Page Type
and DataEntryByQuery
Page Type. For brevity, these abbreviations apply:
| Abbreviation
|
Meaning
|
Column in SDIDataItem
|
| PL |
Parameter List |
ParamListId |
| PLV |
Parameter List Version |
ParamListVersionId |
| Var |
Parameter List Variant |
VariantId |
| DS |
Data Set Number |
DataSet |
| P |
Parameter |
ParamId |
| PT |
Parameter Type |
ParamType |
| R |
Replicate |
ReplicateId |
| NOTE:
|
|
Data Sets that are unavailable for Data Entry as a result
of the application of Test
Method Rules are hidden in Data Entry pages. |
|
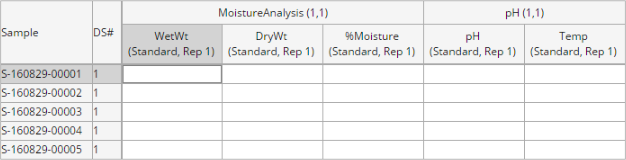
Sample
|
DS
|
PL;PLV;Var |
|
| P;PT;R |
|
| S-001 |
1 |
200 |
← Entered Data |
| • |
Each Sample is listed in the left-most column with its corresponding
Data Sets. |
| • |
Parameters are displayed horizontally. |
| • |
Samples → Manage →
Data Entry |
Grid
with Params by Samples
|
|
| PL;PLV;Var |
DS |
P;PT;R |
Sample |
|
| HighYield;1;1 |
1 |
Pu-239;Std;1 |
239 |
← Entered Data |
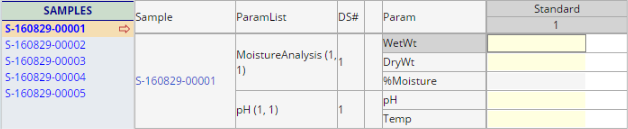
| • |
Each Parameter List is listed in the left-most column with its corresponding
Data Sets and Parameters. |
| • |
Samples are displayed horizontally. |
| • |
Samples → Manage →
Data Entry |
|
Sample
|
DS
|
PL;PLV;Var |
|
| P;PT;R |
|
| S-001 |
1 |
1009 |
← Entered Data |
| • |
Each Sample is listed in the left-most column with its corresponding
Data Sets. |
| • |
Parameters are displayed horizontally. |
Same as Fast Grid.
| • |
Samples → Manage →
Data Entry |
|
Sample
|
PL;PLV;Var
|
DS
|
P
|
PT |
|
| R |
|
| S-001 |
HighYield;1;1 |
1 |
Pu-239;Std;1 |
2719 |
← Entered Data |
| • |
Each Sample is listed in the left-most column with its corresponding
Parameter Lists, Data Sets, and Parameters. |
| • |
Parameter Types and Replicates are displayed horizontally. |
Samples are listed in the left frame. Clicking a Sample loads a Data Entry
page in the right frame for that Sample.
| • |
Samples → Manage →
Data Entry |
Grid
with Params by Samples with Specs
|
|
| PL;PLV;Var |
DS |
P;PT;R |
Spec Limit |
Sample |
|
| HighYield;1;1 |
1 |
Pu-239;Std;1 |
Greater Than 20 |
20 |
← Entered Data |
| • |
Each Parameter List is listed in the left-most column with its corresponding
Data Sets, Parameters, and Spec Limits. |
| • |
Samples are displayed horizontally. |
| • |
The "Spec Limit" is the Specification Limit (actual numerical
range) defined for the "In Spec" Condition. |
| • |
Samples → Manage → Data Entry |
Grid
Samples by Params with Specs
|
|
|
Sample
|
DS
|
PL;PLV;Var |
|
| P;PT;R |
|
| Spec Limit |
|
| S-001 |
1 |
1009 |
← Entered Data |
| • |
Each Sample is listed in the left-most column with its corresponding
Data Sets. |
| • |
Parameters are displayed horizontally. |
| • |
The "Spec Limit" is the Specification Limit (actual numerical
range) defined for the "In Spec" Condition. |
| • |
Samples → Manage → Data Entry |
Grid
Samples by Params with Uncertainty
|
|
|
Sample
|
DS
|
PL;PLV;Var |
|
| P;PT;R |
|
| S-001 |
1 |
300 +60.00
-30.00 |
← Entered Data |
| • |
Each Sample is listed in the left-most column with its corresponding
Data Sets. |
| • |
Parameters are displayed horizontally. |
| • |
The Uncertainty calculation
is displayed to the right of the entered data. |
| • |
Samples → Manage →
Data Entry |
These additional options are provided to perform Data Entry on specific subsets
of Samples:
| Query Option |
Location
|
Description |
| Prep By Sample |
LIMS → Tests → Prep By Sample |
Allows Data Entry to be conducted on Data Sets of type
"Preparation" (see Data
Entry for Preparation and Procedural Data Sets). |
| Data Entry By Sample |
LIMS → Tests → Data Entry By Sample |
Use the Search Bar to query Samples for Data Entry. Select
the Samples, then click "Data Entry". |
| Data Entry By Assignment |
LIMS → Tests → Data Entry By Assignment |
Select a Query to return Samples associated with Parameter
Lists assigned to the current User, then click "Data Entry".
To assign Users to Parameter Lists, see Manage
Data Sets, Manage Tests, and Manage Worksheets. |
| Data Entry By Test |
LIMS → Tests → Data Entry By Test |
Select a Query to return Samples associated with a specified
Parameter List, then click "Data Entry". |
| To select...
|
|
| A block of cells |
Click and drag from the first cell to the last cell.
Alternatively, you can click the first cell, then Shift-click the last
cell.
| NOTE: | | To expand or reduce a selected block of cells, use the Shift-Arrow
keys to expand or reduce the block in the direction of the arrows. |
|
| Single cells |
Ctrl-click each cell. |
| A column (or row) |
Click the column (or row) header. |
Multiple non-contiguous
columns (or rows) |
Click the first column (or row), then Ctrl-click each
additional column (or row). |
Multiple contiguous
columns (or rows) |
Click the first column (or row) header, then Shift-click
the last column (or row) header. |
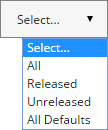
| All cells |
Use "Select" in the Toolbar.
|
If the Parameter List
Data detail specifies Default Values for any Parameters (and no value
has been manually entered into the cell), the Default Values are displayed
in a light gray font (below left).
You can:
| • |
Change a Default Value by editing the value in the cell (above right). |
| • |
Accept Default Values for selected Data Items by using the "Accept
Default(s)" Toolbar button (see Toolbar below). |
| • |
Accept all Default Values using the "Accept All Defaults"
Toolbar button (see Toolbar below). |
When accepting default values, the same data entry rules and live feedback
is used as when manually entering data.
In general, the OOB toolbar configuration appears as shown below. Some items
may appear in a different order, depending on your configuration.
Cells always show the "Display Value". Some of the Toolbar functions operate
on the "Entered Value" and "Transform Value" (see How
Transformations and Calculations are Processed).
| |
Function |
Description |
| 1 |
Data Item Count |
Shows the number of Data Items currently rendered. |
| 2. |
Cut |
Cuts the Entered Value to the Clipboard. |
| 3. |
Copy |
Copies the Entered Value to the Clipboard. |
| 4. |
Copy Display |
Copies the Transform Value to the Clipboard. |
| 5. |
Paste |
Pastes the Clipboard contents to the cell that has focus.
| NOTE: | | In the Chrome browser, Chromes security restriction
prevents access to the User's clipboard. When pasting, use Ctrl-V
intially or after seeing an error message. |
|
| 6. |
Fill Down |
Copies the Entered Value downward to other cells. Select
the first cell (or range of cells) with the values to be copied, drag
or Shift-Click downward to the last cell to be filled in, then click the
icon. |
| 7. |
Fill Across |
Copies the Entered Value across to other cells. Select
the first cell (or range of cells) with the values to be copied, drag
or Shift-Click to the right until you reach the last cell to be filled
in, then click the icon. |
| 8. |
Release |
Releases the selected Data Items:
| • | "Release" implies that correct data have been entered
for a Data Item. | | • | After you "Release" all mandatory Data Items, the Data
Set is ready for Approval. | | • | Released data are not editable and displayed in italic font. | | • | "UnRelease" (below) simply reverses the "Release"
operation. |
|
| 9. |
UnRelease |
UnReleases the selected Data Items. |
| 10. |
Override Certification |
If the current User has not been certified to work with
the current Parameter List and is not assigned to the current Parameter
List, the cell is not editable. In this case, if the Parameter List allows
overriding the certification, this makes the cell editable.
|
| 11. |
Show Instrument Popup |
Opens the Simple Instrument interface (see Parameter
List Configuration and Data Entry in Simple
Instruments).
The Instrument popup in the Data Entry page supports scanning in an
InstrumentId. The InstrumentId field is a dropdown list. When the popup
opens, focus defaults to the InstrumentId field, thus allowing entry
or scanning in an InstrumentId. On enter, the InstrumentId is validated
against the list of valid Instruments for the Data Item. If valid, the
behavior is the same as if choosing a valid instrument from the dropdown
list. If the InstrumentId is not valid, an error message is displayed. |
| 12. |
Show/Hide Detail Panel |
Shows/hides the Detail Panel. Shortcuts are Ctrl-Tab
(show/hide), Ctrl-Arrow (move across tabs). |
| 13. |
Show/Hide Notes |
Shows/hides the Notes
panel. Note that clicking the "Add Notes" icon in the Notes
panel lets you choose the SDC to which the Note is added. The Note will
then be accessible in the Detail Panel for
the SDC. |
| 14. |
Filter Options |
Filters displayed Data Items by Parameter List, Parameter
List Variant, Parameter, and/or Parameter Type. What you check here is
what will be displayed. Filtering is done using a combination of ParamId
and ParamType (for Parameters) and ParamListId and VariantId (for Parameter
Lists).
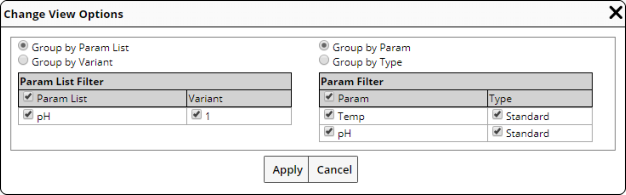
| NOTE: | | Filtering using a combination of ParamId and ParamType
(for Parameters) and ParamListId and VariantId (for Parameter Lists)
is available in LabVantage 8.4.1 and higher LabVantage 8.4.x Maintenance
Releases. |
|
| 15. |
Refresh |
Reloads the page. You are warned that unsaved changes
will be lost. |
| 16.
17. |
Report
Selected
Do Not Report Selected |
Includes or omits the selected result in the Report which,
by default, is the OOB "Analytical Report" (see Reports
and Execute Reports → Execute Reports → OOB Reports).
For example, assume Data Entry on a Sample with a Data Set consisting
of two Parameters Ag and Au. In the Parameter List Maintenance page,
"Report" is checked for both Parameters to establish default
behavior (see the NOTE below). The Report icon is rendered in both Data
Entry cells and both Parameters are reported. 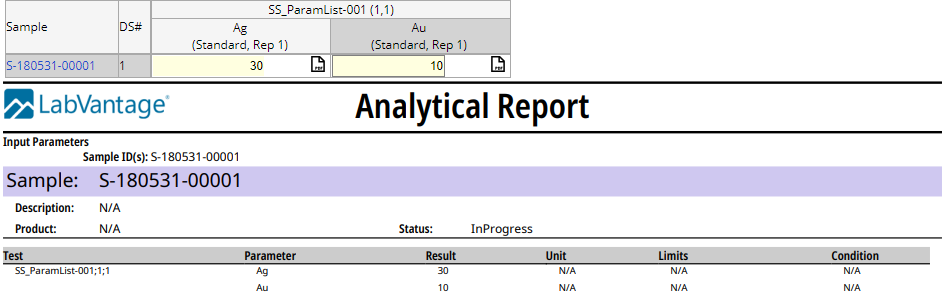
Clicking the "Do Not Report Selected" Toolbar button for
Au removes the icon next to the Au cell and removes Au from the Report. 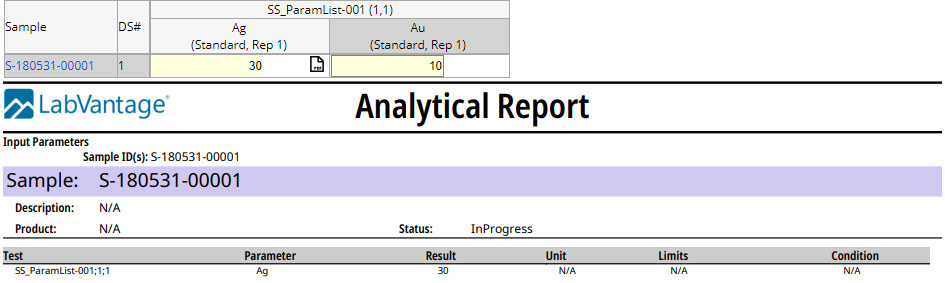
| NOTE: | | The "Report" checkbox for each Parameter
in the Parameter List Maintenance page establishes default behavior
(see Parameter Lists
→ Description → Data Entry Mode). If a Parameter
has "Report" checked, the Data Entry page opens with "Report
Selected" for that Parameter. If a Parameter has "Report"
unchecked, the Data Entry page opens with "Do Not Report Selected"
for that Parameter. Regardless of the default when the Data Entry
page opens, you can use the Toolbar buttons to choose which Parameters
you want to be visible in the Report. In other words, both the Parameter
List and the Data Entry page can set the SDIDataitem.ReportFlag
column. |
|
| 18. |
Mark Outlier |
Marks the select Data Items as "Outliers". "Outliers"
are ignored in Calculations.
For example, avg( [Zinc;Standard;*] ) averages all Replicates that are
not marked as Outliers.
When marking a Data Item as an Outlier, an error is thrown if no match
is found for a token in the Calculation. This is because "Mark
Outlier" works for calculated tokens that match to multiple Parameters.
For example, [P1;Standard;*] returns all Replicates of P1 Standard.
Excluding one Replicate is not a problem. However, excluding all Replicates
results in an error. |
| 19. |
Clear Outlier |
Reverses the "Mark Outlier" function (above). Data Items
that are not Outliers are used in Calculations. |
| 20. |
Calc Report |
Opens a Calculation Report. |
| 21. |
Accept Default(s) |
Accepts selected Default Values
(equivalent to manually entering the values). |
| 22. |
Accept All Defaults |
Accepts all Default Values
(equivalent to manually entering the values). You can use the Select function
(below) to select all Default Values. |
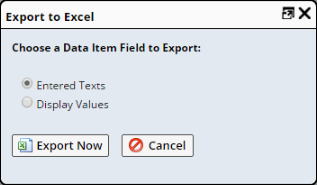
| 23. |
Export to Excel |
When clicked, you are prompted to choose whether you want
to export "Entered Texts" (values from SDIDataItem.EnteredText)
or "Display Values" (values from SDIDataItem.DisplayValue).
Clicking "Export Now" begins the export to Microsoft Excel.
|
| 24. |
Legend and Keyboard Map |
Shows a legend explaining graphical representations of
the Data Items. |
| 25. |
Select |
|
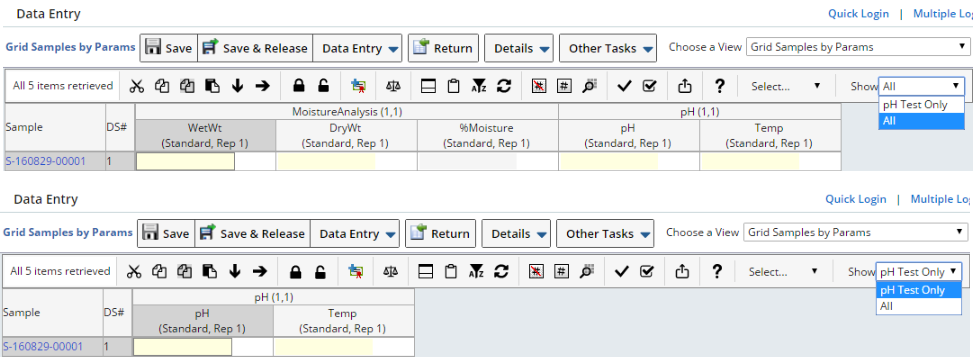
| 26. |
Show |
This is configured using the Toolbars
→ Operation → Named Filter option in the gwtdataentrygrid
Element, which lets you create predefined Data Item filters that can
be applied such as in the example below, where only pH Tests are shown,
or All Tests are shown. For example configuration values, see Toolbars
→ Operation → Named Filter option in the gwtdataentrygrid
Element.
|
|
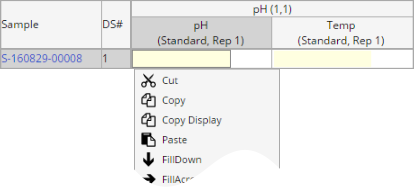
Right-clicking a selection opens a Context Menu. This provides a subset
of the functionality provided by the Toolbar described
in the previous section. |
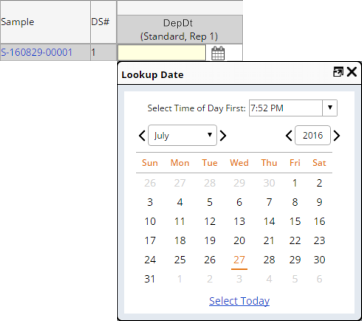
Numeric cells feature a Units helper, while other Data Types contain Editor
Icons that render only on mouseover (or onclick) of an editable cell.
Ctrl-Space on the focused cell also opens the helper and editors.
| Data Type
|
Editor
|
| Numeric |
Units Helper (click Ctrl-Space). Clicking a Unit appends
the Unit to the Entered Value.

|
Date
(D-type) |
Clicking the icon (or Ctrl-Space) opens a Calendar.
|
Lookup
(S-type) |
Clicking the icon (or Ctrl-Space) opens a Lookup page.
 |
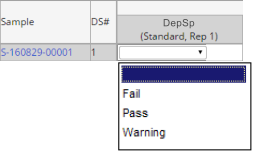
Reference Type
(V- and R- type) |
Clicking the icon (or Ctrl-Space) opens a dropdowncombo
(accepts text entry and allows selection of Reference Values).
 |
Onload, the first cell that can accept data gets focus. Prior to saving,
the Data Entry Policy
defines the kind of feedback provided as you enter data.
With specific regard to validation of dates and numbers, validation of LabVantage
Date (D) Data Type and LabVantage Number (N) Data Type is handled by live
feedback or when results are saved. Numeric parsing is done with strict adherence
to the grouping separator position, i.e., it must in the correct position.
For example, 1,22.45 or 22,45 will generate an "Invalid Number"
error, while 1,234.56 is accepted as a valid number.
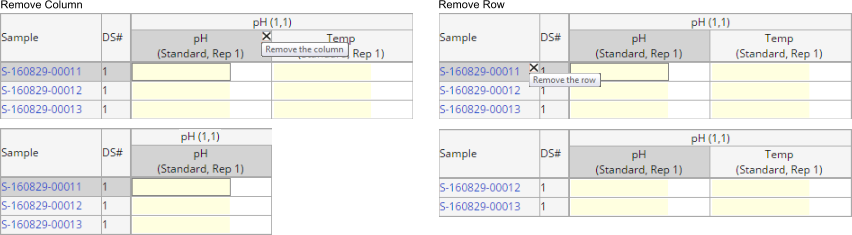
This is configured using the "Allow Column Delete" and "Allow
Row Delete" properties in the gwtdataentrygrid
Element, which allows a User to delete (and restore) a column in the Data
Entry grid. Clicking a column (or row) header displays a delete icon (x).
Clicking the icon deletes the column (or row) from the grid. Clicking "Refresh"
will re-render all deleted columns.
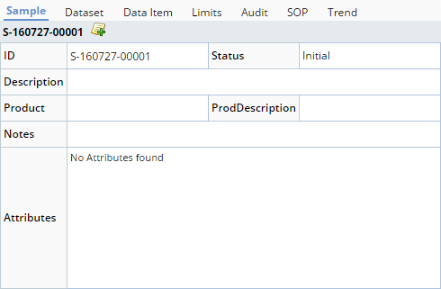
The Detail Panel shows information concerning data in the selected cell.
Identifies the current Sample (such as S-090711-00006). All fields are readonly.
| Field |
Description |
| Id |
Identifier of the Sample. |
| Status |
Sample Status. |
| Description |
Sample Description. |
| Product |
Product associated with the Sample. |
| Prod Description |
Product Description. |
| Notes |
Notes associated with the Sample. |
| Attributes |
Attributes
associated with the Sample. |

|
Opens the Notes
panel and lets you add Notes for the Sample. |

|
Highlights Notes
(in the Notes panel) that exist for the Sample. |
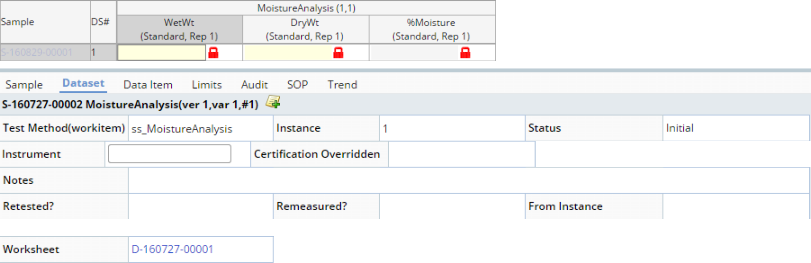
Identifies the current Sample and Data Set (such as S-090711-00006 PLT001(ver
1,var 1,#1)). All fields are readonly except as indicated.
| NOTE: |
|
The "Condition" field is hidden in LabVantage
8.4.1 and higher LabVantage 8.4.x Maintenance Releases. |
Identifies the current Sample and Parameter (such as S-090711-00006 PLT001(ver
1,var 1,#1) U-235(Standard rep#1)). All fields are readonly except as indicated.
| Field |
Description |
| Parameter Description |
Description of the Parameter. |
| Released |
Indicates whether or not the Data Item has been Released. |
| Entered Text |
Entered data value (see How
Transformations and Calculations are Processed). |
| Condition |
These are Reference Values defined by the Data Item Condition
Reference Type. For
example, if you define Reference Values of "Good" and "Bad" for the Data
Item Condition Reference Type, this shows a dropdown containing these
values. Selecting one specifies the Condition of the Data Item. This Condition
appears in the Limits tab. |
| Notes |
This is an editable text field. |
| Outlier? |
Identifies an Outlier. |
| Analyst |
User who entered the data. |
| Certification Overridden |
Whether or not Anaylst Certification
has been overridden. |
| Attachments |
Provides a facility for adding Attachments. |
|
|
Opens the Notes
panel and lets you add Notes for the Data Item. |
|
|
Highlights Notes
(in the Notes panel) that exist for the Data Item. |
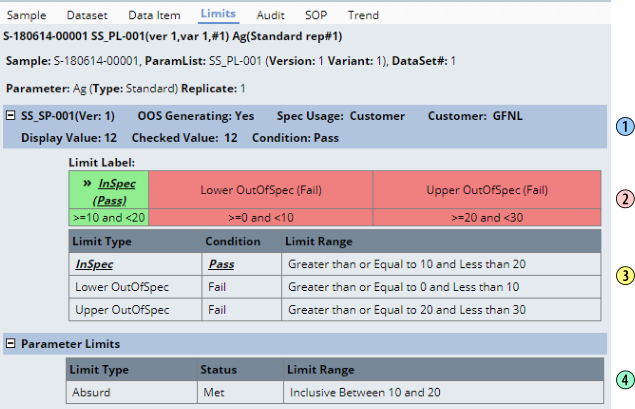
For the current Data Item, this shows results of checks against Specification
Limits and Parameter
Limits.
Multiple Specifications are reported according to options in the Data
Entry Policy. See Specifications
for descriptions of all options.
| 1.
|
OOS Generating flag, Spec Usage, and Customer or Regulatory
Agency (if applicable depending on Spec Usage), Display Value, Checked
Value, and Data Item Condition. |
| 2.
|
Spec Condition for each Spec Limit Type. |
| 3.
|
Results of Spec Limit Checking. |
| 4.
|
Parameter Limit definitions. |
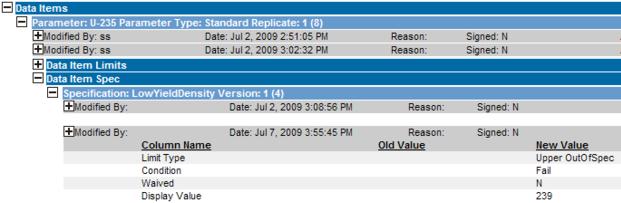
Shows the Audit details for each Data Item (based on AuditView
Page Type containing an auditdetails
Element):
This is an Attachment that
is passed to the page through the URL, e.g.,
rc?command=ViewAttachment&sdcid=ParamList&keyid1=[paramlistid]&keyid2=[paramlistversionid]&keyid3=[variantid]&attachmentnum=1
It is defined by the Details
property of the gwtdataentrygrid Element.
See Data Trending.
These operations are available at the page level:
| Button |
Description |
| Save |
Saves the entered value. See:
|
| Save & Release |
Saves and Releases entered values in a single operation.
See:
|
| Data Entry |
|
| Choose Consumable |
See:
|
| Choose Instrument |
See Simple
Instruments → Associating Instruments with Test Methods.
Testing Labs are considered when showing available Instruments: | • | If a Data Set is not associated with a Testing Lab (SDIData.TestingDepartmentId
is empty), no filtering of Instruments is done (all are shown).
If the Data Set is associated with a Testing Lab (SDIData.TestingDepartmentId
is populated), the only Instruments shown are those with no Testing
Lab (Instrument.TestingDepartmentId is empty) or with a Testing
Lab that matches the Data Set's Testing Lab (SDIData.TestingDepartmentId). | | • | If a Test is associated with a Testing Lab (SDIWorkItem.TestingLab
is populated), only Instruments associated with that Testing Lab
will be available. If the Test is not associated with a Testing
Lab (SDIWorkItem.TestingLab is not populated), all Instruments are
available depending on whether you choose "Certified Instruments"
or "All Instruments. |
See Departments for
information concerning Testing Labs and the Departmental hierarchy. |
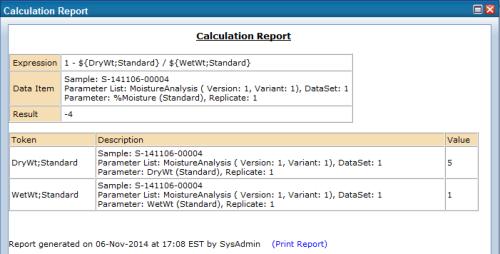
| Calculation
Report |
Generates a Calculation Report. Selecting a calculated field in a Data
Entry page, then clicking the Calculation Report button, generates a
Calculation Report, e.g.,
The report shows: | • | The Calculation expression. | | • | Details of the Data Item being calculated. | | • | The calculation result. | | • | Errors occurring at the expression level. |
For variable references, the report shows which Data Items were matched,
and what their values were. It also shows variable-level errors (such
as unmatched variables). The Print Report link sends a "printer fiendly" report to the printer. Calculation Reports drive from values stored in the database, not from
unsaved values in the page. Therefore, ensure that the page has been
saved before viewing the report. |
| Other Tasks |
|
| Retest |
See Manage
Data Sets, Manage Tests, and Manage Worksheets → Manage Data Sets
→ Retest and Remeasure. |
| Remeasure |
See Manage
Data Sets, Manage Tests, and Manage Worksheets → Manage Data Sets
→ Retest and Remeasure. |
| Add Replicate |
Opens a dialog that lets you add Replicates
to selected Data Items whether or not the "Modifiable" option
is set for the relevant Parameter
List.
If Data Set status is Completed, Released, or DataEntered, adding
a Replicate changes the Data Set status to InProgress. Any Data Set
Approval that exists is reset and the Test (SDIWorkItem) status is
synchronized with the Data Set (SDIData) status. | NOTE: | | The Data Set status behavior described above applies
only to LabVantage 8.4.2 and higher. |
|
| Override Certification |
Overrides Analyst Certification, thus certifying the current
User for Data Entry. See Certifications. |
| View Audit |
Opens an AuditView page. See Concepts
of Auditing. |
| Cancel Data Set
Uncancel Data Set |
See
Manage Data Sets, Manage Tests, and Manage Worksheets → Cancelling
and Uncancelling Data Sets.
|
| Details |
For the Sample SDI in Data Entry, provides maintenance
of Addresses, Attachments, Categories, Data Sets, Roles, Specifications,
and Tests. |
|
|
|
|
Miscellaneous Data Entry Features
|
|
|
|
|
|
Data Sets that have been Cancelled, Retested, and made Unavailable are either
not displayed during Data Entry, or displayed as read-only fields. This functionality
is controlled by the "Data Item Display" Rule property in the gwtdataentrygrid
Element, which determines how data are displayed.
During Data Entry, some configurations may require
entering/returning text that either describes numeric data or explains why
it could not be entered. Such text is referred to as a "non-numeric tag"
(or "NNT"). For example, assume that a value <5 is considered
to be BDL (below detection limit). If the numeric data value is 4, you may
want to make BDL a non-numeric tag in order to enter BDL rather than 4, enter
4 and return BDL, or enter 4 and return <5.
Doing this requires configuring a combination of Parameter Limit Types, Limit
Rules, Parameter Lists, and optionally Specifications. See Using
Non-Numeric Tags for an example of how to do this.
When defining a Limit Rule, you can specify an "Absurd Limit" to reject a
value if that Limit is met (such as 0 > pH > 14, or Weight < 0).
See Limit Rules
→ Limit Details → Handling Absurd Limits for an example of
how this is configured and presented during Data Entry.
Returning Text Based on a Value
|
|
Limit Rule configuration also lets you return text based on a value (such
as entering 4 returns <5). See Limit
Rules → Limit Details → Display Format for an example of how
this is configured and presented during Data Entry.