Overview
| Top |
|
Limit Rules |
Content |
||||||||||||
|
Overview |
|
|
Purpose |
Adds and edits Limit Rules, which let you perform Extended Limit Checking by redefining one or more Limit Types in a Parameter List. For example, each Limit Type can apply additional Transformations to data values defined by Standard Limit Checking (in the Parameter List), or execute Actions based on whether or not the Parameter Limit is met.
Concepts |
| • | Concepts of Parameters and Parameter Lists |
| • | Concepts of Parameter Limits |
| • | Concepts of Specifications |
| • | Concepts of Transformations and Calculations |
| • | Concepts of Versioning |
Example |
|
Limit Rule and Limit Details |
|
|
Functionality of the Limit Rule Maintenance page:
Limit Rule |
Fields of the Limit Rule element:
| Field | Description | ||||||
| Limit Rule | Identifier of the Limit Rule. | ||||||
| Version | Version number of the Limit Rule. | ||||||
| Version Status | Version Status (Active, Current, Provisional, Expired) of the Limit Rule. | ||||||
| Description | Description of the Limit Rule. | ||||||
| Processing Rule | Specifies how to apply the Parameter Limit Types in the Limit Details
element:
|
Limit Details |
Each Parameter Limit Type you add defines a unique set of "Limit Details", which define criteria for Extended Parameter Limit Checking. Click Add or Remove to insert or remove a Parameter Limit Type. If you want to apply the "First Matching" criteria (defined by the Processing Rule), use the arrows to rearrange as required. Fields of the Limit Details element:
| Field | Description | ||||||||
| Limit Type | Identifier of the Limit Type. | ||||||||
| Apply When | When to apply the Limit Details:
|
||||||||
| Reject Value | Used to handle "Absurd Limits" (see Handling Absurd Limits). | ||||||||
| Transform Rule | Transformation Rule applied during the Extended Limit Checking (see Transform Rule). | ||||||||
| Display Format | Display format of the value after it has been transformed (see Display Format). | ||||||||
| Condition | Data Item Condition (see Condition). | ||||||||
| Qualifier | Limit Qualifier (see Qualifier). |
Using Non-Numeric Tags |
During Data Entry, some configurations may require entering/returning text that either describes numeric data or explains why it could not be entered. Such text is referred to as a "non-numeric tag" (or "NNT"). For example, assume that a value <5 is considered to be BDL (below detection limit). If the numeric data value is 4, you may want to make BDL a non-numeric tag in order to do things such as enter BDL rather than 4 or enter 4 and return BDL.
See Using Non-Numeric Tags for an example of how to do this.
Handling Absurd Limits |
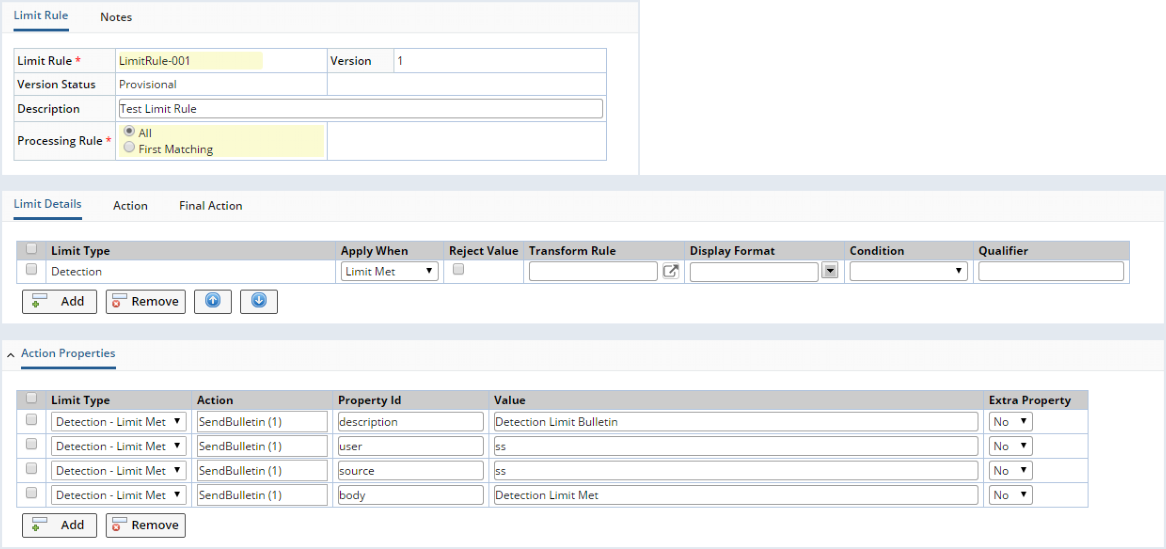
When defining a Limit Rule, you can specify an "Absurd Limit" to reject a value if that Limit is met. Examples of Absurd Limits would be 0 > pH > 14, or Weight < 0. To do this:
|
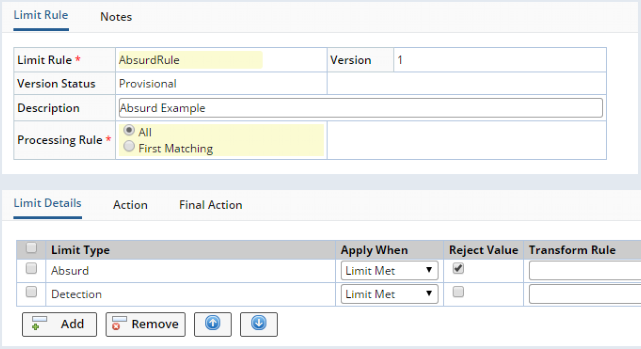
Create a Limit Type (we named the example below "AbsurdRule").
|
|
An "Absurd" Limit Type is provided OOB. Add this "Absurd" Limit Type into the Limit Details, moving it to the top of the list to ensure it is checked first (as shown above). |
|
Check the "Reject Value" check box as shown above. |
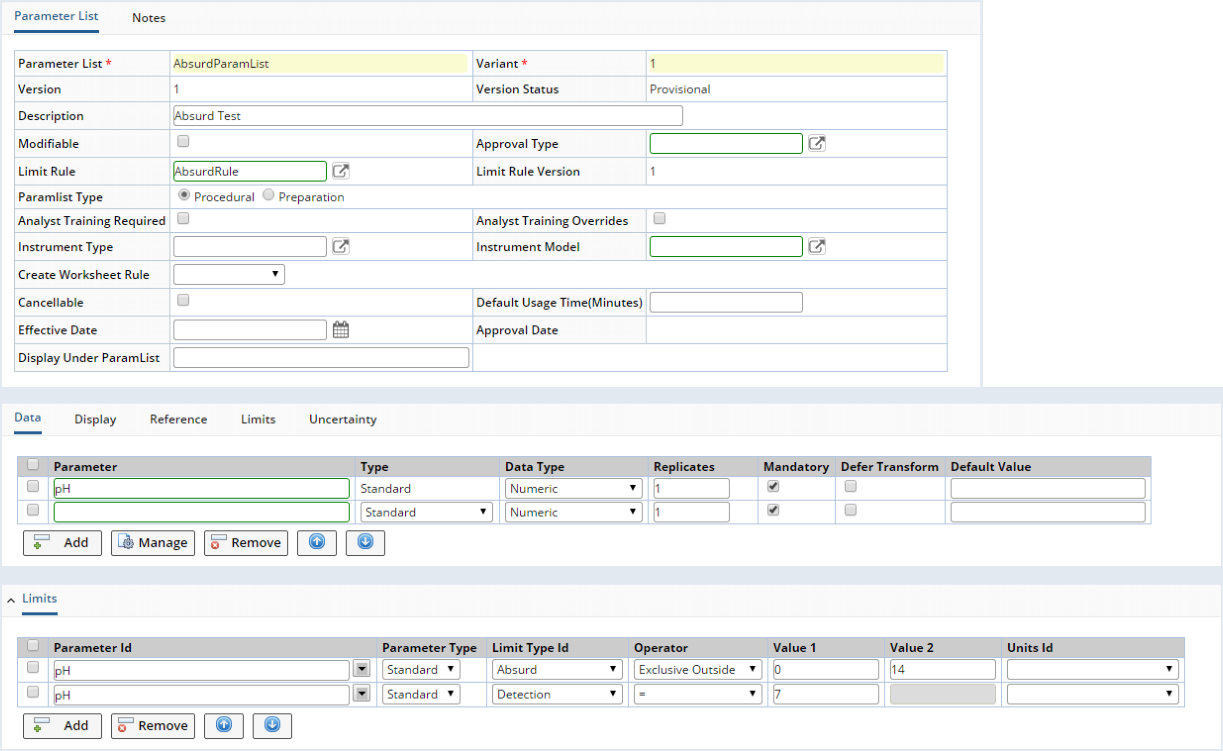
|
In the Parameter List, specify the Limit Rule and add the Limit Type. Set the Limit values to define the range that defines the "absurd" value. In the example below, the "Absurd" Limit Type defines a pH value of 0 > pH > 14, and the "Detection" Limit Types defines pH = 7.
|
|
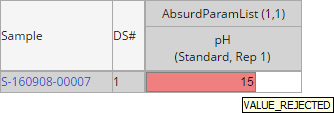
Data Entry pages (and Data Entry Actions) will reject any values that fall within the range defined by the Absurd Limit Type. This is checked in the same manner as text entered into a numeric field. The entered value is stored in the Audit tables for SDIDataItem (a_sdidataitem.enteredtext). Rejected Data Items have a status of Value_Rejected. The "Error Status Option" property of the gwtdataentrygrid Element can be used to determine the operations allowed on a Data Item when the Data Item has an error status of Value_Rejected. If a value is rejected, Transform Rules, Display Values, Conditions and Qualifiers are ignored.
|
Transform Rule |
This lets you define rules used to transform data during Extended Limit Checking. For example, a Transformation Rule could round a number to a specified number of decimal places, or add a number to the entered value. Clicking the lookup icon lets you create the expression by opening the Expression Editor.
Recall that when you specify Standard Limit Checking in the Parameter List Maintenance Page, you define each Parameter Limit Value using an Operator, a Value1, and possibly (if an Inclusive or Exclusive Limit) a Value2. By enclosing Operator, Value1, or Value2 in square brackets, you can use these as variables in the Transform Rule during Extended Parameter Limit Checking defined by the Limit Rule. For example, suppose your Standard Parameter Limit Checking (in the Parameter List Maintenance Page) defines the Parameter Limit <20. The Operator (<) and the Value1 (20) define the Parameter Limit. After Standard Parameter Limit Checking, you want to round the entered data value if it is less then 20. You could do so by entering the Transform Rule
If [this]<[value1], round ([this], 1)
where [this] is the entered data value and [value1] is the value defined by Standard Parameter Limit Checking. This expression states "If the entered data value is less than 20, round the entered data value to one decimal place".
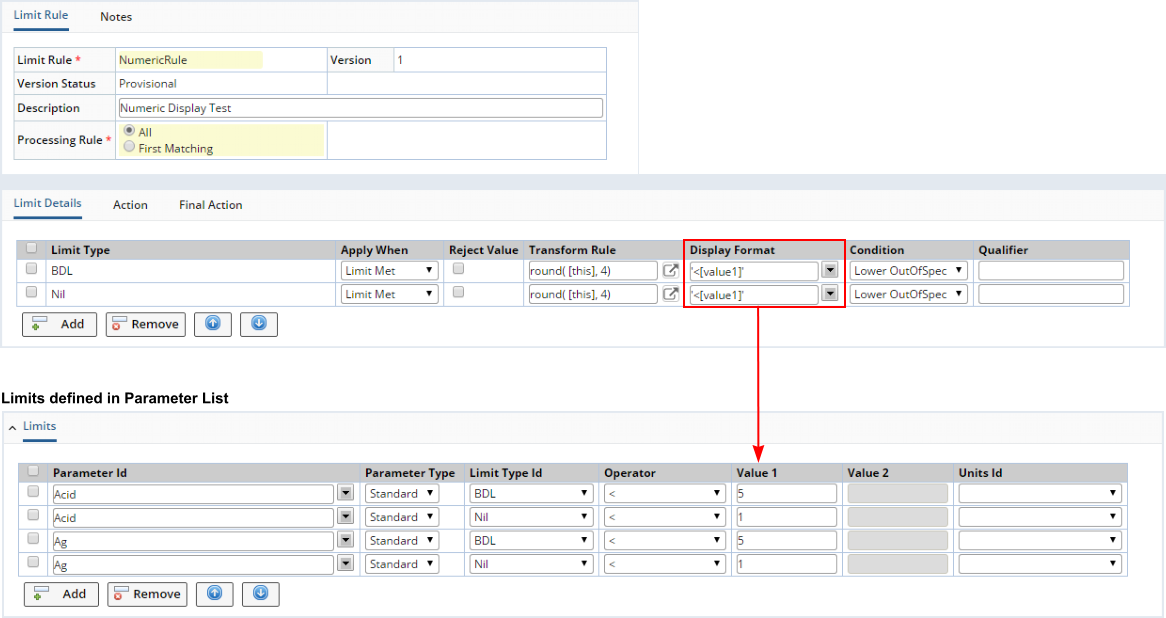
Display Format |
This is the display format of the Parameter value after it has been transformed according to the Transform Rule (see above). Choose from the drop-list, or enter your own.
You can also use Operator, Value1, and Value2 (defined in Standard Parameter Limit Checking) as variables in the same way as with the Transform Rule above. For example, your Standard Parameter Limit Checking (in the Parameter List Maintenance Page) defines the Limit <5, and you want the to display the text <5 if the entered data value is indeed less than 5, you could apply Extended Parameter Limit Checking when the limit <5 is met. Then, specify a Display Format of '<[value1]'. The Data Entry Page would then display the text <5.
|
Entering 4 returns <5 (defined by the Limit Rule).
 |
Entering 0.7 returns <1 (defined by the Limit Rule).
 |
Qualifier |
This is the Limit Qualifier that defines a classification of data (such as MDL for Method Detection Limit).
You can also use Operator, Value1, and Value2 (defined in Standard Parameter Limit Checking) as variables in the same way as with the Transform Rule and Display Format (see Using Variables examples above). For example, your Standard Parameter Limit Checking (in the Parameter List Maintenance Page) defines the Limit <20, and you want to display the text <MDL if the entered data value is less than 20. You could apply Extended Parameter Limit Checking when the limit <20 is met. Then, specify a Display Format of [qualifier]MDL. The Data Entry Page would then display the text <MDL.
Condition |
This is the Data Item Condition Reference Type that you have previously added to define the condition of a Data Item.
Actions |
|
|
Action and Action Properties |
In the "Action" tab, you can specify an Action to execute depending on the value of Apply When. For example, if you chose "Apply when = Limit Met", the Action executes only if the Parameter Limit was met.
| Field | Description |
| Limit Type | Identifier of the Limit Type selected in Limit Details. |
| Apply When | This is the same value selected in Limit Details. |
| Action | Action to execute. |
| Action Version | Version number of the Action. |
Specify properties ("Property Id") and values ("Value") for the Action in the "Action Properties" tab. Note that you must select the "Limit Type" for each (which is defined in the "Action" tab).
Behavior of Action Properties |
When an Action executes as a result of a Parameter Limit being met (or not met), a set of implicit properties is passed into the Action. This mechanism can result in unexpected behavior. For example, suppose you execute an AddDataSet Action when a Limit is met. The primary keys of the SDI and the Parameter List are implicitly passed into the Action, along with the Data Set, Parameter Type, and Replicate Id. In the case of AddDataSet, the problem reveals itself in the way the Parameter Id is passed into the Action. If a value is explicitly passed in through the Limit Rule, those will be the only Parameters that will be added to the newly created Data Set. The remainding Parameters in the Parameter List will not be added. When the Action executes, the second instance of the same Data Set may not contain the correct set of Parameters. In order to add a different Parameter List instance, you must explicitly override the Parameter Id and Parameter Type with blank values. If a matching Parameter is not found in the Parameter List with only the implicit properties, the Action will not add the Parameter. If the Parameter is not passed into the Action as a property, or a blank or null value is passed into the Action, all Parameters will be added.
The following example shows what happens when an AddDataSet Action is defined in a Limit Rule to execute when a Parameter Limit is met. Without overriding the Parameter Id and Parameter Type, it will not create records in the SDIDataItem table:
|
For this example, we use the OOB "Detection" Limit Type:
|
|
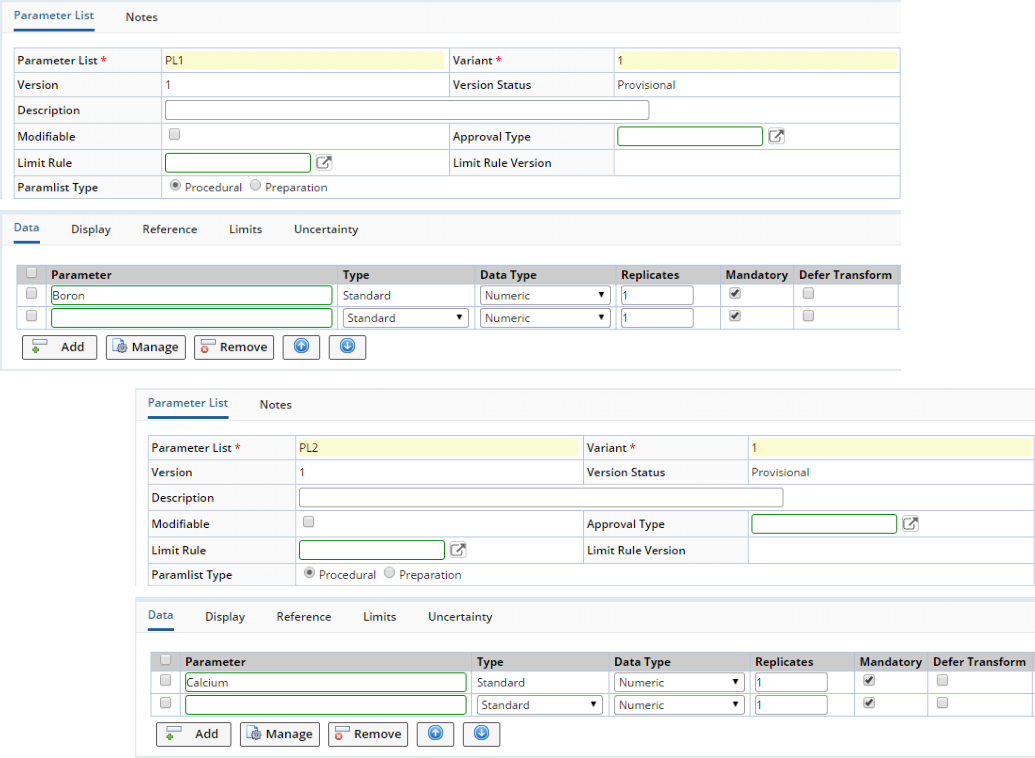
Create 2 Parameter Lists (such as PL1 andPL2). Add a unique numeric parameter to each (such as Boron for PL1 and Calcium for PL2):
|
|
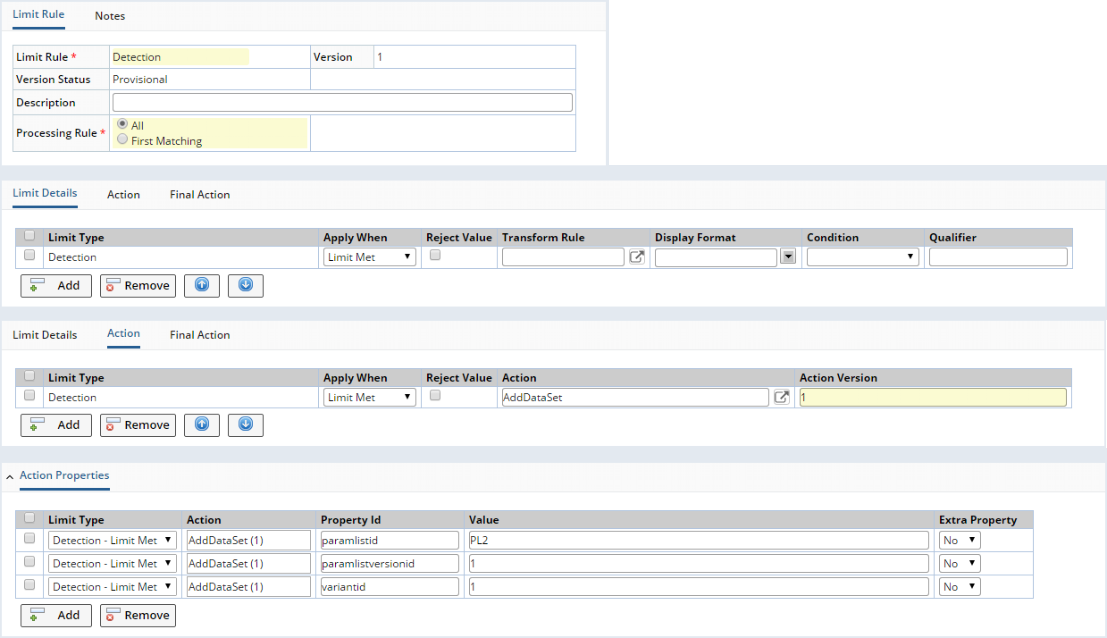
Create a Limit Rule named "Detection". Under the "Limit Details" tab, add the "Detection" Limit Type. For "Apply When", choose "Limit Met". In the "Action" tab, add the AddDataSet Action (version 1). This will be executed when the Limit is met. In the "Action Properties" tab, your instinct is to add only add 3 properties, i.e., only those necessary to identify the Parameter List instance you want to create when the Limit is met. Following your instinct:
However, if you add only the properties required to identify the Parameter List, only PL1 will be shown during Data Entry. Additionally, if you check the database, there will be a record in the SDIData table for PL1 & PL2, but the SDIDataItem table will contain a record for only PL1. The next step shows how to work-around this problem. |
|
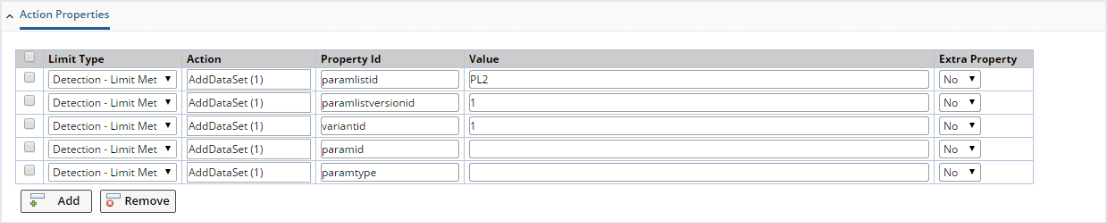
Here is how to work-around this problem. When you setup the Action properties in the Detection Limit Rule Maintenance page, include 2 more Action Properties: the Parameter Id ("paramid") and Parameter Type ("paramtype"). However, leave the Values for these two Parameter-specific columns blank:
|
|
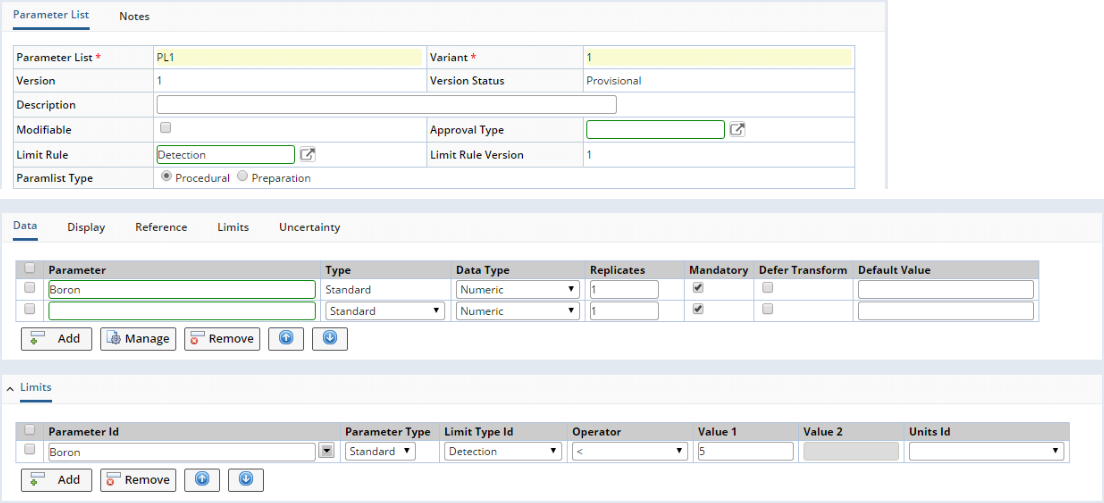
Edit Parameter List PL1 and assign the "Detection" Limit Rule. Under the "Limits" tab, add the "Boron" Parameter. Set the "Limit Type Id" to "Detection". Set the "Operator" and "Value 1" to <5.
|
|
The Action should now behave correctly. To test this:
|
Final Action |
For each Limit Type, the "Final Action" is the very last Action to execute. The Final Action executes following execution of the Action.