Overview |
|
|
Purpose |
|
Parameter Lists |
Content |
||||||||||||||||||
|
Adds and edits Parameter Lists.
Concepts |
| • | Concepts of Parameters and Parameter Lists |
| • | Concepts of Parameter Limits |
| • | Concepts of Transformations and Calculations |
Example |
This is a portion of a configured Parameter List:

|
When adding a new Parameter List, the "Add to Test Method" option is also available:

|
Description |
|
|
Functionality of the Parameter List Maintenance page:
Parameter List |
Fields of the Parameter List element:
| Field | Description | ||||
| Parameter List | Identifier of the Parameter List. | ||||
| Variant | Parameter List Variant. | ||||
| Version | Parameter List Version. | ||||
| Version Status | Parameter List Version Status. | ||||
| Add to Test Method | This option is displayed only when adding a new Parameter List. See Automatically Adding Parameter Lists to Test Methods below. | ||||
| Description | Description of the Parameter List. | ||||
| Modifiable | When checked, Data Sets (instances of this Parameter List)
can be modified in the Data
Sets detail tab of the Sample Maintenance page. "Modification"
includes adding Parameters, adding Replicates, and removing Parameters.
If not checked, attempting to modify a Data Set in the "Data Sets" detail tab of the Sample Maintenance page issues a warning dialog stating that you are not allowed to modify this Data Set. |
||||
| Approval Type | Approval Type that specifies Approval Rules during Data Entry. | ||||
| Limit Rule | Limit Rule to apply (if Extended Parameter Limit Checking is conducted). | ||||
| Paramlist Type | Determines whether the Parameter List is of type "Preparation",
"Procedural", or "Collection":
|
||||
| Analyst Training Required | Checking this specifies that a User must be certified to work with the Parameter List (setup using Certifications). | ||||
| Analyst Training Overrides | If Analyst Training is required, checking this allows the Analyst Certification to be overridden during Data Entry. | ||||
| Instrument Type | Instrument Type associated with the Instrument Model. This field is populated after you select an Instrument Model (below). | ||||
| Instrument Model | Instrument Model associated with the Parameter List. | ||||
| Create Worksheet Rule | Determines how a Worksheet is created. See Data Set in Creating Worksheets. | ||||
| Is Work Plannable | Used with the WAP module. See Introduction to Work Assignment and Planning (WAP). | ||||
| Max Activity Size | Used with the WAP module. See Max Activity Size. This is available when "Is Work Plannable" is "Yes". | ||||
| Testing Lab Type | See Department Maintenance
Page → Department Form → Hierarchy.
If you choose a Testing Lab Type, you cannot choose a Testing Lab or Work Area, but you can choose a Work Area Type. |
||||
| Work Area Type | See Department Maintenance Page → Department Form → Hierarchy. This is available only if you choose a Testing Lab Type. | ||||
| Testing Lab | Testing Lab associated with this Parameter List (see Departments).
You can choose only a Testing Lab, or a Testing Lab and a Work Area in that Testing Lab. If you choose a Work Area, "Testing Lab" is automatically populated with the Parent Testing Lab for the Work Area |
||||
| Work Area | Work Area associated with this Parameter List (see Departments).
If you choose a Testing Lab, the Work Area lookup shows only Work Areas in that Testing Lab. If you choose a Work Area, the "Testing Lab" is automatically populated with the Parent Testing Lab for the Work Area. |
||||
| Auto Assign Rule | Automatically assigns the Parameter List to an Analyst or Work Area. For a summary of Work Area assignment functionality, see Assigning Analysts, Work Areas, and Instruments to SDIs. | ||||
| Auto Assign Analyst | Analyst automatically assigned to the Parameter List if "Auto Assign Rule" is "Analyst". For a summary of Work Area assignment functionality, see Assigning Analysts, Work Areas, and Instruments to SDIs. | ||||
| Cancellable | When checked, Data Sets (instances of this Parameter List) can be Cancelled. | ||||
| Default Usage Time per Use (Minutes) |
The typical time an Instrument is in use each time it is used. Entering a Default Usage Time of 30 minutes means that each time an Instrument is used it is typically used for 30 minutes. If an instrument has been used 2 times with a Default Use Time of 30 minutes the Total Usage Time (Hours) is 1 (30 minutes x 2 uses). This value is used by Instrument Certification to determine when to generate a Workorder. | ||||
| Effective Date
Approval Date |
See Concepts of SDI Versioning and Approval. | ||||
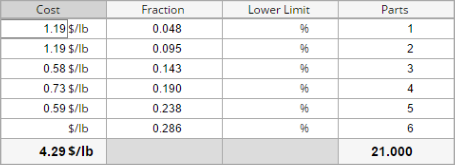
| Display Under ParamList | Determines the column under which the results of a calculation is displayed.
This is used in special Data Entry page configurations (such as Formulation Methods) to support parent/child SDIs shown on a single data entry page, where aggregate information in the parent can be a function of the child SDIs. In the example below, the Display Under ParamList field determines that the result of the Formulation Total Cost aggregate calculation is displayed at the bottom of the "Cost" (IngredientCost ParamList) column.
|
Accreditation |
The "Accreditation" tab lets you declare the Parameter List as "Accredited" by an "Accredited Organization" (accreditation body), with accreditation effective on an "Accredited Date".

|
The AddDataSet Action copies the ParamList.AccreditedFlag (set by the "Accredited" checkbox) to all Data Sets (instances of the Parameter List). An "Accredited" checkbox is therefore displayed in the Data Sets detail tab of the Sample Maintenance page and the Data Set detail of the Data Entry page.
When "Accredited" is checked (enabled) in the Parameter List Maintenance page, newly created Samples with this Parameter List will also have "Accredited" checked in the Data Sets detail tab of the Sample Maintenance page ("Accredited Organization" is also shown). You can uncheck "Accredited" in the Data Sets detail to remove accreditation from this Data Set.
If you then uncheck (disable) "Accredited" in the Parameter List Maintenance page, "Accredited" will still be checked in the Data Sets detail tab of the Sample Maintenance page. You can uncheck "Accredited" for the Data Set. However, you cannot check it again, since you have disabled Accreditation for the Parameter List. A message is displayed to that effect.
The Data Set detail of the Data Entry page exhibits similar behavior.
Accreditation Organizations are maintained in the Organization List page (accessed at Lab Admin → Certifications & Resources → Organizations). Organizations are actually Address SDIs with an Address Type of "AccreditedOrganization".
|
When a COA Report is run for a Sample having Accredited Data Sets, the Report includes information concerning the Accredited Organization. An ordinal number is shown next to each Accredited Data Set (1). Multiple Data Sets accredited by the same Organization have the same number. If all Data Sets are accredited by the same Organization, a 64x64 image of the Organization logo is shown in the header (2) and the Accreditation Statements (3) are not displayed. If multiple Data Sets are accredited by multiple Organizations, 32x32 images from all Organizations are shown in the Accreditation Statements (3) and no image is displayed in the header (2). The Accreditation Statements (3) are the "Notes" entered for the Organization SDI (which are typically descriptions of the Accredited Organization. |
Data |
Fields of the Data detail:
| Field | Description | ||||||||||||||||||||||||||||||||||||||||||
| Parameter |
Identifier of the Parameter. If the Parameter already exists, you can
enter it, or click"Add" with the focus in the field to open
the lookup from which you can choose the desired Parameter.
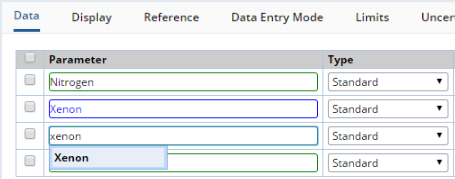
Alternatively, you can create new Parameters directly from here. In the example below, Nitrogen already exists, but Xenon does not. Enter the new Parameter into the field. The color and border changes to indicate that the Parameter Xenon does not exist:
If you enter the same Parameter using a different case, the existing case is automatically detected:
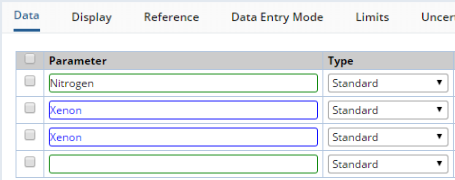
When the focus changes beyond the field, the case is automatically corrected:
The new Parameter Xenon will be created when you save the Parameter List.
|
||||||||||||||||||||||||||||||||||||||||||
| Type | Parameter Type:
|
||||||||||||||||||||||||||||||||||||||||||
| Data Type | Specifies the kind of data (based on the LabVantage
Data Type) that must be entered for the Parameter:
|
||||||||||||||||||||||||||||||||||||||||||
| Replicates | Number of Replicates of the Parameter. | ||||||||||||||||||||||||||||||||||||||||||
| Mandatory | When checked, this is a mandatory field during data entry. | ||||||||||||||||||||||||||||||||||||||||||
| Defer Transform | When this is checked, all Transformation Rules specified
for SDIDataItems are not applied. SDIDataItem.TransformValue will equal
SDIDataItem.EnteredText.
This does not affect any other functionality involving the evaluation and display of data (such as Calculation Rules, Parameter Limits, Parameter Limit Rules, Specifications, and Display Format). |
||||||||||||||||||||||||||||||||||||||||||
| Default Value | Value that you want to automatically enter into the Data Entry page (see Default Values in the Data Entry Page). If you specify a Default Value, you cannot delete any Data Set made from that Parameter List. |
In addition to Specifying Parameter Limit Values in the Limits tab, the "Manage" button offers a shortcut to Parameter Limits and Replicate Calculations. The behavior of this feature is defined by the ParamList Policy, which is configured OOB for "Managed Parameter" mode.
|
Selecting a Parameter and clicking "Manage" opens the "Manage Parameter" dialog:
|
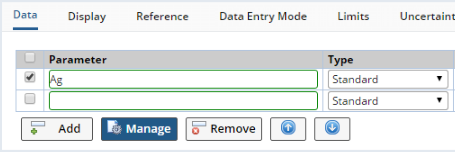
Editing and removal cannot be applied to Calculated Parameters. If you want to perform any operation on the Parameter (such as edit or remove), you must select the main Parameter, then click Manage (to edit) or Remove (to remove it). If you remove the main Parameter, the Calculated fields will be removed with it. In the example below, the "Standard" Parameter Type for Ag is the main Parameter, while the "Average" Type is the field added to show the Calculation results.

|
This extra field is also inserted into the Data Entry page to show the Calculation results. In the example below, applying "Average" shows the main Ag Parameter (Type = Standard) and the Calculated field (Type = Average):

|
|
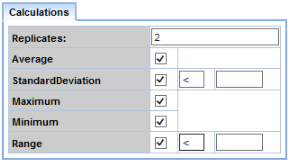
Here is an example of all Calculations for the two Ag Replicates:

|
Display |
Fields of the Display detail:
| Field | Description | ||||||||||||||||||||||||||||||||||||||||||||||||||||||||||||||||||||||||||||||||||||||||||||||||||||||||||||||||||||||||||||||||||||||||||||||
| Parameter | Identifier of the Parameter. | ||||||||||||||||||||||||||||||||||||||||||||||||||||||||||||||||||||||||||||||||||||||||||||||||||||||||||||||||||||||||||||||||||||||||||||||
| Type | Parameter Type. | ||||||||||||||||||||||||||||||||||||||||||||||||||||||||||||||||||||||||||||||||||||||||||||||||||||||||||||||||||||||||||||||||||||||||||||||
| Display Format | When you enter data for this Parameter, the Display Format
defines how the data value is displayed. If Transformation
Rules are applied to the value, the display format is applied after
the Transformation Rules.
If you do not specify a Display Format, the Transform Value (see Transformation Rules) is converted to text using all numbers detected in the entered value. Since the Transform Value is numeric, significant trailing zeros are dropped. You have three options for using display formats:
You can choose one of the following predefined Display Formats:
The easiest way to create display formats is to modify the predefined formats.
You can create a display format that is conditional on user input. Do this by writing an eval expression using the variable [this] to represent user input. For example: [eval; if ([this] < 10, "0", "0.00")] The expression evaluates user input: If it is less than 10, round to zero decimal places (leaving only the integer). If it is greater than or equal to 10, round it to two decimal places as shown below:
Use single quotes to return literal strings. Note that a "zero" indicates a position for a numeric digit (as in 0.00). However, if a zero is to be displayed literally, it must be enclosed in single quotes. Examples:
|
||||||||||||||||||||||||||||||||||||||||||||||||||||||||||||||||||||||||||||||||||||||||||||||||||||||||||||||||||||||||||||||||||||||||||||||
| Display Units | Units of the Parameter value (as defined by a Units SDI). | ||||||||||||||||||||||||||||||||||||||||||||||||||||||||||||||||||||||||||||||||||||||||||||||||||||||||||||||||||||||||||||||||||||||||||||||
| Transformation Rule | Opens the Expression Editor, in which you can create a Transformation Rule to apply to the Parameter. See How Transformations and Calculations are Processed in Concepts of Transformations and Calculations. | ||||||||||||||||||||||||||||||||||||||||||||||||||||||||||||||||||||||||||||||||||||||||||||||||||||||||||||||||||||||||||||||||||||||||||||||
| Display Under Param | This is used in special Data Entry page configurations (such as Formulation
Methods). Determines the column under which the results of an additional aggregate calculation is displayed.
In the Formulation example below, when an additional aggregate calculation is defined (Total Parts) entering "Parts" in the Display Under ParamList field displays the results of the aggregate calculation under the "Parts" column.
|
Reference |
Fields of the Reference detail:
| Field | Description | ||
| Parameter | Identifier of the Parameter. | ||
| Type | Parameter Type. | ||
| SDC | If the Data Type (in the Data detail) is SDC, this specifies the SDC to use during data entry. For example, if you specify the Project SDC containing SDIs Project01and Project02, the Data Entry page lets you choose data values of Project01 and Project02. | ||
| Reference | If the Data Type (in the Data detail) is Reference or Validated Referenceas , this specifies the Reference Type to use during data entry. | ||
| Calculation Rule | The lookup icon opens the Expression
Editor, in which you can create a Calculation Rule to apply to the Parameter.
See How Transformations and Calculations are Processed in Concepts of Transformations and Calculations. |
||
| Alias | Parameter Alias (see Concepts of Parameter Lists → Parameters and Parameter Lists). | ||
| Instrument Field | Measurement parameter that is sent from an Instrument (see Simple Instruments → Instrument Types → Add Instrument Fields). | ||
| QC Transfer Flag | When checked, parameter values are transferred to the Display Value field (in the Consumable Params detail of the Consumable Lot).
When the same Parameter is listed multiple times, only one can have the QC Transfer Flag checked. The QC Transfer Flag cannot be checked when muptiple Replicates are specified. |
||
| Report | Determines if Data Entry results for this Parameter will be included in the Report, and establishes the default behavior of the "Report Selected" feature of the Data Entry page when the page opens. For an example, see Data Entry Pages → Editing Features → Toolbar → Report Selected. This sets SDIDataItem.ReportFlag to Y (checked) or N (unchecked). This is checked when adding a new row. |
Data Entry Mode |
Fields of the Data Entry Mode detail:
| Field | Description | |||||||||||||
| Parameter | Identifier of the Parameter. | |||||||||||||
| Type | Parameter Type. | |||||||||||||
| Display Width | Width (in pixels) of the cell in the Data Entry page. This value is stored in the ParamListItem.DisplayWidth column. If this value is not specified, the width of the cell defaults to the "Entry Field Width" value set in the gwtdataentrygrid Element. | |||||||||||||
| Editor style | Editor style
used to render the cell in the Data
Entry page.
Notes concerning Editor style:
|
|||||||||||||
| SDC Mode | If the Data Type (in the Data detail)
is SDC, this specifies how the user will choose the SDC in the interface:
Changes made to Editor style, SDC Lookup URL, or SDC Extended SQL affect existing Data Items, as these are not copied down to SDIDataItem. Editor style, SDC Lookup URL, and SDC Extended SQL are not supported by Elements that render Classic Data Entry pages (dataentrylist and dataentrygrid). |
|||||||||||||
| SDC Lookup URL | If the Data Type (in the Data detail) is SDC and SDC Mode is Lookup, this optionally specifies a URL to a custom Lookup page. | |||||||||||||
| SDC Extended SQL | If the Data Type (in the Data detail) is SDC, this is an optional restrictive where clause for filtering data. | |||||||||||||
| Mapping Param ID
Mapping Param Type |
Defines a Parameter (associated with a Product) to which Formulation data are sent (see Promote Formulations → Promote Additional Information to the New Product). |
Limits (Short Form) |
Fields of the Limits detail:
| Field | Description |
| Parameter | Identifier of the Parameter. |
| Type | Parameter Type. |
| Limits | Shows the Parameter Limit Types specified in the Limits detail below. |
Uncertainty |
| Overview |
Uncertainty automatically calculates the uncertainty of measure for an entered data value. For example, if a measurement is considered "accurate" only to within +/- 1% and the entered value is 100g, uncertainty could report this as 100.0 g +/- 1.0g. Uncertainty can also calculate variants such as asymmetric deviation (such as +1% but -2%), range operators (such as +/-1% if the value is 0 to 100, but +/- 5% if the value exceeds 100), use of linear function to calculate uncertainty between two values, and so on. Display format is also selectable.

|
You have two options for defining Uncertainty: Managed and Unmanaged.
| Managed Option |
The managed option lets you build the uncertainty calculation using a special graphical interface. Clicking the ellipsis under "Managed" opens the interface:

|
Here is an example of how to setup multiple ranges:
|
The first range as provided applies to all data. | |||
|
Click "Add Range". This extends the calulation by providing another range of values. | |||
|
Enter a numeric value for the new range, then advance out of the entry field. | |||
|
The number in the previous range is adjusted. Since the second range
is >= 200, the previous is adjusted to < 200 to make the definition
continuous.
The previous range is adjusted in this manner each time you define a value for a new range:
"Remove Range" removes ranges from the bottom-up. |
|
The "Type" defines the Uncertainty
Calculation to perform.
"Uncertainty Format" defines the format string used to convert the uncertainty value into a string. These are taken from the Predefined Display Formats. |
|
Here is an example of a set of Ranges defining different Uncertainty Calculations. |
| Uncertainty Calculations |
These Uncertainty Calculations are provided:
| Type | Input | Description | Groovy Expression | ||||||||||||
| None | This denotes no input and returns an empty string. Example:
|
$G{ return ""; } | |||||||||||||
| Text | [___] | This accepts and returns a text string. Example:
|
$G{ return "Bad Value"; } | ||||||||||||
| Absolute | [ ] | This accepts a numeric value. Example:
|
$G{ return LV.absoluteUncertainty( 5 ); } | ||||||||||||
| %age | [ ]% | This accepts a numeric value. Example:
|
$G{ return LV.percentUncertainty( [this], p ) } | ||||||||||||
| Linear | m[ ] c[ ] | This accepts a numeric value for the multiplier and constant.
Example:
|
$G{ return LV.firstOrderUncertainty( [this], m, c ) } | ||||||||||||
| Linear %age | m[ ] c[ ] | This accepts a numeric value for the multiplier and constant.
Example:
|
$G{ return LV. firstOrderPercentUncertainty( [this], m, c) } | ||||||||||||
| 2nd Order | a[ ] b[ ] c[ ] | This accepts numeric values for the 1st and 2nd order coefficients
and the constant. Example:
|
$G{ return LV.seconrdOrderUncertainty( [this], a, b, c ) } |
After clicking "OK", a user-friendly Function and Format syntax is returned back to the field. For example:
Submitted Function:
$G{ return ${this} < 200 ? "within limit"
: ${this} < 300 ? "limit exceeds" : ${this} < 500 ? LV.absoluteUncertainty(30)
: ${this} < 600 ? LV.percentUncertainty( ${this}, 4 ) : LV.firstOrderPercentUncertainty(${this},
12, 4);
//*;*200*;*text*;*within limit*;*#,##0.00|!|200*;*300*;*text*;*limit exceeds*;*[astmround;1]|!|300*;*500*;*absolute*;*30*;*#,##0.00|!|500*;*600*;*percentage*;*4*;*[maxsigfigdp;1]|!|600*;**;*linear_percentage*;*12!,!4*;*#,##0.00
}
Returned Syntax:
[eval; if( [this] < 200, "#,##0.00", if( [this] < 300, "[astmround;1]", if( [this] < 500, "#,##0.00", if( [this] < 600, "[maxsigfigdp;1]", "#,##0.00" ) ) ) )]
Managed Functions and Formats are automatically parsed, with ranges rebuilt and displayed in the managed interface during editing. Unmanaged Functions and Formats cannot be parsed and managed by the managed interface.
|
The "Function" and "Format" controls are disabled
when using the managed option.
Unchecking "Managed" (it is checked automatically in managed operation) issues a warning that unmanaged operations cannot be parsed. |
| Asymmetry |
Clicking "Asymmetric" lets you define another Function ("Upper Function") and Format ("Upper Format"). This makes the calculations defined in "Function" and "Format" the lower definition. Here is an example:
The lower Function returns an Uncertainty of 10% of the entered value, while the Upper Function returns an Uncertainty of 20% of the entered value. As shown below in Data Entry, a value within the definition (300) returns an Uncertainty of -30 (300 * .10) and +60.00 (300 * .20). Note that you must select the Grid Samples by Params with Uncertainty view in order to see the Uncertainty returns.

|
| Unmanaged Option |
Using the unmanaged option, you must use the Expression Editor to build the uncertainty calculation. Clicking the "Function" lookup icon opens the Expression Editor:

|
|
If you define calculations in unmanaged operation, then click the ellipsis under "Managed", a warning is issued to indicate that you will lose the "Function" and "Format" defined in those fields because you will be switching to the managed interface. |
Limits |
Fields of yet other Limits detail:
| Field | Description |
| Parameter Id | Identifier of the Parameter List. |
| Parameter Type | Parameter Type. |
| Limit Type Id | Identifier of the Parameter Limit Type. |
| Operator | Arithmetic operator applied to the Value. See Specifying Parameter Limit Values below. |
| Value 1
Value 2 |
Values that define the range of the Parameter Limit. See Specifying Parameter Limit Values below. |
| Units Id | Units for the Parameter Limit (defined by a Unit SDI). |
Forms |
Adds Worksheet Forms of Worksheet Type "Data Set". See Creating Worksheets → Data Set.
Consumable Types |
Adds Consumable Types that can be used by this Parameter List. See Consumable Example → Add Consumable Type to Parameter List.
Data Set Attributes |
See Attributes → Adding Attributes to Data Sets.
Resource Planning |
This is used with the WAP module. See WAP Resources.
Approve Version |
This button approves the current Parameter List version.
Specifying Parameter Limit Values |
|
|
This section describes the Parameter Limit values themselves.
| In General |
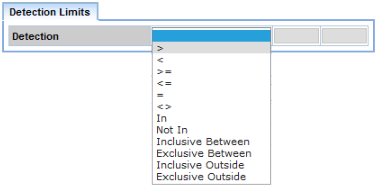
| • | The interface uses these fields to define each Parameter Limit Type:
|
||||||
| • | For the operators containing <, >,
and =, the operator applies to Value1. For example: To define a Parameter Limit of less than 10, choose the < Operator, and enter a Value1 of 10. When you enter data in the Data Entry Page, you will be notified of any value (associated with this Parameter Limit Type) that is greater than 10. |
||||||
| • | For the Inclusive Between, Exclusive Between,
Inclusive Outside, and Exclusive Outside
operators, the operator applies to both Value1 and Value2. For example: To define a Parameter Limit of between 2 and 7, choose the Exclusive Outside Operator, then enter values of 2 and 7 for Values 1 and 2, respectively. When you enter data in the Data Entry Page, you will be notified of any value (associated with this Parameter Limit Type) that is less than 2 or greater than 7. |
| Specifying Limit Values for Numeric Data Types |
If you choose the Numeric Data Type (in the Data detail), you can specify the following Limit Values:
| Operator | Value1 | Value2 | Meaning |
| = | 20 | =20 | |
| < | 20 | <20 | |
| <= | 20 | < or = 20 | |
| > | 20 | >20 | |
| >= | 20 | > or = 20 | |
| <> | 20 | not equal to 20 | |
| E.B. (Exclusive Between) | 10 | 20 | 10<x<20 |
| I.B. (Inclusive Between) | 10 | 20 | 10<=x<=20 |
| E.O. (Exclusive Outside) | 10 | 20 | x<10 or x>20 |
| I.O. (Inclusive Outside) | 10 | 20 | x<=10 or x>=20 |
In the ParamLimits table, the Value1 and Value 2 columns store the entered Limit value as strings (VARCHAR2(2000)), while the Value1Num and Value2Num columns store these values as numeric data types (NUMBER). All Limit evaluation functionality uses the values in Value1Num and Value2Num (if they contain data).
| Fractional Parameter Limits |
You can also enter fractional limits such as 1/4 and 2 1/2. Fractional values are converted to decimal and stored in the Value1Num and Value2Num columns.
| Specifying Limit Values for Textual Data Types |
The following are examples of textual Limit values. You can define a textual Limit as either a Reference Type or Text Data Type:
| Data Type | Description |
| Reference Type | If you define a textual Limit as a Reference
Type, you can choose the Limit values from a Lookup List. The example
below uses a Reference Type named Color, which contains Reference Values
red, orange, yellow, green, blue, violet. When specifying a Limit
value for a Reference Type, operators act upon Reference Values based on
the order in which the Reference Type lists the values. In the example
below, the Color Reference Type list Reference Values in the following order:
|
| Text | If you define a textual Limit as Text, you must
enter semicolon-delimited values. The example below uses values
red;orange;yellow;green;blue;violet Operators act upon these values based on the order listed. |
| Data Type = Reference Type | |||
| Operator | Value1 | Meaning | |
| = | yellow | A data value of yellow. | |
| < | yellow | Data values less than yellow, i.e., orange and red. | |
| <= | yellow | Data values less than or equal to yellow, i.e., yellow, orange, and red. | |
| > | yellow | Data values greater than yellow, i.e., green, blue, and violet. | |
| >= | yellow | Data values greater than or equal to yellow, i.e., yellow, green, blue, and violet. | |
| <> | yellow | Any data value other than yellow, i.e., red, orange, green, blue, or violet. | |
| Operator | Value1 | Value2 | Meaning |
| E.B. (Exclusive Between) | orange | blue | A data value of yellow or green. |
| I.B. (Inclusive Between) | orange | blue | A data value of orange, yellow, green, or blue. |
| E.O. (Exclusive Outside) | orange | blue | A data value of red or violet. |
| I.O. (Inclusive Outside) | orange | blue | A data value of orange, red, blue, or violet. |
| Operator | Value1 | Value2 | Meaning |
| In | red | yellow | Data is one of the values red, orange, or yellow. |
| Out | red | yellow | Data is some value other than red, orange, or yellow. |
| Data Type = Text | ||
| Operator | Value1 | Meaning |
| = | yellow | A data value of yellow. |
| < | yellow | Data values less than yellow, i.e., orange and red. |
| <= | yellow | Data values less than or equal to yellow, i.e., yellow, orange, and red. |
| > | yellow | Data values greater than yellow, i.e., green, blue, and violet. |
| >= | yellow | Data values greater than or equal to yellow, i.e., yellow, green, blue, and violet. |
| <> | yellow | Any data value other than yellow, i.e., red, orange, green, blue, or violet. |
| Operator | Value1 | Meaning |
| E.B. (Exclusive Between) | orange;yellow;green;blue | A data value of yellow or green. |
| I.B. (Inclusive Between) | orange;yellow;green;blue | A data value of orange, yellow, green, or blue. |
| E.O. (Exclusive Outside) | orange;yellow;green;blue | A data value of red or violet. |
| I.O. (Inclusive Outside) | orange;yellow;green;blue | A data value of orange, red, blue, or violet. |
| Operator | Value1 | Meaning |
| In | red;green;blue | Data is one of the values red, green, or blue. |
| Out | red;green;blue | Data is some value other than red, green, or blue. |
| Using Non-Numeric Tags |
During Data Entry, some configurations may require entering/returning text that either describes numeric data or explains why it could not be entered. Such text is referred to as a "non-numeric tag" (or "NNT"). For example, assume that a value <5 is considered to be BDL (below detection limit). If the numeric data value is 4, you may want to make BDL a non-numeric tag in order to enter BDL rather than 4, enter 4 and return BDL, or enter 4 and return <5.
Doing this requires configuring a combination of Parameter Limit Types, Limit Rules, Parameter Lists, and optionally Specification. See Using Non-Numeric Tags for an example of how to do this.
Expression Library and Expression Editor |
|
|
Use the Expression Library and Expression Editor to define Transformation Rules and Calculation Rules.
Automatically Adding Parameter Lists to Test Methods |
|
|
When adding a new Parameter List, "Add to Test Method" can be used to automatically add the Parameter List to a Test Method. Checking "Add to Test Method" displays a Dynamic Lookup that is configured for Test Methods. Since Test Methods are actually Workitems, the Dynamic Lookup pulls values from the Workitem.WorkitemId column.
If the Variant is 1, the identifier of the Parameter List is inserted into the "Add to Test Method" field:

|
If the Variant is not 1, the entered Variant is appended to the Test Method:

|
Alternatively, you can enter a Test Method. Since this is a Dynamic Lookup, it displays matching Test Methods (WorkitemIds) as you type:

|
If you enter a Test Method that already exists, the field color and border change as shown below (this does not occur if the Test Method does not already exist):

|
If you enter a Test Method that does not already exist, saving the Parameter List creates a new Test Method with the identifier you have entered, and the current version of the Parameter List is added to the newly created Test Method:

|
If you choose an existing Test Method that has multiple Versions, the newly created Parameter List is added to the most recent version of the Test Method. In the example shown below, the most recent version of the Test Method is 3, so the Parameter List is added to version 3 of the Test Method.

|
If you Approve the most recent version of Test Method LV-001, then add another new Parameter List to Test Method LV-001, a new version of Test Method LV-001 is created and the new Parameter List will be added to it:

|