Overview
| Top |
|
Simple Instruments |
Content |
||||||||||||||||||||||||
|
Overview |
|
|
Introduction to Simple Instruments |
The Simple Instruments feature allows data to be transferred from a "simple" laboratory instrument to LabVantage Data Entry. A "simple" instrument is defined as one that uses a protocol such as RS-232, generates raw test results without knowing sample IDs, synchronously receives commands, and optionally sends back responses. Examples include weight balances and pH meters.
Simple Instrument Configuration |
Configure a Simple Instrument data transfer in the following order:
| 1. | Add an Instrument Type. |
| 2. | Add an Instrument Model. |
| 3. | Add an Instrument. |
| 4. | Add the Instrument Type to a Parameter List. |
| 5. | View the data collected from the instrument in the Data Entry page. |
Configurable Components of Simple Instrument |
| Component | Description | Menu for Configuration |
| Instrument Type | Functional classification of the instrument (such as "WeightBalance"or "pHMeter"). | Lab Admin → Certifications & Resources → Instrument Types |
| Instrument Model | Identifier of a model of a specific Instrument Type. For example, the Instrument Type "WeightBalance" can be manufactured in two Models: "WB-200" and "WB-500". | Lab Admin → Certifications & Resources → Instrument Models |
| Instrument | Identifier you want to assign to a specific Instrument in the lab (such as "SolidsLabWeightBalance"). | Lab Admin → Certifications & Resources → Instruments |
Instrument Types |
|
|
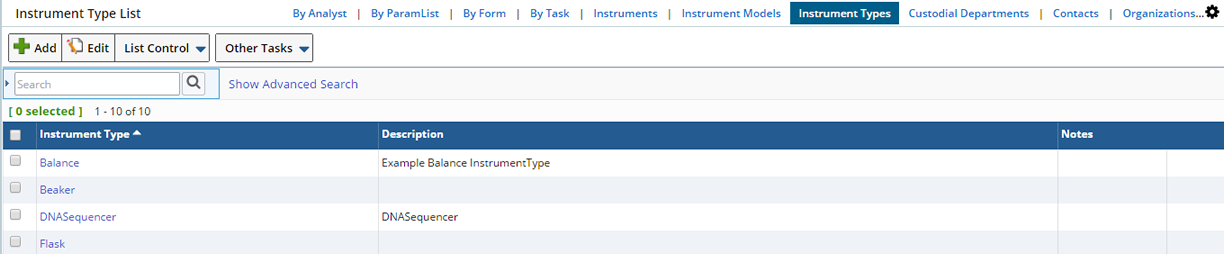
Instrument Types List Page |
Navigate to Lab Admin → Certifications & Resources → Instrument Types. The Instrument Type List page is displayed.
|
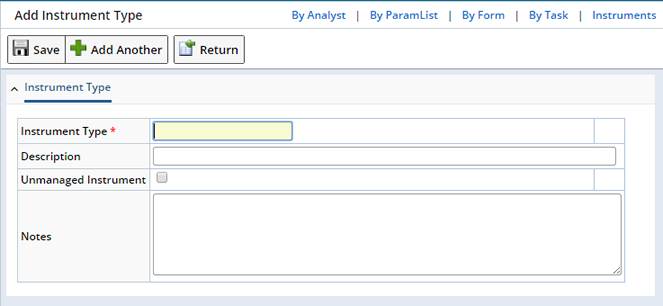
Add an Instrument Type by clicking "Add".
Add Instrument Types |
|
| Field | Description |
| Instrument Type | Identifier of the Instrument Type. |
| Description | Textual description. |
| Unmanaged Instrument | When checked this Instrument's use is not managed (Instrument Certification). You might define a "Beaker" or "Flask" as an Unmanaged Instrument (or equipment).
If checked at the Instrument Type level, all new Models of that Type will default with "Unmanaged Instrument" checked. You can then uncheck it at the Instrument Model level. See Unmanaged Instruments for more information. |
| Notes | Additional information regarding the Instrument Type. |
Upon saving, the detail tabs display.
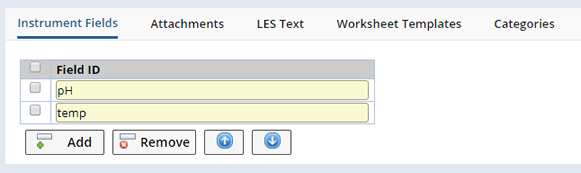
| Add Instrument Fields |
An Instrument Field is a measurement parameter that is sent from the Instrument. The Field ID, which may or may not appear in an instrument response, is the name or alias given to the parameter. Add Instrument Fields by clicking "Add" and entering the Field ID.
|
| Add Attachments |
Adds Attachments to the Instrument Type.
| Add LES Text |
LES Text is essentially a collection of Attributes, each Attribute defining Instructions and Information that will be rendered by each Attributes Control in a Worksheet. See LES Worksheet Generation → LES Text for more information.
| Add Worksheet Templates |
Lets you associate a Worksheet Template with this Instrument Type. See LES Worksheet Generation → LES Worksheet Template Detail for more information.

This Template will guide you through the steps necessary to complete a Workorder that might be used for regular instrument calibration or to schedule routine maintenance. See Instrument Certification for information about defining certification and scheduling.
See LES Worksheets → LES Worksheet Template Detail for more information about defining a Worksheet Template.
Instrument Models |
|
|
Navigate to Lab Admin → Certifications & Resources → Instrument Models. The Instrument Model List page is displayed.

|
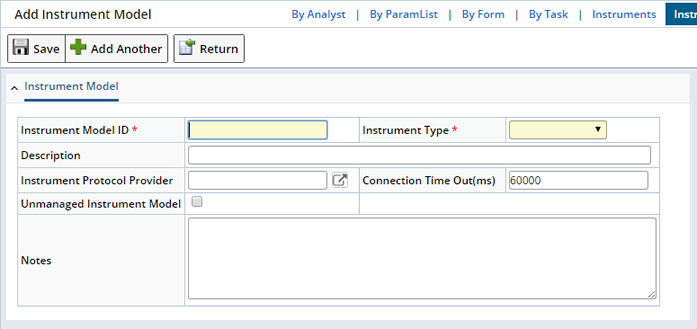
Add an Instrument Model by clicking "Add".
Add Instrument Models |
|
| Field | Description |
| Instrument Model Id | Identifier of the Instrument Model. |
| Instrument Type | Identifier of the Instrument Type. |
| Description | Textual description. |
| Instrument Protocol Provider | Class file that implements sapphire.ext.BaseInstrumentProvider to replace the OOB implementation (see Add Instrument Protocol Provider). |
| Connection Time Out(ms) | The Instruments under the instrument model should respond within this time period. If it does not, the system will automatically timeout. |
| Unmanaged Instrument Model | When checked, Instruments of this Model are not managed (see Instrument Certification). A Beaker or Flask are examples of an Unmanaged Instrument (or Equipment). |
| Notes | Additional information regarding the Instrument Model. |
Add Model Commands |
Model Commands map the Instrument response to LabVantage data.

|
| Field | Description | ||||||||
| Command | Name of the command (you can specify any arbitrary name). | ||||||||
| Label | Label Name to be displayed on the Instrument popup. | ||||||||
| ASCII Code | ASCII code based on the command specified by the instrument manual. | ||||||||
| Response Type | Choose the Response Type when a response is expected containing
results from the instrument.
|
||||||||
| Is Default | Displays the Label Name as the default label in the instrument pop up and the keyboard shortcut (alt-ctrl-space) sends this command. | ||||||||
| Parsing Rule | Defines the parsing rule with fields and field values. | ||||||||
| Example Response | Displays the entire string for parsed rule as an example. |
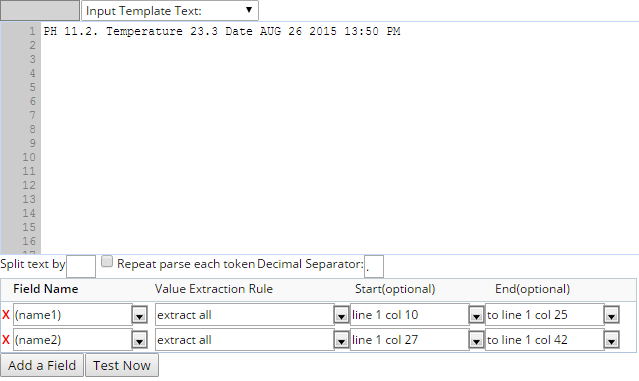
To define the Instrument Response Parsing Rule, click the lookup icon. The Edit Response Parsing Rule text box is displayed.
Following are the steps for Instrument Response Parsing:
| 1. | Specify a global rule such as "Split text by" a character, "Remote parse each token", and a character for the "Decimal Separator". |
| 2. | Click the "Add a Field" button, then select a Field Name from the dropdown (or enter one). |
| 3. | Specify the Value Extraction Rule by selecting a value from the dropdown (modify if necessary). If using Groovy, provide a global variable "s" to reference the response text. |
| 4. | Specify Start and End positions if needed. |
| 5. | Click the "Test Now" button to generate and view Parsing Results. Hovering over a result highlights the corresponding parsed token in the example data text area except when the extraction rule is a custom groovy expression. |
|
| Field | Description |
| Input Template Text | Text area where the example response for parsing rule is entered. |
| Load Instrument Response | Loads the real instrument response after connecting with a real instrument. See Load Instrument Response. |
| Try a Parsing Example | Provide few examples to practice writing parsing rules. Options are available in the "Select An Example" dropdown. |
| Select An Example | Options for parsing text. (see Response Parsing Example). |
| Split text by | Delimiter used to split text and extract values. |
| Repeat parse each token | Performs repetitive parsing for each token after splitting. |
| Decimal Separator | Decimal separator symbol when using extract number rule. |
| Field Name | Displays the field name to be used while parsing the text. |
| Value Extraction Rule | Defines the rule used to extract values (see Value Extraction Rule). |
| Start (optional) | Defines the line and column number, or a marker where the text starts for the extraction rule. |
| End (optional) | Defines the line and column number, or a marker where the text ends for the extraction rule. |
| Add a Field | Adds a Field. |
| Test Now | Generates a table showing parsed results as name-value pairs. |
Response parsing through the Input Template Text:

|
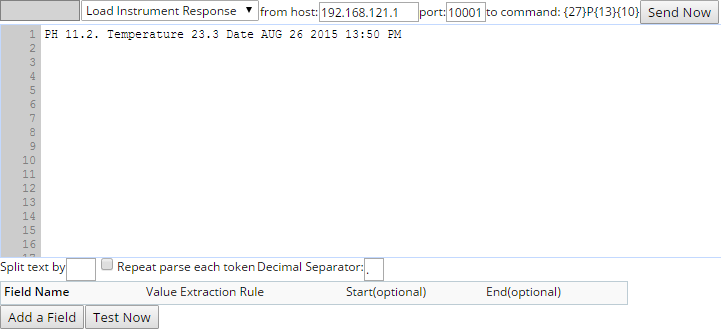
Connect with a real instrument and select the option "Load Instrument Response". Input "from host" and "port" to send the command code.
|
| Field | Description |
| from host | Input the host address. |
| port | Input the port ID. |
| Send Now | Sends the command code. |
The following response parsing examples are provided:
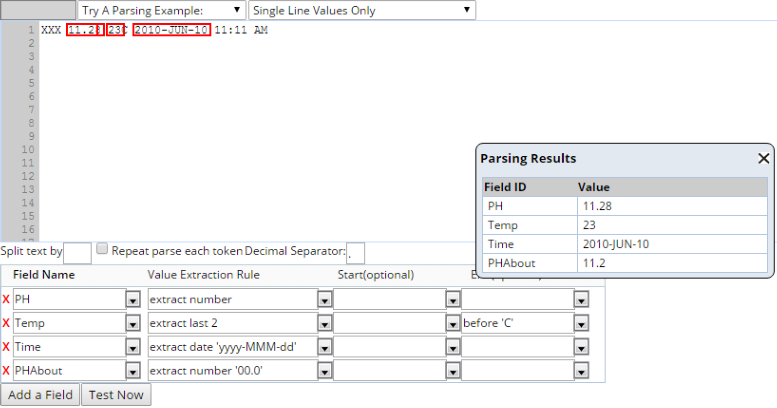
| 1. | Single Line Values Only:
|
| 2. | Single Line With Label and Value:
|
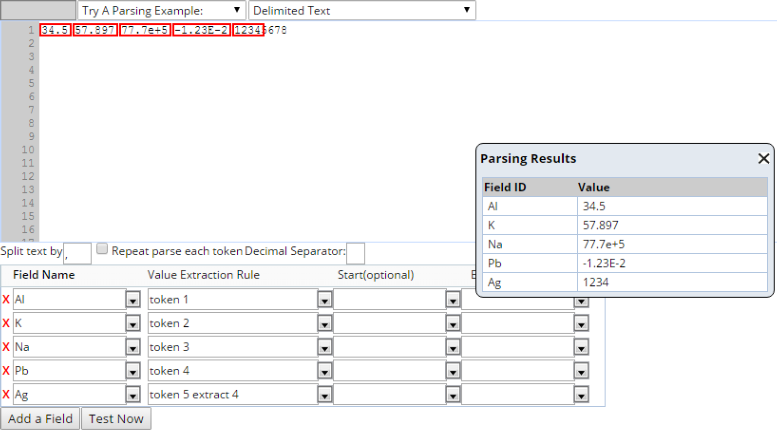
| 3. | Delimited Text:
|
| 4. | Delimited Text With Embedded Labels:
|
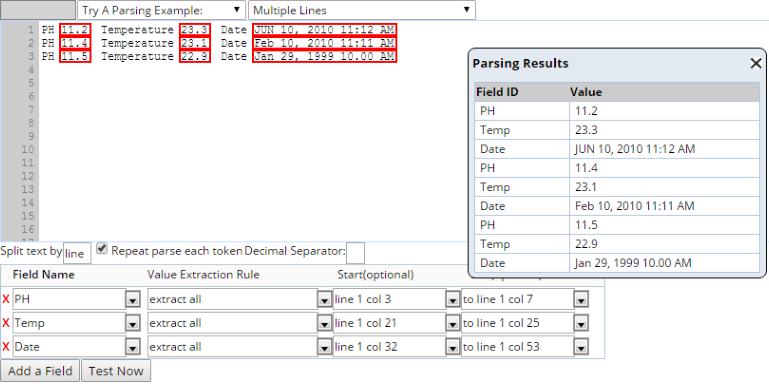
| 5. | Multiple Lines:
|
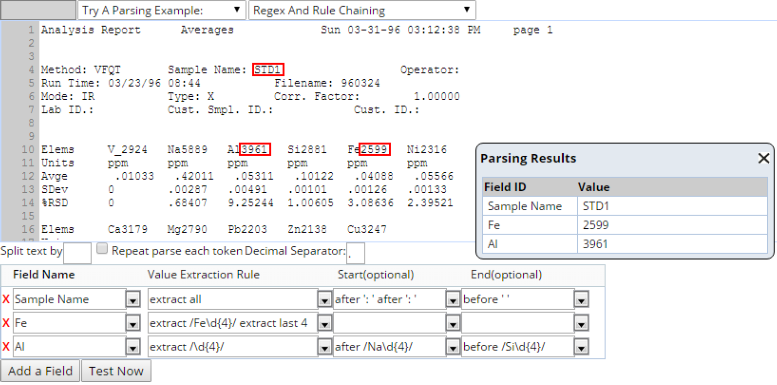
| 6. | Regex and Rule Chaining:
|
The following Value Extraction Rules are provided:
| Value Extraction Rule | Description |
| extract all | Extract all the values. |
| extract n | Extract "n" number of characters. |
| extract last n | Extract the last "n" number of characters. |
| extract number | Extract the first number. |
| extract number '(fmt)' | Extract number in the specified format, e.g., "00.0". |
| extract last number | Extract the last number. |
| extract date '(fmt)' | Extract date in the specified format, e.g., "yyyy-MM-dd". |
| extract/regex/ | Extract value through the use of regular expressions. |
| token n | Extract the nth token when a split by is defined. |
| token n extract | Extract the "n" (variable) text. |
| extract..extract.. | Chaining the extraction rule so that a later extract is based on the result of previous extract. |
| $G: (groovy) | Extract value using Groovy expressions using a global variable "s" that represents the example response String. |
LES Text |
LES Text is essentially a collection of Attributes, each Attribute defining Instructions and Information that will be rendered by each Attributes Control in the Worksheet. See LES Worksheet Generation → LES Text for more information.
Worksheet Templates |
Lets you associate a Worksheet Template with this Instrument Model. Clicking "Add" opens the Select Template dialog. Select the Template you want to add and click "Select & Return".

This Template will guide you through the steps necessary to complete a Workorder that might be used for regular instrument calibration or to schedule routine maintenance. See Instrument Certification for information about defining certification and scheduling.
See LES Worksheets → LES Worksheet Template Detail for more information about defining a Worksheet Template.
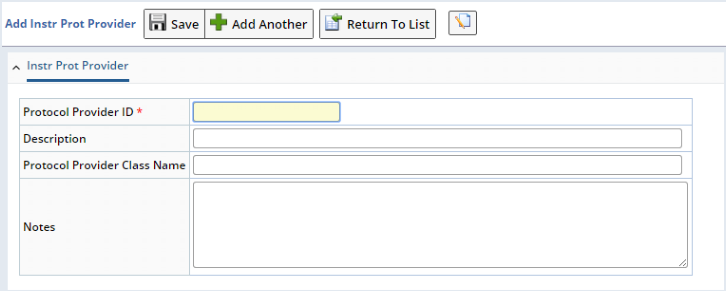
Add Instrument Protocol Provider |
The Instrument Protocol Provider field must be populated only if a custom implementation of the sapphire.ext.BaseInstrumentProvider is needed.
Click the lookup icon associated with the Instrument Protocol Provider field on the Add Instrument Model page. The "Instr prot provider" page is displayed. Add an Instrument Protocol Provider by clicking "Add".
|
| Field | Description |
| Protocol Provider ID | Identifier of the Protocol Provider. |
| Description | Textual description. |
| Protocol Provider Class Name | Fully qualified name of the class extending sapphire.ext.BaseInstrumentProvider. |
| Notes | Additional information regarding the Protocol Provider. |
Instruments |
|
|
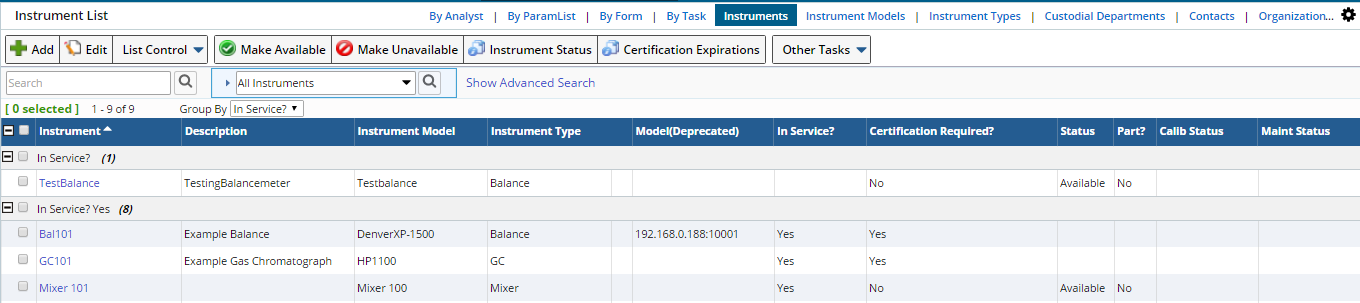
Instruments List Page |
Navigate to Lab Admin → Certifications & Resources → Instruments. The Instrument List page is displayed.
|
Add an Instrument Model by clicking "Add".
Add Instruments |

|
| Field | Description | ||||||||
| Instrument | Identify the Instrument. | ||||||||
| Description | Describe the Instrument. | ||||||||
| Status | The Instrument's Status. When first entered, Instruments have a status of Initial. Once an Instrument is made Available either by using a Certification process or manually, the Status changes to Available. See Instrument Availability for more information. | ||||||||
| Instrument Part? | Check this box if this Instrument is "Part" of another
Instrument. If you check the box, the Part tab (where you can associate Parts with Instruments) will not display. |
||||||||
| Instrument Model ID | Lookup and Select the Instrument Model. | ||||||||
| Instrument Type | The Type of Instrument. Each Model is defined as an Instrument Type, the defined Type will fill in here. | ||||||||
| Host Name | IP Address of the device. Leave blank to run instrument in Simulation mode. See Simple Instruments for detailed information about defining Host and Port. | ||||||||
| Host Port | Port on which the instrument listens. Leave blank to run instrument in Simulation mode. | ||||||||
| Model(Deprecated) | Manually enter a Model number if you are not defining Instrument Models. | ||||||||
| In Service? | Determines whether or not the Instrument is currently In Service. | ||||||||
| Certification Required? | Specifies whether or not Instrument Certification is required.
The option you choose here determines which tabs display upon saving. See Certification Process for more detailed information about adding a Certification Schedule. |
||||||||
| Certification Overrides Permitted | Specifies whether or not Instrument Certification can be overridden. | ||||||||
| Testing Lab | Testing Lab associated with this Instrument (see Departments). | ||||||||
| Work Area |
Work Area associated with this Instrument (see Departments). If you choose a Testing Lab, the Work Area lookup shows only Work Areas in that Testing Lab. If you choose a Work Area, the "Testing Lab" is automatically populated with the Parent Testing Lab for the Work Area. |
For information about the Certification options, Usage and Information tabs see Instrument Certification.
Parameter List Configuration and Data Entry |
|
|
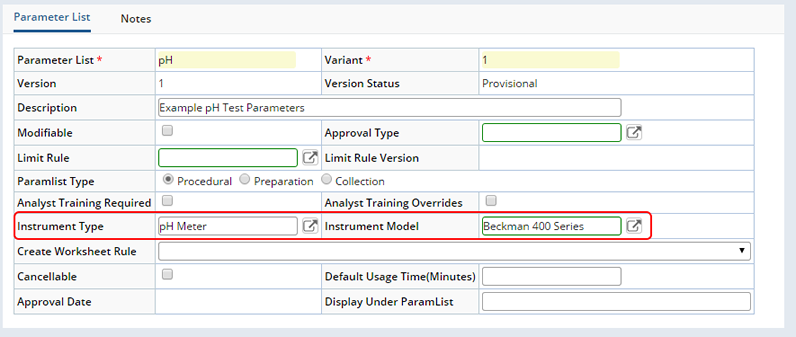
Parameter List Configuration |
You must specify the "Instrument Type" and "Instrument Model" in the relevant Parameter List as shown below. The Data Set must also be added to the relevant Sample.
|
Data Entry Interface |
| NOTE | Alternatively, press Ctrl-Alt-Space to display the Instrument Connection popup. |
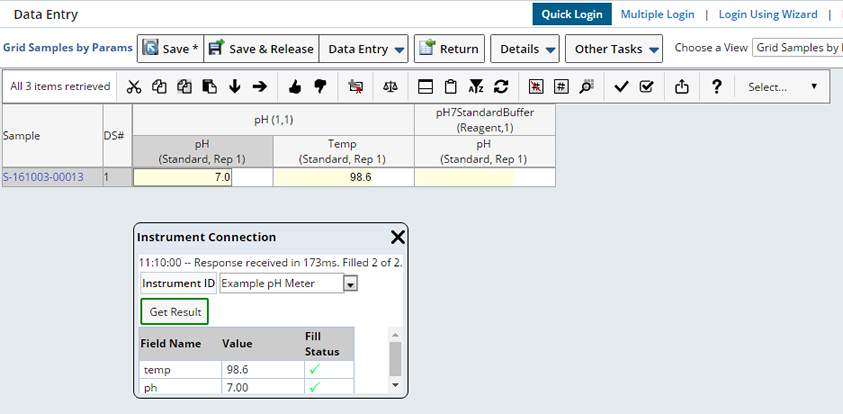
| Field | Description |
| Instrument ID | Displays the identifier of the Instrument that collected the data. |
| Get Result | Shows the result after parsing. |
| Field Name | Name of the Field for which results have been parsed. |
| Value | Parsed value. |
| Fill Status | Displays the data reading status. |
Scanning of Instrument Id
The Instrument popup in the Data Entry page supports scanning in an InstrumentId. The InstrumentId field is a dropdown list. When the popup opens, focus defaults to the InstrumentId field, thus allowing entry or scanning in an InstrumentId. On enter, the InstrumentId is validated against the list of valid Instruments for the Data Item. If valid, the behavior is the same as if choosing a valid instrument from the dropdown list. If the InstrumentId is not valid, an error message is displayed.
Unmanaged Instruments |
| |
Unmanaged Instruments are instruments (or individual pieces of equipment) that do not need to be individually identified in LabVantage (such as Beakers or Flasks). These pieces of equipment may be necessary when performing a test and can be specified with a Test Method. Unmanaged Instruments are defined in the same way as managed Instruments. Define an Instrument Type (Beaker), then an Instrument Model (50 ml Beaker). At each level, you can identify the Instrument as an "Unmanaged Instrument". Doing so simply means that the individual Instrument used for this sample, need not be specified when performing a test.
During Data Entry, define the actual amount of equipment used.
Associating Instruments with Test Methods |
| |
Define Instruments (or equipment) at the Test Method level to more specifically detail which equipment or Instruments are required for a test. Specify whether the Instrument is for the entire Test Method (available for all Parameter Lists), or link the Instrument to a specific Parameter List. When performing Data Entry for a specific Parameter List only those defined specifically for that Parameter List (or the entire Workitem) display (unless configured otherwise, see Configuring the Instrument Chooser Dialog).
Test Method Configuration |
Use the Equipment detail to specify the equipment (Managed or Unmanaged Instruments) needed to perform the test.

| Option | Description |
| Equipment Class | The type of Equipment (Instrument Type) to use. These values are defined as Instrument Types. |
| Model | The Equipment (Instrument Model) Model. These values are defined as Instrument Models. If you choose the Equipment Class first, Model lookup is restricted to Equipment within that Class, otherwise the Class is filled when you choose an Equipment Model. |
| Equipment Id | The specific piece of Equipment to use.
Typically, the specific Equipment ID is chosen later during processing when the Equipment Type and Class is provided. However, if you know the specific piece of equipment to use, it may be specified here. |
| Count | The number of Instruments or pieces of equipment needed. |
| Mandatory | Indicates that use of the specified Equipment is mandatory. When "Mandatory" is checked, the specified Equipment must be selected during Data Entry. If not, the status of the Sample and Workitem will not transition to Complete.
The "Mandatory" checkbox is not available for Unmanaged Instruments. |
| Linked To | The Parameter List with which the Equipment is associated. Each piece of equipment or Instrument can be associated with a specific Parameter List (defined in the Parameter List detail tab). These Parameter Lists are available in the dropdown list.
If not defined, the equipment is associated with the overall workitem. During Data Entry, only Equipment specifically associated with the Parameter List and/or the overall Workitem are available. See Configuring the Instrument Chooser dialog below for more information. |
| NOTE | If you add an Instrument, already listed on a Parameter List associated with the Test Method, a warning message is generated indicating that the Instrument is already defined for the Parameter List. |
Results Producing (managed) Instruments defined here are available in the Instrument Connection dialog during Data Entry.
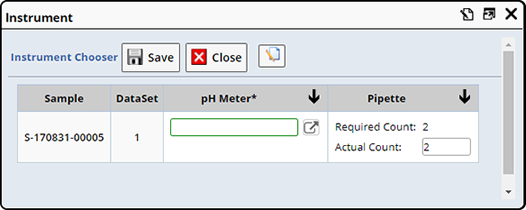
Choosing the Equipment During Data Entry |
During Data Entry use the Data Entry → Choose Equipment menu item to select the piece of equipment or Instrument you want to use. With the Test Method defined as above the Instrument dialog displays as follows:
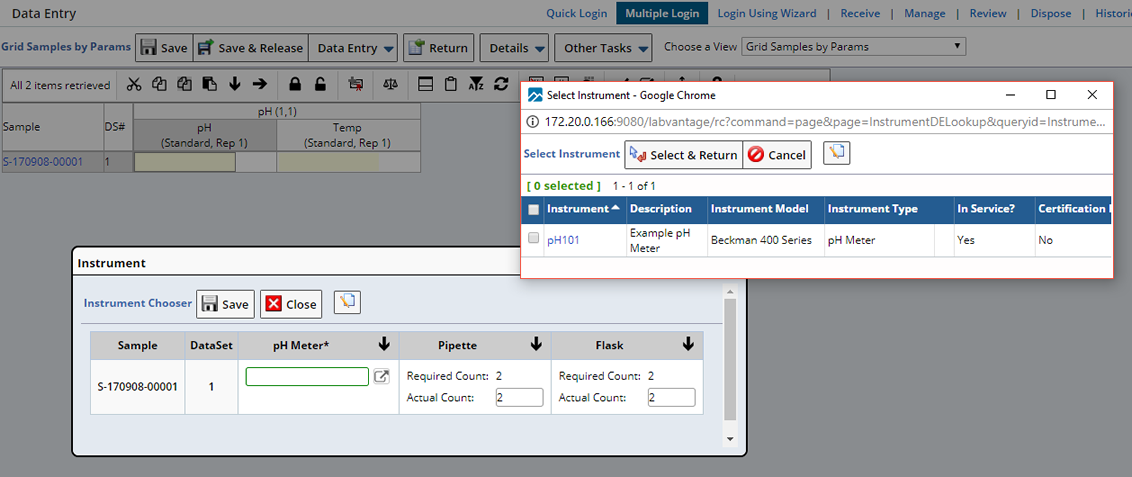
Note that the specifid Balance and Titrator(defined for the whole Workitem), and the pH Meter (defined specifically for the pH Parameter List) are available. The Unmanaged Instruments (Pipette and Flask) display the count specified in the Test Method as well as a field in which you can input the actual count. The Managed Instruments provide a lookup where you can select the specific Instrument used (only Instruments that are Certified and Available will be shown). Multiple lookup boxes will display when the count is more than 1. In the lookup, select multiple Instruments, the lookup boxes are filled with the selected Instruments.
Configuring the Instrument Chooser Dialog |
When an Instrument is associated with a Parameter List, an SDIDataRelation is created from the SDIData to the Instrument. When an Instrument is "Linked To" a specific Parameter List on the Test Method an SDIWorkitemRelation is created from the SDIWorkItem to the associated Instrument. You can configure the Instrument Chooser to display information from only the SDIWorkitemRelation table or the SDIDataRelation table, or both. OOB information from both tables is shown as above.
In the advancedtoolbar Element under DataEntry, for the "AddInstrument" button, the Second Validation Javascript property determines what displays in the dialog.
| Option | Enter this Javascript Function... | To Show... |
| Both
(OOB) | advanceToolbarReagentDataentry.addInstrument(1000,600) | Both, Instruments defined on the Test Method and those defined on the Parameter List.
When Both, Instruments defined on the Parameter List are identified with an "*" as seen above for the pH Meter. |
| sdidatarelation | advanceToolbarReagentDataentry.addInstrument(1000,600,'','sdidatarelation'); | Only Instruments defined on the Parameter List. |
| sdiworkitemrelation | advanceToolbarReagentDataentry.addInstrument(1000,600,'','sdiwirelation'); | Only Instruments defined on the Test Method. |
The UseInstrument Page Type lets you further configure fields on the Instrument dialog.