AdvancedCreateSDI is enhanced variant of Create SDI
that provides merging and conditional execution properties.
Property Name
Description
SDC Id
Identifier of the SDC for the new SDIs.
Schedule Condition
Determines if the Task is executed. You can use the following
tokens: queryProcessor, source.* (fields from the Source SDI) and template.*
(fields from the Template SDI).
Column Values
Column values that are added to the generated SDI.
Property Name
Property Value
Column Id
Identifier of the column.
Value
Value in the column. You can use the following tokens:
[eventdate], [eventnum], [sourcesdcid], [sourcekeyid1], [sourcekeyid2],
[sourcekeyid3], [planid], [planitemid].
Merge
Choose whether or not to merge created item's details with
an existing SDI. If Merge is set to Yes, the created Item's details (Tests,
Data Sets, Specs) are merged to an existing SDI if an SDI filling given
condition exists.
Property Name
Property Value
Merge
Yes enables merging.
Event Date Field
Date field in the Scheduled SDC that is compared to
the Event date of the Schedule Event.
Grace Period
Unit
The event date must be within these limits. Enter
0 if the date must match. Enter the Unit of the Grace Period (such
as Days or Hours).
Match Columns
The value of this column must match on existing SDI
and scheduled SDI. Choose to enable or disable Columns. If No, the
column is not checked.
Extend Where
Extended where clause.
Force New Workitem/DataSet
Yes adds Tests and Parameter Lists even though they
exist on the original SDI. The Default is No.
Copy Security Department and User
Determines if the Security Department and User are copied
from the Source, Schedule Plan or Plan Item to the created SDI.
Property Name
Property Value
Copy Security Department and User
Yes copies the Security Department and User.
Copy From
Choose where to copy from (Source, Schedule Plan or
Schedule Plan Item).
Instance Properties
Options for creating Instances in Sample Monitoring.
Property Name
Property Value
Populate Instances
Whether or not to populate the Instance Counts to the SDI created by the task.
Instance Count columnid in Source SDC
The columnid containing the Instance Count in the Source SDI.
Instance Column in Primary SDC
The columnid in the primary SDC where the current Instance is saved.
Group by Columns
Determines when the Instance Count is increased. OOB settings add a new Instance when the Schedule Plan, Schedule Plan Item, and Event Date are the same. Samples created from a single Schedule Plan Item, at a given time, increase the number.
Advanced Pull Sample creates a pull of a specified quantity, creates Samples
(current and deferred) for the pull, and can optionally create a Workorder
(with a grace period) to provide instructions.
Unit Validation is performed throughout Stability. See Stability
Unit Validation for details about Unit Validation and defining Unit Conversions.
Property Name
Description
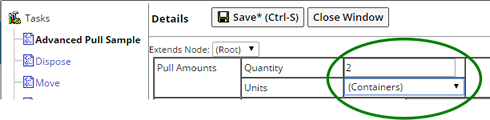
Pull Amounts
Specifies quantities of the unit under Study to be pulled.
Value
Description
Quantity
Integer quantity to be pulled.
Units
Unit of measure associated with the Quantity.
As you specify value above, it overrides the inventory calculation.
There are two ways of specifying value:
Raw Unit
Specify the raw units of material needed for inventory
calculation.
Typically for Advanced Pull Sample, the raw unit is specified
for each Test Method added. But, if you specify a pull amount
here, this value overrides the total value given in the Test Method.
Example:
Say you specify the raw units to pull for the individual Test
Methods while defining the Working
Set of Test Methods.
Alkali Metals = 20ml
Assay = 10ml
Total = 30ml (20ml + 10ml)
Ideally during inventory calculation the raw pull amount of 30cc
is considered.
Now, you also specify a pull amount value for the task.
Here, a pull amount of 50ml is specified.
Therefore during inventory calculation, this value (50ml) is
considered instead of value (30ml) specified for Test Methods.
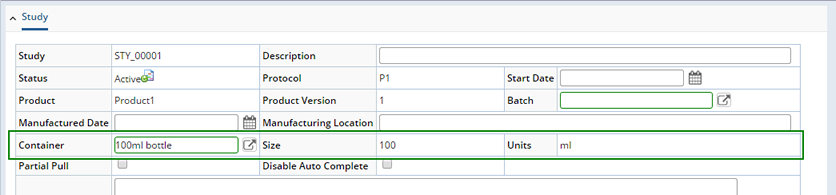
Specify the number of containers needed for inventory
calculation.
Typically, based on the total raw unit specified for Test Methods
in Advanced Pull Sample and the Container Type selection in Protocol/Study,
the total number of container is derived during inventory calculation.
But, if you specify the number of containers in Pull Amount,
this value overrides the value derived during inventory calculation.
Example:
Say you specify the raw units to pull for the individual Test
Methods while defining the Working
Set of Test Methods.
Alkali Metals = 20ml
Assay = 10ml
Total = 30ml (20ml + 10ml)
After specifying raw units, you also specify the container type
in Protocol/Study.
The selected Container size is 100ml.
Therefore in the result of inventory calculation 1 container
is needed for raw pull amount of 30ml.
Now, you also specify the number of containers for the task.
Specify 2 containers in the task.
Therefore now for the task 2 containers will be used instead
of 1.
Sample Template (if any) upon which the Sample is
based. Typically you should choose a blank row if not based on a
Sample Template.
Column
Values
Copies information from the s_sample table to the
new Samples. There are three ways of using this:
1.
For Column, choose the Sample column that holds
the value from the s_sample table.
For Value From, choose the column from the s_sample
table that will be copied into the Sample column.
The example below copies the Event Date from the s_sample
table into the newdate column of the new Samples.
Property Name
Property Value
Column
newdate
Value
From
Event Date
2.
For Column, choose the Sample column that will hold
the value from the s_sample table.
For Value, enter a variable enclosed in brackets.
For Value From, choose the column from the s_sample
table that will be represented by the variable. The variable
is then copied to the Sample column.
3.
For Column, choose the Sample column that will hold
the value from the s_sample table.
For Value, enter a string that will be copied into
the Sample column.
Specs
Specifications associated with the new Samples.
a.
Click Add Item. This inserts a new tab.
b.
Choose one or more Specifications from the lookup page.
Choose specifications in two ways:
Click Select and Return to add a specific
version of a specification.
Click Select Current and Return. The
system uses the version of the specification that is current
at the time of the task execution.
Create Distinct Laboratory Samples
Allows the creation of separate samples based on the distinct
laboratories defined in the Test Methods on the workitems applied
to the Pull Task.
If No, one sample is created with multiple workitems
for the associated laboratories.
If Yes, a sample is created for each laboratory
as well as a Trackitem for each referencing the Workitem on each
Sample.
For Example:
Test Methods and their Laboratories
Assigned to the Pull Task
Samples Created
Tests
S_sample.Security Department
PH
Chemistry
S00001
PH, LOD, Assay
Chemistry
LOD
Chemistry
Assay
Chemistry
Appearance
Physical Testing
S00002
Appearance
Physical Testing
Biological
MicroLab
S00003
Biological
MicroLab
Precious Metals
None
S00004
Precious Metals
Since no laboratory was defined in this test
the Security Department of the Study is populated here.
Defer Sample Creation?
The Sample creation is delayed until the corresponding
Workorder is completed (signifying that the Sample is actually pulled).
Once the sample is actually pulled in laboratory, then the Sample
ID is created in the application.
The concept of deferred creation of Sample is desired for two
reasons:
If the Sample is never pulled, there is no need to ever create
the Sample in the application.
Defer Sample creation as long as possible to identify and
confirm which tests are required on this particular Sample.
Create Workorder
If you want to create a Workorder when the Advanced Pull
Sample Task executes, this specifies the Workorder details.
Value
Description
Create?
Yes creates a Workorder.
Instructions
Text displayed on the Plan. These will be the instructions
to the person doing the work during the Study.
Assign To
User to whom the Workorder is addressed.
Grace
Period
Add a grace period to a Workorder (for Sample pull).
Grace periods associated with a workoder signifies that the Workorder,
which needs to be completed on a specific date/time, now has some
extra day/time added to it for completion.
Value
Description
Default Grace Period
Define a single grace period for the Sample
pull regardless of the time span between condition Start Date
and the actual pull date of the Sample.
Duration of the timepoint refers to the time span from
the start date of a condition until the actual pull date
of the Sample. The value specified for the default grace
period applies to all timepoints, all Advanced Pull Sample
Workorders.
This rule applies when there is no timepoint based grace
period defined.
Value
Description
Early Grace Period
Integer value of the grace period. Combined
with the Unit determines the amount of time the Workorder
can be completed early.
Late Grace Period
Integer value of the grace period. Combined
with the Unit determines the amount of time the Workorder
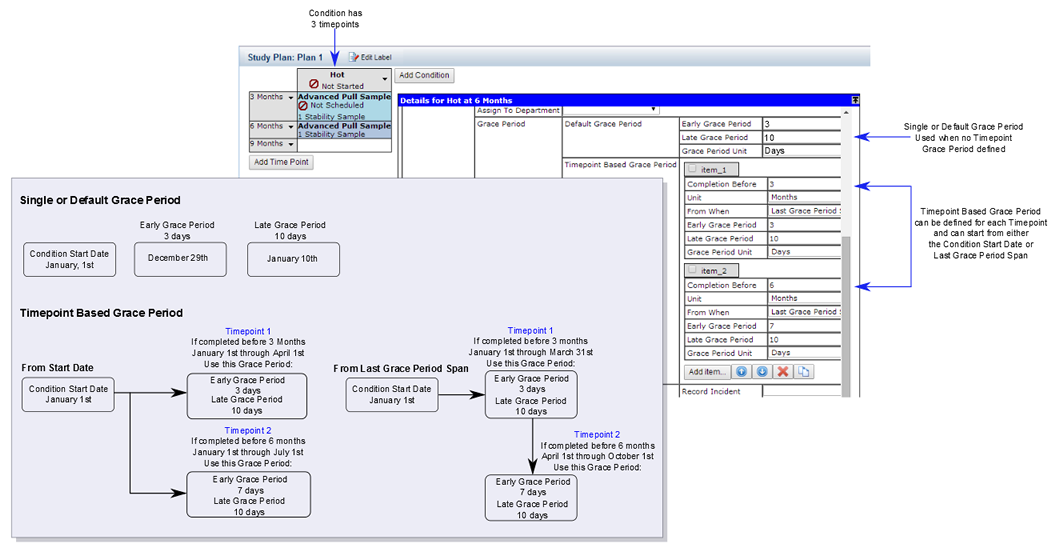
can be completed late.
Specified grace periods for individual timepoints
with regard to the timepoint duration.
Grace period is based on the time span of the start date
of a condition until the actual pull date. The value of
the grace period applies to individual Timepoints and individual
Sample Workorders. Thus you have the option to specify more
than one grace period (such as for each of the Timepoints).
Value
Description
Completion Before
Define the Timepoint duration.
Unit
Unit, such as hours, days or months.
From When
Determines if the time span should begin
at the Condition start date, or at the end of the last
grace period.
Start Date
The "Completion Before" duration starts
from the Condition start date and includes the
end time point.
If left blank, this defaults to Last Grace
Period.
Last Grace Period Span
The "Completion Before" duration starts
from the end of "Last Grace Period Span"
and does not include the end Timepoint.
Early Grace Period
The duration a Sample may be pulled
early. If left blank, the Early grace period defaults
to the value defined in Late Grace Period.
Late Grace Period
The duration a Sample may be pulled
late. If left blank, the Late grace period defaults
to the value defined in Early Grace Period.
Grace Period Unit
Unit of measure associated with the
period.
For example:
Say the condition start date is 1st January.
Completion Before
3
Unit
month
Early Grace Period
3
Late Grace Period
10
Grace Period Unit
day
The timepoint duration is 3 months, the Early Grace period
is 3 days and the Late Grace Period is 10 days.
The pull Sample task in the Workorder is due on (January
1st + 3 months) = April 1st. It is calculated by start
date and the interval time duration.
Based on the Early and Late Grace periods, the pull Sample
task in the Workorder can be completed 3 days early and
up to 10 days late from the due date (from 28th March
to 10th April).
Completion Before
6
Unit
month
Early Grace Period
7
Late Grace Period
10
Grace Period Unit
day
The timepoint duration is 6 months, the Early Grace period
is 7 days and the Late Grace Period is 10 days.
The pull Sample task in the Workorder is due on (January
1st + 6 months) = July 1st. It is calculated by start
date and the interval time duration.
Based on the Early and Late Grace periods, the pull Sample
task in the Workorder can be completed 7 days early and
up to 10 days late from the due date (from 23rd June to
10th July).
If "From When" is "Start Date" the
end time point is included in the span. In other words if
the condition Start Date is January 1st and the timepoint
duration is 3 months the end time point of April 1st is
included. If an event occurs on April 1st the 3 month duration
grace period is used, 3 days early 10 days late.
If "From When" is "blank" or "Last
Grace Period Span" the end time point (April 1st) is
not included, for an event occurring on April 1st the 6
month timepoint duration grace period is used, 7 days early
10 days late.
Grace Period Comparison
Incident
If the grace period is violated, this specifies
the Incident to be recorded. An Incident can be recorded for
Workorders, Samples, and Studies. Incidents are handled by
the Lab Investigations
module.
Value
Description
Record Incident
Incident to record.
Incident Template
Uses the selected Template for Incident
recording.
CreateDisposeWO issues disposal instructions to personnel.
Property Name
Description
Instructions
Text displayed on the Plan. These will be the instructions
to the person doing the work during the Study.
Assign To
User to whom the instructions are addressed.
Assign To Department
Department to which the Work Order is assigned.
Priority
Choose the Priority based on requirements.
Columnvalues
Lets you write column values into the Workorder table:
a.
Click Add Item.
b.
For the Column, click the ellipsis. This opens a
window showing all columns in the Workorder table. Choose
the column into which you want to write the new value.
c.
For the Value, enter the value you want to write into
the Workorder column.
Grace Period
For a detailed explanation, refer to the Grace
Period for AdvancedPullSample, as the concept is similar.
CreateMoveWO notifies personnel to move the unit under study from
one Environment to another.
Property Name
Description
Target Environment
Environment to which the unit under study is to be moved.
Instructions
Text displayed on the Plan. These will be the instructions
to the person doing the work during the Study.
Assign To
User to whom the instructions are addressed.
Assign To Department
Department to which the Work Order is assigned.
Priority
Choose the Priority based on requirements.
Columnvalues
Lets you write column values into the Workorder table:
a.
Click Add Item.
b.
For the Column, click the ellipsis. This opens a
window showing all columns in the Workorder table. Choose
the column into which you want to write the new value.
c.
For the Value, enter the value you want to write into
the Workorder column.
Grace Period
For a detailed explanation, refer to the Grace
Period for Advanced Pull Sample, as the concept is similar.
CreateSDI adds one or more SDIs or SDI Templates to
the database. You can add/remove Data Sets, Data Items, Workitems, Specifications
to/from the SDIs, and override these items that are already associated with
the Template.
Property Name
Description
SDC
Identifier of the SDC for the new SDIs.
Copies
Number of SDIs to add to the database. If you specify
an SDI Template (below), this adds copies of the Template.
Template
Use this only if you want to add SDI Templates.
Property Name
Description
Template
Identifier of the SDI Template.
Exclude Dataset
Exclude Workflow
Exclude Workitem
"Yes" removes all associations that exist between
the SDI Template and any Data Sets, Workflows, Workitems, and/or
Specifications.
After removing associations, you can establish new ones using
the "Data Sets", "Workflows", "Workitems",
and "Specs" properties.
Apply Workitem
"Yes" adds a Workitem to the SDI Template
and Applies the Workitem.
"No" adds a Workitem to the SDI Template, but does
not Apply the Workitem.
Determines if Specification Templates are to be
excluded.
Column Values
Copies information about the current Plan, Folder, and
Plan Item from the Scheduler data model to the new SDIs. This is how you
write the date and time specified by the Schedule Rule into the SDI. For
example, if you Execute Ahead, and your Schedule Rule says "Every day
@ 0600", you can write the time from the Schedule Rule (defined in the
Event Date column of the Scheduler's ScheduleEvent table) into any column
of the SDI you are creating.
There are three ways of using this:
1.
For Column, choose the SDI column that will hold the value
from the Scheduler table.
For Value From, choose the column from the Scheduler table
that will be copied into the SDI column.
The example below copies the Event Date from the ScheduleEvent
table into the newdate column of the new SDIs.
Property Name
Property Value
Column
Value From
Value
2.
For Column, choose the SDI column that will hold the value
from the Scheduler table.
For Value, enter a variable enclosed in brackets.
For Value From, choose the column from the Scheduler table
that will be represented by the variable. The variable is then
copied to the SDI column.
The example below copies the Event Date from the ScheduleEvent
table into the variable [date], then inserts the variable into
the newdate column of the new SDIs.
Property Name
Property Value
Column
Value From
Value
3.
For Column, choose the SDI column that will hold the value
from the Scheduler table.
For Value, enter a string that will be copied into the
SDI column.
The example below copies the Value into the newdate column of
the new SDIs.
Property Name
Property Value
Column
Value From
Value
If you are adding SDI Templates, choose "Yes" for Override Template
if you want to override the value in the SDI Template.
Here are descriptions of columns you can choose from the Scheduler
data model:
Column
Description
Event Date
Date and time the Scheduled Event is due to occur
(key column of the ScheduleEvent table).
Event Number
Event number assigned to the Scheduled Event (key
column of the ScheduleEvent table).
Plan Id
Identifier of the Plan (key column of the SchedulePlan
table).
Plan Item Id
Identifier of the Plan Item (key column of the SchedulePlanItem
table).
Source SDCId
If the Folder represents an SDI, this
is the SDC and key column(s) required to identify the SDI.
Source KeyId1
Source KeyId2
Source KeyId3
Be certain to add relevant columns to the SDC, otherwise you will have
no place to put the values from the Scheduler tables.
NOTE:
The next four properties associate items with the new SDIs. If
you are adding SDI Templates, anything you associate here will be
added to items already associated with the Template.
Alternatively, you could use the Template properties to remove
existing associations with the Template, then make new ones using
the properties below.
Data Sets
Data Sets and Data Items that will be associated with
the new SDIs.
To associate a Data Set one or more of its Data Items:
a.
Click Add Item. This inserts a new Data Set tab.
b.
Click the ellipsis. This opens a window with a select list
at the top. The list shows the keys of all Parameter Lists
in the database.
c.
Use the select list to choose the Parameter List. After choosing
one, the window displays all Parameters in the Parameter List.
d.
Use the checkboxes to choose the Parameters, then click OK.
The Data Set and Data Items are inserted into the Data Sets field and
displayed using Expression Editor syntax.
Workflows
Workflows to add in addition to what is defined in the
Template (if any) and not excluded.
Workitems
Workitems associated with the new SDIs. The "applyworkitem"
property applies the Workitem (meaning each Workitem Item is actually
associated with the SDI).
Specs
Specifications associated with the new SDIs.
Copy Security Department and User
Determines if the Security Department and User are copied
from the Source, Schedule Plan or Plan Item to the created SDI.
Property Name
Property Value
Copy Security Department and User
Yes copies the Security Department and User.
Copy From
Choose where to copy from (Source, Schedule Plan
or Schedule Plan Item).
Instance Properties
Options for creating Instances in Environmental Monitoring.
Property Name
Property Value
Populate Instances
Populate the Instance Counts to the SDI created by task.
Instance Count columnid in Source SDC
The columnid containing the Instance Count in the Source SDI.
Instance Column in Primary SDC
The columnid in the primary SDC where the current instance is saved.
CreateShakeWO notifies personnel to shake the unit under study.
Property Name
Description
Instructions
Text displayed on the Plan. These will be the instructions
to the person doing the work during the Study.
Assign To
User to whom the instructions are addressed.
Assign To Department
Department to which the Work Order is assigned.
Priority
Choose the Priority based on requirements.
Columnvalues
Lets you write column values into the Workorder table:
a.
Click Add Item.
b.
For the Column, click the ellipsis. This opens a
window showing all columns in the Workorder table. Choose
the column into which you want to write the new value.
c.
For the Value, enter the value you want to write into
the Workorder column.
Grace Period
For a detailed explanation, refer to the Grace
Period for Advanced Pull Sample, as the concept is similar.
CreateWorkorder issues generic instructions to personnel. This is not related
to the Add
Workorder feature.
Property Name
Description
Type
Identifies the type of Workorder this will be. The word
you use here should describe the instruction (such as "Pull"
or "Move").
Instructions
Text displayed on the Plan. These will be the instructions
to the person doing the work during the Study.
Assign To
User to whom the Workorder is addressed.
Assign To Department
Department to which the Work Order is assigned.
Priority
Choose the Priority based on requirements.
Columnvalues
Lets you write column values into the Workorder table:
a.
Click Add Item.
b.
For the Column, click the ellipsis. This opens a
window showing all columns in the Workorder table. Choose
the column into which you want to write the new value.
c.
For the Value, enter the value you want to write into
the Workorder column.
Grace Period
This adds a grace period to the Workorder completion date
(for Sample pull).
Value
Description
Default Grace Period
Specified grace period without regard to the duration
of the Timepoint.
Duration of the Timepoint refers to the time span from the start
date of a condition till the actual pull date of the Sample. The
value specified for the default grace period applies to all Timepoints.
This rule applies when there is no Timepoint based grace period
defined.
Value
Description
Early Grace Period
The duration a Workorder may be completed
early. If left blank, the Early grace period defaults to the
value defined in Late Grace Period.
Late Grace Period
The duration a Workorder may be completed
late. If left blank, the Late grace period defaults to the
value defined in Early Grace Period.
Grace Period Unit
Unit of measure associated with the grace
period.
Timepoint Based Grace Period
Specified grace periods for individual Timepoints
with regard to the Timepoint duration.
Grace period is based on the time span of the start date of a
condition till the actual pull date.
Value of the grace period applies to individual Timepoints and
individual Sample Workorders. Thus you have the option to specify
more than one grace period (such as for each Timepoint).
Value
Description
Completion Before
Definition of the timepoint duration. Time
range from the start date of the condition till the actual
pull date.
Unit
Unit of measure associated with the period.
From When
Choose whether to make all Grace Period starting
times the same as the condition start date or start at the
end of the previous Grace Period span.
Start Date
From the condition start date (span includes
the end time point).
Last Grace Period
At the end of the last or previous Grace Period (span
does not include end time point).
Early Grace Period
The duration a Workorder may be completed
early. If left blank, the Early grace period defaults to the
value defined in Late Grace Period.
Late Grace Period
The duration a Workorder may be completed
late. If left blank, the Late grace period defaults to the
value defined in Early Grace Period.
If the grace period is violated, this specifies
the Incident to be recorded. An Incident can be recorded for Workorders,
Samples, and Studies. Incidents are handled by the Lab
Investigations module.
Value
Description
Record Incident
Incident to record.
Incident Template
Uses the selected Template for Incident recording.
GenericPullSample is a simplified version of AdvancedPullSample,
which was introduced as a replacement in LabVantage R4.6 (13-Jul-2007). However,
GenericPullSample is still supported.
Like AdvancedPullSample, GenericPullSample also creates a pull of a specified
quantity, creates Samples, and can optionally create a Workorder to provide
instructions.
Property Name
Description
Pull Amounts
Specifies quantities of the unit under Study to be pulled.
Value
Description
Quantity
Integer quantity to be pulled.
Units
Unit of measure associated with the Quantity.
As you specify value above, it overrides the inventory calculation.
There are two ways of specifying value:
Raw Unit
Specify the raw units of material needed for inventory
calculation.
Typically for Advanced Pull Sample, the raw unit is specified
for each Test Method added. But, if you specify a pull amount
here, this value overrides the total value given in the Test Method.
Example:
Say you specify the raw units to pull for the individual Test
Methods while defining the Working
Set of Test Methods.
Alkali Metals = 20ml
Assay = 10ml
Total = 30ml (20ml + 10ml)
Ideally during inventory calculation the raw pull amount of 30cc
is considered.
Now, you also specify a pull amount value for the task.
Here, a pull amount of 50ml is specified.
Therefore during inventory calculation, this value (50ml) is
considered instead of value (30ml) specified for Test Methods.
Specify the number of containers needed for inventory
calculation.
Typically, based on the total raw unit specified for Test Methods
in Advanced Pull Sample and the Container Type selection in Protocol/Study,
the total number of container is derived during inventory calculation.
But, if you specify the number of containers in Pull Amount,
this value overrides the value derived during inventory calculation.
Example:
Say you specify the raw units to pull for the individual Test
Methods while defining the Working
Set of Test Methods.
Alkali Metals = 20ml
Assay = 10ml
Total = 30ml (20ml + 10ml)
After specifying raw units, you also specify the container type
in Protocol/Study.
The selected Container size is 100ml.
Therefore in the result of inventory calculation 1 container
is needed for raw pull amount of 30ml.
Now, you also specify the number of containers for the task.
Specify 2 containers in the task.
Therefore now for the task 2 containers will be used instead
of 1.
Specifies details concerning Samples created in the database
during the Pull.
Value
Description
How Many
Number of Samples to be created. Typically one Sample
is created.
Template
Sample Template (if any) upon which the Sample is
based. Typically you should choose a blank row if not based on a
Sample Template.
Column
Values
Copies information from the s_sample table to the
new Samples. There are three ways of using this:
1.
For Column, choose the Sample column that holds
the value from the s_sample table.
For Value From, choose the column from the s_sample
table that will be copied into the Sample column.
The example below copies the Event Date from the s_sample
table into the newdate column of the new Samples.
Property Name
Property Value
Column
newdate
Value
From
Event Date
2.
For Column, choose the Sample column that will hold
the value from the s_sample table.
For Value, enter a variable enclosed in brackets.
For Value From, choose the column from the s_sample
table that will be represented by the variable. The variable
is then copied to the Sample column.
3.
For Column, choose the Sample column that will hold
the value from the s_sample table.
For Value, enter a string that will be copied into
the Sample column.
Test Methods
Test Method associated with the new Samples. Choose
from the dropdown.
Specs
Specifications associated with the new Samples.
Choose from the dropdown.
Create Workorder
If you want to create a Workorder when the Advanced Pull
Sample Task executes, this specifies the Workorder details.
Value
Description
Create?
Yes creates a Workorder.
Instructions
Text displayed on the Plan. These will be the instructions
to the person doing the work during the Study.
Assign To
User to whom the Workorder is addressed.
Grace
Period
Add a grace period to a Workorder (for Sample pull).
Grace periods associated with a workoder signifies that the Workorder,
which needs to be completed on a specific date/time, now has some
extra day/time added to it for completion.
Value
Description
Default Grace Period
Define a single grace period for the Sample
pull regardless of the time span between condition Start Date
and the actual pull date of the Sample.
Duration of the timepoint refers to the time span from
the start date of a condition until the actual pull date
of the Sample. The value specified for the default grace
period applies to all timepoints, all Advanced Pull Sample
Workorders.
This rule applies when there is no timepoint based grace
period defined.
Value
Description
Early Grace Period
Integer value of the grace period. Combined
with the Unit determines the amount of time the Workorder
can be completed early.
Late Grace Period
Integer value of the grace period. Combined
with the Unit determines the amount of time the Workorder
can be completed late.
Specified grace periods for individual timepoints
with regard to the Timepoint duration.
Grace period is based on the time span of the start date
of a condition until the actual pull date. The value of
the grace period applies to individual Timepoints and individual
Sample Workorders. Thus you have the option to specify more
than one grace period (such as for each of the Timepoints).
Value
Description
Completion Before
Define the Timepoint duration.
Unit
Unit of time measurement.
Early Grace Period
The duration a Sample may be pulled
early. If left blank, the Early grace period defaults
to the value defined in Late Grace Period.
Late Grace Period
The duration a Sample may be pulled
late. If left blank, the Late grace period defaults
to the value defined in Early Grace Period.
Grace Period Unit
Unit of measure associated with the
period.
For example:
Say the condition start date is 1st January.
Completion Before
3
Unit
month
Early Grace Period
3
Late Grace Period
10
Grace Period Unit
day
The timepoint duration is 3 months, the Early Grace period
is 3 days and the Late Grace Period is 10 days.
The pull Sample task in the Workorder is due on (January
1st + 3 months) = April 1st. It is calculated by start
date and the interval time duration.
Based on the Early and Late Grace periods, the pull Sample
task in the Workorder can be completed 3 days early and
up to 10 days late from the due date (from 28th March
to 10th April).
Completion Before
6
Unit
month
Early Grace Period
7
Late Grace Period
10
Grace Period Unit
day
The timepoint duration is 6 months, the Early Grace period
is 7 days and the Late Grace Period is 10 days.
The pull Sample task in the Workorder is due on (January
1st + 6 months) = July 1st. It is calculated by start
date and the interval time duration.
Based on the Early and Late Grace periods, the pull Sample
task in the Workorder can be completed 7 days early and
up to 10 days late from the due date (from 23rd June to
10th July).
If "From When" is "Start Date" the
end time point is included in the span. In other words if
the condition Start Date is January 1st and the timepoint
duration is 3 months the end time point of April 1st is
included. If an event occurs on April 1st the 3 month duration
grace period is used, 3 days early 10 days late.
If "From When" is "blank" or "Last
Grace Period Span" the end time point (April 1st) is
not included, for an event occurring on April 1st the 6
month timepoint duration grace period is used, 7 days early
10 days late.
Grace Period Comparison
Incident
If the grace period is violated, this specifies
the Incident to be recorded. An Incident can be recorded for
Workorders, Samples, and Studies. Incidents are handled by
the Lab Investigations
module.
Value
Description
Record Incident
Incident to record.
Incident Template
Uses the selected Template for Incident
recording.
SDICertification notifies when a Certification is required (such as Instrument
Certification).
Property Name
Description
Certification Interval
Defines the time interval between calibration or maintenance
tasks ("Daily Calibration", "Weekly Calibration",
"Weekly Service", "Monthly Service", or "Yearly
Service"). This allows each "Certification Type" (above)
to be performed at different time intervals.
"Certification Interval" is a Reference Type that is copied
to the Workorder.WorkorderInterval column.
When generating LES
Worksheets for Instrument Certification Workorders, the "Worksheet
Template" detail in the Instrument Model or Instrument Type allows
a Certification Interval to be defined for each row of the detail. In
the database, the Worksheet Template is determined by matching the Certification
Interval of the Schedule Task to the record identified by the Certification
Interval in the SDIWorksheetRule.WorksheetRule column.
Certification Type
Type of Certification to be performed ("Calibration"
or "Maintenance").
Create Samples
Specifies details concerning Samples created in the database
for certification testing purposes.
Value
Description
How Many
Number of Samples to be created (typically one).
Template
Sample Template (if any) on which the Sample is
based. Leave this blank if the Sample is not based on a Sample Template.
Column
Values
Property Name
Property Value
Identifier
Unique Identifier for this item.
Column
Sample column to be reported in the notification.
Value
Value of the column. Tokens can be used such
as 'Created on [EventDate] from [Source Keyid1]'.
Tests
Tests associated with the new Samples.
Choose one or more Workitems from the lookup page. Choose
Workitems in two ways:
Click Select and Return to add a specific
version of a Workitem.
Click Select Current and Return. The
system uses the version of the Workitem that is current
at the time of the task execution.
Specs
Specifications associated with the new Samples.
Choose one or more Specifications from the lookup page.
Choose Specifications in two ways:
Click Select and Return to add a specific
version of a Specification.
Click Select Current and Return. The
system uses the version of the Specification that is current
at the time of the task execution.
Create Workorder
Specifies details concerning the Workorder created when
the Certification Task executes.
Value
Description
Message
Instructions to the person doing the work.
Assign To
User to whom the Workorder is assigned.
Assign To Department
Department to which the Workorder is assigned.
Grace
Period
Adds a grace period to a Workorder.
Value
Description
Grace Period
Defines a window in which the Workorder must
be completed.
Value
Description
Grace Period
Integer value of the grace period. Combined
with the Unit determines the amount of time in which
the Workorder must be completed late or early.
Grace Period Unit
Unit of measure associated with the
period.
Incident
If the grace period is violated, an Incident
is recorded. Incidents are recorded for Workorders, Samples,
and Studies. Incidents are handled by the Lab
Investigations module.
Value
Description
Record Incident
Determines if an Incident is recorded
when a Grace Priod is violated.