Adding Workorders |
|
|
|
Stability Workorders |
These are Workorders you can create outside of a Plan. They are stand-alone instruction sets for the purpose of assigning duties to personnel who are participating in a Study.
Begin from the Workorder List Page. This lists all Workorders created outside of any Plan, as well as any Workorders created in Plans. In the example below, WO 00006 was created outside of a Plan (note the absence of Time Point and Condition information). Others are created in a Plan Condition.

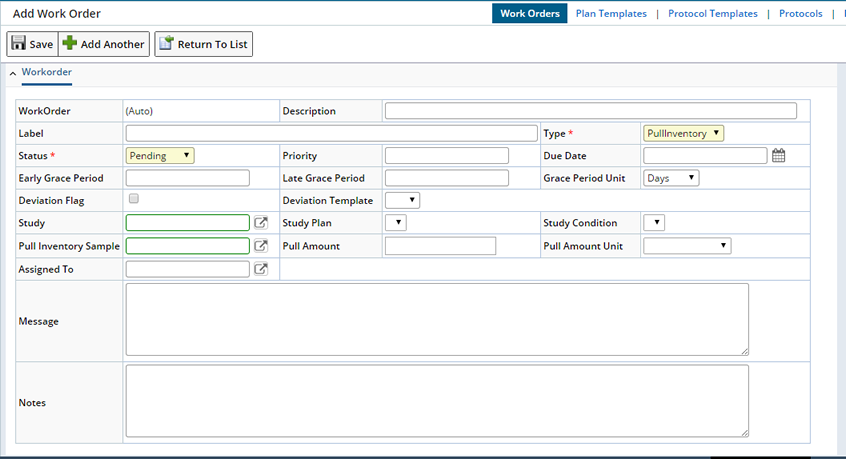
To create a Workorder outside of a Plan, click Add. Supply the information in the Add Workorder Page:

| Field | Description | ||||||||
| Workorder | Automatically generated identifier of the Workorder. | ||||||||
| Description | Enter a text description if desired. | ||||||||
| Label | Textual description that can be set if the task is configured to do so. The SamplePull task always populates this label column with "Pull". This is one of three columns that provide ancillary information about the Workorder, the other two being workorderdesc (text description) and workordertype. The workordertype contains the Reference Value defining what kind of Workorder this is. | ||||||||
| Type | Choose the type of activity to be performed. | ||||||||
| Status | Choose the Status you want to appear on the Workorder
List Page:
|
||||||||
| Priority | Choose the Priority based on requirements. | ||||||||
| Due Date | Choose the date and time the Workorder is due for execution. | ||||||||
| Early Grace Period | The duration a sample may be pulled early. If left blank each, Early or late, will default to the other. | ||||||||
| Late Grace Period | The duration a sample may be pulled late. If left blank each, Early or late, will default to the other. | ||||||||
| Grace Period Unit | Unit of measure associated with the period. | ||||||||
| Window Start Date Window End Date |
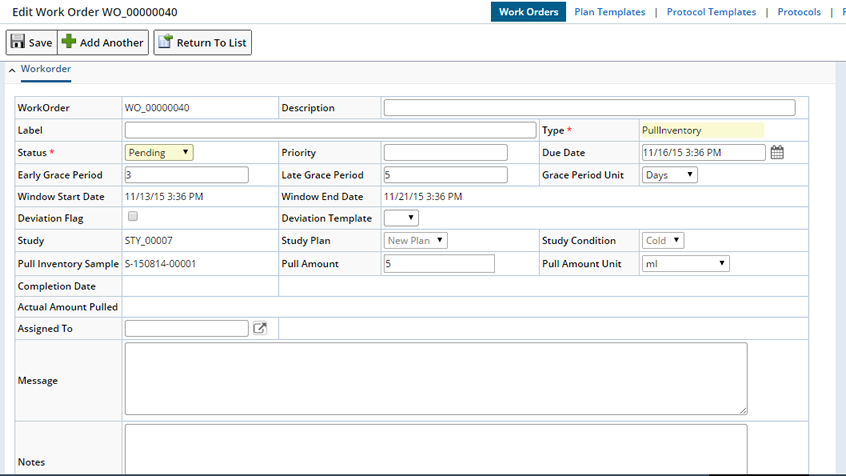
Displays in the Edit Workorder page upon Saving the Workorder (Return to List, select the Workorder and click Edit). This is the total time frame within which the task needs to be executed. If the user fails to do so then an incident is recorded. The dates are automatically inserted by the system based on the Early and Late grace periods.  For example:
Note: If either the Early or Late fields are blank the grace period will default to the other (+/- 2 days for example). If both are blank no grace period is defined. |
||||||||
| Deviation Flag | Flag to record deviation, if an incident is recorded against a Workorder. | ||||||||
| Deviation Template | Template based on which the deviation is recorded. | ||||||||
| Study
Study Plan Study Condition |
Choose the Study with which you want to associate execution of this Workorder (it will appear on the list page). Plans and Conditions associated with the Study become available. choose a specific Study Plan and Condition. | ||||||||
| Pull Inventory Sample Pull Amount Pull Amount Unit |
Using the lookup select a Sample associated with the Study for which you want to create the Workorder. Enter the Amount Pull and the Unit. |
||||||||
| Assigned To | Choose the person with whom you want to associate execution of this Workorder (it will appear on the list page). | ||||||||
| Message | Enter the instructions directed to the person executing the Workorder. | ||||||||
| Notes | Enter descriptive notes if desired. |
Once a workorder has been added or generated you can make some changes and view details about Completed Workorders.

Notice that the Window Sart and End Dates have filled in and once completed the Actual Amount Pulled is provided.
General Buttons |
|
|
| Button | Description | ||||||
| PreComplete |
When the property option "Deferred Sample Creation" is selected
for Advanced Pull Samples
task while creating a Plan, the Sample creation is delayed until the
corresponding Workorder is complete (signifying that the Sample is pulled).
Thus the Sample ID is generated only after the Workorder is complete.
However, there are times when Sample labels and Sample pull list need to be printed, containing the Sample ID. In this scenario the Workorder needs to be pre-completed, to generate the Sample ID, if it is not generated previously. |
||||||
| Print Pull List |
Printed list enumerates the entire list of Sample pull tasks associated
to Workorder. The list displays the date/time when the tasks are due.
This allows the personnel to know the daily list of tasks to execute for the Workorder. |
||||||
| Print Label |
As Sample is pulled for a test, it is kept in a container. The container
needs labeling for future reference, which generally includes Study
ID, condition, timepoint and Sample ID.
To print label Sample ID is needed. Therefore, first generate the Sample ID using "Pre Complete" button, if it is not previously generated.
A .dd file is generated by the system that contains all the label information. |
||||||
| Mark as Complete |
After all tasks are executed for a Workorder, the Workorder is ready
for completion.
The Complete Workorder maintenance page displays Workorder details. It has been determined that an exception is thrown when you try to mark a Workorder as "Complete" if the WorkOrderType is a custom Reference Value. To avoid this, create a completion page for the custom Reference Value. The exception is typically accompanied by one of these helpful messages:
|
Assignment Buttons |
|
|
Assign Department |
"Assign Department" assigns Workorders to a Department. After selecting Workorders, you are prompted to choose a Department from a lookup page, which shows only Departments with the "Departments that are Work Areas" option enabled. After selecting a Department, the Workorders are assigned to the Department.
Assign User |
"Assign User" assigns Users to a Department. After selecting Workorders, you are prompted to choose a User). If a Workorder is already assigned to a Department, the list of Users shows only those who are Members of the assigned Department. The selected Workorders must be assigned to the same Department as the User.