Stability Tasks are initially defined at the System level, System Admin → Scheduling & Events → Stability Tasks. Values defined here are inherited by a Study Plan. As Plans are created values defined at the System level default to the Plan and can be changed. Values defined within the Plan then default to Conditions defined for a Study Plan, finally values defined for a Condition default to the Timepoint. Values can be changed at each level.
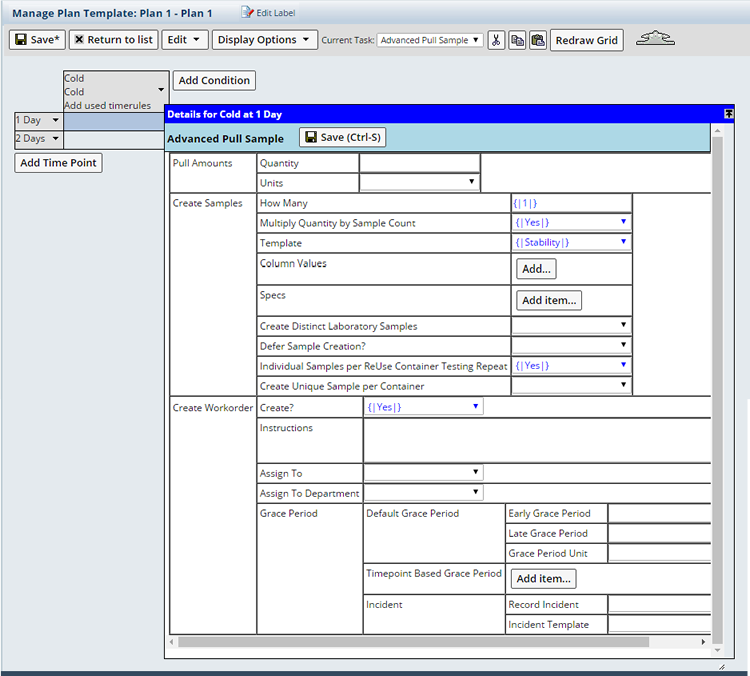
Advanced Pull Sample creates a pull of a specified quantity, creates
Samples (current and deferred) for the pull, and can optionally create a Workorder
(with the grace period) to provide instructions.
Unit Validation is performed throughout Stability. See Stability Unit Validation for details about Unit Validation and defining Unit Conversions.
| Property Name
|
Description
|
| Pull Amounts
|
Specifies quantities of the unit under Study to be pulled.
| Value | Description | | Quantity | Integer quantity to be pulled. | | Units | Unit of measure associated with the Quantity. |
As you specify value above, it overrides the inventory calculation. There are two ways of specifying value: | Raw Unit | Specify the raw units of material needed for inventory
calculation.
Typically for Advanced Pull Sample, the raw unit is specified
for each Test Method added. But, if you specify a pull amount
here, this value overrides the total value given in the Test Method. Example: Say you specify the raw units to pull for the individual Test
Methods while defining the Working
Set of Test Methods. Alkali Metals = 20ml Assay = 10ml Total = 30ml (20ml + 10ml) 
Ideally during inventory calculation the raw pull amount of 30cc
is considered. Now, you also specify a pull amount value for the task. Here, a pull amount of 50ml is specified. 
Therefore during inventory calculation, this value (50ml) is
considered instead of value (30ml) specified for Test Methods. For details of inventory calculation, see Stability
Inventory Calculation. | | Whole Container | Specify the number of containers needed for inventory
calculation.
Typically, based on the total raw unit specified for Test Methods
in Advanced Pull Sample and the Container Type selection in Protocol/Study,
the total number of container is derived during inventory calculation. But, if you specify the number of containers in Pull Amount,
this value overrides the value derived during inventory calculation. Example: Say you specify the raw units to pull for the individual Test
Methods while defining the Working
Set of Test Methods. Alkali Metals = 20ml Assay = 10ml Total = 30ml (20ml + 10ml) After specifying raw units, you also specify the container type
in Protocol/Study. The selected Container size is 100ml. 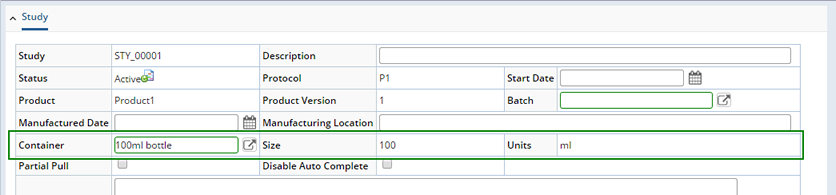
Therefore in the result of inventory calculation 1 container
is needed for raw pull amount of 30ml. Now, you also specify the number of containers for the task. Specify 2 containers in the task. 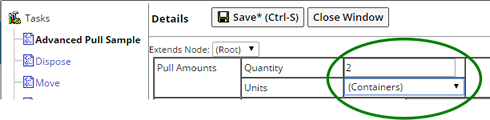
Therefore now for the task 2 containers will be used instead
of 1. For details of inventory calculation, see Stability
Inventory Calculation. |
|
| Create Samples
|
Specifies details concerning Samples created in the database
during the Pull.
| Value | Description | | How Many | Number of Samples to be created. Typically one Sample
is created. | | Template | Sample Template (if any) upon which the Sample is
based. Typically you should choose a blank row if not based on a
Sample Template. | | Multiply Quantity by Sample
Count | If the number of Samples to be created ("How
Many" above) is greater than 1, this determines if the Stability
inventory calculations should multiply the Pull Quantity (Quantity
per Repeat) by the number of Samples. For an example, see Stability
Inventory Calculation → Calculate Required Quantity →
Multiply Quantity by Sample Count. | | Column
Values | Copies information from the s_sample table to the
new Samples. There are three ways of using this:
| 1. | For Column, choose the Sample column that holds
the value from the s_sample table.
For Value From, choose the column from the s_sample
table that will be copied into the Sample column. The example below copies the Event Date from the s_sample
table into the newdate column of the new Samples. | Property Name | Property Value | Column | newdate | Value
From | Event Date |
| | 2. | For Column, choose the Sample column that will hold
the value from the s_sample table.
For Value, enter a variable enclosed in brackets. For Value From, choose the column from the s_sample
table that will be represented by the variable. The variable
is then copied to the Sample column. | | 3. | For Column, choose the Sample column that will hold
the value from the s_sample table.
For Value, enter a string that will be copied into
the Sample column. |
| | Specs | Specifications associated with the new Samples.
| a. | Click Add Item. This inserts a new tab. | | b. | Choose one or more Specifications from the lookup page.
Choose specifications in two ways:
- Click "Select and Return" to add a specific
version of a specification.
- Click "Current and Return". The system
uses the version of the specification that is current
at the time of the task execution.
|
| | Create Distinct Laboratory
Samples | Allows the creation of separate samples based on
the distinct laboratories defined in the Test Methods on the workitems
applied to the Pull Task.
If No, one sample is created with multiple workitems
for the associated laboratories.
If Yes, a sample is created for each laboratory
as well as a Trackitem for each referencing the Workitem on each
Sample.
For Example:
| Test Methods and their Laboratories
Assigned to the Pull Task | Samples Created | Tests | S_sample.Security Department | PH | Chemistry | S00001 | PH, LOD, Assay | Chemistry | | LOD | Chemistry | | Assay | Chemistry | | Appearance | PhysicalTesting | S00002 | Appearance | Physical Testing | | Biological | MicroLab | S00003 | Biological | MicroLab | | Precious Metals | None | S00004 | Precious Metals | Since no laboratory was defined in this test
the Security Department of the Study is populated here. |
| | Defer Sample Creation? | The Sample creation is delayed until the corresponding
Workorder is completed (signifying that the Sample is actually pulled).
Once the sample is actually pulled in laboratory, then the Sample
ID is created in the application. The concept of deferred creation of Sample is desired for two
reasons: - If the Sample is never pulled, there is no need to ever create
the Sample in the application.
- Defer Sample creation as long as possible to identify and
confirm which tests are required on this particular Sample.
| | Individual Samples per ReUse Container Testing Repeat | When the Repeat Count is greater than 1, and ReUse Container is checked (Adding Working Set of Test Methods), create a Separate Sample for each Container pull. The default is Yes. | | Create Unique Sample per Container | Whether or not LabVantage must create a new sample for every unique Container Group. This unique Sample must reference the single Trackitem, and only the Workitems associated with that Container.
| Value | Description | | Yes | A unique Sample is created for each unique Container Group. This unique sample must contain the single Trackitem, and only the Workitems for that Container Group. | | No | One Sample is created for all repeat testing, associating multiple trackitems, created for each pull, with that Sample. |
|
|
| Create Workorder
|
If you want to create a Workorder when the Advanced Pull
Sample Task executes, this specifies the Workorder details.
| Value | Description | | Create? | Yes creates a Workorder. | | Instructions | Text displayed on the Plan. These will be the instructions
to the person doing the work during the Study. | | Assign To | User to whom the Workorder is addressed. | | Assign To Department | Assign a specific Department's Security to the Workorder. Using the dropdown choose the Department whose Security you would like to assign to the Workorder. | | Use Assigned Department as Security Department | This determines how the workorder's security department will be set when the Workorder supports Departmental Security. Displays when "Assign to Department" is Yes.
If Yes, the Assigned Department's Security is assigned to the Workorder. If No, the Study's Security Department is assigned. No is the default. | | Grace
Period | Add a grace period to a Workorder (for Sample pull).
Grace periods associated with a workoder signifies that the Workorder,
which needs to be completed on a specific date/time, now has some
extra day/time added to it for completion.
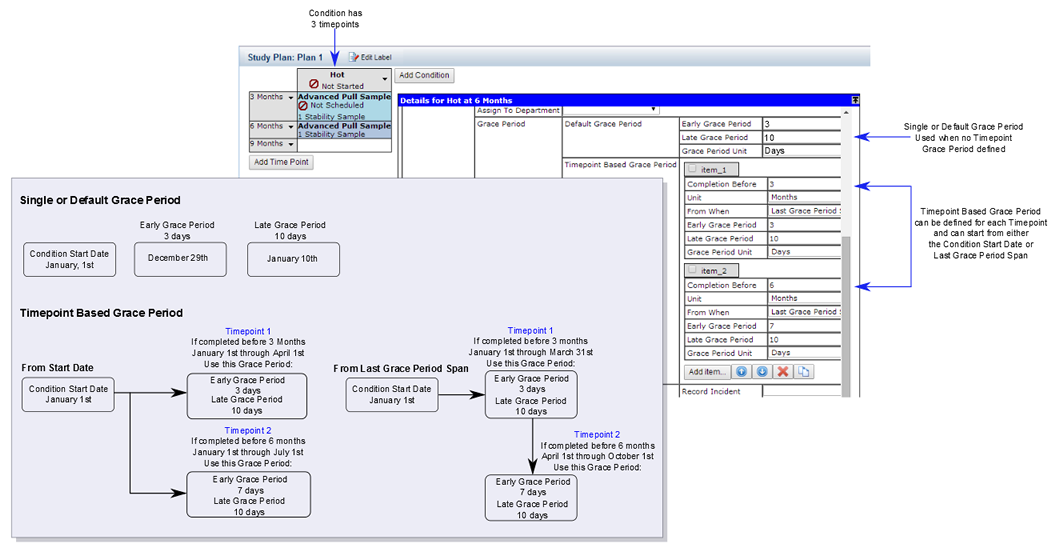
| Value | Description | | Default Grace Period | Define a single grace period for the Sample pull regardless of the time span between condition Start Date and the actual pull date of the Sample.
Duration of the timepoint refers to the time span from
the start date of a condition until the actual pull date
of the Sample. The value specified for the default grace
period applies to all timepoints, all Advanced Pull Sample
Workorders. This rule applies when there is no timepoint based grace
period defined. | Value | Description | | Early Grace Period | Integer value of the grace period. Combined with the Unit determines the amount of time the Workorder can be completed early. | | Late Grace Period | Integer value of the grace period. Combined with the Unit determines the amount of time the Workorder can be completed late. | | Grace Period
Unit | Unit of measure associated with the
period. |
| | Timepoint Based Grace Period | Specified grace periods for individual timepoints with regard to the timepoint duration.
This means, grace period is based on the time span of the start date of a condition until the actual pull date.
Value of the grace period applies to individual timepoints, individual Sample Workorders. Thus you have the option to specify more than one grace period (say, for each of the timepoints). | Value | Description | | Completion
Before | Define the timepoint duration. | | Unit | Unit, such as hours, days or months. | | From When | Should the time span begin at the condition Start date or the end of the last grace period.
| Start Date | The "Completion Before" duration starts from the condition start date and includes the end time point.
Note: When blank defaults to Last Grace Period. | | Last Grace Period Span | The "Completion Before" duration starts from the end of "Last Grace Period Span" and does not include the end time point. |
| | Early Grace Period | The duration a sample may be pulled early. If left blank the Early grace period defaults to the value defined in Late Grace Period. | | Late Grace Period | The duration a sample may be pulled late. If left blank the Late grace period defaults to the value defined in Early Grace Period. | | Grace Period
Unit | Unit of measure associated with the
period. |
For example: Say the condition start date is 1st January. | Completion Before | 3 | | Unit | month | | Early Grace Period | 3 | | Late Grace Period | 10 | | Grace Period Unit | day |
The timepoint duration is 3 months, the Early Grace
period is 3 days and the Late Grace Period is 10 days. The pull Sample task in the Workorder is due on (January
1st + 3 months) = April 1st. It is calculated by start
date and the interval time duration. Based on the Early and Late Grace periods, the pull Sample task in
the Workorder can be completed 3 days early and up to 10 days late from the due
date (from 28th March to 10th April).
| Completion Before | 6 | | Unit | month | | Early Grace Period | 7 | | Late Grace Period | 10 | | Grace Period Unit | day |
The timepoint duration is 6 months, the Early Grace
period is 7 days and the Late Grace Period is 10 days. The pull Sample task in the Workorder is due on (January
1st + 6 months) = July 1st. It is calculated by start
date and the interval time duration. Based on the Early and Late Grace periods, the pull Sample task in
the Workorder can be completed 7 days early and up to 10 days late from the due
date (from 23rd June to 10th July).
If "From When" is "Start Date" the end time point is included in the span. In other words if the condition Start Date is January 1st and the timepoint duration is 3 months the end time point of April 1st is included. If an event occurs on April 1st the 3 month duration grace period is used, 3 days early 10 days late. If "From When" is "blank" or "Last Grace Period Span" the end time point (April 1st) is not included, for an event occurring on April 1st the 6 month timepoint duration grace period is used, 7 days early 10 days late. | Grace Period Comparison
 | | Incident | If the grace period is violated, then incident
is recorded. Incident gets recorded for Workorder, Sample
and Study. Incidents are handled by the Lab Investigations module.
| Value | Description | | Record Incident | Incident to get recorded in the system. | | Incident Template | Use of a selected template for the incident
recording. |
|
|
|
Dispose issues disposal instructions to personnel.
| Property Name
|
Description
|
| Instructions
|
Text displayed on the Plan. These will be the instructions
to the person doing the work during the Study. |
| Assign To
|
User to whom the instructions are addressed. |
| Priority
|
Choose the Priority based on requirements. |
| Column Values
|
Lets you write column values into the Workorder table:
| a. | Click "Add Item". | | b. |  | For the Column, click the ellipsis. This opens a
window showing all columns in the Workorder table. Choose
the column into which you want to write the new value. |
| | c. | For the Value, enter the value you want to write into
the Workorder column. |
|
| Grace Period
|
For a detailed explanation please refer to the Grace
Period of Advanced Pull Sample. The concept is similar. |
Shake notifies personnel to shake the unit under study.
| Property Name
|
Description
|
| Instructions
|
Text displayed on the Plan. These will be the instructions
to the person doing the work during the Study. |
| Assign To
|
User to whom the instructions are addressed. |
| Priority
|
Choose the Priority based on requirements. |
| Column Values
|
Lets you write column values into the Workorder table:
| a. | Click "Add Item". | | b. | | For the Column, click the ellipsis. This opens a
window showing all columns in the Workorder table. Choose
the column into which you want to write the new value. |
| | c. | For the Value, enter the value you want to write into
the Workorder column. |
|
| Grace Period
|
For a detailed explanation please refer to the Grace
Period of Advanced Pull Sample. The concept is similar. |
Move notifies personnel to move the unit under study from one Environment
to another.
| Property Name
|
Description
|
| Target Environment
|
Environment to which the unit under study is to be moved. |
| Instructions
|
Text displayed on the Plan. These will be the instructions
to the person doing the work during the Study. |
| Assign To
|
User to whom the instructions are addressed. |
| Priority
|
Choose the Priority based on requirements. |
| Columnvalues
|
Lets you write column values into the Workorder table:
| a. | Click "Add Item". | | b. | | For the Column, click the ellipsis. This opens a
window showing all columns in the Workorder table. Choose
the column into which you want to write the new value. |
| | c. | For the Value, enter the value you want to write into
the Workorder column. |
|
| Grace Period
|
For a detailed explanation please refer to the Grace
Period of Advanced Pull Sample. The concept is similar. |
Create Workorder issues any generic instructions to personnel. This is not
related to the Add Workorder feature.
| Property Name
|
Description
|
| Type
|
Kind of Workorder this will be. The word you use here
should describe the instruction, such as Pull or Move. |
| Instructions
|
Text displayed on the Plan. These will be the instructions
to the person doing the work during the Study. |
| Assign To
|
User to whom the Workorder is addressed. |
| Priority
|
Choose the Priority based on requirements. |
| Columnvalues
|
Lets you write column values into the Workorder table:
| a. | Click "Add Item". | | b. | | For the Column, click the ellipsis. This opens a
window showing all columns in the Workorder table. Choose
the column into which you want to write the new value. |
| | c. | For the Value, enter the value you want to write into
the Workorder column. |
|
| Grace Period
|
Add grace period to Workorder (for Sample pull). Grace
period associated with Workorder signifies that Workorder, which needs
to be completed on a specific date/time, now has some extra day/time added
to it for completion.
| Value | Description | | Default Grace Period | Specified grace period without regard to the duration
of the timepoint.
Duration of the timepoint refers to the time span from the start
date of a condition till the actual pull date of the Sample. The
value specified for the default grace period applies to all timepoints. This rule applies when there is no timepoint based grace period
defined. | Value | Description | | Grace Period | Integer value of the grace period. | | Grace Period Unit | Unit of measure associated with the period. |
| | Timepoint Based Grace
Period | Specified grace periods for individual timepoints
with regard to the timepoint duration.
This means, grace period is based on the time span of the start
date of a condition till the actual pull date. Value of the grace period applies to individual timepoints, individual
Sample Workorders. Thus you have the option to specify more than
one grace period (say, for each of the timepoint). | Value | Description | | Completion
Before | Definition of the timepoint duration.
Time range from the start date of the condition till
the actual pull date. | | Unit | Unit of measure associated with the
period. | | From When | Choose whether to make all Grace Period starting times the same as the condition start date or start at the end of the previous Grace Period span.
| Start Date | From the condition start date (span includes the end time point). | | Last Grace Period | At the end of the last or previous Grace Period (span does not include end time point). |
| | Early Grace Period | The duration a sample may be pulled early. If left blank each, Early or Late, will default to the other. | | Late Grace Period | The duration a sample may be pulled late. If left blank each, Early or Late, will default to the other. | | Grace Period
Unit | Unit of measure associated with the
period. |
Click here to view an example of
grace period. | | Incident | If the grace period is violated, then incident is
recorded. Incident gets recorded for Workorder, Sample and Study.
| Value | Description | | Record Incident | Incident to get recorded in the system. | | Incident Template | Use of a selected template for the incident
recording. |
|
|
Pull Sample was deprecated in LabVantage R4.6 (July 13, 2007) and exists
only to maintain backward-compatibility. Use Advanced
Pull Sample to create Sample pulls.
|