Options for Creating Plans |
|
|
|
Stability Plans |
Content |
|||||||||||||||||||||||
|
You have several options for creating Plans:
| • | Create a Plan Template is a convenience that lets you reuse the Template as many times as required without having to create a new one. This is the most flexible approach to creating Plans; that is, create a Plan Template, then reuse it as needed. In the next section, we will show how to create a Plan Template. If you can create a Plan Template, you can create a Plan from a Protocol or a Study (the next two options below), as they utilize the same pages and features. |
| • | Create a Plan from a Protocol lets you wait until you create or edit a Protocol until you create a Plan. This is covered in Stability Protocols (see this document after you have learned how to create a Plan Template. |
| • | Create a Plan from a Study lets you add a Plan directly to a Study. This is covered in Stability Studies. |

Note that each option lets you create a Plan "From Scratch" or "From a Template":
| • | From Scratch lets you create a new Plan starting with nothing.
Regardless of the option you choose, creating a Plan From Scratch always
opens the Plan Grid Maintenance
Page for this purpose. Depending on the option you choose, the Plan
is identified by a special nomenclature, and the Plan Grid Maintenance
Page is labeled accordingly:
|
||||||||||||
| • | From a Template lets you create a Plan from a Plan Template regardless of where you create the Plan. |
Unit Validation is performed throughout Stability and Studies. See Stability Unit Validation for information about when validation occurs and setting up unit conversions.
Creating a Plan Template |
|
|
Choose the Plan Templates menu item. The Plan Templates List Page opens.
In the Plan Templates List Page, click "Add". A dialog opens where you can define the new Plan.
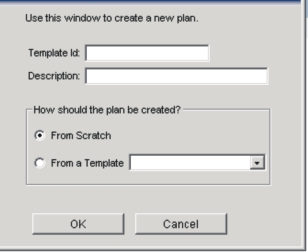
In the dialog:
| a. | Supply a Template Id. This is an identifier for the Plan Template.
You can optionally provide a Description of the Template. |
||||
| b. | Choose how the Plan will be created: | ||||
|
Creating Plans from Protocols and Studies |
|
|
These options are covered in the discussions concerning Protocols and Studies (see Stability Protocols and Stability Studies. Be advised that only the dialog box shown in the previous section changes... you still use the Plan Grid Maintenance Page just as you would for creating a Plan Template from scratch.
Plan Grid Maintenance |
|
|
Plan Grid Maintenance Page |
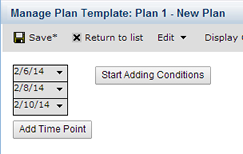
The Plan Grid Maintenance Page is used throughout Stability. This is where you actually create a Plan.
As previously discussed, the name of the Page changes depending on where you are maintaining the Plan. Although the following examples show the Manage Plan Template Page, the functionality is the same for all Plan Grid Maintenance Pages.
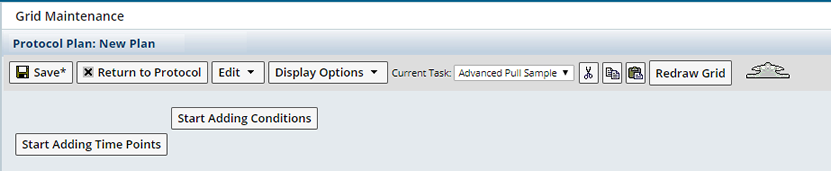
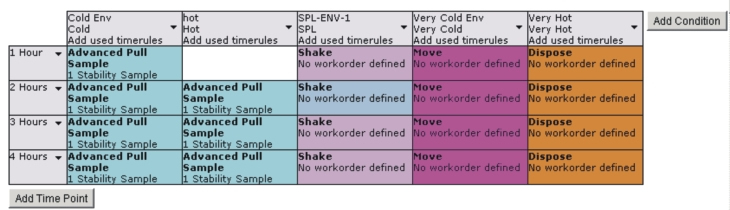
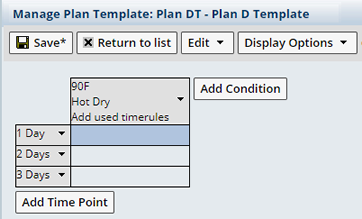
Adding Time Points |
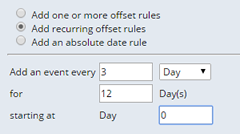
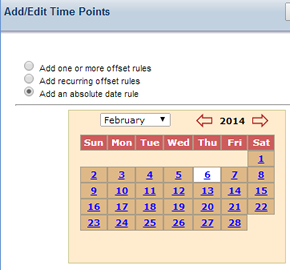
Click "Start Adding Timepoints". In the Add Time Points dialog, choose how you want to generate the Time Points:
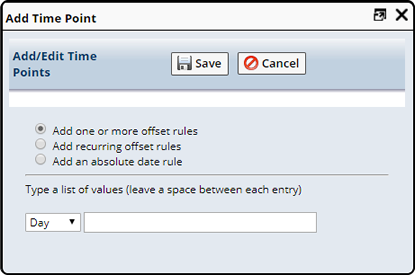
| Option | Description | |||
| Add one or more offset rules | Lets you specify multiple increments
relative to the start of the Study.
|
|||
| Add recurring offset rules |
Define a recurring offset rule.
|
|||
| Add an absolute date rule |
Lets you insert an absolute (specific) rather than offset (relative) date.
|
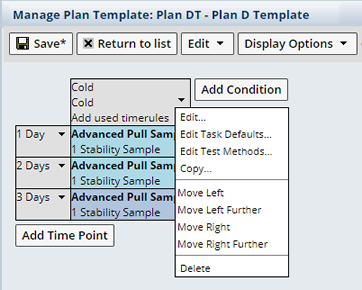
Adding Conditions |
Click "Start Adding Conditions". You have two choices:
| • | Create a new condition from scratch lets you create a new Condition. |
| • | Choose one from a template lets you choose a Condition from an existing Plan. |
Each Condition is a column in the Plan display. We therefore use the term "Condition" and "column" interchangeably.
| Create a new condition from scratch |
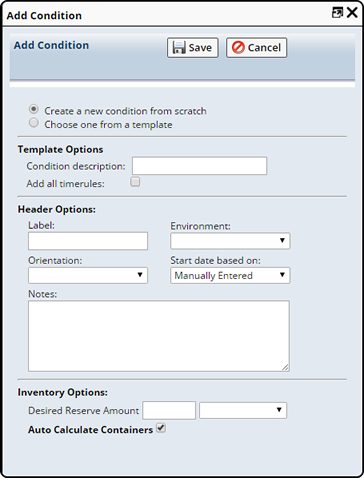
| Template Options | |||||||||||||
| Condition Description | Enter a text description that will appear on the header of the column. | ||||||||||||
| Add all timerules | This is intended to be used when you add an existing Condition from a Plan Template (see the next choice under Choose one from a template), which essentially merges selected Conditions from Plan Templates with the current Plan. Some Conditions from these Plan Templates may not contain any Tasks. When Add all timerules is checked, such a merge will bring all Time Points into this Plan whether or not they contain Tasks. When not checked, only those Time Points containing Tasks will be merged into this Plan. | ||||||||||||
| header Options | |||||||||||||
| Label | If Label information was defined for the Environment, it will fill in here when the Environment is selected (if not, the Environment Id will fill in). If desired, you can change the defaulted Label text after selecting an Environment.
|
||||||||||||
| Environment | Choose the Environment for this Condition. | ||||||||||||
| Orientation | If applicable, choose the position of the unit under study (Upright or Inverted). | ||||||||||||
| Start date based on | This determines when the Plan will start (you can override
this at the Study level):
|
||||||||||||
| Notes | If desired, you can enter free text comments here. | ||||||||||||
| Inventory Options | |||||||||||||
| Desired Reserve Amount | When you actually run the Study, you will probably want
an excess amount of the unit under study for reserve. If you know how
much you will need, enter that amount here.
As we proceed farther along in creating the Plan, you will specify the quantities you want to pull during the Study. You will be doing this shortly when you add Tasks. We will revisit this area after adding Advanced Pull Sample Tasks. At that time, you can also enter or change the reserve amount. |
||||||||||||
| Auto Calculate Containers | If this option is selected, the total amount of inventory
(number of containers to pull) is automatically calculated (based on the
raw pull quantity) from the context of Protocol/Study, considering the
container size and
partial pull flag.
Typically, when the Plan defines inventory for each task using raw units (from the Edit -> Test Method option in the manage Plan maintenance page), this auto-calculation option should be used. Alternatively, the number of containers is indicated manually. If unchecked, the option "Choose (Containers) if partial pulls are not allow" is displayed. Auto-calculation is done in Stability Protocols (see Automatically Calculating Containers) and in Stability Studies (see the Plan Form). |
||||||||||||
| Choose one from a template |
The Condition description and Add all timerules are identical to the previous technique. The difference here is that you can choose one or more Conditions from existing Plans. Pay special attention to the Add all timerules option.
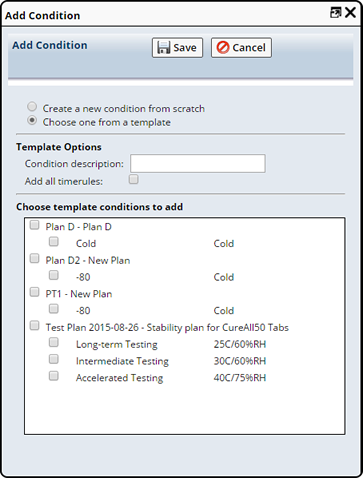
As a point of departure, we will add one Condition to the Plan by choosing "Create a new condition from scratch". The Condition Description is Hot Dry. No Tasks have yet been added to pull Samples. We will do this in the next section on Adding Tasks.
You can add more Conditions, but we will continue with this one to follow through the process of creating a simple example.
Adding Tasks |
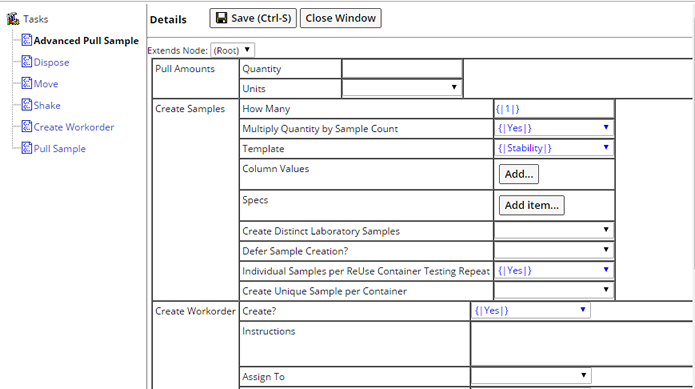
The banner at the right shows details for the selected cell (in the example above, this is the Hot Dry Condition). Double-clicking the cell (or clicking the down-arrow on the banner) opens the Task Editor to the Task currently selected in the Current Task list on the Toolbar (below).
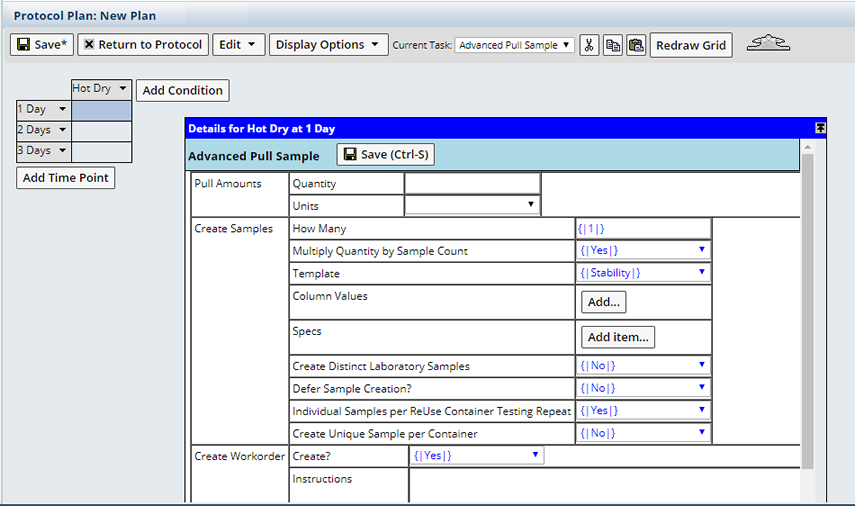
Use Current Task to choose which Task you want to execute in the cell (meaning at the intersection of the Time Point and Condition). The Task you select is the one that is inserted into the cell. If you want to create a Task to pull Samples in this cell, you choose Advanced Pull Sample. When you display both on the screen as shown above, changing the Current Task changes the Task in the Details window (providing a Task is not already defined).
For descriptions of Tasks, see Stability Tasks.
Generating Workorders |
When dealing with Tasks, you will encounter the term Workorder. A Workorder is a set of instructions addressed to personnel, such as "Move 3 Samples" or "Shake the Sample for 30 seconds". For example, Note that the Advanced Pull Sample Task contains an option to generate a Workorder (you can include instructions such as "Pull 3 Samples"). Other Tasks such as Shake, Dispose, and Move are themselves Workorders, as they exist solely to display instructions in the Plan. There is also a Create Workorder Task, which generates a Workorder of any type.
We have also included a provision to add Workorders outside of a Plan (described in Workorders).
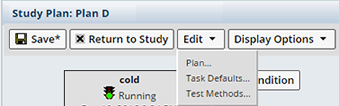
Adding Default Properties for the Plan |
Properties for the entire Plan are globally defined through the option "Edit → Plan...".
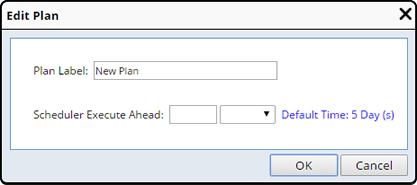
| Field | Description | |||
| Plan Label | Optionally, change the Plan Label. | |||
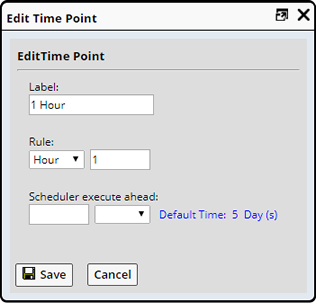
| Scheduler Execute Ahead | The number, and Units such as 1 Day, ahead of the scheduled date the Timepoint can be executed. See Scheduler Mechanics for more information. | |||
| Default Time | Unless defined otherwise the default Scheduler Execute Ahead value is always 5 Day(s) (displays in blue within the dialog). If a new Scheduler Execute Ahead value is defined here, this value applies only to this Plan and will be the default for the Timepoints. You will be able to override this default at each Timepoint.
|
Adding Default Properties for Tasks |
The properties of different tasks for the entire Plan are globally defined through the option "Edit → Task Defaults".
This implies that, all tasks associated with the Plan inherit the defined properties.
Stability Tasks contains descriptions of properties for each Task.
Adding Working Set of Test Methods |
Similar to above, Test Method and its properties are globally defined for the entire Plan through the option "Edit → Test Methods".
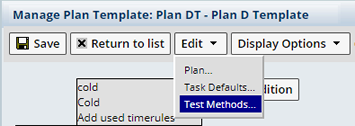
This implies that, all tasks associated with the Plan inherit the defined tests and test properties.

Test properties defined here reflect in all the Advanced Sample Pull tasks for all the timepoints/conditions in the Plan maintenance page. You may modify test properties for the individual tasks from the Single Condition/Timepoint Test Maintenance page.
| Property Name | Description |
| Test Method | Test Method to be used for the test in the sample pull task of this Plan. Click on the "Add" button and then select the Test Method. |
| Version | Test Method Version. Clicking the icon allows you to choose a different version of the Test Method. The lookup displays available versions of the selected Test Method. |
| Quantity Required
per Repeat
(Quantity / |
The quantity of material required to execute a single repeat of the test. |
| Unit | Unit of measure associated with the Quantity. |
| Number of Repeats | Number of individual execution/repeat required for a
test on a Sample. Repeat means how many times a particular test would
be executed for a Sample. Each additional repeat causes an additional
instance of the SDIWworkItem and DataSet.
Each repeat of the test requires additional test material (defined in Quantity Required per Repeat). |
| Requires Separate containers
per Repeat
(Container / |
Each repeat of a particular test must execute from a separate
Container. This property is valid only when the number of repeats >
1.
Should you choose to require Separate Containers per Repeat, and the number of Repeats is > 1, choose (within the task) whether or not you want to create a unique Sample for each Container Pull. See Create Unique Sample per Container in Stability Tasks for more information. On checking the ReUse Container option (below), the Container/Repeat option is automatically checked. |
| Requires Separate containers
per Test
(Container / |
Each test must execute from a separate container. This property is valid only when the number of tests> 1. |
| Destructive Test |
Flag indicates that the test is destructive. Destructive test consumes the material during testing, while Non-Destruction test does not consume it. |
| Reuse Container |
Flag indicates that each time the test occurs at different
intervals (timepoints), it uses the same container. The same container
is repulled for subsequent pulls.
After testing, the container is returned back to storage. Typically, this flag is needed for a test that is non-destructive, and doesn't require breaking the seal on the container. Weight loss test is a prime example of a container reuse test. When repulling a reuse container, a "RePull" type Workorder is created to identify the Sample and container that is pulled. The Timepoint field displayed on the Reuse Sample will display as Multiple. On checking the ReUse Container option, the Container/Repeat option (above) is automatically checked. |
| Contingent Test |
Flag indicates that the test is contingent. When the execution of a test on Sample is uncertain or not mandatory, it is treated as contingent test. If unchecked, the test is ready for use. |
| Laboratory | Laboratory required to conducting test. |
| Due Date Offset |
It is a notification that after the Sample is pulled, the test is conducted on it within the given time frame. The value of the offset is specified in "Due" and the unit is defined in "Date Offset". |
Shortcut Menus |
| Time Point Shortcut Menu | Condition Shortcut Menu | |

|
|
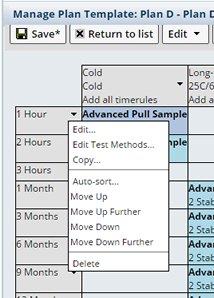
| Time Point Shortcut Menu |
| Menu Item | Description | ||||||||||||||||||||||||||||||
| Edit | Lets you change the Label, Offset Rule and Scheduler Execute Ahead time for this timepoint.
|
||||||||||||||||||||||||||||||
| Edit Test Method | This option appears only after you add
and save the working set of Test Methods to the plan. This provides
the ability to edit the tests for a single time point (includes all conditions
for the time point). The check boxes in the cells indicate that this test
is enabled for the particular time point. When enabled, the test is "armed"
for the time point.
|
||||||||||||||||||||||||||||||
| Copy | Copies the entire row, meaning all Conditions for the
Time Point. Conditions are covered in the next section Adding
Conditions, but now we will simply explain how to use this editing
function.
This feature opens the Add Time Points dialog shown in the previous section Adding Time Points. Specify the offset or date rules you want to apply to the new row. The new row is duplicated beneath the original, with the new offset or date rule applied. For example:
|
||||||||||||||||||||||||||||||
| Auto-sort | Sorts absolute dates and offset dates, places absolute dates before offset dates. | ||||||||||||||||||||||||||||||
| Move Up | Moves the Time Point one row up or down. | ||||||||||||||||||||||||||||||
| Move Down | |||||||||||||||||||||||||||||||
| Move Up Further | Prompts you for the number of rows to move, then moves the Time Point accordingly. | ||||||||||||||||||||||||||||||
| Move Down Further | |||||||||||||||||||||||||||||||
| Delete | Removes the Time Point from the Plan. |
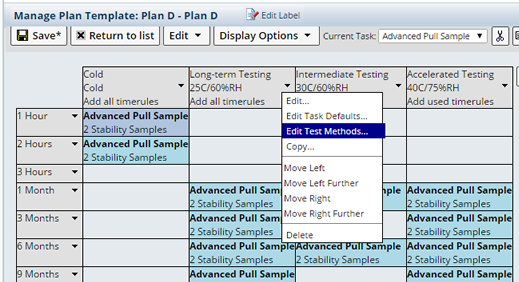
| Condition Shortcut Menu |
Use this menu when adding Conditions.
| Menu Item | Description | |||
| Edit | Lets you change the Label, Offset Rule and Scheduler Execute Ahead value (see the discussion on default Scheduler Execute Ahead values for information about where the defaulted value might come from). | |||
| Edit Test Method | This option appears only after you add
and save the working set of Test Methods to the plan. This provides
the ability to edit the tests for a single condition (includes all time
points for the condition). The check boxes in the cells indicate that
this test is enabled for the particular condition. When enabled, the test
is "armed" for the condition.
|
|||
| Edit Task Defaults | Opens the Task Properties for the Task in the selected cell. The values you set here will be the default values for the properties of each of Task. | |||
| Copy |
|
|||
| Move Left | Moves the Condition one column left or right. | |||
| Move Right | ||||
| Move Left Further | Prompts you for the number of columns to move, then moves the Condition accordingly. | |||
| Move Right Further | ||||
| Delete | Removes the Condition from the Plan.
If Samples or Workorders are associated with the Stability Study Condition, the "Delete" operation not shown. |
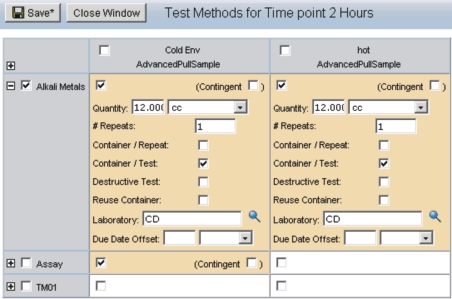
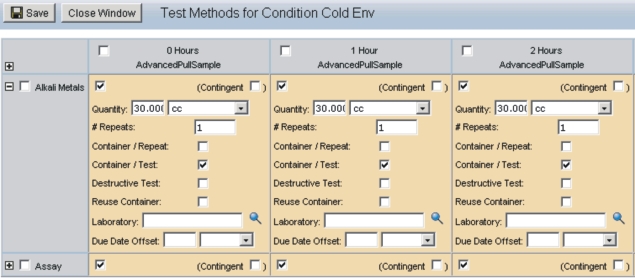
Access Single Condition/Timepoint Test Maintenance |
Provides the ability to edit and enable/disable tests for a particular Sample pull task. This option is valid only for the task "Advanced Pull Samples".
Via Condition
Via Timepoint
The entire list of tests display for all the timepoints and conditions of the Plan.
The selected check box in the cells indicate that the test is enabled for the particular Sample pull. Otherwise the unselected test does not execute for the Sample pull task.
The contingent check box implies that although the test is enabled for the pull, it is not required. However you have the option to suspend the Plan at any given time and deselect the flag to perform the test.

The "+" symbols on the left side of the page expands each cell, thus providing access to the additional test properties. The properties are same as on the Test Maintenance page for the Plan (Edit -> Test Methods).
Changes made in a particular cell (for a task) are not copied down to the other cells.
Display Options |
On the Toolbar, Display Options let you alter how the Plan is displayed:
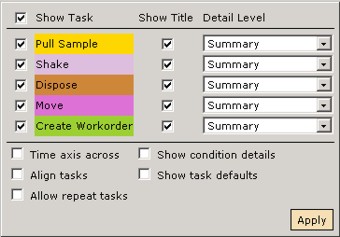
| Option | Description | |||
| Show Task | Lets you show all or only a selected subset of Tasks on the Plan. Check the Tasks you want to show (or check Show Task to show all). | |||
| Show title | Check to show the name of the Task. | |||
| Detail Level | Lets you choose the amount of information displayed in the column header. | |||
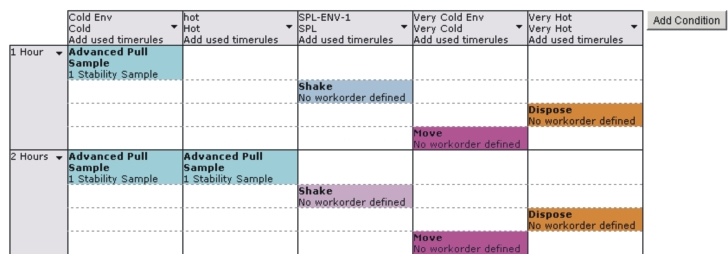
| Time Axis Across | Check to display Time Points horizontally and Conditions vertically. | |||
| Align Tasks | For each Time Point, arranges like Tasks in a separate
row. In the following example, each Time Point specifies Advanced Pull
Sample, Shake, and Move Tasks. If Align Tasks is not selected, the Tasks
are arranged as you have entered them:
Selecting Align Tasks arranges all Advanced Pull Sample Tasks in one row, all Shake Tasks in another row, and all Move Tasks in another:
|
|||
| Allow Repeat Tasks | This lets you add multiple Tasks at the same Time Point.
|
|||
| Show Condition Details | Check to show all information you setup for the Condition. | |||
| Show Task Defaults | Check to show the default values for the properties of each of Task. |
Toolbar Functions |
| Function | Description | ||||
| Save | Saves all changes made since you loaded the page. | ||||
| Return to List | Exits the Plan Grid Maintenance Page without saving changes and returns to the List Page. | ||||
| Cut, Copy, Paste | Windows Clipboard functions. | ||||
| Redraw Grid | Refreshes the Plan grid display. This should not lose any unsaved information. | ||||
| Clipboard Viewer | Shows the contents of the Windows Clipboard. Double-click
to expand and collapse.
|