Fundamental Building Blocks |
|
|
|
Scheduler Principles |
Schedule Tasks and Scheduled Items |
The Scheduler module performs Schedule Tasks on a recurring basis. A Schedule Task performs an operation on an SDI, such as adding Samples to the database. The SDI is the Scheduled Item.
Plan Items Sources Folders and Plans |
| Definitions |
| • | A Plan Item specifies a Schedule Task and the times at which it will run. | |
| • | A Source is an SDI associated with a Plan Item. For example, if a Plan Item adds WaterSample SDIs, a Source could be an SDI that indicates the well from which the water sample was taken (the origin of the samples). | |
| • | Folders help you organize Plan Items. Similar to Windows Explorer folders, they serve as a container for Plan Items. A Folder can represent an SDI, or it can be just a named storage area. | |
| • | A Schedule Plan defines a scheduling strategy for all Plan Items in the Schedule Plan. | |
|
|
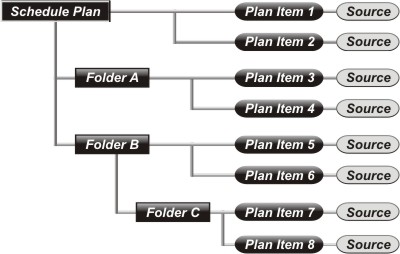
The structure of a Schedule Plan follows a tree model, a example of which is shown at the left. The root node of the tree is "Schedule Plan". When creating a Schedule Plan, you can associate:
|
| Basic Example |
Although you can build a Schedule Plan to accommodate almost any scheduling situation, the following example shows a logical use for a Schedule Plan, Folders, Sources, and Plan Items.
A recent taste test revealed that Reflux Springs should waste no time building the following scheduling strategy for water tests conducted at their wells:
| • | Water samples will be taken from two of their wells. |
| • | Each well is a different depth (300 and 400 feet). |
| • | Samples from the 300-foot well will be taken directly from the well.
Water from the 400-foot well will be stored in a container. Samples will be taken from the container. |
| • | The schedule must add (to the database) two water samples per well, and indicate when each sample must be taken. |
In this case:
| • | The Schedule Task is to add a Sample. | ||||||
| • | The Scheduled Item is the Sample SDI. | ||||||
| • | The Schedule Plan defines three Folders. Each Folder represents:
|
||||||
| • | The 300-foot Folder is associated with two Plan Items. Each Plan Item specifies when one of the 300-foot Samples is scheduled to be taken from that well. The Source of each Plan Item will be the 300-foot well. | ||||||
| • | The 400-foot Folder contains another Folder, which represents the container. | ||||||
| • | The container Folder is associated with two Plan Items. Each Plan Item specifies when one of the 400-foot Samples is scheduled to be taken from that well. Reflux has decided that the Source of each Plan Item should be the 400-foot well (not the container). |
The Schedule Plan for Reflux could look something like this:
|
Each Plan Item indicates the Source of the sample, in this case the 300- or 400-foot well. You can choose any SDI as the Source of a Plan Item, or relate the Source to the Plan Item's Folder. More about this in the next section.
Adding Folders and Plan Items to a Plan |
| Overview |
We demonstrate the interface for dealing with Folders and Plan Items in Creating Folders and Creating Plan Items. However, the following concepts are fundamental. You should not wait until you are staring at the interface to familiarize yourself with them.
| Folders |
Most scheduling applications would benefit from organizing Plan Items into Folders. Each of these child Folders would be the parent of their Plan Items (such as Well-300 is the parent of WaterSample-300-001 in the previous example).
When you add a Folder (covered in Creating Folders), you are offered the following choices that let you choose what the Folder represents:
| • | Create Any Folders
This creates a Folder that does not represent an SDI. When adding Plan Items to the Folder, you can associate any Source with each Plan Item. |
| • | Create Folders for source SDIs from SDC
This creates a Folder that represents an SDI. This SDI becomes the Source for all Plan Items added to the Folder. |
| • | Create Folders from linked records of Sample:S-040622-00069 from Sample
Filter Whereclause
This choice is available only when you add a Folder to another Folder that represents an SDI. This creates a Folder that represents an SDI linked to the current Folder from another SDI. Again, the SDI represented by the Folder becomes the Source for all Plan Items added to the Folder. |
Note the relationship between Folders and Sources:
| • | If a Folder represents an SDI, that SDI becomes the Source for all Plan Items added to the Folder. |
| • | If a Folder does not represent an SDI, you can associate any Source with each Plan Item in the Folder. |
The section below on Plan Items expands this concept.
| Using SDIs as Sources |
If you want to use an SDI as a Source, you must enable the May Be Scheduled option in the SDC Definition Page. When you enable this option for an SDC, all SDIs for the SDC can be Sources.
| Plan Items |
Adding Plan Items (covered in Creating Plan Items) has subtle differences, depending on the the nature of the Folder to which you add them:
| • | When you add a Plan Item directly to the root node of the Schedule Plan
(below left), or to a Folder that does not represent an SDI (below right),
you must choose the Source (SDI that is associated with the Plan Item).
After clicking Add Item, a new window opens, offering only one choice: Create Plan Items for source SDIs from SDC The SDI you choose here will be the Source for the Plan Item. |
|||||||||||||||||||
| • | When you add Plan Items to a Folder that represents an SDI (below), the
Scheduler automatically uses that SDI as the Source for all Plan Items in
the Folder.
|
|||||||||||||||||||
Scheduler Mechanics |
|
|
Overview of Internal Mechanisms |
Before attempting to build a schedule or trying to interpret any of the information it reports, you must know how the Scheduler works. Behind the interface, the Scheduler uses separate engines to build and run the schedule:
| • | Event Scheduler
The Event Scheduler generates Scheduled Events. Each Scheduled Event defines when a Schedule Task is due to be run. |
| • | Task Executor
After all Scheduled Events have been generated, the Task Executor runs each Schedule Task at times specified by the Schedule Plan and its Plan Items. |
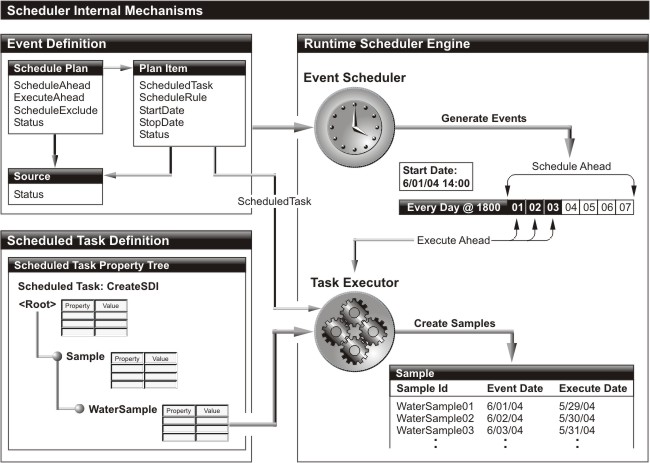
From a configuration standpoint, note that the SchedulePlan SDC is a System SDC, i.e., it is extendable. The MaintenanceForm page for editing SchedulePlan SDCs can therefore be configured to show/hide these user columns.
The Event Scheduler: Generating Scheduled Events |
| Functionality |
To create Scheduled Events, the Event Scheduler uses information from both the Plan Items and the Schedule Plan. Here are simplified definitions (to be developed farther along in this discussion):
| Information from the Plan Items: |
| Column | Simplified Definition |
| Schedule Task | Operation performed on an SDI. For example, CreateSDI is a Schedule Task that creates an SDI in the database. |
| Schedule Rule | Date and time the operation defined by the Schedule Task is due to be performed. For example, if you want a sample to be taken daily at 6 p.m., you could use the CreateSDI Schedule Task, and the Schedule Rule "Every Day @ 18:00". When the Scheduler creates the SDI, it will be marked as due to be taken daily at 6 p.m. |
| Start Date | Date and time all Scheduled Events will be generated. |
| Stop Date (optional) |
If you do not want to generate all Scheduled Events (meaning you want to stop the schedule prematurely), you can optionally enter a Stop Date. We will explain this further when we get to our examples. |
| Information from the Schedule Plan: |
| Column | Simplified Definition |
| Schedule Ahead | Duration of the Schedule. |
| Execute Ahead | The Task Executor uses this value (discussed later in The Task Executor). We mention it here only because it is part of the Plan. |
| Schedule Exclude (optional) |
Days on which Scheduled Events will not be generated. |
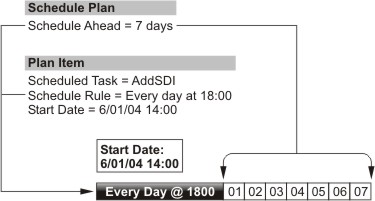
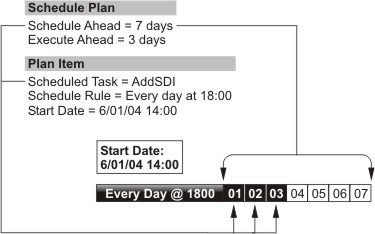
How the Event Scheduler creates Scheduled Events is probably best shown by example. We will use our previous Water Test Plan example, simplified to contain just one Folder and one Plan Item.
|
||||||||||||
The Plan Item is set to AddSDIs as follows:
| Plan Item Column | Value | Meaning |
| Schedule Task | CreateSDI | At 2 p.m. on June 1, Scheduled Events will be generated.
Each Schedule Task (CreateSDI) will add a WaterSample to the database,
with a due date of 6 p.m. each day.
If you specify a Stop Date, Scheduled Events will be generated only until that date. For example, if the Stop Date is 6/02/04, only two days' worth of Scheduled Events will be generated. For simplicity in our example, we have no Stop Date. If you want to setup a schedule but not actually generate it, do not specify a Start Date. |
| Schedule Rule | Every day @ 18:00 | |
| Start Date | 6/01/04 2:00 PM | |
| Stop Date (optional) | None |
Before generating Scheduled Events to do this, the Scheduler needs to know the total time duration of the schedule. The Schedule Rule has told the Event Scheduler to add a WaterSample daily, but for how many days to you want this to occur? The Schedule Plan's Schedule Ahead value specifies this. In our example, the Schedule Plan is set as follows:
| Schedule Plan Column | Value |
| Schedule Ahead | 7 days |
| What this means... |
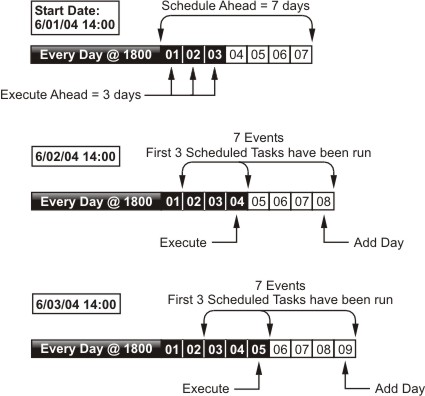
On the Start Date (2 p.m. on June 1), 7 Scheduled Events will be generated to add a WaterSample to the database every day. The last Event is June 7th.
At 2 p.m. on each day thereafter, the Event Scheduler generates another Event to maintain a total of 7 Scheduled Events on any given day. In this example, the Event Scheduler generates an 8th event at 2 p.m. on June 2nd, a 9th Event at 2 p.m. on June 3rd, and so on until you turn off the Plan Item, its Folder, or its Schedule Plan.
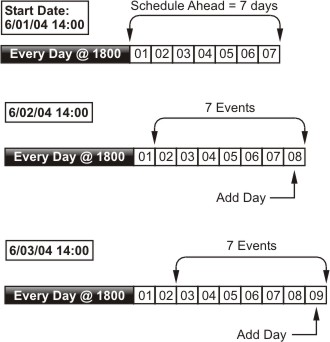
| Event Date |
Each of these days in the Schedule defines an Event Date. In the example above, June 01 is the first Event Date, June 02 is the second Event Date, and so on.
| Schedule Details |
When you view each Plan Item using the interface, the Plan Item reports details concerning the schedule. Continuing with our example:
| Plan Item Detail | Meaning |
| Next Schedule | When the Event Scheduler will generate the next Event. After 2 p.m. on June 1, the Next Schedule will be 2 p.m. on June 2. |
| Scheduled To | Last Event that is currently scheduled. After 2 p.m. on June 1, the Schedule To would be June 7. After 2 p.m. on June 2, the Schedule To would be June 8. |
| Last Scheduled | When the most recent Event was generated. After 2 p.m. on June 1, the Last Scheduled would be at 2 p.m. on June 1. |
| Excluding Events |
If you do not want Scheduled Events generated for certain days, you can define a Schedule Exclude for the Schedule Plan. For example, if you want to generate Scheduled Events only for weekdays, you can setup a Schedule Exclude to skip all weekends. For simplicity, we have left this to be discussed later in the interface description (see Excluding Events).
| Status |
It is now worth mentioning that you must turn on the Schedule Plan, Folder, and Plan Item in order for the Event Scheduler to do anything. Don't worry about this now (it is covered later in Status).
| Polling Interval |
Also worthy of mention is the Polling Interval. This determines the exact time Scheduled Events are generated. Since this does not affect construction of the schedule, we defer discussion to the section on Polling.
| Locking and Timeouts |
Trying to leave nothing to chance, this is also a good time to mention that you will be locked out of the Scheduler unless you set your timeouts accordingly. We defer this discussion to the section on Timeout Poll Interval.
The Task Executor: Executing Schedule Tasks |
After Scheduled Events have been generated, the Task Executor runs the Schedule Tasks for each Event.
| Execute Ahead |
The Plan's Execute Ahead determines how far in advance to schedule all Schedule Tasks in the Schedule Plan. Extending our example, the Schedule Plan is set as follows:
| Schedule Plan Column | Value |
| Schedule Ahead | 7 days |
| Execute Ahead | 3 days |
Immediately after the Event Scheduler generates all Scheduled Events, the Task Executor will run Schedule Tasks for the first 3 days' worth of Scheduled Events:
| a. | At 2 p.m. on June 1:
|
||||
| b. | At 2 p.m. on June 2:
|
||||
| c. | The Scheduler repeats step b on each day until you stop the Plan Item, its Folder(s), or its Schedule Plan (see Status). |
The idea is to always maintain a 7-day schedule, with 3 days' worth of Tasks already having been run.
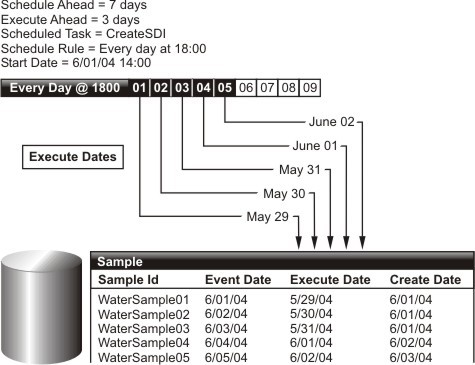
| Execute Date |
In our example, when the WaterSample SDIs are added to the database, the Schedule Rule specifies their Execute Date (Every Day @ 18:00). This is the date the samples are due to be taken, moved, or whatever you want people to do with them.
Execute Date is the difference between the Event Date and the Execute Ahead. For an Execute Ahead of 3 days:
| Event Date | Execute Date |
| June 04 @ 14:00 | June 01 @ 14:00 |
| June 05 @ 14:00 | June 02 @ 14:00 |
| June 06 @ 14:00 | June 03 @ 14:00 |
When you setup the properties of your Schedule Task, you create a column in the Scheduled Item to hold the Execute Date (below). For example, if the Schedule Task is CreateSDI, and the SDI is a Sample SDI, you add a column to your Sample SDC. Then, use the Schedule Task properties to write the Execute Date into this column. The Execute Date tells everyone when this Sample is due for whatever has to be done to it. This is described in the section Scheduled Tasks. Although you would probably not bother creating an Event Date column, the example below includes it to show its relationship to the Execute Date. Create Date is the date the Samples were actually created.
A zero execute ahead would set the Execute Date to be the same as the Event
Date. Therefore the execution of the task would not occur until the first
poll after the Event Date, not necessarily at the Start Date.
Start Date Relative to Schedule Rule |
Not to add unnecessary complexity here, but this one caught me off guard when I was trying to figure out how all of this worked.
In the previous examples, the time specified by the Start Date was earlier than that specified by the Schedule Rule. Recall that on June 1st, we generated our Scheduled Events at 2 p.m., with the Schedule Rule specifying "daily at 6 p.m". I found that if the time specified by the Start Date is later than that specified by the Schedule Rule, you will see something subtly different. Assume everything in the previous example is the same, but your Schedule Rule says "Every Day @ 06:00". At the Start Date, the Scheduler generates an extra Event for the first day of the schedule, and executes it ahead of schedule.
Polling |
Both the Event Scheduler and the Task Executor constantly poll (query) the SchedulePlanItem table to determine if any Events must be generated or any Tasks are scheduled to be run. You can set the polling interval using the Schedule Poll Interval property in System Tools.
It follows that neither the Event Scheduler nor the Task Executor do anything until the next polling interval following the time specified by the Start Date. For example, if your polling interval is set for 60 seconds, and the Start Date is June 01 at 14:00, the Scheduled Events will actually be generated within a 60-second period after 14:00 (whenever the next 60-second polling interval begins). This is really not an issue, since the exact time Events are generated is of little consequence when generating a schedule... it is the Execute Date that tells users when to take action. If you want to generate Events more quickly, you can decrease your Schedule Poll Interval; however, this makes your machine work harder.
Locking and the Timeout Poll Interval |
When you access a Schedule Plan or Plan Item, LabVantage locks all data associated with it. When locked, no other user can access these data.
Following a successful logon, LabVantage assigns each user a Connection Id. This unique identifier is held in the Connection table of the LabVantage schema. The Timeout Poll Interval properties in System Tools monitor the Connection Id, performing various functions if configurable periods of time expire. One of these properties affects data locking:
| • | Remove locks that have not been used for more than 'n' seconds |
Assume you set this for 3600 seconds. If you create a Schedule Plan with some Plan Items, and do not modify them, they will be unlocked after one hour.
Status |
You can set the Status of any Schedule Plan, Folder, and Plan Item to On or Off. The following information describes this behavior.
| Schedule Plan |
You can turn a Schedule Plan on or off only in the Schedule Plan List Page (shown later in the section on Creating Plans).
| Status of Schedule Plan | Behavior | ||||||||||||||
| On
|
|
||||||||||||||
| Off
|
|
| Folder |
The Status information below applies to all Folders whether or not they represent SDIs. Turning a Folder on or off also turns all of its child Folders on or off, respectively.
| Status of Folder | Behavior | ||||||||||||
| On | On the Start Date of any Plan Item that is turned on for the Folder, the Event Scheduler generates Scheduled Events for the Plan Item. The Plan must also be on (see Status Rules below). | ||||||||||||
| Off
|
|
| Plan Item |
| Status of Plan Item | Behavior | ||||||||||
| On | On the Start Date, the Event Scheduler generates Scheduled Events for the Plan Item. The Plan and the Plan Item's Folder (if any) must also be on (see Status Rules below). | ||||||||||
| Off |
|
| Status Rules |
In the nodes of the Schedule Plan tree, Status behaves according to the rules below. A Status of N/A means the Status does not matter (it can be either on of off).
| 1. | Turning off a parent prevents all of its children from generating Scheduled Events. | ||||||||||||||||||||||||||||||||||||||||||||||||||||||||||||||||||||||||||||||||||||||||||||||||||||||||||||||||||||||||||||||||||||||||||||||||||||||||||||||||||||
Turning off the root node Plan-001 prevents all Plan Items from generating Scheduled Events.
Folder-A and Folder-C are off. Consequently, their PlanItems cannot generate Scheduled Events.
|
|||||||||||||||||||||||||||||||||||||||||||||||||||||||||||||||||||||||||||||||||||||||||||||||||||||||||||||||||||||||||||||||||||||||||||||||||||||||||||||||||||||
| 2. | You can selectively turn Plan Items on and off. Those that are on will generate Scheduled Events if their parent nodes are on. | ||||||||||||||||||||||||||||||||||||||||||||||||||||||||||||||||||||||||||||||||||||||||||||||||||||||||||||||||||||||||||||||||||||||||||||||||||||||||||||||||||||
|
|||||||||||||||||||||||||||||||||||||||||||||||||||||||||||||||||||||||||||||||||||||||||||||||||||||||||||||||||||||||||||||||||||||||||||||||||||||||||||||||||||||