Study Mechanics |
|
|
|
Stability Studies |
Content |
||||||||||||||||||||||||||||||||||||||||||
|
As shown in Fundamental Relationships, a Study is a mechanism for executing one or more Plans. In Stability Plans, we saw that the essential purpose of a Plan was to organize Tasks by Condition as a function of Time Point. It follows that the Study's primary purpose is to execute these Tasks.
For simplicity, consider a Study with a single Plan having a single Condition. Three Pull Sample Tasks are to be executed on each of the three consecutive days following the start of the Study. After the Study starts, an internal mechanism called the Event Scheduler will populate a database table with all Tasks for all Conditions in all Plans in the Study. These are called Scheduled Events. Each Scheduled Event defines the execution of a Task at a Time Point.
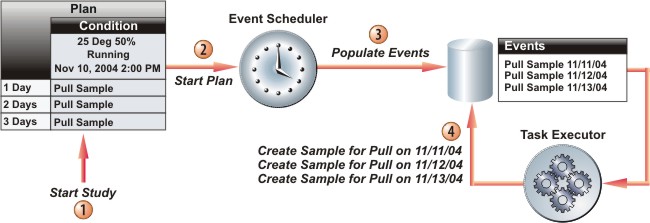
When each Time Point arrives, another internal mechanism called the Task Executor executes each Task. In the example above, three Pull Sample Tasks have each had a Sample created for the Pull. The entire Stability application drives to this point. This is the gist of what a Study does.
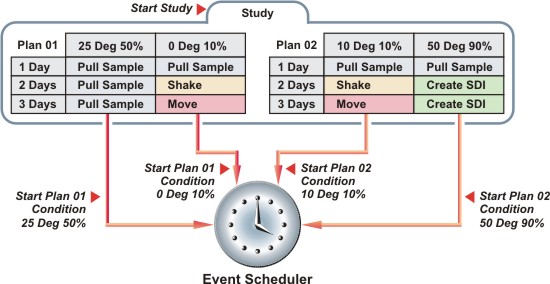
Most Studies will contain multiple Plans, and most Plans will contain multiple Conditions. An important concept is the difference between "starting a Study" and "starting a Plan Condition". For each Condition within a Plan, you can specify a Start Date and other requirements necessary for the Condition to start. When you "start a Study", it means that all Conditions for all Plans that meet the start requirements will start. In the example below, you could start the Study today, but have a different Start Date and other start requirements for each Condition in each Plan.
Throughout the following discussions concerning Studies, we often use the terms Study Plan to refer to a Plan that is associated with a Study, and Study Plan Condition to refer to a Condition within a Plan that is associated with a Study. The terms Plan and Condition are used where the distinction is irrelevant, or when otherwise more appropriate (such as when emphasizing that something applies to "all Conditions within all Plans").
Unit Validation is performed throughout Stability and Studies. When Specifying a Container in a Study, all units in the Plans of the Study will be validated against the Container unit. See Stability Unit Validation for more details about Unit Validation.
Study Flow |
|
|
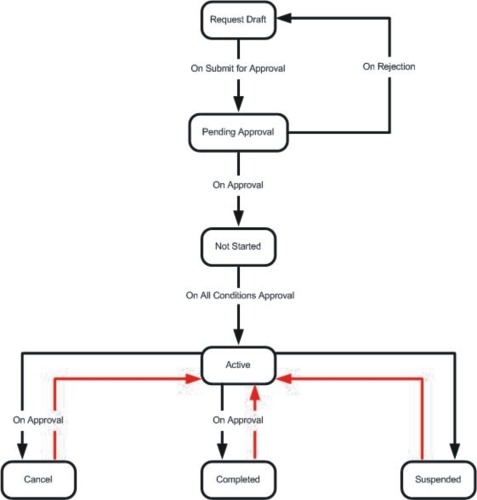
A general flow of the Study is shown below.
Each Study Plan Condition and each Study has a Status:
| Description | ||
|
Status |
Study Plan Condition
Status:
The Study Plan Condition... |
Study Status:
The Study... |
| Request Draft | Not applicable to Study Plan Conditions. | ...has been requested for creation. |
| Pending Approval | Not applicable to Study Plan Conditions. | ...has been requested for approval. |
| Not Started | ...has never been started. | ...has never been started. |
| Running | ...has been started and is currently capable of executing Tasks. | ...has been started and is currently capable of starting its Study Plans. |
| Active | Not applicable to Study Plan Conditions. | ...has been started and is running. |
| Suspended | ...has been momentarily halted. | ...has been momentarily halted. |
| Complete | ...has been declared "finished". | ...has been declared "finished". |
| Cancelled | ...has been cancelled. | ...has been cancelled. |
Study Status Rules and Transitions |
|
|
Status Rules |
This is how the Status of a Study Plan Condition affects the Status of its Study:
| If... | The Study Status is... |
| All Conditions in all Plans are Not Started | Not Started |
| One Condition in any Plan is Running or Suspended | Active |
| All Conditions in all Plans are Suspended | Suspended |
| All Conditions in all Plans are Complete | Complete |
| All Conditions in all Plans are Cancelled | Cancelled |
Valid Status Transitions |
Each Status can transition to a finite number of other statuses:
| Status | Can transition to... | ||||||
| Request Draft | Pending Approval | ||||||
| Pending Approval |
|
||||||
| Not Started |
|
||||||
| Suspended |
|
||||||
| Complete |
|
||||||
| Cancelled | Running |
Study Evolution |
|
|
A Study evolves through these phases. A separate List Page displays Studies in each phase:
| Phase | Description | Applicable Section |
| Request | "Creating a Study Request" means creating a new Study to be submitted for review. | Creating a Study Request |
| Pending Approval | An authorized person approves the Study request. | Approving Study Request |
| New | After the request is reviewed, a new Study is created. | Creating a New Study |
| Approval | An authorized person approves and starts the Study. | Approving a Study |
| Activation | Each Study becomes Active after it is started. An authorized person can work with the Study while it is Active. | Working with Active Studies |
| History | Historical Studies are those that have been cancelled or declared complete. | Viewing Historical Studies |
Creating a Study Request |
|
|
Options for Creating a Study Request |
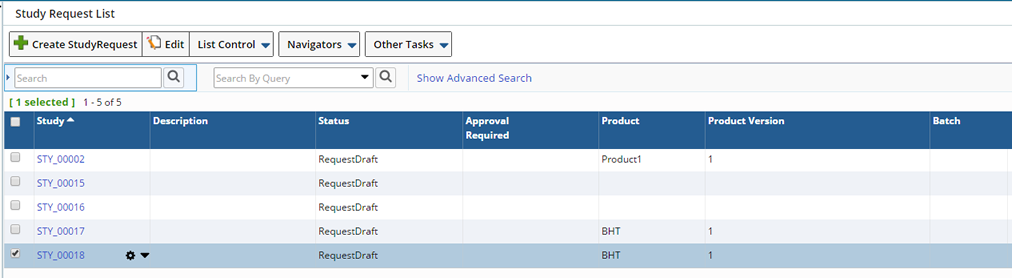
Choose the Study Request menu item. The Study Request List Page opens.
In the Study Request List Page, click "Create Study Request".
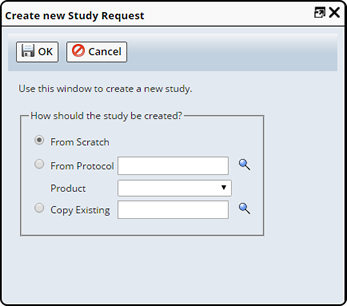
Choose how the Study will be created:
| • | From Scratch lets you build a Study using only Plans and no Protocol. This may be useful when developing testing requirements on an experimental basis (as during research and development). In this case, you can add Plans directly to the Study. |
| • | From Protocol lets you base the Study on an existing Protocol. You must also choose one Product. All Plans associated with that Product will be executed by the Study. |
| • | Copy Existing lets you create a Study that is a duplicate of an existing Study. |
The Study Page opens. This is where you setup your Study request. The Study Request Page consists of a Study Form, Approvals and may contain one or more Plan Forms.
Study Page |
Study Form |
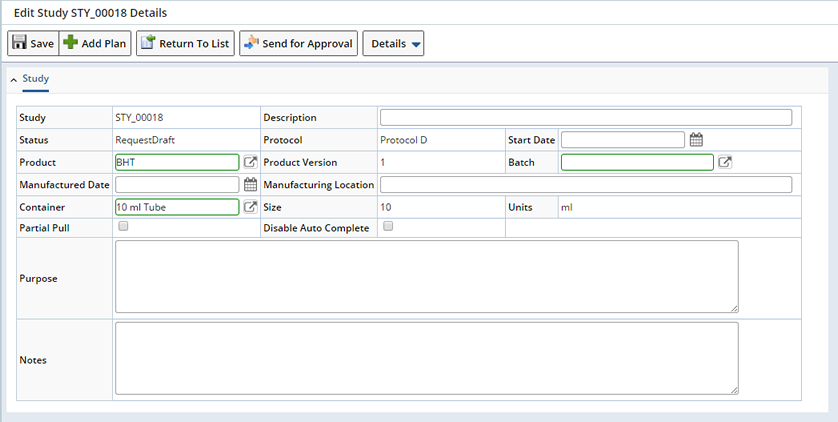
The Study form (below) is where you specify Study management details.
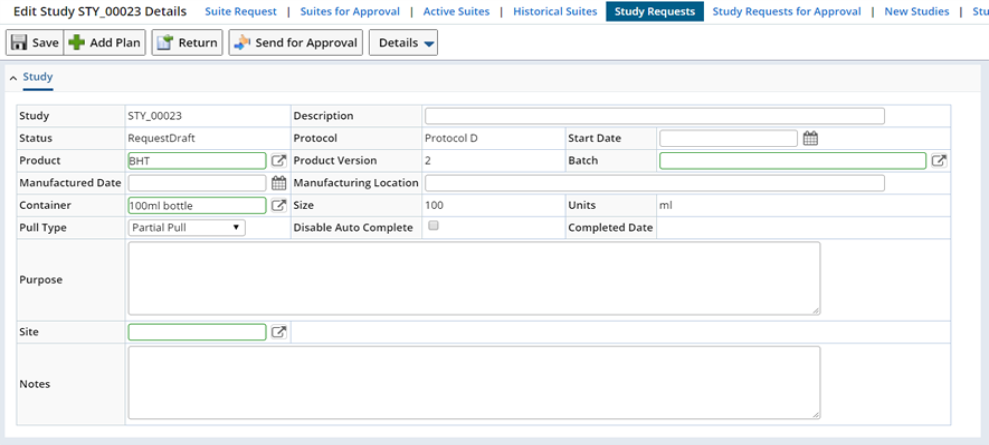
| Field | Description | ||||||||
| Study | Shows the automatically generated identifier of the Study. | ||||||||
| Description | Enter a text description if desired. | ||||||||
| Status | Shows the current Study Status. When Study request is created, it has the status of "Request Draft". | ||||||||
| Protocol | Shows the Protocol (if any) on which the Study is based. | ||||||||
| Start Date | Choose the date and time when the Study will start. This will make all Tasks in all Study Plan Conditions Plans available for execution (see Study Mechanics). | ||||||||
| Product | Shows the Product associated with the Study. | ||||||||
| Batch | Choose a Batch if you want to associate one with the Study. | ||||||||
| Manuafactured Date | Choose a Manufactured Date if you want to associate one with the Study. | ||||||||
| Manufacturing Location | Enter a location if desired. | ||||||||
| Container | Shows information copied from the Protocol. | ||||||||
| Size | |||||||||
| Units | |||||||||
| Disable Auto Complete | Disables the Auto Complete functionality. Optionally a Study will automatically become Complete when all necessary pre-requisites are completed. If disabled you will need to manually complete the Study. See Study Completion for details on Completing Studies. | ||||||||
| Pull Type | Select the type of pull.
|
||||||||
| Purpose | Enter this information if desired. | ||||||||
| Notes |
Plan Form |
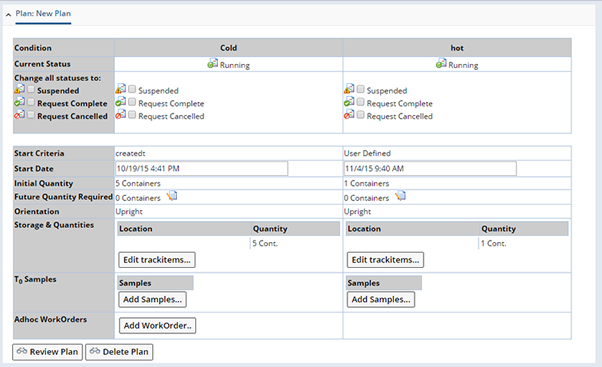
If you based the Study on an existing Protocol or copied the Study on an existing Study containing Plans, a Plan form (below) is displayed for each Study Plan in the Study.
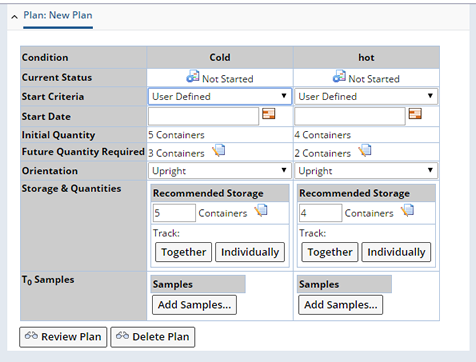
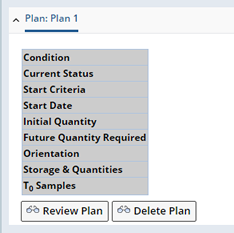
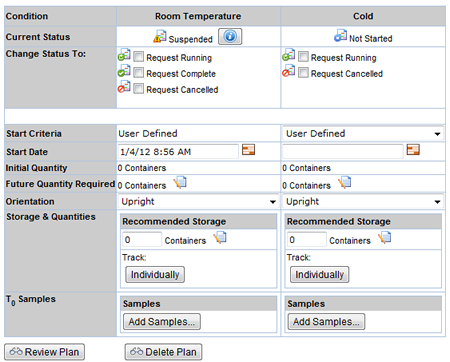
The Plan Form lets you control selected variables for each Study Plan Condition.
| Field | Description | ||||||||||||||||||||
| Current Status | Shows the current status of the Study Plan Condition. Initial status of the Plan is "Not Started". | ||||||||||||||||||||
| Start Criteria
and Start Date |
Start Criteria specifies the origin of the Start
Date.
Start Date is the date and Time the Study Plan Condition will start. This will make all Tasks in the Condition available for execution (see Study Mechanics). Choosing User Defined as the Start Criteria lets you choose any date/time as the Start Date. Do this by clicking the Calendar icon in the Start Date field. If you want to automatically populate the Start Date with any of the following dates/times, choose appropriately:
|
||||||||||||||||||||
| Initial Quantity | Total amount of quantity originally loaded at the start of a Study. | ||||||||||||||||||||
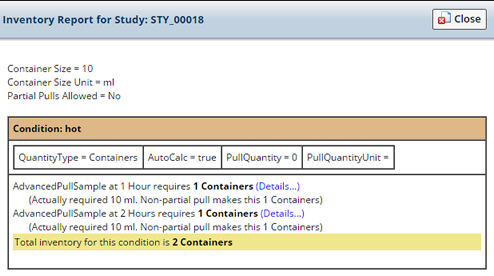
| Future Quantity Required |
This is the quantity that is required to execute the Study from any point forward. As the Study progresses, this quantity changes. This field indicates whether the current number of containers is sufficient to complete the remaining Study or more containers is needed. For Example:
The details of how this quantity is calculated are determined from
the Inventory Detail Report accessible from striking the
|
||||||||||||||||||||
| Orientation | This shows (and lets you change) the Orientation you set in the Plan. | ||||||||||||||||||||
| Storage and Quantities |
This is the current amount of quantity that currently exists in storage.
This mimics (and lets you change) the total number of containers needed for a Study condition.
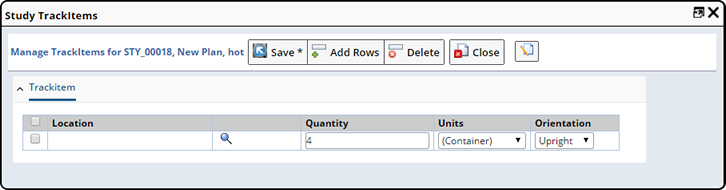
This shows the method of Container Tracking you chose when you added a Product to the Protocol. Like Container Tracking, this requires familiarity with Trackable Items and Storage Locations. In the Protocol, if you chose Together, a single Trackable Item was created. In the example Plan Form shown above, the Total Pull Quantity is 40 ml, specified in 4 Containers. Tracking them Together creates a single Trackable Item of Quantity = 4 Containers. Clicking Together opens the Manage Trackitems Page, which shows the single Trackable Item (below). Choose the Storage Location, and you can track the quantity with respect to it.
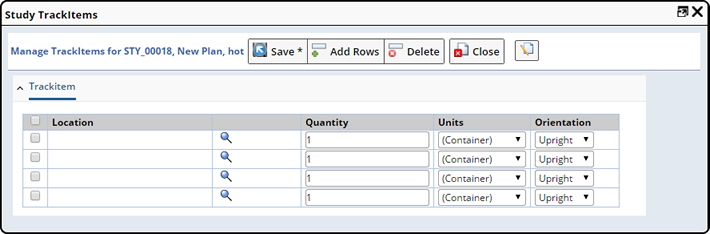
In the Protocol, if you chose Individually, a Trackable Item was created for each Container. Referring back to the example Plan Form shown above, the Total Pull Quantity is 2000mg, specified in 20 Containers. Tracking them Individually creates 20 Trackable Items, each of Quantity = 100mg. Clicking Individually opens the Manage Trackitems Page, which shows the 20 Trackable Items (below). Choose the Storage Location for each, and you can track the quantity with respect to each location.
In either case, when you return to the Plan Form, the Quantity for each Storage Location is shown. An Edit Trackitems button is then added to the Plan Form. Click it to reload the Manage Trackitems Page (above) if you want to add, delete, or otherwise edit the items. All Trackitems you create here will be available for viewing and editing on the Trackitem List Page (see Trackable Items).
Unit validation will be performed on Trackitems in the Study. Consider adding Unit Conversions if Trackitem Units might be different from Container Units. See Unit Validation for more detailed information. |
||||||||||||||||||||
| T0 Samples | Sometimes an initial or base Sample must be associated
with the Study when conducting a test. It is generally associated with the
Pull task at 0 day, 0 month, 0 year in a Plan condition,
before the start of the Study. As it is added at the "zero"
timepoint, it is referred as T0 Sample.
If the Study Plan condition has a zero timepoint the Sample is associated in the following ways:
|
||||||||||||||||||||
| Adhoc Workorders
(displays only when samples have been created for a Condition) |
Sometimes for investigation or retesting purposes a Stability Sample may need to be pulled on an ad-hoc basis. To record the additional inventory pull from an existing Stability Sample you can generate an Adhoc WorkOrder. The Add Workorder button displays on the Plan Form only when Samples have been created for a Condition of the Study. 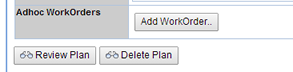 Upon clicking the Add Workorder button the Workorder page displays. You are required to select a Pull Inventory Sample, enter a Pull Amount and Unit. See Adding a Workorder for a description of the fields on the Workorder page. |
||||||||||||||||||||
|
To change or remove the Plan: |
Review Plan opens the Plan Grid Maintenance Page, where you can edit the Study Plan.
Delete Plan removes the Study Plan from the Study.
Adding Plans to a Study |
You can add Plans directly to the Study by clicking Add Plan without associating it with any Protocol.
Note that, if a Plan is added to a Study (without Protocol), then based on the Container selected in the "Study" tab, the inventory is auto-calculated and displayed in the Initial Quantity, Future Quantity Required and Storage & Quantities fields.
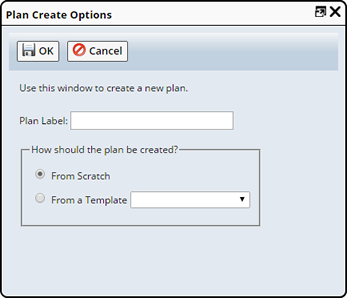
In the dialog:
| a. | Supply a Plan Label. This is an identifier for the Plan. | |||||||
| b. | Choose how the Plan will be created:
|
Associating Approvals with a Study |
Approval is associated to the Study request for review and approval.
"Add Type" button displays the "Select ApprovalType" lookup page to select an approval type.

Approval properties:
| Property | Description |
| Type | Type of the approval for the Study request. |
| Step | Default steps for the approval. |
| Role | Role to perform the approval step. |
| Mandatory | Flag indicating that the approval step mandatory or not. |
| Assigned To | User to perform the approval step. Note that the lookup page displays only the relevant user(s) that has the required role. |
| Status | Status of the approval. |
| Notes | Additional notes for future reference. |
If you need to add another approval step for the selected type, click on the "Add Step" button.
Approving a Study Request |
|
|
Submitting for Approval |
To submit a Study Request for Approval you can do so while creating the new request or from the Study Request List, navigate to LIMS → Studies → Study Requests. The Study Requests list page displays.
Select the Study you want to send for Approval and click "Edit". Use this page to Edit the Study and make changes as required prior to Study Approval. See creating a Study Request for information about the fields on the Study Request page.
When the information on the Study is correct and needs no further modification click "Send For Approval". Once clicked, the Study is displayed on the "Study Request List" page in the "Study Requests for Approval" section with a status of "Pending Approval".
Reviewing an Approval |
Approve or reject Study request from the Study Request List page, which shows all Study requests with the status as "Pending Approval". This page is accessed through the option Study Requests for Approval.

To approve or reject Study, click "Review".
Study request page gets displayed in view mode. To approve or reject, click on the "Approve/Reject" button.
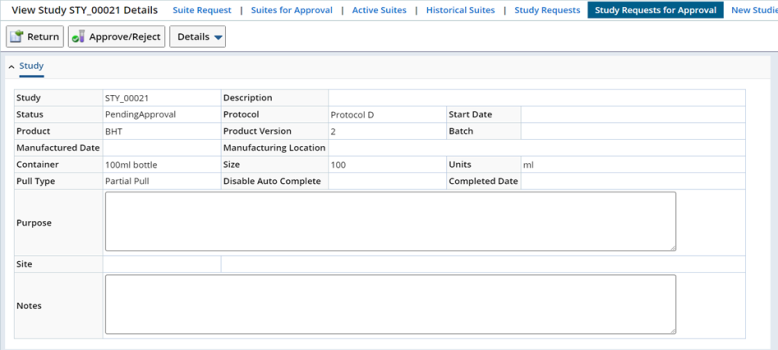
The approve/reject page gets displayed on a new window.
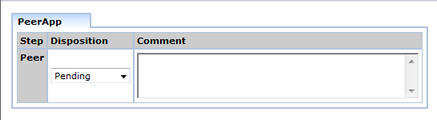
The page shows the status of the approval steps specific for the current user.
Here you pass or fail the approval step and enter comment about the approval step.
Multiple steps appear if the user is authorized to approve them all.
The Study request has any of the following status.
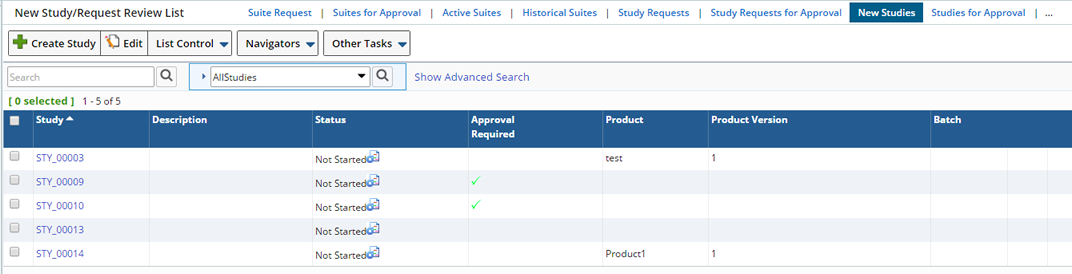
Once the Study request is approved, it is then displayed as "New Studies" in the New Study/Request Review List Page.
Creating a New Study |
|
|
Once the Study Request is Approved, it becomes a New Study and is displayed in the New Study/Request Review List Page.
This section also offers the ability to create and edit Studies (without creating a Study request), plus the ability to Delete a Study.
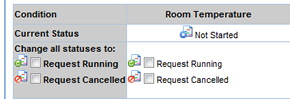
You can still make changes as needed before starting the Study. Each Condition of the Plan must be started in the Plan Form. In the Plan Form you can Request the following for each Condition:
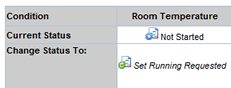
Check Request Running for the Condition you want to Start and "Save". The Status becomes "Set Running Requested".
| Status not set during Study Request: | Status set during Study Request: | |
|
|
After you set the Study Plan condition to Running or Cancelled, the Running Request must be approved.
Approving a Study |
|
|
Reviewing Changes |
When a Study Plan Condition Running Request is submitted, the Study moves to the "Study for Approval" list.
To Approve or Reject Study Plan Conditions, select the Study and click "Review Changes".
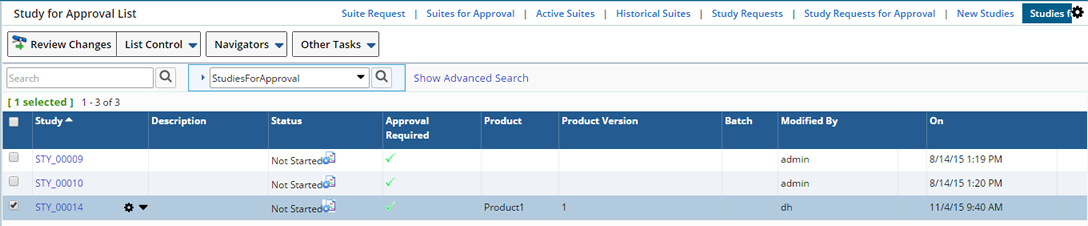
Choose to "Approve" the running request or "Reject" the request.
Approving and Rejecting Study Plan Conditions |
Clicking Approve for at least one Study Plan Condition allows the Study to start (see Study Mechanics). All Tasks in the approved Study Plan Condition(s) will then be available for execution on their respective Start Dates.
Clicking Reject prevents a Study Plan Condition from starting. All Tasks in rejected Study Plan Condition(s) will not be executed.
Starting the Study |
To start the Study, click "Save", then enter your Electronic Signature. The Study Status is now "Active", as described in Study Status Rules and Transitions.
Working with Active Studies |
|
|
Accessing Active Studies |
Work with Active Studies from the "Active Studies List Page".
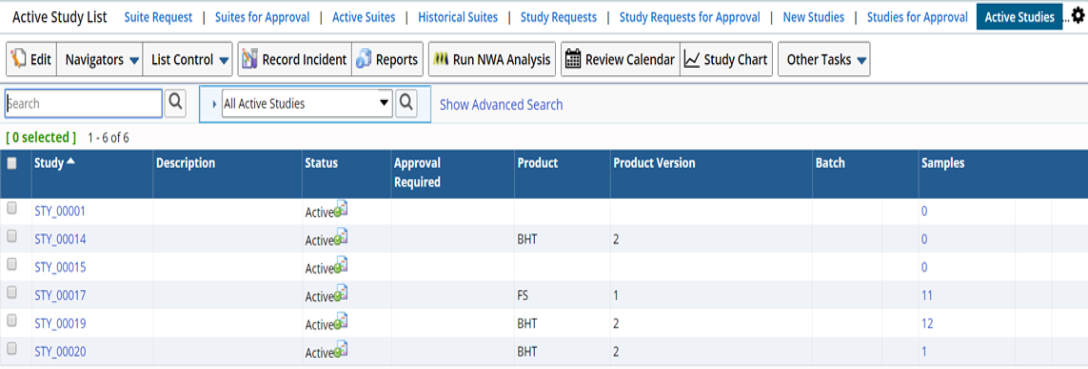
Editing functionality is the same as you used when Creating a New Study. The difference is that you can change any Study Plan Condition Status.
Changing Study Plan Condition Status in an Active Study |
You can change any Study Plan Condition Status. This affects the Study in accordance with the Status Rules. All Status changes on an Active Study require approval.
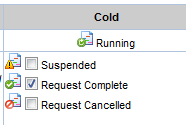
| Suspended |
Checking Suspended suspends the Study Plan Condition, with consequences for the Study defined by the Status Rules.
| a. | Check Suspended, then click "Save" and enter your Electronic Signature. |
| b. | The Study is now listed in the Studies for Approval List Page as Suspended. |
You can restart the Study by editing it and choosing Request Running and (see Study Flow).
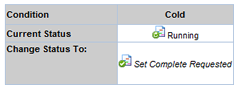
| Request Complete |
Checking Request Complete declares the Study Plan Condition as having been completed, with consequences for the Study defined by the Status Rules.
| a. | Check Request Complete, then click "Save" and enter your
Electronic Signature.
The Study is now listed in the Studies for Approval List Page as an Active Study with Approval Required (you have requested approval for completion). |
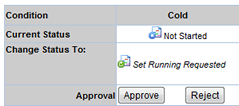
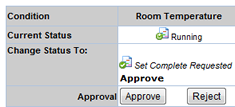
| b. | Click Review Changes. In the Plan
Form of the Study Page, the Study Plan Condition Status shows Set
Complete Requested, with an Approve and Reject button
below it:
|
| c. | To declare any Study Plan Conditions as being Completed, click "Approve". |
| d. | Click "Save", then enter your Electronic Signature. |
If these actions have resulted in the Study now being Complete (as defined by the Status Rules), it is now a Historical Study. These are shown on the Historical Studies List Page.
| Request Cancelled |
Checking Request Cancelled cancels the Study Plan Condition, affecting the Study according to the Status Rules.
| a. | Check Request Cancelled, then click "Save" and enter your
Electronic Signature.
The Study is now listed in the Study for Approval List Page as an Active Study with Approval Required (you have requested approval for cancellation). |
| b. | Click "Review Changes". In the Plan
Form of the Study Page, the Study Plan Condition Status shows Set
Cancelled Requested, with an Approve and Reject button
below it:
|
| c. | To cancel any Study Plan Conditions, click "Approve". |
| d. | Click "Save", then enter your Electronic Signature. |
This is now a Historical Study, and is shown on the Historical Studies List Page.
Recording an Incident for an Active Study |
Record an unplanned deviation or a planned modification on Study using the "Record Incident" button on the "Active Study List" page.
this is handled by the Lab Investigations module.
Run NWA Analysis |
LabVantage uses NWA Quality Analyst to provide Stability Analytics on data collected in one or more Studies. Select one or Studies and click "Run NWA Analysis". See Running NWA Analysis for details.
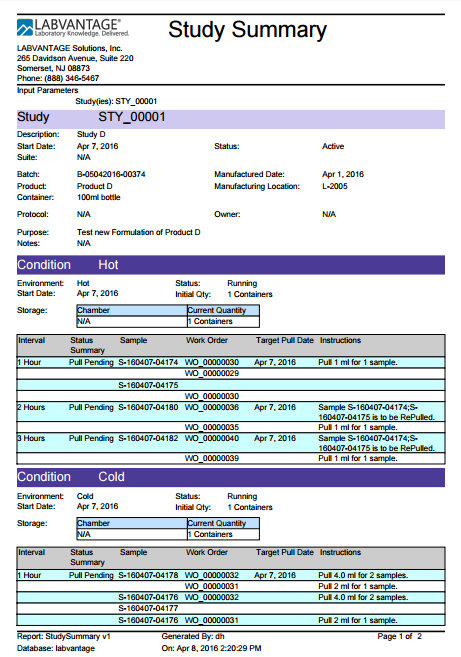
Print Study Summary |
Print a Summary for the selected Study. Select the Study, open the Other Tasks menu and click "Print Study Summary". The Study Summary displays.
Auditing Studies |
|
|
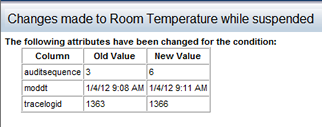
Making changes to an active Study requires suspending the Study conditions first. After changes are made, the condition is then approved (typically by another user).
An audit view of the condition is provided to the approver, to know what has changed.
Click on this ![]() icon to open a popup page showing the details of the Study condition changes.
icon to open a popup page showing the details of the Study condition changes.
Reviewing a Plan |
|
|
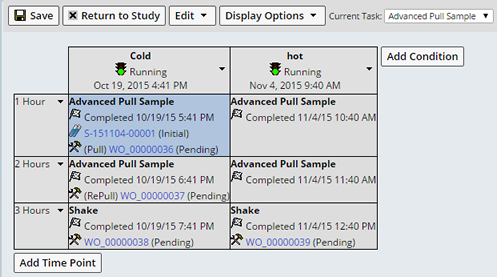
To see the Tasks executed by each Study Plan Condition, click "Review Plan".
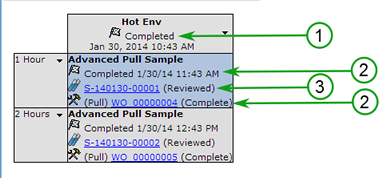
This opens the Plan Grid Maintenance Page, which shows execution progress. The example below shows the Cold Condition with three completed Tasks. Note the Study Plan Condition Start Date (Oct 19 4:41), with the corresponding execution date of each Task determined by the Time Point.
Review Samples by Timepoint |
Users with the the Role "Stability Timepoint Review" can easily review the Samples of a Timepoint within the Plan Grid.
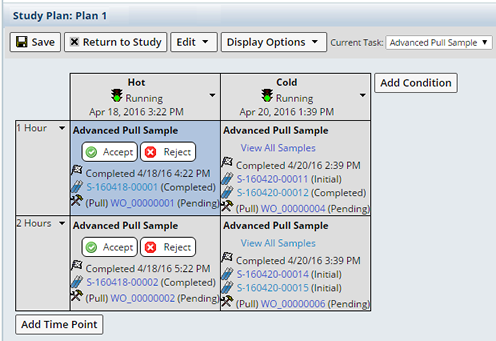
When multiple Samples are defined, reviewers can view all Samples associated with a timepoint in one page. Clicking "View All Samples" for the timepoint: Cold at 2 hours, displays the following:
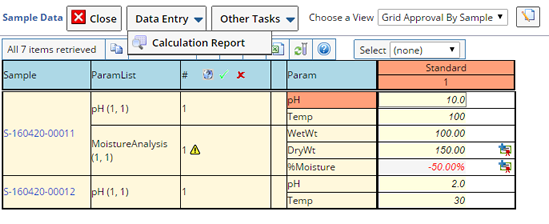
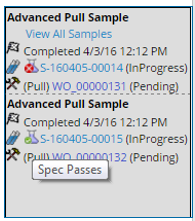
When Specification limits are defined for a Sample, an icon appears next to the Sample indicating the results. Hovering over the icon displays a tool tip with the actual disposition.
|
The following icons may display:
Note: The icons shown need not be the actual icon used for a spec condition. The Data Entry Policy provides a mapping of the actual spec condition to the interpretation for either Pass, Warn or Fail.
|
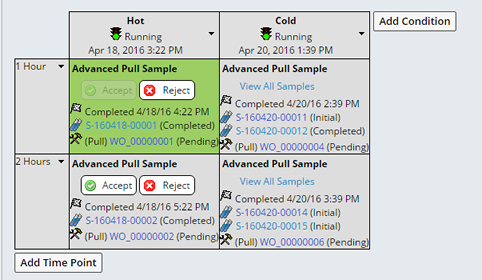
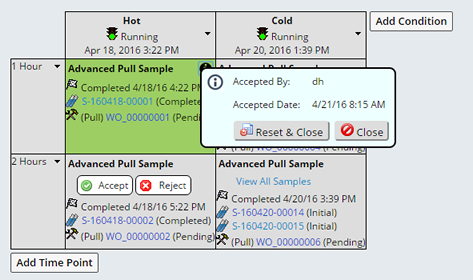
When all Samples associated with a timepoint are Completed, the Accept and Reject buttons become available. Clicking the Accept or Reject button dims the button, the background of the timepoint becomes green when the Accept button is clicked or red for when Reject button is clicked.
The disposition is not applied until you click "Save", upon Saving you are asked to enter you Electronic Signature, then either the Reject or Accept disposition is applied. The background becomes green or red and an Information icon displays in the upper right corner of the timepoint. Clicking the icon displays the details of the disposition. Optionally the reviewer can reverse their decision by clicking "Reset and Close", clearing the disposition.
|
|
Once a timepoint disposition is set you can no longer edit the associated Samples.
Study Completion |
|
|
Study Completion Overview |
Auto Completion of Study |
You have the option to automatically complete a Study or disable auto completion. To automatically complete a Study you must define a task having an action that governs the auto-completion of Study.
The study is completed when the following pre-requisites are fulfilled:
|
|
As all the above conditions are fulfilled for a Study, it is automatically completed (unless you chose to Disable Auto Complete on the Study Maintenance page). It is then displayed in the Historical List Page with the status as Completed.

Manual Completion of Study |
Apart from automatically completing a Study, you also have the option to manually complete a Study. For this you do not need to define any Task (having action).
For this the Plan associated with the active Study must have the Request Complete option checked. For this you need to select an Active Study from the Active Study List page and click on the "Edit" button.
The Plan associated with the Study completes, provided the following pre-requisites are fulfilled:
Next you need to approve the Study. For this you need to select the Study from the Studies for Approval List page and click on the "Review Changes" button.
Click on the "button" to approve the Study. As the Study is approved and saved, it is automatically completed.
Defining a Task for Study Completion |
For auto-completion of a Study, you need to add a Schedule Task. The task should have the action AutoCompleteStudies.
The task executes the action to detect when the Study conditions are completed and marks the Study as Completed.
This transition from Active to Completed does not require approval.
To add a Task navigate to System Admin → Scheduling and Events → Tasks.
In the Task List page, click "Add".
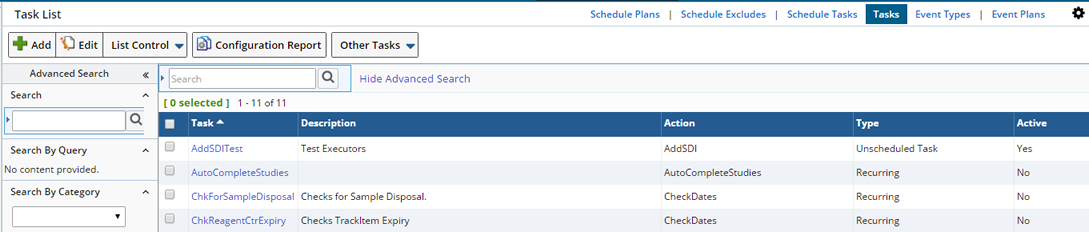
The Add Task maintenance page gets displayed.
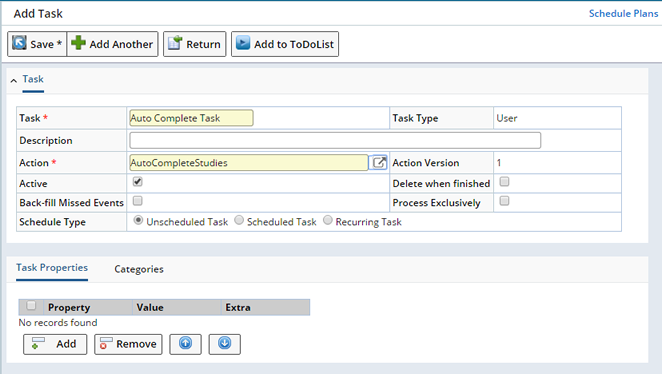
Enter the following details:
| Field | Description | ||||||||||||||||||||
| Task | Name of the task. | ||||||||||||||||||||
| Description | Enter a text description if desired. | ||||||||||||||||||||
| Action | Choose the action to be performed. Click on the info icon to open the Action lookup page in a new window. In the left search panel, select the option "Stability" to view the related actions. Choose the action "AutoCompleteStudies" from the list. | ||||||||||||||||||||
| Action Version | Action version is by default "1". | ||||||||||||||||||||
| Active | Option to make the action in the task active. | ||||||||||||||||||||
| Delete when finished | Option to delete the task when the action executes and completes. | ||||||||||||||||||||
| Back Fill Missed Events | How should the Scheduler handle missed Events. No, the Scheduler will not create events with an Event date prior to the current date. Yes, the Scheduler will create events with Event dates in the past and the future. |
||||||||||||||||||||
| Type | Choose the Type of task to execute:
|
As you create the task, it automatically gets associated with the application and executes.
Viewing Historical Studies |
|
|
The Historical Studies List Page shows Studies that have been cancelled, as well as those that have been declared complete.