QC Review |
|
|
Content |
||||||||
|
QC Review |
|
|
QC Review is the process of evaluating the overall plate testing process. The user typically examines outcomes of the various known values stored in control and standard zones. To assist the user, the ArrayMethod defines evaluation limits, for both aggregate zone parameters, as well as parameters in the individual ArrayItems.
The QC Review page lets you approve or reject all or part of an Array. Based on criteria established in the Array Method, results are rendered in red or green depending on whether or not they meet evaluation limits. Select an Array, then click the QC Review button on the Plates and Gels List page. This displays the QC Review page.
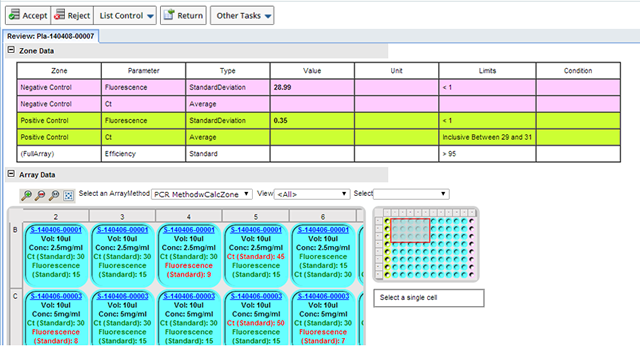
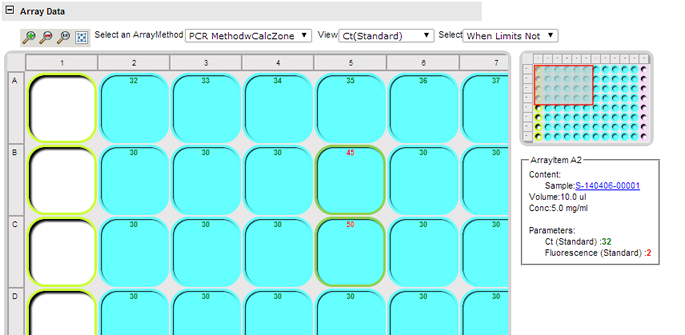
The Zone Data section presents all parameters defined at the Zone level, along with their Value and corresponding limits.
The Array Data section presents the Array Grid which can be zoomed in to expose all parameters or individual parameters one at a time.
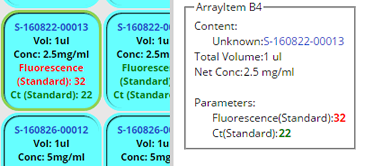
In the above example, two Parameters were defined for the Negative and Positive Controls (fluorescence and Ct) to obtain a Standard Deviation and Average for each. Limits have been defined to identify Array Items with values between 29 and 31. As you can see in the Array Items, those values that fall within the limits are rendered in green and those that do not are red. This helps to easily identify Array Items that fall within the desired range.
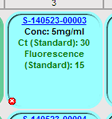
When an individual Array item is selected, details are displayed in the Array Item Panel to the right of the Array:
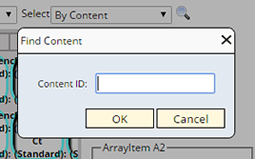
Using the Search bar you can filter and isolate results based on the Array Method.
![]()
| Option | Description | ||||||||||
| Toolbar |
|
||||||||||
| Select an Array Method | Choose to view results for a particular Array Method. | ||||||||||
| View | Choose to view results for a specific Parameter. | ||||||||||
| Select
|
This is a helper feature to automatically select the Array Items that meet the various criteria options shown below.
|
Array Items that meet the defined criteria are highlighted. In the example below we looked for the Ct Parameter whose values did not meet the criteria (between 29 and 31). Array Items that did not meet the criteria are selected.
This helps to easily identify and select Array Items that you may want to Reject.
With the desired Array Items selected, you can then choose to Approve or Reject all or part of the Array. Using the options on the Array Review page do any of the following:
| Option | Description |
| Accept | Accepts the entire Array. The Array status changes to "Reviewed" and the Array disposition becomes "Approved". |
| Reject | Rejects the entire Array (and the individual ArrayItems). This sets the Array status to "Reviewed" and the Array disposition becomes "Rejected". |
| Reject Selected Wells
Undo Cell Rejection |
Reject specific Array Items. This sets the Array status
to "Reviewed", and the Array disposition becomes "Partial".
The Array Item is Rejected and displays a red x.
|
| Accept Partial | Partially Accept the Array. The disposition of the Array Method Instance becomes "Partial" and the Array Status becomes "Reviewed". |
All Array selection and zooming capabilities are available on this page.
Promote Results |
|
|
Results entered against an Array are associated to the ArrayItems, and possibly the ArrayZones. Nothing is associated to the individual content Samples. Getting data to the content Samples requires you to "Promote Results".
Promoting Results can occur in 2 ways as defined by the Array Method's "Promote Results to Unknowns" flag. The options are:
| Option | Description |
| Automatic | Results are automatically synchronized with the ArrayItem result on Array Data Entry. This is typically the case when no QCReview is required or desired. |
| Manual | Results are manually promoted by the user. Typically, this is after a successful QCReview. |
Regardless of when the Result Promotion occurs, the system supports two different ways for promoting results. The system supports both a Push and Pull option. See Array Method Parameters for a discussion about the Push and Pull options on the Array Method.
After Results have been Reviewed and Approved, you can Promote those results back to the Samples. Click "Promote Results" on the Plates and Gels List page. The results are pushed to the Samples. Results are posted to the Test Method on the Content Unknown sample using the Test Method defined on the Array Method's Content tab. If this Test Method does not exist on the Content Unknown sample, it will automatically be added.
From the Plates and Gels list page, in the Samples column, the number of Samples associated with the Array displays. Click the number to open the Sample list page, all the Samples associated with that Plate are displayed.

Note that the Samples have a status of InProgress. The icon indicates that Data have been entered and that the Sample has an sdidata dataset structure.