Preparing to Use Array Management |
|
|
Master Data Setup discusses the master data that must be defined in order to create and manage Arrays. For details about creating and managing Arrays once this information is defined, see the Array Management Overview as a starting point.
To create and load an Array, you must first define details about the types of Arrays you intend to create. Consider the physical characteristics of the Array, such as dimensions and layout. Determine what content goes where, and what results need to be gathered. Each of these components work together to create and process Arrays. When preparing to use Array Management, you must define the following:
Define these system-level attributes:
| • | Reference Types
to identify the typical types of Arrays used by your organization. Two Reference
Types should be defined in Array Management:
|
||||
| • | Parameter Lists to be used when pushing results to the Unknown Sample. See Define Parameters for more information. | ||||
| • | Storage Units into which to place Arrays when they are complete but you do not want to dispose of them. |
Define the physical properties of an Array:
| • | The Array Classification (such as Plate, Rack or, Gel), which is a previously defined Reference Type. |
| • | The number of Rows and Columns. |
| • | How the Columns and Rows are labeled. |
| • | Maximum Volume of each Array Item. |
Define the following features of an Array:
| Feature | Description |
| Zones | Define the different Zones of the Array and the items within that Zone. A Zone is a collection of Array Items sharing a common behavior in terms of the Content it can hold. |
| Loading Pattern | The pattern in which each Zone should be loaded. |
Array Methods define the content that can be loaded into Array Items and Zones and how to handle results. Define the following in Array Methods:
| Define | Description |
| Content | The kind of content with which each Zone can be loaded (such as Controls, Unknowns and Treatments). |
| Parameters | Using Parameters and Calculations, define Methods for testing Array Items or entire Zones. |
| QC Checks | Define methods for performing Quality Checks across the Array. |
Array Transfer Methods define a set of rules for moving content from source Arrays to target Arrays. There are two types of Transfers:
| • | Standard: Rule-driven transfers based on the physical structure of the source plate (such as Condensing, Splitting or Replicating a Plate). |
| • | Custom: Create a map between the source and the target Array Items. |
Array Types |
|
|
Use Array Types to define the physical properties of Arrays (Plate, Racks, or Gels). Later, when defining Array Layouts, these Array Types will be available as options. To add or maintain Array Types, navigate to the Array Type List at Lab Admin → Arrays → Array Types. The Array Type List page opens:
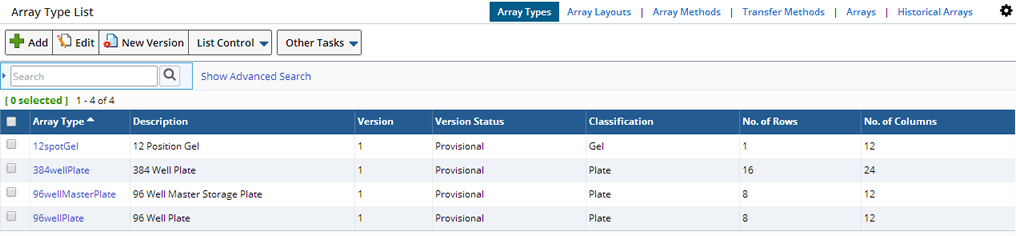
Here you can Add, Edit, View, Delete or Copy Array Types. You can also create a New Version of an existing Array Type. Click "Add" or select an existing Array Type and click "Edit" to make changes.
Adding a New Array Type |
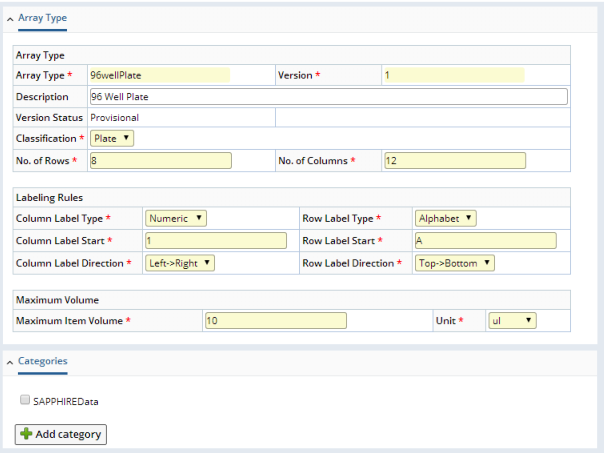
Clicking "Add" opens the Add Array Type page. Here you define the physical characteristics of the Arrays you plan to use.
|
Following is an example of how the Physical Array will appear
using the values entered in this example.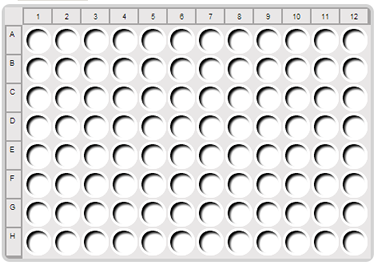 |
| Fields | Description |
| Array Type | Name of this Array Type. |
| Version | Version of the Array Type. |
| Description | A description of the Array Type. |
| Version Status | Initially the Version Status is Provisional. The status becomes Current when the Version is Approved using the Approve Version button on the Add or Edit Array Layout Page. |
| Classification | The kind of Array (as defined in Reference Types). |
| No. of Rows No. of Columns |
Defines the number of rows in the Array. Defines the number of columns in the Array. |
| Column Label Type Column Label Start Column Label Direction |
Determines if the Label is Numeric or Alphabet. At what number or letter should the column label start. Should the numbers or letters start on the left or the right. |
| Row Label Type Row Label Start Row Label Direction |
Should the Row Label be Numeric or Alphabet. At what number or letter should the column label start. Should the numbers or letters start at the top or bottom. |
| Maximum Item Volume Unit |
Maximum volume and Unit of each Array Item. When loading Arrays a check is preformed to ensure this value is not exceeded. |
Click "Save" to add the Array Type.
Array Layouts |
|
|
Array Layouts allow you to predefine different content layouts and loading patterns for loading Arrays:
| • | Zone configuration and colors for visualization. |
| • | Arrangements (such as the number of distinct Samples to load, the number of Repeats, and Serial Dilutions). |
To add or maintain Array Layouts navigate to Lab Admin → Arrays → Array Layouts. The Array Layout List page opens.
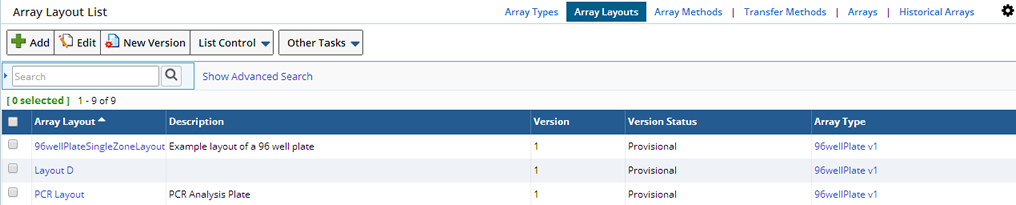
From the Array Layout List page, you can Add, Edit, View, Delete or Copy an Array Layout.
Click "Add" or select an existing Layout and click "Edit" to make changes. You can also create a New Version of an existing Array Layout.
Adding a New Array Layout |
Click "Add". The Add Array Layout page opens.
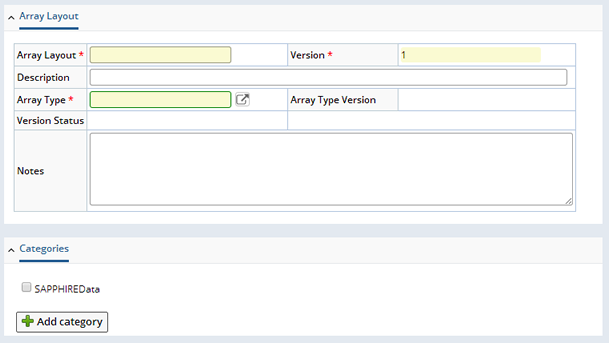
Define basic information about the Array.
| Fields | Description | |||
| Array Layout | Name of the Array Layout. | |||
| Version | Version of the Layout. Once Saved, you can Approve this Version. | |||
| Description | Description of the Layout. The Layout's description is copied to the Array's description. | |||
| Array Type
|
Using the lookup choose an Array
Type. Defines the physical properties of the Array (such as a 96 well
plate).
The Version of the Layout. |
|||
| Version Status | Initially the Version Status is Provisional. The status becomes Current when the Version is Approved using the Approve Version button on the Add or Edit Array Layout Page. | |||
| Notes | Descriptive notes. |
"Save" the Array Layout. The physical Layout (as defined by the Array Type) displays. Each well is considered an Array Item.
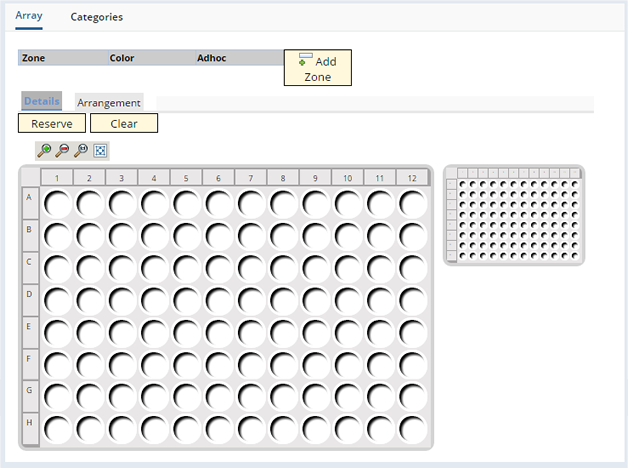
Defining Zones |
In the Array Tab, map the contents of each Array Item either individually or by Zones. Click "Add Zone", then choose one or more Zones (the list of available Zones is defined in the Array Zones Reference Type).
Note: You will not be able to add the same Zone more than once. If you want multiples of the same Zone, you will need to define a unique Reference Type for each.
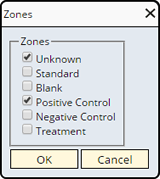
Click "Ok".
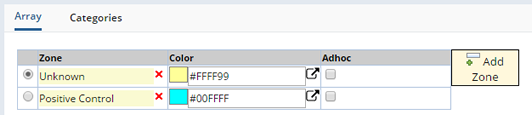
| Fields | Description |
| Zone | Zone you are defining. |
| X | Click the X to delete existing Zones. |
| Color | Using the Lookup, choose a color to visually identify each Zone. Choosing lighter colors makes it easier to read the text within Array Items. |
| Adhoc | When checked, Array loading is on an Adhoc basis for this Zone. You will not be able to reserve any Array Items for that Zone. The association between the Array Item and the Zone occurs during Loading.
Note: Zone level loading is not possible for Adhoc zones, this is important when you are defining the Array Method Content. |
Once you have identified the Zones, you will need to map them on the Array. Assign Array Items to Zones either individually or by groups. Choose the Zone you want to define, then highlight the Array Items you want to include in that Zone.
The following grid selection tools are available for highlighting Array Items:
| • | Click the upper left corner to select the entire Array. |
| • | Click individual Array Items. |
| • | Set of contiguous Array Items (shift-click or click and drag). |
| • | Set of non-contiguous Array Items (ctrl-click). |
| • | Individual rows or columns by clicking the headers. |
| • | Set of continuous rows or columns by shift clicking on headers. |
| • | Set of non-continuous rows or columns by control clicking. |
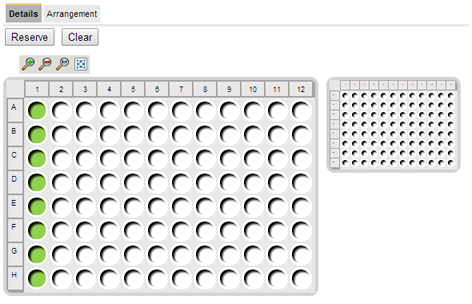
Highlighted Array Items will appear green during selection.
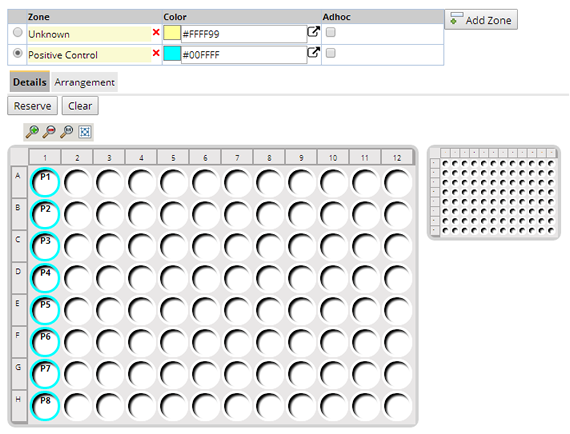
With the Zone you want to Reserve selected, and the Array Items you want to include in that Zone highlighted (green), click "Reserve". The Zone will change to the color you specified. Notice that each Array Item now contains a letter and number which represents the Zone (the first letter of the Zone name) and its position, the Arrangement String. The Arrangement String represents what will be loaded into an individual well. You will see only the contents of the Array for the Zone selected.
| Column 1 was reserved for the Positive Control.
|
Columns 2 through 11 are reserved for the Unknowns. Note that Unknown Zone has 80 Array Items available.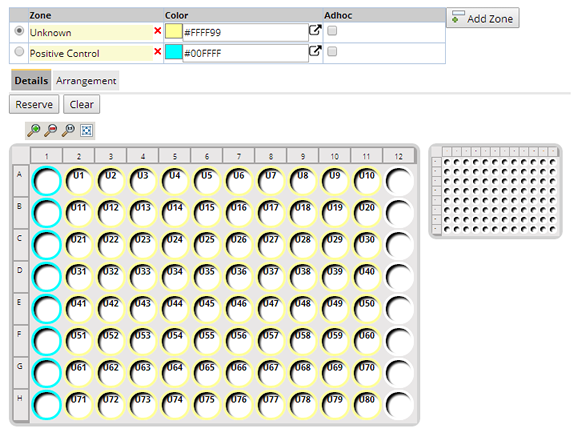 |
Optionally, fill the entire Layout or leave Array Items unassigned. You can also create overlapping Zones, including an Array Item in multiple zones. There is a many-to-many relationship between Array Items and Zones.
To clear the Reserve, first choose the Zone containing the Array Items you want to clear. Select the Array Items within that Zone (they will turn green), then click Clear. The highlighted items will be cleared.
Arrays Layouts can be zoomed in and out using the options provided on the toolbar. In the case of very large Arrays, a smaller version of the entire Array is displayed to the right to show into which portion of the Array you are zoomed. You can move the red bordered box over the entire grid to zoom to a particular location.
![]()
| 1 | Zoom in. |
| 2 | Zoom out. |
| 3 | Returns the Array to the original view. Zoom to 100%. |
| 4 | Fits the Array into the display. |
Zoom using the scroll wheel on the mouse is also supported. You can pan the grid by clicking within the grid then moving the viewport around or using the reference grid.
Defining Arrangements |
Once you have identified the Zones on your Array, you must define the relative positioning of Array Items for replication or serial dilution and how Array Items should be loaded. Using the Arrangement tab, define Arrangement Rules for loading Content into an Array. Define the following for a Zone:
| • | The number of times to load each distinct Sample. |
| • | A specific loading pattern for each Zone (indicate the direction and priority of the next item to be loaded). |
| • | Any Repeats. |
| • | Any Serial Dilutions and the dilution factor. |
Following is an example of how you might choose to load an Array. Suppose you want to load 24 samples with 4 repeats each into a 96 position Unknown Zone. Below is an example of 2 possible ways to load the Samples.
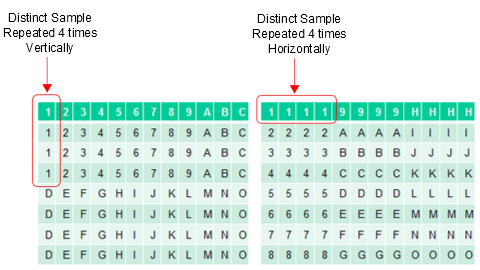
In the first example, you see the distinct sample repeated vertically. The second is a Horizontal repeat. Use Dimensions to define these and other loading patterns.
LABVANTAGE provides three dimensions for defining Arrangement Rules.
| • | Content (distinct Samples) |
| • | Repeats |
| • | Dilutions |
Loading boxes are provided to easily add dimensions to the Arrangement. Click the dimension you want to add and drag it into the Horizontal or Vertical loading area. Add as many dimensions as needed to a loading box and rearrange them as necessary once placed in the box. You can also give a dimension priority over the others. Initially a simple arrangement with only the Content Dimension is defined (as below).
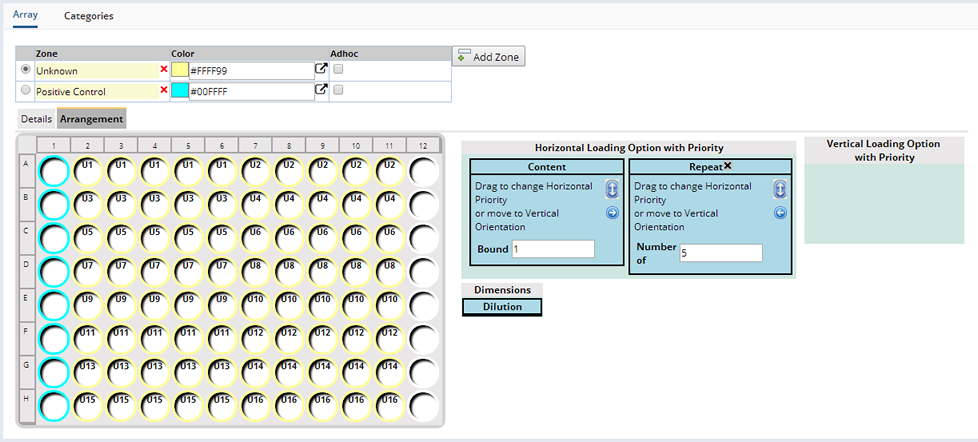
Once defined, the Arrangement is shown in each Array Item. In the following example, only Content is defined in the Horizontal loading box, one distinct sample per Array Item within the Unknown Zone, positioned one after the other horizontally. The Arrangement is shown as U1 (Unknown 1), U2, U3, U4 etc. to fill the entire Zone. With this Arrangement, there are 80 available Array Items.
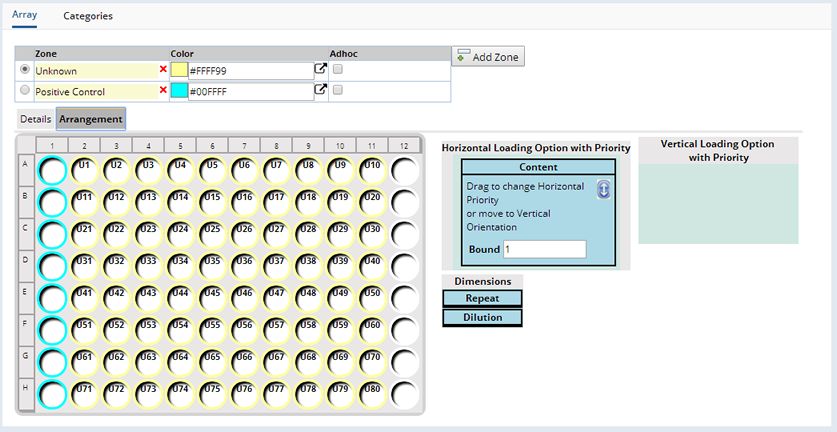
You can optionally click and drag additional Dimensions to either loading box (vertical or horizontal). The left-most dimension in the horizontal loading options box (or top-most dimension in the vertical loading options box) will be given Priority.
Priority determines which dimension is given consideration over the others, in other words if you choose to make Content the priority with a repeat of 3, the Sample is given priority and you would see (as an example): U1 U2 U3 repeated 3 times. If the Repeat has the priority you will see U1 U1 U1 U2 U2 U2 etc. for each sample.
When there are multiple Dimensions in a Loading Box, arrows are available to change the Priority or Orientation of each Dimension. To remove a Dimension from a Loading box, either drag it out or click the X at the top of the box. The Content dimension cannot be removed.

You can also drag the boxes to change Priority or Orientation. Following is a description of each Dimension.
You can load as many distinct Samples as will fit within the Array Zone as defined in the Array Layout. The number defined here determines the number of Array Items filled for each distinct Sample (this number does not represent the Loading order). For example, should you decide to change the Content to 2, you will be loading each Arrangement twice for every distinct Sample you choose when Loading. You must then consider the number of available Array Items in the Zone and the Arrangement to ensure you will have enough Array Items to accommodate the Arrangement.
Using the Layout above as an example: If you were to change Content to 2, you will be able to load 40 distinct Samples (40 Samples, loaded twice).
As you add Repeats and Dilutions, you will need to factor those additional Array Items per defined Content number. For example, if you were to add a Repeat of 5 and the content was 2, the entire arrangement is loaded twice (number of distinct samples 2, times the number of repeats 5) each distinct Sample will require 10 (content 2, 5 repeats each) Array Items in the Zone. If you have 80 Array Items available, you can load 8 distinct Samples.
Load each distinct Sample multiple times for averaging or for quality checks.
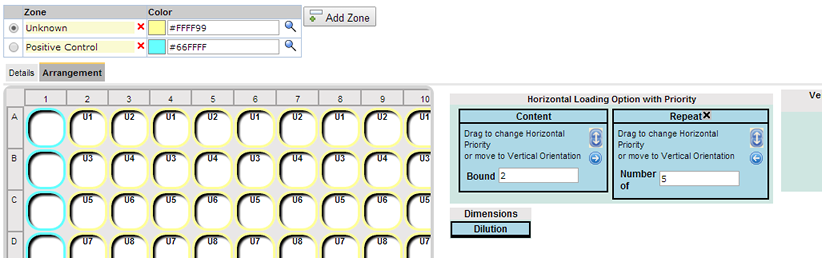
In the example below we added a Repeat of 5 for the Unknown Zone. The Samples repeat 5 times in the Horizontal direction. In the Unknown Zone, as we defined it in the Layout, there are 80 available Array Items. With this Arrangement, a repeat of 5 and Content 1, we will be able to fit 16 samples, 80 divided by 5 (number of repeats) = 16. If the Arrangement will not fit within the specified Zone you will receive an error message stating this is not a valid combination of Dimensions.
| NOTE: | Arrangements (a given "group" of repeats or dilutions) that go beyond the end of a row will wrap around to the next row provided all the dimensions have the same loading option (Horizontal or Vertical). |
Serial Dilution is the process of changing the concentration of the content across different Array Items.
|
Following is an example of a typical Serial Dilution. 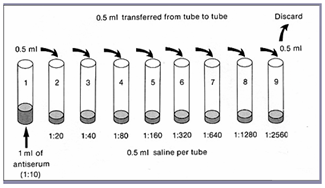 A distinct Sample is diluted across a specified number of Array Items by a specified concentration amount. |
|
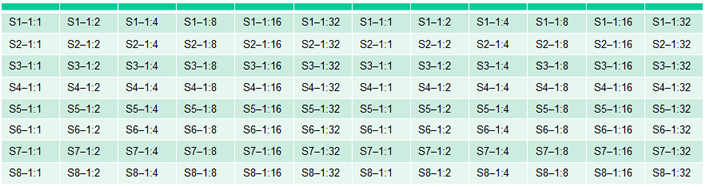
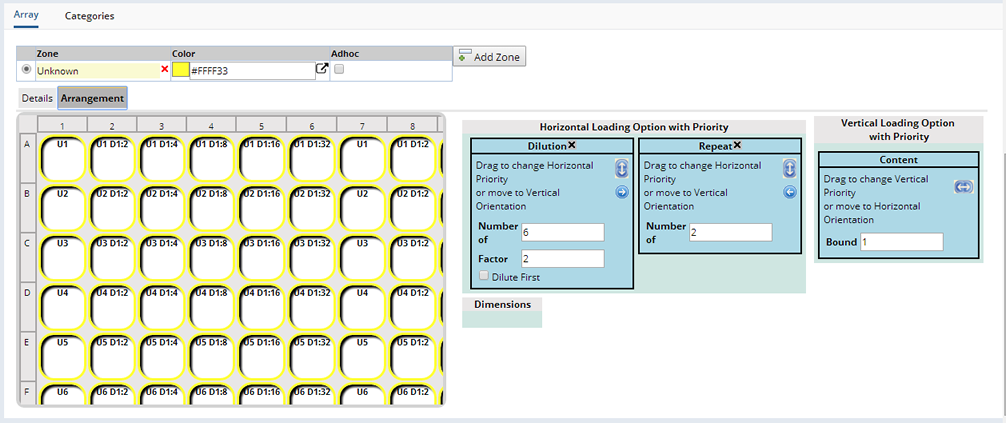
To create the following Serial Dilution in Array Management: 8 Samples at 6 different concentrations repeated twice:
|
Using the Dilution box, enter the number of diluted Array Items and the dilution factor (expressed as the denominator of the dilution ratio). Optionally check Dilute First to indicate whether or not the first Array Item is full strength (if unchecked the first Array Item is full strength).
A Category allows you to group Arrays into Categories you define. Defining a Category here will group Array Layouts into the defined Category (see Categories).
Once you have finished the Arrangement, "Save" the Layout. Optionally click "Add" to add another Array Layout from this page directly.
Approve the Layout Version |
Once you have added a Layout or created a different Version, you can Approve that version. Approving a Version changes the status to Current and the fields in the Array Layout tab are no longer editable. Click "Approve Version" on the Add Array Layout page.
Array Methods |
|
|
The Array Method defines the procedure for the execution of a Laboratory technique. This includes both how the Array is to be loaded, as well as how it will be analyzed and on which instrument. The Array Method has two distinct sections, content and parameters. The content defines:
| • | The source content available when loading Arrays. Define a query to present specific Samples by Type, present Reagent Lots for a specific Reagent Type. |
| • | Define Content Volume and Concentration. |
| • | Define Instruments and the Parameters and calculations used to return results to the Array. |
| • | How Results are promoted to the Unknown Sample. |
| • | Result Parameters for raw data and aggregate calculations. |
The information defined here is copied to the Array and used throughout the Array life cycle. Before loading an Array, you must apply an Array Method. You can do so either when creating an Array or after the Array is created using the Apply Array Method button.
You can Apply multiple Methods to an Array. Each time a Method is Applied (instance) it is listed on the Array (see Applying Array Methods).
To add an Array Method navigate to: Lab Admin → Arrays → Array Methods. The Array Method List opens:
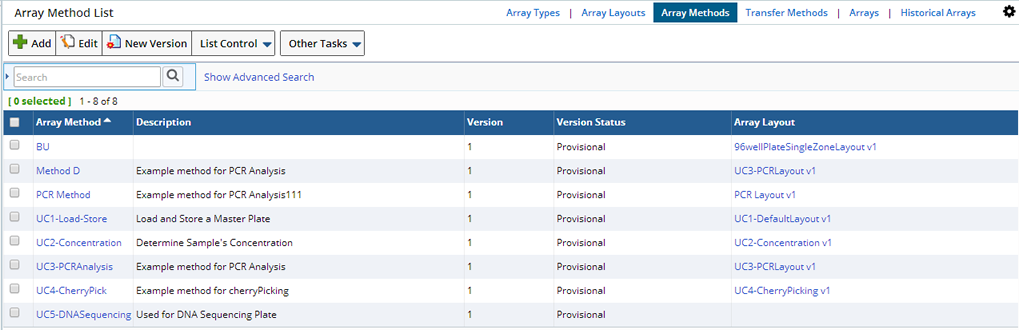
Here you can Add, Edit, View, Delete or Copy an Array Method. You can also create a New Version.
Changes to the Method will not affect Arrays to which the Method has already been Applied. You would need to create a new Array and Apply the Method again. Once applied to an Array, the Array Method cannot be deleted.
Adding a New Array Method |
Click "Add". The Add Array Method page opens:
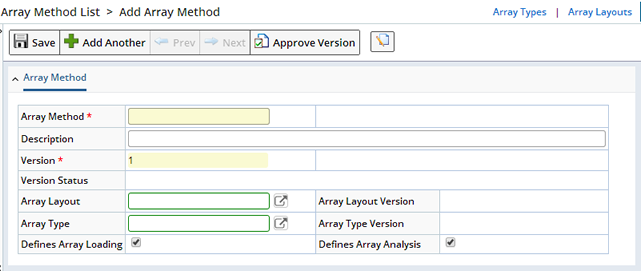
Define basic information about the Method.
| Fields | Description |
| Array Method | Name of the Array Method. |
| Description | Description of the Method. |
| Version | The Version of the Method. |
| Version Status | Initially the Version Status is Provisional. The status becomes Current when the Version is Approved using the Approve Version button on the Add or Edit Array Method Page. |
| Array Layout
Array Layout Version |
Using the lookup choose the Array Layout with which you want
to associate to this Method.
The Version of the Layout. |
| Array Type
Array Type Version |
Using the lookup choose the Array Type you want to associate
with this Method.
The Version of the Array Type. |
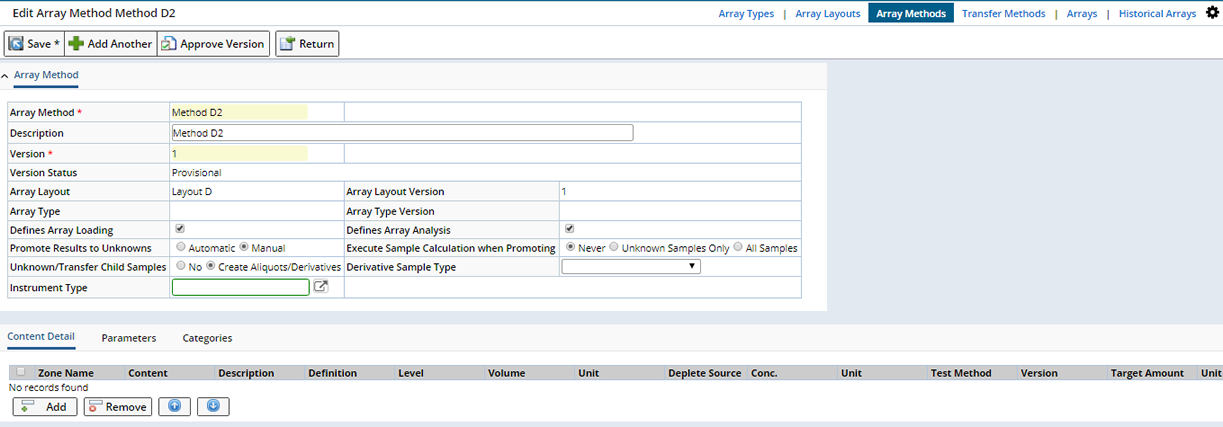
There are three types of Array Methods: Array Methods that define the Loading directives only, Array Methods that define the Analysis directives only, and Methods that define both. The "Defines Array Loading" and "Defines Array Analysis" checkboxes determine which you are defining. Both are assumed, but you have the option to de-select either.
| Fields | Description |
| Defines Array Loading | Check to define Array Loading. When checked, the Content Detail tab displays where you can define information about the type of Content available when Loading. |
| Unknown/Transfer Child Samples | When loading Arrays, either the Sample selected is loaded directly into the Array, or in the case of a Transfer (when you are creating either an Aliquot or Derivative) LABVANTAGE creates a child Sample of that sample. It is the child sample that is loaded into the Array. This option determines whether or not to allow the creation of Child Samples when performing a Create Aliquot or Create Derivative Transfer. |
| Derivative Sample Type | Define the Sample Type to use when Creating Derivatives. If blank, it is assumed the child sample will be an Aliquot. |
| Fields | Description | ||||||||
| Defines Array Analysis | Check to include Array Analysis information. In addition to the Content Detail tab the Parameters tab displays where you can define Parameters and Calculations that are used to analyze Array data.
When checked, the following additional fields display. |
||||||||
| Promote Results to Unknowns | Determine whether you want to Promote Results Automatically or Manually. If Automatically, results are promoted as soon as they are returned from the Instrument or during manual Data Entry. If Deferred, you must promote the results manually using the Promote Results button on the Plates and Gels List page. | ||||||||
| Execute Sample Calculation When Promoting | Determine when Calculations are performed during Promoting.
See Calculation Rule for more information on Calculations. Choose:
Note: These calculations cause execution of the RedoCalculation Action on the content Samples. RedoCalculation then executes the calculation to pull the results to the Sample's Test from the Array. |
||||||||
| Instrument Type | Using the lookup, choose the Instrument Type you intend to use. Instruments of this type will be available when sending an Array to an Instrument. |
Save the Array Method. Once saved, the additional fields and tabs become available. In the following example, both the Array Loading and Array Analysis fields are checked.
Define Content Details |
In the Content Detail Tab define which type of Content is available in the Source pane when loading an Array.
Optionally, define specific query parameters to restrict the content that is available during loading. For example, you can specify that only Samples with a certain Sample Type are displayed, or to display Trackitems from specific Reagent Lots. If no specific criteria is defined Users can perform an Advanced Search during Loading to find Content.

To define Content for each Zone click "Add". The Array Method Content Editor opens. Depending on the Type of Content you choose in the Content Editor, different options are available.
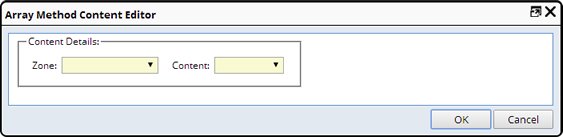
In the Zone dropdown, you will find a list of the Zones defined in the associated Array Layout. Choose the Zone for which you want to define Content details.
In the Content dropdown choose the type of content you want to load for the Zone you selected. Following is a description of the options available for each Content Type.
| Content Type | Description | ||||||||
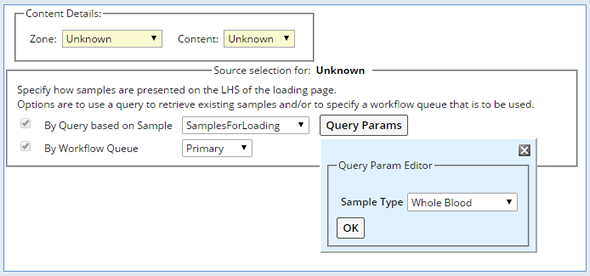
Unknown
|
Place an unknown Sample into an Array Item. Use specific Queries or Workflow Queue to determine which Samples are available when loading Arrays.
|
||||||||
Control
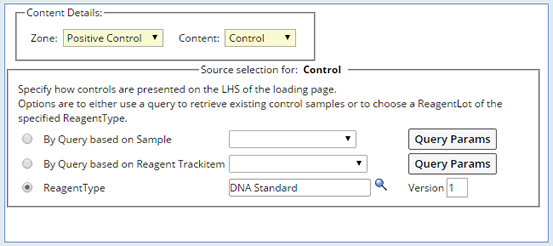
|
Place a known entity into Array Items (such as Controls,
Standards or Blanks). Samples or Reagents can also represent Controls. Choose
to search for these Controls using a specific query or choose to load Reagent
Lots associated with a specific Reagent Type.
|
||||||||
Treatment
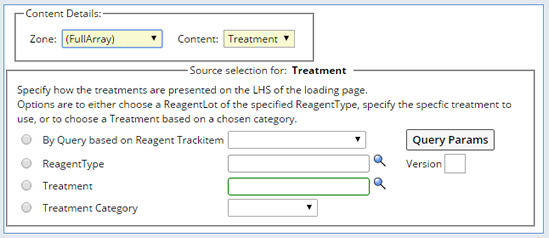
|
A Treatment is an additive for each Array Item, which can
be done individually, or against the entire Zone (such as Dye or a spiking
Reagent).
When choosing the Source for Treatments you can define a specific Reagent Trackitem (Container), specific Reagent
Type, lookup a specific Treatment or define a Treatment Category. Choose
a specific Treatment in that Category when Loading. Available queries are those defined with the ArrayQueryforTreatment category. |
||||||||
Operation
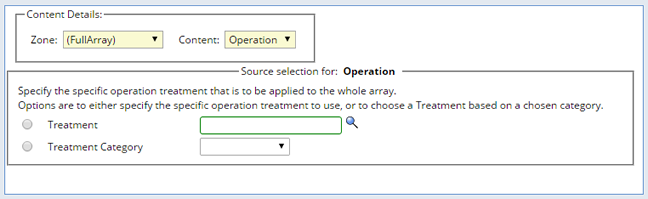
|
Operation is a procedure performed either on the entire Array; for example,
Incubating, Spinning or Freezing or in individual wells like Mixing.
Choose to define a specific Treatment or a Treatment Category.
Queries are not available when loading an entire Zone at a time. When defining an Operation for Zone Level loading be sure to choose a specific Treatment. |
||||||||
| Transfer
|
The Transfer option allows you to define criteria for determining available Content when Cherry Picking. Cherry Picking allows you to select specific Array Items to Transfer onto a Target plate.
The Content Detail for Transfers allows you to further define which Arrays display in the list. Choose to populate the list with results from a specific Query. Queries displayed are those defined with an Array Category. The Workflow Queue contains the source Arrays from which you can Cherry Pick.
If multiple Array Items are selected individually, the selection order is remembered and those Array Items are loaded in the order in which they were selected. Define the Content to be included with the Transfer. Choose to propagate: Unknowns, Controls, Transfer, Treatment, Operation and/or Master Mix (see Transfer Rule). |
||||||||
|
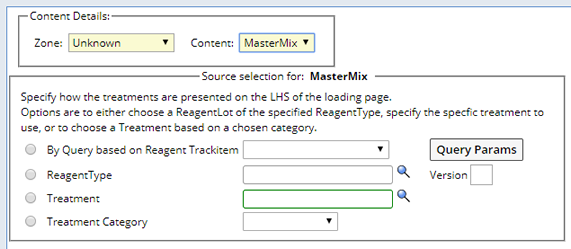
Master Mix
|
Master Mix is a premixed solution containing Taq DNA polymearase, dNTPs, MgC12 and reaction buffers at optimal concentrations for efficient amplication of DNA templates by PCR. Specify Master Mix content by identifying either a Reagent Type or specific Reagent Trackitem, or a Treatment Category or specific Treatment. Queries are not available when loading an entire Zone at a time. When defining a Master Mix for Zone Level loading (such as Positive Controls or Full Array) be sure to choose a specific Reagent or Treatment. |
When you are finished defining the Content Type, click "OK". The remaining detail fields display.

| Fields | Description |
| Zone Name | Zone selected in the Content Editor. |
| Content | Type of Content to load. This will be Unknown, Controls, Transfers, Treatments, MasterMix, or Operations. |
| Description | A description of the Content. Displays in the Source Content pane when Loading Arrays. |
| Definition | A read-only description of the criteria chosen in the Content Editor. This expresses how the content to be added to the Array is qualified. Click the lookup to open the Content Editor. |
| Level |
Defines how the Array Item is loaded.
Arrays Items defined at Item Level are available to load with the Load button. Content is loaded into individual Array Items. Those defined at Zone level are loaded with the Load Zone button (you cannot perform Zone level loading for an Adhoc Zone). All Array Items in that Zone are identical and therefore the entire zone can be loaded at once with Content. See Loading Arrays for more information. Choose Item Level when loading Samples. For example, you might want to place Samples one at a time onto the Array. Controls on the other hand might be loaded exactly the same in each Array Item, an entire Zone could be loaded at a time. |
| Volume and Unit |
Target or Default Volume of Content to be loaded. This defaults to the Array during loading, and can be changed. |
| Deplete Source |
Whether to deplete the source Content after loading. When checked, the source will be set to 0 whether or not it is completely used. |
| Conc. and Unit |
Target or Default Concentration of the Content to be loaded. Defaults to the Array during loading and can be changed. Typically used only for Unknown content. |
| Test Method Version |
Test Method associated with the Zone. Used when Promoting Results back to the Unknown Sample. At this time, if the Unknown Sample has this test Method, then the results are filled in. Otherwise, the Test Method is added to the Unknown Sample. This is the Test Method that will be used during Array Data Entry. |
| Target Amount and Unit |
Target Amount for the Array Item. This is used in combination with Volume and Concentration. When any of the two values are provided, LABVANTAGE will calculate the other, or missing value. You will not be able to enter all three. |
Parameters |
Each Array Item has an SDIData structure that is defined in the Parameters tab on the Array Method (not a Parameter List). When Data Entry is performed (either by an instrument or manually into the Array), it is against these Data Items. In the Parameters tab, define the testing parameters for analyzing the data.
Click "Add", choose the Parameter you would like to include, then click "Select and Return".

| Fields | Description | ||||
| Parameter | Parameter used to record the measurement or result during Array Data Entry (such as Ct or fluorescence). | ||||
| Zone | Zone for which this parameter will apply. There could be
two different strategies: either specify a different parameter for each
of the Array Items of a Zone, or (typically) record a parameter for every
Array Item of the whole Array (Full Array).
Select the Zone you want to evaluate. Full Array evaluates the entire Array. Choosing a specific Zone evaluates only Array Items in that Zone. |
||||
| Level | Generally, the results are recorded with each individual Array Item. In addition, you have the ability to specify an Aggregate result for an entire Zone, or the FullArray Zone. Choose:
|
||||
| Type | Parameter Type. This is a qualifier to the Parameter. This permits the ability to record multiple results using the same ParameterId. Examples would be Standard(observed), and a Corrected parameter. Examples for Zone aggregate parameters would be Average, Standard Deviation, etc. This defaults to Standard. | ||||
| Data Type | Specifies the kind of data (LABVANTAGE Data Type) that must
be entered for the Parameter (such as Numeric, Numeric Calc, Text, Date). |
||||
| Display Format | When you enter data for this Parameter, the Display Format defines how the data value is displayed. |
||||
| Display Units | Units in which to display the data value. | ||||
| Push Results Rule | Use the Push Results Rule to determine how results are pushed back to the Samples (see Simple Push). | ||||
| Calculation Rule | Define a Calculation Rule for analyzing Array Item data.
When performing Calculations on Array Items you have two options: you can perform a Simple Push using calculations defined directly in the Array Method, or choose a Complex Pull using a calculation defined on both the Array Method and the Parameter List on the Unknown Sample. See Simple Push or Complex Pull for more details about each. |
||||
| Operator | Relational operator applied to the limit Value. Value 1, and Value 2, specified for QC violation limits.
The operator and Value 1 and 2 columns are used to define alert limits against the parameter. Alert limits are evaluated during Array Data Entry, and are presented during QC Review of the Array. Typically, when Alert limits are violated, the plates results are suspect and may be discarded. |
||||
| Value 1 Value 2 |
Upper and lower limits of an Inclusive or Exclusive Limit, respectively. |
The Push Results Rule allows you to push results from the Array Item structures to the loaded content Samples. Using the Push Results Rule Editor, define whether to push data to specific columns on the Sample, Parent Sample or a Trackitem, or to a Parameter on an associated Parameter List.
Click the Push Results Rule lookup on the Array Method Parameters tab to open the Push Results Rule Editor. Choosing "To Column" gives you the option to promote results directly to specific columns on the Sample, Parent Sample or Sample's Trackitem. Choose the Column to which you want to push results.
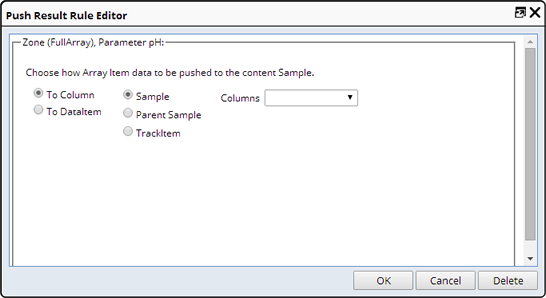
Choosing "To DataItem" allows you to choose the Parameter List and Parameter to which you want to push results.

The values available in the ParamList and Param dropdown are determined by the Test Method defined in the Content Detail tab. The Test Method data type must be compatible with the Parameter for which you are defining the Push Results Rule. You cannot use the Push Results Rule if you have defined Serial Dilutions.
Click "Ok" to add the Rule.
Define calculations that use data from Array Items to perform a calculation. You can define the following types of Calculations:
| Calculation | Description |
| Intra Array Item calculations | Calculate one parameter based on a function of other parameters of the same Array Item (such as A=B+C). |
| Inter Array Item Calculations | Calculate a parameter of one Array Item based on results in other Array Items. For example, here you can have a Caffeine parameter Observed, and subtract off a Blank Array Item to calculate the Caffeine parameter Corrected. |
| Aggregate Array Zone Calculations | Calculate results to be stored against the entire Zone. Typically, these are used to calculate QC values to be used during a QC Review. |
The above 3 calculation types are calculations within an Array. These are not to be confused with a calculation used to pull Array data from the Array to the Unknown Sample. That is defined in the Sample's Parameter List and is a Complex Pull. See Complex Pull for more information.
In the Parameters tab, clicking the lookup icon in the "Calculation Rule" field opens the Expression Editor.
Click the Cross SDI Helper in the Parameters box. The Array Item option of the CrossSDI Helper displays where you can specify a Calculation Rule. The Parameter List defined here with the Calculation Rule is added to the Test Method that is applied to the Zone when the Content Type is Sample.
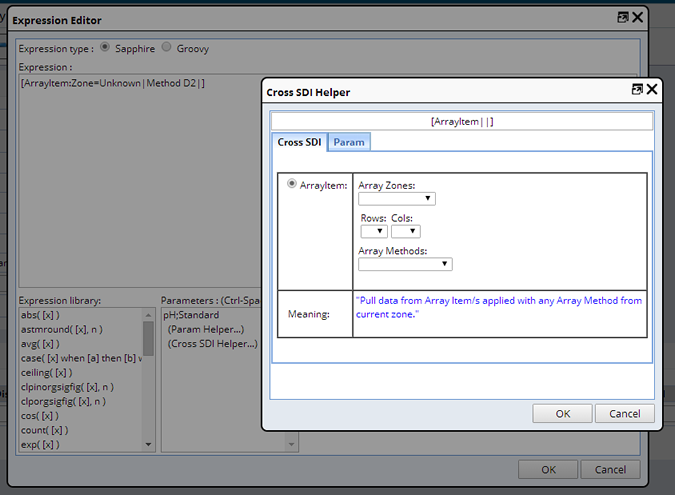
In the Cross SDI tab define:
| Field | Description |
| Array Zones | The Zone to which this Calculation Rule applies. "#" references Array Items from the Current Zone. |
| Rows
Cols |
Choose a specific Row and/or Column to apply the Calculation Rule. The # references rows and columns from the current Zone. The * references any row, any column. |
| Array Methods | The Array Method to use with this Calculation Rule. The Test Method defined on the Array Method selected here determines the Data Set. The # references the results from the current Array Method and Instance. The * references any Array Method or Instance. |
In the Parameter tab define the parameters to be used in the Calculation.
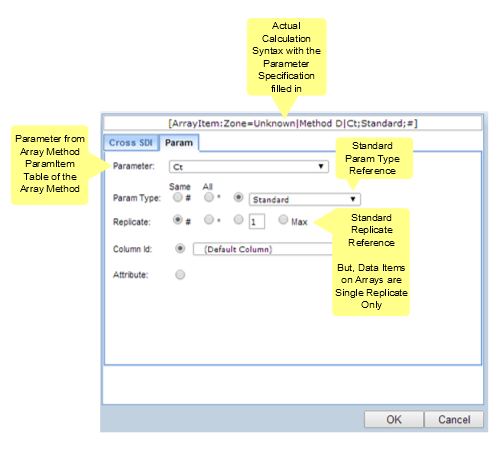
| Field | Description |
| Parameter | Choose the Parameter for the calculation. Parameters available in the dropdown list are from the previously defined Array Method. The # references the same named parameter. The * references any parameter. |
| Param Type | Choose a Param Type from the dropdown list. See Expression Editor for detailed information about options for defining Calculations. |
| Replicate | Replicate number. It is recommended that you leave as the default. Array Results do not leverage any replicate number other than 1. |
| Column Id
Attribute |
Array results default to the TransformValue; therefore, you do not need to specify any value here. |
Click "Ok" to add the Rule.
You can define a Calculation rule for Item level and Zone Level parameters of an Array.
Example Calculation Rules
| To | Rule |
| Indicate current Parameter of Standard Parameter Type. | [#;Standard] |
| Denote the average of the Blank zone. The Parameter is the same as the current one of Standard Parameter Type and is applied with the same Array Method applied to the current data item. | avg([ArrayItem:Zone=Blank|#|#;Standard]) |
| Calculate a BlankCorrected value for item level parameters
of Standard paramtype.
This helps to deduce the BlankCorrected parameter for each item level parameter by subtracting the average of Blank zone parameter of Standard paramtype from the current parameter. |
[#;Standard]-avg([ArrayItem:Zone=Blank|#|#;Standard]) |
When performing a Complex Pull, Array data is pulled from the Array and used in a Calculation defined on the Unknown Sample's Parameter List. Consider the following when deciding to use a Complex Pull or a Simple Push:
| Option | Consider... | ||||||||||
| Simple Push
|
Pros
Cons
|
||||||||||
| Complex Pull | Pros
Cons
|
Whether or not Calculations defined on the Sample are considered depends on your decision in the "Execute Sample Calculation when Promoting" option. When checked, the Calculation is evaluated when the Promote Results button is clicked. Results are then pushed back to Data Sets on the Samples. See Results Handling for more details.
Example Sample Paramlist Calculations
| To | Rule |
| Use an * in place of the Array method to draw all the Array Items of a content Sample regardless of the Arraymethod applied to the Arrayitems. | [Array:Repeat=2:dilution=5|*|Absorbance;Standard] |
| Consider only Array data items with a maximum repeatcount. | [Array:Repeat=Max:Dilution=2|NewMethod|Fluorescence;standard] |
Optionally, you can define details for additional Zones before saving the Method.
Creating Overlays |
Apply as many Array Methods as needed to an Array creating overlays. Doing so creates a new Array Method instance. At any given point, only a single Array Method is in play at a time on an Array. Each time a new Method is Applied, the previous Applied Method must have a status of either Completed or Reviewed, if not, that instance will be cancelled and the latest Method Applied will be the Active Method.
When all Applied Methods are Complete, the Array is complete. You can manually Cancel an Applied Method using the Cancel Array Method button on the Plates and Gels list page. If all applied Methods are cancelled the Array is cancelled.
Clicking the Array link in the Plates and Gels list or selecting the Array and clicking "Edit" displays general details about the Array including any Applied Methods and their status.

Array Method Instance Status |
Each Applied Method contributes to the Status of the Array. The following chart details the Status of the Array depending on the Status of the active Array Method Instance.
| Array Method Instance | Array Status |
| No Array Methods | Created |
| Initial | Applied |
| Loaded | Loaded |
| No Array Method (in the case of a Transfer) | Loaded |
| Sent To Instrument | Sent To Instrument |
| Data Entered | Data Entered |
| Reviewed | Reviewed |
| Cancelled | Cancelled (only when all Array Method Instances are Cancelled) |
| Completed | Completed |