ASL Grid Transfer utilizes the Transfer Array Action to quickly and easily transfer content (such as when using a liquid handling robot) automatically from one Storage Unit (such as a tube rack) to another, or to an Array.
Technicians can more quickly transfer content, and prevent errors caused by manual transfer.
Two types of Transfer have been provided:
| • |
ASL to ASL transfer, creating a new Child ASL Grid. |
| • |
ASL Grid to or from an Array. Transfer content from an ASL Grid to an Array or an Array to an ASL Grid. |
To perform these types of Transfer you will need to utilize an ASL Grid Layout and define an ASL Transfer Method. The following sections define each of these Transfer types and the ASL Grid Layouts and Methods needed to perform the Transfers.
ASL Grid Transfer simply moves part or all of a Sample from one Storage Unit or Array to another. For details about more complex Array Transfers (which include replicates, dilution and treatments) see Array Transfers.
|
|
|
|
Define an ASL Grid Layout
|
|
|
|
|
|
Creating an ASL Grid Layout lets you file Samples into a pre-defined Storage Grid either directly using the File Samples page, or automatically when transferring between ASL Grids, or to Arrays. Specified Samples are then placed into pre-defined "Zones" during filing or transfer.
This section details how to create an ASL Grid Layout, associate that Layout with a Storage Unit, then file Samples into the Storage Unit. For information about transferring to and from ASL Grids see Transfer Between ASL Grids (Create Child Box) or Transfer Between ASL Grids and Arrays.
Create an ASL Grid Layout
|
|
This section provides a high level description of how to define an ASL Grid Layout. For more detailed instructions and information about defining an Array Layout see Array Layouts.
To determine where content will be placed within the ASL Grid during filing or transfer you will need to pre-define a grid layout. This is done using the Array Layout page.
ASL Grid Layouts are based on system level ASL Grid Types (Array Types with the Classification "ASL"). These ASL Grid Types correspond to typical Storage Unit Types (such as 9x9 Box). When defining an Array Layout to be used as an ASL Grid, selecting an "ASL" Array Type (in the Array Type field) is what identifies the Layout for use with ASL.
| NOTE: |
|
A background synchronization process automatically creates and maintains an associated Array Type for each ASL Grid Type. Any dimension or label modifications to the ASL Grid Type will be reflected in it's associated ASL Array Type.
All associated ASL Array Types will have the ASLGRIDFLAG set to "Y". These are system level ASL Array Types that can not be changed or deleted. |
To create an ASL Grid Layout navigate to Lab Admin →
Array → Array Layouts. The Array Layout List page displays where you can choose to Add new, or Edit existing Layouts.
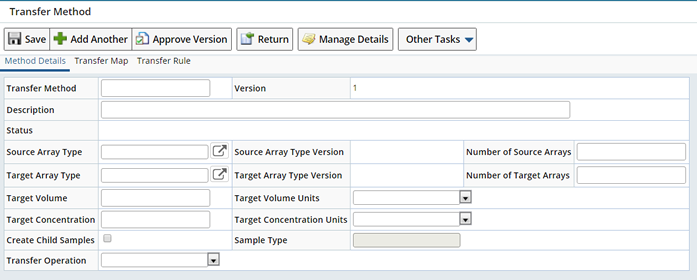
Click "Add" to add a new Layout. The Add Array Layout page displays. Choosing an ASL Array Type identifies this Layout as an ASL Grid. Several ASL Grid Types are provided OOB.

Select an ASL Array Type, then define basic information about the Layout.
| Fields
|
Description
|
| Array Layout |
Name of the Array Layout. |
| Version |
Version of the Layout. Once Saved, you can Approve this
Version. |
| Description |
Description of the Layout. The Layout's description is copied to the ASL Grid's description. |
|
Array Type
Array Type Version
|
Using the lookup choose an Array
Type. This defines the physical properties of the Array (such as a 96 well
plate).
When defining an ASL Grid Layout choose one of the predefined ASL Array Types. These are non editable and correspond to System defined ASL Grid Storage Unit Types.
The Version of the Layout.
|
| Version Status |
Initially the Version Status is "Provisional". The status
becomes "Current" when the Version is Approved using the Approve Version button
on the Add or Edit Array Layout Page. Only "Current" Array Layouts can be associated with a Box. |
| Notes |
Descriptive notes. |
Click "Save", the detail tabs display.
Define Zones
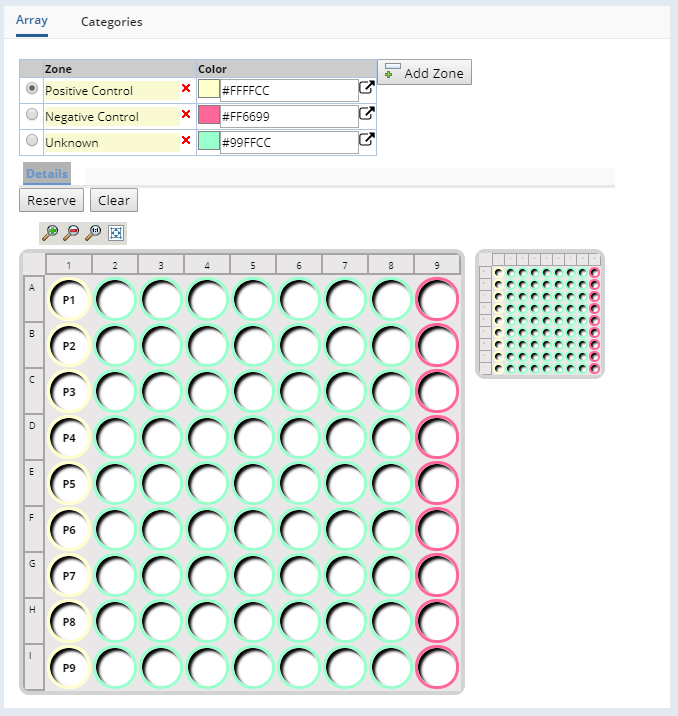
You may want to organize the way Samples are loaded into the Grid by grouping Items (a single well or slot within the grid) into Zones. Use the Array detail to define the different Zones into which you want to place Samples during Transfer.

Clicking "Add Zone" lets you choose one or more Zones to include in this Layout (the
list of available Zones is defined in the Array Zones Reference
Type), choose different colors to easily identify each Zone.
With the Zone selected, highlight the Items you want to include in the Zone, then click "Reserve". The selected Items are highlighted with the assigned color for that Zone.
In the following example we have reserved the first column for Positive Control Samples, columns 2 through 8 for Unknown Samples, and column 9 for Negative Control Samples.
If needed, see Array Layouts for detailed instructions and information about about assigning Zones and defining an Array Layout.
Changing the Layout
Once a Box contains Samples you can not change the associated Layout. However, once the Box is used and emptied, you can associate a new Layout.
Associate an ASL Grid Layout with a Box
|
|
Now that you have created an ASL Grid Layout you can associate that Grid Layout with a Box (or any corresponding Storage Unit). This makes it possible for the Box to be either the Source or Target when transferring content. To associate an ASL Grid with a Box navigate to LIMS → Storage →
Boxes. The Box List page displays.
Click "Add", or select an existing Box and click "Edit". The Box page displays. See Boxes → Adding Boxes for detailed information about adding a new Box.
After Saving, or when Editing existing Boxes, the Array Layout lookup is available.
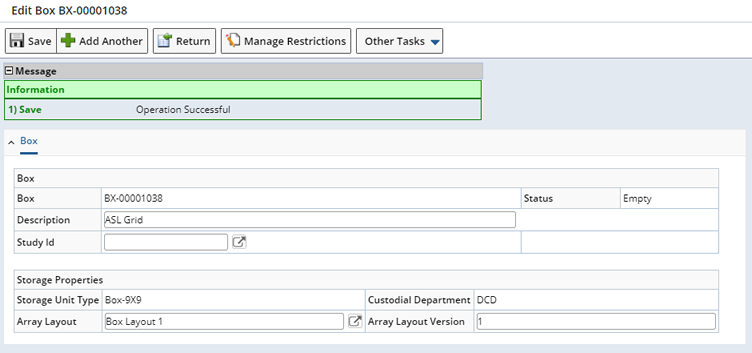
Use the Array Layout lookup to find a corresponding Array Layout (as determined by the Storage Unit Type, such as Box-9x9). In this example we chose the Layout we defined in Define a Layout, "Box Layout 1". Upon Saving, note that the Zones defined in "Box Layout 1" are now represented within the Box rendering.
| NOTE: |
|
Any grid items not assigned to a Zone in the Layout are disabled. You will not be able to load content into unassigned grid items. |
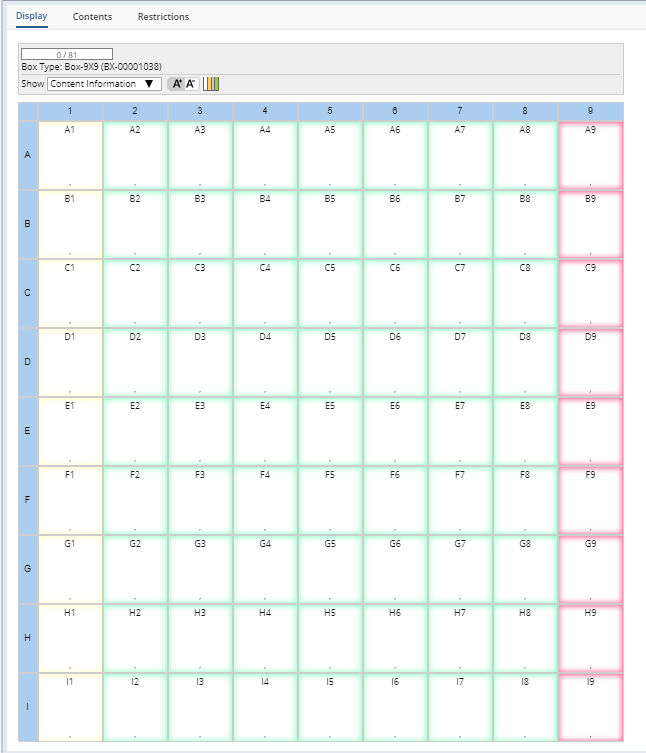
Opening the Legend identifies each Zone in the grid.
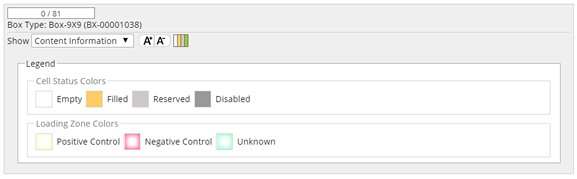
This Box can now be selected as a Target or Source when transferring content.
Changing the Array Layout
The Array Layout can be changed at any time provided the Box is empty.
File Samples to an ASL Grid
|
|
Use the File Samples Page to file Samples into an ASL Grid. From any Sample List page select the Samples to file and click "Check In". The File Samples page opens. Search for the ASL Grid Storage Unit into which you want to transfer the Samples.
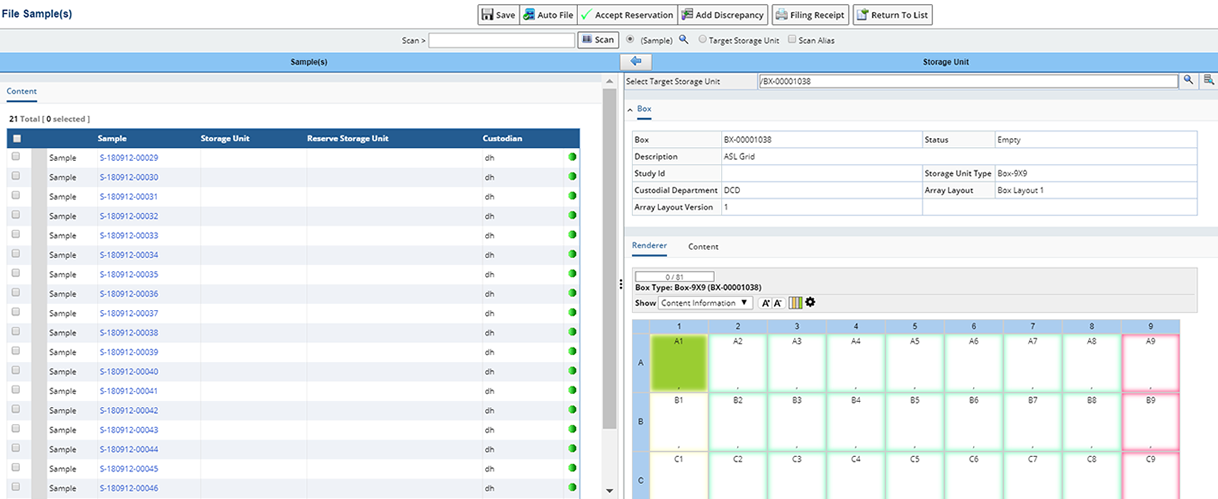
Note that the ASL Grid Layout associated with the Storage Unit displays (following our previous example, Box BX-00001038 with Box Layout 1). When filing, you will need to identify which Samples belong in which Zone, then file the Samples Zone by Zone.
In our example we will file the Unknown Samples first. Select the Unknown Samples you want to file in the left pane. Click the start position in the right pane (A2, first position in the Unknown Zone). Upon clicking "Auto File", the Samples will be filed within the selected Zone only, starting with the selected position.
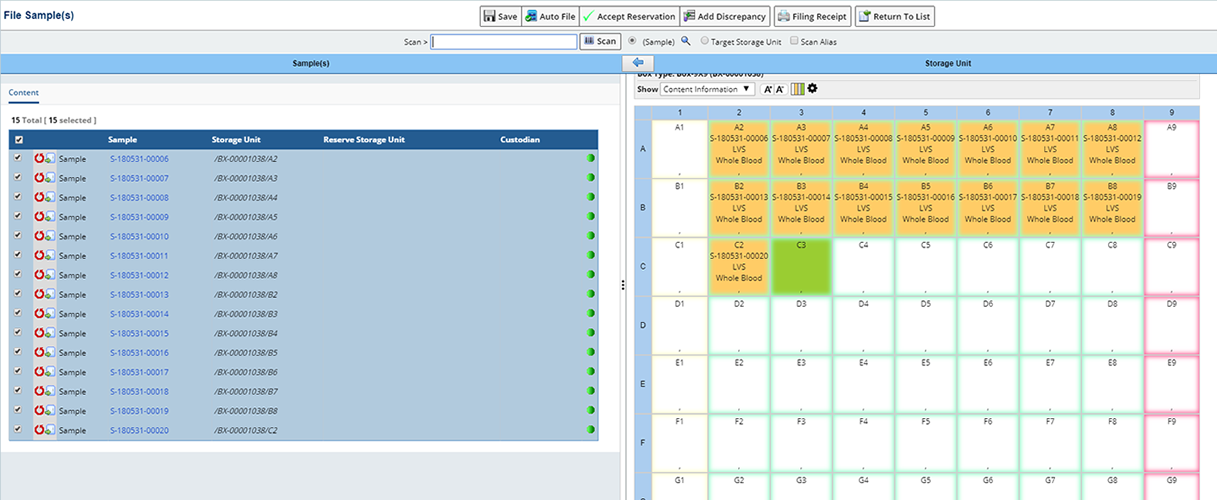
Continue filing Samples into each Zone.
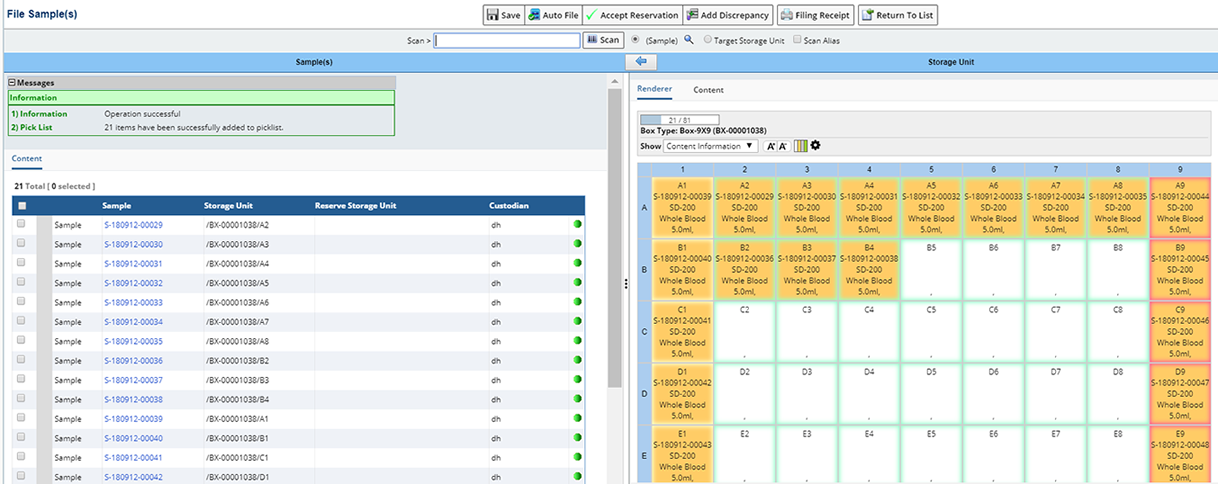
For more detailed information about the File Samples page, see File Samples.
|
|
|
|
Define an ASL Grid Transfer Method
|
|
|
|
|
|
Samples filed within an ASL Grid can be automatically transferred to and from other ASL Grids and Arrays. The ASL Grid Transfer Method defines the necessary details for creating a new Child Box or Array and any Child Samples. The Transfer Method also determines the positioning of Child Samples within the target Child Box or Array.
This section assumes you are familiar with creating an Array Transfer Method and discusses only options that pertain specifically to ASL Grid Transfer Methods. For more detailed instructions and more information about defining an Array Transfer Method see Transfer Methods.
ASL Grid Transfer Methods are defined in the same way as Array Transfer Methods. Several example ASL Transfer Methods have been provided OOB. Depending on the type of Transfer (ASL Grid to ASL Grid or ASL Grid to Array), different options are defined for each and default during Transfer.
Choose to use the ASL Transfer Methods provided or define your own. To define an ASL Grid Transfer Method navigate to Lab Admin →
Array → Transfer Methods. The Transfer Method List displays.
Chick "Add" to define a new Transfer Method.
See Transfer Methods for more general details about the Transfer Method page.
Choosing Source and Target Array Types
Choosing an ASL Grid Type as either the Source or Target Array Type is what identifies this as an ASL Grid Transfer Method.
When choosing the Source or Target Array Type, consider the following:
| • |
When the source is an ASL Grid, a single source can not be mapped to multiple targets without creating Child Samples. The "Create Child Samples" option must be checked. |
| • |
When the target is an ASL Grid, multiple sources can not be mapped to a single target position. |
| • |
When performing a Transfer between ASL Grids only, a Transfer Rule is not defined (Transfer Rule detail is removed). |
Specify Volume and Concentration
Volume and Concentration values defined here default during Transfer and can be changed. Volume and Concentration values are only used when creating Aliquots or Derivatives (Create Child Samples option is checked). During Transfer, the Source Volume is checked and must be greater than the specified Target Volume.
Manage Details
The Manage Details dialog lets you pre-define any Consumables, Equipment or Tests needed for the newly created Child Samples. These default during transfer and can be changed.
| NOTE: |
|
You cannot pre-define Tests for Child Samples when transferring to an Array. The Tests detail does not display when the target is an Array. |
|
|
|
|
Transfer Between ASL Grids (Create Child Box)
|
|
|
|
|
|
Lets you transfer content from one ASL Grid to another creating a new Child Box. Content can be transferred to:
| • |
Condense multiple source ASL Grids to one larger ASL Grid, or split one larger ASL Grid into multiple smaller grids. In this case the Create Child Samples option is left unchecked. Content is moved entirely from one ASL Grid to the other without creating Child Samples. The Sample's trackitem points to a new ASL Grid position. |
| • |
Create Aliquots or Derivatives in a newly created ASL Grid. This creates a new Storage Grid, and a new Sample for each grid item. |
The following example uses the OOB "ASLDNADerivative96" ASL Grid Transfer Method and the Create Child Box task to create a DNA Derivative within an 8x12 Tube Rack.
The OOB "ASLDNADerivative96" ASL Grid Transfer Method is defined as follows:
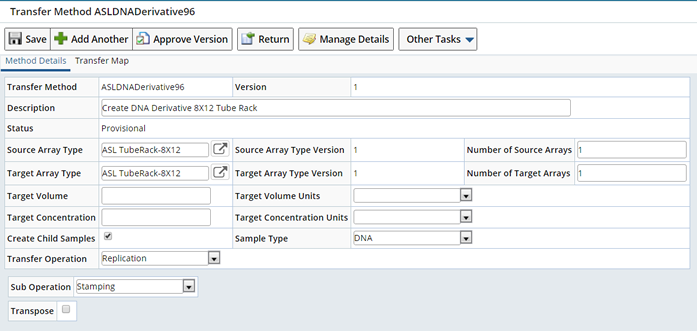
Both the Source Array Type and Target Array Type are an ASL Tube Rack, 8x12. Since we are creating derivatives, the "Create Child Samples" option is checked. The Sample Type for the created Samples is "DNA". Volume and Concentration will be defined during Transfer.
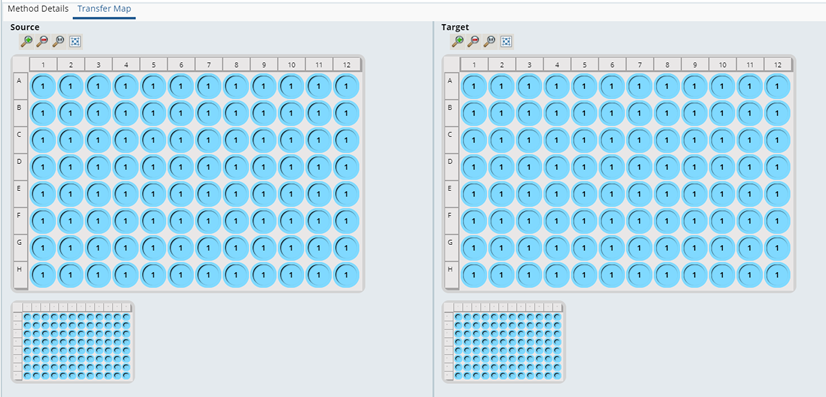
The Transfer Operation is "Replication", we are creating a replicate of the Source. This can be seen in the Transfer Map.
To begin the process, navigate to the Box list page (LIMS → Storage →
Boxes). Since we are transferring content from one Box (ASL Grid) to another (new ASL Grid), in the Box list page, select the Box you want to transfer from (source). If you were planning to condense multiple smaller Boxes into one larger Box, select multiple Boxes. Selected Boxes must not be empty.
Click "Create Child Box".

This starts the Create Child Box task.
Select a Parent Box (Source)
|
|
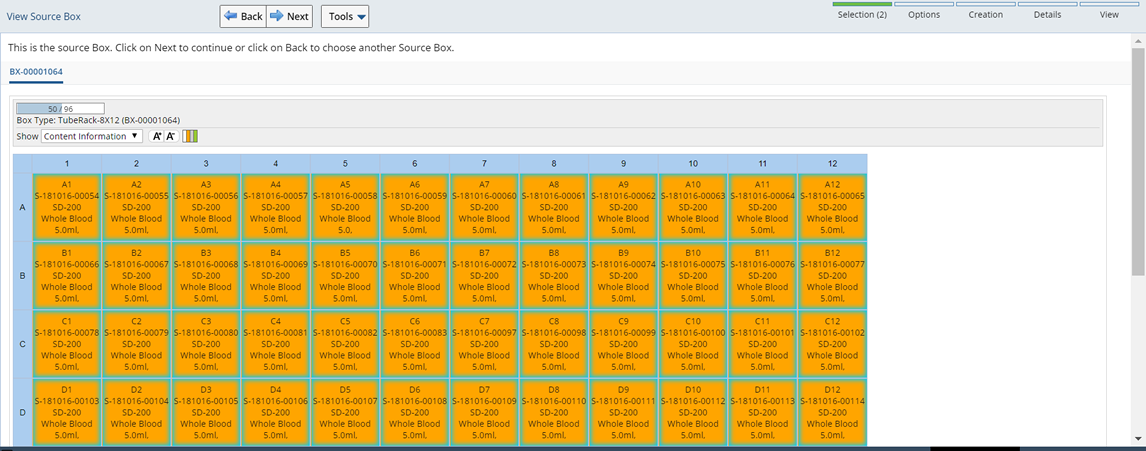
In the first pane select the Parent Box or Boxes, then click "Next".

The View Source Box pane displays the Source content including Sample details.
When multiple source Boxes are selected a tab is provided for each Parent Box. Click the tabs (Box Id) to view the details of each.
Continue with the selected Box or Boxes as the Source by clicking "Next", or click "Back" to choose a different Source Box (Parent).
Define the Child Box (Target)
|
|
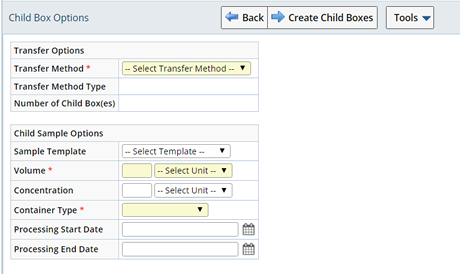
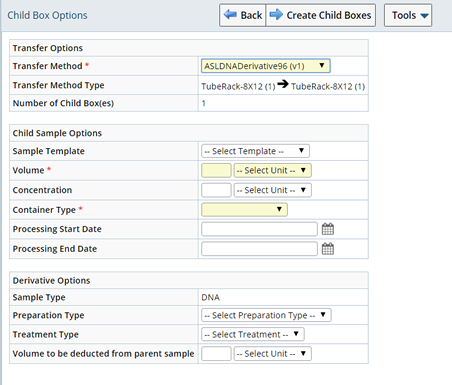
Clicking "Next" opens the Child Box Options pane where you specify details for the Child Box(es) to be created (target). Depending on the Transfer Method, different options are available. Choosing the "ASLDNADerivatives96(v1)" Transfer Method adds the Derivatives Options.
| |
|
|
|
|
|
| Fields
|
Description
|
| Transfer Method |
Choose a Transfer Method to reference during Transfer. The list of Transfer Methods is based on the Array Type of the source Box. |
| Transfer Method Type |
Details the Array Types involved in the Transfer. In this example we are transferring from a TubeRack-8x12 (1) to a TubeRack-8x12 (1). |
| Number of Child Boxes |
How many Child Boxes will be created. |
| Child Sample Options
|
| Sample Template |
Sample Type of the Child Sample to be created. |
| Volume |
Target Volume and Units to transfer. Must be less than or equal to the Source Volume. |
| Concentration |
Target Concentration and Units to transfer. |
| Container Type |
Container Type for newly created Child Samples. |
| Processing Start Date |
Record the date and time processing starts for the Aliquot Sample(s). |
| Processing End Date |
Record the date and time processing ends for the Aliquot Sample(s). |
| Derivative Options
|
| Sample Type |
Sample Type for Derivative Samples. |
| Preparation Type |
Preparation Type for Derivative Samples. |
| Treatment Type |
Treatment Type for Derivative Samples. |
| Volume to be deducted from parent sample |
The amount to be deducted from the Parent Sample. |
The Fields displayed in this step are configurable.
When you are finished defining the Child Box click "Next". You are asked to confirm that you are ready to create the new Child Box.
Click "Yes". In the next steps choose any Consumables, Equipment or Tests needed for the Child Samples.
Choose to add one or more Consumable(s) for use with the Child Samples.
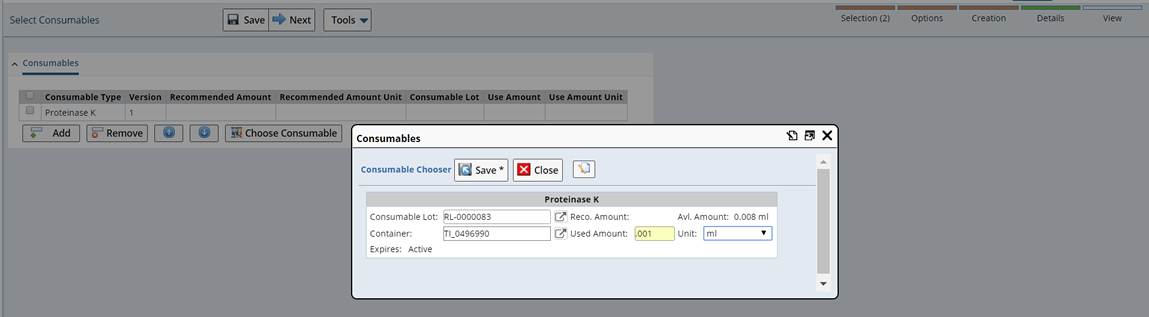
Clicking "Add" opens the Select Consumable dialog where you can choose a Consumable Type. Select a Consumable Type and click "Select and Return". To define a specific Consumable Lot, select the Consumable Type and click "Choose Consumable".
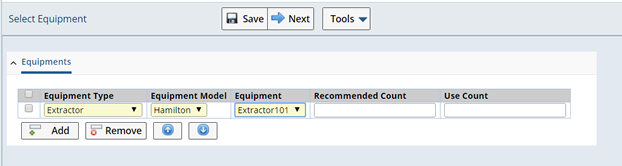
Choose to add Equipment.
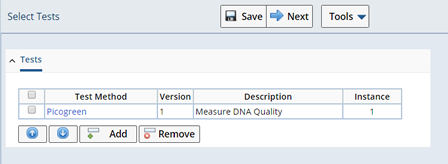
Select any Tests for the Child Samples.
Click "Next" to view the new Child Box.
A new Child box is created according to the Transfer Method defined.
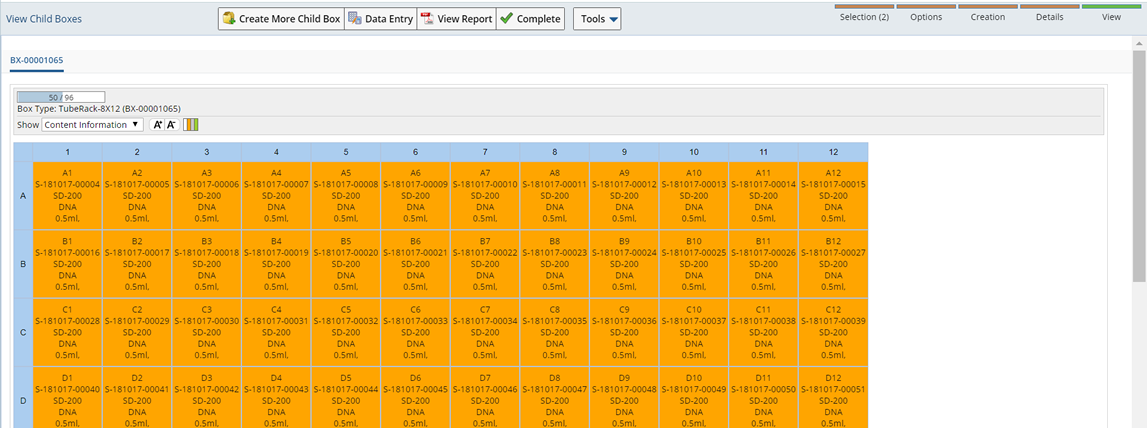
Child Samples for each item have been created and loaded into the new Child Box as specified by the ASL Grid Transfer Method.
Note that the content of each Box was filled according to the Method Details and Transfer Map defined in the "ASLCondense16to96(v1)" Transfer Method (Define an ASL Grid Transfer Method above).
| NOTE: |
|
If a source position in the ASL Grid is empty it is automatically skipped during transfer.
If a source Sample Volume reaches 0, the Sample status is changed to "Disposed" and the ASL Grid position is emptied. The Source Box status is set to "Partial" or "Empty" accordingly. If all Samples in the source are emptied, its status is set to "Empty". |
Diluent Volume Calculations
The Diluent Volume in a Child Sample is calculated when the Child Sample's concentration is less than the Parent Sample's concentration. If the Child Sample's Concentration is not given, or is the same or greater than the Parent Sample's concentration, then the diluent volume is set to zero.
If the Child Sample's concentration is less than the Parent Sample's concentration, then some diluent is added to dilute the Child Sample and reduce it's concentration. The calculation for diluent volume is as follows:

Once the Child Diluent Volume is determined, the volume to deduct from the Parent Sample is calculated as follows:
Parent Sample deducted Volume = Child Sample Volume - Child Diluent Volume.
Upon creating new Child Boxes you have the option to perform Data Entry when Tests are included. Click "Data Entry" to open the Data Entry grid.

Samples are presented according to the ASL Grid Layout.
The View Report button generates
an LHR (Liquid Handling Robots) Report. This includes instructions for moving liquid from one Item to another. These instructions may be in the form of a spreadsheet. An
example report is provided OOB to generate a spreadsheet. However, robots will
have specific format requirements. These spreadsheets are sent directly
to the robot.

|
|
|
|
Transfer Between ASL Grids and Arrays
|
|
|
|
|
|
Lets you transfer Samples between ASL Grids and Arrays. Transfer from an Array to an ASL Grid or from an ASL Grid to an Array.
Navigate to the Plates & Gels List page (Lab Admin → Array →
Arrays). Select the Array you want to transfer from and click Transfer → Transfer To Box.
| NOTE: |
|
When the target is an ASL Grid, multiple sources can not be mapped to a single target position. |
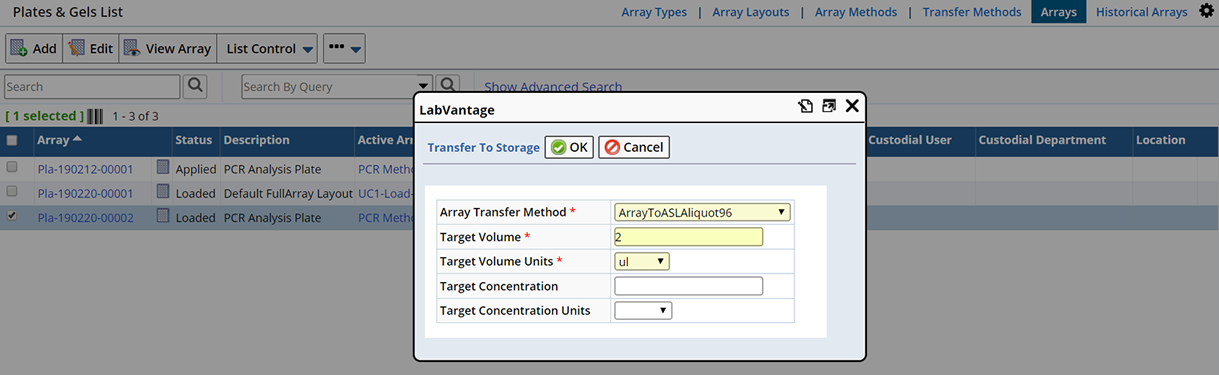
The Transfer To Storage dialog opens. Define the Transfer Method to use and any Volume or Concentration values.
Click "OK". A message identifies the newly created Box (into which the Samples were transferred according to the Transfer Method). The Parent Array icon displays in the Plates and Gels list page for the Array.
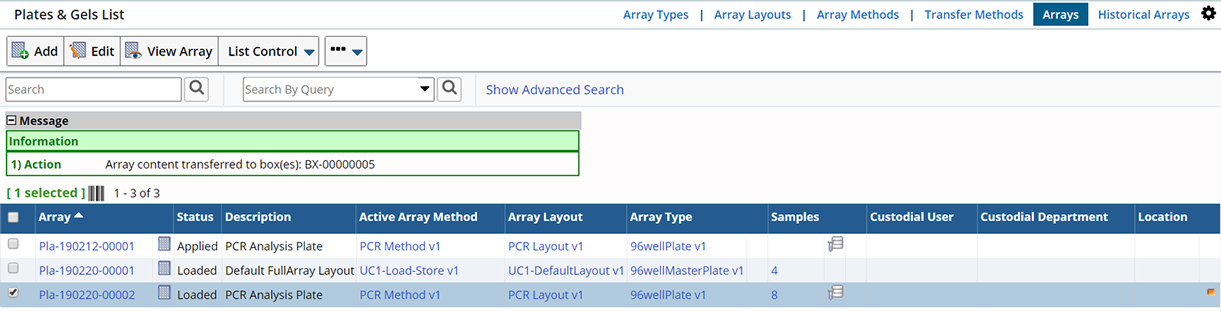
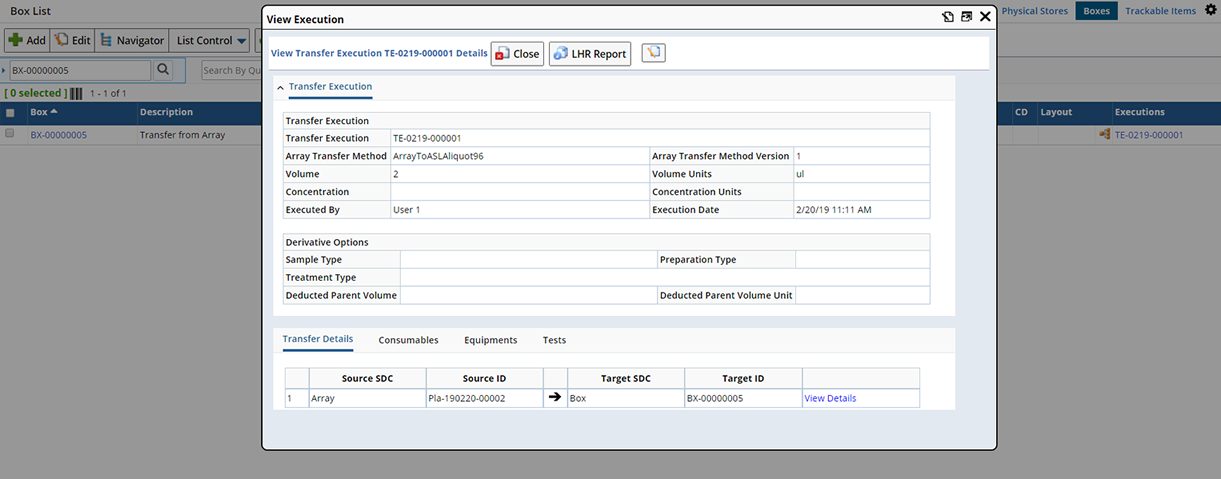
The newly created Box displays on the Box List page with a link to the Transfer Execution for this transfer.

Clicking the Executions hyperlink opens the View Execution dialog. Here you can view the details of the Transfer and generate an LHR Report. See View Transfer Execution Details for more information.
When a Transfer Method includes either Aliquots or Derivatives (Create Child Samples option is checked), new Child Samples are created and placed within the Box for each Aliquot or Derivative.
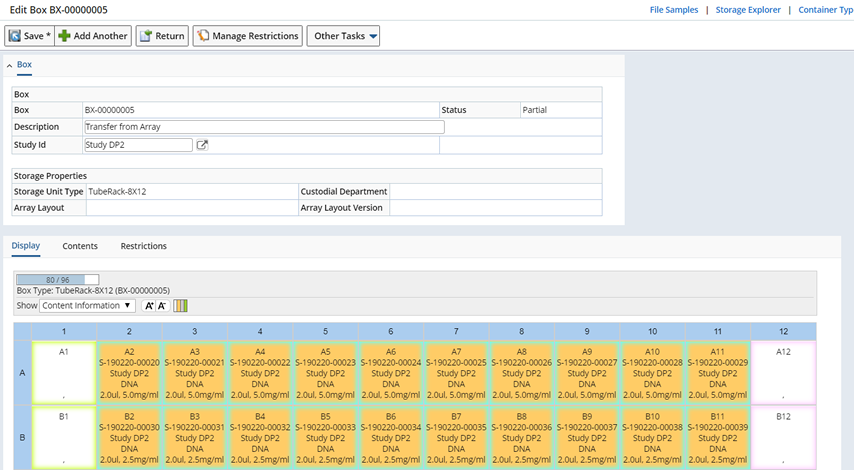
Child Samples are created and placed in the ASL Grid according to the ASL Grid Transfer Method. A new "InCirculation" Sample is created and points the Sample's trackitem to the ASL Grid position.
The Volume transferred is decremented from the ArrayItem. This defines the Volume for the new Sample.
Navigate to the Box List page (LIMS → Storage →
Boxes). Select the Box (must include an ASL Grid Layout) you want to transfer from (source) and click "Transfer to Array".
| NOTE: |
|
When the target is an Array, only a single target location can be mapped from a single ArrayItem. |
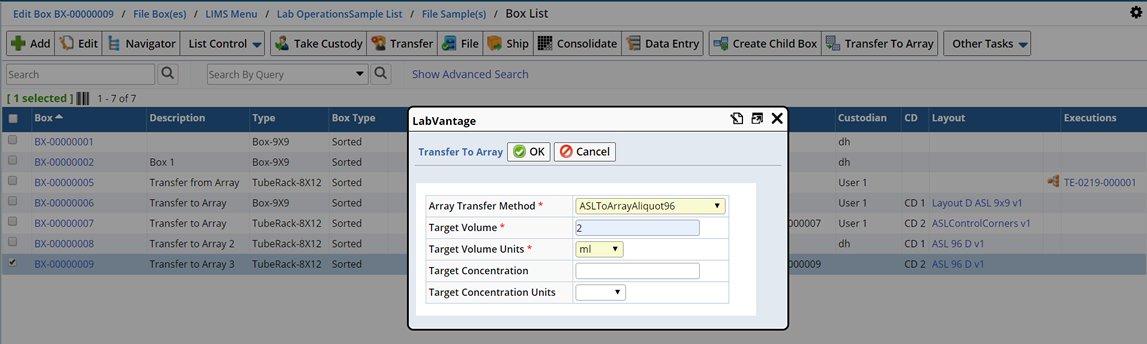
The Transfer To Array dialog opens. Define the Transfer Method to use and any Volume or Concentration values.
Click "OK". A message identifies the newly created Array (into which the Samples were transferred according to the Transfer Method).
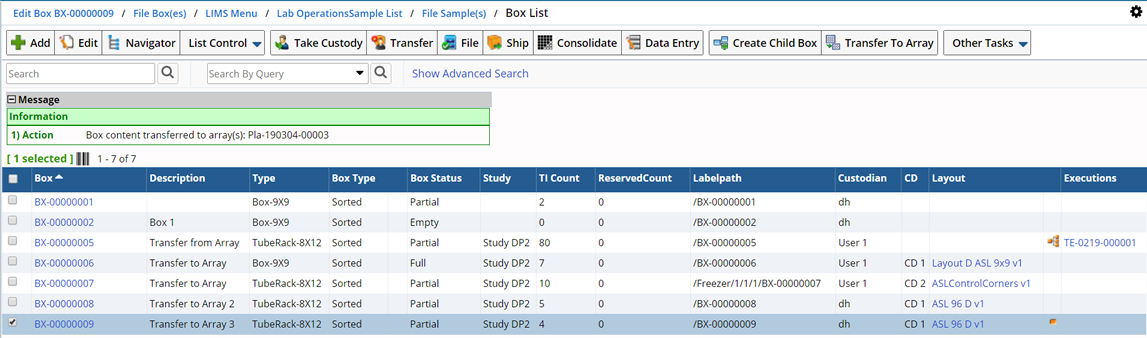
A new Array is created according to the ASL Grid Transfer Method.
| NOTE: |
|
LabVantage automatically skips transfers when the source position of the ASL grid is empty. |

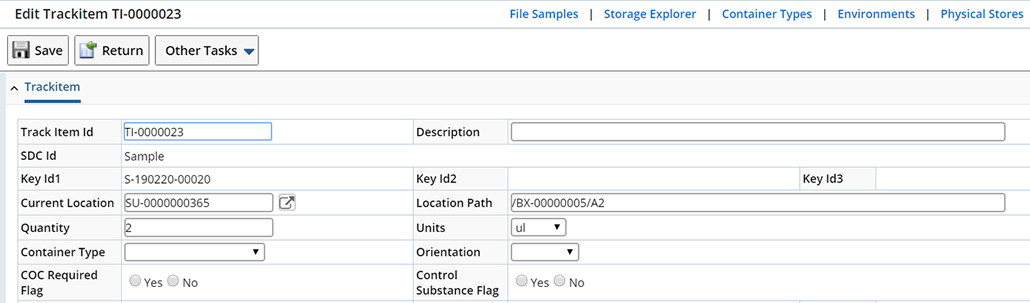
New "In Array" Child Samples are created according to the Array Transfer Method. The Sample's trackitem points to the Source ASL Grid position (as if the Sample was loaded directly into the Array).
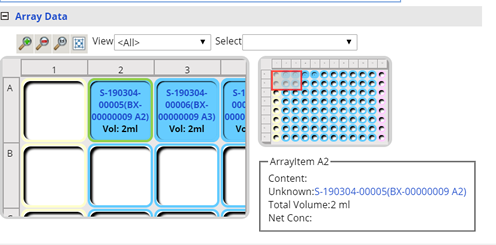
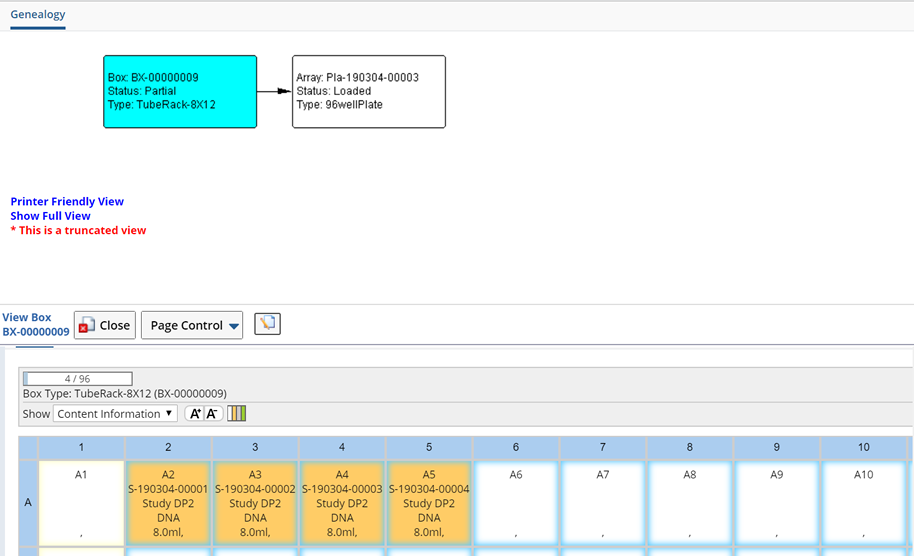
The Volume transferred (Target Volume) is decremented directly from the Sample in the specified position of the ASL grid. The Genealogy viewer for the source Box indicates that a Partial transfer occurred and references the Array.
When Multiple source Samples are Transferred to a single target position, Samples are pooled. The target ASL grid position is associated with the Pooled Child Sample.
Consider the following scenarios:
Example 1
Multiple Source ASL Grid positions are mapped to a single Target ASL grid position, Create Child Sample is "Y".
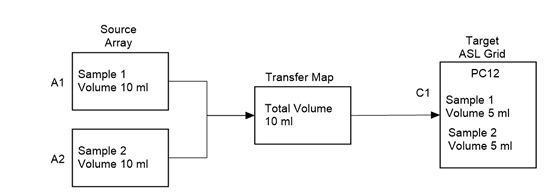
If the Target Volume is specified as 10ml,
the target position C1, will have a pooled child sample "PC12". Samples Sample 1 and Sample 2 are its parents.
The volume of PC12 equals 5ml from Sample 1 and 5ml from Sample 2 for a total volume of 10ml.
Source Samples Sample 1 and Sample 2 will each have their volume decremented by 5ml.
| NOTE: |
|
If validatesourceqty="Y" and S1 or S2 has less than 5ml, an error occurs. |
Example 2
Multiple Source Array Items are mapped to a single Target ASL grid position, Create Child Sample is "Y".
The Transfer occurs the same as Example 1, however the Sample's volume remains unchanged, it is the Array Item's volume that is decremented by 5ml (for each source Array Item).
Example 3
A Single Source Array item contains multiple Samples and is mapped to a single Target ASL grid position, Create Child Sample is "Y".

If the Target Volume is specified as 10ml, the target position C1, will have a pooled Child Sample, PC12. Samples Sample 1 and Sample 2 are its parents.
The volume of PC12 equals 5ml from Sample 1 and 5ml from Sample 2 for a total volume of 10ml.
The Sample volume remains unchanged, it is the Array item volume (A1) that is decremented by 10ml.
| NOTE: |
|
If validatesourceqty="Y" and A1 has less than 10ml, an error occurs. |
|
|
|
|
View Transfer Execution Details
|
|
|
|
|
|
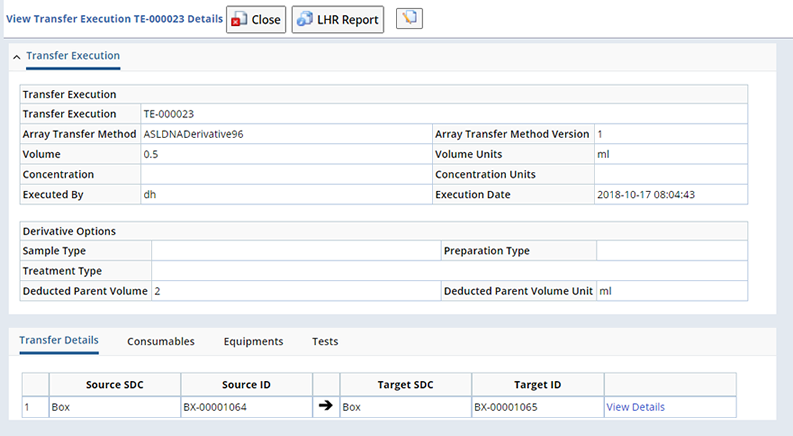
Details of the Transfer can be viewed by clicking the Transfer Execution link in the Box List page (Executions column) or the View Executions button on the Array Transfer Method maintenance page. Clicking the link (such as TE-000023) opens the View Transfer Execution page. From here you can view the details of the transfer including any associated Consumables, Equipment and Tests.
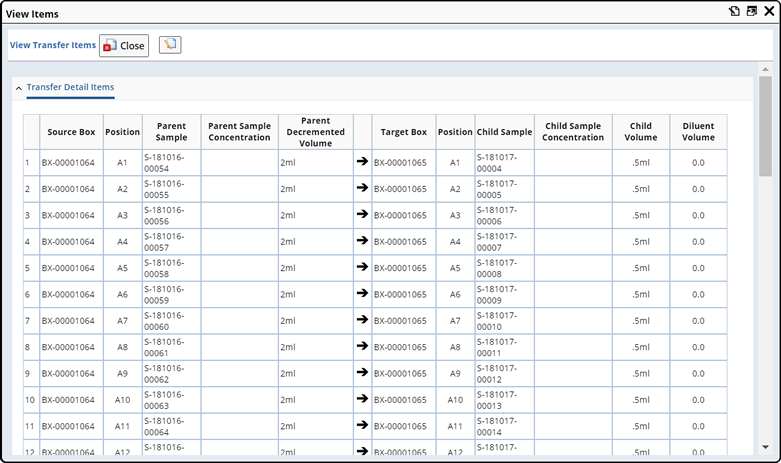
Clicking the View Details link opens the View Items dialog. View specific details about Source and Target positions, Samples within each position as well as Volume, Concentration and Diluent information.
From the Transfer Execution dialog generate the LHR (Liquid Handling Robot) Report. This includes instructions for moving liquid from one Array Item (or ASL Grid position) to another. These instructions may be in the form of a spreadsheet. An example report is provided OOB to generate this spreadsheet. However, robots will have specific format requirements. These spreadsheets are sent directly to the robot.
Click LHR Report to generate the report.

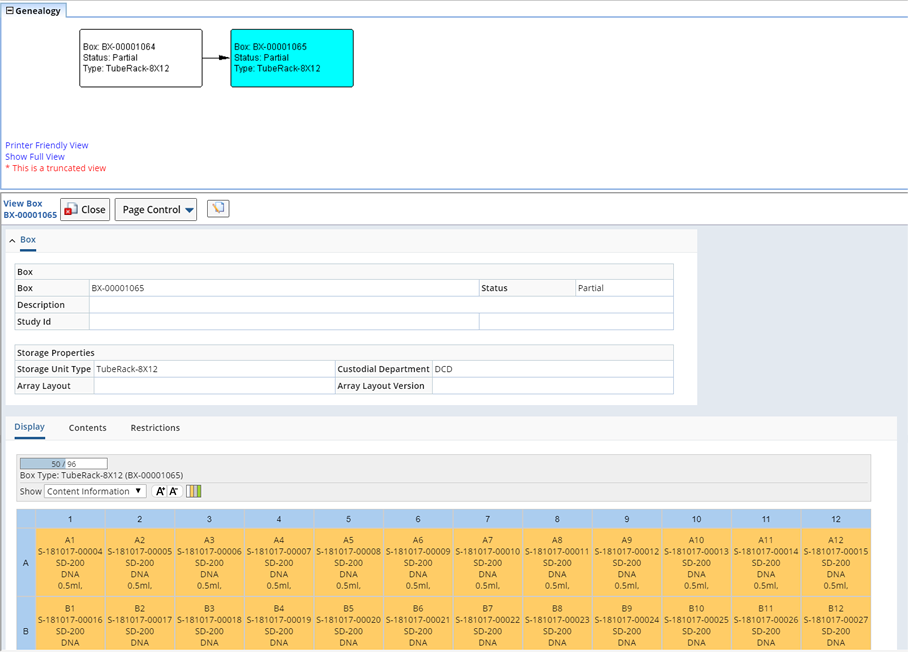
Clicking the Genealogy icon  on the Box list page opens the Genealogy Viewer where you can see all Parent-Child relationships for the selected Box.

Here we see that Box BX00001065 is a child of Box BX-00001064. A Box detail View is provided.