Overview
| Top |
|
Boxes |
Content |
||||||||||||||||||||||||||||||
|
Overview |
|
|
Boxes represent a lower level Storage Unit within the Storage system hierarchy (see Storage Locations for information). Boxes are storage structures that can hold items (such as Samples). Typically Boxes containing Samples are then checked into a Storage Unit. The Samples sit in dynamic positions, whereby one Sample can easily be taken out, and replaced with a new Sample. When taking custody of the Box as a whole, the system automatically gives the User custody of each of the Samples in the Box.
Boxes can represent different kinds of Storage Units, such as a 9x9 sorted box, an unsorted Box, or tube racks. You can configure different display formats to provide a visual understanding of the contents.
Adding Boxes |
|
|
Boxes can be added using Storage Explorer when defining a Storage Unit hierarchy, or add an Adhoc Box from the Box List page. See Storage Locations → Building a Storage Location Hierarchy for information about adding a Box while building a Storage Hierarchy.
Here, we describe adding a Box (Adhoc Box) from the Box List page.
Navigate to LIMS → Storage → Boxes. The Box List page displays.

Click "Add", the Add Adhoc Box displays.
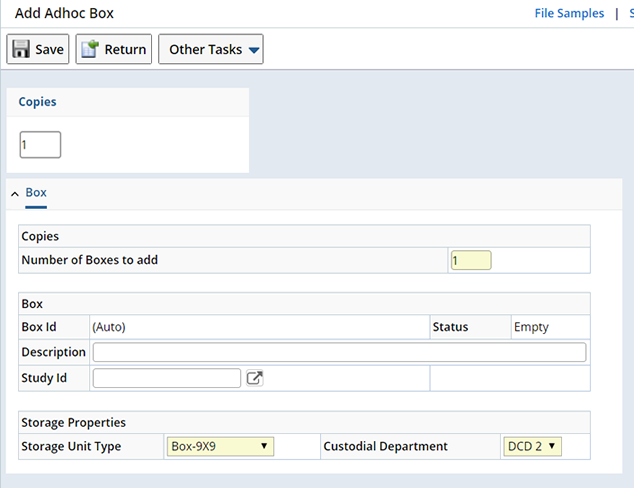
| Field | Description |
| Copies | Adds 1 or more copies of the defined Box. |
| Number of Boxes to Add | Specify the number of Boxes to add. |
| Box Id | Automatically generated unique Box Id. |
| Status | Current content status of the Box. Empty, Partial or Full. |
| Description | Text description of the Box. |
| Study Id | This is optional. It is the Study that will use this Box. The system does not enforce this in any rules. |
| Storage Unit Type | Storage Unit Type used to create the Box. |
| Custodial Department | Custodial Department assigned to this
Box when checked into a Physical Store. The Box inherits the Physical
Store's Custodial Department.
When creating new adhoc Boxes, select a Custodial Department to which you belong. However, this can not be modified after the Box is created. |
Upon Saving, the Array Layout and Array Layout Version fields display. These are used to define this Box with a pre-defined ASL Grid Layout. This is useful if you intend to file Samples into pre-defined groups or "Zones" within the Box or plan to transfer content between ASL Grids and Arrays. See ASL Grid Transfer for more information.
| NOTE: | An Array Layout can only be selected for an existing, empty Box. |
![]()
| Array Layout | Use the Array Layout lookup to find a corresponding Array Layout (as determined by the Storage Unit Type, such as Box-9x9). You can change the Array Layout anytime, provided the Box is empty. |
| Array Layout Version | Specify a version for this Array Layout. The Array Layout and Version are displayed as a link in the Layout column of the Box List page. Clicking the link opens the View Array Layout dialog where you can see the details of the Array Layout. |
Manage Existing Boxes |
|
|
Existing Boxes can be managed using the Edit button on the Box List page. Navigate to LIMS → Storage → Boxes, select an existing Box and click "Edit". The Edit Box page displays.
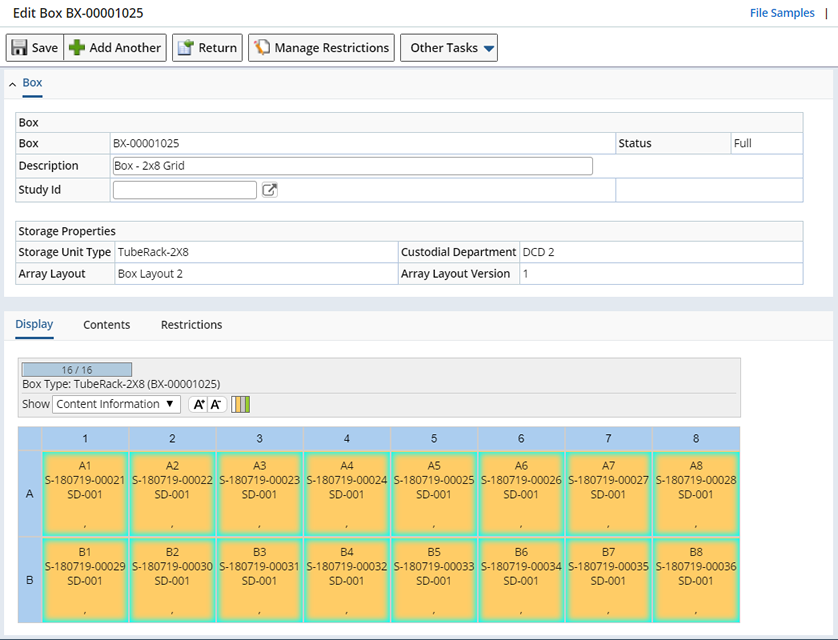
Use the Edit Box page to make changes to existing Boxes and change the way content displays in the Box.
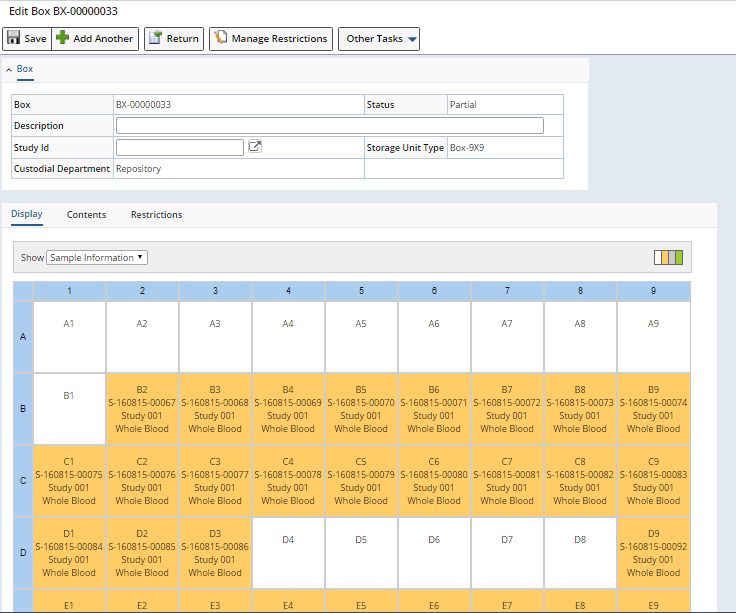
Display Tab |
The Display tab is a configurable tab that shows information about the contents and status of each location within the box. The following example shows the Grid Storage Unit.
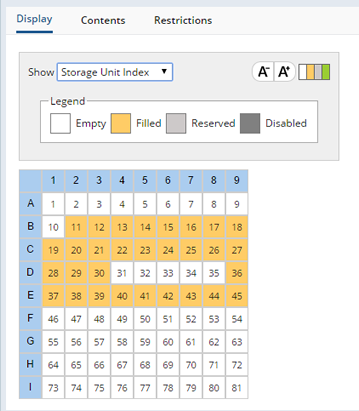
Using the "Show" dropdown select a Display Format (such as show Sample Information or just the Storage Unit Index). You can configure additional Display Formats in the Storage Unit Type.
The example below shows the Display format as "Sample Information" including the Sample ID, Study Id and the Sample Type.
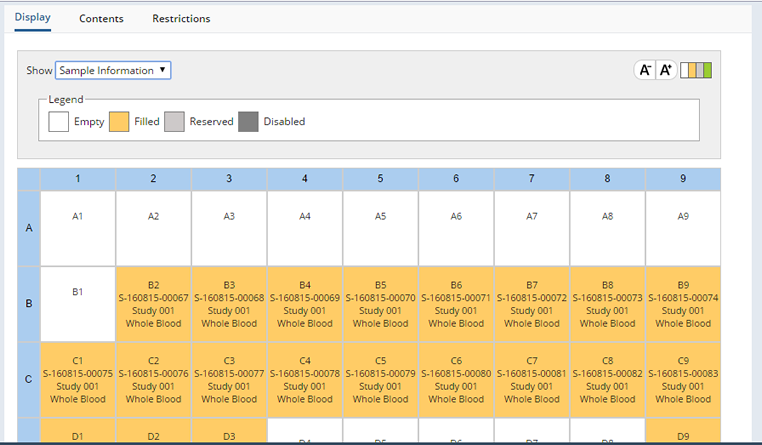
Open the Legend by clicking the icon ![]() . Optionally configure the Storage Unit Renderer Element to display different colors according to the Sample Type.
. Optionally configure the Storage Unit Renderer Element to display different colors according to the Sample Type.
The Storage Unit Index shows the status of each location.
Increase or decrease the font size by clicking A+ or A-.
You can easily rearrange the content within the box. Select the content (use ctrl click and shift click to select multiple conents), then drag and drop to a new location.
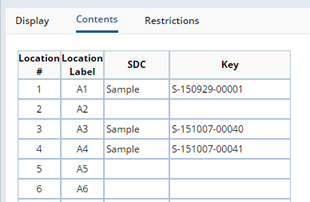
Contents Detail |
The Contents tab lists the current contents of the Box:
Restrictions Detail |
Restrictions associated with this box are displayed in the Restrictions tab. Restrictions are hierarchical. Restrictions defined at a Parent level will be inherited by Child levels and displayed here.

To add Restrictions for this box click "Manage Restrictions". See Manage Storage Restrictions for details about adding Restrictions to Storage Units.
Additonal Box Operations |
Perform any of the following operations on existing Boxes.
| Button | Description |
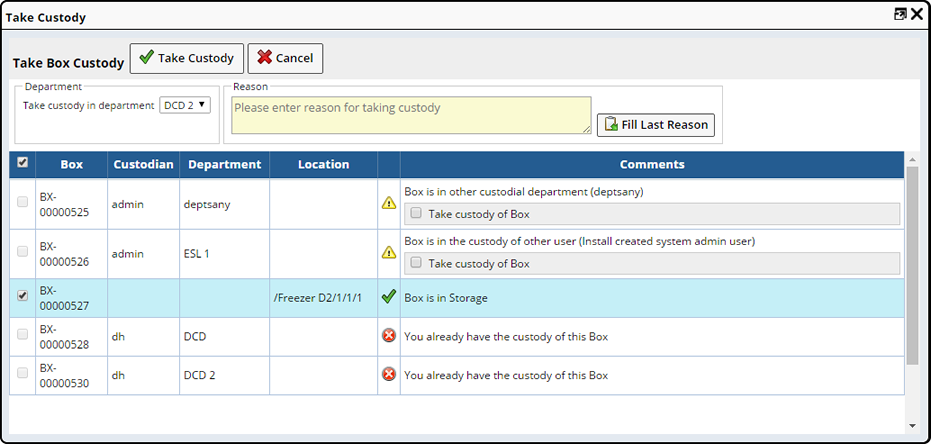
| Take Custody | Opens the Take Custody dialog where you can take custody of the selected
Boxes. See Move Samples → Take Custody for more information about the Take Custody dialog.
|
| Transfer | Lets you transfer Boxes between internal departments in close proximity. See Move Samples → Transfer |
| File | Opens a "File Boxes" TISM page (LV_FileBox), which lets you file Boxes into a Storage Unit. |
| Ship | Create a Package and Ship the Box to an internal or external Shipping Location. See Move Samples (Custodial Management) → Ship |
| Consolidate | Lets you easily consolidate the content of one or more boxes. See Consolidate Boxes. |
| Data Entry | Opens a standard Data Entry page. Samples are presented according to the associated ASL Grid Layout. |
| Create Child Box | Lets you transfer content from the selected Box or Boxes to a new Child Box (or Boxes). Quickly and easily transfer content automatically between Boxes. See ASL Grid Transfer for more information. |
| Transfer to Array | Lets you transfer content from the selected Box or Boxes to an Array. See ASL Grid Transfer for more information. |
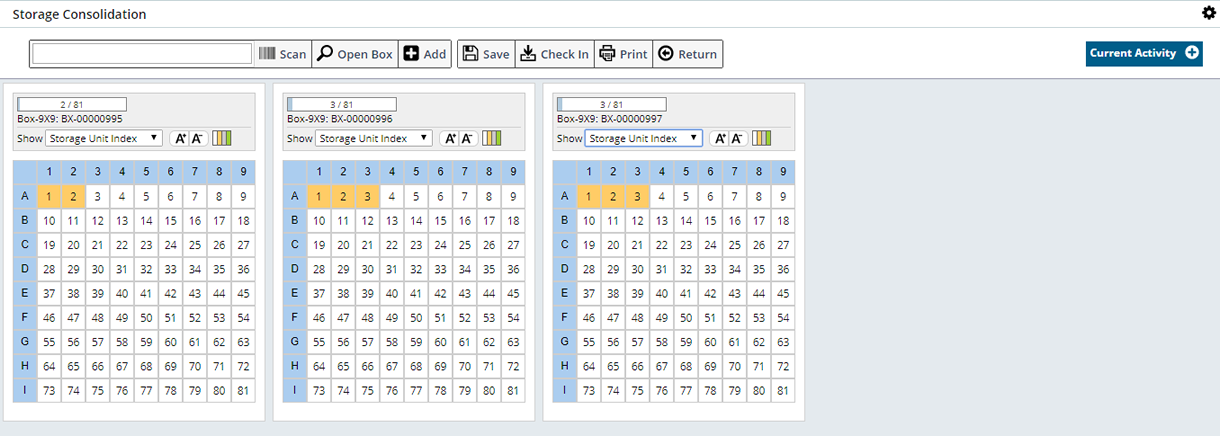
Consolidate Boxes |
|
|
Should you need to consolidate, or condense the contents of multiple Boxes into one (or more) Boxes, you can easily do so from the Box list page. Choose to Consolidate heterogeneous (9x9 Box to a 9x9 Box) or homogeneous (9x9 Box to a 2x8 Tube Rack) boxes.
| NOTE: | Storage Consolidation can also be performed within the Storage Explorer. |
Select the Boxes you wish to consolidate and click "Consolidate". The Storage Consolidation page displays. You will have the opportunity to add new Boxes or select additional Boxes within the Storage Consolidation page.
Boxes must either be in the User's custody or User's Custodial department, and not in the custody of another User.
Within the Storage Consolidation page you can do the following to find or create the boxes you want to consolidate:
| • | "Scan" lets you scan a box (either the boxid or the Box storageunitid). You must have custody of the Box (or the Box must be in your Custodial Department). |
| • | "Open Box" displays the Box Lookup page where you can search for and open existing Boxes. You must have custody of the Box (or the Box must be in your department). |
| • | "Add" a new, empty Box. The Box is placed in the User's custody. |
When you have established which Boxes you wish to work with you can begin consolidating.
Arrange the Boxes as needed to help organize the process. You might choose to place the Box you are consolidating into, in the upper left, and the boxes you are consolidating from, together on the right. Drag and drop the boxes to any location on the page.
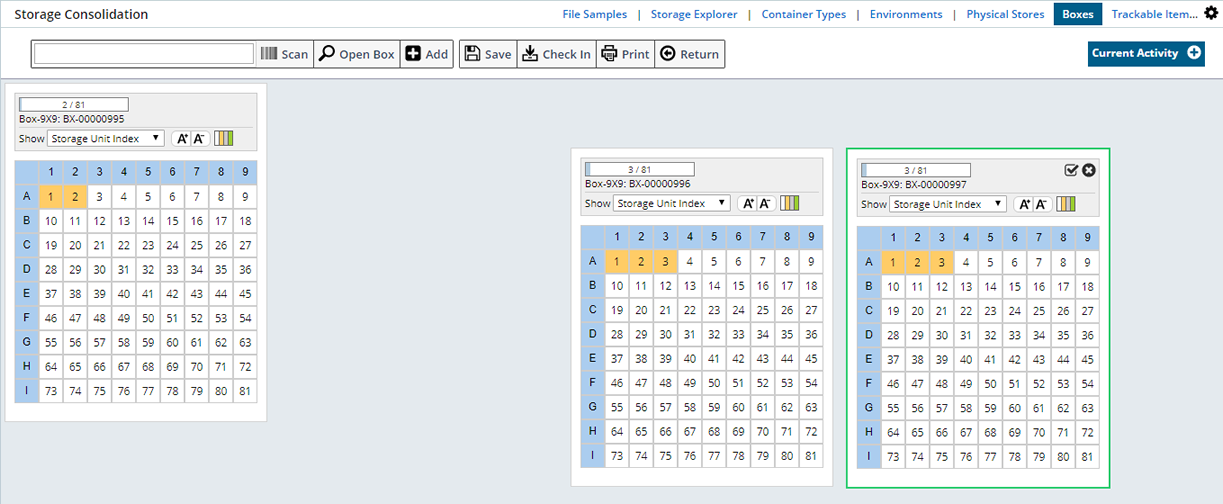
Hovering within a box displays a checkbox so that you can select a specific Box (in order to do things like Check In), or click the X to close the Box (removing it from the working area).
Boxes are displayed using the Box Renderer. Within the Box rendering you can manage the way in which Sample information is displayed (such as displaying Sample information or simply the Storage Unit index). See Display Tab for more information.
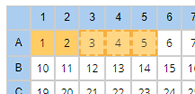
To move contents from one Box to another, highlight the content you want to move (it will turn green).
Use the following tools to select content.
| • | Click the upper left corner to select the entire Box. |
| • | Click individual content items. |
| • | Set of contiguous content items (shift-click or click and drag). |
| • | Set of non-contiguous content items (ctrl-click). |
| • | Individual rows or columns by clicking the headers. |
| • | Set of continuous rows or columns by shift clicking on headers. |
| • | Set of non-continuous rows or columns by control clicking. |
| • | Multiple content using shift-click (for Unsorted Boxes) |
Click, then drag the content to the desired Box. Content will load depending on the Fill Direction defined in the Storage Unit Renderer Element, starting with the location into which you drop the content.
Any Storage Restrictions (such as Sample Type, Custodial Domain or Study) are honored when moving Samples from one Box to another.
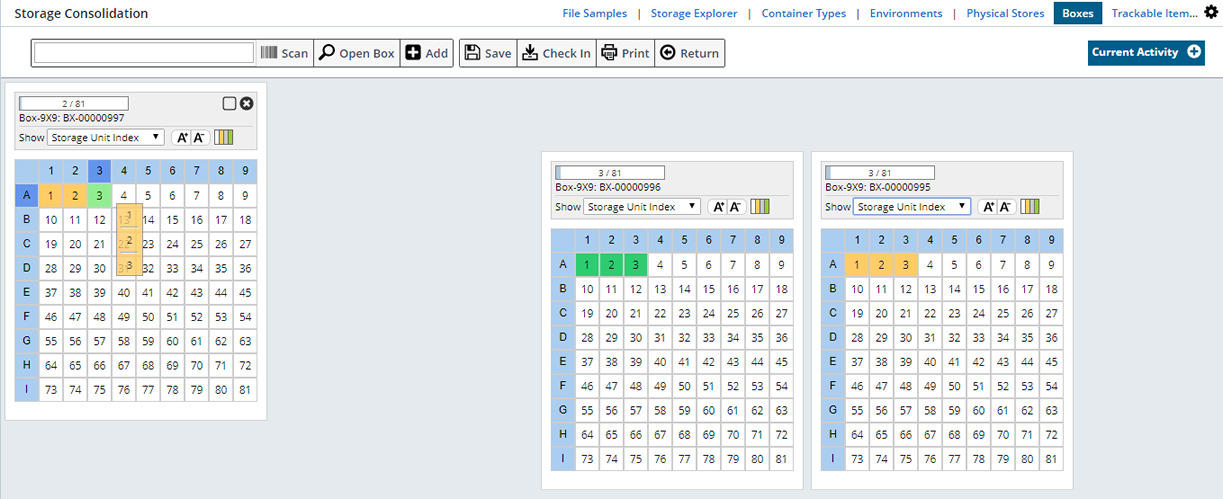
The moved content fills horizontally.
Once Content has been moved (but not yet Saved) the moved content is identified with dotted lines.
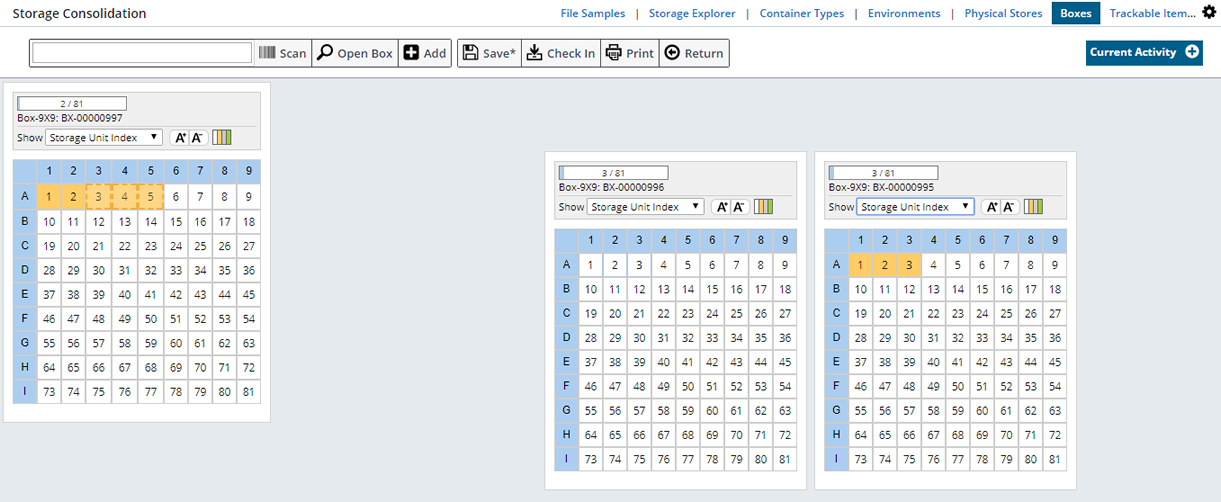
Prior to Saving (as you move content around between boxes) each move is listed within the Current Activity box.
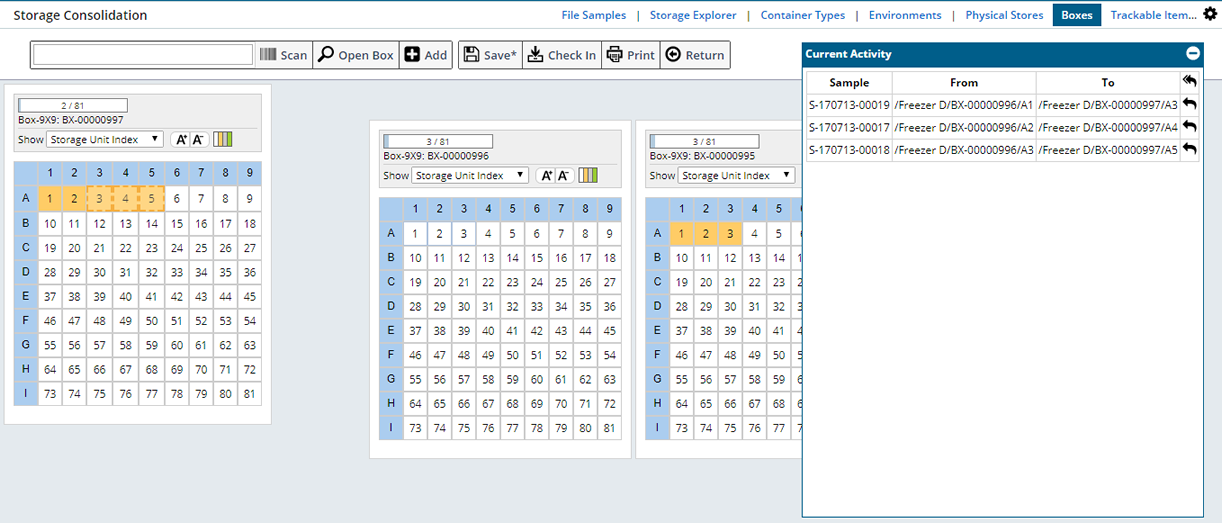
Within the Current Activity box, using the arrows at the right you can undo activity individually, or use the arrow at the top to undo all activity. The undo option is only available before Saving, once saved all activity is cleared.
Moving content around does not impact the actual Box contents until you click "Save". Once Saved, the progress bar indicates the new counts within each Box. The Current Activity information is cleared.

Add a new Box for use when consolidating by clicking "Add". The Add dialog displays.
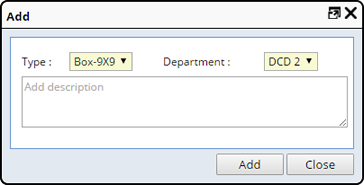
Select the Type of Box to create and the Department with which the Box should be associated. Use the Description area to provide information about the Box.
| NOTE: | The Storage Units available in the "Type" field are defined in the Storage Consolidate Page Type. |
Lets you file Storage Units using the File Boxes TISM page.
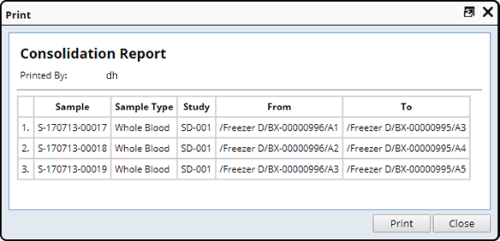
After saving the changes you can print a Consolidation Report listing the Sample movement during the current session. Origination and Destination information is listed.
Define an ASL Grid Layout for a Box |
|
|
Defining a Box Layout lets you pre-define different "Zones" within a Storage Grid. Specified Samples can then be filed into each defined Zone manually using the File Samples page, or automatically when transferring between ASL Storage Grids or ASL Storage Grids to Arrays. For detailed information about defining a Box Layout see ASL Grid Transfer.
Transfer Box Content |
|
|
Atuomatically transfer the contents of a Box using ASL Grid Transfer. This lets you transfer content from Box to Box creating a Child Box with Child Samples (aliquots or derivatives), or from a Box to Arrays. See ASL Grid Transfer for more information.
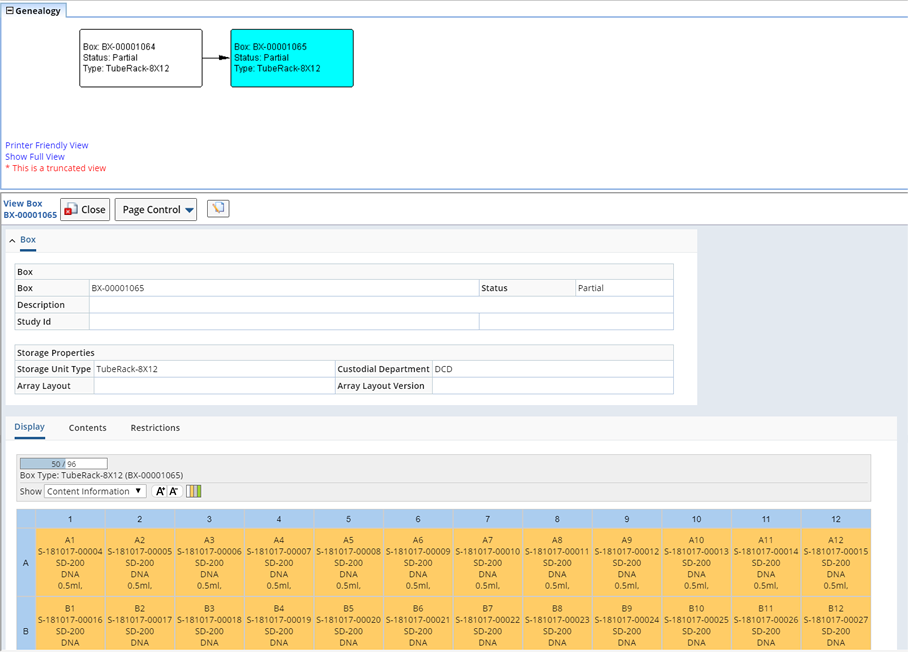
Box Genealogy |
|
|
Clicking the Genealogy icon ![]() on the Box list page opens the Genealogy Viewer where you can see all parent-child relationships for the selected Box.
on the Box list page opens the Genealogy Viewer where you can see all parent-child relationships for the selected Box.

Here we see that Box BX00001065 is a child of Box BX-00001064. A View of the Box details is provided.