Track Item Management pages are used to:
| • |
File Trackable
Items into Storage
Units. |
| • |
Move Trackable Items between Storage Units. |
| • |
Pack and unpack Packages. |
| • |
Scan, enter, or select SDIs and Storage Units used in
the filing process. |
| • |
Perform specialized OOB (preconfigured) functionality
as described later in this document. |
| • |
View the contents of Storage Units as a graphical
rendering or a list. |
Any Trackable Item can be filed. For example, if you are
filing Samples into a Storage Unit, LabVantage identifies the Sample by
finding its associated Trackable Item (Generally, unless indicated otherwise, SDIs and Trackable Items have a
one-to-one relationship).
Below is the File Sample(s) page used for filing Samples. This is the
representative page used for the following general discussion of TISM
page functionality.
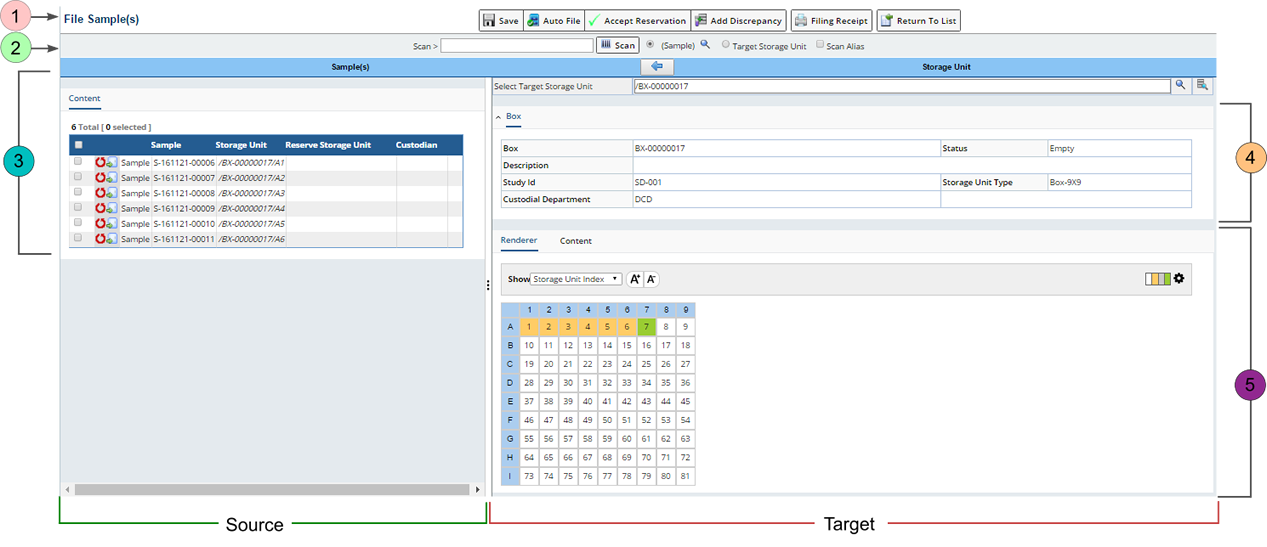
In general, the TISM page has
5 sections:
| |
Section
|
Description
|
| 1.
|
Toolbar |
The "Toolbar" contains buttons that perform specialized
functionality. These vary among the various TISM pages, as described in
the TISM Page Summary. |
| 2.
|
Scan Options |
Trackable Items are filed form the "Source" (left
frame) to the "Target" Storage Unit (right frame). The "Scan Options"
offer methods of populating the Source Content with SDIs. These vary among the
various TISM pages, as described in the TISM
Page Summary. |
| 3.
|
Source Content |
List of items (selected using the Scan Options) to be
filed into the Target Storage Unit. |
| 4.
|
Target Storage Unit Details and Layout |
This shows details of the Target Storage Unit. |
| 5.
|
Target Storage Unit Contents |
The Renderer tab shows (when
appropriate) storage structures, a graphical rendering of the
contents of the Storage Unit. Our example shows a 9x9 Box. More about
this in the section Rendering. The Content tab (after the Source items have been filed) shows the list of SDIs that have been filed in the Target Storage Unit. See Content for more information. |
The Storage Unit Contents (items 3 and 5) can be (but need not
be) in a Box or Package.
The Source and Target Storage Unit can be any Storage Unit
defined in the configuration (such as a Package or Box). The Storage Unit
Type determines the exact information shown. Our example
shows columns in the Box.
The Move Target Storage button  shifts the Target Storage Unit to the left so that the target may be filed itself. Shifting the Target Storage Unit to the left enables you to file a Sample into a Box, and then the Box into a Storage Unit for example. You can configure the TISM page to include this option or not. See TrackItemManagement PageType for more information.
This section describes operations on all TISM pages, as
described in the TISM Page
Summary.
| Operation |
Description |
| Save |
| • |
Commits all changes made on the page to the
database. |
| • |
To file Samples, you must have access to them. If
the Sample is in another Custodial Department, and you are not a member of
that Custodial Department, you cannot file the Sample. For example, if the
Samples are in a Storage Unit that is linked to a Physical Store, and
the Physical Store is not in your Custodial Department, you cannot file the
Samples. |
| • |
Similarly, you may file Samples into a Box that
is within your Custodial Department (or in your custody). If someone else
has checked out a Box, you cannot file Samples into that Box unless you
first take custody of the Box. |
|
| Auto File |
| • |
Files Trackable Items from the Source to the
Target Storage Unit. |
| • |
If you are filing items into a Box, the selected
items are added to the Box into empty locations (as if you individually
scanned and assigned each item into a location). |
|
| Return To List |
Returns to the List page from
which the TISM page was launched. |
| Allocate Sample |
| • |
Lets you Allocate new Samples by directing you to
the Sample Allocation page. |
| • |
When this returns you to the TISM page, the newly
Allocated samples should be added to the Package. |
|
| Accept Reservation |
| • |
Puts the Trackable Item back to its Reserved
Location in the Storage Unit. |
| • |
In general, you select Trackable Items that have
a Reserved Location, then click Accept Reservation. The value in
"Reserved Location" is copied to the "Location" column, and the
"Processed" checkbox should be checked (if it is not already).
If a value already exists for the "Location"
column (by previous scan during the same session), this should override
the assigned Location and accept the Reserved Location. |
|
| Take Custody |
Lets you immediately take custody
of the Trackable Items in the Package (rather than moving them to
a Storage Unit, then taking custody). |
| Add Deviation |
Adds Deviations to the Trackable
Items. This is linked to the Lab Investigations module. |
| Add Discrepancy |
Adds Discrepancies to the
Trackable Items. |
| Mark Missing |
| • |
Marks a Trackable Item as "Missing". |
| • |
This handles the condition where Trackable Items
were expected in a Package, but were not actually packed into the
Package. |
|
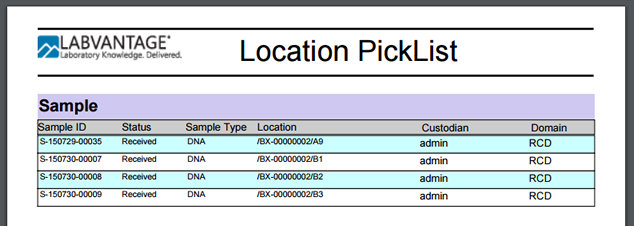
| Filing Receipt |
Prints a Filing Receipt and
displays a pick list report.
|
These vary among the various TISM pages, as described in the TISM Page Summary.
| Control |
Description |
| Scan
Input Cell |
Input field where you can enter or
scan the identifier of the SDI to file. Pressing the Enter key
automatically triggers the Scan button. After a successful scan, the scanned item is filed, and the
input field is cleared and gets the focus for next scan. |
| Scan Button |
Adds the identifier in the Scan
Input Cell to the Storage Unit. The identifier is validated, then the
SDI is automatically filed into the Storage Unit position.
After scanning and pressing the Enter key, the scanned
value is immediately processed to determine if the Sample is already in
the list, or must be added. After the Sample has been processed, the
text box is cleared and the User can scan the next Sample. The Scan Button is controlled by three radio buttons
that define what is being scanned: | • | SDI
Causes the Scan button to locate items that are to be moved to the
Target Storage Unit. The typical example is to scan Sample Ids. The SDI
Selection RadioButton works in conjunction with the SDC Selection
dropdown that defines the SDC in which the scan will look. | | • | Source SU
Causes the Scan button to locate the Source Storage Unit by scanning
the storageunitID of the Source. | | • | Target SU
Causes the Scan button to locate the Target Storage Unit by scanning
the storageunitID of the Target. | | • | Scan Alias
Causes the Scan button to locate items that are to be moved to the Target Storage Unit using an Alias. Select an Alias Type. |
|
| Add
new SDI |
If an SDI is scanned and it
does not currently
exist in the system, when this option is set, a new SDI will be
created upon saving the TISM page. An optional confirmation window may
appear for the User to verify that they want a new SDI created. The
attributes for the new SDI are prompted for in a popup window that
appears:
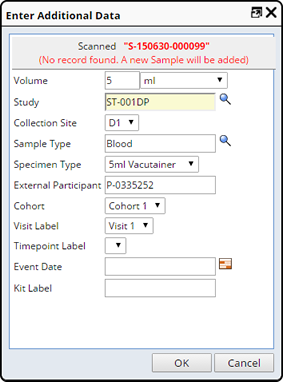
Shown in the dialog above are example attributes that
pertain
to Samples of Protocol driven Studies, but it may be configured for
other types
of Studies. It is also possible to enter a CAPA
Deviation or a Discrepancy (depending on the configuration) if there is an issue with the Sample
such as damage or thawing. As each unknown Sample is scanned, the popup
window appears
and for convenience is populated with the values from the previous
entry. When the TISM page is saved, another popup window appears with
all the attributes of the new Samples to allow confirmation by the User
before saving: 
For any Samples that already exist, but are associated
with a
Protocol Study, then the popup windows also appear during scanning and
saving. This allows additional information, including initial Freeze/Thaw details if appropriate, to be associated
with Samples when they are received and can possibly avoid the
data entry stage of the Sample accessioning process: 
See BioBanking Sample
Accessioning and Data Entry for more details on the Sample
receipt process and how BioBanking Forms interact with the TISM page. |
| SDI
Lookup Icon |
Used as an alternative to the
Scan Input Cell and button to locate items to be moved to the Target
Storage Unit. The typical example is to move Samples to the Target. The
SDI Lookup Icon works in conjunction with the SDC Selection dropdown
that defines the SDC for the lookup. |
| Scan
Alias Checkbox |
By default, the Scan button
locates the SDI by its identifier. This checkbox permits searching
using various Aliases defined for the SDI. One use of the Alias is to
define an external identifier used outside of the LIMS system.
When scanning by Alias, if multiple Samples have the
same Alias, all Samples will be included. |
|
|
|
|
Find Target Storage Location
|
|
|
|
|
|
If not already chosen when you
enter this page, you must choose a Target Storage Unit as the
destination for your Trackable Item(s). Clicking the Target
Storage Unit ID Lookup opens the Select Target Storage Unit dialog where you can select, Browse for, or search for available Storage Locations.
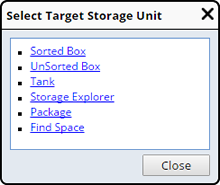
| Option |
Description |
| Select a specific Storage Unit
|
Choose a specific Storage Location (such as Sorted Box or Tank) to open the appropriate Storage Unit lookup
configured for the respective Storage Unit.
Optionally select a Storage Unit from the Quick Storage Unit selection list. 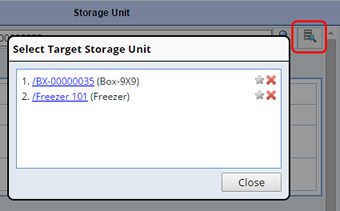
The TISM Pages remember the last 5 selected storage units, you can also mark a selected Storage Unit as a Favorite (by clicking the star), it will then remain in the
Quick Storage Unit Selection list until you remove it from favorites
or from the list. |
| Browse For Storage
|
Storage Explorer lets you browse for available space. |
| Find Space
|
Find Space lets you search for and filter through available Storage Units according to specified needs. Use the Find Space dialog to define your requirements.

Sample Type and Study fields are populated with information from the selected Samples. "Having free space" is populated with the number of Samples selected. All can be changed here. "Find" lets you define the type of Storage you are looking for, such as "Any Box" or "Box-9x9". These values are defined by the "Storage Location Search" property in the Biobanking Policy. Clicking "OK" opens the Storage Explorer view page showing a filtered list of Physical Stores that have at least one Storage Container matching your requirements. Any Storage Containers that do not match the search criteria are dimmed. You can further drill down into any Physical Store to find a Storage Container. |
The Renderer detail displays a graphical layout rendering of the Storage Unit contents. This rendering
is based on the Storage Unit
Type. This is supported only for Storage Units that utilize a
graphical rendering.
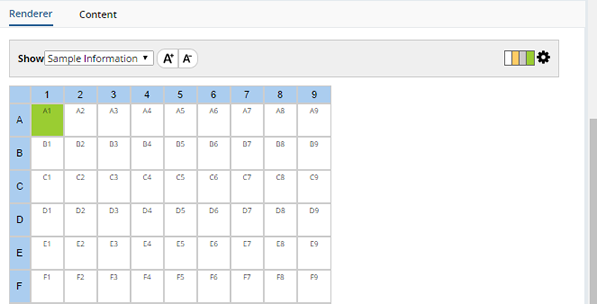
| Show
|
Determines what information to render:
Choose "Sample Information" to show information about the Sample in the cell. Choose "Storage Unit Index" to show only the storage unit index. |
Text Size

|
Expand or decrease the font size by clicking A+ or A-. |
| Legend

|
The legend identifies the status of each cell. Optionally configure the Storage Unit Renderer Element to display different colors according to the Sample Type.

When filing into an ASL Grid, each
defined Zone is included in the Legend. 
|
| Options

|
Opens the Options
panel which determines the orientation of the filing order.
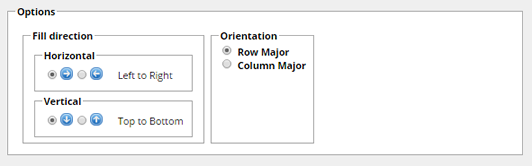
| • | Fill direction Horizontal/Vertical
Controls the filling order in conjunction with the Orientation. This may be different than the order in
which individual cells are numbered. Users have the ability to indicate
that filling be done left to right, right to left, top to bottom, or
bottom to top. | | • | Orientation
Row Major means an entire row is filled, according to the Horizontal Fill
direction, before the next row is selected based on the Vertical Fill
direction. Column Major means an entire column is filled, according to the Vertical Fill
direction, before the next column is selected based on the Horizontal
Fill direction. |
|
These are the Storage Unit Layout renderings that are
preconfigured OOB based on Storage Unit
Types:
| Layout
|
Description
|
| Grid
|
In the example above, rows are
labeled with letters, columns with numbers. Cell positions are assigned
left-to-right, right-to-left, top-to-bottom, or bottom-to-top. The
order of position assignments is configurable, as defined by the
storage device.
In the OOB configuration, this applies to Sorted Boxes
and Plates. |
| Linear
|
The Linear layout can be either
horizontal or vertical. Individual positions can be labeled with
numbers or letters (depending on how the storage device is configured).
For horizontal layouts, positions can be assigned
left-to-right or right-to-left. For vertical layouts, positions can be
assigned top-to-bottom or bottom-to-top. The order of position
assignments depends on how the storage device is configured. In the OOB configuration, this applies to Freezers,
Racks, Shelfs, and Slots (a Slot is typically a one-by-one). |
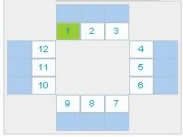
| Circular
|
The example above shows the
circular layout for a twelve-position tank. Positions along the circle
are labeled with letters or numbers in a clockwise or counterclockwise
order, depending on the configuration of the storage device.
In the OOB configuration, this applies to Tanks. |
Specify any cell to be
the start position by clicking in that cell.
ASL Grid transfer lets you file Samples into a pre-defined grid. See ASL
Grid Transfer for more information about defining the grid and filing Samples.
The Content detail lists the contents of the Storage Unit.
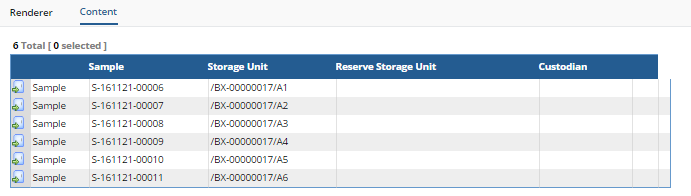
| Sample |
Identifier (KeyId1) of the item in
the Storage Unit, such as Sample Id. |
| Storage
Unit |
Full path of the current location
for the Sample in the storage system. |
Reserved
Storage Unit |
Full path of the location (if any)
last used to store this Trackable Item in this Custodial Department. Note
that the ASL module permits multiple reservations per Sample (one per
Custodial Department). |
| Custodian |
Name of the current Custodian. |
Preconfigured TISM pages are available to perform these
operations in the OOB configuration.
| Operation
|
Tramstop
Location
|
TISM Page
Accessibility and Configuration
|
File Samples into
a Storage Unit. |
Storage >
File Samples |
| • |
Click the LIMS > Storage > File Samples tramstop. |
| • |
Loads the "File Samples" TISM page
(LV_FileSample) with this configuration:
Toolbar Buttons: Scan Options:
|
|
| Sample Management >
Allocated Samples |
| • |
Click the "Check In" button on the Allocated
Samples List page. |
| • |
Loads the "File Samples" TISM page (LV_FileSample) with the same
configuration as the Storage > File
Samples location above. |
|
| Sample Management >
Admin Samples |
| • |
Click the "Check In" button on the Admin Samples
List page. |
| • |
Loads the "File Samples" TISM page (LV_FileSample) with the same
configuration as the Storage > File
Samples location above. |
|
| Sample Management >
Sample Movement |
| • |
Click the "Check In" button on the Sample
Movement List page. |
| • |
Loads the "File Samples" TISM page (LV_FileSample) with the same
configuration as the Storage > File
Samples location above. |
|
Managing Package Content
(other than Boxes). |
Packages >
Add Package for Shipment |
| • |
Define the Package, "Save" it, then
click the "Manage Contents" button. |
| • |
Package's "Package Content" must be "Sample". |
| • |
Loads the "Manage Package Contents" TISM page
(LV_PackNewPackage) TISM page with this configuration:
Toolbar Buttons: Scan Options:
Note that this is the only TISM page that lets you
select a Source Storage Unit in the "Source" frame. |
|
| Packages >
Packages |
| • |
Click the "Manage Contents" button on the Package List page. |
| • |
Package's "Package Content" must be "Sample". |
| • |
Loads the "Manage Package Contents" TISM page
(LV_PackNewPackage) TISM page with the same configuration as the Packages > Add Package for Shipment
location above. If the Package Status is either "Expected" or "Received" the Allocate
Sample option is also available. |
|
| Managing Package Content (Boxes). |
Packages >
Add Expected Package |
| • |
Add the Expected Package, "Save" it, then click
the "Manage Contents" button. |
| • |
The User must be a member of the Package's
Custodial Department. |
| • |
Loads the "Manage Package Contents" TISM page
(LV_PackExpPackage) TISM page with this configuration:
Toolbar Buttons: Scan Options:
|
|
| Unpack
a Package. |
Packages >
Packages |
| • |
Click the "Unpack" button on the Package List page. |
| • |
The Package must be "Received". |
| • |
Loads the "Unpack Package" TISM page
(LV_UnpackPackage) TISM page with this configuration:
Toolbar Buttons: Scan Options:
|
|
File
Boxes into
a Storage Unit. |
Storage > Boxes |
| • |
Click the "File" button on the Box List page. |
| • |
The User must have custody of the Box. |
| • |
Loads the "File Boxes" TISM page (LV_FileBox)
with this configuration:
Toolbar Buttons: Scan Options:
None. |
|
File
Plates into
a Storage Unit. |
LabAdmin > Array
>
Arrays Or LIMS > Tests > Plates & Gels |
| • |
Click the "Check In" button on the Plates and Gels List page. |
| • |
The User must have custody of the Plate. |
| • |
Loads the "File Track Item" TISM page (LV_FileTrackItem)
with this configuration:
Toolbar Buttons: Scan Options: |
|
File
Trackable Items
into a Storage Unit. |
Storage >
Trackable Items |
| • |
Click the "Check In" button on the Trackitem
List page. |
| • |
Loads the "File Trackitem" TISM page
(LV_FileTrackItem) with this configuration:
Toolbar Buttons: Scan Options: |
|
Each Storage Unit may contain Storage Restrictions for that Unit. When placing Trackitems into the Storage Unit a check is performed, should you attempt to place a restricted Trackitem you will receive a message indicating the restriction. See Manage Storage Restrictions for detailed information.