Overview
| Top |
|
Accession Samples |
Overview |
|
|
Accessioning is the process of annotating Samples with phenotypic information such as the type of Sample, the age and the disease state of the donor of the Sample, etc. LabVantage supports 3 means of accessioning an Allocated Sample.
| • | After Allocating, and Receiving a sample, use of the Accession Samples page to supply the required demographics and ancillary information. |
| • | Using the TISM page, while unpacking a package, the demographics and ancillary information can be provided while creating new samples directly in the TISM page. |
| • | Using Sample collection forms before or after actual receipt of the samples |
The Accessioning Task automates many of these processes all in one cohesive step by step task. The processes include:
| • | Sample Allocation |
| • | Subject creation and Enrollment |
| • | Unpacking |
| • | Recording Volume and other Sample information |
| • | Recording Demographics and other ancillary information |
| • | Printing of labels |
| • | Assigning of additional Services |
Receive and Accession Samples Task |
|
|
The Receive and Accession Samples Task is a Workflow driven set of steps. The task is a sequence of steps to complete the full accessioning of new samples. This task may be run standalone, or included with a LabVantage Workflow.
Following is a summary of the steps involved in Receiving and Accessioning Samples.
| Step | Description |
| Identify Study | Choose a Study then identify the specific Events within the Study for which you are receiving Samples. |
| Search for the Subject | Using information provided with the incoming Sample(s) search for the Subject within LabVantage. Once identified, enroll the Subject into the Study if necessary. |
| View Expected Samples | View expected Samples for the Study and its Events (Protocol and Non Protocol). |
| Identify Samples that have arrived | From the list of expected Samples, determine which Samples have come into the lab. |
| Accession Samples | During Accessioning, the selected Samples are received into LabVantage, any Services are applied to the Samples and any necessary Child Samples are created. |
| View and Manage Services Annotate Samples |
Once the Samples are Received you can view and manage the associated Services and annotate the Samples with any additional information. |
| Print Labels | Choose to print Labels for the newly received Samples. |
| Move Samples to InCirculation | Depending on Approval Rules Samples would be automatically approved and move to InCirculation. |
Note: Each step of the workflow can be configured to suit your needs. See Workflow Task Step Definitions, the Accession steps, for information about configuring these pages.
Optionally choose to configure the Workflow in "Existing Participant Mode". Doing so allows you to identify the Participant first, which then allows LabVantage to find the Study. In Existing Participant Mode the Subject Selector page displays first, then the Event Selector page. See Workflow Task Definition: Accession Samples for details about configuring the Workflow for Existing Particpant Mode.
To use the Receive and Accession Samples Task navigate to LIMS → Sample Management → Receive and Accession Samples. The Event Selector page displays.
Event Selector |
Use the Event Selector pane to identify the Study and Event for the scope of this accessioning session.
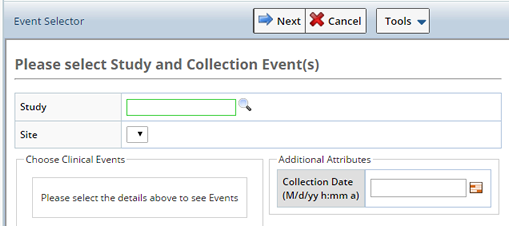
For Non Protocol Studies only the Site is selected.
Following is a description of the Operations you can perform from the Event Selector Task.
| Operation | Description |
| Next | Move to the next step in the task. |
| Cancel | Cancels the Task. |
Depending on the Study and Site selected, additional fields display.
| Protocol Study | Non Protocol Study |

|
|
| Field | Description |
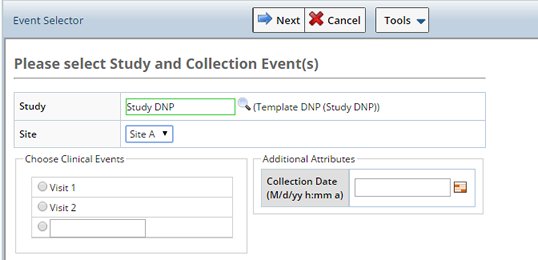
| Study | Search and select the Study for which you want to Accession Samples. If a non Protocl Study is chosen, only the Site field displays. |
| Site | The site from which Samples were collected. This is the Collection Site, will be used as the Enrollment Site if and when the Participant is enrolled in the Study. |
| Cohort | The Cohort for which Samples were collected (Protocol Studies only). |
| Choose Events | Based on the Study chosen the associated Events display. Choose the Events for which the Samples were collected.
Optionally add a Duplicate Visit (Protocol Studies only). The Duplicate Visit is an optional Visit (when the visit is defined to be a repeating visit). Repeating visits are common and represent an adhoc or sick visit. When repeating, this checkbox allows you to assession into the first occurrence of that visit rather than adding a new visit and accessioning into that. |
| Additional Attributes | These attributes are configurable. Any column from the Sample, Sample Family, or Participant Event may be specified and will be used for all Samples accessioned during this session. |
Click "Next" to provide Subject information.
Search Subjects |
Clicking "Next" displays the Subject Selector pane. The purpose of this pane is to identify the Study Participant, whose Samples you will receive during this Accessioning session, using their Subject information. Subjects may or may not be enrolled as Participants in the Study, if not, you have the option to Enroll the Subject during Accessioning. If the Subject is not found you can add a new Subject as necessary.
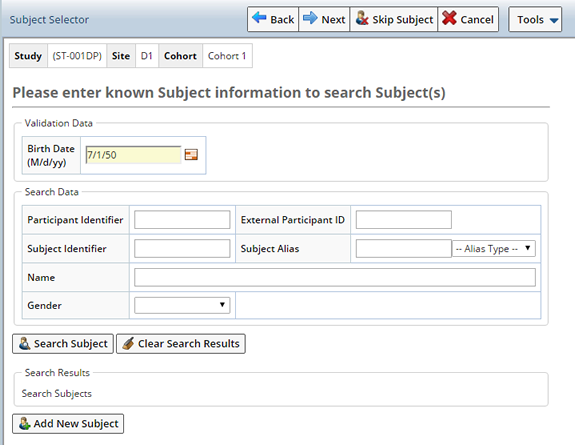
The Validation portion of the page is where you enter additional information about the Participant to confirm that the selected Subject/Particpant is correct. Ensuring that, if the Participant Id is entered incorrectly, and verification can not be confirmed, the wrong Particpant will not be chosen. Depending on the configuration, this validation data may be mandatory. OOB validation is configured to match on the Subjects birth date.
The Search Data portion of the page is where you specify details about the Subject, or Participant, to help locate the Participant within LabVantage. This may include the Participant or Subject Id, or either the Subject or Participant Aliases.
Configuration of this page can determine whether or not partial values may be entered, or if values are case sensitive. Depending on the configuration, simply tabbing out of a field may also auto execute the search.
Enter any information provided with the Sample to identify the Subject. OOB, and in this example, the Birth Date of the donor is required to verify the Subject.
In this example we searched for Males whose birth date is July 1, 1950. Click "Search Subject", Subjects matching some or all of the criteria are displayed. Basic information about the Subject is displayed as well as the Studies in which the Subject is enrolled.
Shown here are the results of the Search. Subjects/Participants not matching the validation data are shown with a red background.

Select the Subject you want to associate with the Sample(s) and click "Next". Upon clicking Next you may be presented with any of the following scenarios:
Should you choose a Subject that does not exactly match the criteria entered you will receive a Validation Failure message. You need to supply a reason for continuing with the error, Stop the Accessioning Process or Cancel to Search again.
Note: There may be cases where the Validation Data and Participant may not align, you will still be able to accession the sample, rather than letting it melt on your desk. In this case the data can be corrected outside of this task.

If no Subjects are found ou can choose to add a new Subject. Click the "Add New Subject button", the Subject Maintenance page opens where you can add the new Subject. All data used for searching is copied into this popup page.
Note: Depending on your customization of the system, the "Search External System" button may be available. This enables LabVantage to locate the subject from an external 3rd party system, which may have the subject details, as the new subject is copied into LabVantage.
Save the new Subject and close the popup. A new Subject is created and now appears in the list. Select the new Subject to associate with the Sample(s).
Optionally choose to "Skip Subject", receiving the Sample(s) without associating Subject information. A confirmation message displays.
If the matching Subject has not yet been enrolled in the Study you are presented with the Confirm Enrollment dialog where you can enroll the Subject during Accessioning.

Chose one of the following:
| Field | Description | |||
| Enroll | Enrolls the selected Subject as a Participant in the Study.
|
|||
| Stop | Stops the Accessioning process, a confirmation message appears. |
|||
| Skip Subject | Allows you to Accession without identifying a Subject. A warning message is displayed on the Expected Samples pane. | |||
| Cancel | Cancels the Enrollment and returns you to the Subject Selector pane. |
Note:
Receive Samples |
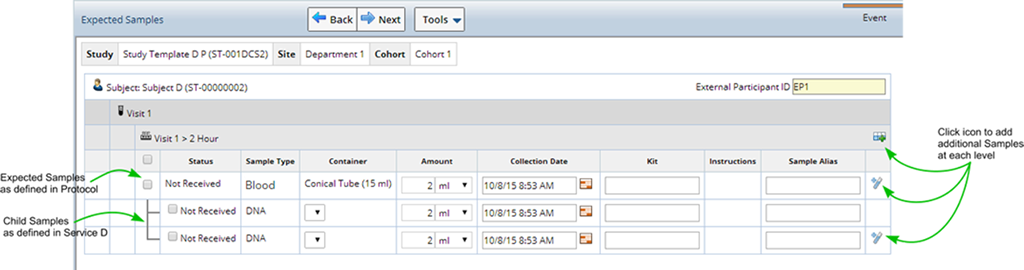
Upon clicking "Next" a list of expected Samples (based on Events defined in the Study) displays. Use this pane to indicate which specific samples are actually received and being recorded into LabVantage. Record specific Sample attributes typically scribed from the sample tube such as volume, Kit identifier, etc. Shown may be the expected volume, but this can be changed to reflect the actual sample volume.
Expected Samples are displayed with a Status of either "Not Received", or "Received" (the Sample was Received in a prior Accessioning session), along with all the information defined in the Study Event such as Sample Type, Container, and Amount to expect.
If an associated Service includes a Child Sample Plan (and was marked to be included in Accessioning) those Child Samples also appear.
Select the expected Samples you want to Receive and Accession, fill in any additional information and click "Next". Samples are created, any Services are applied (including the creation of any additional child Samples needed to perform the Service).
Note: You can choose to Receive just Child Samples, just Parent Samples or both. For example, if you are receiving a Tissue Block from which 3 Slides are taken (children of the Tissue Block) you may choose to Receive and Accession only one of the Slides, 1 Slide and the Block itself (Parent) or all. When a Child Sample is Received, without receiving the Parent, a virtual Parent is defined in order to identify the Sample Family.
If this is the first enrollment of the Subject, the External Participant ID must be provided as the subject will be enrolled upon leaving this page.
On the right side of the page are various icons used to duplicate the row. The icon at the top on the Visit line, is used to add a blank row. This permits you to accession any Sample Type regardless of what Sample Types and Container Types the protocol is expecting.
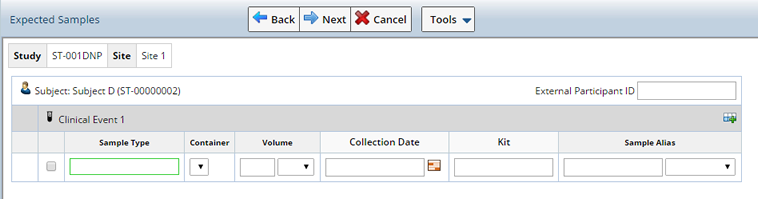
When selecting Samples for Non Protocol Studies any Clinical Events defined in the Study display. Select the Event for which you are receiving Samples and define the Sample.
Accession Samples |
On the Accessioning pane further annotate the Samples by including any additional information. Choose to Print Labels that include information from the Samples or View and Manage any associated Services.
See Biobanking Accessioning Data Entry for details about the tabs and fields on the Accessioning Data Entry page.

Choose to print Labels containing the Accessioned information. Click the "Print Labels" button, the Print Labels dialog appears. Select a Printer and click "Print". The Label Method defined in the Clinical Protocol, or the Service's Child Sample Plan is used to generate the Labels.
Only samples of a common Label Method may be labeled together. Otherwise, separate Samples must be labeled independently.

Services are the processes, Tests or procedures done to a Biobanking Sample. Services are initially included within a Study Event. Here you can add and remove Services for each Sample as necessary. See Services in Master Data Setup for more information about defining Services.

Use the Manage Services page to include Services for each of the selected Samples. Use the lookup to find additional Services. "Save" your changes.
Completing the Task |
Click "Next" to finish the Task. The Accessioning Summary pane shows a summary of what was just accessioned, and the followup instructions for each sample.
Note: These follow up instructions can be printed on Sample labels.
The Status of the sample would likely be either "InCirculation", if all required information is provided for the sample or "Received", when additional information is lacking. Hit the "I" icon to see what additional information is needed so that these samples can be moved to InCirculation.
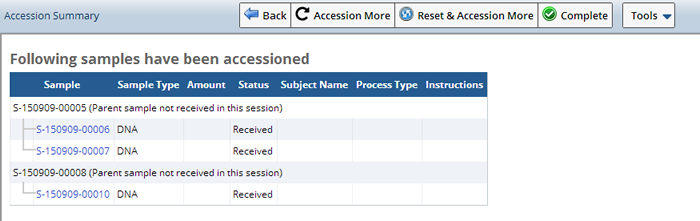
If, according to the Approval Rules, a Sample is Approved, selected Samples automatically go into circulation (status of InCirculation).
Upon completion of the Accessioning task you have the following options:
| Button | Description |
| Back | Go back to the previous step. |
| Accession More | Remembers the Study you are working with and brings you back to the Event Selector Page to Accession more Samples for that Study. |
| Reset and Accession More | Resets the task and brings you back to the Event Selector pane to begin Accessioning Samples for a different Study. |
| Complete | Completes and exits the Task and returns you to the main menu page. |
Forms |
|
|
The following Use Cases describe the different Sample accessioning and data entry options supported by LabVantage when using Forms to collect and enter Accessioning information.
Use Cases 1 and 2 show that with the use of online Form completion and processing, it is possible to associate various data fields with a Sample. This can occur before or after the actual physical Sample is received. Part of the Form processing can also perform the necessary data Approvals on a Sample as designated by the Study. Therefore Forms provide an alternate data path to the BioBanking Data Entry pages shown in Use Case 4. Use Case 3 shows how all the necessary data entry may be completed during Sample receipt on the TISM page.
The Use Case diagrams show data collected (for the SDC Ids displayed) from online Forms, the TISM page, or the BioBanking Data Entry pages. The diagram numbers refer to the numbered Use Case step described in the associated table below:
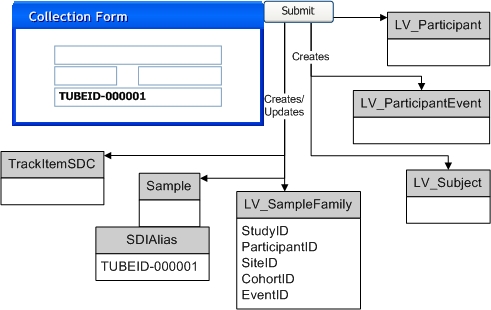
Use Case 1: Form processing followed by Sample receipt |
|
|
|
|
|
Optional Step: User allocates new Sample SDI(s) from the Allocated Sample List page or the Pack Expected Package page. If an External Id is provided this is saved as an alias for the specified Sample SDI. |
||
|
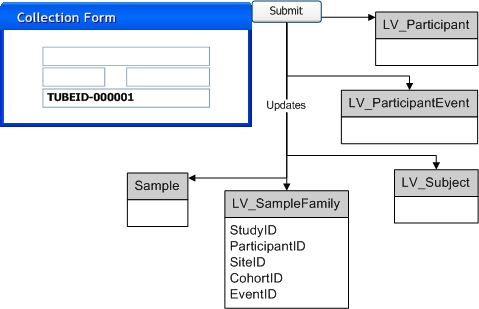
User selects and completes an appropriate Sample Collection Form and submits it for processing: |
||
|
System searches for the Sample SDI(s) specified on the Form. For this search to be successful, the Form must use the LabVantage Sample Id assigned to the Sample in Step 1, or the External Id provided in Step 1. When the External Id is used for the search, the External Id Type specified in Step 1 must be "External" and the Study Site must also be provided in Step 1. A found Sample SDI is updated with the values provided on the Form. If a Sample cannot be found then the system creates the specified new Sample SDI(s). The Sample identifiers provided on the Form are saved as aliases for the Sample SDIs. |
||
|
Any necessary associated SDIs, as specified on the Form, are created or updated and linked to the created or found Sample SDIs. This includes LV_Participant, LV_Subject, or LV_ParticipantEvent SDIs. Existing LV_SampleFamily SDIs are also updated with data from the Form. These were created as part of Step 1 or Step 2.a when the Sample SDIs were created. |
||
|
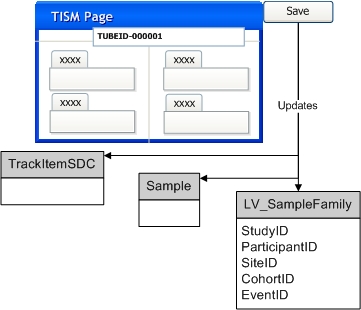
Physical Sample is received and processed via the TISM page. As each Sample identifier is scanned or entered, additional information for the Sample can be entered by the user: |
||
|
When data from the TISM page is saved, each scanned or entered Sample identifier is matched against the previously created Sample Ids or Sample aliases to find the appropriate Sample SDIs. The Sample SDIs and any associated SDIs are updated based on information provided on the TISM page. |
||
|
Sample storage status is updated to "Received". |
||
Use Case 2: Sample receipt followed by Form processing |
|
|
|
|
|
Optional Step: User allocates new Sample SDI(s) from the Allocated Sample List page or the Pack Expected Package page. If an External Id is provided this is saved as an alias for the specified Sample SDI. |
||
|
Physical Sample is received and processed via the TISM page. As each Sample identifier is scanned or entered, information for the Sample can be entered by the user: |
||
|
System searches for the Sample SDI(s) specified in the TISM page. For this search to be successful, the data from the TISM page must use the LabVantage Sample Id assigned to the Sample in Step 1, or the External Id provided in Step 1. When the External Id is used for the search, the External Id Type specified in Step 1 must be "External" and the Study Site must also be provided in Step 1. A found Sample SDI is updated with the values provided in the TISM page. If a Sample cannot be found then the system creates the specified new Sample SDI(s). The Sample identifiers provided in the TISM page are saved as aliases for the Sample SDIs. |
||
|
Any necessary associated SDIs, as specified in the TISM page, are created or updated and linked to the created or found Sample SDIs. This includes LV_Participant, LV_Subject, or LV_ParticipantEvent SDIs. Existing LV_SampleFamily SDIs are also updated with data from the TISM page. These were created as part of Step 1 or Step 2.a when the Sample SDIs were created. |
||
|
Sample storage status is updated to "Received". |
||
|
User selects and completes an appropriate Sample Collection Form and submits it for processing: |
||
|
When the Form is processed, each entered Sample identifier is matched against the previously created Sample Ids or Sample aliases to find the appropriate Sample SDIs. The Sample SDIs and any associated SDIs are updated based on information provided in the completed Form. |
||
|
Sample is submitted for approval. |
||
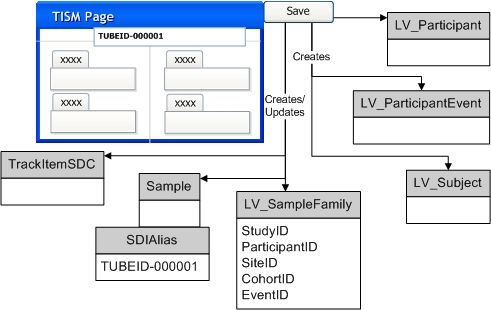
Use Case 3: Sample receipt only (no Form processing) |
|
|
|
Optional Step: User allocates new Sample SDI(s) from the Allocated Sample List page or the Pack Expected Package page. If an External Id is provided this is saved as an alias for the specified Sample SDI. |
||
|
Physical Sample is received and processed via the TISM page. As each Sample identifier is scanned or entered, information for the Sample can be entered by the user: |
||
|
System searches for the Sample SDI(s) specified in the TISM page. For this search to be successful, the data from the TISM page must use the LabVantage Sample Id assigned to the Sample in Step 1, or the External Id provided in Step 1. When the External Id is used for the search, the External Id Type specified in Step 1 must be "External" and the Study Site must also be provided in Step 1. A found Sample SDI is updated with the values provided in the TISM page. If a Sample cannot be found then the system creates the specified new Sample SDI(s). The Sample identifiers provided in the TISM page are saved as aliases for the Sample SDIs. |
||
|
Any necessary associated SDIs, as specified in the TISM page, are created or updated and linked to the created or found Sample SDIs. This includes LV_SampleFamily, LV_Participant, LV_Subject, or LV_ParticipantEvent SDIs. Existing LV_SampleFamily SDIs are also updated with data from the TISM page. These were created as part of Step 1 when the Sample SDIs were created. |
||
|
Sample storage status is updated to "Received". |
||
Use Case 4: Using BioBanking Data Entry pages (no Form processing) |
|
|
|

|
|
Optional Step: User allocates new Sample SDI(s) from the Allocated Sample List page or the Pack Expected Package page. If an External Id is provided this is saved as an alias for the specified Sample SDI. |
||
|
Physical Sample is received and processed via the TISM page. As each Sample identifier is scanned or entered, information for the Sample can be entered by the user: |
||
|
System searches for the Sample SDI(s) specified in the TISM page. For this search to be successful, the data from the TISM page must use the LabVantage Sample Id assigned to the Sample in Step 1, or the External Id provided in Step 1. When the External Id is used for the search, the External Id Type specified in Step 1 must be "External" and the Study Site must also be provided in Step 1. A found Sample SDI is updated with the values provided in the TISM page. If a Sample cannot be found then the system creates the specified new Sample SDI(s). The Sample identifiers provided in the TISM page are saved as aliases for the Sample SDIs. |
||
|
Any necessary associated SDIs, as specified in the TISM page, are created or updated and linked to the created or found Sample SDIs. This includes LV_SampleFamily, LV_Participant, LV_Subject, or LV_ParticipantEvent SDIs. Existing LV_SampleFamily SDIs are also updated with data from the TISM page. These were created as part of Step 1 when the Sample SDIs were created. |
||
|
Sample storage status is updated to "Received". |
||
|
Open BioBanking Data Entry page for selected Samples: |
||
|
Enter or update necessary Sample attributes. Save data. |
||
|
Submit selected Samples for approval. |
||
Sample Collection Forms |
|
|
Online Forms to be used for Sample collection can be accessed from the eForm Manager at Lab Admin → eForms → eForm Manager. From here a Sample Collection Form can be selected:
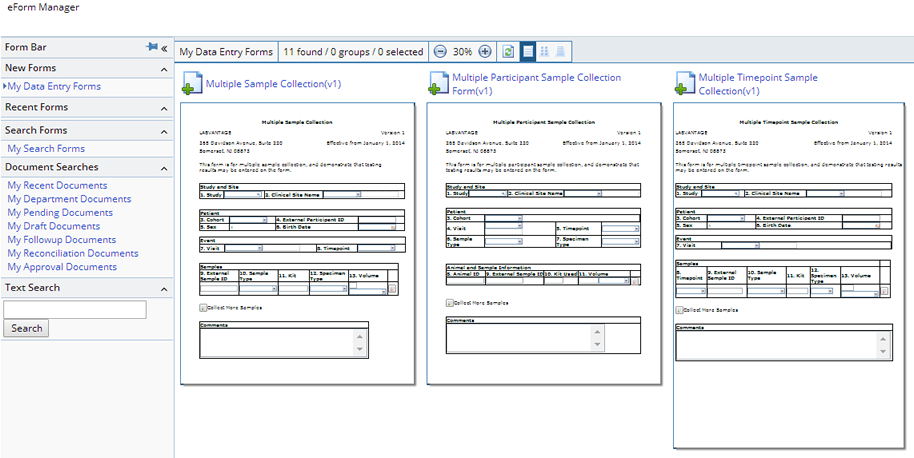
Various types of Sample Collection Forms can be defined for different circumstances or they can be specifically designed for particular Studies and/or Protocols. Some examples are, single Sample collection - "Sample Collection v(1)", multiple Sample collection - "Multiple Sample Collection v(1)", multiple Sample collection for multiple Participants - "Multiple Participant Sample Collection Form v(1)", or multiple Sample collection for multiple Timepoints - "Multiple Timepoint Sample Collection v(1)".
When a new Form is loaded it can be completed and upon submission a new Document is created and processed. The defined processing for the Sample Collection Form is according to the appropriate Use Case described above:

Depending on the Form definition it may require review and approval before it is processed. See Documents management page.