Overview
| Top |
|
BioBanking Sample Operations |
Content |
||||||||||||||||||||||
|
Overview |
|
|
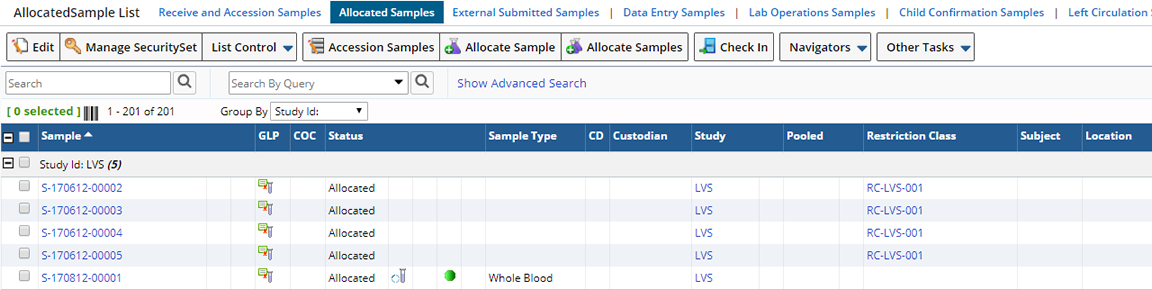
Sample functionality is distributed across multiple Sample List pages, based on the state of the Samples as described below. Access the Sample Management List pages by navigating to LIMS → Sample Management.
Sample List Page Column Descriptions |
| Column | Description | ||||||||||
| Sample | System generated Sample identifier. Hyperlinked to the Sample View page. | ||||||||||
| GLP |
 Icon to show
whether handling of the Sample has maintained Good Laboratory
Practices (GLP) procedures. Icon to show
whether handling of the Sample has maintained Good Laboratory
Practices (GLP) procedures. |
||||||||||
| COC |
 Icon to show
whether the Sample has any Chain of Custody (COC) restrictions.
Hyperlinked to the relevant Restriction Class View page. Icon to show
whether the Sample has any Chain of Custody (COC) restrictions.
Hyperlinked to the relevant Restriction Class View page. |
||||||||||
| Status | The Storage Status of the Sample. |
||||||||||
| Tests | Icons to show the current status
of any Tests applied to the Sample. No icon represents no Tests have
been applied to the Sample.
|
||||||||||
| Documents | Icons to show the current status
of any Documents associated with the Sample. No icon represents no
Documents have
been added to the Sample.
|
||||||||||
| Disposition | The disposition of the Sample when
it is in the "Disposed" state. |
||||||||||
| Sample Type | The specific type of Sample. For example, Blood, DNA, RNA, etc. | ||||||||||
| Parent | The identifier of the Sample's parent, if applicable. | ||||||||||
| CD | The Custodial Department of the Sample. | ||||||||||
| Custodian | The Custodian of the Sample when the Sample is not in storage. | ||||||||||
| Study | The specific Study of which this Sample is part. Hyperlinked to the Study View page. | ||||||||||
| Study Mismatch |
|
||||||||||
| Pooled |
 Icon to show
that this Sample was created by pooling one or more parent Samples. Icon to show
that this Sample was created by pooling one or more parent Samples. |
||||||||||
| Data Restriction |
 Icon to
show whether the Sample has any Data Restrictions (DR). Hyperlinked to
the relevant Restriction Class View page. Icon to
show whether the Sample has any Data Restrictions (DR). Hyperlinked to
the relevant Restriction Class View page. |
||||||||||
| Conditional Approval |
 Icon
to show that this Sample has only been conditionally approved and
is still waiting for full approval. Icon
to show that this Sample has only been conditionally approved and
is still waiting for full approval. |
||||||||||
| Restriction Class | The Restriction Class of the Sample. Hyperlinked to the relevant Restriction Class View page. | ||||||||||
| Subject Id | The Subject assigned to the Sample. Hyperlinked to the Subject View page. | ||||||||||
| Location | The Location of the Sample in storage or in a package. | ||||||||||
| Genealogy Viewer | Icons to show the genealogy of the Sample. See Child
Samples for information about Splitting or Pooling Samples.
|
Operations Available on the Sample List Pages |
Here is a brief summary of operations performed on Biobanking Samples. These operations are available on some or all of the Sample Management List pages (as a toolbar button or by dropping down the Other Tasks menu). The remaining sections describe each in detail.
Basic Operations |
| Operation | Description |
| Allocate Samples | Reserve a "virtual" Sample in the system for a Sample that has not yet arrived in the lab, but is expected in the future. |
| Edit | Modify Sample columns as permitted.
"View" offers read-only information about the Sample and its associated details. |
| Move to In Lab Status | Sample receipt process used by a laboratory that receives Samples, but the laboratory is not defined as a Repository. |
| Submit Sample | Process by which personnel external to your lab create Samples in your database (for processing by your laboratory). |
| Change Sample Study | Change the Study on an existing Sample that has already either been Allocated or Received. |
| Add Auxiliary Study | Add an Auxiliary Study. Allows you to run additional tests on a BioBanking Sample under a different Study. |
Accessioning Operations |
| Operation | Description |
| Accessioning Data Entry | Modify the attributes of a Sample (as part of the Accessioning process). |
| Perform Additional Verification | Requirement of some Studies, where an additional party must verify or authorize a Sample prior to its release to circulation. |
| Verification Complete | Verification or authorization has been completed for Sample to be released to circulation. Requirement of some Studies, where an additional party must verify or authorize a Sample prior to its release to circulation. |
| Approve | Approve Sample data and change Sample status to "In Circulation". |
| Conditional Approve | Approves Samples (putting them into circulation) for future approval (through use of the "Approve" operation above). |
Laboratory Operations |
| Operation | Description |
| Add Treatment | Add Treatments (defined in the Controlled Vocabulary) to a Sample. |
| Apply Child Sample Plan | Apply a Child Sample Plan to a Sample. |
| Assign Storage | Assign a temporary storage location to a Sample. |
| Check In | Put Samples into a storage location. |
| Take Custody | Take Custody of Samples. |
| Transfer | Transfer Samples to a different Custodial Department. |
| Ship | Create a Package for shipment to an internal or external Shipping Location. |
| Create Aliquot | Create an aliquot of a Sample. |
| Create Derivative | Create a derivative of a Sample. |
| Pool Sample | Create a new Sample by combining multiple Samples into one. |
| Accessioning Data Entry | Modify the attributes of a Sample (as part of the daily data entry process). |
| Add Services | Add new Services to the Sample. |
| Manage Services | Add or remove Services. |
| Load Into Plate | Loads selected Samples to an Array. |
| Results Data Entry | Entering the Test results for a Sample. |
| Results Data Approval | Entering the approvals for Test results for a Sample. |
| Record Deviation | Record negative conditions for a Sample via the Lab Investigations module. |
| Record Discrepancy | Record negative conditions for a Sample. |
| Record Procedure | Record a procedure against a Sample. |
| Remove from Storage | Remove a Sample from a temporary storage location. |
Miscellaneous Operations |
| Operation | Description |
| 3rd Party Transfer | Transfer of a Sample beyond the control of the laboratory. |
| Add Comment | Record ledger comments on a Sample. |
| Archive | Process of moving a Sample to a permanent storage location for an indefinite period of time. |
| Confirm | Confirm aliquots, derivatives or pooled Samples. |
| Dispose | Record the "final state" of a Sample. |
| Make Available | Returns a Sample back to "In Circulation" status. |
| Manage Documents | Allows the management of Documents associated with a Sample. |
| Print Labels | Print one or more Labels for the selected Samples. |
| Remove Disposition | Reverses the Dispose operation. |
| Remove GLP | Clears the GLP status for a Sample. |
| Fix Sample Data | Lets you make changes to Accessioned Sample Data. |
Basic Operations |
|
|
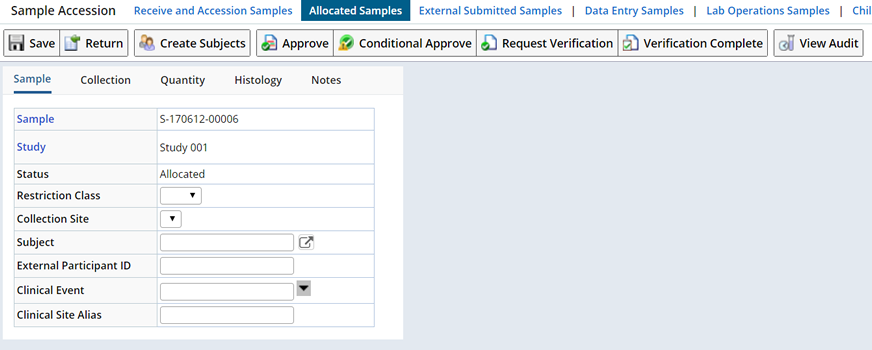
Allocate Samples |
Description |
This is an "Ad Hoc" Sample Allocation process, which creates a unique identifier for each Sample.
Allocated Samples do not represent existing Samples until they are received.
From the Allocated Samples List page, click "Allocate Sample".
In a new window, you are asked to define the number of different Samples you would like to create (Copies). The "Add Multiple Samples" button adds a corresponding number of rows to the Sample Allocation page. Define the Samples you want to Allocate and click "Allocate Samples".
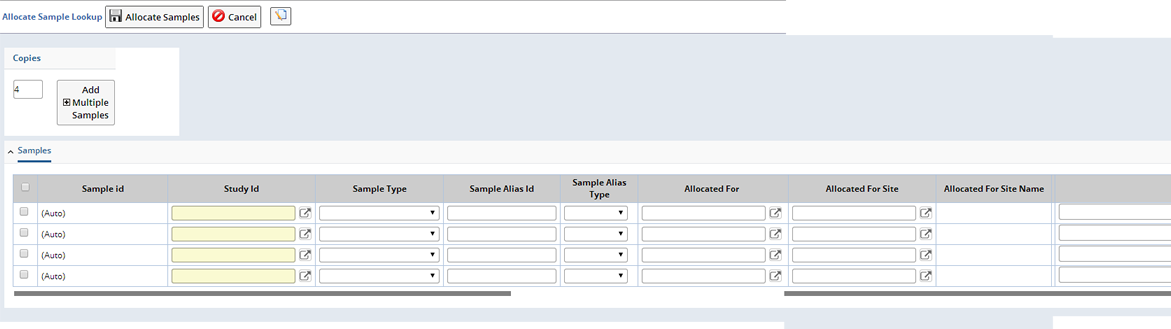
| Column | Description |
| Sample ID | System generated identifier. This value is not modifiable by the user and is assigned after the page is saved. |
| Study ID | The specific Study of which this Sample is part. |
| Sample Type | The specific type of Sample. For example, Blood, DNA, RNA, etc. There is a lookup of all active SampleTypes. |
| Sample Alias Id Sample Alias Type | Id of any Sample Aliases. Type of Sample Alias. |
| Allocated For | Used to specify for whom this Sample is allocated. There is a lookup that shows both internal and external contacts. |
| Allocated For Site | Used to specify the shipping location for which the Sample is allocated. This is a lookup of shipping locations. Upon returning from the lookup, the name of the site is shown in the "Allocated for Site Name" field. |
| Notes | Any additional annotations about this Sample. Up to 2000 characters may be specified. |
After creation of the Samples, you are forwarded to an Allocated Samples List page containing the newly created Samples.
The "Allocate Samples" button allows you to add multiple, identical Samples at once.

The "Batch Allocate Sample" operation allows allocation of 200 to 300 Samples in one operation.
This page includes the columns Study Id, Allocated For, Allocated Site, Sample Type, and Number of Copies.
As with Ad Hoc Sample Allocation, control returns to the Allocated Samples List page.
Required Roles |
User must have the Role "Staging Lab User", "Repository User", or "Data Manager".
Validation |
None.
Results |
| • | Sample is created. |
| • | Sample ID is assigned. |
| • | Sample status is set to "Allocated". |
Edit |
Description |
Editing is done in the Sample Maintenance page.
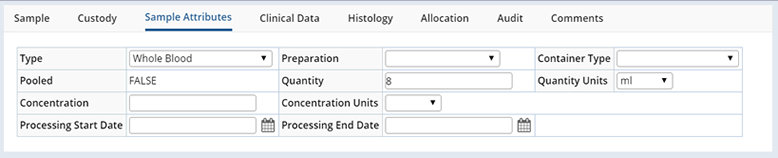
These are several of the tabs, from the Sample Maintenance pages, displaying fields from both the Sample and SampleFamily records:

Validation |
Sample status must not be "3rd Party Transfer".
Results |
| Changes are committed to the Sample record. |
Sample Details |
The Maintenance page contains a number of detail tabs to maintain the following details of the Sample:
| Detail | Purpose |
| Services | Lists the Services associated with this Sample. Services are added to a Sample at the Study, Protocol and Sample levels. If, when Services were added, Sample Creation was deferred (Apply unchecked) you can manually Apply the Services here to create any Samples and Child Samples needed to perform the Service.
|
| Auxiliary Studies | Displays the Auxiliary Studies with which this Sample is associated.
|
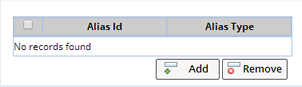
| Aliases | View and maintain Aliases
assigned to the Sample (these include External Ids). Aliases are used
when searching for Samples using the Alias Search feature.
|
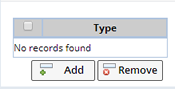
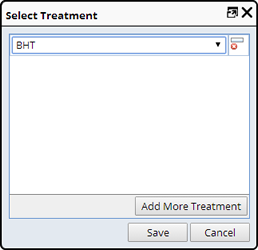
| Treatments | View and maintain Treatments
assigned to the Sample.
When you click "Add" you will see a list of Treatments with the same Sample Type as the Sample.
Treatments can only be added to Samples with the same Sample Type.
|
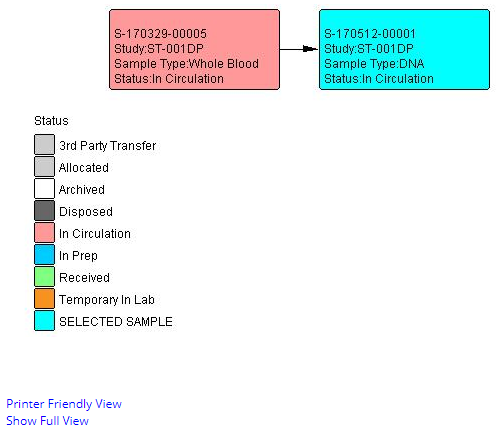
| Genealogy | View the Sample's Genealogy.
|
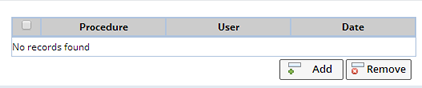
| Procedures | View and maintain Procedures
assigned to the Sample.
|
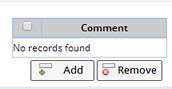
| Comments | View and maintain Comments
assigned to the Sample.
|
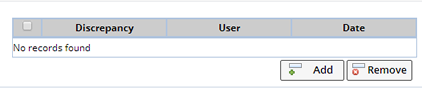
| Discrepancy | View and maintain Discrepancies
assigned to the Sample.
|
| Sample Family | Shows information about Samples in the Sample Family. This is presented in a hierarchy, showing both descendant and ancestor Samples.
|
| Attributes | The Attributes detail lets you add/remove Attributes to/from the Sample. See Attributes → Adding Attributes Directly to SDIs. |
| Parent Samples |
Shows information about the Sample's Parent.
|
| Child Samples | Shows information about the Sample's Children.
|
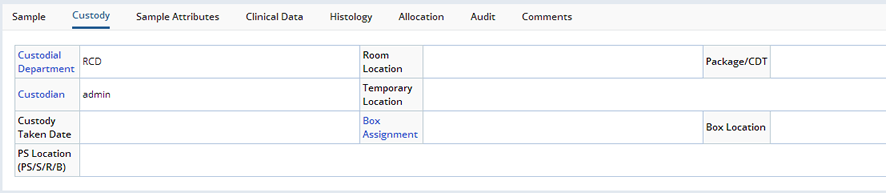
| Custody History | Shows the Check In and Check Out history of the Sample.
|
Toolbar |

A toolbar is at the top of Maintenance Pages. Following is a discussion of major tools on the bar.
| Manage Security Set |
SDI Security lets you grant a set of Users, Job Types (Users assigned the Roles and SDC Access for the Job Type), or Departments (Users in the Department) permission to perform a set of SDC Operations on selected SDIs. Manage SecuritySet lets you define a new SecuritySet or choose an existing SecuritySet. See Concepts of LabVantage Security → SDI Security for details about defining Security Sets.
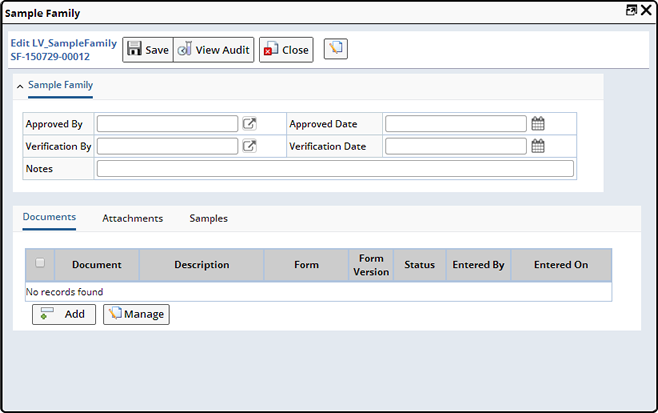
| Sample Family |
This opens a Maintenance page to edit Sample Family-related fields, manage the Documents for the Sample Family and view the Samples contained in the Sample Family.
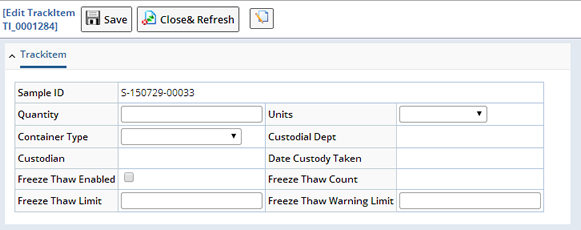
| Edit Trackitem |
This opens a Maintenance page to edit Trackable Item-related fields. This is used to modify the current quantity or change the Container. Freeze-Thaw attributes for the Sample can also be modified:
Move to In Lab Status (Other Tasks) |
Description |
Exceptions to the general Sample receipt process can occur when a laboratory receiving Samples is not defined as a Repository. Some laboratories will have the ability to confirm a Sample's existence at the facility and perform a limited set of operations on that Sample prior to sending it to a Repository.
Users are prompted to select a Custodial Department to which these Samples are assigned for the "Temporary In Lab" status. The list of Custodial Departments is limited to Custodial Departments to which the user is assigned, and Custodial Departments with the "Temporary In Lab Status" flag is set.
You can manage Samples with a status of "Temporary In Lab" into storage locations. If you want to transfer these items, the destination must be a Custodial Department with the Repository flag set.
Required Roles |
User must have the Role "Staging Lab User".
Validation |
| • | Sample status must be "Allocated". |
| • | User must be a member of a Custodial Department that has "Allow Temporary In Lab" status set. |
Results |
| • | Sample status is set to "Temporary In Lab". |
| • | Sample's Custodial Department is set to the selected Custodial Department. |
| • | Sample's GLP setting is cleared if the Custodial Department is not GLP. |
Submit Sample |
Description |
External facilities occasionally submit Samples to the laboratory. Typically, Samples are submitted to leverage the high throughput capabilities of molecular technologies. In this case, the submitting personnel must register their Samples in BioBanking with a set of basic information. Samples that are registered by an external facility have a status of "Allocated".
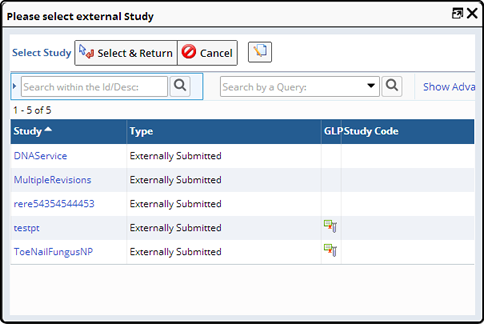
| a. | From the External Sample List page ("Submit" button),
an External Study lookup page lets the user choose a Study. Only
Studies of type "Externally Submitted" are shown:
|
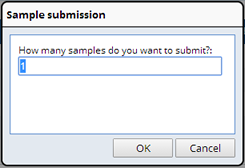
| b. | After choosing a Study by clicking its hyperlink, you
are prompted for the number of Samples you want to submit:
|
| c. | Enter the number and click OK. You are then directed to the Accessioning Data Entry page, in which you specify information about these Samples. |
This process is similar to the Sample Allocation process. However, you must enter more information about the Sample being submitted.
Studies that are created for the purpose of "External Submission" (type of "Externally Submitted") must have the following attributes set:
| • | Study must not be a Protocol driven study. |
| • | "Require Link to Subject" property must be "No". |
| • | "Require Sample Collection Information" property must be "No". |
| • | The Study must not have any Sites assigned. |
| • | No clinical events for the Study can be specified. |
This will permit full approval of the Sample with limited accessioning data entry required by the Repository receiving the Samples.
Required Roles |
User must have Role "Sample Submitter", "Staging Lab User", or "Data Manager".
Validation |
None.
Results |
| • | Sample is created. |
| • | Sample ID is assigned. |
| • | Sample status is set to "Allocated". |
Change Sample Study |
Description |
Should you need to change the Study on an existing Sample (after the Sample has been Allocated or Received) you can do so using the Change Sample Study operation in the Sidebar. This operation is available on the following List pages:
| • | Allocated Samples |
| • | Data Entry Samples |
| • | Lab Operations Samples |
| • | Admin Samples |
To change the Study on a Sample(s), select one or more samples from the list page and click "Change Sample Study" in the Sidebar.
LabVantage performs the following validations:
If all criteria is met a Study lookup page opens where you can select the new Study for the Sample(s). Enter the demographic data for the Sample based on the new Study. |
Required Roles |
None.
Results |
Sample Study is changed.
Add Auxiliary Study |
Description |
Auxiliary Studies allow you to run additional Tests on a BioBanking Sample under a different Study. The Study under which the Sample is Collected and Accessioned is the Primary Study, any other additional Studies become the Auxiliary Study. A sample can only have one Primary Study but can have multiple Auxiliary Studies.
The Add Auxiliary Study operation can be performed from the following List pages:
| • | Data Entry Samples |
| • | Lab Operations Sample List Page |
| • | Admin Sample List Page |
To add an Auxiliary study, select one or more Samples and click "Add Auxiliary Study" (More tasks, Other Tasks). The following window opens displaying the selected sample(s).
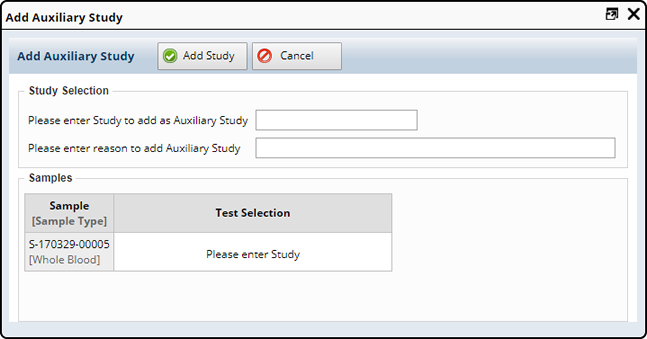
Enter the Auxiliary Study you want to add to the selected samples and include a reason.
| NOTE: | The Study field is a dynamic lookup, as you begin to type the Study Id available Studies will display. |
LabVantage checks that the Study is not already a Primary or Auxiliary Study on any of the Samples.
If the new Study has Tests defined LabVantage displays those tests for each sample based on Sample Type and the Study Test definition.
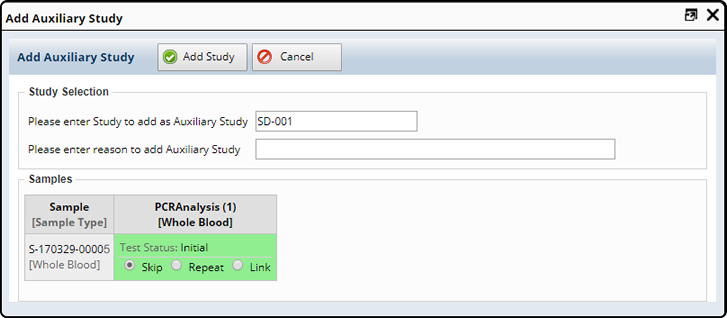
If the Sample already has a test defined, the status of the Test is shown and the following options are given:
| Option | Description |
| Skip | Does not do anything. The test will not be ordered. (Default) |
| Repeat | Order the test to be tested again. |
| Link | Order the tests but do not test again and link to the existing results. |
If Tests are not defined on the Sample the following options are given:
| Option | Description |
| Skip | Does not do anything. The test will not be ordered. (Default) |
| Add | Order the Test. |
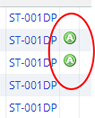
Once you have determined which Testing should be done for the new Study enter a reason and click "Add Study". The study is added as an Auxiliary Study on the Samples, any Tests are ordered and the Sample List is refreshed. The list page now shows an icon to indicate that the samples have an Auxiliary Study.
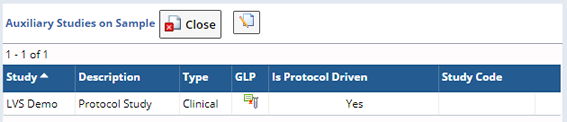
Clicking the icon displays a dialog that details the Auxiliary Study.
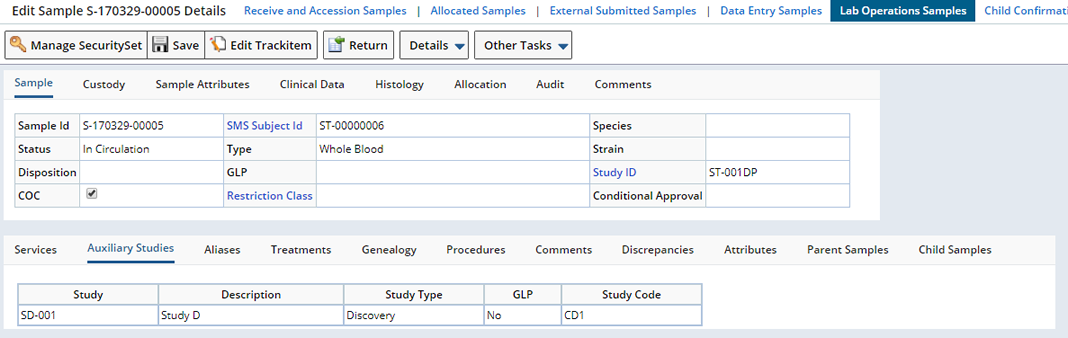
The Sample Maintenance page displays any Auxiliary Studies for the Sample in the Auxiliary Studies tab.
LabVantage performs the following validations:
|
Required Roles |
None.
Results |
Study is added to Sample(s).
Accessioning Operations |
|
|
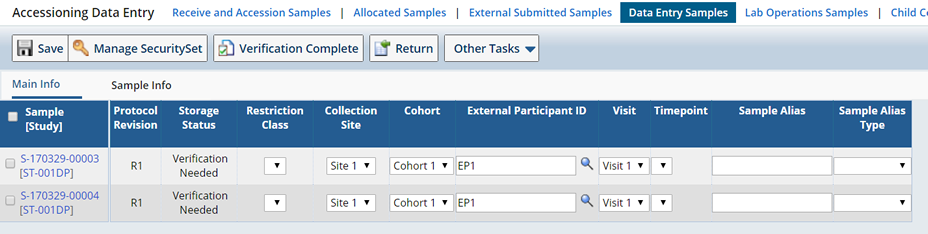
Accessioning Data Entry |
Description |
Typically Samples are Received and Accessioned using the Receive and Accession Samples task. Accessioning Data Entry allows Data Managers to enter data for a Sample that was not Accessioned at the time of receipt or requires editing. Changes made during the Accessioning Data Entry process, as well as subsequent editing, require users to provide a reason for change.
From a Sample List page, users search for Samples requiring Accessioning Data Entry. They can then choose all (or a subset of) the Samples and click the "Accessioning Data Entry" button. This directs the user to the Accessioning Data Entry page.
Required Roles |
| • | Users having the Role "Data Manager" can perform this operation on Samples with any status except "Allocated". |
| • | If a user has both the "Allocation Editor" and "Data Manager" Roles, the user can perform this operation on Samples with a status of "Allocated". |
Validation |
Samples status can not be "Disposed".
Results |
Sample attributes are set or changed.
Perform Additional Verification and Verification Complete |
Description |
Some Studies require that another party perform additional verification or authorization on a Sample prior to its release to circulation. In some cases, Samples may also travel to a separate group or entity to verify or enter additional information about the Sample.
To require additional verification for a Sample navigate to the Accession Samples page (the "Accession Samples" button is available on most Sample list pages).
Click the "Request Verification" button. The Sample status becomes "Verification Needed" and the Sample moves to the Data Entry list page where you (or others) can "Perform Additional Verification".
Samples that have a status of "Verification Needed" must undergo this verification step before the Sample can be released to inventory, and its status changed to "In Circulation".
| NOTE: | If using Restriction Classes the "Verification Required" field in the Restriction Class lets you require verification of created Samples (for Studies on which this Restriction Class is referenced). Samples will have a status of "Verification Needed". |
From the Data Entry List page, select a set of Samples having "Verification Needed" status. Click Lifecycle → Perform Additional Verification to review the Sample data to be verified. For the selected Samples, the user must be either the Data Manager and/or have the role assigned to the "Verification Role" field for the Study attributes of the selected Samples, or (when using Restriction Classes) the user assigned to the "Verification By" field for the Study attribute of the selected Samples.
From the Lifecycle menu, upon clicking "Perform Additional Verification", you are taken to the Accessioning Data Entry page as described in the Accessioning Data Entry section. You can view and modify the data:
The page contains two relevant operations:
"Save" saves edits to the data.
"Verification Complete" completes the verification process, the status changes to "In Circulation".
Required Roles |
User must have Role "Data Manager", or the Role assigned to the "Verification Role" field for the Study attribute of the selected Samples, or be the user assigned to the "Verification By" field for the Study attribute of the selected Samples, to perform verification.
Validation |
These validation requirements must be met when verifying Samples:
| • | Sample status must be "Verification Needed" |
| • | If a user has both the "Allocation Editor" and "Data Manager" Roles, the user can perform this operation on Samples with a status of "Allocated". |
Results |
Sample status changes from "Verification Needed" to "In Circulation". No changes are made to the conditional approval status.
Approve and Conditional Approve |
Descriptions |
These operations are accessible from the Data Entry Sample List, Accessioning Data Entry Grid and Accessioning Data Entry Form pages (see Accessioning Data Entry).
The "Approve" operation changes Sample status to "In Circulation" after the system verifies that all information entered for the Sample has met the approval requirements defined in the Sample's Study.
The "Conditional Approve" operation approves Samples (putting them into circulation) for the user with the Conditional Approval flag set, thereby allowing full approval (through use of the "Approve" operation) when all required information has been supplied.
Required Roles |
User must have the Role "Data Manager".
Validation |
All required information must be entered for the Samples being approved (see Accessioning Data Entry).
Results |
For both "Conditional Approve" and "Approve", if all required information has been entered for the Samples, the storage status changes to "In Circulation".
If validation fails, a page appears with specific violations found (see Accessioning Data Entry).
Laboratory Operations |
|
|
Add Treatment |
Description |
This adds Treatments to a Sample, either independently or after preparation/derivation. Treatments that can be applied after derivation also depend on the Sample's Sample Type. Treatments can only be added to Samples with the same Sample Type.
This is done from a Sample List Page ("Add Treatment"):
Required Roles |
User must have Role "Admin User".
Validation |
| • | User must be the Custodian of the Sample. |
| • | User must belong to the Sample's Custodial Department. |
| • | Sample status must not be "Allocated" (Sample must be a real Sample). |
| • | Samples must not be in temporary storage or in a Package. |
| • | All Samples must be of the same Sample Type. |
Results |
| • | Treatment is recorded with the Sample. |
| • | Concatenation of all Treatments is recorded with the Sample. |
Apply Child Sample Plan |
Description |
Define a plan that creates Aliquots and Derivatives from new or existing Samples. See Child Sample Plans for information.
Required Roles |
None.
Validation |
Results |
Child Sample Plan is added.
Assign Storage |
Description |
This places items in temporary storage locations while they are being used or awaiting a function (such as unpacking or shipping).
You can place these items in temporary storage:
| • | Samples |
| • | Plates |
| • | Boxes |
| • | Packages |
On the relevant List page (Sample, Plate, Box, or Package), operations exist for assigning items to temporary storage. Using the standard search capabilities of List pages, search for Samples to place into temporary storage. By selecting all or a subset, you can click the appropriate operation to assign storage.
During assignment of storage, all previous temporary storage locations are cleared.
Required Roles |
| • | User must have Role "Lab User" or "Repository User" to assign storage. |
| • | The Role "Package Receiver" can also assign storage for a Package. |
Validation |
User must be the Custodian of the item for which storage is assigned.
Results |
| • | Item is stored in temporary location. |
| • | Assignment to temporary location does not relinquish custody of the item. |
Check In |
Description |
Check In returns Samples from a user's custody (you must be a member of the Sample's Custodial Department) back to the storage system.
From a Sample List page, query Samples to check in. Select the Samples and click "Check In". The File Samples page displays.
Required Roles |
User must have the Role "Lab User" or "Repository User".
Validation |
| • | In general, Sample status must not be "Allocated" or "Disposed". However, Sample status can be "Allocated" if the user has the "Repository User" Role. |
| • | Sample must not be in a Box. |
| • | Sample must not be in a Package. |
| • | Either the Sample must be Confirmed, or the Study must have an Active Restriction Class. |
Results |
User is forwarded to the File Sample(s) (TISM) page to choose a location in the storage system.
Take Custody |
Description |
Take Custody lets Users take (or force) custody of a Sample.
From the Sample List page, select the Samples you need to Take Custody of and click "Take Custody". The Take Custody Dialog displays.
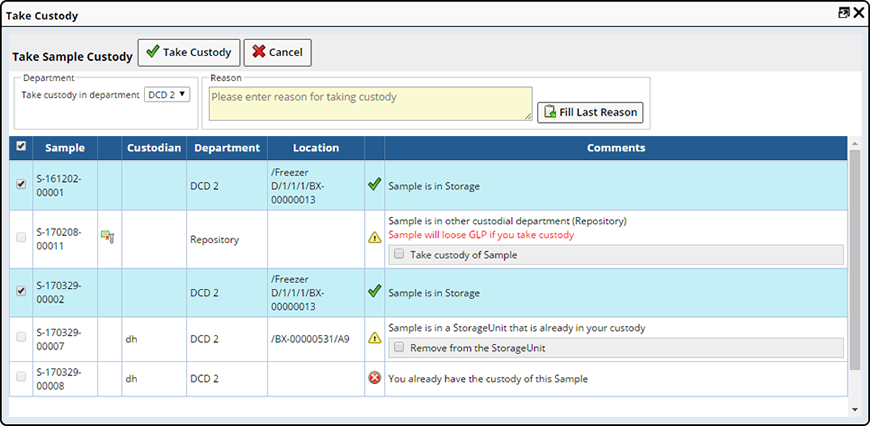
See Move Samples → Take Custody for more information.
Required Roles |
User must have the Role "Lab User" or "Repository User".
Validation |
| • | Sample must not be in a Package. |
| • | Sample status must be "In Circulation" or "Temporary In Lab". |
Results |
| • | User becomes the Custodian of the Sample. |
Transfer |
Description |
Custodial Department Transfer lets you move Samples between internal departments that are in close proximity and do not require shipping.
From the Sample List page, select the Samples you need to transfer and click "Transfer". The Transfer Dialog displays.
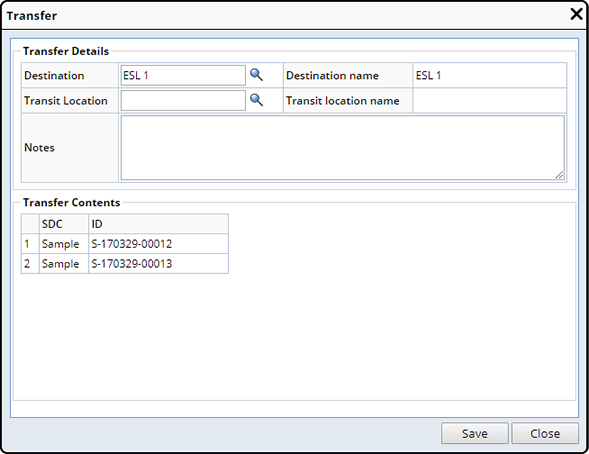
See Move Samples → Transfer for more information.
Required Roles |
User must have the Role "Lab User" or "Repository User".
Validation |
| • | Sample must not be in a Package. |
| • | Sample status must be "In Circulation" or "Temporary In Lab". |
Results |
| • | User becomes the Custodian of the Sample. |
Ship |
Use "Ship" when you need to Ship Samples to an internal or external Shipping Location (an actual shipment is created and the Samples are transported to the internal or external location). Select the Samples you want to ship and click "Ship".
The "Add Package" dialog displays.
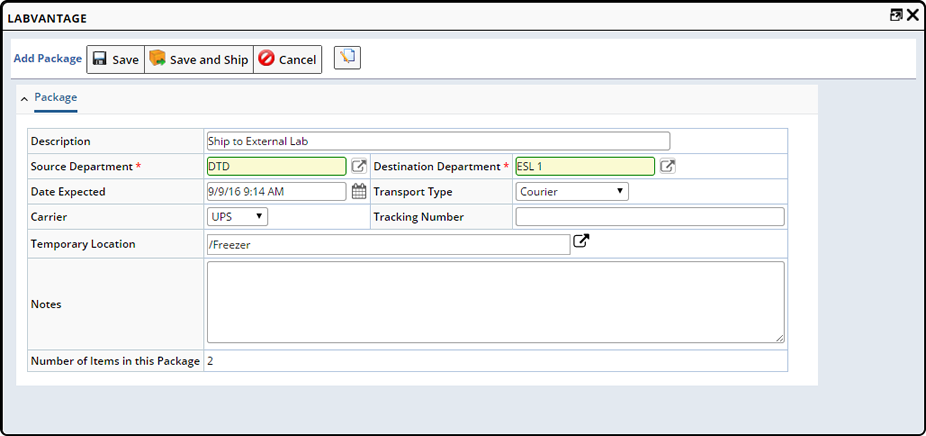
See Move Samples → Ship for more information.
Required Roles |
User must have the Role "Lab User" or "Repository User".
Validation |
| • | Sample must be in User's custody. |
| • | Sample status must be "In Circulation" or "Temporary In Lab". |
Results |
| • | A Package is created containing the selected Samples. |
Create Aliquot |
Description |
From a Sample List page, create Sample Aliquots by selecting the desired parent Sample(s) and clicking "Create Aliquot". This opens the Aliquot page:
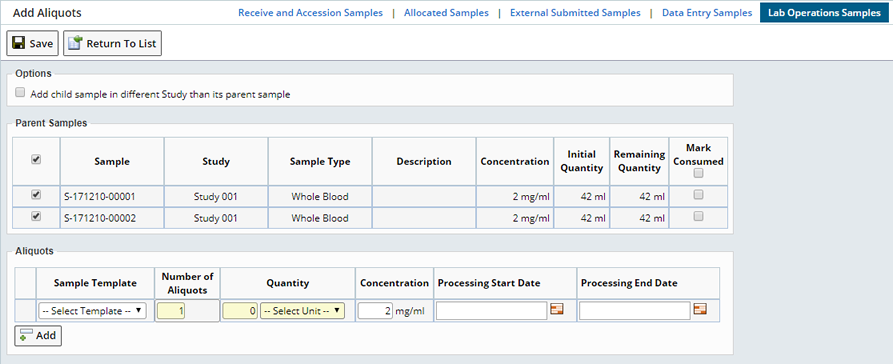
This information is shown for the parent Samples:
| Column | Description |
| Concentration | The concentration of each parent Sample. This will be copied to the concentration of the child Samples. |
| Initial Quantity | The numeric amount for the quantity of the parent Samples before aliquoting. This may be either volume or mass. |
| Remaining Quantity | The numeric amount of the quantity of the parent Samples after aliquoting. This may be either volume or mass. This value is updated dynamically as the details of the aliquots to create are provided by the user. |
| Mark Consumed | If the aliquoting will completely deplete the parent Sample, then this box should be checked. The parent Samples quantity will be set to zero and its status set to "Disposed". |
Enter the following information for the aliquots. Aliquots using different templates can be created by clicking the "Add" button to add rows to the Aliquots tab:
| Column | Description |
| Sample Template | This is optional. You can choose a Sample Template. Based on the previous setup, the Template can be used to preset any additional fields. |
| Number of Aliquots | Numeric field that lets you enter the number of child Samples to create from each of the selected parent Samples. If a parent Sample is not selected in the Parent Samples tab then no aliquots are created for that Sample. |
| Quantity
Unit | Numeric field that lets you enter the volume or mass of
the child Samples.
Units to use for the Quantity field. If this is different from the parent Samples quantity units then automatic unit conversion is performed to calculate the remaining quantity for the parent Samples. The same Unit is used for all child Samples. |
| Concentration | The concentration of Child Sample. |
| Processing Start Date | Record the date and time processing starts for the Aliquot Sample(s). |
| Processing End Date | Record the date and time processing starts for the Aliquot Sample(s). |
Optionally, choose to add Child Samples to a Study different from the Parent Sample. When enabled (the "Allow Selection" option in the Child Sample Study Selection property on the Multi Sample Child Page Type is checked), the Study lookup displays on the Child Sample Creation page. Choose the Study with which you want to associate the Child Sample.
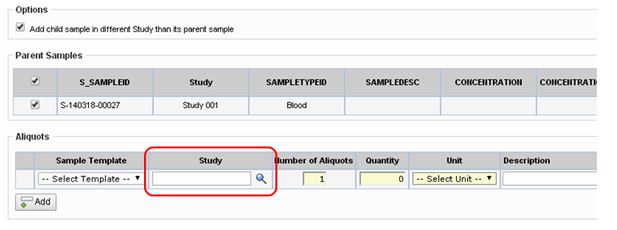
Child Samples associated with a different Study will have their own Sample Family with the new Study.
If no previous relationship exists between the Study and the Sample's Subject a new Participant record is created for the Child Sample. The Sample Family will reference the new ParticipantID, and the SubjectID as well as the Clinical Site and Clinical Event from the prior Sample Family. The Participant will have a status of "Associated", indicating that the Participant is not enrolled in the second Study only that their Sample is used in the second Study.
Associated Participants will have limited operations available and will not appear in Participant Lists during Enrollment.
The Sample status is set to "Received". Once the Child Samples are added, you are taken to the SMS Data Entry page (default) to enter Sample related data under the new Study.
Tests defined in the new Study, matching the Sample Type of the Child Sample, are also added to the Child Samples. Documents from the new Study that are to be added "on Allocation/Creation" are also added to the Child Samples.
If the Study is left blank the Child Sample is added with the Parent Sample's Study.
Required Roles |
User must have the Role "Lab User".
Validation |
| • | If Samples are GLP, the user must be the Custodian of the parent Samples. |
| • | If Samples are not GLP, the user must be in the Sample's Custodial Department. |
| • | Samples must have a status of "In Circulation" or "Temporary In Lab". |
| • | Samples must not be in a Package. |
| • | Samples must be Confirmed. |
Results |
| • | Child Samples are created. | ||||
| • | Child Samples are assigned status of "In Prep". | ||||
| • | Container Type, Current CD, Custodian, Prep Type, Sample Type ID and Study Id are copied from the Parent Sample. If Samples were added to a different Study the new Study ID is copied. The Child Sample Policy specifically determines which fields are copied. | ||||
| • | The volume of the parent Samples are decremented based
on the quantity of children and volume of each child created as follows:
|
After the new Samples are created, you are forwarded to the Child Confirmation Sample List page showing the new Samples. From this page, the "Confirm Samples" operation is available.
Add Derivatives |
Description |
From a Sample List page, create Sample Derivatives by selecting the desired parent Samples, all with the same Sample Type, and clicking "Create Derivative". This opens the Add Sample Derivatives page:
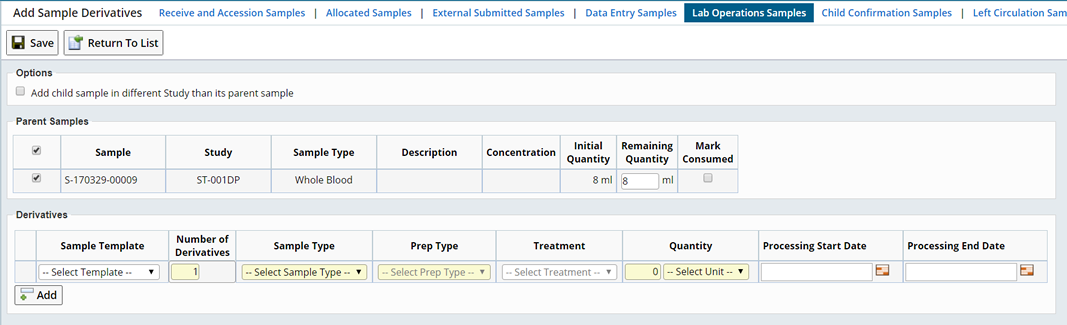
This information is shown for the parent Samples:
| Column | Description |
| Concentration | The concentration of each parent Sample. Note that the concentration is not copied to the child Samples. |
| Initial Quantity | The numeric amount for the quantity of the parent Samples before creating the derivatives. This may be either volume or mass. |
| Remaining Quantity | The numeric amount of the quantity of the parent Samples after creating the derivatives. This may be either volume or mass. This value is entered by the user. |
| Mark Consumed | If the derivatives will completely deplete the parent Sample, then this box should be checked. The parent Samples quantity will be set to zero and its status set to "Disposed". |
Enter the following information for the derivatives. Derivative Samples using different templates, or of different Sample Types, can be created by clicking the "Add" button to add rows to the Derivatives tab:
| Column | Description |
| Template | This is optional. You can choose a Sample Template. Based on the previous setup, the Template can be used to preset any additional fields. |
| Number of Derivatives | Numeric field that lets you enter the number of child derivative Samples to create from each of the selected parent Samples. If a parent Sample is not selected in the Parent Samples tab then no derivatives are created for that Sample. |
| Sample Type | List of Sample Types, filtered by the parent Sample Type as being valid derivatives, as defined in the Control Vocabulary mappings. |
| Prep Type | List of Preparation Methods, filtered by the chosen Sample Type and the parent's Sample Type, as defined in the Control Vocabulary mappings. |
| Treatment | List of Treatments, filtered by the chosen Prep Type, as defined in the Control Vocabulary mappings. This selection is optional. |
| Quantity
Unit | Numeric field that lets you enter the volume or mass of the child Samples. |
| Processing Start Date | Record the date and time processing starts for the Derivative Sample(s). |
| Processing End Date | Record the date and time processing ends for the Derivative Sample(s). |
Required Roles |
User must have the Role "Lab User".
Validation |
| • | If Samples are GLP, the user must be the Custodian of the parent Samples. |
| • | If Samples are not GLP, the user must be in the Sample's Custodial Department. |
| • | Samples must have a status of "In Circulation" or "Temporary In Lab". |
| • | Samples must not be in a Package. |
| • | Samples must be Confirmed. |
Results |
| • | Child Samples are created. |
| • | Child Samples are assigned status of "In Prep". |
| • | Container Type, Current CD, Custodian, Prep Type, Sample Type ID and Study Id are copied from the Parent Sample. If Samples were added to a different Study the new Study ID is copied. The Child Sample Policy specifically determines which fields are copied. |
| • | The volume of the parent Samples are decremented to the value provided in the "Remaining Quantity" field. If this field is left blank, the parent Sample quantities remain unchanged. It is not possible for the system to automatically decrement the parent Sample quantities as there is no direct correlation between the amount of the parent Sample used, and the amount of the child derivative Sample created. This is because to create derivative samples, the source samples undergo some processing and therefore the amount of the source sample used can be more or less of the resulting derivative sample. |
After the new Samples are created, you are forwarded to the Child Confirmation Sample List page showing the new Samples. From this page, the "Confirm Samples" operation is available.
Pool Sample |
Description |
Pooling is the act of combining multiple Samples into a single, composite Sample. Users can select any number of Samples of the same Sample Type and pool them together to create a new Sample.
From a Sample List page, choose the Samples to pool together, then click "Pool Samples". This opens the Create Pooled Samples page:
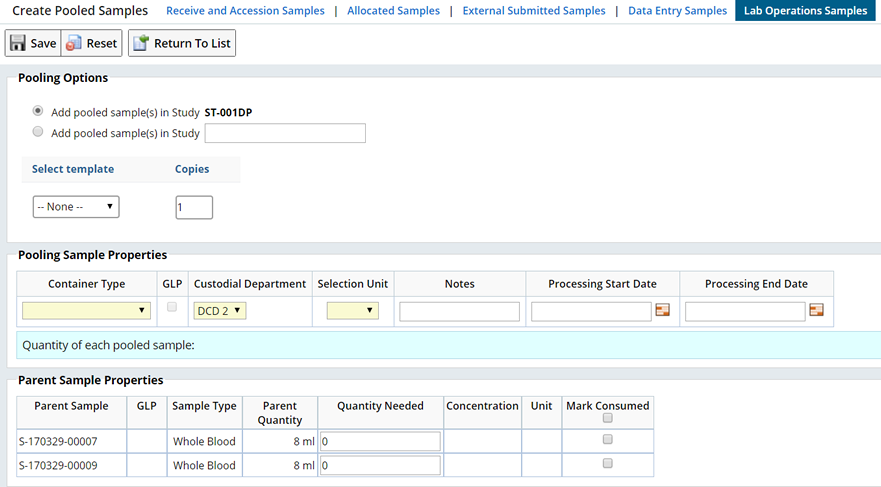
This information is shown for each parent Sample:
| Column | Description |
| Parent Sample | Sample identifier of the parent Sample. |
| Sample Type | Sample Type of the parent Sample. |
| Parent Quantity | The current amount available of the parent Sample. This may be either volume or mass. This amount is automatically decremented by specifying how much is to be used in the "Quantity Needed" column. |
| Quantity Needed | The numeric amount for the quantity of the parent Sample used for the creation of the pooled Sample. This may be either volume or mass, depending on the "Selection Unit" chosen. This is the amount decremented from the parent's current quantity. The child Sample quantity will be the sum of all the parent quantities used divided by the number of child Samples created. |
| Parent Conc. | The concentration of the parent Sample. This will be copied to the concentration of the child Samples. |
| Mark Consumed | If the pooling will completely deplete the parent Samples, then this box should be checked. The parent Samples quantity will be set to zero and its status set to "Disposed". |
Enter the following information:
| Column | Description |
| Study | Choose to add the new Sample in the current Study or add the Sample to a different Study. Begin typing the Study Id, a list of Studies becomes available. Options in the ChildSamplePolicy determine how Sample columns are copied from the Parent Samples to the new Child Sample. |
| Template | This is optional. You can choose a Sample Template. Based on the previous setup, the Template can be used to preset any additional fields. |
| Copies | Numeric field that lets you enter the number of pooled Samples to create. |
| Container Type | List of Container Types (from the ContainerType SDC) for the pooled Sample. This list is filtered through the ContainerMap SDC based on the unique parent Sample Type (which will become the child's Sample Type). |
| GLP | The GLP checkbox is displayed if the user's GLP flag is set. Checking "GLP" retains GLP status for both the parent and child Samples (where applicable). By default, this checkbox will be checked if all the parent Samples are GLP. If any one of the parent Samples is not GLP, the pooled Samples can not be GLP (GLP status = "N"), and the checkbox is deselected and disabled. |
| Custodial Department | List of Custodial Departments to which the user belongs. Defaults to the User's default Custodial Department. |
| Selection Unit | Volume or mass units for selecting the quantity of the child samples. |
| Notes | Text stored with the child Samples (in the Sample SDC). |
| Processing Start Date | Record the date and time processing starts for the Pooled Sample(s). |
| Processing End Date | Record the date and time processing ends for the Pooled Sample(s). |
Required Roles |
User must have the Role "Lab User".
Validation |
| • | User must be the Custodian of the Samples to be pooled. |
| • | Samples to be pooled must have a status of either "In Circulation" or "Temporary In Lab". |
| • | Samples to be pooled must not exist in a Package. |
| • | Samples to be pooled must be Confirmed. |
Results |
| • | Pooled child Samples are created. | ||
| • | Pooled Child Samples are assigned status of "In Prep". | ||
| • | Container Type, Current CD, Custodian, Prep Type, Sample Type ID and Study Id are copied from the Parent Sample. If Samples were added to a different Study the new Study ID is copied. The Child Sample Policy specifically determines which fields are copied. | ||
| • | The volume of the parent Sample is decremented based on
the quantity of children and volume of each child created as follows:
| ||
| • | Common Accessioning demographic data is copied to the Pooled Sample. When the same, common fields (such as, eventdef, Subject, Participant) are applied to the Pooled Sample Family. |
After the new Samples are
created, you are forwarded to the Child Confirmation Sample List page
showing the new Samples. From this page, the "Confirm
Samples" operation is available.
Accessioning Data Entry (Lab) |
Description |
From a Sample List page, this operation opens the Accession Samples page for daily data entry.
Required Roles |
User must have the Role "Lab Data Entry".
Validation |
Access is independent of Custodial Department or Sample Status.
Results |
Sample attributes are set or changed.
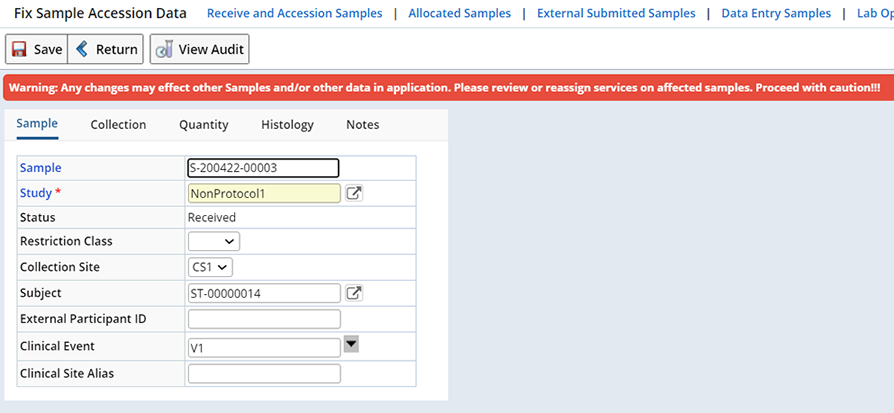
Fix Sample Data |
Description |
Available on the Sample Admin List page, opens the Fix Sample Accession Data page. This lets you correct any errors made during Accessioning.
A warning message is displayed to remind you that changes made here may have a significant impact on other data within the application.
| NOTE: | When changing Studies, Protocols, Protocol Revisions, Cohorts, and Visits or Timepoints, the system does not make changes to any Services associated with the modified Samples. |
The following example shows the Fix Sample Accession Data page:
 |
Required Roles |
User must have the Role "SMS Admin".
Validation |
Changes to the Participant's External Participant ID are validated against the Sample Family's External Participant ID. This in turn invokes the "Ambiguous Subject Rule" (Biobanking Policy).
Selected Samples must either belong to a Protocol Study or Non Protocol Study.
Results |
Accessioned Participant data can be changed.
An icon![]() is displayed on the various list pages to indicate a Study/Participant mismatch has been created.
is displayed on the various list pages to indicate a Study/Participant mismatch has been created.
Add Services |
Description |
This adds and applies Services to a Sample(s). This allows Laboratory testing results to be recorded against the selected Sample(s).
This is done from a Sample List Page after selecting one or more Samples ("Add Services"):
Required Roles |
User must have Role "Lab User" or "Lab Data Entry".
Validation |
Access is independent of Custodial Department or Sample Status.
Results |
Selected Sample(s) have the specified Test Methods added and applied.
Manage Services |
Description |
This allows you to add or remove Services associated with a Sample. From the Sample List page select one or more Samples and click "Manage Services". The many to many dialog displays. Choose which Services to include on each Sample.
Required Roles |
User must have Role "Lab User" or "Lab Data Entry".
Validation |
Access is independent of Custodial Department or Sample Status.
Results |
Services are added or removed from Selected Sample(s).
Load Into Plate |
Description |
From a Sample List page, this operation loads the selected Sample into an Array.
Required Roles |
User must have the Role "Lab Data Entry".
Validation |
Access is independent of Custodial Department or Sample Status.
Results |
Sample attributes are set or changed.
Results Data Entry |
Description |
From a Sample List page, this operation opens a Data Entry page for Sample Test Results data entry.
Required Roles |
User must have Role "Lab User" or "Lab Data Entry".
Validation |
Access is independent of Custodial Department or Sample Status.
Results |
Sample Test Results are set or changed.
Results Data Approval |
Description |
From a Sample List page, this operation opens a Test Approval Data Entry page for Sample Test data approval.
Required Roles |
User must have Role "Lab User" or "Lab Data Entry".
Validation |
Access is independent of Custodial Department or Sample Status.
Results |
Sample Test Results are reviewed and approved or rejected.
Record Deviation (Lab Investigations) |
Description |
This allows entry of a negative condition assessment to the Sample via the Lab Investigations module.
Deviations can be recorded either from the package-unpacking TISM page, or from the Laboratory Operations Sample List page. From the Sample List page, select a set of Samples against which you want to record a deviation, then click "Record Deviation (Lab Investigations)". Select the CAPA Incident template from the dropdown:
For Samples on the TISM page, select the Sample and then click "Add Deviation" to open the same Lab Investigations Incident template selection window.
Upon clicking "Save" a Lab Investigations Incident is created and associated with the selected Samples. The Lab Investigations Incidents can be accessed and processed from the Incident List pages.
Required Roles |
User must have Role "Lab User".
Validation |
| • | User must be the Custodian of the Sample. |
| • | User must belong to the Sample's Custodial Department. |
| • | Sample status must not be "Allocated" (Sample must be a real Sample). |
| • | Samples must not be in temporary storage or in a Package. |
Results |
| • | Deviation is saved as a CAPA Incident and associated with the selected Samples. |
Record Discrepancy |
Description |
This allows entry of a negative condition assessment to the Sample.
Discrepancies can be recorded either from the package-unpacking TISM page, or from the Laboratory Operations Sample List page. From the Sample List page, select a set of Samples against which you want to record a discrepancy, then click "Record Discrepancy". For Samples on the TISM page, select the Sample and then click "Add Discrepancy". The Enter Discrepancy dialog displays.
You can record the same discrepancy multiple times for a single Sample. Each discrepancy is associated with the person recording the discrepancy and the date it was recorded.
You can view discrepancies by clicking the Sample identifier (shows a Sample detail view).
Required Roles |
User must have one of these three Roles: Lab User, Sample Submitter, or Data Manager.
Validation |
| • | User must be the Custodian of the Sample (unless Sample status is "Allocated" or "In Prep"). |
| • | User must belong to the Sample"s Custodial Department. |
| • | Samples must not be in temporary storage or in a Package. |
Results |
| • | Discrepancy is saved in the Sample detail record. |
| • | Concatenation of all discrepancies is saved with the Sample record. |
Record Procedure |
Description |
Procedures are a list of processes that can be recorded against a Sample to meet the Sample"s COC and GLP requirements.
This is done from a Sample List page ("Record Procedure").
This prompts for an electronic signature and reason for change.
Required Roles |
User must have Role "Lab User".
Validation |
| • | User must be the Custodian of the Sample. |
| • | User must belong to the Sample"s Custodial Department. |
| • | Sample status must not be "Allocated" (Sample must be a real Sample). |
| • | Samples must not be in temporary storage or in a Package. |
Results |
| • | Record of the procedure is recorded with the Sample. |
Remove from Storage |
Description |
This takes an item out of temporary storage (reverses the Assign Storage operation).
On the relevant List page (Sample, Plate, Box, or Package), operations will exist for removing items from temporary storage. Using the standard search capabilities of List pages, search for Samples to remove from temporary storage. By selecting all or a subset, users can then click the appropriate operation to clear storage.
Required Roles |
| • | User must have Role "Lab User" or "Repository User" to remove from storage. |
| • | The Role "Package Receiver" can also remove a Package from storage. |
Validation |
User must be the Custodian of the item being removed from storage.
Results |
| • | Item is removed from the temporary location. |
| • | Removing an item from temporary location does not relinquish custody of the item. |
Miscellaneous Operations |
| |
3rd Party Transfer |
Description |
3rd Party Transfer refers to the transfer of the material beyond the control of the facility.
Users perform a 3rd Party Transfer from a Sample List page ("3rd Party Transfer" button).
This operation prompts for an electronic signature and reason for change.
Required Roles |
User must have Role "Repository User" or "Data Manager".
Validation |
| • | Sample status must be "Received", "Verification Needed", "In Circulation", or "Archived". |
| • | User must be the Custodian of the Sample. |
| • | User must belong to the Sample"s Custodial Department. |
| • | Sample can not exist in a Package. |
Results |
| • | Sample status is set to "3rd Party Transfer". |
| • | Sample is removed from storage. |
Add Comment |
Description |
This adds general comments about a Sample. This is done from a Sample List page ("Add Comment"). A dialog prompts for the comment in a text field:
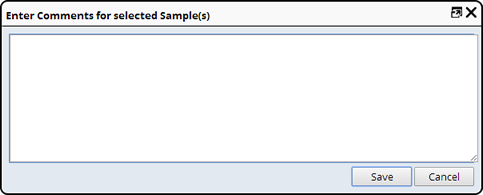
A running list of comments is maintained for the Sample and viewed as a separate tab in the Edit Sample or View Sample pages.
Required Roles |
User must have Role "Lab User", "Repository User", or "Data Manager".
Validation |
None.
Results |
Comment is saved after clicking "Save".
Archive |
Description |
Archiving is the permanent storage of a Sample for an indefinite period of time.
Users perform archiving from a Sample List page (the "Archive Sample" button).
This operation prompts for an electronic signature and reason for change.
Required Roles |
User must have Role "Repository User" or "Data Manager".
Validation |
| • | Sample status must be "In Circulation". |
| • | User must be the Custodian of the Sample. |
| • | User must belong to the Sample"s Custodial Department. |
| • | Sample can not exist in a Package. |
Results |
| • | Sample status is set to "Archived". |
| • | Sample is removed from storage. |
Confirm |
Description |
When Aliquots, Derivatives and Pooled Samples are created, they are assigned a status of "In Prep". This is similar to "Allocated", except that Accessioning Data Entry is not required (because the Sample has a relationship to a parent Sample). The Sample exists in the laboratory only after it is physically confirmed as having been prepared (meaning physically aliquoted, derived or pooled).
From a Sample List page, select the Aliquots, Derivatives, or Pooled Samples that have a status of "In Prep". Then, click "Confirm Sample".
| NOTE: | Another method of confirmation is by simply using the "Check In" operation to check-in the "In Prep" child Sample. It will then be confirmed and placed into storage in a single operation. |
Required Roles |
User must have the Role "Lab User".
Validation |
| • | If Samples are GLP, the user must be the Custodian of the child Samples. |
| • | If Samples are not GLP, the user must be in the Sample's Custodial Department. |
| • | Samples must have a status of "In Prep". |
| • | Sample must not be in a Package. |
Results |
| • | Sample status is set to either "Temporary in Lab" or "In Circulation", depending on the status of its parent. |
| • | User retains custody of the child Sample. |
Dispose |
Description |
Sample Disposition broadly refers to the concept of recording the "final state" of a Sample. The "Disposed" Sample status is used for any state in which the Sample is not readily retrievable or accounted for. Disposed Samples cannot be moved, transferred, or acted upon in any way... unless they are moved back to "In Circulation" status.
Samples can undergo a disposition at any point in their lifecycle.
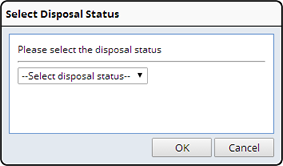
Users record Sample dispositions from a Sample List page (the "Dispose Sample" button). This prompts for an electronic signature, a reason for change, and to select a disposition from the DisposalStatus reference type.
Required Roles |
User must have the Role "Lab User" or "Repository User".
Validation |
| • | User must be the Custodian of the Sample. |
| • | User must belong to the Sample's Custodial Department. |
| • | Sample can not exist in a Package. |
Results |
| • | Sample status is set to "Disposed". |
| • | Selected disposition value is stored in the Disposition field of the Sample SDC. |
| • | Sample is removed from storage. |
Make Available |
Description |
This removes a disposition from a Sample, or places archived or 3rd party transferred Samples back into circulation.
This is done from a Sample List page ("Make Available" button).
This operation prompts for an electronic signature, a reason for change, and selection of a Custodial Department in which to place the Sample.
The user must select a Custodial Department of which he is a member.
Required Roles |
User must have Role "Repository User" or "Data Manager".
Validation |
| • | Sample status must be "Disposed", "3rd Party Transfer" or "Archived". |
| • | Sample can not exist in a Package. |
Results |
| • | Sample status is set to "In Circulation". |
| • | User becomes the Custodian of the Sample. |
| • | Sample's Custodial Department is set to the selected Custodial Department. |
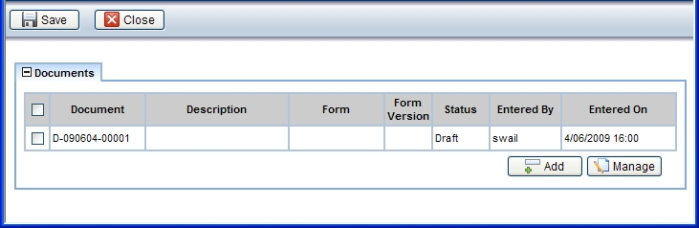
Manage Documents |
Description |
This opens a page showing the Documents associated with the selected Sample:
Required Roles |
User must have Role to access any of the Sample List pages.
Validation |
None.
Results |
| • | New Document is added to the selected Sample. |
| • | Selected Documents are viewed or modified. |
Remove Disposition |
Description |
This reverses the "Dispose" operation.
This is done from a Sample List page ("Remove Disposition" button).
This operation prompts for an electronic signature and reason for change.
Required Roles |
User must have Role "Repository User" or "Lab User".
Validation |
| • | Sample status must be "Disposed". |
| • | User must belong to the Sample"s Custodial Department (essentially the last Custodial Department known for the Sample before the disposition was recorded). |
Results |
Sample status is set to what it was prior to Disposal.
Remove GLP |
Description |
This removes the GLP status of a Sample (sets the GLP flag to "No").
This is done from a Sample List page (the "Remove GLP" button).
This operation prompts for a reason for change.
Required Roles |
User must have Role "Lab User".
Validation |
| • | User must be the Custodian of the Sample. |
| • | User must belong to the Sample"s Custodial Department. |
Results |
Sample's GLP flag is cleared.