Services
| Top |
|
BioBanking Master Data Setup |
Content |
|||||||||||||||||||||||||||||||||
|
Services |
|
|
Biobanking Services represent any action, process or testing to be performed on a biospecimen. See Services for detailed information.
Diagnosis |
|
|
Define the different types of Diagnoses used by your organization. Pathological, Gross and QC Diagnoses can be recorded during Accessioning Data Entry, diagnoses defined here are available in the lookup during Accessioning. Navigate to Lab Admin→ Biobanking → Diagnosis. The Microscopic Diagnosis Tree displays.

Choose to "Add" a new Diagnosis, or select an existing Diagnosis and click "Edit" to make changes.
Click "Add", Diagnosis are defined with Parent and Child relationships. These relationships are displayed in a Tree form allowing you to view them in a hierarchy.
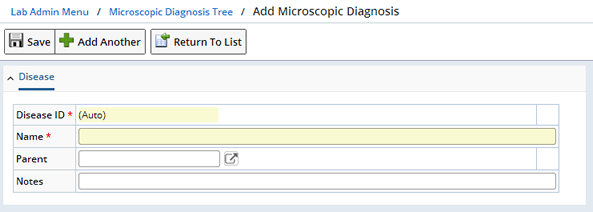
| Field | Description |
| Disease ID | Automatically generated Id for the Diagnosis. |
| Name | The name that displays in a Lookup when selecting a Diagnosis. |
| Parent | Choose a previously defined Diagnosis as a Parent. |
| Notes | Further describe the Diagnosis. |
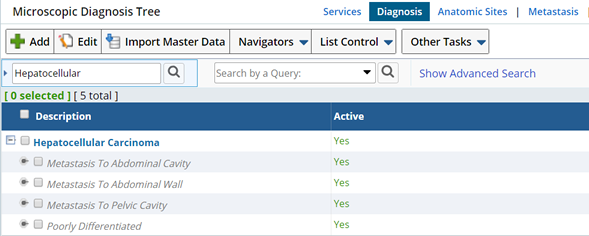
The following example illustrates the hierarchy that can be created for Diagnoses.
Anatomic Sites |
|
|
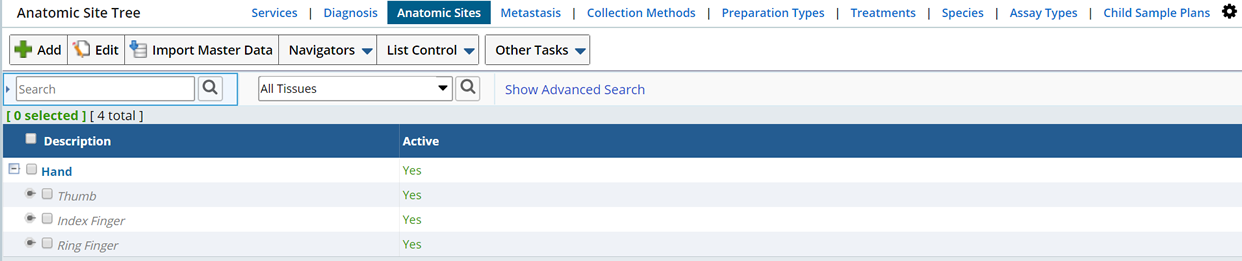
Define the different Anatomical Sites referenced by your organization. Anatomic Sites are defined with Parent and Child relationships (such as body, Lower body, Abdomen). These relationships are displayed in Tree form allowing you to view them within a hierarchy. Once defined, Anatomic Sites are referenced during Accessioning Data Entry.
| NOTE: | During Accessioning Data Entry you will have the opportunity to define Laterality, and a Tissue Class (such as "Normal", "Abnormal"). |
Navigate to Lab Admin→ Biobanking → Anatomic Sites.

You can "Add" a new Anatomic Site (or choose "Edit" to make changes).
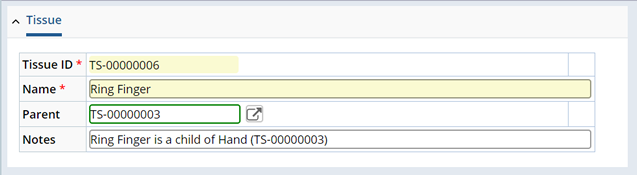
Clicking "Add" opens the Add Tissue Type page.
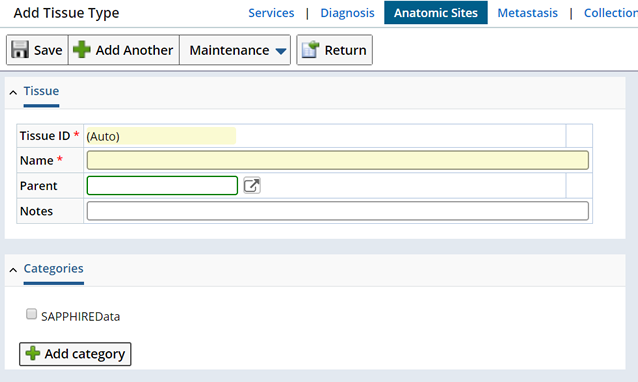
| Field | Description |
| Tissue ID | Automatically generated Id for the Tissue Type. |
| Name | The name that displays in a Lookup when selecting a Tissue Type. |
| Parent | Choose a previously defined Tissue Type as a Parent. |
| Notes | Further describe the Tissue Type. |
Defining a Parent begins to identify the hierarchy. Clicking the Parent Lookup opens the Tissue Tree dialog where you can select the Parent Anatomical Site.
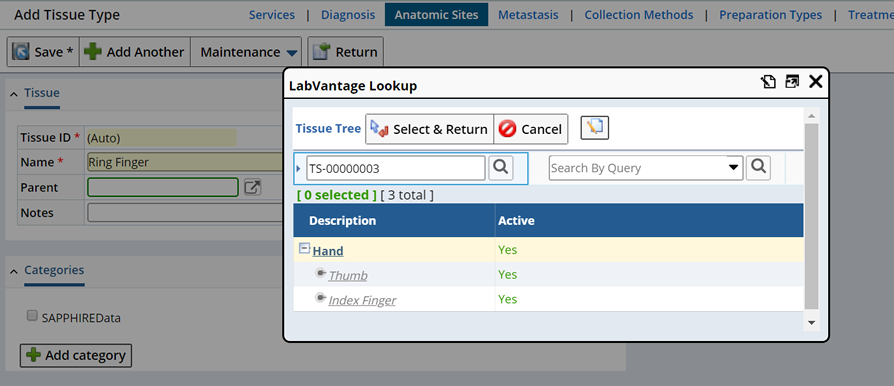
Upon Saving, note that the Parent's Tissue Id is used to identify the Parent/Child relationship.
In the Anatomic Site Tree list page the Name is displayed.
Metastasis |
|
|
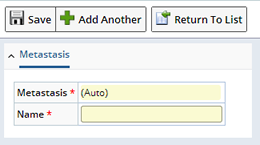
Define the different types Metastasis references used by your organization. Metastasis defined here are available in the lookup during Accessioning Data Entry. Navigate to Lab Admin→ Biobanking →Metastasis.
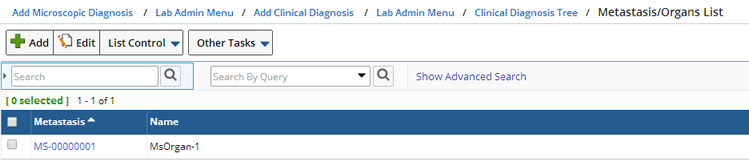
Choose to "Add" a new Metastasis, or "Edit" to make changes. Click "Add", a Metastasis Id is automatically generated, include a Name to identify the Metastasis in the lookup during Accessioning.
Collection Methods |
|
|
Define common Collection Methods for reference during Accessioning. Collection Methods defined here are available in the Lookup on the Accessioning Data Entry page.
Navigate to Lab Admin→ Biobanking →Collection Methods. The Collection Method List page displays.
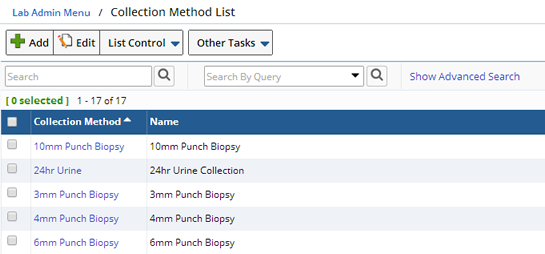
Choose to "Add" a new Collection Method, or "Edit" to make changes. Click "Add", define a unique identifier for the Collection Method and a Name.
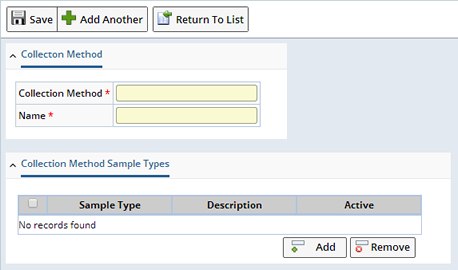
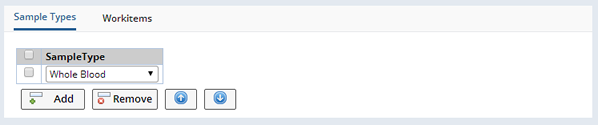
Collection Methods are associated with Samples Types. When Accessioning, Collection Methods associated with the Type of Sample being Accessioned are displayed. Associate the Collection Method with as many Sample Types as needed. Clicking "Add" opens the Sample Type List. Select one or more Sample Types and click "Select and Return".
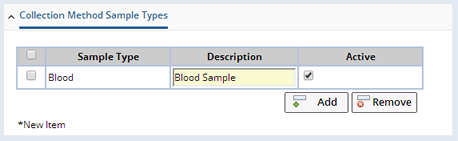
Enter a Description for the Collection Method. Uncheck the Active box to temporarily exclude a Sample Type during Accessioning. Use the Remove button to remove the association.
Preparation Types |
|
|
Define the different preparation types used by your organization.
Navigate to Lab Admin→ Biobanking →Preparation Types. The Preparation Types List page displays.
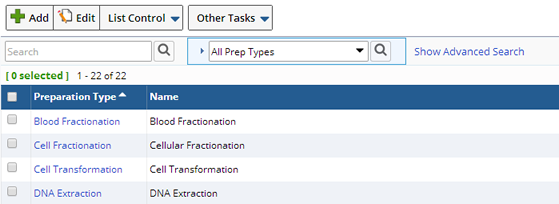
Choose to "Add" a new Preparation Type, or "Edit" to make changes. Click "Add", define a unique identifier for the Preparation Type and a Name.
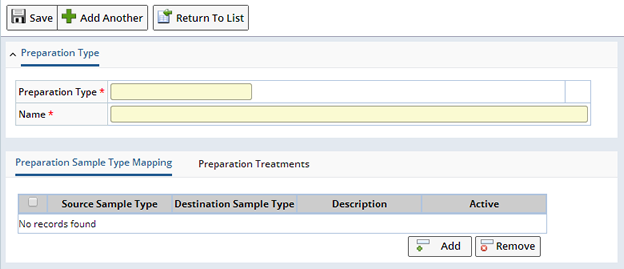
If during Preparation you create a type of Sample that is different from the original Sample Type you can create a map between the Sample Types. Click "Add".
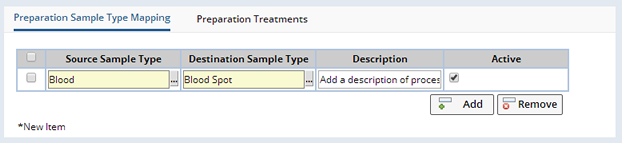
| Field | Description |
| Source Sample Type | The Sample Type of the source Sample. |
| Destination Sample Type | The Type of Sample to be created. |
| Description | Describe the process. |
| Active | Uncheck to make the Sample Map inactive. |
Specify any Treatments associated with Preparation. Clicking "Add" opens the Treatments list where you can select the Treatment you want to include. Describe any additional details in the Description field. Optionally make a Treatment inactive by unchecking the Active box. Use the Remove button to delete the Treatment from the Preparation Type.

Treatments |
|
|
Define common Treatments applied to Samples, reference these Treatments during Accessioning. Treatments defined here are available in the Treatment Lookup on the Accessioning Data Entry page.
Navigate to Lab Admin→ Biobanking →Treatments. The Treatment List page displays.
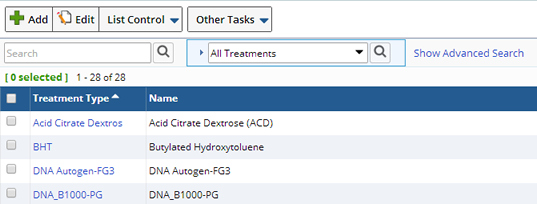
Choose to "Add" a new Treatment, or "Edit" to make changes. Click "Add", define a unique identifier for the Treatment and a Name.
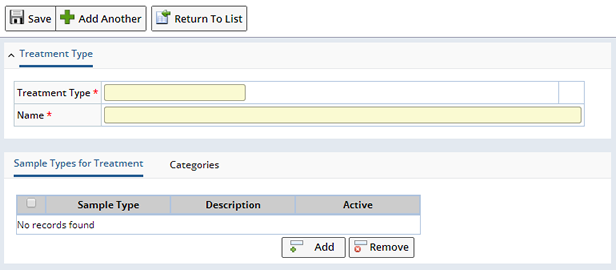
Treatments are associated with Samples Types. When Accessioning, Treatments associated with the Type of Sample being Accessioned, are displayed. Associate the Treatment with as many Sample Types as needed. Clicking "Add" opens the Sample Type List. Select one or more Sample Types and click "Select and Return".
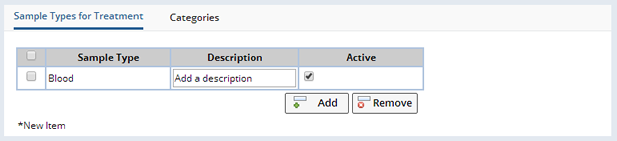
Enter a Description for the Treatment. Uncheck the Active box to temporarily exclude a Sample Type during Accessioning. Use the Remove button to remove the association.
A Category allows you to group Treatments into Categories you define. See Categories for more details.
Species |
|
|
Define the Species of Sample donors. Species defined here are available in the Species Lookup on the Accessioning Data Entry page.
Navigate to Lab Admin→ Biobanking →Species. The Species List page displays.
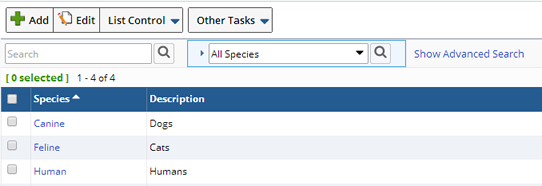
Choose to "Add" a new Species, or "Edit" to make changes. Click "Add", define a unique identifier for the Species and a Description.
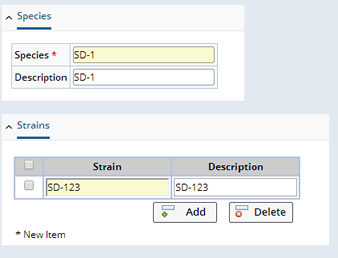
Click the "Add" button to include different Strains of each Species to further identify the source of the Sample.
Assay Types |
|
|
Assay Types are a definition of the various Test Methods that can be applied to Samples of the appropriate Sample Type.
Navigate to Lab Admin → Biobanking → Assay Types. The Assay Types List page displays.

Choose to "Add" new Assay types, or "Edit" to make changes. Click "Add", define a unique identifier for the Assay Types and a Description.
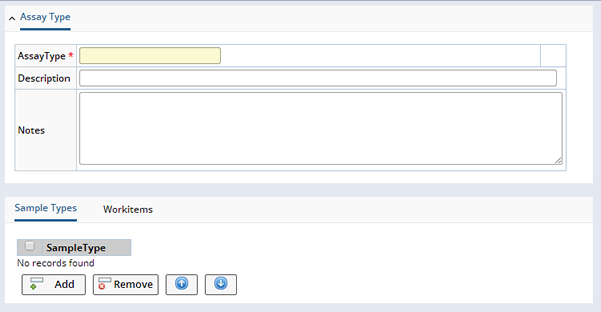
Associate the Assay Type with one or more Sample Types. When defining a Protocol Default Collection Plan the association of Sample Type with Assay Type here determines whether or not Test Methods are available for the Assay Type, Sample Type combination. See Default Collection Plan for more information.
Click "Add" then use the dropdown list to select a Sample Type.
Clicking "Add" opens the Test Method lookup page. Select the Test Method(s) to associate with this Assay Type.

Child Sample Plan |
|
|
Consider defining a Child Sample Plan when you need to create multiple Aliquots and Derivatives from new or existing Samples. Define a plan that determines how many child Samples, Aliquots or Derivatives, to create and in what quantities. Then, from the Laboratory Operations Samples List, apply the Child Sample Plan to one or more Samples, the Aliquots and Derivatives (Child Samples) are created according to the plan. Optionally define Grand Child Samples within the plan.
The Child Sample Plan can be applied to samples you select in the Lab Operations Sample List.
To cerate a Child Sample Plan navigate to:
| Lab Admin | → | Biobanking | → | Child Sample Plans |
The Child Sample Plan List page displays.
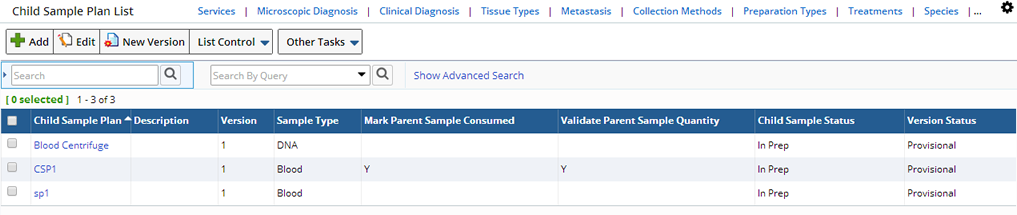
Click "Add" to add a new Plan or select an existing plan and click "Edit" to make changes. You can also Copy, View or Delete an existing plan as well as create a New Version.
Adding a New Child Sample Plan |
Clicking Add on the Child Sample Plan List page displays the Add Child Sample Plan page.
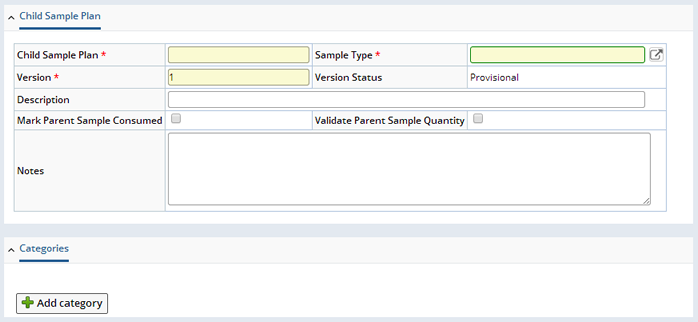
| Field | Description | ||||||||||
| Child Sample Plan | The name of this Child Sample Plan. | ||||||||||
| Sample Type | Choose a Sample Type, Child and Parent Sample Types must be the same therefore when choosing a Child Sample Plan, only plans with the same Sample Type as the Parent Sample will be displayed in the lookup. | ||||||||||
| Version Version Status |
Version of the Child Sample Plan. Status of this Version. |
||||||||||
| Description | Description of the Child Sample Plan. | ||||||||||
| Status for Child Samples | Choose the Storage Status for the newly created Child Samples. Available Statuses are defined as Reference Types.
|
||||||||||
| Mark Parent Consumed | When checked, the Parent will be consumed when Child Samples are created. | ||||||||||
| Validate Parent Sample Quantity | When checked perform quantity validations while adding aliquots. If checked, quantity will be deprecated from parent sample. |
When you have defined the basic Plan information Save the Plan.
The Child Sample Plan Items tab displays.
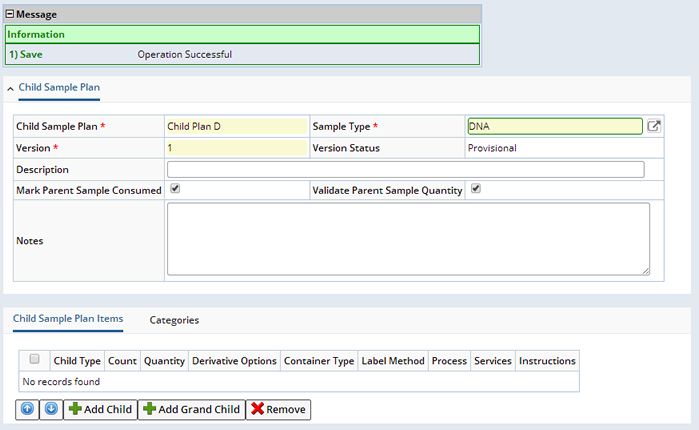
Add Aliquots and Derivatives to the Plan by clicking the Add Child button. Choose Aliquot or Derivative from the Child Type dropdown.
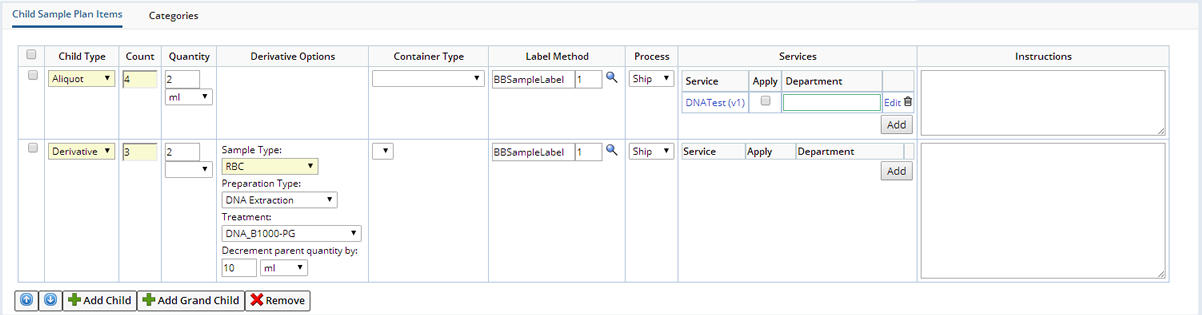
| NOTE: | Using the ChildSamplePlan Element configure additional columns to display in the Child Sample Plan Items tab. |
Aliquots are taken from the Parent Sample directly, nothing additional is done to change the Sample.
| Field | Description |
| Count | How many Aliquots to create. |
| Quantity Unit |
The amount and unit of Parent Sample used to create the Aliquot. |
| Container Type | Type of Container for the Aliquot. |
| Process | What to do with the Sample, choose Ship or Store. |
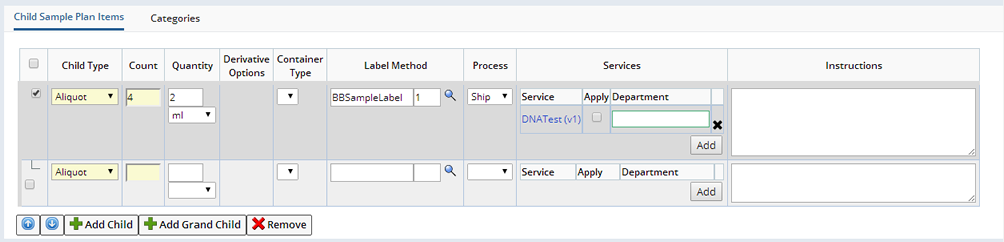
| Services | Add Services to the Child Samples. Clicking "Add" opens the Services dialog where you can choose the Service you want to include. |
| Instructions | Include detailed instructions for the Child Samples. |
Derivatives are the result of performing some type of action on the Sample, creating a different type of Sample. Choosing Derivative in the Child Type field displays the the Derivative Options fields. You will need to define the following:
| Field | Description |
| Sample Type | Choose the Sample Type for the newly created derivative Samples. The drop down list is based on the allowed child sample types that can be created for parent sample's sample type. |
| Preparation Type | The Preparation Type for the Derivative Sample. |
| Treatment | The Treatment to be applied to the Derivative Sample. |
| Decrement Parent Quantity by: | Define the amount and Unit to be decremented from the Parent Sample. |
Optionally add a Grand Child to Aliquots or Derivatives. Select the Child to which you want to add the Grand Child and click "Add Grand Child".
A new level is created below the Child level. Define the Grand Child Sample as either an Aliquot or Derivative, see adding an Aliquot or adding a Derivative above for detailed information.
Applying a Child Sample Plan |
Once defined you can apply the Child Sample Plan to Samples on the Lab Operations Sample List page.
| LIMS | → | Sample Management | → | Lab Operations Samples |
Select one or more Samples and click "Apply Child Sample Plan" from the menu (More, Other Tasks). A Lookup page opens displaying all current Child Sample Plans for the Sample Type of the selected Samples(s). Note: If multiple Samples are selected they must all have the same Sample Type.
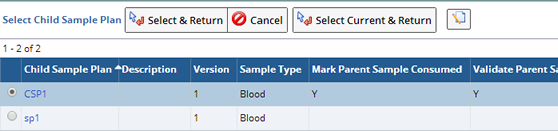
Select the Sample or Samples to which you want to add the plan and click Select and Return. You will receive a message stating that the Plan has been successfully Applied.