Overview
| Top |
|
BioBanking Protocol Studies |
Content |
|||||||||||||
|
Overview |
|
|
Protocol Studies (requires BioBanking Protocol Management Module) are just like regular BioBanking Studies except they allow the definition of a versioned Protocol that can specify a series of Sample collection events with associated Assays to apply to the Samples. For each event, it is possible to define the Sample Types of the Samples collected, the number of containers for each Sample Type and any Services to apply to the Samples. Each event can also be assigned to a specific Cohort of Participants in the Study - Subjects are enrolled as Participants in a Study in a single Cohort. Event types allow the definition of Enrollment, Collection, Withdrawal and Completion events. Some events might not define Samples to be collected, but might require Documents to be filled out by the Participant or the appropriate Study Coordinator. The type of collection Kits required for a specific event can also be defined.
New revisions of a Protocol can be defined during Study setup as well as once the Study is active. Once a Protocol is defined it requires an approval to become current. New versions of a current Protocol revision can also be created at any time and approved to replace the current version. Each Study Site is assigned a particular Protocol revision, allowing the flexibility for different sites to follow different collection Protocols.
Most of the Protocol Study maintenance and template maintenance is the same as for regular BioBanking Studies.
Study and Protocol State Chart |
The following diagram shows Study and Protocol status values and transitions from one state to another:

Study State Descriptions |
| State | Description |
| Initial | Study state when it is initially created. |
| Pending Approval | Study details have been completed and it is ready for approval. |
| Active | Study has been approved and is now in active use. |
| Rejected | Study has been rejected and needs to be edited and resubmitted for approval. |
| Completed | Study has been completed and is no longer in use. |
| Canceled | Study has been canceled for some reason and is not in use. |
Study State Transitions |
| State | Description |
| Study Creation | Initial information for the Study
is completed by the user and saved. |
| Submit for Approval | All details of the Study,
including the Protocol are completed, saved and then submitted for
approval. |
| Approve | The necessary users have reviewed
and accepted the Study for approval. |
| Reject | One or more of the approval users, according to the approval types, have rejected the Study for approval. |
| Completed | Study is marked as no longer
active by the user. |
| UnComplete | Study is restored to an active state when incorrectly completed. |
| Canceled | Study is canceled by the user. |
| UnCancel | Study is restored to an active state when incorrectly canceled. |
Protocol State Descriptions |
| State | Description |
| Provisional | Protocol state when a new revision
is initially created. |
| Current | Protocol is available
for use by the Study. |
| Current and Provisional | Current Protocol has been
edited and a new version is created. |
Protocol State Transitions |
| State1 | Description |
| New Revision | From Study maintenance,
the user requests a new
revision of a Protocol, that is then created with the initial
information supplied by the user. If a Protocol already exists and is
selected, then details of the selected Protocol are copied to the new
revision as a starting point for changes. |
| Approve | The Protocol is reviewed
and
approved by the user. |
| Make Editable | Upon a user request an existing
approved Protocol is made editable by creating a new version of
the selected Protocol revision. |
| 1 | The Protocol version status is not shown for simplicity. When a Protocol Revision is first created, it has a version status of "Provisional". Once the Protocol is approved, its version status becomes "Current". When a new version of a Protocol Revision is created, by making the current approved version of the Protocol Revision editable, the new version also has a version status of "Provisional". Once the new version is approved, its version status now becomes "Current" and the prior current version has its version status changed to "Active". |
Protocol Maintenance |
|
|
Protocol Maintenance Page |
The maintenance of Protocol Studies has the same details as regular BioBanking Studies with the addition of a Protocols tab to manage the Study Protocol:
From this page the details of the Protocol are completed and saved. Protocol approval can also be done from this page. All changes to a Protocol must be approved in order for the changes to take affect.
Protocols are revisioned as well as versioned (See Concepts of LabVantage Versioning) as described below:
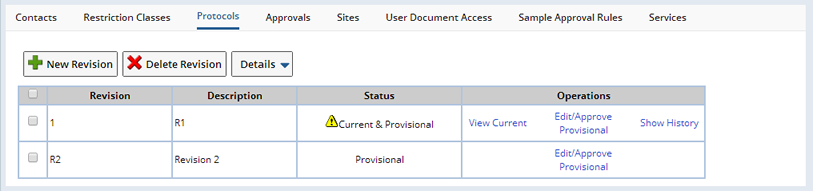
Protocol Operations |
| Operation | Description |
| New Revision | When a new Protocol revision is initially created using the "New Revision" button, it is the first (1) version of the Protocol revision, with a revision and version status of "Provisional". If an existing Protocol revision is selected then the "New Revision" button will create a copy of the last version of the selected Protocol revision as the new revision, otherwise an empty Protocol revision is created. |
| Edit/Approve Provisional | With the new revision created, it is possible to modify the complete details of the Protocol and approve it for use from the "Edit/Approve Provisional" hyperlink. This allows editing of the "Provisional" Protocol revision until it is approved. After approval the version status is changed to "Current" and the revision status is also set to "Current". Multiple revisions of a Protocol can be active at the same time and assigned to different Sites in the Study. |
| Make Editable | If you subsequently need to edit an approved Protocol revision use the "Make Editable" hyperlink to copy the current version and increment the version number. The new version is given the "Provisional" status with the revision status set to "Current & Provisional". This new version of the Protocol still appears as the same Protocol revision in the "Protocols" tab. |
| View Current | The current or previously approved version of the selected Protocol revision is viewable using the "View Current" hyperlink. |
| Show History | To view the complete version history of a particular Protocol revision click the "Show History" hyperlink. |
The versioning of Protocols allows the control of changes to the Protocol that do not affect the structure or potential "clinical" outcomes of the Protocol. This might be updating the Test Methods that are applied to Samples collected under the Protocol, but not the adding or changing of Events, Cohorts, Forms, etc. For such changes a new revision of the Protocol would be used.
When a new revision is selected, you are prompted for the Revision Identifier, which must be unique for the Study, as well as the Protocol description. A Protocol maintenance page is then displayed:
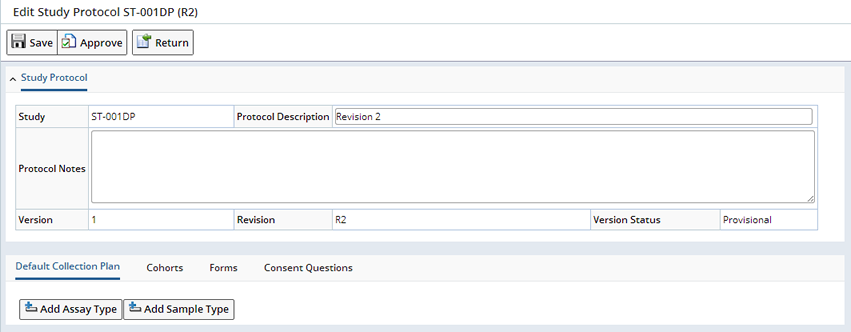
Default Collection Plan |
The Default Collection Plan allows the creation of a grid of the different Sample Types of the Samples that are collected during the Study, and the Assay Types to apply by default to the collected Samples. Assay Types are a definition of the various Test Methods that can be applied to Samples of the appropriate Sample Type. Click "Add Assay Type" the Select Assay Type dialog displays.
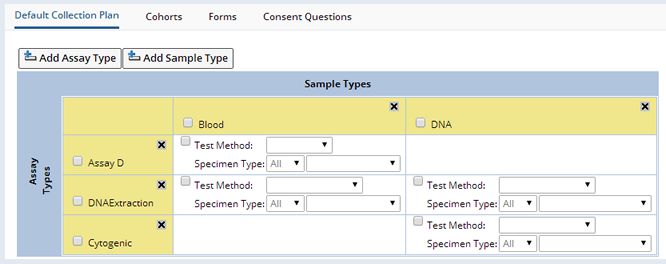
As Assay Types and Sample Types are added to the grid, from the Assay Type and Sample Type lookups respectively, the system determines which grid cells should display the Test Method selection details. If a cell shows the Test Method selection, this means that the Sample Type column has been defined as valid for the particular Assay Type row. The Test Method dropdown shows the various Test Methods that are defined for a particular Assay Type.
A Specimen Type is a combination of a selected Container Type (limited to those valid for the particular Sample Type) and the occurrence (1st, 2nd, 3rd, etc), or arrival order of that Container Type for a particular collection event. The arrival order is relevant when multiple tubes of the same Sample Type are collected and it is necessary to prioritize the Assays applied. In the case when not all expected tubes of a particular Sample Type are returned, then at least the primary Assays will be applied if the arrival order is specified. An arrival order of "All" specifies the Assay is to be applied to all collection tubes for the relevant Sample Type.
If the Container Type field is left blank in the Specimen Type definition, then the Assay will apply to the specified occurrence of the Sample Type in any Container Type.
If the Test Method checkbox is marked, then whenever Samples of the particular Sample Type are collected for this Protocol, then by default for all collection events, the selected Test Method is applied to the Samples on the condition that they also match the Specimen Type specified. This default application of Assays to Samples can be modified for each individual collection event defined in the Protocol (See Collections), but also, if changes are made to this default grid, such as selecting a different Test Method, then the changes are reflected throughout all the Protocol collection events , if they're using the Default Tests, without the need to edit each Event individually.
An example Default Collection Plan illustrates these concepts:
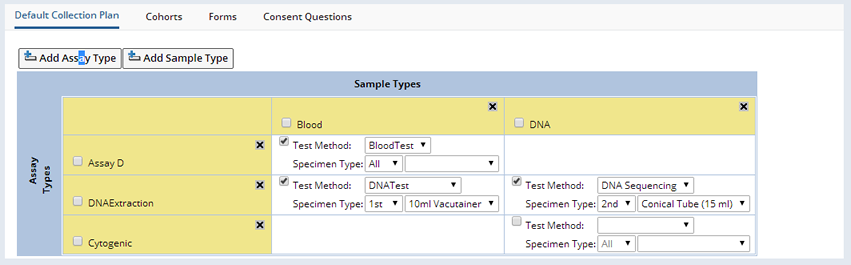
By default the checked Assay Types will be applied to the following Blood, Tissue Block and DNA Samples when they are received for each collection event in the Protocol:
| • | The Assay D Assay Type is applied to All Blood Samples in any Container. They will all have the BloodTest Test Method applied to them. |
| • | The DNAExtraction Assay Type is applied to the 1st Blood Sample in a Vacutainer Container. It will have the DNA Test Test Method applied to it. |
| • | The DNA Extraction Assay Type is applied to the 2nd DNA Sample in a Conical Tube Container. It will have the DNA Sequencing Test Method applied to it. |
| • | The Cytogenetic Test Method is not applied to any DNA Samples as the Test Method is not checked. |
Cohorts |
A Cohort is a grouping of Participants enrolled in a Study according to specific criteria or having different dosing regimens. The criteria used is completely arbitrary and defined by the Protocol designer. The system does not enforce Cohort membership rules and it is up to the user to ensure a Participant is placed in the correct Cohort. A Participant can only belong to one Cohort for the Study. The Cohorts are managed from the Cohort detail tab:

Upon selected a single Cohort, it is possible to create and manage the collection events for that Cohort by clicking the Manage Events button. This opens up the Event Maintenance page.
Events |
Below is the Event Maintenance page used to manage Protocol Events. This is the representative page used for the following general discussion of the Event Maintenance page functionality.
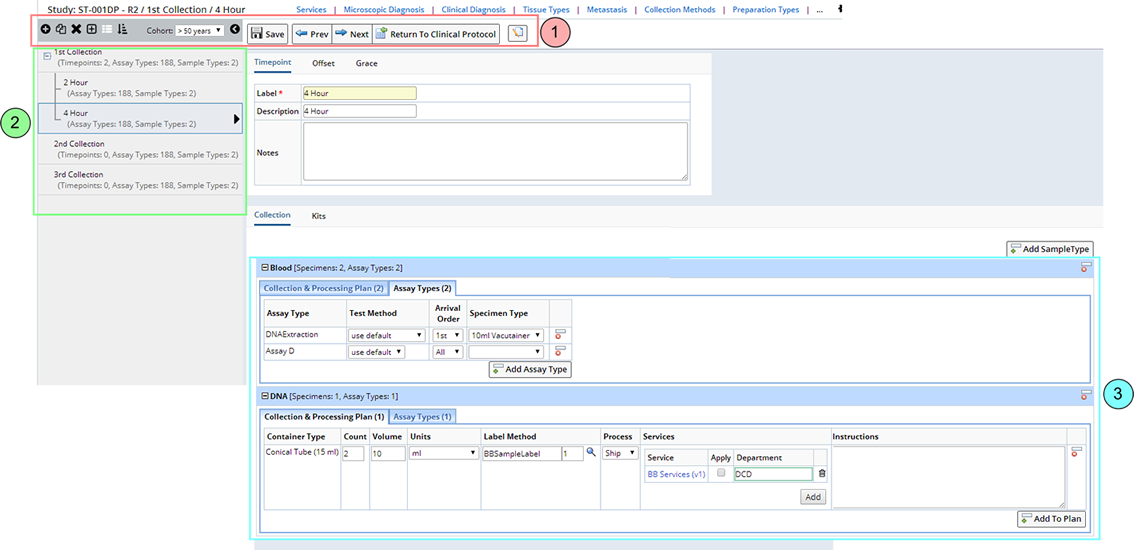
In general, the Event Maintenance page has 3 sections:
| Section | Description | |
| 1. | Toolbars | The "Toolbars" contains buttons that perform specialized functionality for Event management. These are described in the Event Maintenance Operations. |
| 2. | Events | Protocol Events are listed in the left frame. They can be expanded to show all Timepoints within a Visit event. |
| 3. | Event Detail Information | Upon selecting an Event the right frame is updated with
the Event Information
in various tabs for each Sample Type. |
Event Maintenance Operations |
Following is a description of the Operations available in the Toolbar:
| Operation | Description | |||||||||||||||||
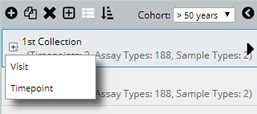
| Add | Adds a new Event immediately after
the currently highlighted Event in the tree. Upon clicking the "Plus"
icon a dropdown menu appears to select the Event type. Choose from
"Visit", or "Timepoint":
"Timepoint" will not be selectable if an existing Timepoint is highlighted. To add a new "Timepoint" Event, select the enclosing "Visit" Event and the Timepoint will be added to the end of the Visit. Once a Event type is selected, an Event maintenance popup window appear to enter the Event information and details:
Operations on the Add Event popup allowing saving of the entered data ("Save" button) and after saving another Event of the same Event Type can be added by clicking the "Add Another" button. This refreshes the window ready for new Event details to be entered. The "Cancel" button cancels the current add operation, but if the Event has already been saved then the Event has already been created. The "Close & Refresh" button closes the popup window and updates the Event tree frame. This button should always be used after any save operation (instead of Cancel). |
|||||||||||||||||
| Copy | Copies the currently highlighted
Event. Before the copy occurs an Event maintenance popup window appears
(same as Add Event window) to allow any of the event details to be
modified for the copied Event. Click "Save" in the popup window to copy
the Event. If the selected Event is a "Visit" event that contains
"Timepoints", then the Visit and all the encompassed Timepoints will be
copied together to create a new Visit Event. |
|||||||||||||||||
| Delete | Deletes the currently highlighted
Event. Before the deletion occurs a confirmation popup appears. |
|||||||||||||||||
| Expand
All/Hide All |
Expands all the Visits with
Timepoints to show the Timepoints in the Event tree, or hides all the
Timepoints. |
|||||||||||||||||
| Hide/Show Single Line Summary | Shows or hides the additional
details of an Event in the Event tree. This is all the information in
the round bracket and just leaves the Event Label. |
|||||||||||||||||
| Reorder Events | Opens a popup where you can rearrange the order of the Events listed in the tree. Select the Event you want to move and use the up and down arrows. |
|||||||||||||||||
| Cohort | The dropdown allows a different Cohort's Events to be edited. This refreshes the page to show the new Cohorts Event tree and details. | |||||||||||||||||
| Show/Hide Event Tree | Shows or hides the Event tree in
the left frame. |
|||||||||||||||||
| Save | Saves changes made to Events. | |||||||||||||||||
| Previous/Next Event | Selects the previous or next Event
in the Event tree for editing in the right frame. |
|||||||||||||||||
| Return to Clinical Protocol | Returns to the Protocol
maintenance page. |
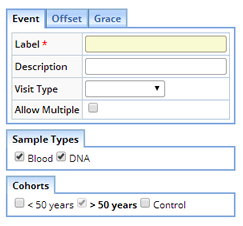
Event Information |
The Event Information form shown in the top of the right frame of the Event Maintenance page is the same as appears in the Add Event popup window when an Event is created. Upon selecting an Event in the left frame, the right frame is refreshed to show the information for the selected Event. The details of the Event, the Collections, Timepoints, Kits and Forms are shown is separate tabs below the Event information form and described below.
Collections |
The Collections tab is used to define the Samples to be collected during an Event. Part of this definition is the Sample Type of each Sample, how many containers of Samples of a particular Sample Type and what Assay tests to apply to certain containers of different Sample Types. By default this tab is populated by the details specified in the Default Collection Plan tab in the Protocol Maintenance page:
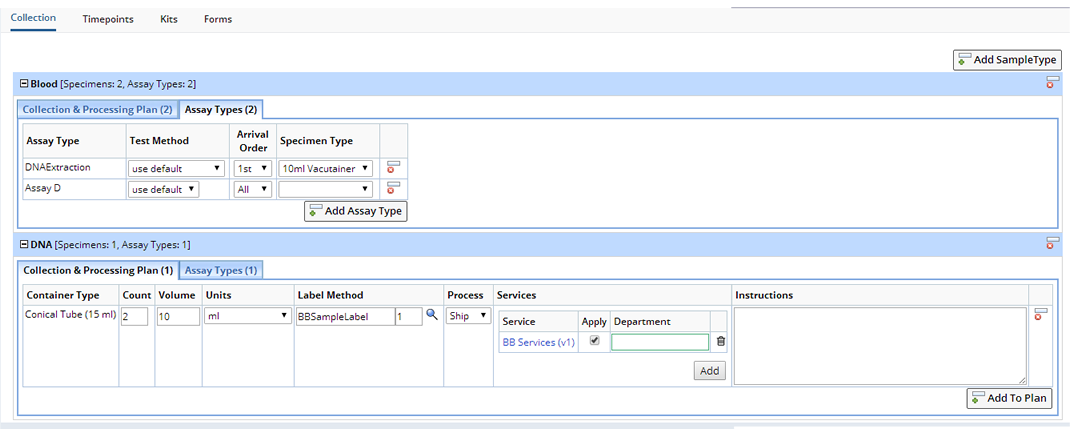
When a Sample is collected and assigned to an Event, then Services will be added and applied to the Sample according to the rules defined in the Collections tab. The rules are that the Sample is of the appropriate Sample Type, and that its Container Type matches the Specimen Type and is the correct occurrence (1st, 2nd, 3rd, etc) of the Sample. If the Specimen Type is not defined for the Assay, then any Container Type for the Sample will match. Any of the items or values automatically inserted from the Default Collection Plan into the Collections tab can be overridden or even removed. Additional Specimen Types and Assay Types can be added for a particular Sample Type, clicking the "Add to Plan" button adds an additional row where you can define new Specimen Types or Assay Types. Even additional Sample Types and their Specimen Types and Assay Types can be added using the "Add Sample Type" button. In all cases only those Sample Types or Assay Types previously defined in the Default Collection Plan tab can be added.
The additional details for the Collection & Processing Plan are:
| • | Count
Expected number of containers of the Container Type to be collected. Enter the Volume and Units expected. |
| • | Label Method
Using the Lookup choose a Label Method. |
| • | Process
Choose to Ship or Store the collected specimen. |
| • | Services
Services associated with this Specimen. Services default from the Study. Choose to "Add" new Services or make changes to the Service for this Specimen only. Enter the Department responsible for completing the Service. Optionally delete the Service for this Specimen. |
The additional details for the Assay Types are:
| • | Test Method
Test Method to apply to Samples collected for the Assay Type if match Arrival Order and Specimen Type. |
| • | Arrival Order
Occurrence of the Sample container in the collection. Used to prioritize application of Assays if not all expected Sample containers are returned. If "All" is selected then the Assay is applied to all matching Sample containers. |
| • | Specimen Type
Container Type of the Sample collected. If left blank Assay will apply to appropriate Samples in any container. |
Timepoints |
When a Visit Event with Timepoints is selected in the left frame, the Timepoints tab in the right frame displays the Timepoints for the Event in a read only grid. By then clicking on the Timepoint Label hyperlink in the grid, the page is reloaded with the selected Timepoint in edit mode.
Kits |
In the Kits tab, it is possible to specify a Kit Type and how many kits are required for the selected Event. If Kits are defined for a Visit that consists of Timepoints, define the kit Type and quantity within the Timepoint. If the Kit Type Version field is left blank, then the latest active version of the specified Kit Type will be used.
Forms |
Like Forms defined for a Study or Protocol, it is also possible to define Forms to link with Events and particular entities associated with the Event. In the Forms tab, it is possible to add the Forms from which to create Documents when the Event occurs:
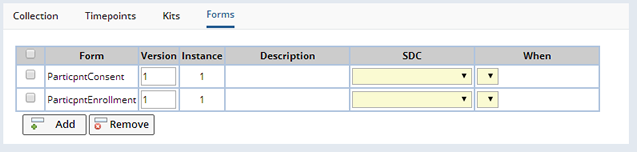
Once a Form is added, you can specify to which SDC Documents from this Form, will be associated as well as when such Documents are created. The SDC choices are "Visit", or "Sample", and the time Documents are created is when the Visit Event is created (Visit SDC "on Creation"), or when a Sample collected is linked to a Visit Event (Sample SDC "on Allocation/Creation"). This means that when the Event occurs (e.g. Sample collection) a blank Document based on the Form definition is created and linked to the SDI of the chosen SDC that is associated with the Event. If the Version field is left blank, then the latest current version of the specified Form will be used.
Forms |
During the course of a Protocol certain documents are completed by persons involved in the Study. Examples of such documents are Participant enrollment details, Participant Case Report Forms (CRFs), details of Samples collected, etc. LabVantage has the capability to define templates of these documents as online Forms (See Forms) that can be completed to create Documents associated with particular SDIs. In the Protocol Maintenance page, in the Forms tab, it is possible to specify the Forms available for a particular Protocol:
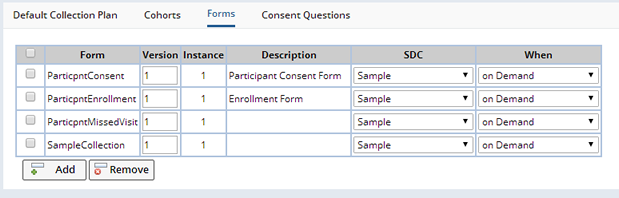
Once a Form is added, you can specify to which SDC Documents from this Form, will be associated as well as when such Documents are created. The SDC choices are "Participant", "Visit", or "Sample" and the time Documents are created is dependent on the chosen SDC. For Participants it is possible to have Documents created when the Participant SDI is created, or when its status is set to "Enrolled", "Completed" or "Withdrawn". For Visits it is possible to have Documents created when the Visit SDI is created, or when its status is set to "Completed" or "Missed". For Samples it is possible to have Documents created when the Sample SDI is created, or when it is linked to the current Protocol. For all SDCs, "on Demand" can be chosen where the blank Document is not automatically created, but can be added by the user from the Documents tab of various maintenance pages (the Forms lookup when the "Add" button is clicked is filtered by the list provided here as well as the relevant SDC), or from the Documents management page. When automatically creating blank Documents, if the Version field is left blank, then the latest active version of the specified Form will be used, otherwise any version of the specified Form can be used when created on demand.
If the SDC field is left blank, then this indicates that the Form is to be made available within the context of the Study or Site Documents management page, accessed from the "Manage Documents" button on the Study List or Maintenance pages, or the Study Sites tab. This allows the definition of a short list of Forms specific to the Protocol. As each Site is assigned a specific Protocol revision, then within the Site context, only those Forms defined for the Site's Protocol revision are accessible in the Documents management page. From the Study context, a union of all the Forms defined for all the Study's Protocol revisions are accessible in the Documents management page.
Forms defined here are applicable across the entire Protocol, whereas Forms defined for Events are only valid for a specific Event. For example, if a common Form is to be used for every Visit, then it would be defined here. Any additional Forms for specific Visits would be defined in the Event's Form tab for that Visit. If a different Form is required for each Visit then these must be listed in each Visit Event's Form tab and not here.
Consent Questions |

Click "Add" to add new questions.
| Field | Description |
| Question | Question to be asked of Participants. |
| Answer style | The style for answering the question. Choose Yes/No or Yes/No/NA (not applicable) |
| Consent Type | Reference Type defining the type of Consent provided. Defining a Consent Type enables you to Search for Samples by Consent Type. |
| Cohort | Define different Consent Questions for each Cohort. If no Cohort is specified all Participants will receive the question. |
| Requires Reconsent | When Checked, requires Participants to Reconsent to changed or added questions. When versioning and uprevisioning the Protocol, the Consent Questions are copied to the new version/revision. The Consent Questions can be changed for each individual Protocol Revision. "Requires Reconsent" indicates that Reconsent is required when a new revision is created and Participants are uprevisioned. |