Users |
|
|
Principle |
A LabVantage "User" is someone who is granted access to (or can be referenced in) LabVantage.
|
|
Users |
|
|
Principle |
A LabVantage "User" is someone who is granted access to (or can be referenced in) LabVantage.
During installation, LabVantage installs a customer-specific license (the labvantage.lic file) that defines the maximum number of each type of User you can create:
|
Type of User |
Access Permitted by License1 |
Comments |
||||
| Full Named |
|
Although the license defines the maximum number of Full Named Users you can create, it does not restrict the number that can simultaneously access LabVantage. | ||||
| Full Concurrent | You can create any number of Full Concurrent Users, but the license defines the number that can simultaneously access LabVantage. | |||||
| Virtual Named | JSPs defined as "virtual pages" in the Web Page Designer. | Although the license defines the maximum number
of Virtual Named Users you can create, it does not restrict the number that
can simultaneously access LabVantage.
The license defines the maximum number of virtual Web pages you can have. |
||||
| Virtual Concurrent | You can create any number of Virtual Concurrent Users, but the license defines the number that can simultaneously access LabVantage. | |||||
| Unnamed | None. | You can create Unnamed Users in the database and reference them from SDIs. For example, you can link from a column in an SDI to an Unnamed User. |
| 1 | Several areas of LabVantage require that the User be assigned to a Module. |
When you logon to LabVantage as the owner of the LabVantage schema, you are the (system) User. The (system) User cannot utilize all licensed LabVantage Modules, as these require a defined LabVantage User as described above. The (system) User is intended for use as an emergency administrator function (such as resetting passwords when it is not possible as a defined User).
Configuration |
Users are configured and maintained from the User List page (see Users and Roles).
Other settings for Users are defined in these areas of LabVantage:
| • | System-wide settings are described in System Configuration. Those that can be overridden at the user level are so noted. |
| • | User-specific settings are set under the Roles tab of the User Maintenance page. |
User Passwords |
| • | Passwords are created when adding Users in the User Maintenance page. |
| • | Whenever a System Administrator assigns a password or a LabVantage User changes his password, LabVantage uses properties of the Password Validator to determine if the password meets certain criteria. |
| • | LabVantage installations running under JDK 1.5 or higher use an RSA password encryption technique (see Password Encryption in the topic Password Validaton). |
Role-Level Access |
|
|
Principle |
A "Role" defines a group of Users who are granted access to SDIs. Users "Jim" and "Mary" belong to the Role "Technicians", while "Bob" belongs to both "Technicians" and "Auditors":
| User | Role | Role-Level Access | Operations Permitted by Role |
| Jim | Technician | Sample SDC
Batch SDC |
View Samples
View Batches |
| Mary | |||
| Bob | |||
| Bob | Manager | Project SDC
User SDC |
Edit Projects
Add Users |
Role Level Access is set for the Sample, Batch, User, and Project SDCs. This means that:
| • | Jim, Mary, and Bob can do things that involve Sample SDIs and Batch SDIs. |
| • | Bob has the same access as Jim and Mary, but can also do things that involve User and Project SDIs. |
| NOTE: | If you do not give any Roles access to an SDC, access depends on the Access Control option set in the SDC Maintenance page. |
Configuration |
You define Role-Level Access in the SDC Maintenance page. You assign Roles to Users in the User Maintenance page.
Departmental Security and SDC Access |
|
|
Principle |
"Departmental Security" is based on ownership of an SDI. What you can do with the SDI (the "SDC Operation") depends on who owns it. Both Users and Departments can own SDIs. We'll look at this by example. Assume these starting conditions:
| • | "Jim" owns "Sample-001". |
| • | The "QC" Department owns "Sample-002". |
| • | The "SDC Operation" available for the Sample SDC is "View" (meaning view the Sample in read-only mode). |
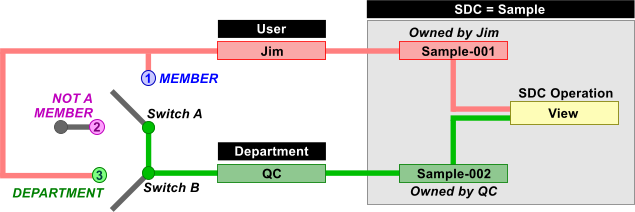
"SDC Access" defines four "Access Types" that an owner can be granted:
| Switch Position | Access Type | Who can do the operation? | ||||
| Does not matter. | Owner | User who owns the SDI.
Example:
Jim can view "Sample-001", and all members of "QC" can view "Sample-002". |
||||
| Move "Switch A" to position "1". |
Member | User who is a member of the Department that owns the SDI.
Example:
Since Jim is a member of "QC", and "QC" owns "Sample-002", Jim can view "Sample-002". |
||||
| Move "Switch B" to position "3". "Switch A" |
Department | A User can perform the operation on the SDI if the SDI
is owned by the department specified by the "Department" AccessType.
Example:
Whether or not Jim is a member of "QC", he is granted access to it. In this example, Jim can view "Sample-002"... in fact, he can view any Sample owned by "QC". |
||||
| Not applicable. | World | All Users in all Departments can view Sample-001 and Sample-002 (no restrictions). |
| NOTE: | If no Users or Departments own an SDI, all Users in all Departments can view it. |
Configuration |
Here is an example of how to setup SDC Access for Departmental Security:
|
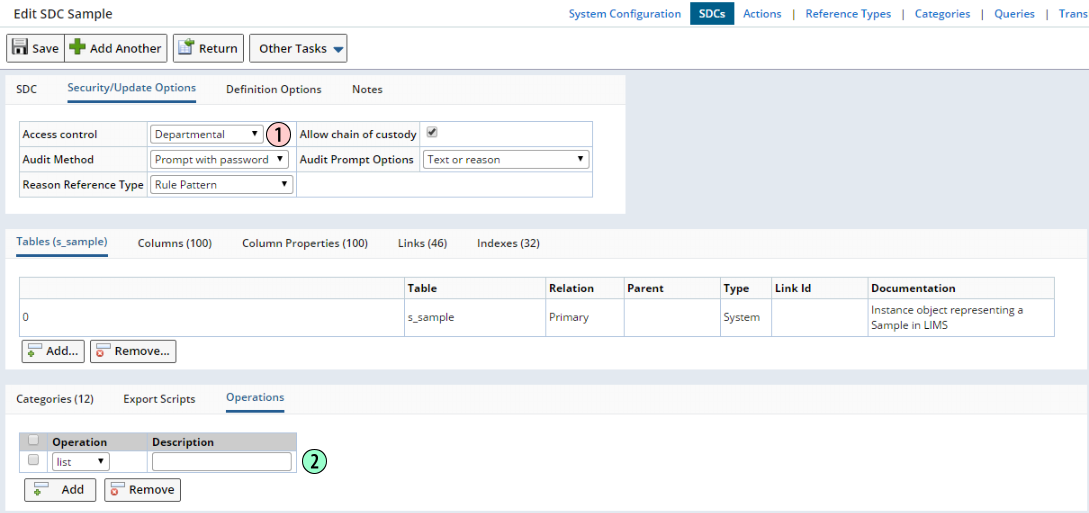
Go to the SDC List page (System Admin → Configuration → SDCs). Edit the SDC Maintenance Page for the Sample SDC:
|
|
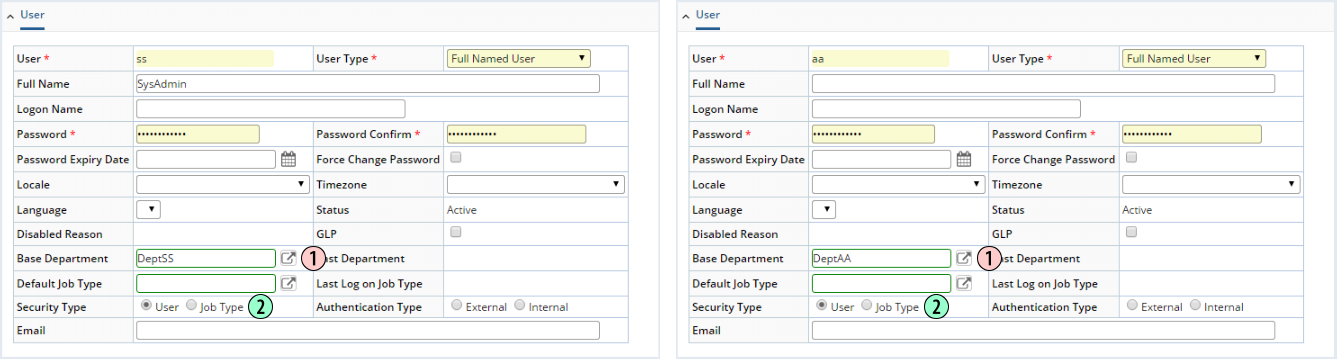
Go to the Department List page (System Admin → Security → Departments). Add two Departments with the identifiers "DeptSS" and "DeptAA".
|
|
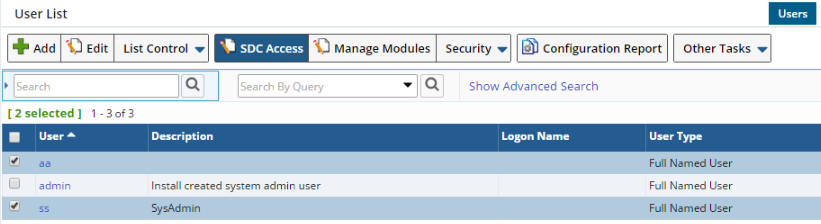
Go to the User List Page (System Admin → Security → Users). Add two Users with the identifiers "ss" and "aa".
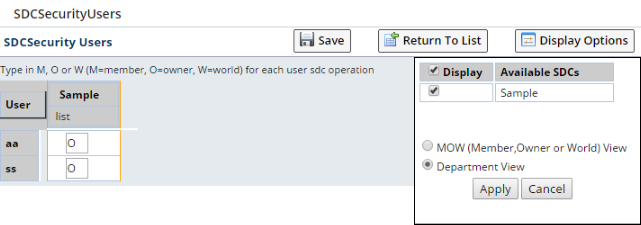
After saving these changes, return to the User List page. Select both Users, then click "SDC Access".
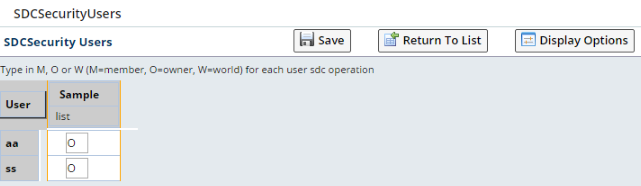
In the Security Users page, enter O for the "list" operation. This assigns the "Owner" Access Type to both Users as described in Departmental Security Principle above.
|
|
Test and see how all of this works:
Users "ss" and "aa" cannot see each others Samples in the Sample List page. They can see only the Samples they own. You can test this as follows:
The same effect would occur if the Access Type is "M" ("Member"
Access Type as described in Departmental
Security Principle above). Since "ss" is a member of "DeptSS"
and "aa" is a member of "DeptAA", each User |
You can also specify SDI ownership by using "Department View" to directly declare each User's Department:
|
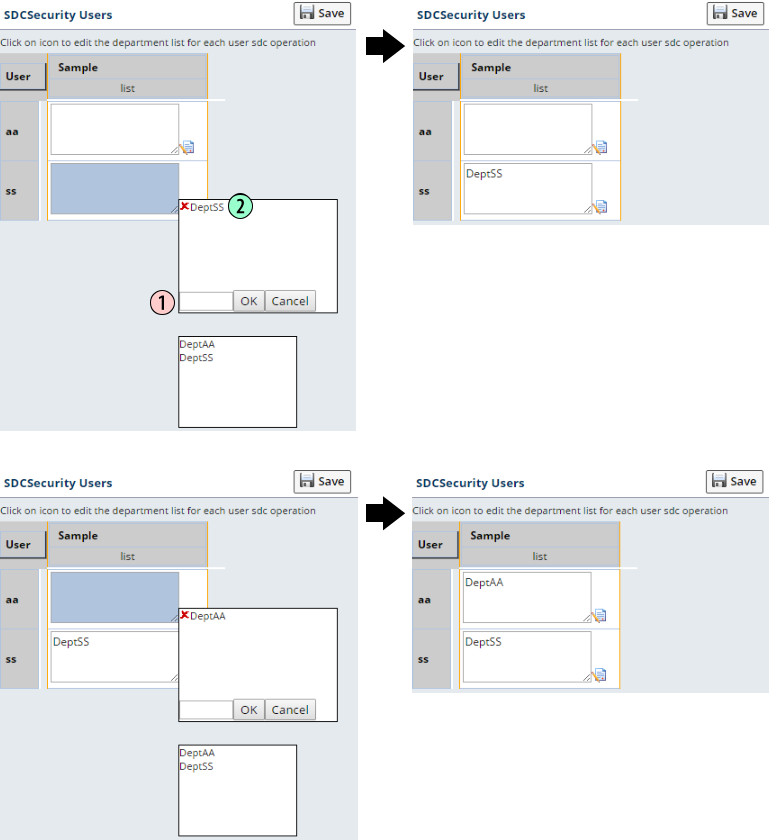
In addition to the "MOW" (Member-Owner-World) View in the SDC Access Security Users page, clicking "Display Options" lets you switch to "Departmental" View:
Click the "Department View" radio button. For each User, this lets you specify Departments that will own SDIs. In order for "Departmental View" to work for a given Department, "Can Take Ownership" must be checked in the Department Maint page. The "MOW View" does not require this. Here we specify a unique Department for each User ("DeptSS" for User "ss" and "DeptAA" for User "aa"):
|
|
Since "ss" is a member of "DeptSS" and "aa" is a member of "DeptAA", each User cannot see the others Samples because they are in different Departments. |
Departmental Security for Data Sets and SDIWorkitems (Tests) |
The DataSet and SDIWorkitem SDCs provide specialized functionality in their respective SDC "Access Control" Security/Update Options.
| Definitions |
The following definitions apply to this discussion:
| SDC | Displayed Name in LabVantage GUI | Database Table |
| Primary | Sample (see Note 1) | s_Sample |
| DataSet | Data Set | SDIData |
| SDIWorkitem | SDI Workitem (see Note 2) | SDIWorkitem |
| Workitem | Test Method | Workitem |
Note 1: "Primary" is the SDC for which data are entered. In this discussion, we assume this is the Sample SDC.
Note 2: "SDI Workitems" are also referred to as "Tests" (see Adding and Maintaining Tests).
| Terminology | Meaning |
| Data Entry | Access Control option will be enforced when entering data in the Data Entry page. |
| Data Set Maintenance | Access Control option will be enforced when accessing Data Sets in the Data Set List page. |
| Test Maintenance | Access Control option will be enforced when accessing Tests in the SDIWorkitem List page. |
| Data Sets |
|
| Access Control defined for the DataSet SDC: |
Data Entry enforces Departmental Security defined for this SDC: |
Data Set Maintenance enforces Departmental
Security defined for this SDC: |
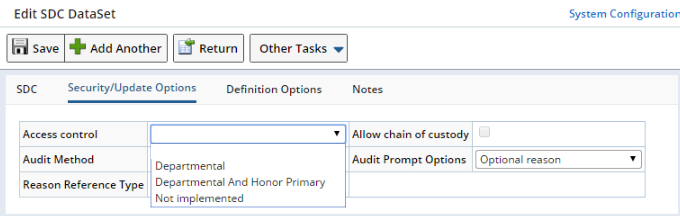
| Departmental | DataSet | DataSet |
| Departmental and Honor Primary | Primary and DataSet | Primary and DataSet |
| Not Implemented | Primary | None |
Note that the DataSet SDC has no Role-Level Access options.
| Departmental |
The "Departmental" option enforces only the Departmental Security defined for the Data Set SDC, thereby allowing separate Department Security definitions for the Primary SDC and the DataSet SDC.
The AddDataSet and AddSDIWorkItem Actions set the appropriate values in the SecurityUser and SecurityDepartment columns of the SDIData table. However, these values can be overridden by the "securityuser" and "securitydepartment" properties of the AddDataSet Action. The order of preference is:
| • | SecurityUser: |
| 1. | Property value passed to the AddDataSet or AddSDIWorkitem Action. |
| 2. | Current User. |
| • | SecurityDepartment: |
| 1. | Property value passed to the AddDataSet or AddSDIWorkitem Action. |
| 2. | SecurityDepartment value for the Workitem (if added using the AddSDIWorkitem Action). |
| 3. | SecurityDepartment value for the corresponding Parameter List. |
| 4. | Current Users default Department. |
| Departmental and Honor Primary |
The "Departmental and Honor Primary" option allows the Departmental Security defined for both the Primary SDC and the DataSet SDC to be enforced during Data Entry and Data Set Maintenance.
As a use case, assume that the following relationships and conditions exist:
User-Specific Relationships
Four Departments exist. Two represent physical locations ("NY Site" and "NJ Site"), while the other two represent conceptual laboratories ("Chemistry Lab" and "Biology Lab"). These relationships exist with regard to each User's Department and physical location:
| User | User is a Member of Department: | User's Physical Location: |
| aa | Chemistry Lab, NY Site | NY Site |
| bb | Biology Lab, NJ Site | NJ Site |
| cc | NY Site | NY Site |
| dd | NJ Site | NJ Site |
Department-Specific Relationships
Sample S1 exists with these Data Sets and Access Control settings:
| Sample | Sample SDC Access Control | Data Sets | DataSet SDC Access Control |
| S1 | Departmental | ChemTest, BioTest | Departmental and Honor Primary |
Assume that S1 is shipped to the NY Site. In this case:
| • | User cc can manage the Sample but cannot access any of its Data Sets. |
| • | User aa can access the ChemTest Data Set but not the BioTest Data Set. |
| • | Users bb and dd cannot access the Sample or any of its Data Sets. |
Next, assume that S1 is shipped to the NJ Site. In this case:
| • | User dd can manage the Sample but cannot access any of its Data Sets. |
| • | User bb can access the BioTest Data Set but not the ChemTest Data Set. |
| • | Users aa and cc cannot access the Sample at all. |
| SDI Workitems (Tests) |
The SDIWorkitem SDC offers the "Honor Workitem" and "Honor Workitem and Primary" options:
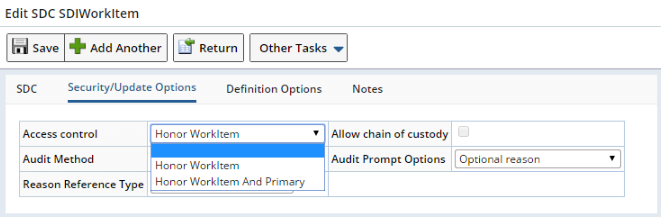
|
As shown below, "Honor Workitem" allows the SDIWorkitem SDC to simply inherit the Departmental Security defined for the Workitem SDC. "Honor Workitem and Primary" also inherits the Workitem's Access Control, but additionally enforces the Departmental Security defined for the primary SDC:
| Access Control defined for the SDIWorkitem SDC: |
Data Entry enforces Departmental Security defined for this SDC: |
Test Maintenance enforces Departmental Security defined for this SDC: |
| Honor Workitem | Not Applicable (see Note 1) | Workitem (see Note 2) |
| Honor Workitem and Primary | Not Applicable (See Note 1) | Primary and Workitem (see Note 2) |
Note 1: These options do not affect Data Entry.
Note 2: The SDIWorkitem SDC inherits the Access Control defined for the Workitem SDC. For example, if you define "Departmental" Access Control for the Workitem SDC and "Honor Workitem and Primary" for the SDIWorkitem SDC, that would be equivalent to defining "Departmental and Honor Primary" to the DataSet SDC.
Granting SDI Access to Multiple Departments |
The example configurations provided thus far assume that Departmental Security associates one Department to an SDI. However, multiple Departments may require access to the same SDI.
For example, assume that a site called "Laboratory-A" is also a Department. Users who access Sample-001 at "Laboratory-A" are therefore also members of that Department. These Users will generally retain sole access to Sample-001, i.e., they are the "owners" of the Sample and assume ultimate "responsibility" for the Sample. Security protocol dictates that Users in other parallel laboratories cannot have access to Sample-001. In this case, the Department "Laboratory-A" is specified in the SecurityDepartment column of the primary (Sample). No problems exist as long as Sample-001 remains in the posession of "Laboratory-A".
In the real world, Sample-001 will eventually be moved to a Repository. The Repository is also a Department with its own Users who require access to Sample-001. This is a typical BioBanking (ASL) scenario. During all Custodial Domain transfers in BioBanking ASL, the SecurityDepartment of the primary is changed to the Repository Department when Sample-001 is transferred. The result is that the original "owners" of Sample-001 can no longer access it. However, both "Laboratory-A" and the Department in possession require access. The problem becomes subsequently more complex if Sample-001 is transferred to a third-party testing facility. Suffice it to say that somewhere along the line, someone is going to lose access to the Sample.
To deal with these problems, the AddSDISecurityDept Action lets you specify multiple Departments that can access a Sample. This Action inserts a record into the SDISecurityDepartment table, which specifies additional Departments that can access the primary. Security is then defined by the union of all Departments specified in the SDISecurityDepartment table, plus all Departments specified in the SecurityDepartment column of the primary. A User who is a member of either of these Deaprtmentd can access the SDI. The DeleteSDISecurityDep Action lets you remove these records from the SDISecurityDepartment table.
About Departments and Custody |
With specific regard to Custody, the Department Maintenance page offers a "Retain Department Access" option that allows a Custodial Domain to retain membership access to the SDI (Sample) when Departmental Access Control is enabled for the primary SDC.
Interaction Between Role-Level Access and Departmental Security |
|
|
Roles are used to control 2 levels of access:
|
Access Level |
Description |
|
| (a) | Row-level | Assign Roles to Users and SDIs. A User's Role then determines whether or not he can access rows (SDIs) in the SDC. |
| (b) | Element-level | Assign Roles to Users, then assign Roles to buttons or columns on a Web page. A User's Role then determines whether or not he can see the buttons or columns. |
Departmental Security also provides two levels of access:
|
Access Level |
Description |
|
| (c) | Row-level | The viewing and editing operations a user can do on an SDI depend on his relationship to the owner of the SDI. |
| (d) | Element-level | The buttons a user can click (which do something with an SDI) depend on his relationship to the owner of the SDI. |
Roles relate to Departmental Security as follows:
| • | (a) and (c) are mutually exclusive (you cannot use them together). |
| • | (b) can be used with (d), but (b) overrides (d). This is because (b) determines if the button or column is there at all. In contrast, (d) assumes the button or column is there, and decides if you can do the operation on the selected SDIs. |
Job Types |
|
|
Principle |
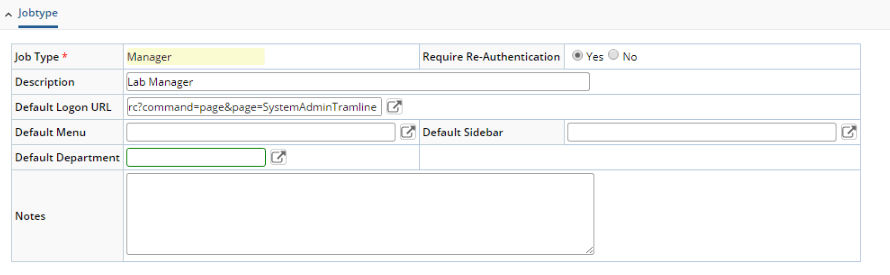
A User who enters data may belong to only one Role and one Department. However, this same User may also assume managerial duties that are defined by other Roles in other Departments. "Job Types" let such a User dynamically change between these jobs. For example, such a User can be assigned two Job Types:
| Job Type | Roles | SDC Access for Departmental Security |
| Data Entry | Lab Data Entry
Analyst |
Member of "Testing" Department |
| Manager | Administrator
Lab Manager |
Member of "QC" Department |
When a User logs on with one of these Job Types, he is assigned the Roles and SDC Access for that Job Type, and is directed to a startup page based on the Job Type.
Configuration |
Here is an example of how to setup Job Types:
|
Go to the SDC List page (System Admin → Configuration → SDCs). Edit the SDC Maintenance Page for the Sample SDC:
|
|
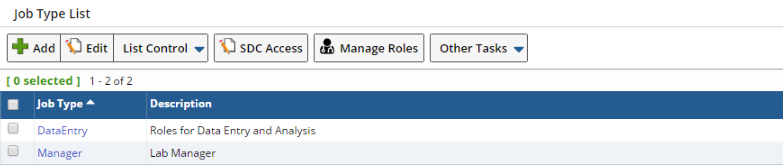
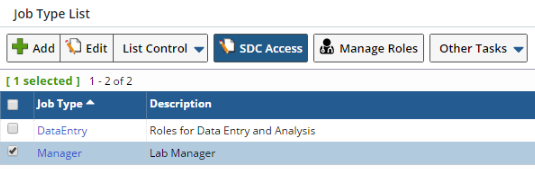
Go to the Job Type List page (System Admin → Security → Job Types).
Add a Job Type by clicking "Add":
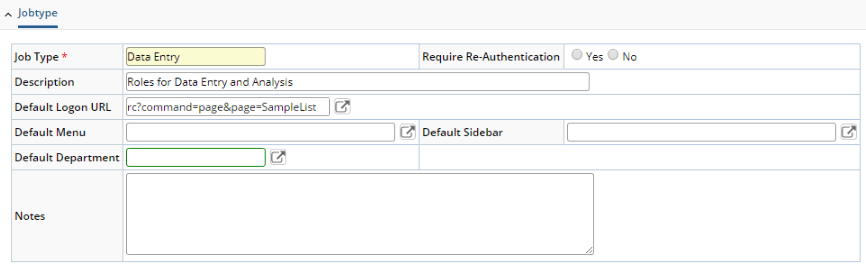
Enter values for these fields, then "Save".
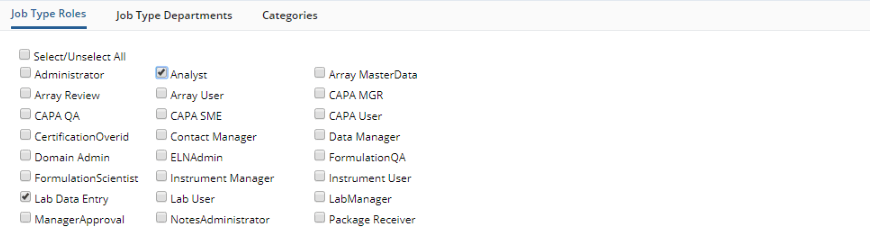
Select the Roles that will apply to this Job Type, then "Save" again. This example uses the "Lab Data Entry" and "Analyst" Roles:
|
|
Add a second Job Type by repeating step 2, but using these values:
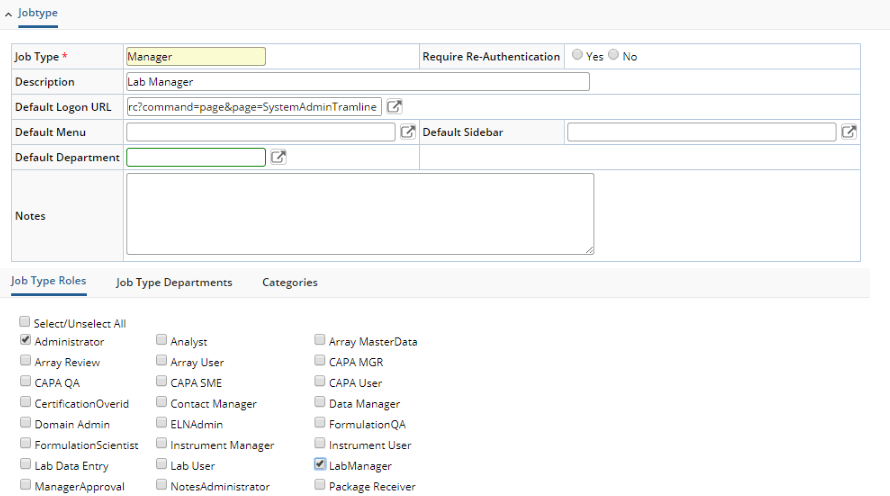
Select the Roles that will apply to this Job Type, then "Save" again. This example uses the "Administrator" and "Lab Manager" Roles:
|
|
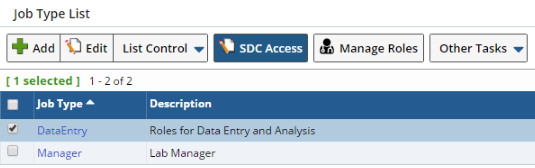
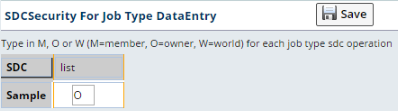
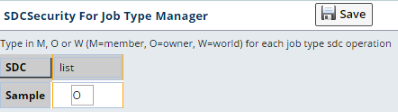
Go to the Job Type List page (System Admin → Security → Job Types). Select the "Data Entry" Job Type, then click "SDC Access" (below left). In the Security Job Type page, enter O for the "list" operation, then "Save". This assigns the "Owner" Access Type as described in Departmental Security Principle above.
Return to the Job Type List page and repeat the above procedure for the "Manager" Job Type:
|
|
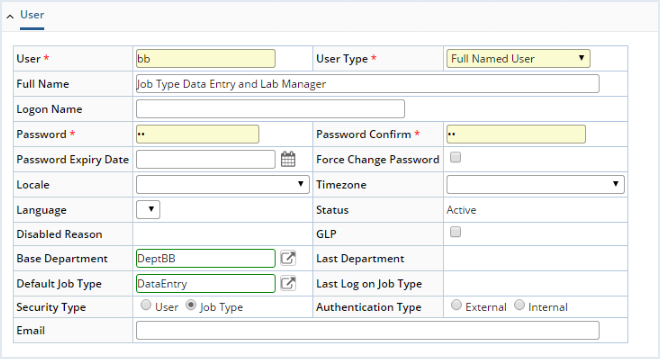
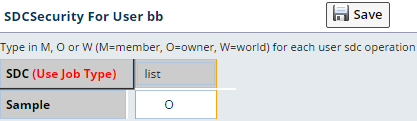
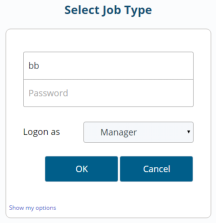
Go to the User List Page (System Admin → Security → Users). Add a User for the Job Type (this example uses the User identifier "bb").
Proceed as follows:
|
|
Logon as the User with the two Job Types (this is User "bb" in our example). As specified, the Sample List page opens with the Data Entry Job Type. Also, functionality is restricted to the Roles you assigned. SDC Access through Departmental Security functions as described in Departmental Security and SDC Access.
Now you are ready to change jobs (see Changing Jobs below). |
Changing Jobs |
| Option 1: Require Re-Authentication |
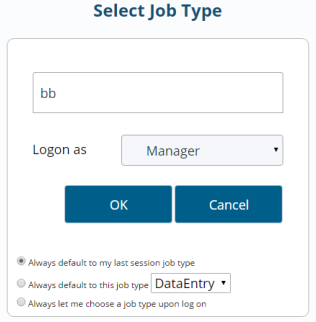
To change jobs, choose a different Job Type from the dropdown in the lower right corner of the screen:

|
|
The Job Type Manager page then provides a new logon form with the Username
populated and the chosen Job Type selected.
If "Require Re-Authentication" is set to "Yes" for the Job Type, a Password is required as shown at the left.
|
After providing the Logon credentials, you are then logged on with the new Job Type:

|
The session for the previous Job Type is auto logged out, functionality is now restricted to the Roles you assigned, and SDC Access through Departmental Security is now applicable to the new Job Type.
|
The Job Type for the previous logon is remembered, and all subsequent logons will default to last Job Type.
Clicking "Show my options" offers these logon alternatives:
|
|
| Option 2: Do Not Require Re-Authentication |
To change Job Type without re-entering password, set "Require Re-Authentication" for the Job Type to "No".
Default Departments and Job Type Departments |
You can add dynamic Department memberships to Job Types. This lets a User logon with a Job Type and inherit the Department membership defined for that Job Type.
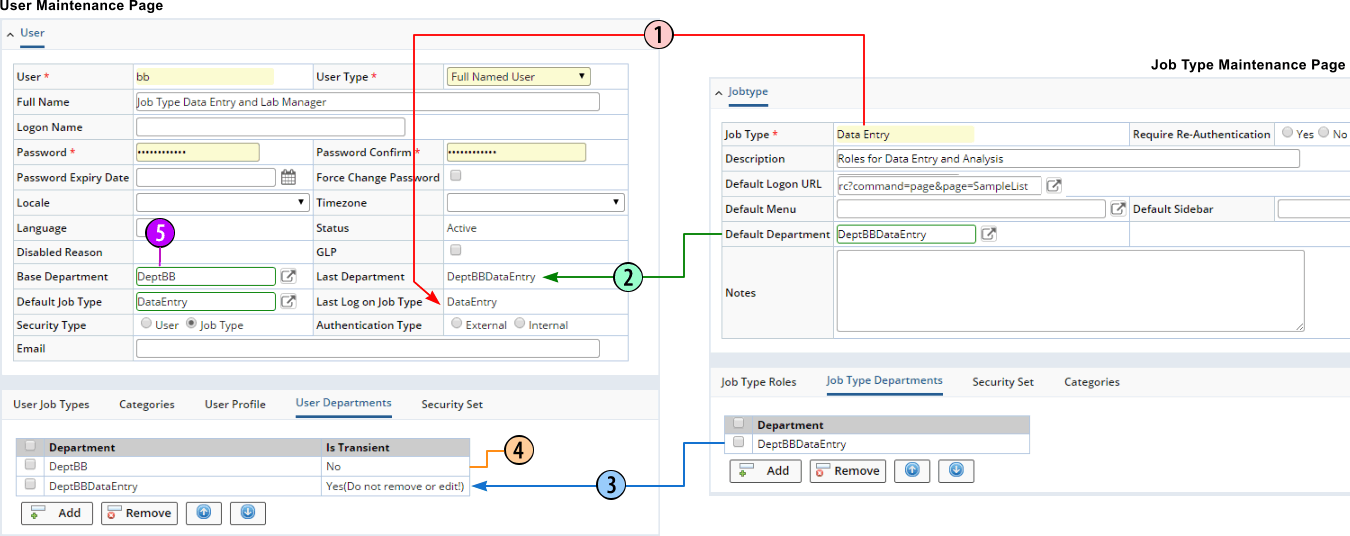
|
| 1. | The "Last Logon Job Type" in the User Maintenance page is a read-only field that shows the last Job Type with which the User logged on (including the current active session). It is not populated until the User logs on with a Security Type of "Job Type". | ||||||||||||
| 2. | The "Default Department" field in the Job Type Maintenance page lets you specify a Default Department for the Job Type. The "Default Department" for the Job Type is reflected in the read-only "Last Department" field in the User Maintenance page to indicate the actual Department to which the User belongs after logging on. | ||||||||||||
| 3. | The "Job Type Departments" detail in the Job Type Maintenance page lets you optionally add and delete Departments from a Job Type. | ||||||||||||
| 4. | "Is Transient" = "No" indicates that
the Department is the User's assigned Department.
"Is Transient" = "Yes (do not remove or edit)" indicates that the Department is transiently synchronized during the logon process. This is the logon process:
|
||||||||||||
| 5. | The "Base Department" field on the User Maintenance page specifies the primary Department to which the User belongs. |
Default Menu and Sidebar |
If you specify a "Default Menu" and "Default Sidebar" for a Job Type, when a User logs on or changes Job Types, these are used instead of the Default Menu and Sidebar defined in the GUI Policy or the Startup Menu and SideBar defined by the User Profile. Additional control is provided by the "Do Not Use Job style Start URL" property in the GUI Policy, which can ignore the Logon, Menu, and Sidebar defaults specified by the Job Type and use those defined by the GUI Policy or User Profile.
|
|
SDI Security |
|
|
Principle |
SDI Security lets you grant a set of Users, Job Types (Users assigned the Roles and SDC Access for the Job Type), or Departments (Users in the Department) permission to perform a set of SDC Operations on selected SDIs. "Security Set" SDIs are used to define these permissions.
| Simple Use Case: Samples |
In the most simple use case, a Security Set defined for each Sample can grant the permissions shown.
|
|
||||||||||||||||||||||||||||||||||||||||||
| Typical Use Case: Batch Samples |
A theoretical scenario shows the granularity achievable with SDI Security. Here, SDI Security can be used to provide different permissions on each Batch, as well as each Sample within a Batch.
|
|
||||||||||||||||||||||||||||||||||||||||||||||||||||||||||||||||||||||||||||||||||||||||||||||||||
In this case, typical options would be:
| • | Apply Two Security Sets
This is the use case shown above. Here, one Security Set is applied to the Batch SDC, and another to the Sample SDC. This lets you control a set of permissions for a Batch SDI, and another set for the Sample SDIs in the Batch. |
| • | Use the Copy-Down Policy You can apply a Security Set to the Batch SDC, then use the "Security Set" property in the Copy-Down Policy to copy the Security Set to all Samples in the Batch. The permissions for the Batch are then automatically applied to the Samples in the Batch. |
Configuration |
| Enabling SDI Security for an SDC |
| NOTE: | All examples use the Sample SDC, but the procedure is the same for all SDCs. |
Before using SDI Security, you must setup the SDC (and optionally some associated SDI List pages) according to this example.
Go to the SDC List page (System Admin → Configuration → SDCs). Edit the SDC Maintenance Page for the desired SDC (in this case, Sample):
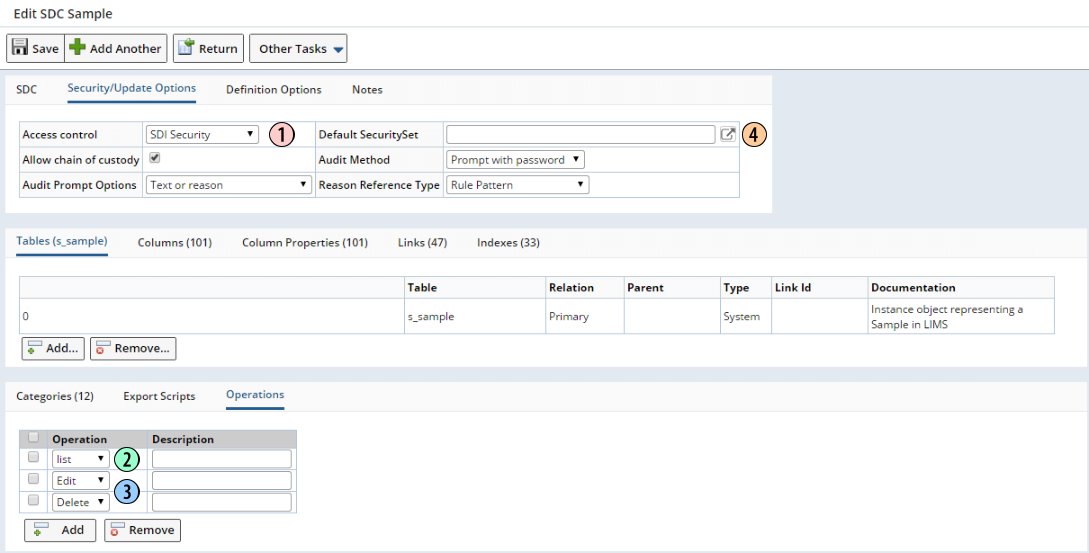
|
| 1. | Set "Access Control" to "SDI Security", then "Save". This activates SDI Security for the SDC (in this case "Sample"). The "SecuritySet" column is added to the "s_Sample" table, which allows specific Security Sets to be associated with Sample SDIs. |
| 2. | The "list" SDC Operation is automatically added. Users granted "list" access to the Sample SDC will be able view Samples in the Sample List page. |
| 3. | You can also add the "Edit" and "Delete" SDC Operations, providing the "Security" property for the "Edit" and "Delete" button in the advancedtoolbar Element for the relevant SDI List page (in this case, the Sample List page) is set to provide these Operations. |
| 4. | After you have created some Security Sets, you can optionally add a "Default Security Set", which will automatically be added to all new SDIs for this SDC. |
Now that the SDC is setup, you can create Security Sets for SDIs belonging to this SDC.
| Global and Owned Security Sets |
There are two types of Security Sets: "Global" and "Owned".
|
Global Security Sets Create "Global" Security Sets when you want to setup permissions ahead of time, then apply them to SDIs as required. You create Global Security Sets in the Security Set List page (System Admin → Security → Security Sets). This is shown in Example: Creating and Applying a Global Security Set.
|
|
Owned Security Sets Create "Owned" Security Sets when you want to grant permissions for specific SDIs on a "as needed" basis. As such, Owned Security Sets are "owned by" (applicable to) that specific SDI. You create Owned Security Sets in the List or Maintenance page for a specific SDI. This is shown in Example: Creating and Applying an Owned Security Set. |
| Example: Creating and Applying a Global Security Set |
|
Open the Security Set List page (System Admin → Security → Security Sets), then click "Add":
Enter a unique identifier for the Security Set, then click "Save":
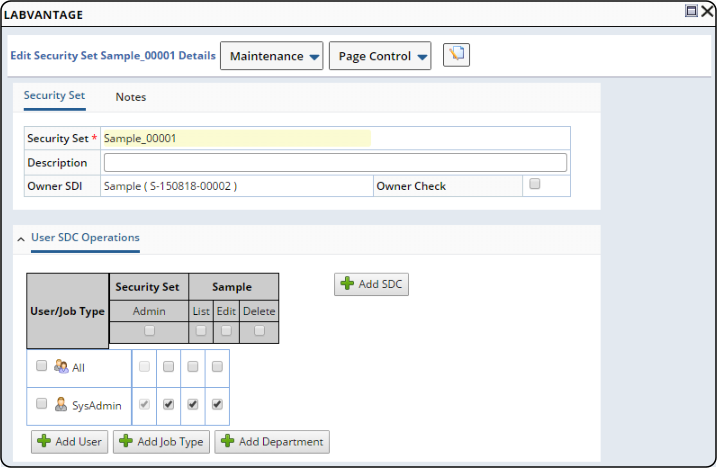
The detail tab added to the Security Set Maintenance page now lets you setup permissions for Users (or Job Types or Departments) and SDCs:
|
|
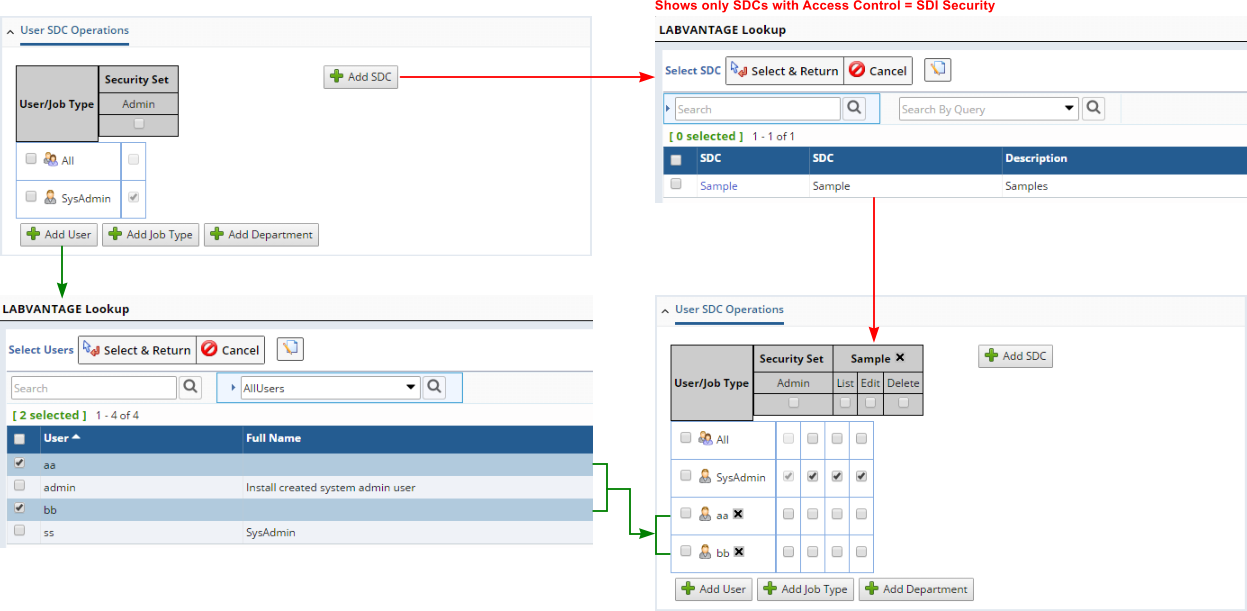
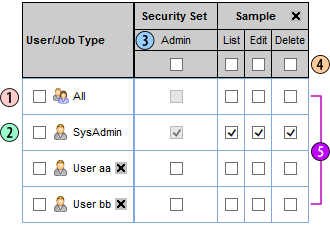
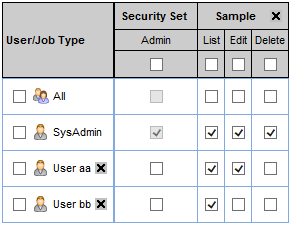
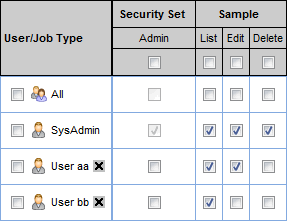
Here is where you grant permissions. Although this example adds Users, the procedure would be the same for adding Job Types or Departments. Accordingly, click "Add User" to add Users to the Security Set. Click "Add SDC" to add SDCs that have been enabled for SDI Security (as described in Enabling SDI Security for an SDC). This will create a selection matrix as shown below:
Here are guidelines for use when granting permissions. Although these guidelines reference Users, they apply to Job Types as well.
When you create a Security Set (whether Global or Owned):
When granting permissions, note that:
In this example, we grant the permissions shown at the right in the above illustration.
|
|
After saving, the Global Security Set is added to the Security Set List page:
You can now apply this Global Security Set to any SDI in the relevant SDI List or Maintenance page. |
|
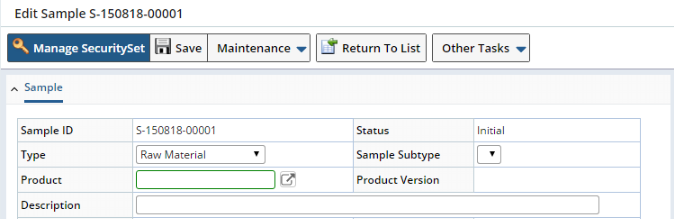
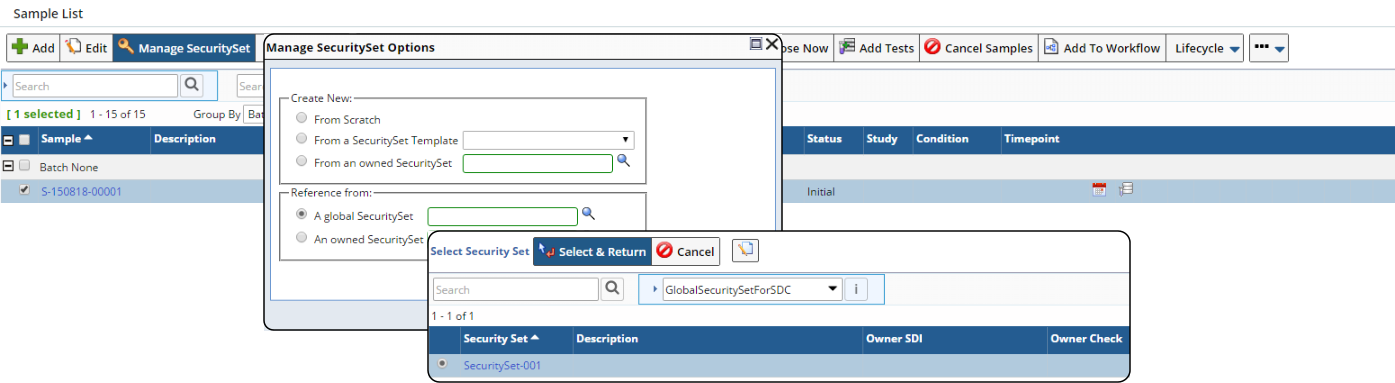
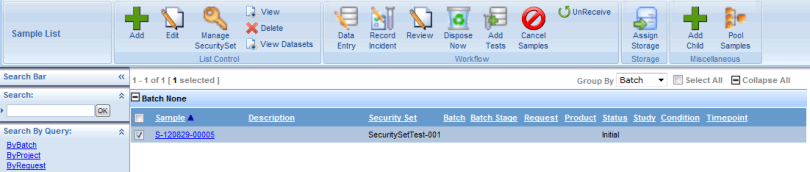
You can apply the Global Security Set from an SDI List page or an SDI Maintenance page. Since this example uses the Sample SDC, the two alternatives are: Sample List Page Open the Sample List page (LIMS → Samples → Manage). Select a Sample, then click "Manage Security Set":
Sample Maintenance Page Open the Sample List page (LIMS → Samples → Manage). Select a Sample, then click "Edit". In the Sample Maintenance page, click "Manage Security Set":
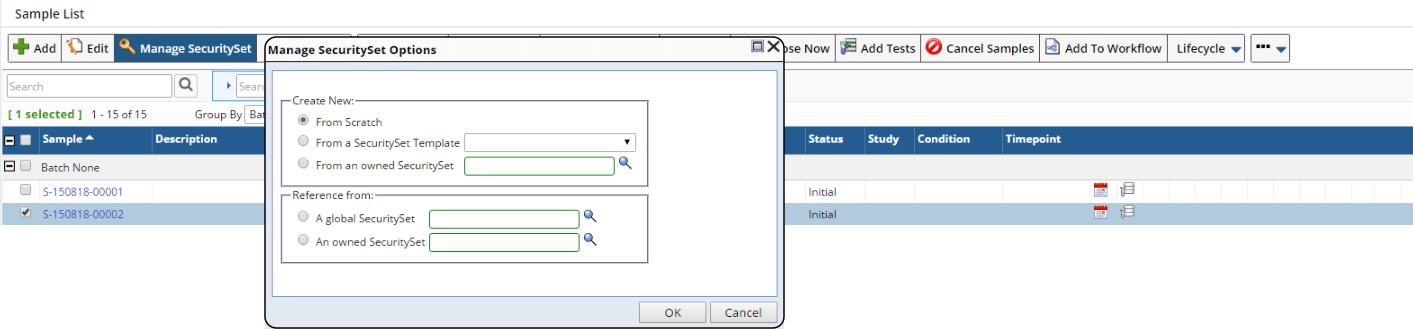
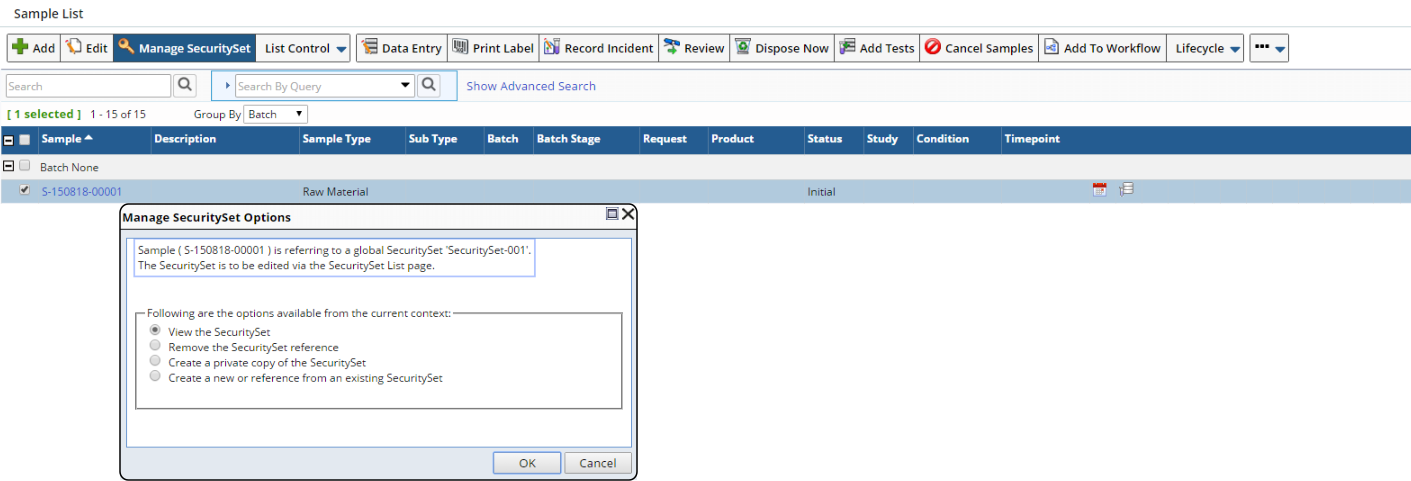
In either case, the "Manage Security Set Options" dialog opens (Sample List page shown below). This lets you choose how to apply the Security Set:
Since you want to apply the Global Security Set you just created, select "Reference From: A Global Security Set". The Lookup page shows only Global Security Sets that have been created for the current SDC (which, in this case, is the Sample SDC). After selecting the Global Security Set, click OK in the "Manage Security Set Options" dialog. The Global Security Set is now applied to the selected Sample:
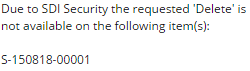
Users without permission to perform an operation are notified by a dialog such as this example, which is what "User aa" and "User bb" would see if they tried to delete the Sample:
|
|||||||||||||||||||||||||||||||||||
| Example: Creating and Applying an Owned Security Set |
|
You can create the Owned Security Set from an SDI List page or an SDI Maintenance page. Since this example uses the Sample SDC, the two alternatives are: Sample List Page Open the Sample List page (LIMS → Samples → Manage). Select a Sample, then click "Manage Security Set":
Sample Maintenance Page Open the Sample List page (LIMS → Samples → Manage). Select a Sample, then click "Edit". In the Sample Maintenance page, click "Manage Security Set":
In either case, the "Manage Security Set Options" dialog opens (Sample List page shown below). This lets you choose how to apply the Security Set:
|
|
Select "Create New: From Scratch". A matrix is created similar to the matrix described in step 2 of the Example for Creating a Global Security Set. The only exception is that the SDC is automatically added (and cannot be deleted), since Owned Security Sets are created in the context of a specific SDC (in this case, the Sample SDC):
You can then add Users in the same manner as step 2 of the Example for Creating a Global Security Set, except that you do not have to add the SDC. All other behavior described in step 2 of the Example for Creating a Global Security Set also applies to Owned Security Sets.
Another notable difference between Global and Owned Security Sets is that Owned Security Sets have an "Owner SDI" column and an "Owner Check" flag:
|
|
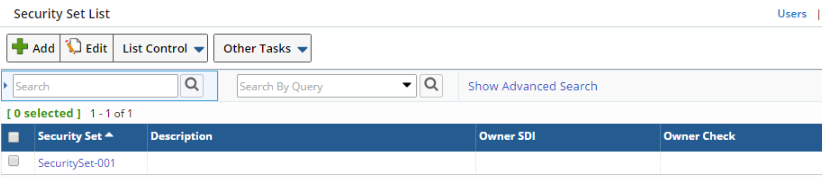
Open the Security Set List page (System Admin → Security → Security Sets). You will see the Owned Seurity Set with the automatially-generated key [SDCId]_nnnnn, where [SDCId] is the identifier of the SDC, and nnnnn is the sequenced number of the Owned Security Set.
Also note that the "Owner SDI' is shown, as well as the "Owner Check" flag. |
Managing Global Security Sets |
| Conditions for Editing and Deleting Global Security Sets |
These conditions apply to editing and deleting Global Security Sets:
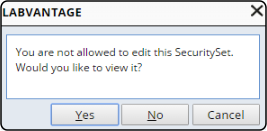
| • | Global Security Sets can be edited and deleted in the Security Set List
page, but only by a User with the "Admin" permission for the Security
Set, by or the (system) User. Violators are prompted by the dialog below.
Clicking "Yes" lets you view the Security Set in read-only mode:
|
|
| • | A Global Security Set cannot be deleted in the Security Set List page if it is applied to an SDI. You must delete the SDIs before you can delete the Global Security Set. |
| Editing Global Security Sets in SDI List and Maintenance Pages |
In the SDI List page (shown) or SDI Maintenance page, click "Manage Security Set" for an SDI that has a Global Security Set applied.
|
The "Manage Security Set Options" dialog informs you that this refers to a Global Security Set, and offers these options:
| Option | Description | |||||||||||||
| View the Security Set | Opens the Security Set in read-only mode. | |||||||||||||
| Remove the Security Set Reference | Breaks the association between the Global Security Set and the SDI, effectively "un-applying" the Security Set by nulling the "Security Set" column of the SDI. | |||||||||||||
| Create a Private Copy of the Security Set | Creates an Owned Security Set from this Global Security Set. This makes a private copy of the existing Global Security Set and applies it to the current SDI. The current SDI then becomes the "Owner SDI". | |||||||||||||
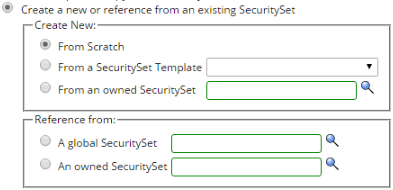
| Create a New or Reference from an Existing Security Set |
Opens the same dialog as that shown when creating an Owned Security Set:
These options are available:
|
Managing Owned Security Sets |
| Conditions for Editing and Deleting Owned Security Sets |
These conditions apply to editing and deleting Owned Security Sets:
| • | Owned Security Sets can be edited in the Security Set List page, but
only by a User with the "Admin" permission for the Security Set,
or by the (system) User. Violators are prompted by the dialog below. Clicking
"Yes" lets you view the Security Set in read-only mode:
|
|
| • | Owned Security Sets cannot be deleted from the Security Set List page, since they maintain a context to an existing SDI that belongs to a SDC that has SDI Security enabled. If all SDIs having the same Security Set are deleted, the Security Set is automatically deleted from the Security Set List page. |
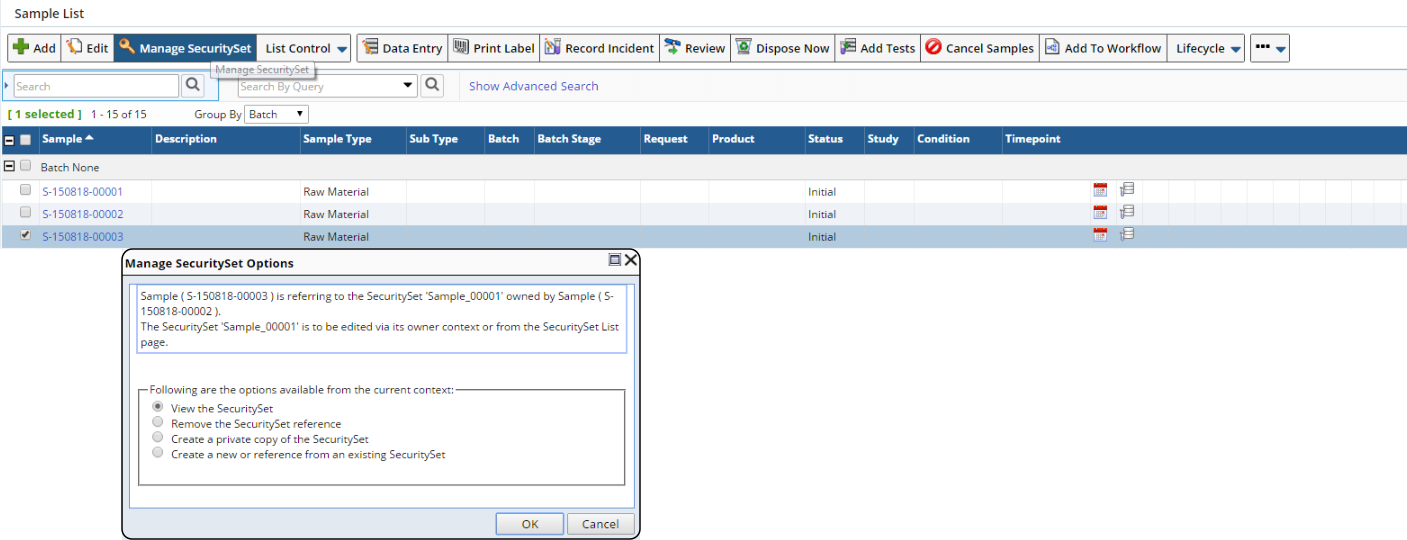
| Editing Owned Security Sets |
There are two cases, depending on the Owner Check option.
|
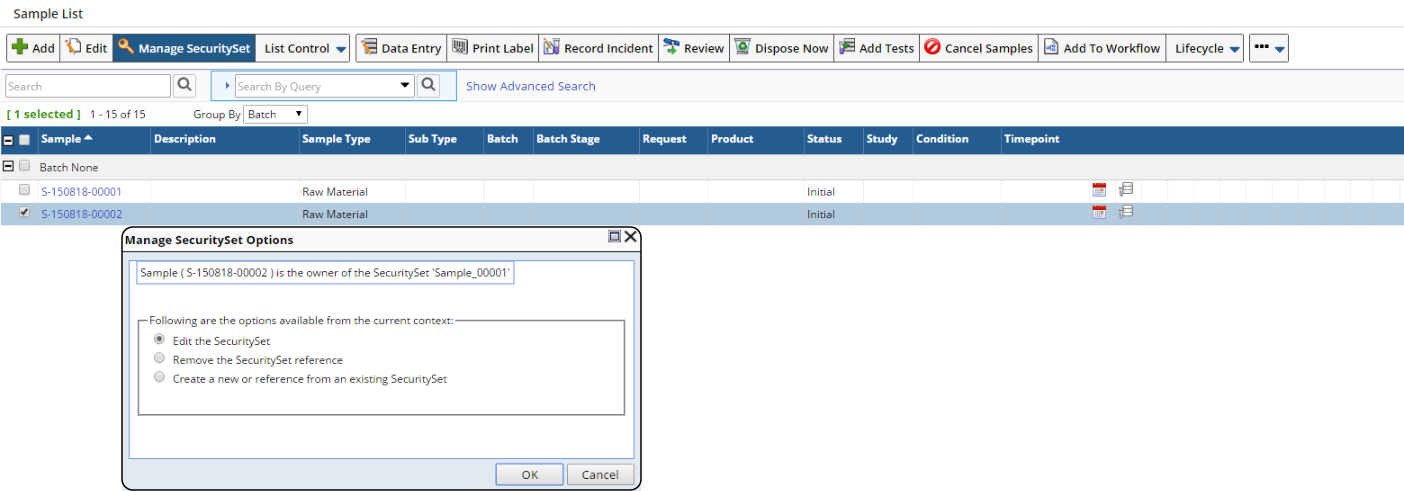
Case 1 If Owner Check is not enabled for the Owned Security Set, or "Owner Check" is enabled and the selected SDI is the "Owner SDI", the "Manage Security Set Options" dialog informs you that this SDI is the owner, and offers these options from the context of the current SDI:
|
|
Case 2 If Owner Check is enabled and the selected SDI is not the "Owner SDI", the "Manage Security Set Options" dialog informs you that this SDI is not the owner (as shown in Owner Check), and offers these options from the context of the current SDI:
|
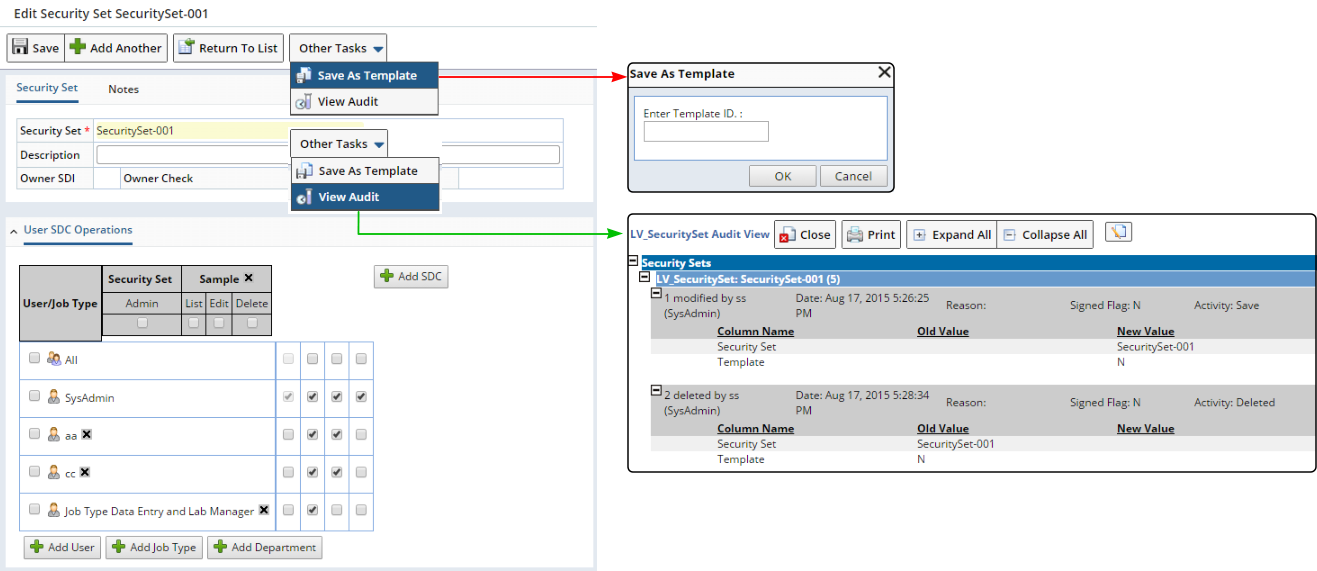
| Security Set Templates and Auditing |
Create Security Set Templates in the Security Set Maintenance page as shown below.
|
Security Sets are Audit-enabled in the Security Set Maintenance page (shown above) and Security Set List page.
Granting SDI Access to Multiple Security Sets |
The example configurations provided thus far assume that SDI Security associates one Security Set to an SDI. However, multiple Security Sets may require access to the same SDI. This scenario for Security Sets is similar to that described for Departments in Departmental Security and SDC Access → Granting SDI Access to Multiple Departments.
To deal with this, the AddSDISecuritySet Action lets you specify multiple Security Sets that can access a Sample. This Action inserts a record into the SDISecuritySet table, which specifies additional Security Sets that can access the primary. Security is then defined by the Users, Job Types, or Departments associated with any of the Security Sets specified in the SDISecuritySet table, plus all Security Sets specified in the SecuritySet column of the primary. The DeleteSDISecuritySet Action lets you remove these records from the SDISecuritySet table.
About Departments and Custody |
The Department Maintenance page offers "Current Custodian Security Set" and "Relinquish Custody Security Set" options that allow you to specify the Global Security Set to associate with the SDI when a Department takes or relinquishes custody of the SDI (Sample).
Database Connections |
|
|
When a User logs onto LabVantage, LabVantage assigns a "ConnectionId" to the database connection. This is a unique identifier consisting of a large number (an integer of typically 13 digits). The ConnectionId is random and is not generated in any defined sequence. The Security Policy lets you define Session Management options for the connection.
Security Policy |
|
|
A system-wide Security Policy lets you determine the level of Web security desired, including:
| • | Level of security when running Web Services. |
| • | Scope of Action processing supported when POSTing and GETing URL requests. |
| • | Scope of Action processing supported by the ProcessAction Ajax request. |
| • | Scope of Action processing supported by remote Java API calls from sapphire.accessor classes constructed using a RAK file (Remote Access Key). |
| • | Whether or not a a browser connection is bound to a specific entity. |
| • | How a request is filtered. |
| • | What happens when a security violation occurs. |