Overview |
|
|
|
Array Operations |
Overview |
|
|
Prior to adding and managing Arrays you must first define Array Master Data to identify the different types of Arrays you will create, and define a method for processing the Array. See Master Data Setup for more information.
Most Array operations are performed from the Plates and Gels List page. First, create an Array. Next, process it through the various steps of the Array life cycle. Once created, you can Load Arrays using rules previously defined in Array Layouts and Array Methods. Access the Plates and Gels list page from either Lab Admin → Arrays → Arrays or LIMS → Tests → Plates and Gels menu.
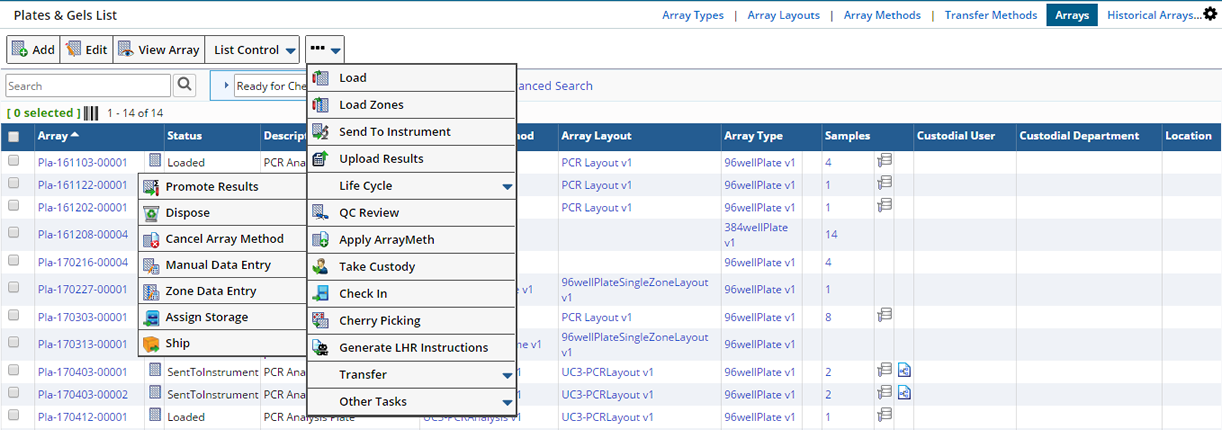
Following is a list of the Array Operation buttons and tasks you can perform from the Plates and Gels List Page. See Transfers for information about Transfer Operations.
| Button | Description |
| Add | Adds a blank Array. |
| Edit | Selects an Array to edit primary columns, manage Attachments and View details about the Array and any Applied Methods. |
| View Array | Shows the Array Grid for details allowing examination of content and results. |
| Delete | Deletes the individual Array instance. |
| Show Notes
Add Note |
Adds or Shows related Notes to the Array. |
| Load | Loads content into individual Array Items. When Loading, available content is determined by the Level field in the Array Method Content Detail tab. Only Zones defined as Item-level are displayed. |
| Load Zones | Loads content into all Array Items in a single step by specifying the content once for the entire Zone. When loading, available content is determined by the Level field in the Array Method Content Detail tab. Only Zones defined as Zone level are displayed. |
| Send to Instrument | Sends the Array to an Instrument to obtain results. |
| Upload Results | Uploads Instrument Results to the Array. Browse for the file to upload. |
| QC Review | Performs a QC Review against the whole Array (such as evaluating, inspecting controls and other checks, as well as noticing when alert limits are flagged or not). You can accept or reject all or part of the Array. |
| Apply Array Method | Applies an Array Method to a newly created Array or to an Existing Array. |
| Take Custody | Opens the "Take Array Custody" dialog where you can take, or force custody, of an Array (if permitted). The current user and department become the custodian. See Move Samples (Custodial Management) for more information. |
| Check In | Puts an Array into a Storage Location. |
| Dispose | Disposes of the entire Array. Status becomes "Disposed" and moves to the Historical Array List page. Once Disposed, an Array cannot be re-used. |
| Cancel Array Method | Cancels the most recently Applied Array Method (provided the Array Method status has not reached "Reviewed" or "Completed"). |
| Manual Data Entry | Performs manual Data Entry directly into the Array. |
| Zone Data Entry | Manually enters Zone-level data. |
| Assign Storage | Assigns an Array to a Storage Unit. Once an Array is stored, the status changes to "Stored" and moves to the Historical List page. From there you can clear the Storage and return the Array to the Plates and Gels list page. |
| Transfer | Array Transfer is the process of moving Array Item content from source Arrays to target Arrays or using ASL Grid Transfer, move Array Item content to or from an ASL Grid. See Transfer for information about the different types of Transfers you can perform. |
| Promote Results | Used to update the results back onto the loaded content Samples. Promoting results can include either Pushing results (see Simple Push) or pulling results using Calculations (see Complex Pull). |
| Dispose | Disposes of the entire Array. Status becomes "Disposed" and moves to the Historical Array List page. Once Disposed, an Array cannot be re-used. |
| Cancel Array Method | Cancels the most recently Applied Array Method (provided the Array Method status has not reached "Reviewed" or "Completed"). |
| Manual Data Entry | Performs manual Data Entry directly into the Array. |
| Zone Data Entry | Manually enters Zone-level data. |
| Assign Storage | Assigns an Array to a Storage Unit. Once an Array is stored, the status changes to "Stored" and moves to the Historical List page. From there you can clear the Storage and return the Array to the Plates and Gels list page. |
| Ship | Should you need to Ship Array(s) to an internal or external Shipping Location select the Arrays and choose "Ship" from the Lifecycle → Ship menu. The Add Package dialog displays. See Move Samples (Custodial Management) for more information about creating a Package for shipment. |
The following fields are displayed in the Plates and Gels list.
| Fields | Description | ||||||||||||||||||
| Array | Number automatically generated when the Array was created. | ||||||||||||||||||
| Status | Status of the Array:
|
||||||||||||||||||
| Description | Description of the Array. | ||||||||||||||||||
| Active Array Method | Active Array Method. See Applying
Array Methods for information about Applying Multiple Array Methods. |
||||||||||||||||||
| Array Layout | Array Layout. | ||||||||||||||||||
| Array Type | Array Type. | ||||||||||||||||||
| Samples | Number of Samples associated with the Array. Click the number to view the Samples in the Sample List page. | ||||||||||||||||||
| Custodial User | The Custodial User of this Array. | ||||||||||||||||||
| Custodial Department | The Custodial Department to which this Array is assigned. | ||||||||||||||||||
| Location | The Location path of an Array when placed in a Storage Unit. | ||||||||||||||||||
| Genealogy | Clicking the Genealogy icon |
||||||||||||||||||
| Executions | View the details of a Transfer Execution. See View Transfer Execution Details for more information. |
Creating/Adding Arrays |
|
|
In the Plates and Gels list page, click "Add". The Add Array dialog opens.
| NOTE: | You can also add Samples to an Array directly from a Sample List page. See Loading Samples to an Array for more information. |
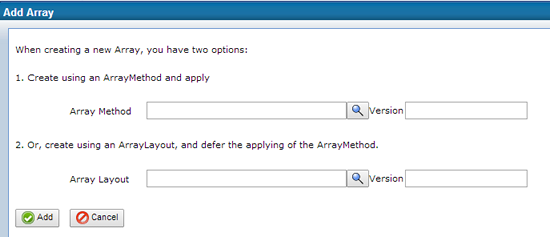
You can either apply an Array Method now (the Layout is defined on the Array Method), or choose just an Array Layout and apply an Array Method before Loading. Should you choose only a Layout, you will need to apply an Array Method manually before loading can take place. Changes made to an Array Method after it has been applied to an Array, are not reflected in the Array. You will need to create a new Array with the changed Array Method. Choose an Array Layout or Method, then click "Add". An Array ID is automatically generated, the Array is saved, and appears on the Plates and Gels List Page.
The Array Method defines the procedure for the execution of a Laboratory technique. This includes both how the Array is to be loaded, as well as how it will be analyzed and on which instrument. See Master Data Setup → Array Methods for details about defining an Array Method.
Typically, when the Array is created, the Array Method is automatically applied. However, there are cases when you need to apply an Array Method separately.
For example, in complex situations you may need to send the Array to multiple instruments for data collection. You will need to apply a new Array Method for each step of the process (an Array Method would need to be Applied each time the Array is sent to an Instrument in order to collect that Instrument's data).
When Transferring Source Arrays to new Target Arrays, the new Target Array will need to have an Array Method applied.
To Apply an Array Method, select the Array then click the "Apply Array Method button" on the Plates and Gels list page.
See Creating Overlays for detailed information about applying multiple Methods to an Array.
Loading Arrays |
|
|
When Loading Arrays, you are loading content (such as a Sample or Consumable) into a position in the Array, specifying how much and of what concentration. Arrays can be loaded:
| • | From the Plates and Gels list page. |
| • | Directly from Sample List pages, Samples are selected and then loaded into a Plate. See Loading Samples to an Array. |
| • | Transferring Array content. Transfers automatically load content from one Array to another. See Transfers. |
| • | Using the LoadArray and LoadArrayByPosition Actions supports Custom Loading. See Array Management API Usage Examples for information about OOB Array Management Actions. |
This section describes loading Arrays from the Plates and Gels list page.
From the Plates and Gels list page you are given two loading options. You can either Load individually (Array Item by Array Item), or entire Zones at a time. Typically, Unknowns are loaded individually, as you may want to choose content more specifically. Alternatively, you may choose to load a single Consumable into an entire Control Zone, exactly the same, in each Array Item.
The Level you define in the Array Method determines whether you are loading at the Array Item level or Zone level. The content displayed is also determined by the level, Item level content is available during Item Loading and Zone level content when Zone Loading. Load Arrays from the Plates and Gels List page, choosing Load or Load Zone:
| Load | Item-level Load. Loads Array Items individually. |
| Load Zone | Load Zone. Loads an entire Zone at once. |
Item Level Loading |
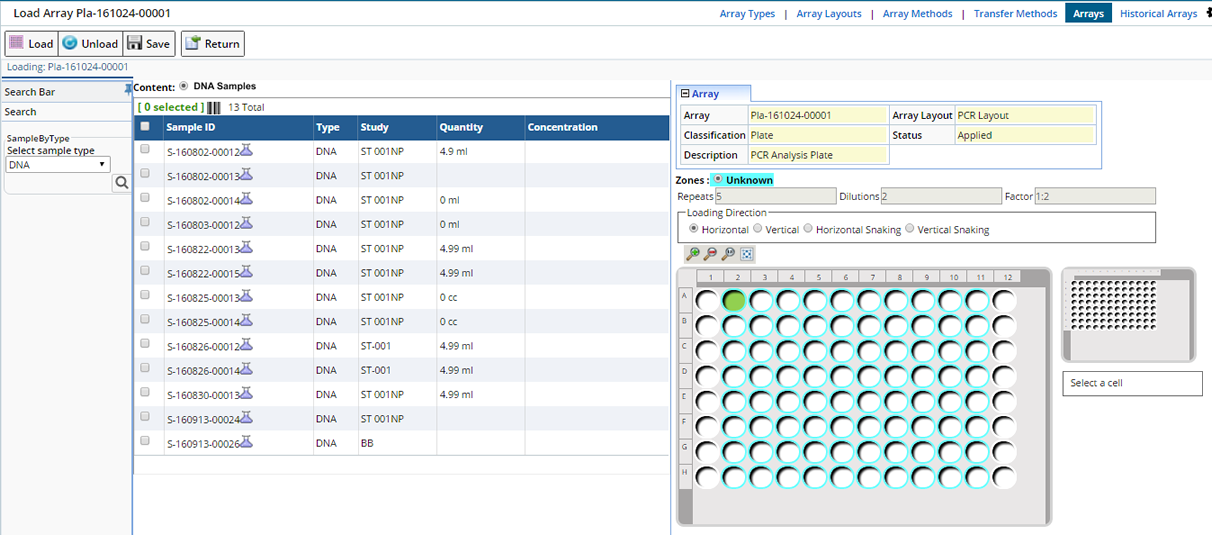
From the Plates and Gels List select the newly created Array and click "Load". The Load Array page opens.

The Load Array page has two panels.
The Left panel displays the Array ID (automatically generated when the Array is added) and the available Content (SDIs) as determined by the Content Detail tab on the Array Method.
| Feature | Description |
| Content Selector | Choose the Content you want to load. If multiple Content Types were defined at the Item level on the Array Method each will be available here. Upon choosing different contents, the left hand Side Candidate List is refreshed. |
| Content Search | If the Array Method defines a query for the Content List, the list top Search displays with the specified query as the only option.
If no query is defined in the Array Method, an Advanced Search Element corresponding to the defined Content SDC (Sample, Consumable) displays. Choose any query configured for the SDC. |
| Candidate List | In the left pane, the Content available for Loading (according to the query defined in the Array Method) displays. When no query is defined, use the Advanced Search Element to find Content. |
| Scan Icon | Scan one or more Samples to quickly locate the Sample(s) within the Candidate list. If the Sample is not found within the list an error displays. See Scan Icon for more information. |
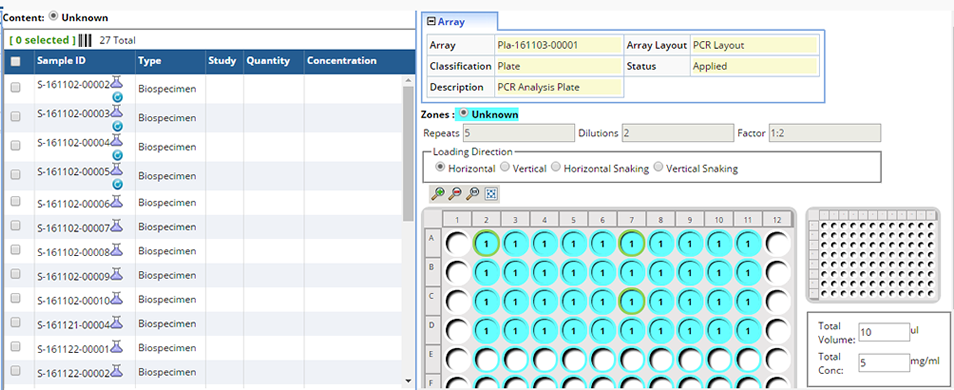
The right panel provides information about the Array based on the Layout and Method chosen when Creating and Loading the Array.
| Feature | Description | ||||
| Array Tab | The Array tab displays information about the Array being loaded. Configure the fields displayed in this tab using the Arrays Policy. | ||||
| Zone Selector | If multiple Zones are defined on the Array Layout each will display here, toggle between the Zones. When you choose different Zones, the Content Selector shows the possible contents of that Zone. | ||||
| Arrangement Rule | Displays the Arrangement specified in the Array Layout. | ||||
| Loading Direction | Loading direction defaults to Horizontal. | ||||
| Working Grid | Allows you to visualize loading the Array. The "active" part of the grid is determined by the Zone selected in the Zone selector. Highlight the the start position. | ||||
| Reference Grid | Provides an overall picture of the entire Array. When zoomed, a red box outlines the portion of the grid into which you are zoomed. You can move the box to any part of the grid to easily view Content. | ||||
| Selected Array Item Panel | Selecting an Array Item in the working grid displays detail information about the Content.
Information displayed could include:
|
| NOTE: | The Load Array page is configurable using the arrayloadtransfer Element. You can configure things like whether or not the Scan icon is available or define the columns that display in the left panel. |
In the left panel a list of available content displays (such as Samples or Consumables). The list of available content is dependent on what you choose in the Zone Selector (such as whether you want to load the Unknown or Control Zone) and what you choose in the Content Selector.Typically only one Content Type is defined per Zone. However, if you define multiple Content Types for the same Zone in the Array Layout, all will be available here. You can toggle between each when selecting the Content Type. Select the content you want to load into the Array.
Use the Scan Icon to quickly locate Content within the list. Clicking the Scan Icon opens the "Scan find and select" dialog. Scan the Samples you want to load into the Array. As each is scanned, those found are selected in the list (a check indicates the Sample was found). Those not found display with a warning icon.

In the right panel, the Array, as defined in the Layout, is displayed. You can load the Array automatically by selecting the content to load, then clicking the Load button. The Array is loaded according to the Arrangement defined in the Array Layout. An error message displays if you have not selected (or the Zone does not contain) enough Array Items for the Arrangement.
Manual Loading
You can optionally load content manually. Click a Sample(s) in the Left panel and drag it to any Array Item in the Array. That Array Item serves as the starting position (first Array Item). The content is then loaded according to the Arrangement including all repeats and dilutions.
Loading direction defaults to Horizontal. You can optionally change it during loading.
| Option | Description |
| Horizontal | Array Items are ordered Horizontally starting with the selected item. Loading moves from one row to the next beginning each new row at the first column of the Zone. |
| Vertical | Array Items are ordered Vertically starting with the selected item. Loading moves from one column to the next, beginning each new column at the first row of the Zone. |
| Horizontal Snaking | Array Items are ordered Horizontally and snake through the selected items. When snaking, after the last Array Item in a row is filled loading moves to the last Array Item of the next row and moves back toward the first column. |
| Vertical Snaking | Array Items are loaded vertically and snake through the selected items. When snaking, after the last Array Item in a column is filled loading moves to the last Array Item of the next column and moves back toward the first row. |
Click "Load". The Volume and Concentration dialog displays. See Volume and Concentration or Viewing Loaded Array for further details.
Zone Level Loading |
Zone Level loading allows you to load the same Content (such as a Consumable, Control or Master Mix) to an entire Zone. From the Plates and Gels List, select the newly created Array and click "Load Zone". Any Zones defined as Zone level display.

| Fields | Description |
| Zone | Zone to load. |
| Content | Content Type (such as Control, MasterMix, Treatment or Operation). |
| Description | Description of the Content to be loaded (defined in the Array Method). |
| Control | Control to be loaded (Consumable Type). |
| Zone Items Count | Number of available Array Items in the Zone. |
| Container | Choose a specific Consumable ContainerID that is used for loading. The container may either be scanned, or chosen from the lookup. |
| Available Quantity | Available inventory of the Container. |
| Consumable Lot ID | Id of the Consumable Lot. |
| Volume per Well | Optional quantity loaded per Array Item. This will default to the quantity specified in the Array Method. Total quantity is therefore multiplied by the number of Array Items. |
| Concentration per Well | Optional concentration loaded for each Array Item. Defaults to the concentration specified in the Array Method. |
| Description and Status of Container Selected | This validation confirms that the container ID that is scanned, matches the correct specified Consumable Type, and that if there is an expiration of the Consumable Lot that it is not expired. |
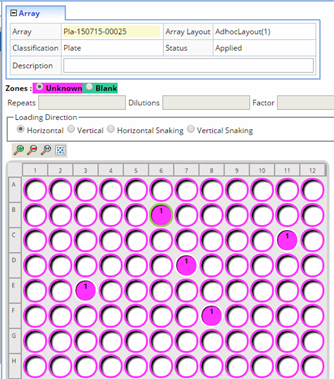
Adhoc Zone Loading |
If, in the Array Layout, you defined a Zone as Adhoc you can Load Samples into Array Items as desired. Choose to load a single Sample into multiple Array Items, or a single Sample into a single Array Item. You cannot load multiple Samples into multiple Array Items using Adhoc Loading.
When loading multiple Array Items from a single Sample the Source Sample is decremented according to the number of Array Items selected. If you select 5 Array Items, and the defined Content to load is 10 ul, the source Sample will be decremented by 50 ul.
The Sample is loaded into the selected Array Items.
Volume and Concentration |
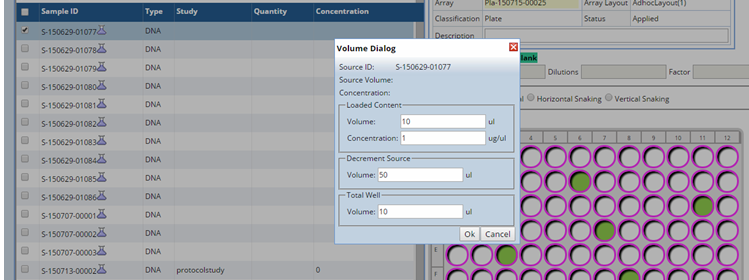
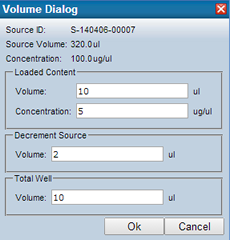
On each Load of an Array Item, LABVANTAGE presents a Volume Dialog. This Volume Dialog manages 3 different volumes whenever loading an Array Item.
| Volume | Description |
| Source Volume (and concentration)
Decrement Source |
With the Source Volume shown is the current volume, specify how much will be decremented from the source. |
| Loaded Content | Specifies how much Volume is being loaded into the Array Item. |
| Total Well | Since the loaded content may be added to content already in the Array Item, the total final Array Item volume is supplied. |
After clicking Load, the volume Dialog opens showing volume values defaulted from the Array Method. You can change them here or accept the defaults.
The following table describes the fields in the Volume Dialog.
| Fields | Description |
| Source ID | Id of the content that is being loaded into the Array Item. This may be either the SampleId, Consumable ContainerID, or another SourceArrayItemID, as when transferring from one Array to another. |
| Source Volume | Current Volume of the source being loaded.
For Samples and Consumables this comes from the current trackitem quantity. For Array Item transfers this comes from the Array Item total volume. |
| Source Concentration | Current concentration of the source being loaded.
For Samples, this comes from the s_sample.concentration column. For Array Item transfers, this comes from the Array Item total concentration. Not used for Consumables. |
| Loaded Content Volume and Concentration | This is the target Volume and Concentration to put in the individual Array Item.
Defaults to the amount specified in the Array Method Content Detail tab.
Concentration will default to the source concentration if not specified in Array Method. This volume and concentration amount can be changed during loading. Volume cannot exceed the Maximum Item Value defined in the Array Type. |
| Decrement Source Volume | Suggested amount to decrement from the source is calculated based on the change of concentration, and the amount loaded into each Array Item, as well as considering if serial dilution is used. The detailed calculation is shown here: If not serially diluting: DSV = N * LCV * (LCC / SC) If serially diluting: Case 2: dilutefirstflag = true
If the amount to decrement exceeds the current volume, then a warning will be issued. The source will then simply be set to 0 volume. This is not an error condition, only a warning. |
| Total Well | This is the total volume of the Array Item. Defaults to the sum of the previous, plus what is added. This can be overridden, as often total volume is not simply additive when mixing contents. |
Click "Ok" to load the Array Items.
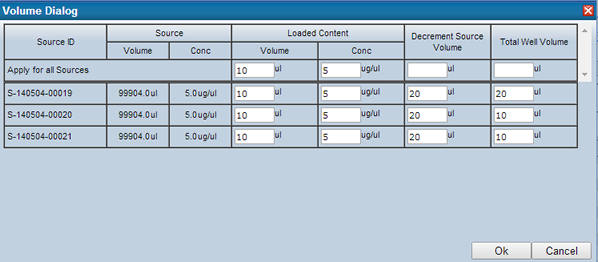
When loading multiple contents a grid displays where you can enter volume information for all content at the same time.
When the Array Method does not specify the Volume and Concentration but does specify the Amount, one of the following calculations is used to determine Volume and Concentration: Volume=Amount/Concentration, or Concentration=Amount/Volume. The volume dialog may present the default volume, or default concentration, based on the supplied Amount in the Array Method.
Example Item Level Load |
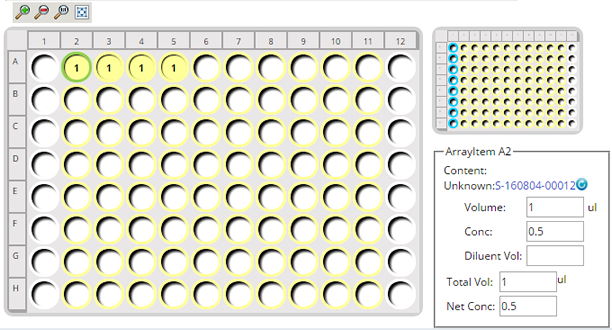
In the following simple example, we selected two Samples in the left panel, selected the Unknown Zone in the right panel, then clicked "Load". The Samples were loaded starting in the first Array Item in the Unknown Zone (A2, it would have been light green indicating that it was the next Array item to be loaded), then loaded horizontally.
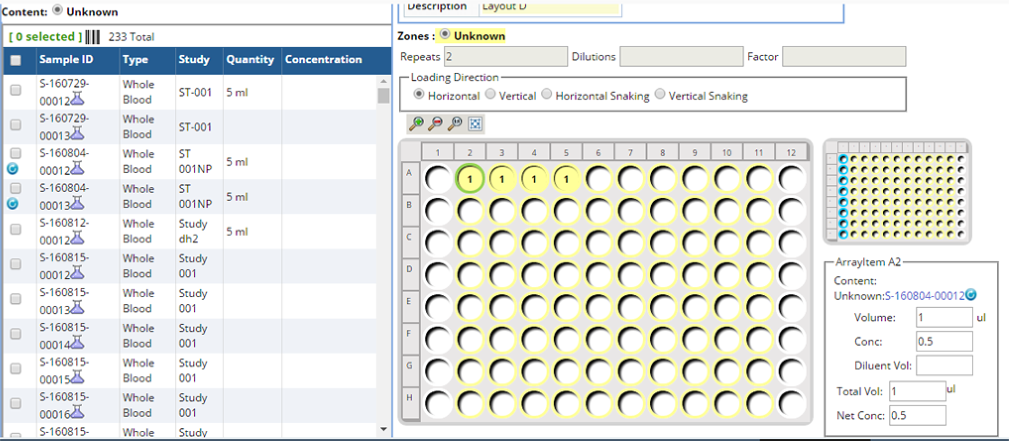
Note that each Sample was loaded twice (repeats = 2).
Once loaded the Sample ID, Volume and Concentration values display in the selected Array Item panel. Make changes to these values as necessary. As changes are made to Volume, the Total Volume is recalculated. If the Total Volume exceeds the maximum value allowed for the well (defined in the Array Type) a warning displays.
The Loaded/Unload
icon ![]() appears next to the Sample. Clicking the icon will unload the Sample from that Array Item. If the Array was previously persisted, unloading will not increment the source volume. If a Serial Dilution had been defined that
information would also display in the Array Item. See Viewing Loaded Arrays
below for details about viewing this and more detailed information about the
Samples loaded into each Array Item.
appears next to the Sample. Clicking the icon will unload the Sample from that Array Item. If the Array was previously persisted, unloading will not increment the source volume. If a Serial Dilution had been defined that
information would also display in the Array Item. See Viewing Loaded Arrays
below for details about viewing this and more detailed information about the
Samples loaded into each Array Item.
| NOTE: | In this example the Sample Id is used to identify the Content displayed in the Grid. Using the Arrays Policy you can choose to display a different Sample column or the Sample Alias to identify the Content. |
Viewing Loaded Array |
In the above example, the Array Items are zoomed so that the Sample information is visible. In the case of very large Arrays, a smaller version of the entire Array is displayed to the right to show into which portion of the Array you are zoomed. You can move the red bordered box over the entire grid to zoom to a particular location. Use the toolbar to zoom in and out in order to view the content of the Array Items or search for specific content.
![]()
| 1 | Zoom in. As you zoom in, more and more details about what is included in the Array Items are shown. |
| 2 | Zoom out. |
| 3 | Zooms Array Item so that all content is visible. |
| 4 | Returns the Array to the original view. |
Selecting a Sample in the left panel highlights the Sample in the Array with a red box, allowing you to quickly locate a Sample within the Array.
Content information is diplayed in the Array Item Panel. When a particular well on the Working Grid is selected (and it already has Content loaded) the following details are displayed.
Unloading Array Item Content |
If you find you incorrectly loaded Array Item content click the Unload icon ![]() next to the Sample in the Selected Array Item Panel.
next to the Sample in the Selected Array Item Panel.
Note: You can only unload content loaded at "Item" level. Content loaded at the Zone level cannot be unloaded.
Clicking the icon will undo the Load and the Array Items are cleared (all repeats and dilutions are also cleared). If you have also loaded Treatments Unload only unloads the Sample, the Treatments will remain.
Select (ctrl click) multiple Array Items within the working grid and click the "Unload" button.
The selected Content and associated repeats and dilutions are cleared.
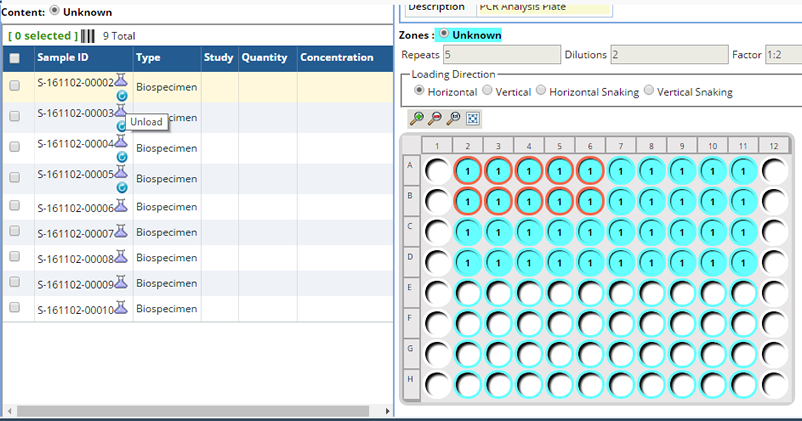
When a Content Sample is loaded in one or more Array Items the Unload icon ![]() displays in the Content List. Hovering over the icon highlights the Array Items (loaded with this Sample) in the Working Grid. Click the icon to unload all the Array Items loaded with the Sample.
displays in the Content List. Hovering over the icon highlights the Array Items (loaded with this Sample) in the Working Grid. Click the icon to unload all the Array Items loaded with the Sample.
Multiple Array Methods |
Apply as many Array Methods as needed to an Array creating overlays. Doing so creates a new Array Method instance. At any given point, only a single Array Method is in play at a time on an Array. Each time a new Method is Applied, the previous Applied Method must have a status of either Completed or Reviewed, if not, that instance will be cancelled and the latest Method Applied will be the Active Method.
When all Applied Methods are Complete, the Array is complete. You can manually Cancel an Applied Method using the Cancel Array Method button on the Plates and Gels list page. If all applied Methods are cancelled the Array is cancelled.
Clicking the Array link in the Plates and Gels list or selecting the Array and clicking "Edit" displays general details about the Array including any Applied Methods and their status.

Historical Arrays |
|
|
The Historical Plates and Gels List page displays Arrays that have been Stored, Disposed or Cancelled.
Navigate to: Lab Admin → Arrays → Historical Arrays:

Arrays move to the Historical Plates and Gels List when any of the following occurs:
| • | An Array is Disposed using the Dispose button on the Plates and Gels list page. Arrays can be disposed from any state. Once disposed it cannot be used again. |
| • | When all associated Methods are cancelled using the Cancel Array Method on the Plates and Gels list page, the Array itself becomes Cancelled. |
| • | When the Array is placed in Storage using the Assign Storage button on the Plates and Gels list page. Use the Clear Storage button to return the Array to its previous state. |
Loading Samples to an Array |
|
|
Optionally, as a quick alternative to the Array Loading page, load selected Samples into an Array from the Samples List page and the Biobanking Lab Operations List page. This is a non visual means of loading Samples onto one or more Arrays, and may be more efficient for high volume, high throughput situations. When using this approach:
| • | The Array will be created immediately, and the Array Method will be Applied. |
| • | Multiple Arrays will be created, depending on the number of selected Samples, and how many may fit on a single Array. |
Choose the Samples to load and click, More options, Miscellaneous, choose "Load into Plate". The following dialog opens.
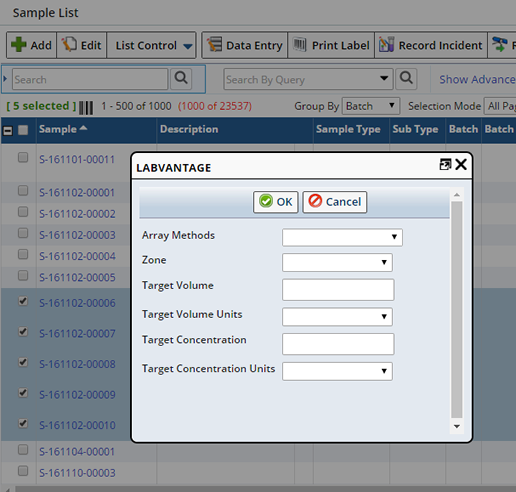
Define the following information about the Array to be created:
| Field | Description |
| Array Methods | Choose the Array Method to apply to this Array. |
| Zone | Choose the Zone into which to load these Samples. Although all zones are provided, you typically only want to load Samples into the Unknown Zone of the Array. |
| Target Volume
Target Volume Units |
Volume to transfer to the Target.
Target Volume unit. |
| Target Concentration
Target Concentration Units |
Concentration of the content being transferred.
Units of the Concentration. |
Clicking OK creates a new Array and Loads the selected Sample(s).

Viewing the new Array you can see that it has been loaded with the Sample according to the Array Method.
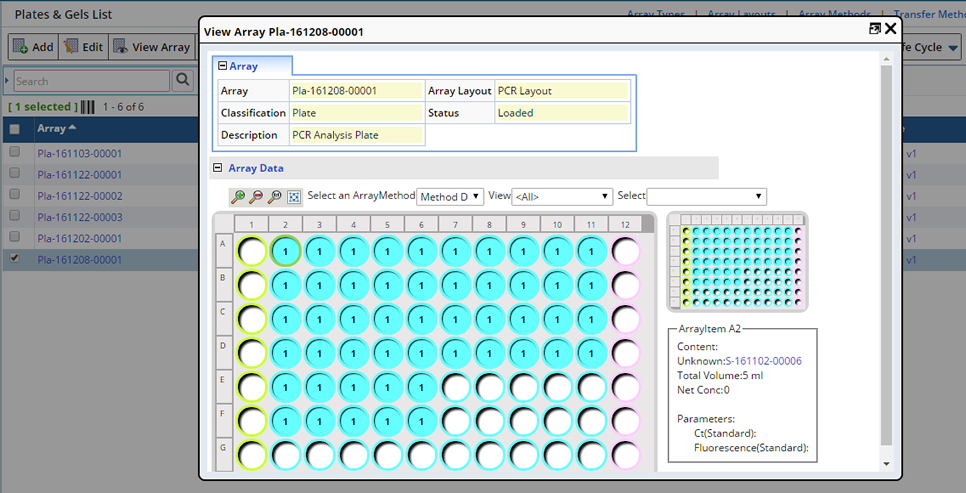
Note that the selected Sample is referenced in the selected Array Item panel when an Array Item (A2) is selected.
Miscellaneous Operations |
|
|
Perform the following miscellaneous operations from the Plates and Gels List page.
Storing Arrays |
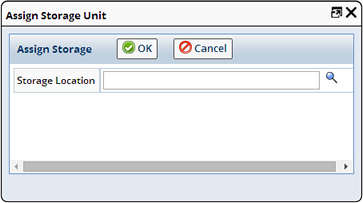
When you are finished with an Array, but do not want to dispose of it, you can place it into Storage. From the Plates and Gels list page select the Array you want to store then click "Life Cycle → Assign Storage". The Assign Storage Unit dialog displays. Use the lookup to open the Storage Explorer where you can find available Storage.
Once assigned to a Storage Unit you can easily clear an Array from storage using the "Clear Storage" button on the Historical List Page.
Disposing Arrays |
You can dispose an Array at any time. From the Plates and Gels List page select the Array you want to dispose then click the "Dispose" button. The operation is confirmed with the following message.

Disposed Arrays are moved to the Historical List Page. Once disposed an Array can no longer be used.
Canceling Arrays |
Arrays are cancelled when all Applied Array Method instances are cancelled. From the Plates and Gels list page select the Array you want to cancel then click the "Cancel Array Method" button. This cancels the active Array Method instance and, provided all other Array Method instances are cancelled, the Array Status becomes "Cancelled" and moves to the Historical Arrays List Page. See Multiple Array Methods for more information about Array Method instances.
Note: Each time a new Array Method is Applied any previous Array Methods are cancelled (provided the Array Method status has not already reached "Reviewed" or "Completed").
Ship Arrays |
Should you need to Ship Array(s) to an internal or external Shipping Location select the Arrays and choose "Ship" from the Lifecycle → Ship menu. The Add Package dialog displays. See Move Samples (Custodial Management) for more information about creating a Package for shipment.
View Genealogy |
Clicking the Genealogy icon ![]() on the Plates and Gels list page opens the Genealogy Viewer. Here we see that Array Pla-181001-00001 is a child of Array Pla161202-00001. A View of the Array details is provided.
on the Plates and Gels list page opens the Genealogy Viewer. Here we see that Array Pla-181001-00001 is a child of Array Pla161202-00001. A View of the Array details is provided.
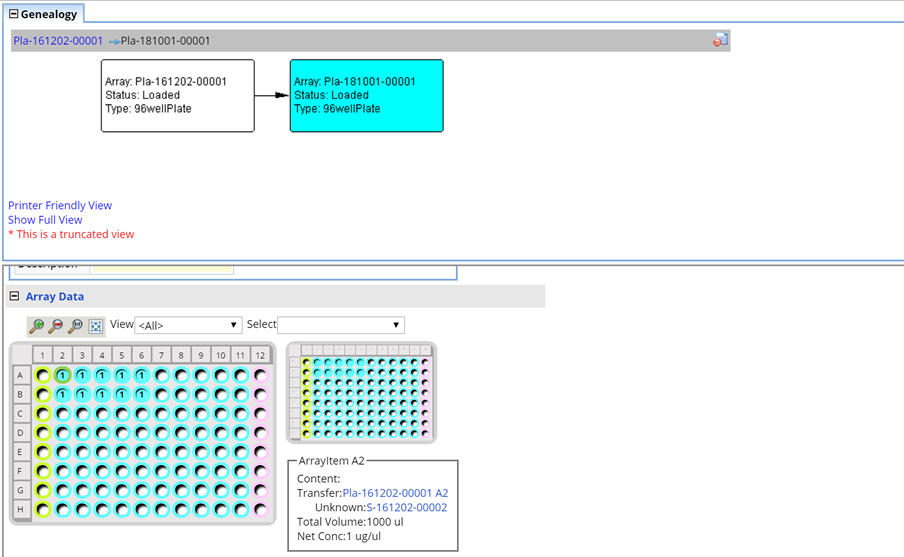
Note that when viewing the Child Array the Parent Array is referenced in the Array Item details.
Transfers involving an ASL Grid will include information about the ASL Grid to or from which the Array was transferred.