Overview |
|
|
|
Array Management API Usage Examples |
Overview |
|
|
This document provides various examples designed to help you understand the capabilities of the Array Management OOB Actions and their usage scenarios.
Master Plate Creation and Content Loading |
|
|
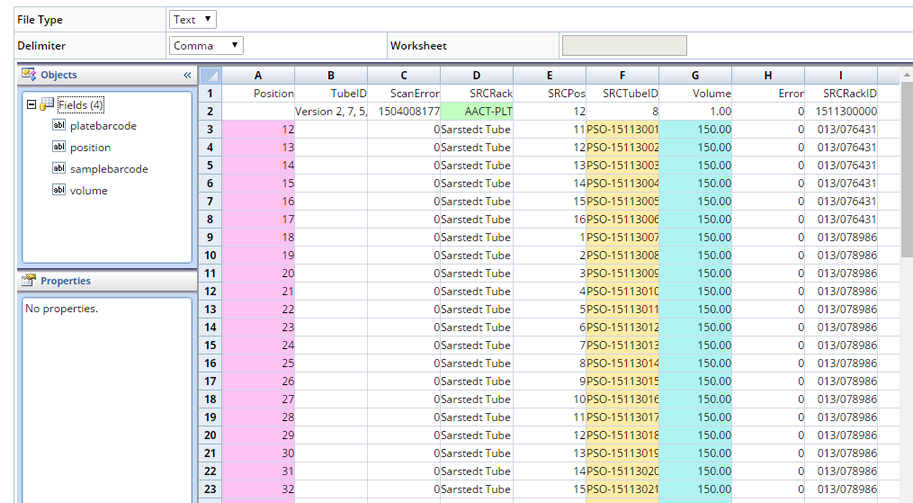
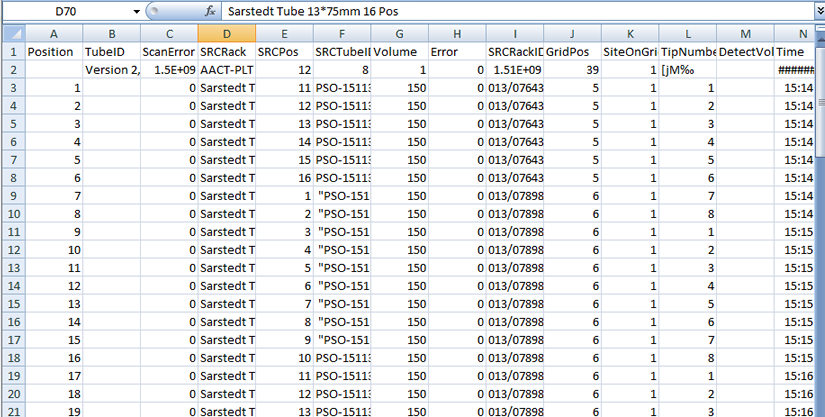
A typical use case is the creation of master plates (based on instrument generated files) that define data mapping. For example, once Samples have been placed on the Instrument (Decapper), a series of activities will result in a csv file detailing the creation of a master plate and mapping of Samples to individual wells. See the file format below and the semantics of the relevant columns.
| Data File Column | Semantics |
| Position (Column A) | The identification of the Tube. Corresponds to an Array cell in LabVantage. |
| SRCTubeID (Column E) | The barcode associated with each Sample loaded in a Tube or an Array cell in LabVantage. |
| Volume (Column G) | The volume of Sample loaded into each Tube or Array cell in microliters. |
| SRCRackID (Column I) | The identity of the rack or Array being loaded, saved into a user column u_barcode on LV_Array SDC.
In the following examples, the assumption is that all of the Array cells belong to a single plate. |
The data from the csv file can be imported into LabVantage using Data File Definitions.
The following examples discuss various scenarios that illustrate how data from instrument files can be uploaded into LabVantage using Data File Import functionality and OOB Array Management API Actions.
Example 1 |
The position for each of the tubes (cells) is specified for all wells (1 through 96), in sequential order.
|
Create a Data File Definition with the style specified as Simple Grid. Note that most of the Array Management Actions allow for processing all the cells of the Array in a single call to the Array Actions, and hence the Process Block Size can be set to "All Items".
|
|
In the parser tab, define the fields for the data that needs to be imported into LIMS. The semantics for each of the columns is outlined in the introduction to this section.
|
|||||||||||||||||
|
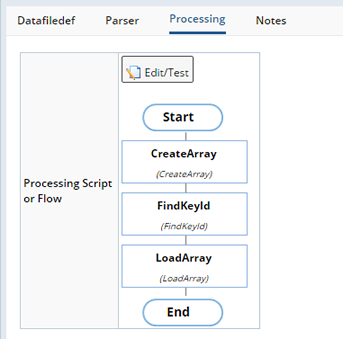
The processing rules for importing this data includes the following steps. The details for each of the steps depend on how the "position" column in the data file is to be interpreted. Positions in column A is the ordinal number 1, 2 ...; 96 corresponding to the wells of the 8 by 16 Array (loading direction is horizontal) and the Samples are to be loaded sequentially in the Array. The processing rules appear as follows:
|
|
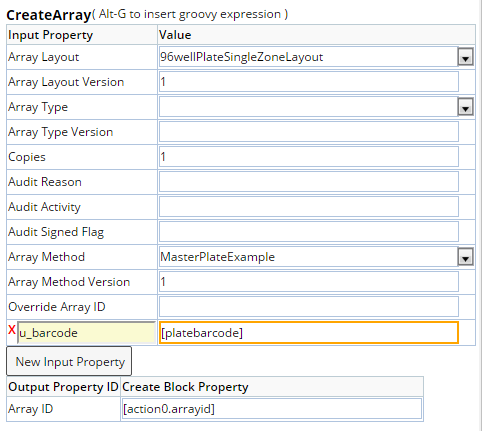
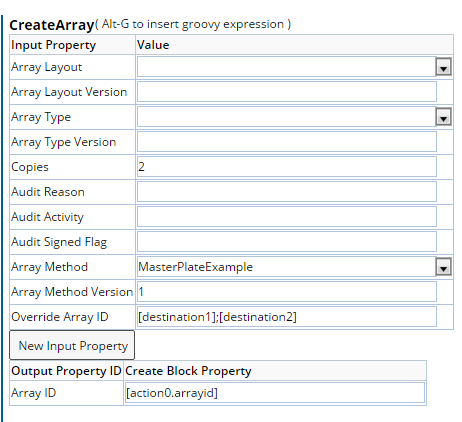
Adding an Array with a predefined ArrayMethod applied to it. The platebarcode is saved in the user column u_platebarcode in the LV_Array SDI. Create Array Action step takes as input, the arraylayoutid and arraymethodid details. The platebarcode is mapped onto to a custom column to persist in the Array created. The output property indicating the arrayid is stored in [action0.arrayid] block property.
|
||||||||||||||||||||||||||||||||||||||
|
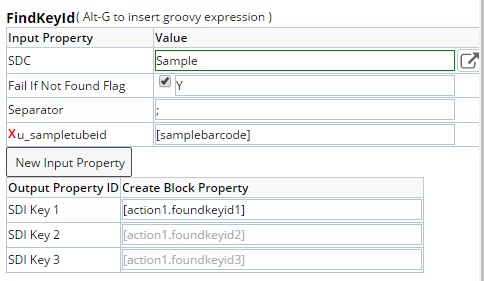
Determining the sampleids from the samplebarcodes. The next step is to translate the sampletubeid to sampleids in LabVantage. This is accomplished using the FindKeyId action step. The return value consists of the list of Sample id's (semicolon separated) and is mapped to action block property [action1.foundkeyid1].
|
||||||||||||||||||||||||||||||||||||||
|
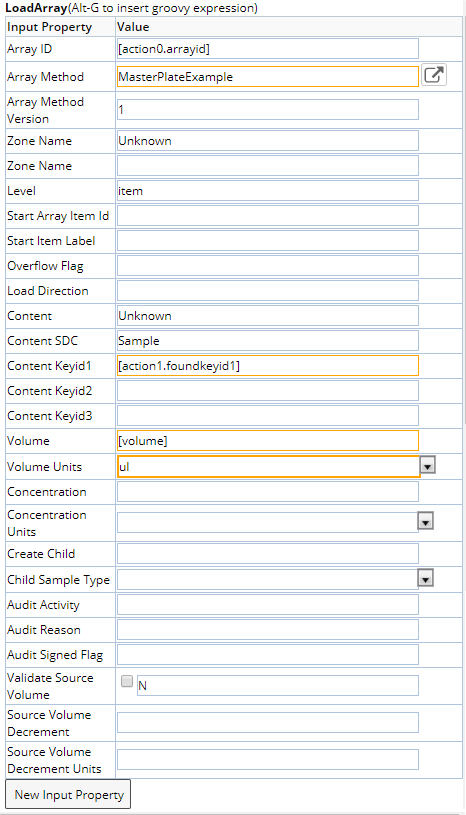
Loading the Samples into specified positions. The final step involves calling LoadArray action with default start position (the first well) which loads the "Unknown" zone sequentially using Horizontal loading direction.
The following input properties are specified for the LoadArray action call:
|
Example 2 |
The position for each Tube is specified as an Array Item Label, the list does not include all the cells of the Array, and can be in any order.

The DFD definition in Example 2 is almost identical to Example 1, except for the call to the LoadArray Action. It is replaced with a call to LoadArrayByPosition. This example highlights the fundamental difference between LoadArray and LoadArrayByPosition. The LoadArray allows for loading contiguous cells of the Array from a specified "Start Item" based on a "Load Direction", while LoadArrayByPosition allows you to choose wells in any order and they can be listed explicitly by their labels.
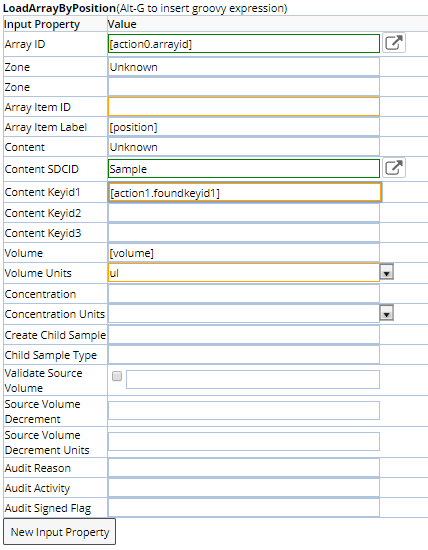
The inputs to the LoadArrayByPositon action are as follows:
| 1. | Arrayid: The output property from Step 1. |
| 2. | Zone: Name of the zone being loading. |
| 3. | Content SDC: Sample in this case. |
| 4. | Content Keyid1: List of samples found by Step 2. |
| 5. | Array Item Label: Labels from position field. |
| 6. | Volume: Target Volume from field defined. |
| 7. | Volume Units: Hardcoded to ul. |
| 8. | Validate Source Volume: Checks to ensure that the "Volume" value does not exceed the Source Volume.
If "Y" (Default), the Volume is validated. If the Target Volume is greater than the Source Volume, an exception is thrown to indicate insufficient volume. If "N", the Volume is not checked. If the Source Volume is 0.0 the Target well is incremented by the specified Volume. If the Source Volume is less than the specified Volume, the Source is decremented to 0.0 and the Target well is incremented by the specified Volume. |
| 9. | Create Child Sample: Determines whether or not to create Derivative Child Samples. Defaults from the Array Method if defined. If not defined, the defaults are assumed to be the values specified in the last applied Array Method. |
| 10. | Child Sample Type: Defines the Sample Type of Derivative Child Samples. If not defined, the defaults are assumed to be the values specified in the last applied Array Method. |
| 11. | Source Volume Decrement: The Source Volume to decrement on Content Transfer. |
| 12. | Source Volume Decrement Units: Units for the Source Volume Decrement. |
The table below illustrates the similarities and differences between LoadArray and LoadArrayByPosition.
| LoadArray | LoadArrayByPosition |
| Only the Start Position is specified explicitly using startitemlabel or startitemid property.
The default start position is assumed to be the first well in the zone. The rest of the cells are loaded sequentially based on the content list, load direction specified. |
Each position to be loaded is specified explicitly using arrayitemlabel or arrayitemid. |
| LoadArray loads content at item or zone level. | LoadArrayByPosition is meant for loading content at item level only. |
| LoadArray honors arrangement rules specified in the zone layout when loading content at "item" level. | LoadArrayByPosition also honors arrangement rules specified in the zone layout when loading content at "item" level. |
| LoadArray optionally creates an Array if the input arrayid property is not specified. If overflow flag is specified as "C", extra Arrays are created to use up all the contents specified as input. | LoadArrayByPosition requires the arrayid to be specified always. |
| LoadArray cannot be called to perform loading on "Adhoc Zones". The arrayitem-zone is assumed to be predefined | LoadArrayByPosition can handle Adhoc Zones, when content is being loaded into specified wells, the corresponding arrayitems are automatically added to the zone as arrayzoneitems. |
| LoadArray takes care of decrementing the source volumes and also updating the totalvolume on arrayitems. | LoadArrayByPosition also takes care of decrementing the source volumes and updating the totalvolume on arrayitems. |
Example 3 |
Positions are specified as an ordinal number and the positions may be in any order and cherry picked.
In this case the positions are identified by Ordinal Number i.e. well A1 -> 1. A2 -> 2, A12 -> 12...;. B1 -> 13 and so on. The example file is shown below.

The DFD in this example is very similar to Example 2. The LoadArrayByPosition action is used, but the field position specified as "Ordinal Number" needs to be converted to arrayitemid to be input to the action.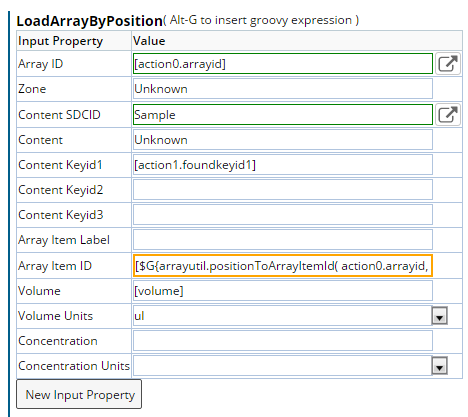
The arrayitemid uses the groovyutil class "arrayutil" and calls the method positionToArrayItemId as follows:
[$G{arrayutil.positionToArrayItemId( action0.arrayid, fields.position.toString(), 8,16,"H" )}]
The groovy function takes the following inputs:
| 1. | Arrayid, returned by Step 1. |
| 2. | Positions: The list of ordinal numbers specified in the "position" field. |
| 3. | Rows: The number of rows in the Array. |
| 4. | Columns: The number of columns in the Array. |
| 5. | itemsequence: Specified as "H" - Horizontal, "V" - Vertical, "HS" - Horizontal Snaking, "HV" - Vertical Snaking |
Example 4 |
Instrument file includes information to load a Reagent for the Entire Zone.
Suppose the excel file in Example 1, includes the details of the reagentlot to be loaded for the entire zone.
Define cell fields for the three fields highlighted below.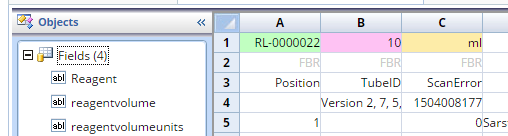
Assume that the MasterPlateExample is defined as follows:
The DFD in Example 1 needs to be modified to add the following steps after the Array is created.
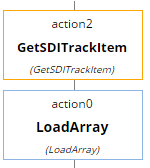
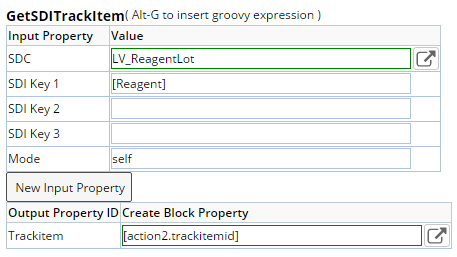
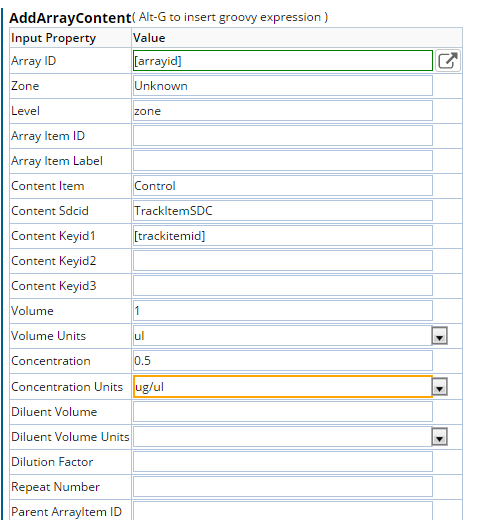
The GetSDITrackItem Action step determines a Trackitem for the ReagentLot specified. Note that the Mode must be specified as "self".
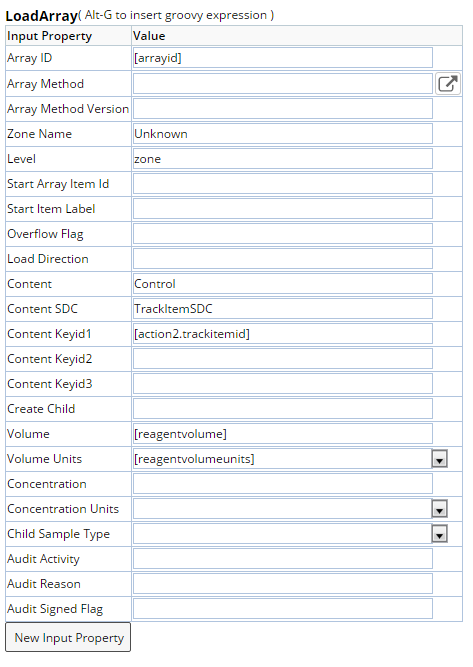
The LoadArray action is called to do the zone level loading for the unload zone to load the reagent lot specified. Note that the inputs specified to the LoadArray action.
| 1. | Arrayid: The Array that is to be loaded. |
| 2. | Zone: The name of the zone, in this case "Unknown". |
| 3. | Content: In this case "Control". |
| 4. | ContentSDC: TrackItemSDC is what needs to be specified for Reagents. |
| 5. | Content Keyid1: The trackitemid found for the specified reagent output property of GetSDITrackItem action. |
Master Plate Content Management |
|
|
In the previous section, we discussed various Loading use cases. Loading is a "complex" operation which has many intrinsic assumptions about the way things work:
| • | Arrangement rules are assumed to be static and are honored |
| • | Volume management rules for the source item are fixed and honored |
| • | Updating the totalvolume for Array item happens as part of the operation as well. |
There may be a situation when you require finer control on the contents and exceptions to the rules mentioned above. The following sections discuss various content management scenarios.
Adding Content at Item or Zone Level |
AddArrayContent is the OOB action that can be used in situations such as the caller does not want to use the automatic volume calculations and does not want to honor arrangement rules for some specific contents.
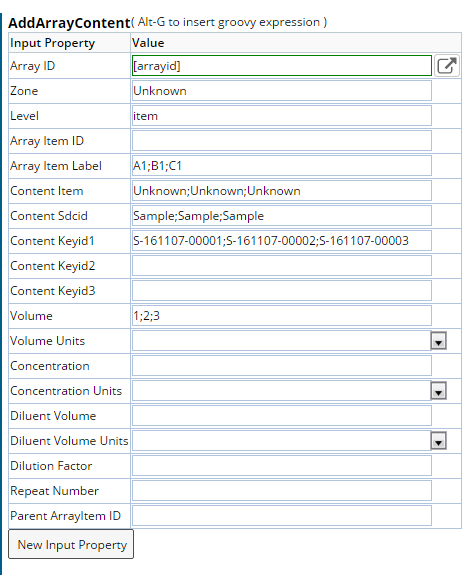
In the image below, we depict the properties that need to be specified to AddArrayContent action to add content at item level. This example assumes that we are adding samples to three specific cells A1;B1;C1. The inputs can be specified as:
| 1. | Arrayid: The input arrayid whose content is being managed. |
| 2. | Zone: The name of zone to which content is being added. |
| 3. | Level: "item" indicates that the item is being loaded for the individual cell and not the entire zone. |
| 4. | Array item label: List of positions to which content is to be added. |
| 5. | Content Item: List of Contents being added, in this case all the contents of type "Unknown". |
| 6. | Content SDCid: List of Content SDCs, in this case all them are "Sample" SDIs. |
| 7. | Content Keyid1: List of Content keys being added to each of the positions. |
| 8. | Volume: Individual volume values for each content being added. |
Note that to add contents at the Zone level, the input properties that change
are:
| 1. | Level is specified as Zone. |
| 2. | Zone: Name of the zone is to be specified. |
| 3. | Arrayitem label is not applicable. |
| 4. | The rest of the information about list of contents is identical. |
AddArrayContent, when invoked with the level as item, the difference between LoadArrayByPosition and AddArrayContent is highlighted below.
| LoadArrayByPosition | AddArrayContent |
| LoadArrayByPosition honors the arrangement rules and takes care of dilutions and Repeats in the layout. It also loads the repeats and dilutions |
AddArrayContent just adds the specified content at the arrayitem or zone level. Arrangement rules are ignored. |
| Source volume is decremented by LoadArrayByPosition. | Source volume is untouched by AddArrayContent. |
| ArrayItem total volume is incremented based on how much content is loaded into each position. | ArrayItem total volume is not incremented. The user must explicitly make a call to EditArrayItem action to update totalvolume for the well. |
When the AddArrayContent is called for level = 'zone' the difference between LoadArray and AddArrayContent is as follows:
| LoadArray | AddArrayContent |
| LoadArray takes care of decrementing the amount from the source |
AddArrayContent does not decrement the amount from the source |
| ArrayItem total volume is incremented based on how much content is loaded for each position in the zone | ArrayItem total volume is not changed. The user must explicitly make a call to EditArrayItem action to update totalvolume for the well. |
Add/Edit Content at Item or Zone Level |
The call to AddArrayContent to load content at zone level looks very similar to Example 1, except:
| • | Level is specified as zone |
| • | No need to identify any arrayitems |
Note that EditArrayContent is analogous to AddArrayContent to modify contents
that were previously added via LoadArray actions or AddArrayContent. Content
can be edited at Item level or Zone level.
Delete Individual Contents |
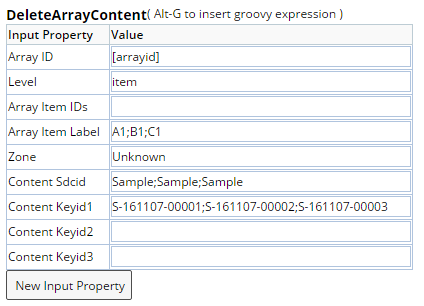
DeleteArrayContent allows you to "delete" content items added by Loading or AddArrayContent Actions.
It does not take care of volume restoration to the source or the totalvolume in arrayitem.
The input properties are:
| 1. | Arrayid : identify the Array to be updated. | ||||||
| 2. | Level: item or zone . | ||||||
| 3. | Array items IDs or Array Item Labels: to identify the list of Array items whose content is to be deleted, used when level is "item". For each well identified, the content to be deleted is identified by the corresponding item in the lists specified for:
|
||||||
| 4. | Zone: The zone for which content is to be deleted, used when level is "zone". The content to be deleted is identified by:
|
Master Plate Data Entry |
|
|
Once Arrays are loaded, they are sent to instruments for analysis to capture data for each parameter of interest. Instruments typically generate text/csv files that need to be uploaded into LabVantage to be reviewed by the user. The following sections describe various formats of data returned by instruments that can be uploaded using the OOB Array Data Entry Action via Data File Import functionality.
Input Data as Crosstab of Labels and Results by Parameters |
The OOB DFD "ExampleArrayResults" can be used for this purpose. The
format of the excel data, mapped on to various fields is illustrated in the
screen shot below. The results are entered a cross tab grid of the Array item
labels and the results for the Array item for each parameter. The list of parameters
is not fixed and can be extended to add more parameters.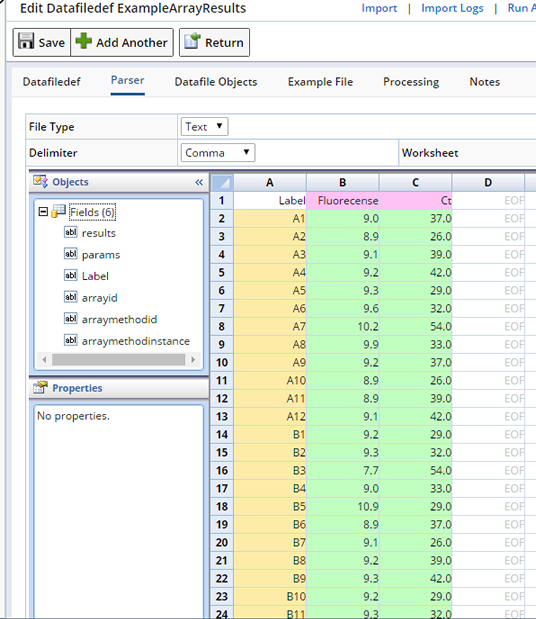
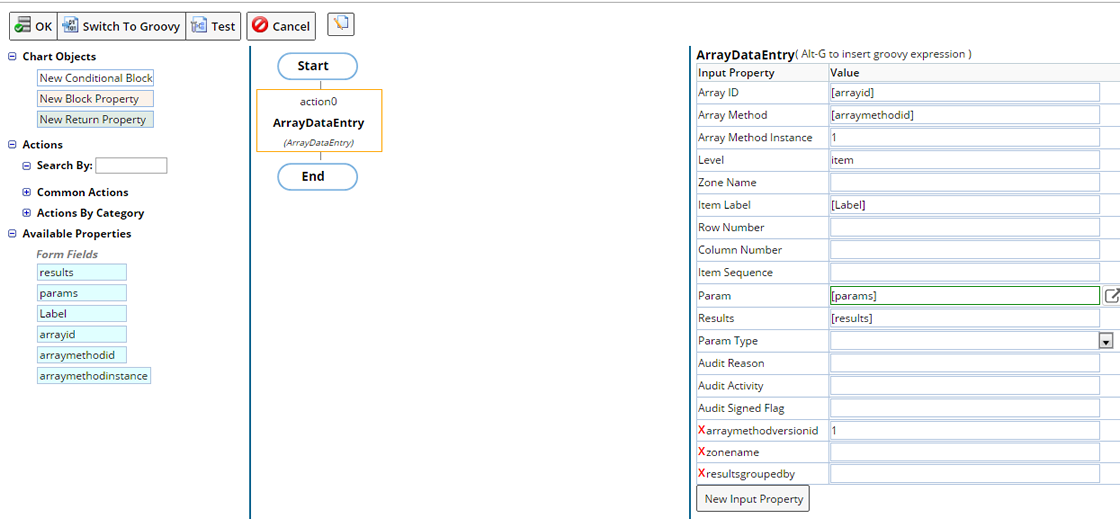
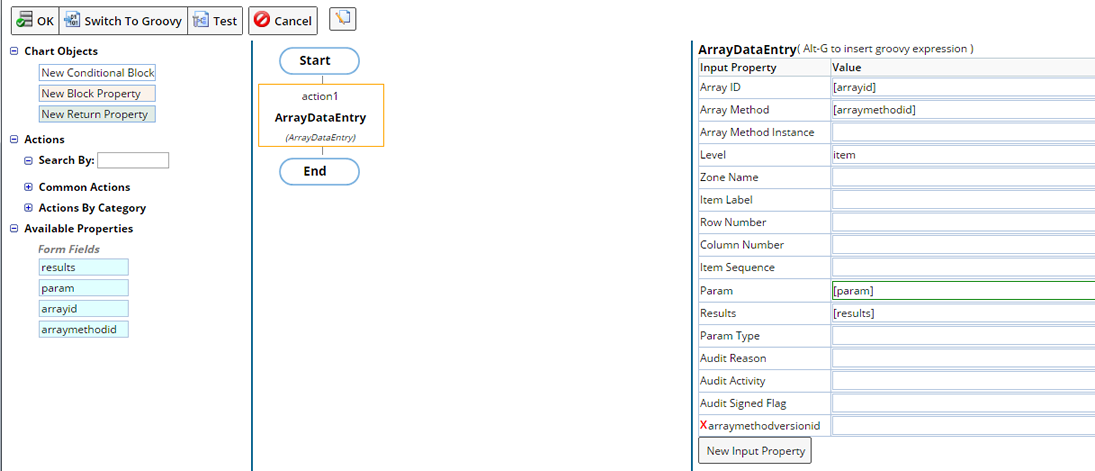
The processing rules uses the ArrayDataEntry action as shown below.
| 1. | Array ID is mapped to the input field arrayid. |
| 2. | ArrayMethodId is mapped to the input field arraymethodid. |
| 3. | Param: The list of params is mapped to headerRow of params. |
| 4. | Arrayitemlabel: The item label property is mapped to headerColumn field "Label". |
| 5. | Results: This property is mapped to "Results" field - range of the crosstab. |
| 6. | Level: This property is hard coded to "item". |
Uploading Zone Level Results |
The OOB DFD "ExampleArrayZoneData" is used for this purpose. This
example illustrates the upload of Array Zone level results. The grid shows the
Minimum/Average/Maximum Parameter results to be uploaded to Positive Control
and Negative Control Zone. Efficiency specified in Cell B2 is uploaded to (Full
Array) zone.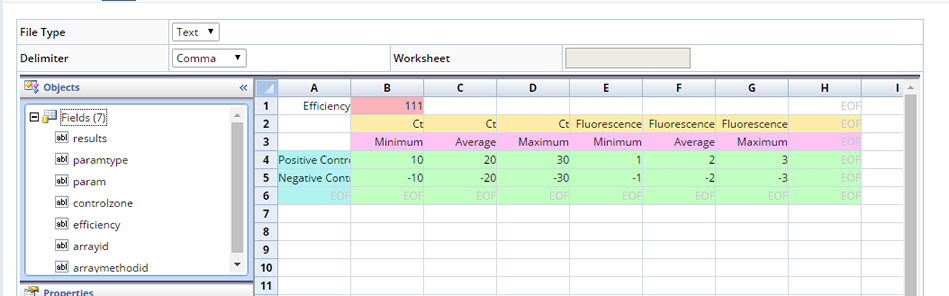
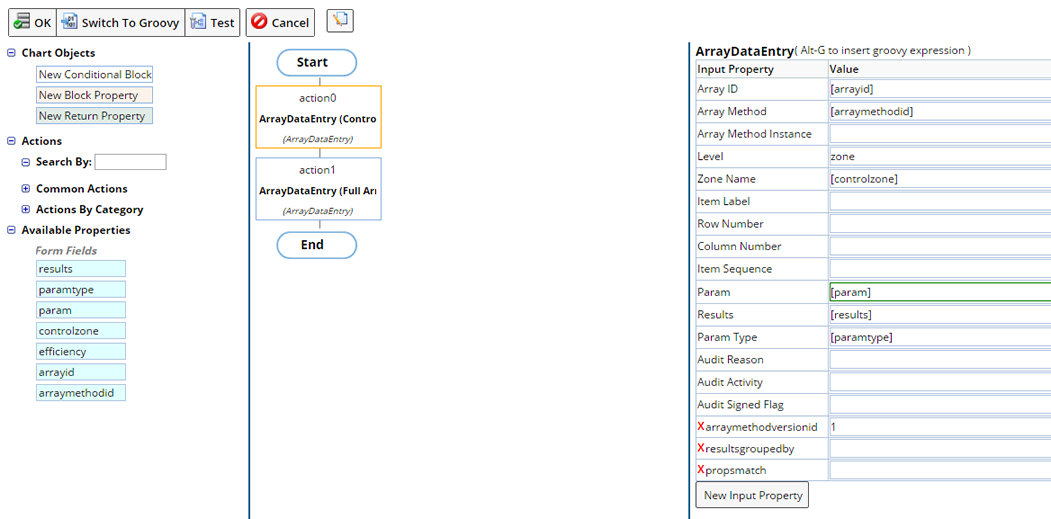
The processing rules has two calls for ArrayDataEntry. The first call is to upload results at "zone" level for "Positive Control" and "Negative" control zones.
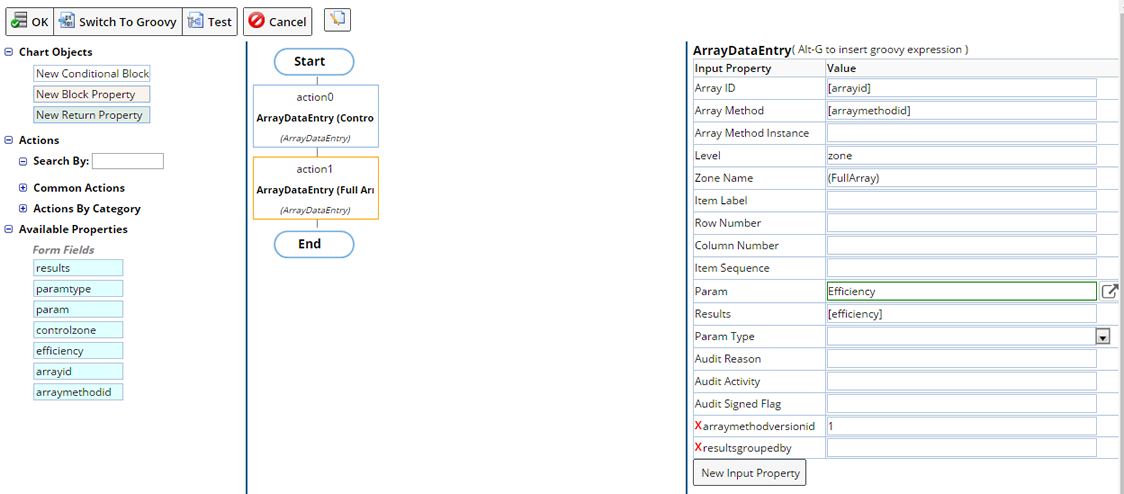
The second call to ArrayDataEntry uploads the Efficiency to "(Full Array)".
Uploading Item Level Data Where the Data is Represented as an Image |
The OOB DFD ExArrayDataBy2DImage can be used for this purpose. The example represents the Array data represented as an image of the Array. The header column is the Row labels, A, B ...; P and the header row is the Column labels 1, 2, 3...;
The results range shows the result for each well. The param name is specified in cell B4.
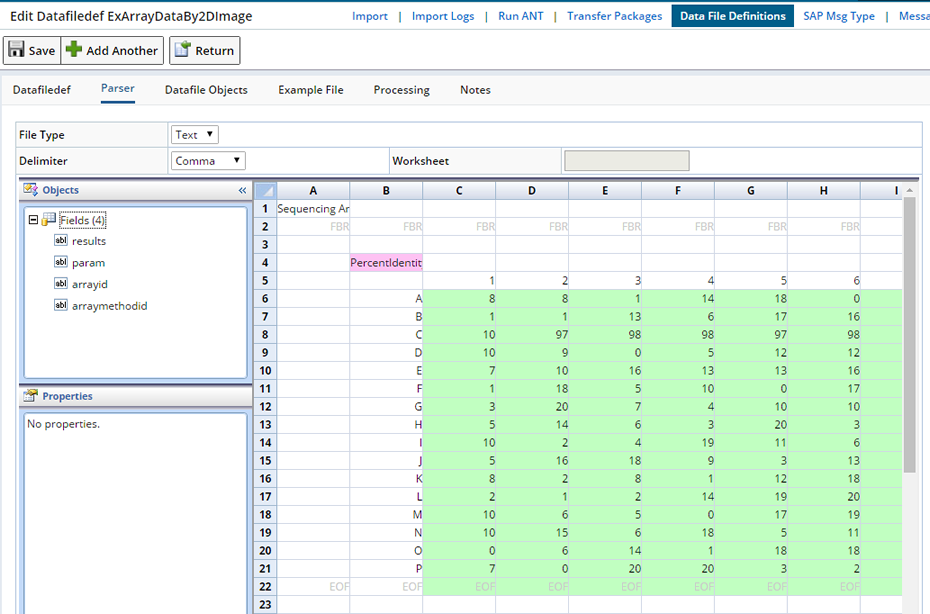
In this case the ArrayDataEntry action is called without any item labels. The results are ordered by sequence of wells, one of the three ways that ArrayDataEntry matches results to wells.
Custom Plate Transfer |
|
|
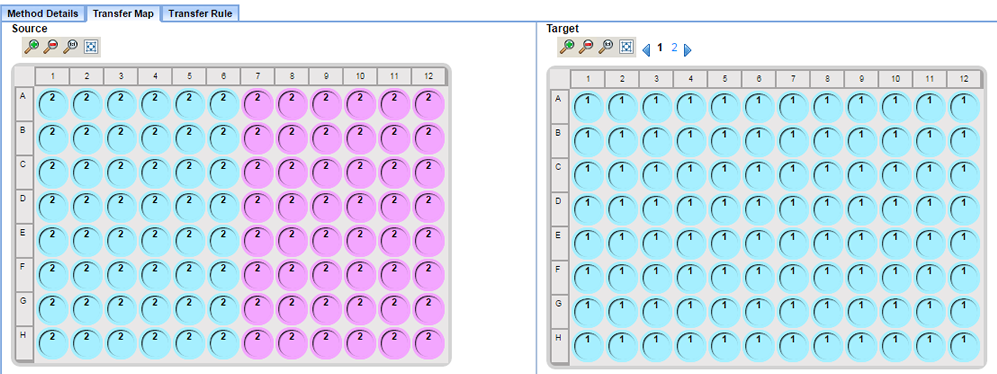
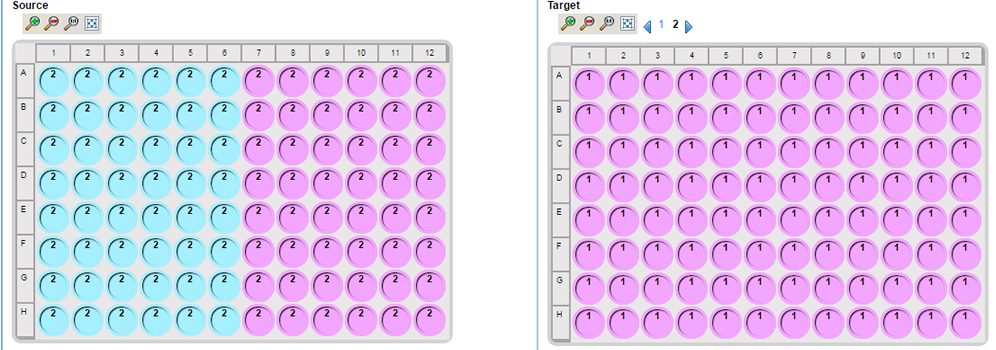
Consider the following Example where the source Array needs to be mapped onto two targets.
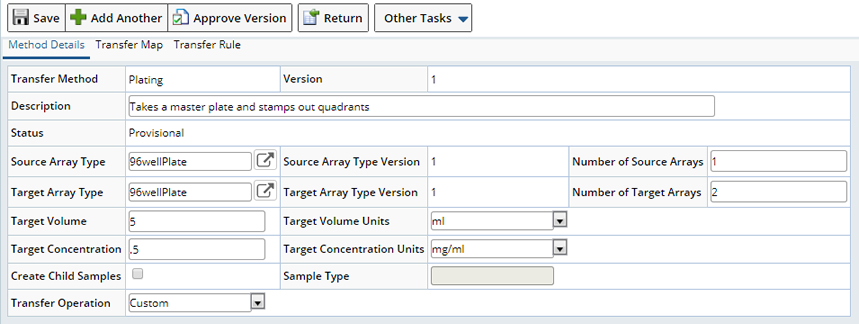
A custom Transfer Method is defined as follows:
The source column defines a source Array bar code. The assumption in this example is the barcode is actually used as arrayid for the Arrays created (using CreateArray action).
Each source plate needs to be applied a "Plating" transfer method that does the following.
The first 48 wells are transferred twice into 96 wells of plate 1. The next 48 wells are transferred twice into 96 wells of plate 2.
Arrays as follows:
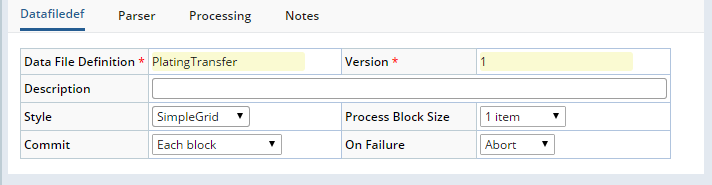
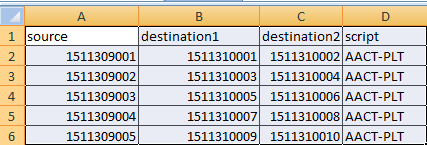
The DFD to import the Plating.csv file is defined as follows:
|
Note that the process block size is one, to perform transfer operation on one source Array at a time
|
|||||||||
|
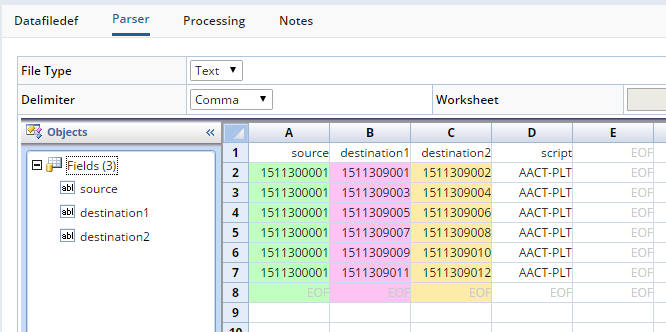
The fields of the DFD are defined as shown in the illustration below:
|
|||||||||
|
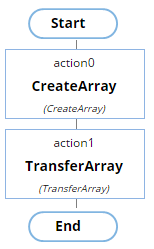
The processing rules are defined as follows: In action0 CreateArray, the target Arrays for the current sourcearrayid
being processed are created
The details of the properties passed to the CreateArray action step are as follows:
|
The next action step is to do the Transfer.

The inputs to the Transfer action are as follows:
| 1. | Array Transfer Method/Version, the id of the custom Transfer Method to be used for each transfer. |
| 2. | Target Volume: Target Volume to be transferred. Required onlly when the Quantity Handling Flag is "D" or "O".
Defaults from the Array Transfer Method if defined. |
| 3. | Target Volume Units: Target Volume Units. Defaults from the Array Transfer Method if defined. |
| 4. | Target Concentration: Concentration of the Volume to be transferred. Defaults from the Array Transfer Method if defined. |
| 5. | Target concentration Units: Concentration Units. Defaults from the Array Transfer Method if defined. |
| 6. | Source Array. |
| 7. | Target Array IDs (again concatenation of the two target arrayids). |
| 8. | Source Volume/Units. |
| 9. | Other default values set. |