Content |
||||||||||||||
|
Transfer Methods are predefined rules referenced by LABVANTAGE when specific types of Transfers are performed. For each type of Transfer (such as Split or Condense), different information is defined. Define the information in the Transfer Method, then choose that Method when performing the Transfer. Consider defining multiple Transfer Methods for different Transfer scenarios. Following is a basic discussion about adding a Transfer Method.
To add a Transfer Method, navigate to the Transfer Method List page at Lab Admin → Arrays → Transfer Methods:

Click "Add" or select an existing Method, then click "Edit" to make changes. The Array Transfer Method page displays.
Method Details |
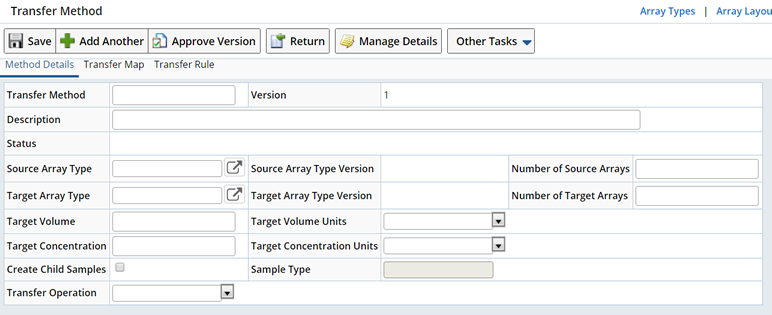
Use the Method Details tab to define general information about the Arrays you are transferring to and from:
| Fields | Description | ||||||||||||||||||||||||||
| Method Id | Transfer Method Id. | ||||||||||||||||||||||||||
| Version | Transfer Method Version. | ||||||||||||||||||||||||||
| Description | Description of the Transfer Method. | ||||||||||||||||||||||||||
| Status | Status of the Transfer Method. Status is Provisional until the Version is Approved. When approved, the status becomes Current. Once the Status becomes Current, you cannot make changes. | ||||||||||||||||||||||||||
| Source Array Type and Version | Array Type and Version of the Source Array.
Choosing an ASL Grid Type as either the Source or Target Array Type is what identifies this as an ASL Grid Transfer Method. See ASL Grid Transfer for more information. |
||||||||||||||||||||||||||
| Target Array Type and Version | Array Type and Version of the Target Array.
Choosing an ASL Grid Type as either the Source or Target Array Type is what identifies this as an ASL Grid Transfer Method. See ASL Grid Transfer for more information. |
||||||||||||||||||||||||||
| Number of Source
Arrays
Number of Target Arrays |
Number of source Arrays based on the Transfer operation
selected. For operations other than Custom, LABVANTAGE calculates the
number of Source and Target Arrays using the specified operation, and respective source and target Array Type sizes. For Custom, you must define the number
of Source and Target Arrays needed.
If an invalid combination of Source and Target Arrays for a particular Transfer operation is entered (such as splitting a 96 well plate into a 24 well plate), an error message is displayed.
|
||||||||||||||||||||||||||
| Target Volume
Target Volume Units |
For use by the Transfer Array Action. Target or Default Volume and Units to transfer. | ||||||||||||||||||||||||||
| Target Concentration
Target Concetnration Units |
For use by the Transfer Array Action. Target or Default Concentration and Units to transfer. | ||||||||||||||||||||||||||
| Create Child Sample Sample Type |
When creating Aliquots or Derivatives, you can optionally
create Child Samples for the Samples originally loaded into the Source Array.
When checked, Child Samples are created.
Child Samples are created one for one for each parent Sample present on the Source array. For example, if 48 Samples are loaded to fill 96 Array
Items, 48 Child Samples are created. |
||||||||||||||||||||||||||
| Transfer Operation | The Transfer Operation identifies the type of Transfers
to be performed for this Transfer Method. When performing a Transfer, you will
choose a Transfer Method. Only Methods with a Transfer Operation of the
same type as the Transfer being performed will be displayed. Additional
Sub Operations and further qualifiers display depending on the Transfer Operation you choose as described
below:
|
||||||||||||||||||||||||||
| Buttons | |||||||||||||||||||||||||||
| Approve Version | Approves this Version of the Transfer Method. | ||||||||||||||||||||||||||
| Manage Details | Opens the Manage Details dialog where you can define Consumables, Equipment and Tests for created Child Samples. | ||||||||||||||||||||||||||
| View Executions | View Transfer Executions associated with the selected Transfer method. See View Executions for more information. | ||||||||||||||||||||||||||
Transfer Map |
Use the Transfer Map to identify where and how Source Array(s) are placed on the Target Array(s). The Transfer Map behaves differently depending on the Operation and Sub Operation you choose. Following is a basic description of the map components.
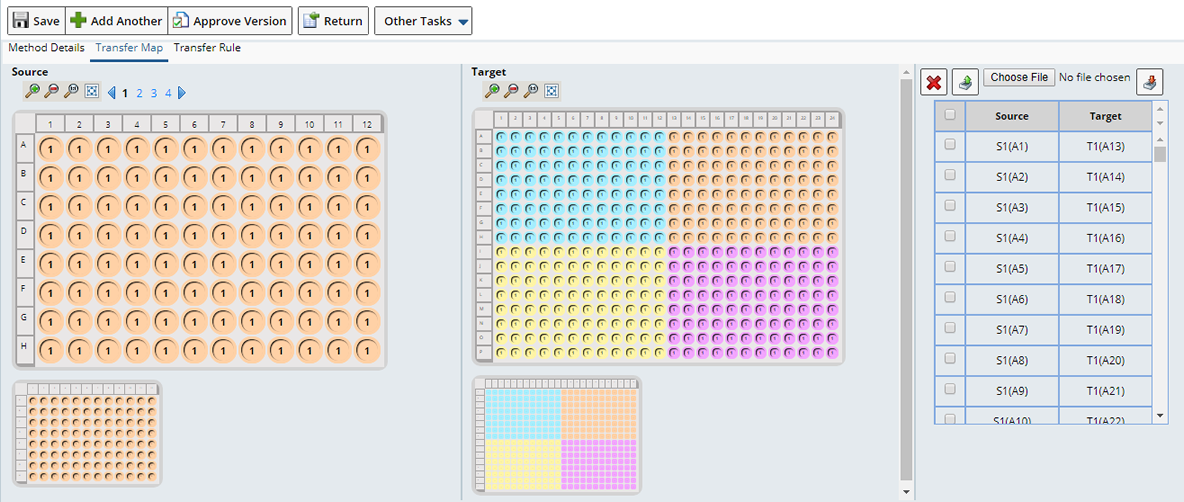
The Transfer map is split into three sections. The left section is always the Source Array, middle is always the Target Array, and the right provides a list view of each Array Item in both the Source and Target Arrays. In the above example the operation Condenses four 96 well plates onto a larger 384 well plate. Notice that you can page through each of the 4 Source Arrays.
Arrays are mapped based on the Source and Target Array Types defined in Method Details and the Transfer Operation. If you define the Source Array Type as a 384 well plate, the Target Array Type as a 96 well plate, and a Transfer Operation of "Splitting", LABVANTAGE will calculate the number of Source and Target Arrays needed and "place" or map the Arrays accordingly.
| Sub Operations |
Sub Operations determine how the Array Items will be filled into the Target Array. In the above example the Sub Operation was Whole Array, meaning the entire source Array was placed intact into the Target Array. In addition to Whole Array, you could choose Interspersed, Row or Column. Following is a discussion of each.
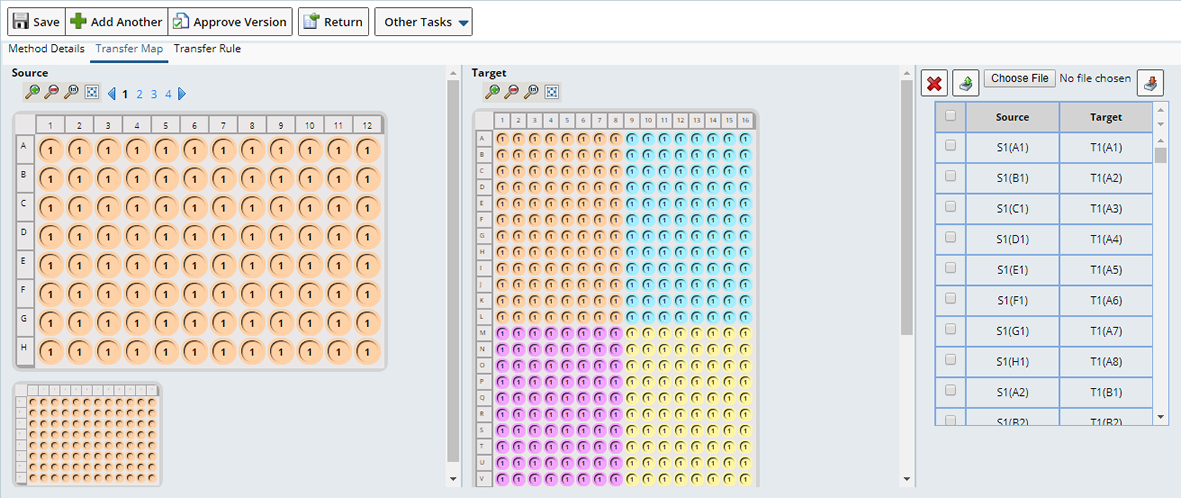
Checking the Transpose checkbox inverts a plate row for a column, or a column for a row.
In the following example, we Condensed four 96 well plates onto a Transposed 384 well plate. You will need to define an Array Type for the Transposed 384 well plate.
| Array List |
The third panel of the Transfer Map is a list of all cell to cell mappings. The cell mappings include both the source and target ArrayItem (A2), and the ordinal Source or Target Arrays as well.
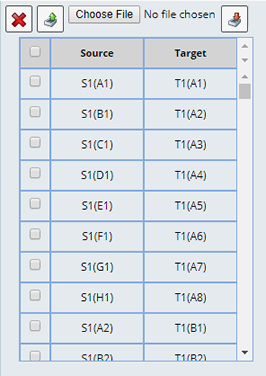
All Array Items placed on the Target are displayed and reference the original position on the Source Array, and the new position on the Target. Using the menu at the top you can choose to:
| Button | Description |
| Delete | Delete the selected Array Items from the Map, allowing you to reposition incorrectly placed Array Items. |
| Export Map | Exports the map from this 3rd pane to Excel. Depending on the extent and complexity of the maps, you may find it easier to define the maps in Excel and then import them. |
| Browser
Import Map |
Browse for a client side Excel file to be used for importing the map.
Discards the current map and imports the map from the chosen Excel file. |
Following are example Export and Import Excel Files for the Transfer Map:
| Map | Example |
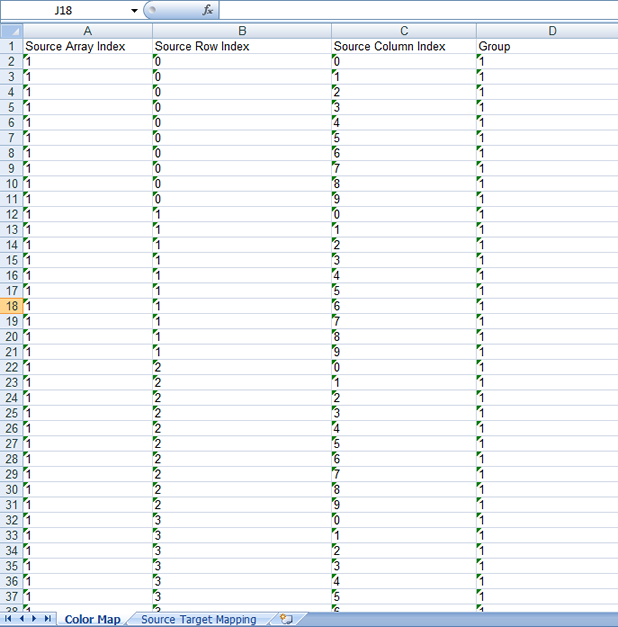
| Color Map Worksheet
Each well, in each of the Source Arrays, is associated with a Group where all the wells in a group are assigned the same color. Source Array Index: The Source Arrays are numbered 1,2,3 and so on. |
|
|
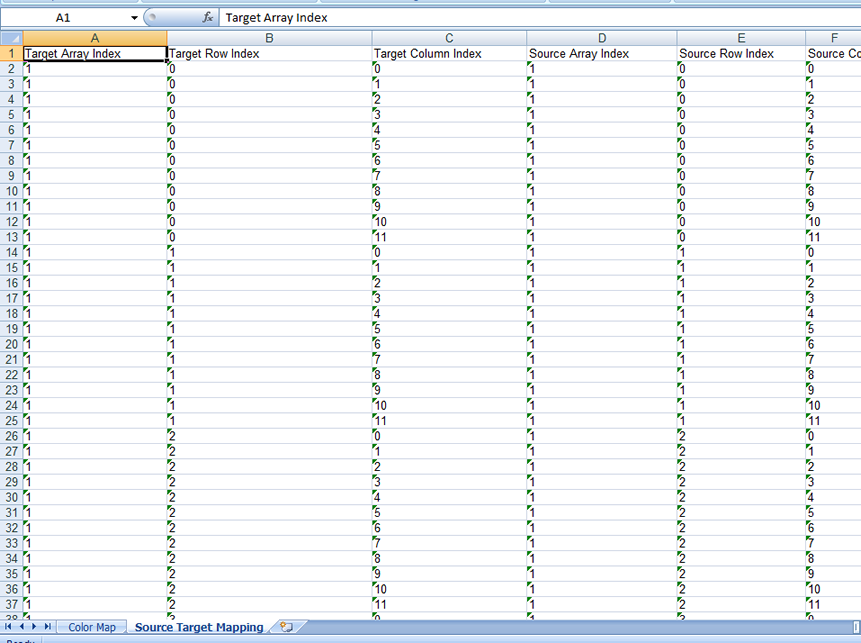
Source Target Mapping This worksheet contains the mapping between Source Array wells to Target Array well. Target Array Well is identified by [Target Array Index, Target Row Index, Target Column Index] Target Row Index is the row number starting with 0, 1, 2...; Target Column Index is the column number starting with 0, 1, 2.
|
|
Transfer Rule |
When transferring, the content placed in the Target Array Item is a reference to the Source Array Item. The Array Item from the Source Array and its entire contents can be transferred to the Target Array Item. The transfer rule provides the ability to decide which content from the source ArrayItem is transferred, detailing what is in the target Array Item.
Optionally, choose to copy only the Zone definition from the Source Array.
The Transfer Rule allows you to specify what is transferred or copied to the Target Array. Typically, the Full Array is transferred. Alternatively, you can choose to specify Zones and determine which content is transferred for each Zone. Doing so disables the Full Array option.
Clicking Add Zones displays the Zone selection box, where you can choose to specifically include any of the Zones defined on the Source Array or Full Array:

| Fields | Description |
| Zone | Zones to include from the Source Array. Click Add Zones to add additional Zones. |
| Copy Zone Definition | Copies the Zone definition from the Source Array. No Content is copied. |
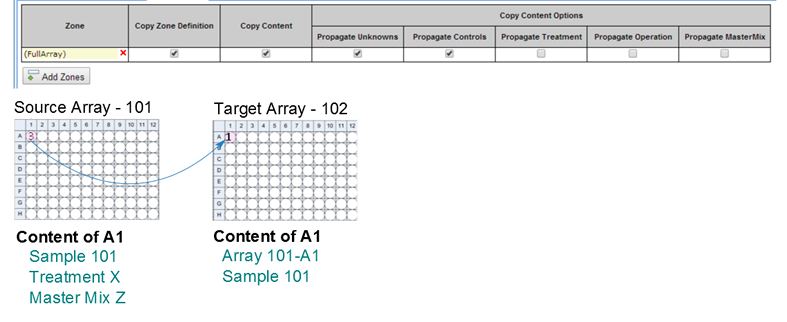
| Copy Content | Copies the Content from this Zone. Propagate Unknowns and Propagate Controls are automatically checked when Copy Content is checked. You can optionally choose to include any Treatments, Operations or Master Mix. |
| Copy Content Options | |
| Propagate Unknowns
Propagate Controls Propagate Treatment Propagate Operation Propagate MasterMix |
Propagate Unknowns and Propagate Controls are automatically checked when Copy Content is checked. You can optionally choose to include any Treatments, Operations or Master Mix. |
Following are examples of how the Transfer rule is used.
| Use Case | Example |
|
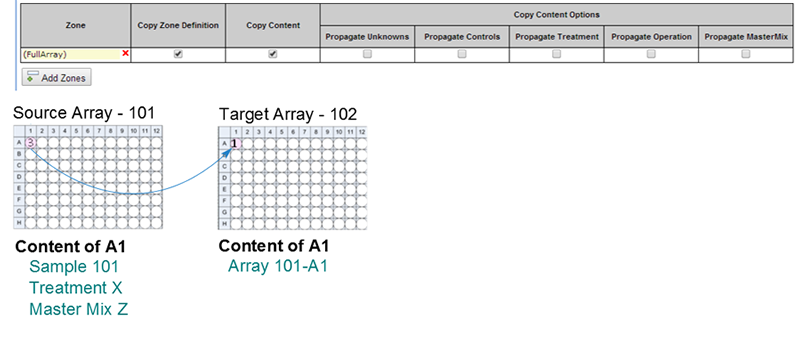
In this first use case it is sufficient to only show in the Target Array, that the content of Array102-A1 references Array101-A1. This would be the case for example, when Array101 is simply replicated. The user knows nothing about what is now in Array102-A1. |
|
|
The second use case shows more information about what is in the target array Array102-A1, in addition to knowing it came from Array101-A1, it shows that Sample 101 which was in Array101-A1, is now also in Array102-A1. However, notice, it may not be important to know that the Treatment X, or the MasterMix Z which were in the Source Array Array101-A1, is also in the Target Array Array102-A1. |
|
|
This last use case shows different rules for different zones. The Unknown zone is handled similarly to how the second use case was defined. That is to allow the Sample in the source ArrayItem to bleed through to the target ArrayItem. In this last use case, notice no content is transferred to the target Array for both the Positive and Negative Control zones. The zone definition is copied to the target array.
|
|
View Executions |
|
|
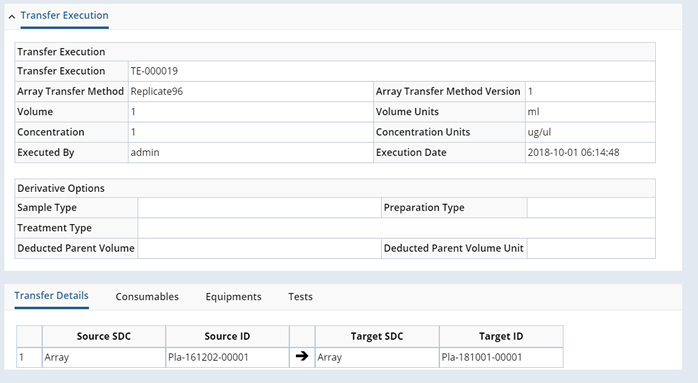
Click the View Executions button to view Executions of this Transfer Method. Clicking an Execution link, such as "TE-000019", opens the View Transfer Execution page. From here you can view the details of the transfer including any associated Consumables, Equipment and Tests.
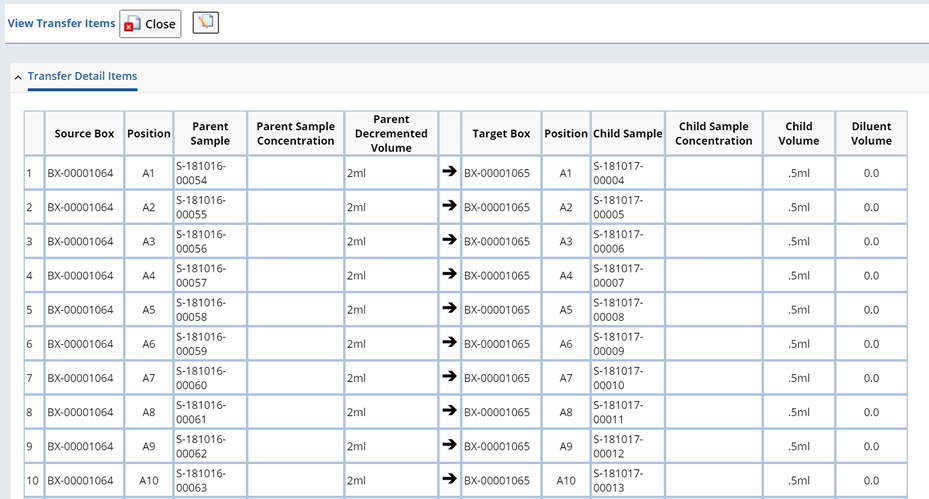
If the Execution is an ASL Transfer, click the View Details link to open the View Transfer Items dialog.

View specific details about Source and Target positions, Samples within each position as well as Volume, Concentration and Diluent information.
Generate an LHR Report |
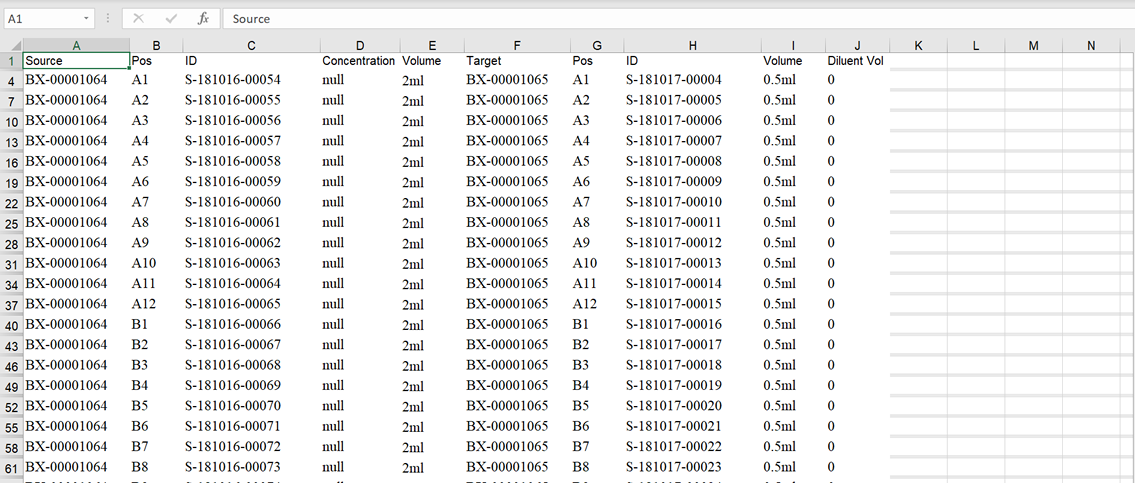
From the Transfer Execution dialog generate the LHR (Liquid Handling Robot) Report. This includes instructions for moving liquid from one Array Item (or ASL Grid position) to another. These instructions may be in the form of a spreadsheet. An example report is provided OOB to generate this spreadsheet. However, robots will have specific format requirements. These spreadsheets are sent directly to the robot.
Click LHR Report to generate the report.
