Overview
| Top |
|
Empower Connector |
Overview |
|
|
Description |
The Empower connector provides two-way communication between LabVantage and the Waters Empower Chromatography Data System. Essentially, Empower SampleSetMethods are created in the current Empower project by downloading pending samples to Empower. Similarly LabVantage test results are uploaded back to LabVantage.
This system supports two modes of operation:
| • | AQC Mode is used when the sequence is first defined in LabVantage prior to downloading to the SampleSetMethod. |
| • | Candidate Mode is used when selection of samples to include in the SampleSetMethod is left to the discretion of the Chromatographer. |
This system has three major components:
| • | Empower Toolkit Application This is an application invoked from Empower to communicate with LabVantage for downloading and uploading. These applications are written using the Empower Toolkit for accessing the Empower database. |
| • | EmpowerUpload Action This is a LabVantage Action that is responsible for persisting results. |
| • | EmpowerPolicy This is a LabVantage Policy that configures details for options for downloading and uploading, along with other configurable rules. |
Architecture |
While one-to-one communication between a single Empower system and a single LabVantage system may be the norm, this Empower connector also supports from a single LabVantage server, multiple Empower systems. Each Empower system may also support multiple Empower Projects. These are diagrammed below:
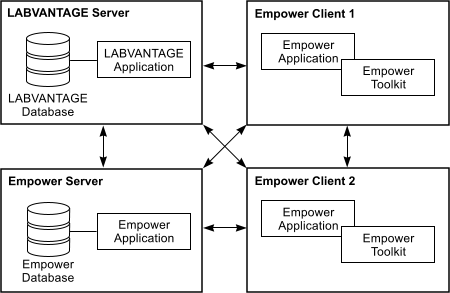
| Empower Client |
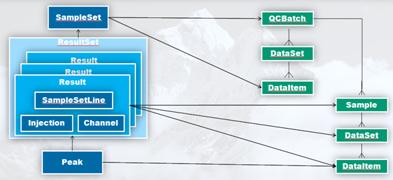
The following diagram is a high level view of the overall architecture of the system.
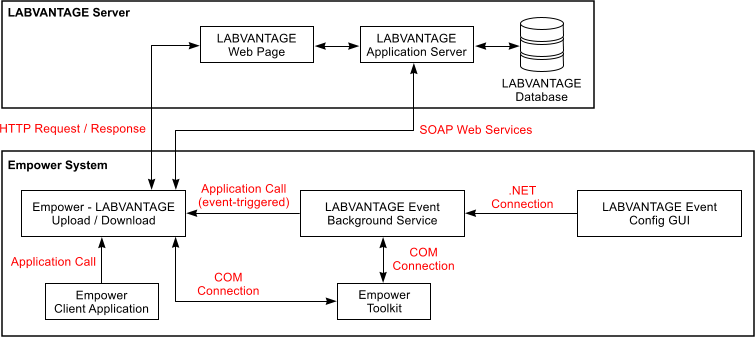
Each Empower System can call an Upload or Download Toolkit application. This application can be called from either the Empower client application (From the toolkit menu) or from a Desktop shortcut. When called from the Empower client application all log in information for Empower is provided, however if launched externally then the applications prompt for any Empower log in information. The Empower Toolkit applications embed an Internet Explorer control that is used to show familiar LabVantage web pages.
Log on to Sapphire is managed through our LOM (LabVantage Object Model) library that uses our web service architecture to pass encrypted (RSA) password and username and receive a connection id token. The Toolkit applications either allow storage of the username and password (encrypted) in configuration files or can prompt for missing information. For example in Upload scenarios a system account for LabVantage can be configured and the relevant username for the results picked from the result record. Whereas for Download the username and password can be prompted for if a shared client or configured for a particular LabVantage user if a single sign on Empower system.
The diagram also shows the LabVantage Event Service which runs an Empower Polling routine that looks for new Sign Offs and uses the upload Toolkit application in a silent mode to send the data to LabVantage. The LabVantage Event Config is an application that sits in the Windows System Tray that allows configuration of the Event service and in turn the Polling. In small scale client only Empower systems then this service can be run on the single client.
| Empower Server |
In Empower Server based architectures, The LabVantage Event Service can be installed on an Empower Server and not on the individual clients. This can then poll for sign offs from all projects for that Empower system.
Download |
|
|
Overview |
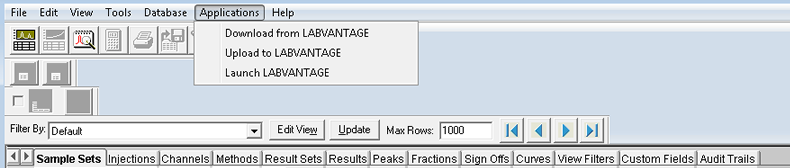
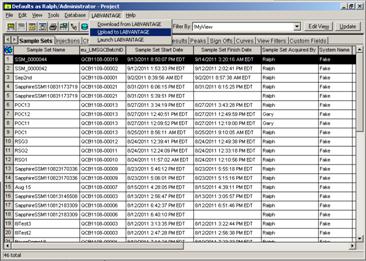
The Download application (EmpowerDownload.exe) is launched from the Empower Toolkit menuitem Download from LabVantage (the toolkit menu will either be labeled Applications if created by LabVantage or it will be combined with any existing menu). This is supported from both the ProInterface and the QuickStart User Interfaces, and regardless of which table is currently selected.
The Download application is used to create a new Empower SampleSetMethod (SSM). This SSM will ultimately be used to acquire a new SampleSet, which will get processed, and then uploaded using the Upload application.
Authentication |
As mentioned, upon executing the Download application (or the upload application), the user can be presented with the sign on window shown below:
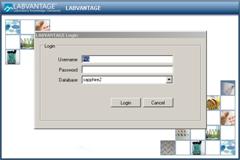
Depending on what is configured in the download configuration file, the system may automatically present the Username, and Database. If the password is configured as well, this sign on window is automatically bypassed (see Download/Upload Application Configuration).
Download Options |
After authenticating the user against the LIMS User list, the first panel of the Download application wizard is shown.
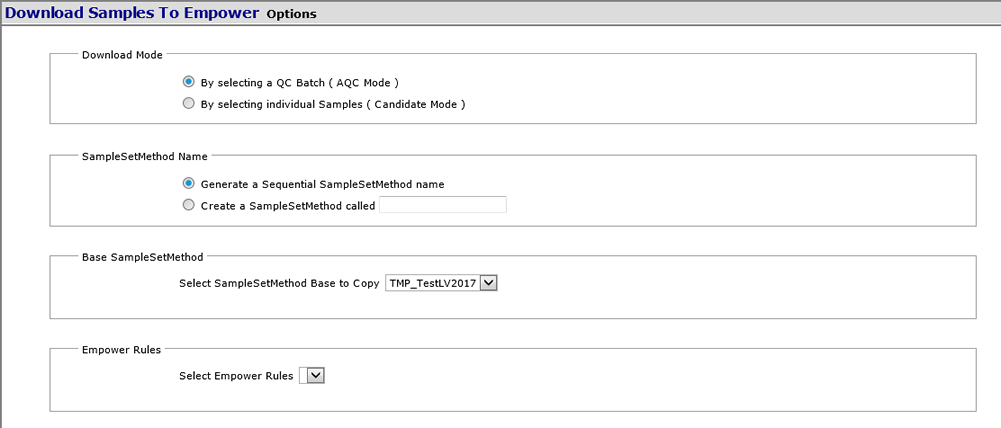
The user must make 4 elections on this page before proceeding in the wizard.
| 1. | The download mode must be chosen. This defines how the samples from LIMS are chosen. There are two options that are covered in the following sections AQC Mode and Candidate Mode. |
| 2. | Name the new SampleSetMethod. You have two choices: |
| a. | The system generates a unique SampleSetMethod ID of SSM_nnnnnn using a global counter on the LabVantage server. |
| b. | The user enters a unique name for this SampleSetMethod in the Current Empower Project. |
| 3. | Choose a Base SampleSetMethod. This is the SampleSetMethod that is cloned
in creation of the new SampleSetMethod that is being created. The user must
choose the correct Base SampleSetMethod depending on the Chromatography
that is to be performed.
This base SampleSetMethod:
|
| 4. | Choose the Chromatography Rules that want to be followed. Essentially
this chooses which Empower Policy configuration setting to follow. Typically
a system may have one set of configured rules. But the capability is provided
to allow the user to choose when multiple sets apply to the current Empower
project. These rules define how:
See Policy Overview. |
AQC Mode |
AQC mode will associate a single LabVantage QCBatch to the Empower SampleSetMethod. This requires the defining the QCBatch in full in advance. The QCBatch would have already completed the following before downloading to the SampleSetMethod:
| • | Defined the different positions in the sequence that are Standards vs.
Unknowns:
|
||||||
| • | The AQC QCSampleTypes for each of the Standard QCSampleType would already have reference to the ReagentLot used as that Standard. This ReagentLot would know the actual concentrations for each of the parameters of the standard. These get download to the Empower Component table | ||||||
| • | If required, the AQC QCBatch would have data entered for the preparation datasets corresponding to each of the samples. Typically this is where one enters Sample Weights, Sample Dilutions, or any other information that may want to be downloaded to Empower in the creation of the SmapleSetMethod. |
The advantages of this AQC Mode are
| • | Full features of AQC still apply including all AQC Calculations, Evaluation and QCBatch review. |
| • | Empower Result and Peak data is uploaded for the Standard samples in addition to the unknown samples. This is useful, and needed, if you intend to upload suitability results to LIMS rather than just keeping that in Empower. |
| • | AQC Supports analyst assignment, and if your laboratory workflow requires it, you can have one person define the required QCBatches, to be assigned to the chromatographer analyst for downloading. |
The disadvantages of this AQC Mode are
| • | Requires definition of the master data to map out the structure of the QCBatch expressed in the QCMethod, in addition to the Base SampleSetMethods expressing the similar structure. |
In AQC Mode the second panel of the Download wizard presents a QCBatch selection page. Shown here is the QCBatch selection page (Webpage=QCBEmpowerLookup).
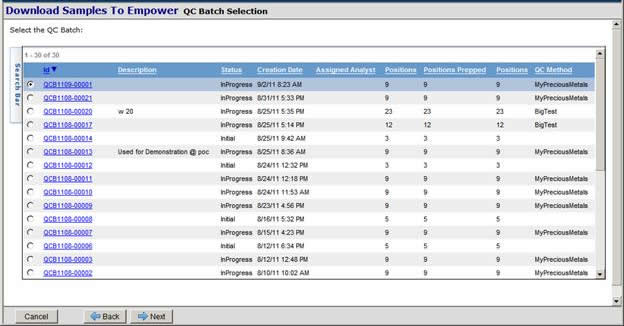
Only QCBatches that have the Initial or Inprogress statuses are shown. Prepping the QCBatch would set the status to InProgress. When the QCBatch does not require prepping, the status is set to Initial. The user is responsible in distinguishing between a Prepped Batch and a Batch that requires Prepping. Shown are the number of QCBatch positions that have been prepped.
Only QCBatches that have not been previously download are shown. This is controlled by checking the qcbatch.blockFlag which is set to a Y when it is downloaded (see Blocking).
Shown in the Lookup page are the following columns:
| • | QCBatch ID: Unique Identifier for the QCBatch. |
| • | Description: Description of the QCBatch. |
| • | Status: Initial or InProgress. |
| • | Creation Date: Date the Batch is created. |
| • | Assigned Analyst: Suggested or assigned analyst for this QCBatch (Not used in the above screen shot.) |
| • | Positions: Total number of positions in the QCBatch. |
| • | Positions Prepped: Total number of positions prepped in the QCBatch. Should match the total positions when all Prepped. |
| • | QCMethod: Method used to create this QCBatch. |
After choosing a QCBatch, the user strikes the Next key to proceed to the Mapping Page.
Mapping Page |
The next page of the wizard is the Mapping page (shown here):
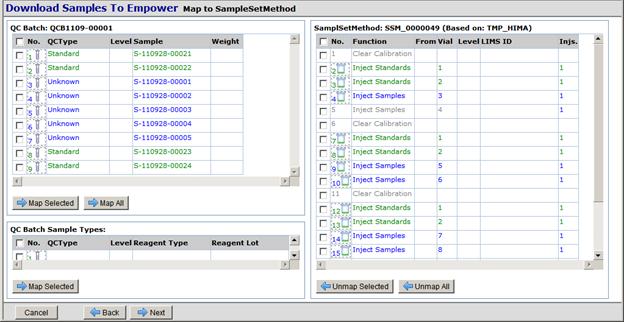
The mapping page contains 3 areas:
| • | Top Left section: Shows the LabVantage object which is either the QCBatch chosen or the working set of the candidate samples chosen in Candidate Mode. This section will show information about each of the samples including its SampleID, the SampleWeight (assuming the Sample Prep has entered a sample Weight). and in the case of standard samples the appropriate standard level for those standards. In AQC Mode the standard level may be specified in the QCMethod, and is designed to align with the Empower SampleSetLine.StandardLevel. | ||||||||||||||
| • | Bottom Left Section: Depending on the Operation Mode (AQC or Candidate),
this section shows information about the working set of standards.
Remember mapping the Bottom Left Section to the Inject Standards SampleSetLines will not post Empower Result and Peak data to the Standard samples. |
||||||||||||||
| • | Right Section: Shows the full structure of the SampleSetMethod that is
about to be created. Remember this is based on the Base SampleSetMethod
that is cloned. Shown for each SampleSetLine are:
Additional columns can be configured to also be presented as configured in the Empower Policy. Note: None of the cells on the Right Section may be modified (see Mapping Page). |
Operationally, the user is going associate a line from the left side to a line on the right side. Provided are the following buttons:
| • | Map Selected: moves the selected Left side row to the selected right
side row.
|
||||
| • | Map All: Maps all unmapped rows from the Top Left section to the Right Section algorithmically matching Standards to the Inject Standard SampleSetLines, and Unknowns to the Inject Sample SampleSetLines. | ||||
| • | UnmapSelected: Undo the selected maps for individual SampleSetLines. | ||||
| • | Unmap All: Undo all previously assigned maps in the SampleSetMethod. |
Drag & Drop
| • | As an alternatively to using the Map Selected button, the user can also use Drag and drop to take any Sample from the Top Left Section to the Right section. |
The user strikes the Create SampleSetMethod button to persist the new method and direct the user to the Confirmation Page.
Candidate Mode |
Candidate mode permits the chromatographer to choose qualified sample tests to be chosen to be added to the Empower SampleSetMethod.
Candidate mode puts more power in the hands of the Chromatographer in choosing the samples and reagent lots to be chosen to be downloaded to the Empower SampleSetMethod
The chromatographer chooses samples to be mapped to the individual Inject Samples SampleSetLines. Specifically, chosen are individual instances of the LabVantage Test object named sdiworkitem.
| • | If required, the sdiworkitem would have data entered of its preparation datasets. Typically this is where one enters SampleWeights, Sample Dilutions, or any other information that may want to be downloaded to Empower in the creation of the SampleSetMethod. |
The chromatographer chooses ReagentLots that are to be mapped to the individual Inject Standard or Inject Control SampleSetLines. These ReagentLots have been properly qualified such that they know the actual concentrations of each of the parameters. This gets download to the Empower component table.
The advantages of this Candidate mode are:
| • | The chromatographer determines which samples are to be tested in this SampleSetMethod without and prebuilt structure in LIMS ahead of time. |
| • | No need to replicate the injection structure expressed in the Base SampleSetMethod also in the LabVantage master data. |
| • | Although a QCBatch is not used in Candidate mode, the system will automatically create a QCBatch representing the generated SampleSetMethod. This is a light weight QCBatch in that it does not use a QCMethod, and therefore, no AQC calculations, evaluations, or review is required. Used only to track the order of the samples as they were processed by Empower. |
The disadvantages of this Candidate Mode are:
| • | There is no support for uploading Empower Result and Peak data for the Standard samples. It is only the Unknown samples that get uploaded results. |
In Candidate Mode, From the Mapping page, the user can iteratively choose additional Unknown Samples and ReagentLots
Unknown samples are chosen by striking the Add button on the Mapping page to open the Sample Test Lookup page (Webpage=SDIWIEmpowerLookup) shown here.
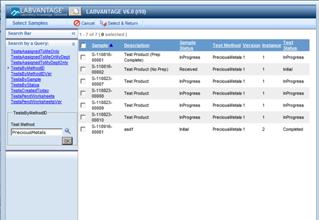
This lookup page looks as if one is choosing samples. But in fact, you are actually choosing Tests (sdiworkitems) from those samples. Only tests that:
| • | Have a DatasetStatus of either Initial or Inprogress are included. |
| • | Have not been assigned to a QCBatch are included. |
| • | Have not been previously download are shown. This is controlled by checking the sdidata.blockFlag which is set to a Y when it is downloaded (see Blocking). |
| • | Have completed the Preparation Dataset if the test requires Preparation. |
Shown in the Lookup page are the following columns
| • | Sample: Unique Identifier for the Sample. |
| • | Description: Description of the Sample. |
| • | Sample Status: Initial, Received or InProgress. |
| • | TestMethod: ID of the Test (workitemid). |
| • | Version: Version number of the workitem. |
| • | Instance: Instance number of the sdiworkitem on this sample. A test can exist multiple times on a single sample, as is the case when the entire test needs to be retested. |
| • | TestStatus: Overall status of the test considering the rollup status of each of the DatasetStatus. |
Shown in the Lookup page are a number of queries that may be configured on this system. In use in the screen shot is a query that shows all tests by the entered Test Name. Regardless of the query shown, the resulting list of tests is filtered by the above set of automatic restrictions.
Choosing a Test and hitting the button Select & Return will return the Sample Test back to the Mapping page.
Confirmation Page |
Before exiting the Download application, a preview page of the new SampleSetMethod is shown.
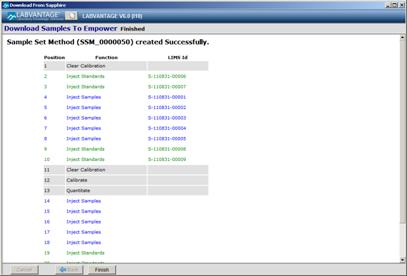
Shown above is a partially mapped SampleSetMethod. Notice the Blank rows left at the end of the cloned Base SampleSetMethod. The user needs to now clean up this SampleSetMethod by deleting and reviewing the new SampleSetMethod in the SampleSetMethod editor.
By hitting the Finish button the DownLoad application is closed and the SampleSetMethod editor is opened.
As a result of an Empower Toolkit bug, you will get the following message box on opening the SampleSetMethod editor.
![]()
Simply indicate Yes.
Blocking |
The system automatically will track what objects have been successfully sent to Empower. Both at the QCBatch and individual sdidata records.
This is done via setting both the qcbatch.BlockFlag and the sdidata.BlockFlag to a Y.
When blocked, won't the object be permitted to be downloaded to another Empower SmapleSetMethod, but also that the LabVantage data entry page will not permit entry of Results for the object that is sent to Empower for processing.
| • | The Block is set upon successfully creating a new SampleSetMethod on the download. |
| • | The Block is cleared upon successfully processing the full SampleSet on the upload. When the QCBatch status transitions to Completed. |
Occasionally, you may need to manually clear the blocks on a QCBatch. The QCBatch List page provides a system admin button to Reset Blocks. This will automatically unblock the sdidata.BlockFlag for those sdidata records of the QCBatch.
Component Table Association |
Throughout this connector the Empower Peak and the LabVantage dataitem are mapped. They may be mapped by either of these methods:
| • | Associating the Empower PeakName to the LabVantage ParamID. |
| • | Associating the Empower PeakName to the ParamListItem.ParamAlias for that ParamID. |
Upload |
|
|
Overview |
The Upload application (EmpowerUpload.exe) is launched from the Empower Toolkit menuitem Upload to LabVantage. This is supported from both the ProInterface and the QuickStart User Interfaces.
The Upload application is used to post results back to LabVantage. This application runs in two modes:
| 1. | Manually: Through the Empower User interface, working on the selected Empower context. Supported are the following contexts. |
| a. | SampleSet: Uploads the latest Result objects for each Injection/Channel across the entire SampleSet. Only a single SampleSet supported. |
| b. | ResultSet: Uploads the latest Result objects for each Injection across the entire ResultSet. Only a single ResultSet supported. |
| c. | Result: Uploads individual selected Result objects. But all must be from a single homogeneous SampleSet. |
| 2. | OnSignoff: When installed on an Empower server, the LabVantage Event service can be configured to detect the presence of a new signoff. This causes the corresponding Result object to be uploaded to LabVantage (see See Upload via Signoff). |
Upload Confirmation Page |
After authenticating the user against the LIMS User list, the first panel of the Upload application wizard is shown.
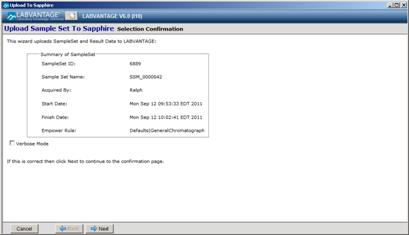
Presented on this page is simply a confirmation that the correct Empower context was selected prior to uploading the results.
The check box Verbose Mode is used if you wish to preview the data. If not, the results are automatically sent to the LabVantage server.
Hit the Next button. If the Verbose Mode was checked this will take you to the Preview Page. If not, the data will be uploaded, and the outcome of the upload (success or failure) is show on the final page.
Upload Preview Page |
If the Verbose Mode is checked, the Upload Preview page will show all data that needs to be uploaded.
| NOTE: | Depending on the size of the upload, presentation of the Preview page can take some time. So you may elect not previewing by leaving the Verbose Mode unchecked. |
The Preview page is shown here.
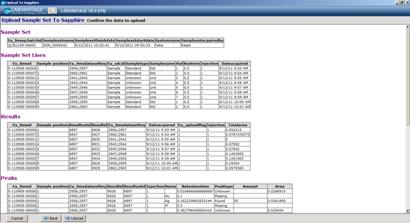
Shown on the Preview page are 4 recordsets containing data:
| • | SampleSet: a one row recordset containing information related to the Empower SampleSet object. Information shown is generated based on the upload mappings for the SampleSet object. |
| • | SampleSetLines: a recordset with each row representing an individual Empower SampleSetLine object. Information shown is generated based on the upload mapping for the SampleSetLine. Internally, Empower does not provide access to the SampleSetLine object. The information is combined from the Empower Result object that is common across all results of the SampleSetLine. |
| • | Results: a recordset with each row representing an individual Empower Result object. Information shown is generated based on the upload mappings for the Result object. Note, the result object also has access to the information stored at the Injection and InjectionChannel objects. |
| • | Peaks: a recordset with each row representing an individual Empower Result object. Information shown is generated on based on the upload mappings for the Peak object. |
After reviewing the data, hit the Upload button to call the action to save the results. In manual mode, the upload occurs with wait. The outcome is shown on the Upload Acknowledgement page.
Upload Acknowledgement Page |
The last page of the Upload application shows success or failure as a result of the upload. The Upload Acknowledgment page is shown here.
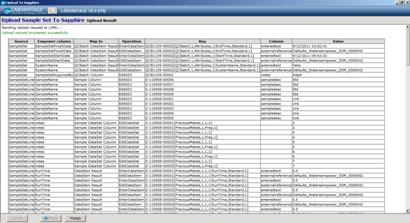
Hit the Finish button to exit the Upload Application.
External Reference |
The Empower SampleSet has reference to the QCBatch in one of the custom Empower Fields. Similarly, the LabVantage system has reference to the Empower objects from which they are associated. Automatically the QCBatch.ExternalReference and the sdidataitem.ExternalReference provide this association.
The s_qcbatch.ExternalReference is a string that is of the format
Project=<project>; database=<database>; samplesetname=<sampleset>;
The sdidataitem.ExternalReference is a string that is of the format
project=<project>; database=<database>; samplesetname=<sampleset>; resultsetid=<resultsetid>; resultid<resultid>; channelid<channelid>; Added=<Y>
Where
<project> is the name of the Empower project
<database> is the name of the Empower database
<sampleset> is the name of the SampleSet
<resultsetid> is the identifier of the ResultSet for this data,
<resultid> is the identifier of the Result for which this result came from, and
<channelid> is the identifier of the channel from which the result came.
<added> identifies those SDI data items that were added on the fly.
Upload via Signoff |
As an alternate to using the Manual Upload application, the system may be setup to automatically detect the Empower Signoffs and upload the signed off results.
The LabVantage Event Service will automatically poll for these signoffs. Here's how it works.
The poller makes a connection to a "Master"Empower project. Typically this could be the granddaddy project in the project hierarchy. From this Master project, the poller gets access to all Empower projects. Based on the project status, if it is Unlocked, or Process Only Locked, then the project will be processed. Lock statuses of ReadOnly Lock and FullProject Lock are bypassed.
The poller works in cycles. For each cycle, it starts by connecting to the Master Project.
For each project processed, the poller does the following on each cycle.
| 1. | Loads the last SignOffID processed for that project. |
| 2. | Finds all signoffs after that SignOffID. |
| 3. | Depending on the configuration, either signoff 1 or signoff 2 is processed. |
| 4. | Depending on the configuration, only process the signoff which has the correct Signoff reason. |
| 5. | Filter out those signoffs for SampleSets not connected to LIMS. This is done by examining the eu_PolicyNode column. Only Results of SampleSets which are non blank are processed. |
| 6. | Group the Results by distinct SampleSets. |
| 7. | Determine the user to Impersonate when uploading the results. This is configurable. Options include: |
| a. | Processing signoff1, impersonating Signoff1 User. |
| b. | Processing signoff2, impersonating Signoff2 User. |
| c. | Processing signoff2, impersonating First Signoff1 User. |
| 8. | Call the Upload application in silent mode to post the results to LabVantage for a single SampleSet, and Impersonating user at a time. |
| 9. | Wait for the Upload application to complete, pause for a configurable inter SampleSet duration, and go process the next SampleSet. |
| 10. | After the Last SampleSet, save the last SignOffID for this project. |
| 11. | Pause for a configurable inter project duration and go process the next project. |
| 12. | After the Last Project, pause for a configurable polling period, before starting the cycle over again. |
See LabVantage Event Service Polling Properties.
Reuploading Results |
When Re uploading results, any SDI data items that were previously added on the fly, will be deleted prior to the Re uploading of a reprocessed Empower Results Object. For example, the first time you uploaded results you might have uploaded Unknown "Y" and Unknown "X", the second time you may have only uploaded Unknown "Z". Unknown "Y" and "X" are now meaningless and will be deleted.
When a Multiple Channel Instrument is used, the SDI data structure may have a mixture of SDI data items from different channels. To prevent deleting unknown peaks from a different channel, the channel is identified in the sdidataitem.ExternalReference (channelid). SDI data items added on the fly are identified with an added = Y property. Only unknown Peaks added for the specific channel are deleted.
LabVantage Configuration |
|
|
Policy Overview |
The Empower policy is used to define all aspects of the Empower Connector. This includes:
| • | Specific mappings of which columns get download to the SampleSetMethod, SampleSetLine, and to the Component table. |
| • | Specific mappings of which columns get uploaded as results to LabVantage. |
| • | Specific mappings of the expected Empower Custom Field names to the actual custom field in the project. |
| • | Other processing options for different PeakTypes. |
Policy Nodes |
The Empower Policy is a multi node Propertytree. In this node hierarchy you may have multiple configurations. Each would be a different PropertyTree node. These PropertyTree nodes also inherit their properties from one node to the other. So if only one property differs from one node to another, you may elect to define one node inherited from another.
The reason you can have multiple configurations are:
| 1. | On large global configurations, it is likely that the global LabVantage LIMS may connect to multiple Empower systems. Given this flexibility it is likely that each system has different custom fields. Therefore the first reason for having multiple configurations to define the mappings of the expected Empower Custom Field names. |
| 2. | The major focus of the Policy configuration is to support different download and upload rules. Different Chromatography procedures then could require different mappings. For example: |
| a. | A Chromatography procedure could require the uploading of additional custom calculated Empower Custom Fields as Results to the LabVantage Test/Dataset records. |
| b. | A Chromatography procedure could require additional information to be downloaded to the Empower Component table used in some additional Empower Custom Field calculation. |
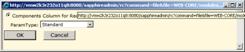
Each Empower node configuration is given a user friendly title. This is the title that is shown in the Empower Rule dropdown on the initial page of the Download application.
Policy Node to Empower Project Registration |
It is common for Empower systems to rollover their Empower projects on a routine basis as they are filled up. When this happens, the new projects need to be mapped. Or do they? Maybe not. When a new project is created, it often is created as a child of an existing project. If the existing parent project is registered against a policy node, then the new child project need not have to be registered. Why? The child project would copy the same custom field configuration from the parent project.
Only if the child project intends to change its configuration does the new child project need to be registered.
When invoking the Download application, the system checks if the current Empower project is registered against the EmpowerPolicy. If so, the policy node would be known. If not, the system checks the immediate parent to determine if that is registered and so on. If no parent ancestor project is registered, the Download application errors out indicating as such.
Up to now we have loosely used the term "registered" in that the project node is registered against the policy nodes. Registration is the matching of the policy node name to the project name.
In fact to support multiple policy nodes for each project in supporting the multiple chromatography procedures described above, the project name matches the leading part of the policy node name.
The format of the policy node name includes
<Project>|<Suffix>
Where
<Project> matches the Empower project name,
| is an optional delimiter when suffix is appended.
<Suffix> appended to be unique as the project name may not be unique when supporting multiple chromatography procedures.
Shown below is an example setup of the Empower Policy node structure
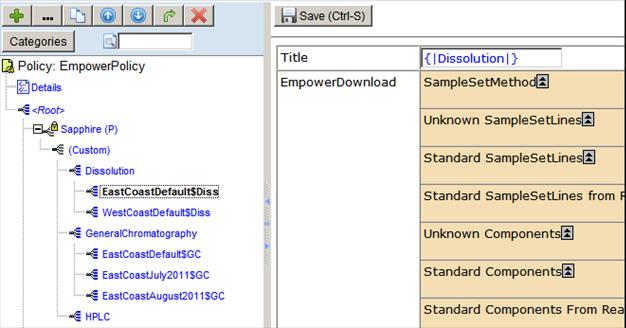
Shown are the following nodes.
| • | Sapphire (P): Out of the Box distributed node settings to establish the default property values. |
| • | (Custom): Configurable Node to store general settings to for project defaults for all nodes. |
| • | Dissolution, General Chromatography, HPLC: Example custom nodes for managing multiple Chromatography procedures. |
| • | Other nodes to match against different Empower projects. |
Note:
| • | The use of site specific project roots, e.g. EastCoastDefault$Diss, or WestCoastDefault$Diss. |
| • | The use of specialized nodes for child projects e.g. EastCoastJuly2011$GC, or EastCoastAugust2011$GC. |
| • | Each node has a title property. Shown on the right hand side is the inherited title of the EastCoastDefault$Diss node. |
Download Configuration |
The EmpowerPolicy configures what gets download to the Empower Objects. The following diagram shows the different sources and targets for the download from LabVantage to Empower.
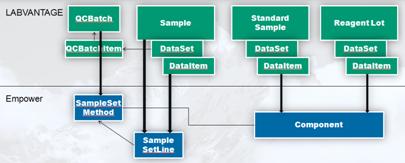
The download section of the EmpowerPolicy is shown below.

Each of these PropertyLists shown above contains a collection of Column mappings. Each column mapping collection associates an Empower Column to a Download Rule.
At this point, this is best documented here by Use Case Examples. In the following sections are the following download use cases:
Download QCBatch column to SampleSetMethod
Download SDI Workitem column to SampleSetLine
Download Sample column to SampleSetLine
Download Sample sdidataitem to SampleSetLine
Download Sample sdidataitem to Component table
Download ReagentLot sdidataitem to Component table
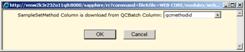
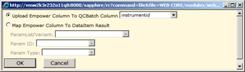
| Download QCBatch column to SampleSetMethod |
Any column the QCBatch may be downloaded to a column in the SampleSetMethod.
Shown below is the download of the QCMethod to the SampleSetMethod.

The Download Rule helper is used to choose the Download rule
Other possibilities include
| • | Downloading the CDScolumnID to the SampleSetMethod. |
| • | Downloading the assigned Analyst to the SampleSetMethod. |
| Download SDI Workitem column to SampleSetLine |
Any column from the Workitem may be downloaded to the SamleSetLine.
Shown below is the download of the Sample Name to the SampleSetLine.
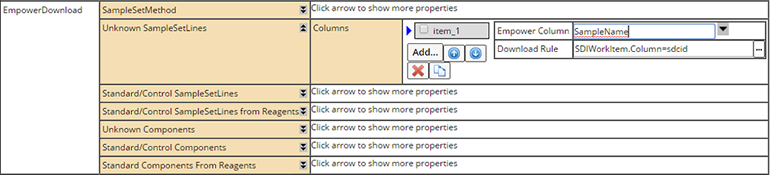
The Download Rule helper is used to choose the Download rule.
| Download Sample column to SampleSetLine |
Any column the Sample may be downloaded to a column in the SampleSetLine.
Shown below is the download of the Dilution to the SampleSetLine.
The Download Rule helper is used to choose the Download rule

Other possibilities include
| • | Downloading the Sample Description to the SampleSetLine. |
| • | Downloading the ProductID to the SampleSetLine. |
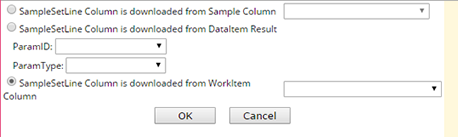
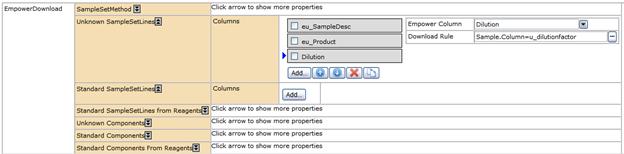
| Download Sample sdidataitem to SampleSetLine |
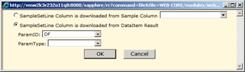
Any sdidataitem result of the Current Dataset on the Sample may be downloaded to a column in the SampleSetLine.
Show Popup definition of "Current" Dataset as hyperlink of Current above.
The Current Dataset is dataset that is mapped to the SampleSetLine. In AQC mode, this is any sdidata record that is associated with the QCBatchItem. In Candidate mode, this is any sdidata record in the chosen sdiworkitem Test.
The sdidataitem is identified by either specifying the ParamID, or the ParamType via the helper. Always replicate 1 of that dataitem is downloaded.
Notice that you may define separate download rules for both Standard and Unknown SampleSetLines. However, if you want the same download for both Standard and Unknown SampleSetLines, you must express it in both collections.
For the Standard SampleSetLines, as you may recall, there is an AQC mode, and a Candidate Mode. These can be configured independently.
In AQC mode:
You configure the download to the Standard SampleSetLine from the Standard SampleSetLine property collection shown below. Here it shows the download of the Dilution from a prep dataset to the SampleSetLine.
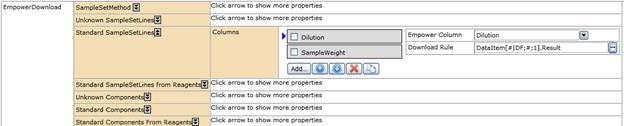
The Download Rule helper is used to choose the Download rule
Other possibilities include:
| • | Download the SampleWeight to the SampleSetLine. |
In Candidate mode:
There is no standard sample that will be used to map to the Inject Standard SampleSetLines. Rather you simply map attributes of the ReagentLot to the SampleSetLines. Here it shows the download from the ReagentLot attribute weight.

The Download Rule helper is used to choose the Download rule
| Download Sample sdidataitem to Component table |
Any sdidataitem result of the Current Dataset on the Sample may be downloaded to a column in the Component table. Typically this is done for standard samples to define the actual amount, but may be done for Unknown samples as well.
Show Popup definition of "Current"Dataset as hyperlink of Current above.
The Current Dataset is dataset that is mapped to the SampleSetLine. In AQC mode, this is any sdidata record that is associated with the QCBatchItem. In Candidate mode, this is any sdidata record in the chosen sdiworkitem Test.
More likely, the actual amounts for standard would be coming from the standard's ReagentLot. See Download Reagent Lot sdidataitem to Component table.
The sdidataitem is identified by either specifying the ParamID, or the ParamType via the helper. Always replicate 1 of that dataitem is downloaded.
Notice that you may define separate download rules for both Standard and Unknown Components. However, if you want the same download for both Standard and Unknown Components, you must express it in both collections.
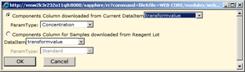
Shown below is the download of the Concentration for all parameters to the Component table.

The Download Rule helper is used to choose the Download rule
Other possibilities include:
| • | Download a Molecular Weight of the component to be used in a custom Empower calculation. |
| Download ReagentLot sdidataitem to Component table |
The sdidata record of the ReagentLot contains the actual amounts in that ReagentLot for each of the parameters. Typically these are downloaded to the standard samples to store in the Component Table.
As you may recall, there is an AQC mode, and a Candidate Mode. Both may utilize the ReagentLot for the download of the actual amounts. But they work slightly differently.
In AQC mode:
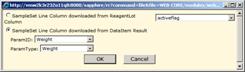
You configure the access to the ReagentLot's actual amounts from the Standard Component property collection as shown below.

The Download Rule helper is used to choose the Download rule

In Candidate mode:
Use of the ReagentLot is not via a standard sample. Therefore, you configure the access to the ReagentLot's actual amounts from the Standard Component from Reagents property collection as shown below.

The Download Rule helper is used to choose the Download rule
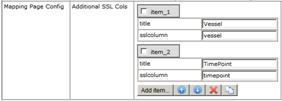
Mapping Page Configuration |
One section of the EmpowerPolicy configuration augments which columns are presented for the SampleSetLines on the DownloadMapping page.
Depending on your requirements you can specify any number of additional SampleSetLines to be presented.
Shown below for a Dissolution setup, shows the columns vessel and timepoint columns along with their presentation titles
Upload Configuration |
The EmpowerPolicy configures what gets uploaded to LabVantage during the result upload. The following diagram shows the different sources and targets for the upload to LabVantage from Empower.
The upload section of the EmpowerPolicy is shown below
Each of these PropertyLists shown above contains a collection of Column mappings. Each column mapping collection associates an Empower Column to an Upload Rule.
At this point, this is best documented here by Use Case Examples. In the following sections are the following upload use cases:
Upload SampleSet field to a QCBatch column
Upload SampleSet field to a QCBatch dataitem param
Upload SampleSetLine to a Sample column
Upload SampleSetLine to a sdidata Dataset column
Upload SampleSetLine to a sdidataitem Result
Upload Result field to a sdidataitem Result
Upload Peak field to a sdidataitem Result
Upload Peak field to a sdidataitem column
Upload Peak field to a new sdidataitem Result
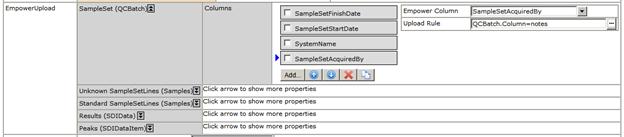
| Upload SampleSet field to a QCBatch column |
Any field of the SampleSet can be uploaded to a column in the QCBatch.
Shown below is the upload of the Empower systemName to the QCBatch.InstrumentID

The Upload Rule helper is used to choose the Upload rule
Other possibilities include:
| • | Uploading the SampleSet Start or Finish Dates to a QCBatch column. |
| • | Uploading the SampleSet SystemComments to a QCBatch column. |
| • | Uploading the SampleSet custom CDSColumnID to a QCBatch column. |
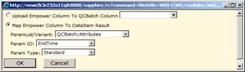
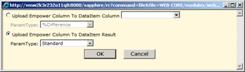
| Upload SampleSet field to a QCBatch dataitem param |
Any field of the SampleSet can be uploaded to a column in the QCBatch.
Shown below is the upload of the Empower Start and Finish Dates to a sdidataitem of the QCBatch.
Notice this rule indicates the ParamList and Variant to be automatically added. This should be the same as the QCBatch Param ParameterList if defined in the QCMethod. You do not want to have both a sdidata recorded added as a result of the QCMethod and this rule.
Notice this rule indicates which parameter and parameter type is to be added.
![]()
The Upload Rule helper is used to choose the Upload rule
Other possibilities include:
| • | Uploading the SampleSet Start or Finish Dates to a QCBatch parameter. |
| • | Uploading the SampleSet SystemComments to a QCBatch parameter. |
| • | Uploading the SampleSet custom CDSColumnID to a QCBatch parameter. |
| Upload SampleSetLine to a Sample column |
Any field of the SampleSetLine can be uploaded to a column of the Sample.
Shown below is the upload of the Empower SampleName to the LIMS Sample Description column.
One should use caution when uploading an Empower field to a column of the Sample, as a given sample may be downloaded for multiple chromatographic samplesets if and when either a sample is retested, or if it simply calls for two different chromatographic test methods.
Notice that you may define separate upload rules for both Standard and Unknown SampleSetLines. However, if you want the same upload for both Standard and Unknown Components, you must express it in both collections.

The Upload Rule helper is used to choose the Upload rule

Other possibilities include:
| • | Uploading any calculated Empower Sample field to a SampleColumn. |
| Upload SampleSetLine to a sdidata Dataset column |
Any field of the SampleSetLine can be uploaded to a column of the sdidata Dataset.
Shown below is the upload of the Empower Vial to the sdidata Dataset column u_vial
Remember a single SampleSetLine equates to the context of a single QCBatchItem or of a single sdiworkitem Test object. As these items may have multiple sdidata Datasets, when updating columns of the sdidata Dataset, both datasets would have their columns updated.
Notice that you may define separate upload rules for both Standard and Unknown SampleSetLines. However, if you want the same upload for both Standard and Unknown Components, you must express it in both collections.

The Upload Rule helper is used to choose the Upload rule

Other possibilities include:
| • | Uploading any standard system suitability data to a sdidata column if appropriate. |
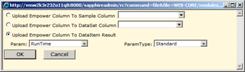
| Upload SampleSetLine to a sdidataitem Result |
Any field of the SampleSetLine can be uploaded to a result on the sdidata Dataset.
Shown below is the upload of the Empower Runtime to a sdidataitem result on the "Current" Dataset.
Show Popup definition of "Current" Dataset as hyperlink of Current above.
The Current Dataset is dataset that is mapped to the SampleSetLine. In AQC mode, this is any sdidata record that is associated with the QCBatchItem. In Candidate mode, this is any sdidata record in the chosen sdiworkitem Test.
The specified parameter and paramtype are first located on any sdidataitem of the Current Dataset. If found the result is simply updated. If not, then a new sdidataitem is automatically added to the first Current procedural dataset.
Notice that you may define separate upload rules for both Standard and Unknown SampleSetLines. However, if you want the same upload for both Standard and Unknown Components, you must express it in both collections.

The Upload Rule helper is used to choose the Upload rule
�
Other possibilities include:
| • | Uploading any calculated Sample field to a sdidata result. |
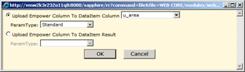
| Upload Result field to a sdidataitem Result |
Any field of the Empower Result object can be uploaded to a result on the sdidata Dataset.
Shown below is the upload of the Empower TotalArea column to a sdidataitem result on the "Current" Dataset.
Show Popup definition of "Current" Dataset as hyperlink of Current above.
The Current Dataset is the dataset that is mapped to the SampleSetLine. In AQC mode, this is any sdidata record that is associated with the QCBatchItem. In Candidate mode, this is any sdidata record in the chosen sdiworkitem Test.
The specified parameter and paramtype are first located on any sdidataitem of the Current Dataset. If found the result is simply updated. If not, then a new sdidataitem is automatically added to the first Current procedural dataset.
The Result object in Empower is the analysis of an entire chromatographic trace. In addition to containing peaks, the Result object very commonly has calculated custom fields in Empower. Any of these custom fields may be uploaded as results. Furthermore, the Result object also has access to any of the Empower information stored at the Injection, or InjectionChannel objects. Therefore, any of this Injection and InjectionChannel information can be uploaded here with the Result object.
The result object gets created for each Injection. When performing multiple injections per SampleSetLine, each injection is automatically uploaded as an additional replicate.

The Upload Rule helper is used to choose the Upload rule
Other possibilities include:
| • | Uploading the Injection DateAcquired date to the sdidata result. |
|
Uploading any calculated Result field to a sdidata result. Examples may
include:
Total Impurities % Impurities Maximum PeakHeight |
| Upload Peak field to a sdidataitem Result |
Any field of the Peak object can be uploaded to a result on the sdidata Dataset.
The result field of the Empower Peak object should be uploaded as a result of the sdidataitem.
This is the only map that the Empower Connector requires. By default it is assumed that the Peak's Amount column is the result field to use. Alternatively, a different field can be assumed.
Shown below is the upload of the Peak Amount column to the sdidataitem result.
The system will automatically associate PeakName to either the LabVantage ParamID, or Parameter Alias.
The result object gets created for each Injection. When performing multiple injections per SampleSetLine, each injection is automatically uploaded as an additional replicate.

The Upload Rule helper is used to choose the Upload rule
Other possibilities include:
| • | Alternatively, you can map another Peak column that always contains the peak's result. |
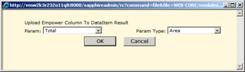
| Upload Peak field to a sdidataitem column |
Any other field of the Peak object can be uploaded to a column on the sdidataitem for the result.
This is commonly done as one may want to associate other Peak information like Peak Height, Width, and/or Area with the data in LIMS.
Shown below is the upload of the Peak's Area into a user column of the sdidataitem Result record.

The Upload Rule helper is used to choose the Upload rule
Other possibilities include:
| • | Uploading the Height, %Area, or any other Peak field include custom fields. |
| • | Adding these Peak attributes as a separate sdidataitem record. See Upload Peak field to a new sdidataitem Result. |
| Upload Peak field to a new sdidataitem Result |
Any peak field can be uploaded to an alternate sdidataitem Result.
This is commonly done as one may want to associate other Peak information like Peak Height, Width, and/or Area with the data in LIMS. But, not as in the prior section as a user column, but as a separate sdidataitem result. The advantage of this approach is that you may now define parameter or specification limits for this additional information about the peak.
Shown below is the upload of the Peak's Area into a separate sdidataitem result.
You will need to specify the Parameter Type to store this Peak attribute into.

The Upload Rule helper is used to choose the Upload rule

Uploading Peak Options |
As part of the Upload section of the Policy you may direct the behavior of the upload with regard to different peak types.
Shown below is the Peak PropertyList of the Policy.
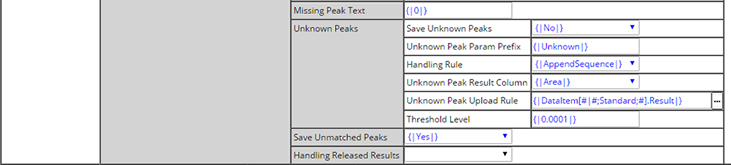
The different properties are discussed below
| Property | Description | ||||||||||||||
| Missing Peak Text |
When an expected peak expressed in the Processing method is not detected,
it is missing.
This property allows you to configure what should be uploaded in this case. Typically this may upload a 0 value. Alternatively, you may configure this to upload the text phrase Missing. |
||||||||||||||
| Unknown Peaks | During processing often unidentified peaks are detected.
As these are not matched with the Components of the Processing methods these
peaks have no name.
These properties control how the interface should handle Unknown peaks
|
||||||||||||||
| Save Unmatched Peaks | Often the LabVantage Parameter List does not contain all
the parameters matching the processing Method, or often additional named
peaks are determined during reprocessing when extra peaks are detected.
This Yes/No property indicates if you wish to automatically create additional sdidataitems using the newly discovered peaks. When this happens, the peak name becomes the ParamID. |
||||||||||||||
| Handling Released Results | When re-posting results that have already been released, this property determines whether to:
|
Empower Configuration |
|
|
Empower Custom Column Setup |
To support this Empower Connector, there are a number of Custom Fields required to be defined in the Empower Project.
The mandatory custom fields are enumerated below
| Name | Field Type | Type, Width, & Source | Description |
| eu_PolicyNode | SampleSet | Text, 80, Keyboard | During the download of a new SampleSetMethod, the user chooses a download rule, which equates to a Policy node ID. This is recorded in the SampleSet to define how the SampleSet is to be uploaded. |
| eu_LIMSQCBatchID | SampleSet | Text, 40, Keyboard | During the download of a new SampleSetMethod, this records the ID of the QCBatch, either which was downloaded in AQC mode, or created in Candidate Mode. |
| eu_LIMSID | Sample | Text, 40, Keyboard | During the download mapping, every SampleSetLine mapped records either the SampleID or the ReagentLotID for that line. |
| eu_SDCID | Sample | Text, 20, Keyboard | During the download mapping, for the SampleSetLine, an indicator if the eu_LIMSID is either a Sample or ReagentLot |
| eu_UploadFlag | Sample | Boolean, Keyboard | During the download mapping, for the SampleSetLine, an indicator that the SampleSetLine is not to have its results uploaded |
| eu_LIMSDatasetkey | Sample | Text, 200, Keyboard | During the download mapping, for the SampleSetLines that are mapped, this is the link(s) to the sdidata records that are associated with this SampleSetLine. |
| eu_ExcludeFlag | Sample | Boolean
Default=No Translation 0=No 1=Yes Keyboard |
An indicator in the Base SampleSetMethod that suggest that this Inject Samples SampleSetLine should not be mapped. Typical use is that position 1 of the SampleSetMethod may be for an Injection Blank and no sample should be mapped to this position. |
Shown above are the recommended and default custom field names that are required of this connector. However, recognizing that different Empower projects already have standard naming conventions, you are free to name these custom fields as you desire. However, you will need to modify the EmpowerPolicy and define the corresponding maps to the modified field names.
Shown below is the section from the Empower Policy that defines the maps to the specific modified Empower custom fields.
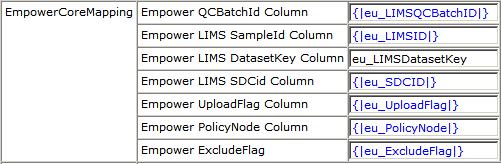
In the special case of the eu_PolicyNode custom field, the name of this custom field must be expressed in the Empower Client configuration files (see Download/Upload Application Configuration).
Download/Upload Application Configuration |
All LabVantage applications including the Toolkit applications are built around the LOM. This saves all the configuration data and log files to the Application Data folder. On Windows Vista and 7 this is locates in "Program Data\LABVNTAGE\" on the root drive. On Windows 2003 server and XP this is "Documents and Settings\All Users\Application Data\LabVantage\" on the root drive.
SOMConfigHelper.exe |
The Download/Upload applications need to be configured to communicate with the LabVantage server. A helper application SOMConfigHelper.exe may be used to configure these properties (this will be installed by the LOM and will be present in the LOM installation directory). This is shown below.
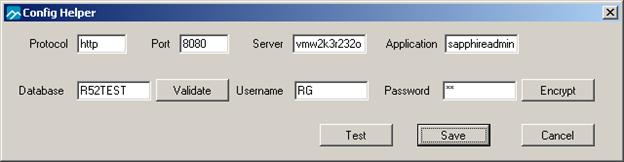
Left to right, the following is shown
| Property | Description |
| Protocol | This is the protocol to communicate to LabVantage. Typically should be "http". |
| Port | This is the port to communicate to LabVantage. Typically should be "8080". |
| Server | This is the name of the LabVantage server. |
| Application | This is the name of the LabVantage application. |
| Database | If supplied, this is the database for signing onto LabVantage
for either the Download or Upload application. Otherwise, the user must
fill in the database.
See Authentication. |
| |
Used to confirm the database name entered |
| Username | If supplied, this is the username for signing onto LabVantage
for either the Download or Upload application. Otherwise, the user must
fill in the username.
When set to [windowsuser] the windows user name is automatically substituted When set to [empoweruser] the Empower user name is automatically substituted. See Authentication. |
| Password | If supplied, this is the password for signing onto LabVantage
for either the Download or Upload application. Otherwise, the user must
fill in the password.
See Authentication. |
| |
Used to assure that the password is encrypted when stored in the underlying configuration file |
| |
Used to validate that the combination of server properties an username/password can signon to LabVantage |
| |
Used to persist all changes to the underlying LabVantage.props configuration file |
| |
Used to exit the application without saving properties. |
The application updates/creates a LabVantage.props file in the Application Data directory. By default every LabVantage application including the Empower Toolkit Applications that use the LOM use a single LabVantage.props property file.
EmpowerDownload.props and EmpowerUpload.props |
The EmpowerDownload.props file is used to configure the download application. The EmpowerUpload.props file is used to configure the upload application. These files contain various settings/properties that must be configured for operation.
The properties defined in these files are:
| Property | Description |
| PropertiesFile | Reference to another file name that stores the connection properties that are managed by the SOMConfigHelper.exe. This can be changed if you do not wish to use the global settings. |
| Debug | An indicator if you wish to enable Debug mode ("Y"or "N"). |
| UseConsole | Used for debugging (writes to .NET console). |
| Page | This is the URL for the startup page for the Download or Upload application. |
| EmpowerLoginPrompt | Set to Y to show the Empower Login Prompt. |
| PolicyNodeColumn | This is the name of the SampleSet custom field that contains the EmpowerPolicy node. Typically this is eu_PolicyNode. |
As mentioned above you may wish the Toolkit applications to use different LabVantage connection settings. You can do this by copying the LabVantage.props and manually modifying the settings , e.g., changing user details, and then setting the PropertiesFile setting to the name of the new file.
To connect the Empower connector to an alternative Labvantage LIMS system define an alternative logon properties file for the Empower Download and Empower Upload applications (such as LABVANTAGE_[project].props).
This logon props file name can include the following expressions:
| Expression | Description |
| Project | The Empower Project. |
| Schema | The Empower Schema. |
| System | The Empower System. |
| Type | The Empower Type. |
| User | The Empower User. |
| PolicyNode | The LIMS policy node for the Empower Policy. |
LabVantage Event Service |
The LabVantage Event Service is our infrastructure for allowing listeners (e.g. listen for file system changes) and pollers (e.g. poll for instrument like balance on network) to trigger specific events on a Windows server. For Empower we use this system to Poll Empower for new signoffs and then trigger the upload application.
The LabVantage Event Service should be installed only on a single Empower Server for each Empower configuration. If the Empower system is small with a single client then the Event Service could be installed on the single client instead.
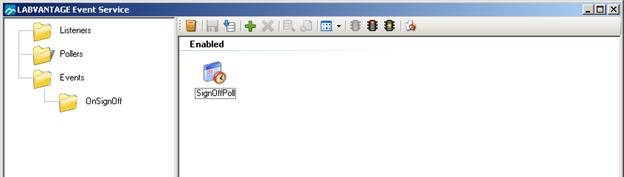
| |
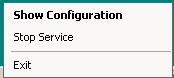
When Installed, the LabVantage EventService is shown in the system tray, shown here as the first icon. |
Right mouse on this icon opens a menu that permits the user to Start or Stop the Service, modify the Service configuration, and Exit.
| LabVantage Event ServicePolling Properties |
When opening the Show Configuration option of the LabVantage EventService, the following window is opened.
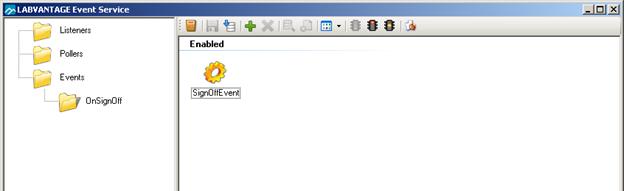
The signoffEvent is used when a signoff is detected by the signoff poller. Properties of this event include
| Property | Description |
| application | Full path and name of the application to launch. Typical applications
are:
ArgumentLogger.exe: Used to simply test the polling by logging the arguments that are passed. EmpowerUpload.exe: (default) Used to call the upload application to upload results to LabVantage |
You may modify the properties of the Poller by selecting Pollers in the tree, and examining the properties of the SignOffPoll poller.
The signoff poller works by establishing a connection to a master project. From this master project the poller gets access to all other projects in the system.
| Property | Description |
| eventname | name of event to fire when signoff found (mandatory). |
| password | Empower password (mandatory). |
| username | Empower username (mandatory). |
| rootprojectname | The parent project to use to get all projects (mandatory). |
| schemaname | Empower Schema Name (mandatory). |
| systemname | Empower System Name (mandatory). |
| typename | Empower Type Name (mandatory). |
| database | Empower Database (mandatory). |
| debug | Y for debug mode and N (default) for no debug. |
| policynodecolumn | Custom sample level column that holds the policy node (defaults to eu_PolicyNode). |
| projectpollinterval | The interval between viewing signoffs in projects. Defaults to 100 (ms) and can be set to -1 to never wait between projects. |
| signoffsendinterval | The interval between calling the event to send signoffs. Defaults to 100 (ms) and can be set to -1 to never wait between events. |
| triggsignoffmask | Mask on the signoff reason to choose which signoff will
cause the upload of the results. This mask includes both the signoff
number and reason exactly as shown in the Empower Signoff reason column.
Possible masks include:
*Level 1*Approved*: Specifically on an approval on signoff level #1. Level2*: Specifically any signoff from signoff level #2. *Approved*: Specifically an approval from either signoff level #1 or #2. |
| userfield | Field from where the signoff poll determines the user
of record. This user of record is recorded against all results as
the sdidataitem.analystid. Options include:
SignoffUser: User executing either the triggering signoff, or the usersignoff if the Usersignoffmask property is supplied. This will default to the SignoffUser if not supplied. Future growth permits use if specifying alternative Result object user columns. E.g. SampleSet Acquiring User |
| usersignoffmask |
When supplied, this mask against the signoff reason is used to locate
an alternate signoff to determine the user of record. This mask
(similar to the triggeringsignoffmask property) includes both the signoff
number an d reason exactly as shown in the Empower Signoff reason column.
If blank the user who filled in the triggeringsignoffmask is used. |
| defaultpolicynode | Used for testing, when the policy node field is empty. Not to be used in production. |
| Determining the Empower Connection Properties |
In configuration of these signoff polling properties, you need to supply the Empower SchemaName, SystemName, TypeName and Database properties. For some, knowing what values to use here may be a challenge. As a shortcut to determine these values, you can use the Info Panel from the Download application accessed with the following steps.
| 1. | Open the Download Application properties file (EmpowerDownload.props) and modify the DEBUG property to Y. Please not that normal operation should have this set to N to maximize performance. |
| 2. | Sign on to Empower using the root project you intend to use for the polling. |
| 3. | Launch the Download Application from the Toolkit menu. |
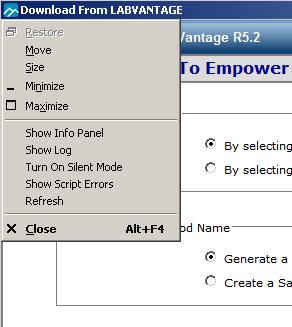
| 4. | Open the application menu by hitting the icon on the top left corner
of the window.
|
| 5. | Hit the Show Info Panel menu item. |
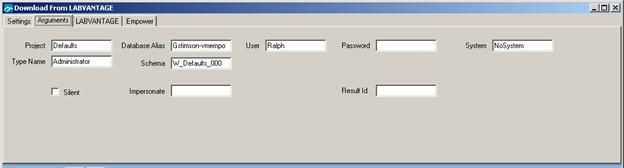
| 6. |
Examine the property values on the Arguments tab shown below (this tab
shows arguments passed into the application).
You may map the values shown in this window to the properties required by the Signoff poller as follows:
It is also important to note that the password in the Poller cannot be empty (in Empower it can allow you to connect with a blank password). Therefore you must enter your normal Empower password. |
Lightweight QC Batch for Empower |
|
|
"Lightweight QC Batch" is an abbreviated QCBatch that mirrors the position sequence of an Empower SampleSet. The term "lightweight" denotes that this QCBatch does not use a QCMethod. Therefore, no AQC calculations, evaluations, or review is required. It is used only to track the order of Samples as they were processed by Empower.
Lightweight QC Batch is used in Candidate mode (selection of samples to include in the SampleSetMethod is left to the discretion of the chromatographer), thus permitting the chromatographer to choose qualified Sample Tests to be added to the Empower SampleSetMethod. While a full QCBatch is not used in Candidate mode, the system will automatically create a QCBatch representing the generated SampleSetMethod.