Before creating a QC Batch be sure you have defined all the necessary information (see QC Batch Overview).
QC Batches are created using the "New QC Batch Wizard. Once created using the wizard, manage the details from the QC Batch List page.
Add new QC Batches using either of these:
| • |
AQC → New QC Batch tramstop. This launches the "New QC Batch Wizard" which walks you through the steps of creating a QC Batch. |
| • |
"Add" button on QC Batch List page (AQC →
QC Batches). This launches the "New QC Batch Wizard" which walks you through the steps of creating a QC Batch. |
| • |
"Create QC Batch" button on the Sample, SDIWorkitem or Dataset List pages. This lets you create a QC Batch using a Workflow. |
Associate the QC Batch with a QC Method.
| Field
|
Description
|
| QC Batch |
Automatically generated identifier of the QC Batch. |
QC Method
Version |
QC Method that defines the
QC Batch.
Version of the QC Method. |
| Description |
Textual description.
|
| Notes |
Textual notes. |
|

|
You can also
create an "empty" QC Batch (containing no QC Samples).
This lets you add QC Samples to an unknown QC Batch later in the
QC Batch life cycle.
To do this, create
a QC Method, but do not specify any QC Sample Types. Then use
the QC Method for this QC Batch. |
|
Select Unknown Samples by clicking "Add Unknown" (or "Add From QCBatch" to add Samples from a Prior QC Batch). The only Samples available
for selection are those with Data Sets from the "Test Methods" defined
by the QCMethod.
Click "Select & Return". Only Unknown Samples matching these
criteria are added to the QC Batch:
| • |
Data Sets are from the "Test Methods" defined by the QCMethod.
|
| • |
Data Sets are not linked to and not present in any other QC Batch. |
| • |
Data have not been entered for any Data Sets. Data Set status is "Initial". |
| • |
Sample status is "Received" or "InProgress". |
Other Controls:
| Control
|
Description
|
| Up and Down Arrow |
Changes the position of the selected Sample in the QC
Batch. |
| Remove |
Deletes a selected Sample from the QC Batch. |
Click "Next".
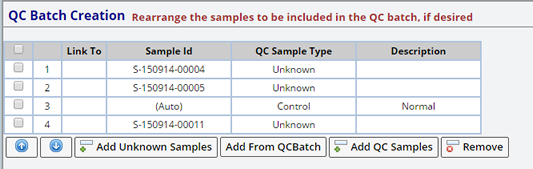
Rearrange the Samples as needed.
The position of the Samples is determined by QC Method Sample Type. Rearrange or add Samples using the following:
| Option
|
Description
|
| Up
and Down Arrow |
Change the position of the selected Sample in the QC
Batch. |
| Add Unknown Samples |
Add more Unknown Samples to the QC Batch. |
| Add QC Samples |
Add more QC Samples to the QC Batch.
If no Samples are selected, the QC Samples are appended to the existing
list. If a Sample is selected, the QC Sample is added before the selected
Sample. |
| Remove |
Delete a selected Sample from the QC Batch. |
Click "Finish". This creates the QCBatch and saves all changes.
You should automatically be transferred to the QC Batch Maintenance page.
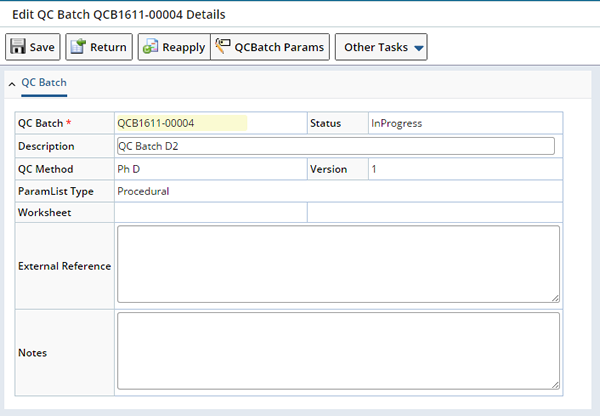
After creating a new QC Batch, from the QC Batch List page, select the QC Batch and click "Edit" to further define the QC Batch and make any changes.
|
|
| Field |
Description |
| QC Batch |
Automatically generated identifier of the QC Batch. |
| Status |
Status of the QC Batch (see QC
Batch Status Transitions). |
| QC Method |
QC Method that defines the
QC Batch. |
| ParamList Type |
Procedural or Preparation, as defined by the Parameter
List. This is used to create separate
QCBatches either for Preparation or Procedural analysis. If a particular
param list type is specified, then only those specific datasets included
in the Param List are associated to create the QCBatch. If the param list
type is left blank, then both the Preparation and Procedural analysis
datasets gets associated to create the QCBatch. |
| Worksheet |
Any associated Worksheets. |
| Description |
Textual description. |
| External Reference |
Provides an reference for Empower Connector. See Empower Connector → External Reference for more information. |
| Notes |
Textual notes. |
The "Reapply" button deletes all QC Samples from the QC Batch, and creates
new QC Samples according to the positioning rules and QC Sample Types defined
by the QC Method. You can "Reapply" the QCMethod only if the status of the
QCBatch is "Initial". However, if a worksheet
has been assigned to the QCBatch, then the positioning rule cannot be applied
to the QCBatch Items.
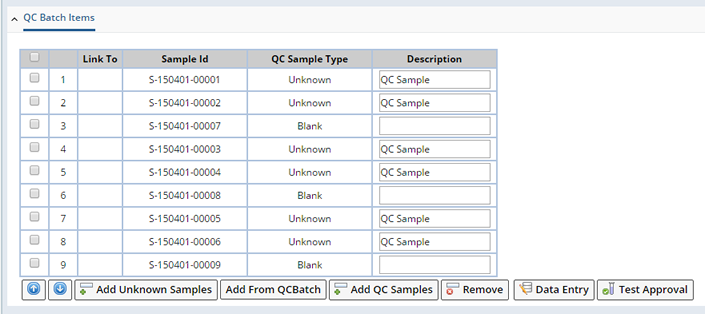
This shows the positioning rules and QC Sample Types defined by the QC Method.
You can exercise these options:
| Option | Description |
| Up / Down | Changes the position of the selected Sample in the QC
Batch. However, repositioning the batch items are not allowed once a Worksheet
is attached to the QC Batch. |
| Add Unknown Samples | Adds more Unknown Samples to the QC Batch. All samples
having the same test method as that of the QC Method are displayed |
| Add From QCBatch | Add Samples from a prior QCBatch. |
| Add QC Samples | Adds more QC Samples to the QC Batch. Precisely lets you
add those QC samples that are specified in the QC Method which in turn
is referred to this QC Batch.
If no Samples are selected, the QC Samples are appended to the existing
list. If a Sample is selected, the QC Sample is added before the selected
Sample. |
| Remove | Deletes selected Samples from the QC Batch. Precisely lets
you delete those QC samples that are specified in the QC Method which
in turn is referred to this QC Batch. |
| Data Entry | Lets you enter data for selected Samples in the QC Batch
(see Entering Data for QC Batches). |
| Test Approval | Lets you approve Data Sets after all mandatory Data Items have been Released (status of DataEntered). See Approve Tests for more information. |
| In the AQC Policy , if the option "Honor SDIWorkItemItem"
is set as "No", and the query "QCBatchItemSelectio2"
is modified (sdiworkitemitem is removed from "From Clause"
and "Where Clause"), then on clicking the Add Unknown
Samples button, all samples having the same Parameter List as that
of the QC Method are displayed. |
|
QC Batch Sample Types and Consumable Details | |
The QC Batch Sample Types to include on a QC Batch are determined by the QC
Method Sample Types (defined in the QC Method) and display here (now QC Batch Sample Types).
For each of the defined QC Batch Sample Types you can associate specific Consumable Lots and Containers (see Use a Consumable
in AQC in the Consumable
Example). As you define actual "Use Amounts", Container Inventory is checked and decremented accordingly.
The "Recommended Amount" and "Amount Scope" are defined on the QC Method Sample Type and display here.
The "Standard Level" is defined when downloading Samples using
the Empower Connector (see Empower
Connector → Mapping Page) or entered manually on the QC Method.
Displays information about Parameters defined to collect additional information about the QC Batch itself.

Lets you choose Consumable Lots for use during Data Entry. These Consumable Lots will be available in the Consumable Chooser dialog (Data Entry → Choose Consumable) along with any Consumable Lots defined for the QC Batch Sample Types. Any Consumable Lots defined at the QC Method Level default here. As you define actual "Use Amounts", Consumable Container Inventory is checked and decremented accordingly.

Lets you assign Managed and UnManaged Instruments to QC Batches. During Data Entry these Instruments are listed in the Instrument Chooser dialog (Data Entry → Choose Instrument).

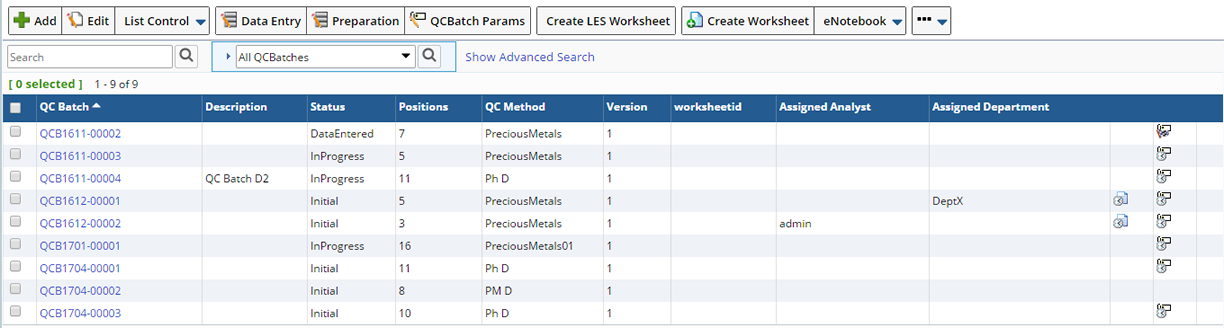
To manage QC Batches navigate to LIMS → AQC →
QC Batches. The QC Batches list page displays.
|
|
| Button |
Functionality |
| Add |
Creates a new QC Batch by launching the New QC Batch Wizard. |
| Edit |
For the selected QC Batch, opens the QC Batch Maintenance
page for editing. |
| View |
For the selected QC Batch, opens a read-only version of
the QC Batch Maintenance page. |
| Delete |
Deletes the selected QC Batch from the database. |
| Data Entry |
Lets you enter procedural data for Samples in the selected
QC Batch. See Data
Entry (Procedural) in Entering Data
for QC Batches. |
| Preparation |
Lets you enter preparation data for the selected QC Batch.
See Data Entry
(Preparation) in Entering Data for
QC Batches. |
| QCBatch Params |
Lets you enter data for the selected QC Batch. |
| Create LES Worksheet |
Generates an LES Worksheet. See Create LES Worksheet for more information. |
| Create Worksheet |
Create a Worksheet using Forms. See Create Worksheet Using Forms. |
| eNotebook |
Create Worksheet & Assign User,
Create Worksheet & Assign Department are described below. |
| Assign Analyst
Assign Department |
Assign Analyst, and Assign Department
are described below. |
| Release Block Flag |
Used with the Empower
Connector. After downloading to a Sample Set, LABVANTAGE locks the
QCBatch to prevent multiple users from downloading the same QCBatch. If
you must unlock the QC Batch, select the Batch, then click "Release
Block". |
Data Entry and Preparation
|
Enter data for Samples associated with this QC Batch. See Entering
Data for QC Batches for detailed information.
Enter data about the QC Batch as a whole. If a Parameter List is associated with the QC Batch (in the QC Batch Params field on the QC Method) select a QC Batch and click QC Batch Params. The data entry Grid, QCbatches by Params page displays.

This is a typical Data Entry page.
Generates an LES Worksheet for this QC Batch. See LES Worksheets for more information.

After clicking "Create LES Worksheet" a message indicates that the Worksheet has been created. Clicking the Worksheet icon displays the Worksheet.
Create
Worksheet Using Forms
|
For the selected QC Batches, "Create Worksheet" creates a Worksheet based on the Worksheet Form that is specified by the relevant Parameter Lists.
In order to do this:
If you select one QC Batch, you are prompted to choose a Worksheet Form from
a lookup that shows all Worksheet Forms specified by the relevant Parameter
List. If the Parameter List specifies only one Worksheet Form, you are not
prompted. A "Success" message is rendered and the Worksheet is created.
If you select multiple QC Batches, you are prompted to choose a Worksheet
Form from a lookup that shows all Worksheet Forms specified by all applicable
Parameter Lists. If there is only one Worksheet Form common to all of the
applicable Parameter Lists, you are not prompted. A "Success" message is rendered
and the Worksheet is created.
If the relevant Parameter List does not specify any Worksheet Forms, or if
a Worksheet already exists for one of the selected QC Batches, you are notified
of this fact, and no Worksheet is created.
The Worksheet is created in a "Pending" state, as indicated by the icon:
|
Pending |
Worksheet has been created, data entry is pending. |
|
InProgress |
Data entry is in progress, Worksheet has not been Submitted. |
|
Complete |
Worksheet has been Submitted. |
Click an icon to open the Worksheet.
Create
Worksheet & Assign User (eNotebook)
|
For the selected QC Batches, "Create Worksheet & Assign User" creates
a Worksheet and assigns it to a User. In order to do this:
The behavior of the Worksheet Form lookup is the same as Create
Worksheet. After selecting a Worksheet Form, you are prompted to choose
a User from a list of "All Analysts" or only "Certified Analysts" (as described
in Certifications). After selecting
a User, that User is assigned to the newly created Worksheet.
Create
Worksheet & Assign Department (eNotebook)
|
For the selected QC Batches, "Create Worksheet & Assign Department" creates
a Worksheet and assigns it to a Department. In order to do this:
This button uses Departmental
Security. The behavior of the Worksheet Form lookup is the same as Create
Worksheet. After selecting a Worksheet Form, you are prompted to choose
a Department from a lookup
page, which shows only Departments with the "Departments that are Work Areas"
option enabled. After selecting a Department, the Worksheet is created and
assigned to the Department.
"Assign Department" assigns QC Batches to a Department. This button
uses Departmental
Security. After selecting QC Batches, you are prompted to choose a Department from a lookup page, which shows only Departments with the "Can be Assigned
Work" option enabled. After selecting a Department, the QC Batches are
assigned to the Department.
"Assign Department" can also assign both QC Batches and Worksheets
to a Department. In order to do this:
The behavior of the Worksheet Form lookup is the same as for "Create Worksheet",
i.e., you are prompted if more than one Worksheet Form is applicable. You
are then prompted to choose a Department from a lookup page, which shows only Departments with the "Departments that are Work Areas" option enabled. After selecting a Department, the Worksheet is
created and both the QC Batches and the Worksheet are assigned to the Department.
"Assign Analyst" assigns Analysts to a Department. This button
uses Departmental
Security. After selecting QC Batches, you are prompted to choose an Analyst
(which is actually a User). If a Data Set is already assigned to a Department,
the list of Analysts shows only those who are Members of the assigned Department.
The selected QC Batches must be assigned to the same Department as the Analyst.
"Assign Analyst" can also assign an Analyst to both QC Batches and
Worksheets. In order to do this:
The behavior of the Worksheet Form lookup is the same as for "Create Worksheet",
i.e., you are prompted if more than one Worksheet Form is applicable. After
selecting QC Batches, you are prompted to choose an Analyst (filtered by Department)
as previously described. The Worksheet is then created, and the selected Analyst
is assigned to both the QC Batches and the Worksheet.
|
|
|
|
Creating QC Batches Using Workflow Tasks
|
|
|
|
|
|
When adding Unknown Samples for a QC Batch, there can be duplicate Data Sets
or Tests of the same Test Method. The OOB configuration provides Workflow Task
Definitions that allow the QC Batch to be created from the Data Set List page
and SDIWorkItem List page. This allows selection of specific Data Sets or Tests
to be added or excluded to remove duplicates where they exist. A QC Batch can
also be created using Samples selected in the Sample List page.
See the following topics: