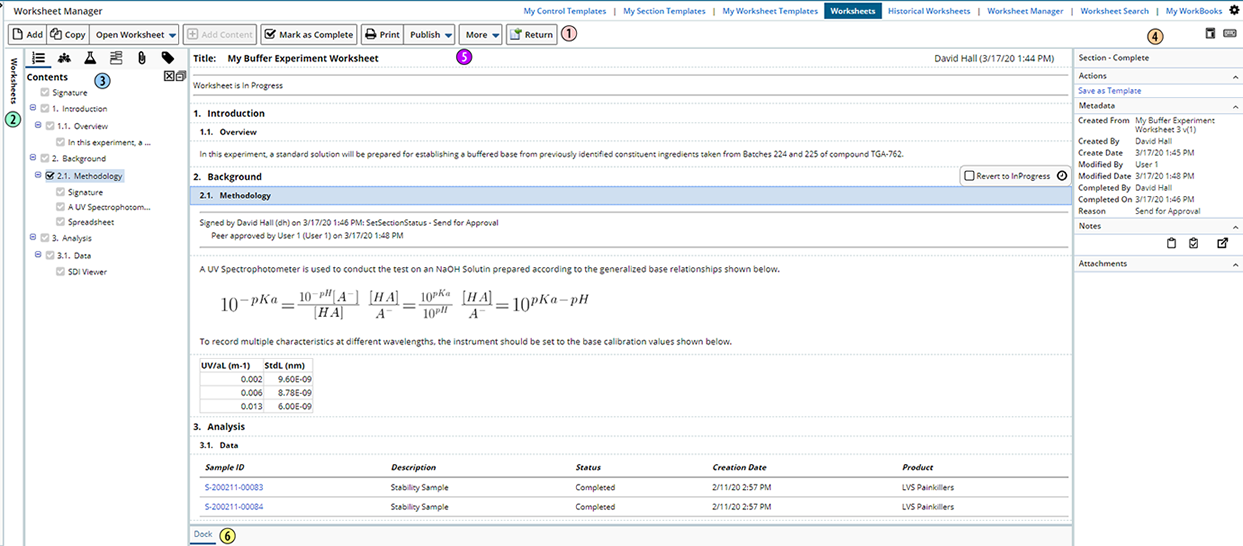
The "Worksheet Manager" provides the interface for creating and
managing ELN/LES Worksheets.
The Toolbar provides control over operations that involve the Worksheet.
| Button
|
Description
|
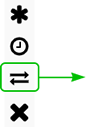
| Add
|
Adds a Worksheet to the Worksheet Manager:
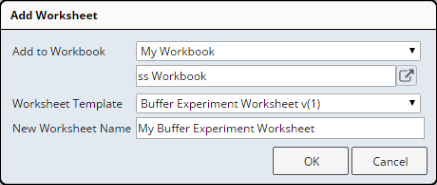 |
| Field | Description | | Add to Workbook | The Worksheet will be added to the Workbook chosen
here. Initially, "My Workbook" is the default target.
You can choose a different Workbook using the lookup or by changing
the dropdown to "Another Workbook", which also opens a
lookup page for selection.
If the current Workbook is different than the current User's
Workbook, an additional "Current Workbook" choice is
available in the dropdown. When this is chosen, the new Worksheet
will be added to the current Workbook. | | Worksheet Template | All Worksheets must be based on a Worksheet Template
(see Introduction
to Templates). Accordingly, select the Worksheet Template to
use. When adding a Worksheet in the LIMS → ELN tramline, both
your Private Templates and the Global Templates are shown in the
dropdown. LES Templates and any Restricted
Templates are not shown. | | New Worksheet Name | Enter a unique name for the Worksheet system wide (unless the
Worksheet is automatically named using the AutoNameTemplate
Worksheet Option).
If you prefer, you can relax the uniqueness requirement to Worksheets within the same Workbook using the "Worksheet Name Uniqueness" property in the ELN Policy. |
|
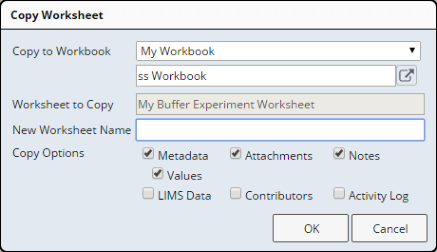
| Copy
|
Copying a Worksheet does not involve selecting a Worksheet
Template, as the new Worksheet uses the original Worksheet's Template.
Enter a unique name for the Worksheet (unless the Worksheet is automatically
named using the AutoNameTemplate Worksheet
Option). When copying a Worksheet, these options are available to specify details
of the current Worksheet that will be copied to the new Worksheet: | Option | Items Copied to New Worksheet | | Metadata | Metadata for
the Worksheet, Sections and Controls. | | Attachments | Attachments
for the Worksheet and Controls. | | Notes | Notes for the Worksheet, Sections
and Controls. | | Values | Metadata values.
This option is disabled if the "Metadata" option is not
selected. | | LIMS Data | LIMS Data for
the Worksheet and Controls. | | Contributors | Contributors
to the Worksheet. | | Activity Log | Activity Log for the
Worksheet. |
|
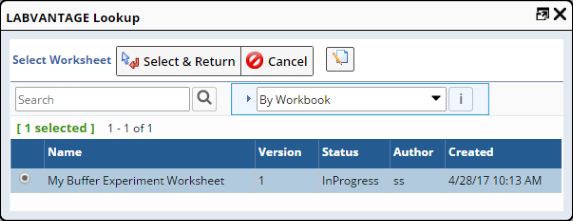
| Open Worksheet |
Opens a Worksheet in the Worksheet Manager. These options
are available:
| Option | Description | | From my Workbook | Opens a Worksheet from the current User's Workbook.
Choose the Worksheet in the lookup dialog. | | From another Workbook | Opens a Worksheet from the selected Workbook. | | From current Workbook | This is rendered if the current Workbook is different
than the current User's Workbook. The selected Worksheet will be
opened from the current Workbook. |
Choose the Worksheet in the lookup dialog: |
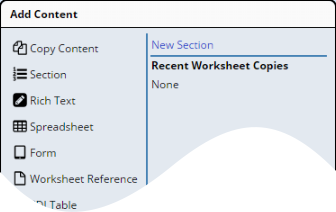
| Add Content |
Opens the "Add Content" dialog from which Sections
and Controls can be added to the Worksheet.
The display configuration for items listed here is defined by the ELN
Policy. The "Add Content" button displayed when the current User is authorized to add both Controls and Sections to the Worksheet. |
| Add Section |
Replaces the "Add Content" button when the current User is authorized to add Sections but is not authorized to add Controls. Clicking "Add Section" inserts a Section immediaty following the selected Section or Control. |
| Status Transition Button |
Status Transition button shown on the Toolbar. This depends
on the "Worksheet Completion option" chosen in the Worksheet
Options. See ELN/ELS
Life Cycles → ELN Status → ELN Worksheet Status for information
regarding status transitions and the corresponding Status Transition buttons
that are displayed on the Toolbar. |
| Print |
Opens a browser print dialog. |
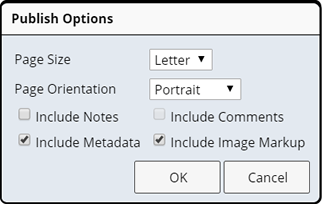
| Publish |
Provides publishing options. These can be restricted using
the ELN Policy property collection
"Publish Format → Publish Options" ("Allow MS Word", "Allow
PDF", and "Allow HTML").
| Publish to Word | Publishes the Worksheet to the local machine's download
folder as a Microsoft Word document. The format of the generated
document is controlled by the ELN
Policy. | | Publish to PDF | Publishes the Worksheet to the browser as an Adobe
Acrobat PDF file. The format of the generated document is controlled
by the ELN Policy. | | Publish to HTML | Streams the Worksheet to a new tab and renders the
Worksheet in HTML. |
The dialog below provides choice of page details and items to include/exclude
in the published document. |
| More |
|
| Cancel Worksheet |
Cancels the Worksheet. See ELN/ELS
Life Cycles → ELN Status → ELN Worksheet Status for information
regarding status transitions and the corresponding Status Transition buttons
that are displayed on the Toolbar. |
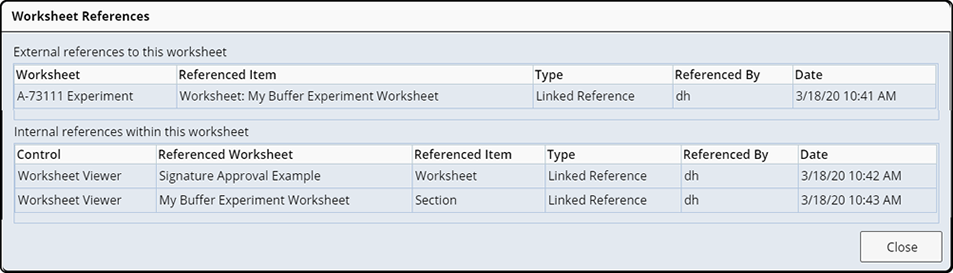
| Show References |
"External references to this Worksheet" shows
Worksheet References to the current Worksheet that originate in other
Worksheets.
"Internal references to this Worksheet" shows Worksheet References
made in the current Worksheet. For details regarding Worksheet References, see Worksheet
Reference Control. |
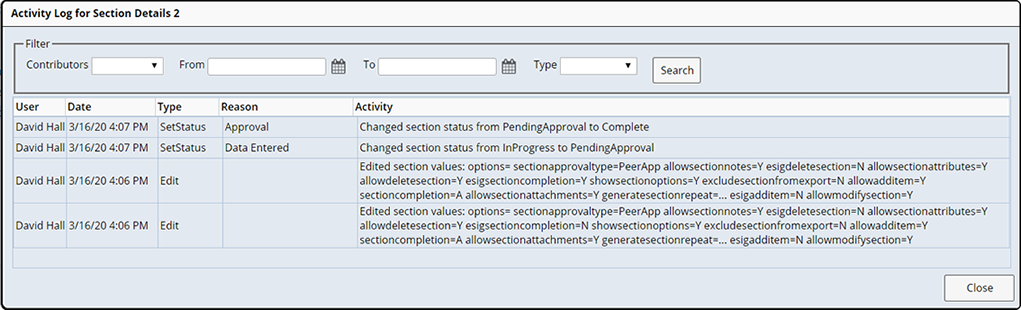
| Show Activity
Log
|
Opens a dialog showing activity in the current Worksheet.
If any of the "SetStatus" entries generated an ESig with reason, then that reason is shown here.
These filters are available: | Contributors | User who performed the activity. | | From / To | Date range during which the activities occurred. | | Type | Nature of the activity. In addition to the self-explanatory
activities (Open, Print, Export, Add, Edit, Delete), these additional
activities can also be specified:
| Activity | Description | | SetConfig | Changing the configuration of a Control. | | SetContent | Saving the content of a Control is saved (such
as adding text to a Rich Text Control). | | SetStatus | Changing the status of a Control, Section
or Worksheet. |
|
| NOTE: | | When opened inline (using the mini toolbar icon), the Activity Log shows Activity Log entries for that Control, Section or Worksheet-level operations only. |
|
| Reload Worksheet |
Reloads the last saved Worksheet into the Worksheet Manager. |
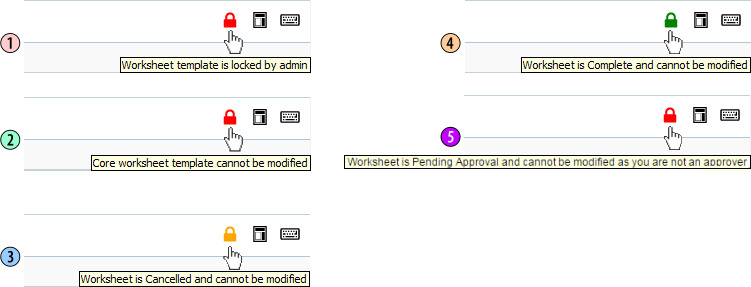
| "Locked" Icon |
A "Locked" icon uses colors and tooltips to
explain why a Worksheet or Worksheet Template is rendered in view-only
mode:
See ELN Life Cycles for information
concerning the Status transitions referenced below. | 1. | The Worksheet Template is Locked by the specified
User using the "Locking Options" in Worksheet
Options. | | 2. | The Worksheet Template is a Core Worksheet Template.
Core Templates cannot be modified. | | 3. | The Worksheet Status is "Cancelled". Cancelled
Worksheets cannot be modified. | | 4. | The Worksheet Status is "Complete". Completed
Worksheets cannot be modified. | | 5. | The Worksheet Status is "PendingApproval"
and cannot be modified because you are not an Approver, i.e., a
member of the Role defined by an Approval Step in the Approval Type. |
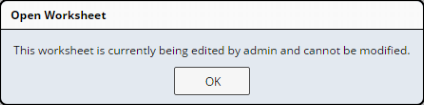
If the Worksheet is being edited by another User, the dialog below
is shown when entering the Worksheet: |
 Toggle |
Expands/collapses the Worksheet frame layout in this
click sequence (assuming Worksheets frame is collapsed):
| 1. | Collapses Information and Detail Panels. | | 2. | Expands Detail Panel. | | 3. | Expands Information Panel. Collapses Detail Panel. | | 4. | Expands Detail Panel. |
Alternatively, you can use the "F4" key to toggle. |
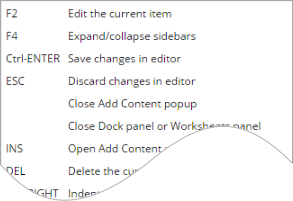
 Shortcuts |
Lists keyboard shortcuts. Check this in the application
for the latest shortcut keys.
|
|
|
|
|
Section and Control Toolbars
|
|
|
|
|
|
|
|
|
Each Section and Control contains a set of mini-toolbars such as the
example shown at the left.
|
The basic set of mini-toolbar icons is described below. The icons displayed
on any single toolbar change depending on the Section/Control and the options
selected in Worksheet Options, Section
Options, and Control Options. Controls contain
specialized operations. For information concerning the Advanced Configuration
for each Control, see Advanced Configuration.

|
Opens the selected item for editing. Alternatively, you
can press the "F2" key, or if enabled in the WorksheetManagerPageType, double click the Control or Section. |

|
If configured, opens the Audit trail for the SDIs associated with the Control. |

|
Deletes the selected item. Alternatively, you can press
the "Delete" key. |

|
Copies the selected item. |

|
Pastes the copied item immediately after the currently
selected item. |

|
Moves the selected item up and down. See Note 1. Alternatively, you can press the "Ctrl-UPArrow"
or "Ctrl-DownArrow key. |

|
Decreases or increases the heading in a Section (applies
to Sections only). Alternatively, you can press the "Ctrl-LeftArrow"
or "Ctrl-RightArrow key. |

|
Docks the item (see Dock). |

|
Opens the Activity Log dialog. Content is filtered to show only activity log entries for that control, section or worksheet-level operations. |

|
Refreshes the selected item. |
| Note 1:
|
Sections and controls are moveable if:
| • | You are editing a Worksheet Template. | | • | You are editing a Worksheet created from a Worksheet Template
and:
| • | The Template options allow a Section/Control to be modified. | | • | You have the User Privileges to modify Sections and/or Controls
(as applicable). | | • | The Worksheet Status and Section Status are both "InProgress". | | • | The Section or Control is not first (for move up) or last
(for move down) in the Worksheet or Section, respectively. |
|
|
These Status transition icons are shown, depending on the options selected
in Worksheet Options, Section
Options, and Control Options. See ELN
Life Cycles for information concerning Status transitions.

|
Shown if the item requires Mark Complete, as determined
by the options noted above. Clicking this changes Control Status to "Complete"
and displays "Revert to InProgress" below. |

|
Shown if Control Status is "Complete". Clicking
this changes Control Status to "InProgress". |
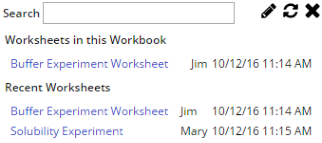
The Worksheets Panel allows search and preview of Worksheets in the current
Workbook, as well as Worksheets that have recently been edited. The images
below show the OOB configuration.
|
|
|
"Search" provides a type-ahead search to find Worksheets.
Clicking the retrieved Worksheet link opens the Worksheet in read-only
mode. The pencil icon allows the previewed Worksheet to be edited. The rotary arrow icon refreshes the Worksheet list. The X icon collapses the Panel. |
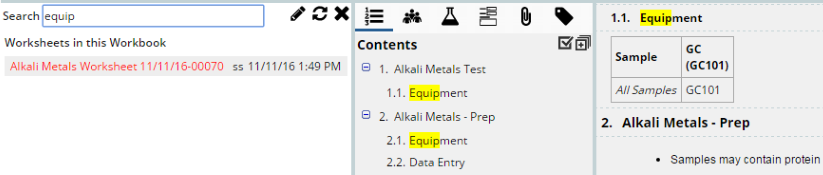
If Indexing and Searching
is enabled:
| • |
"Show Matching Worksheets" will show the "Matching Worksheets"
query in the Worksheets Panel to indicate query matches. All queries available
in the Worksheets Panel are configured by the WorksheetManager
Page Type. For example, the WorksheetManager Page Type can be configured
to disable the "Worksheets in this Workbook" and "Recent
Worksheets" queries, as well as add new search categories (such as
"Worksheets Requiring Approval"). |
| • |
Indexing the LV_Worksheet SDCs automatically indexes the LV_WorksheetSection
and LV_WorksheetItem SDCs and establishes relationships between them.
If you search for a Section or Control, the search results are coordinated
and merged such that the Worksheets containing the Section or Control
are returned. Note the highlighted returns in the Worksheet. |
The Content Panels contain information regarding the content of the current
Worksheet.
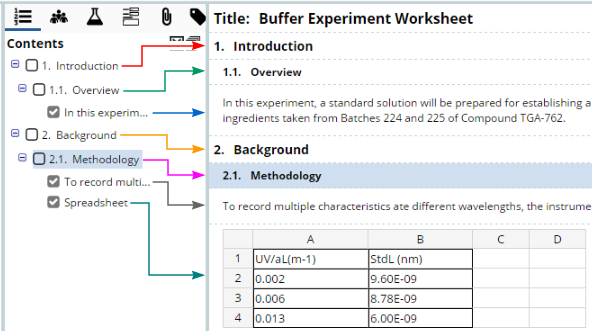
The "Contents" panel shows each Section and Control in the Worksheet.
Clicking a Contents item highlights the relevant area in the Editor. The Detail
Panels dynamically change to provide the details for the selected item.
These icons in the upper right corner toggle to determine what is shown:

|
Hides (x) or shows (check) Status icons to the left of
each Section and Control. |

|
Shows Section and Controls (+) or shows Sections only
(-). |
The Status icons indicate the Status of each Section or Control defined by
"Section Defaults" and "Control Defaults" for Worksheets
as defined in Worksheet Options, or the individual
Section Options and Control
Options.

|
The Section or Control does not require a Completion option. |

|
Mark As Complete is required but the Section or Control
is InProgress. |

|
The Section or Control has been Marked as Complete. |
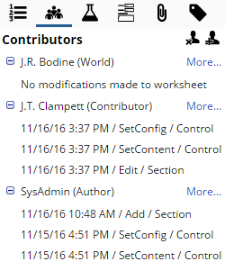
The "Contributors" panel shows all Users and their respective "User
Type" in the context of the Worksheet (as defined by User
Privileges) who have had any interaction with the Worksheet, along with
a brief chronology of the activity each has performed. Clicking "More"
opens the more verbose Activity Log.
Users who have opened the Worksheet but have not performed any activities
in it are shown with a "No modifications made to Worksheet" indication
(as shown by User "J.R. Bodine" below).
The Contributors panel interacts with "User Privileges" defined
in a Worksheet Template (see User Privileges
for further coverage of this feature). A Contributor with the "Manage
Contributors" privilege will see the icons below, which can add/remove
"Nominated Contributors" to/from this list:

|
Adds Nominated Contributors to the Worksheet. This opens
a Lookup page that allows multiple Users to be added simultaneously. |

|
Removes Nominated Contributors from the Worksheet. |
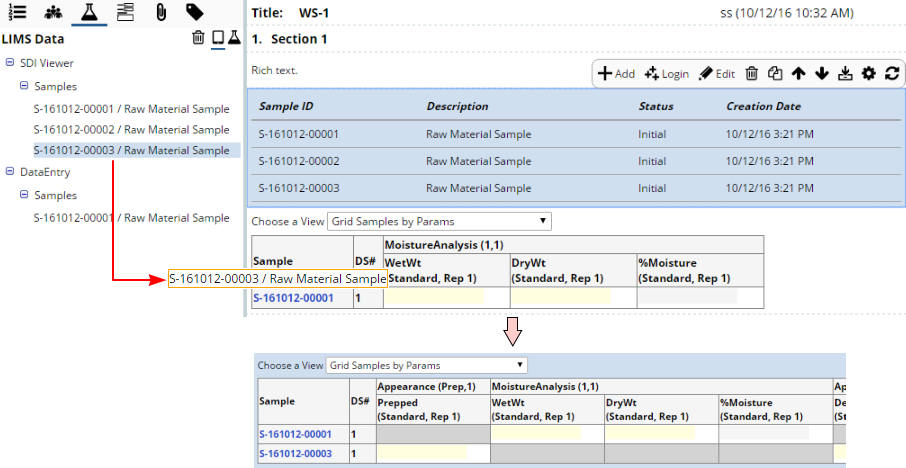
The "LIMS Data" panel shows SDIs that have been added to the Worksheet.
SDIs listed here can be dragged and dropped into Controls that accept the
SDI. For example, you can drag one of the Samples used in the SDI Viewer Control
into a Data Entry Control as shown below. Alternatively, you can also drag
the "Samples" node into the Data Entry Control to associate all
of the Samples in a single operation rather than individually.
Icons provide additional operations:

|
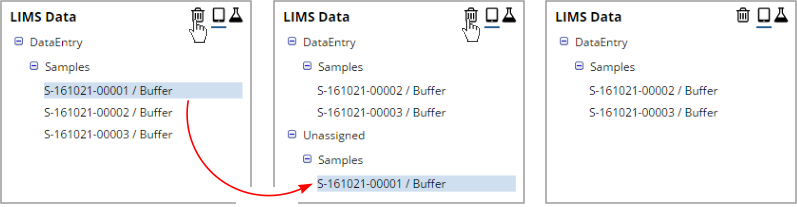
Removes SDIs from the selected Control or the Worksheet.
For example, removing a Sample from a Data Entry Control moves the Sample
into an "Unassigned" branch. It is still available in the Worksheet.
Removing it from the Worksheet does just that, i.e., it is no longer available
in the Worksheet.
|

|
Groups SDIs by Control. The example above shows this,
where Samples are grouped by the Controls that currently use them. |

|
Shows SDIs by their SDC. In the example above, all three
Samples would be grouped under the "Sample" heading regardless
of which Controls use them. |
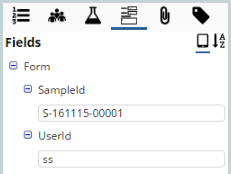
The "Fields" panel shows Fields that have been created using the
Form Control or Spreadsheet
Control.
Icons provide additional operations:
|
|
Groups Fields by Control. |

|
Shows Fields alphabetically. |
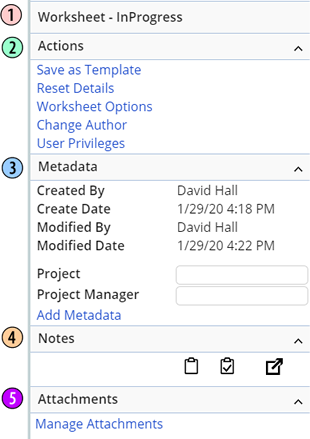
The "Attachments" panel shows Attachments
that have been added to the Worksheet, Control or Section.
Thumbnails are shown for each Attachment. Names are shortened to 18 characters
(indicated by the ellipsis) to prevent panel resizing. A full description
can be seen by hovering over the name or thumbnail. Clicking the thumbnail
opens the Attachment.
Icons provide additional operations:
|
|
Removes Attachments from the Worksheet. This is the way
Attachments can be removed. |
|
|
Groups Attachments by Control. |
|
|
Sorts Attachments in alphabetical order. |
The "Metadata" panel shows Metadata that have been added to the
Worksheet, Section, or Control. See Metadata for more
information.
Icons provide additional operations:
|
|
Removes Metadata from the Worksheet. |
|
|
Groups Metadata by Control. |
|
|
Sorts Metadata in alphabetical order. |
The Detail Panels dynamically change to provide management and configuration
options for the item that is currently selected in the Worksheet.
| Worksheet Detail
|
|
Section Detail
|
|
Control Detail
|
|
|
|
|
|
|
The above examples are provided to identify the areas described in this document.
They may differ subtly depending on your privileges and configuration options
(such as whether you are editing a Worksheet Template or a Worksheet based
on a Template).
"Status" shows the Status of the selected item. This also
shows the Status of a Section when a Control in the Section is selected and
the Section Status is "Complete". See ELN/LES
Life Cycles for details concerning Status transitions.
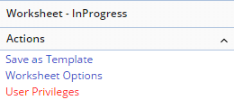
These are ancillary operations that can be performed on the Selected Item.
"Save as Template" saves the Worksheet, Control or Section (whichever is
selected) as a Private Template. Provide the name of the new Template. A confirmation
is issued upon creation. See Introduction
to Templates for details concerning Templates.
These options are available to specify details that will be copied to the
Template:
| Option
|
Items Copied to New Template
|
| Metadata |
Metadata for the Worksheet, Sections
and Controls. |
| Values |
Metadata values. This option is
disabled if the "Metadata" option is not selected. |
| Attachments |
Attachments for
the Worksheet and Controls. |
| Notes |
Notes for the Worksheet, Sections
and Controls. |
| LIMS Data |
LIMS Data in the
Worksheet and Controls. |
| Contributors |
Contributors to the Worksheet (applicable to Worksheets only). |
| Include Sub Sections (Sections only) |
When the "Include sub-sections" option is checked, the Template includes any sub-sections as well as all their Controls. |
"Reset Details" allows details to be removed from the Worksheet,
Section, and Control.
Checking a detail removes it for the selected item. If an "Apply reset
to..." modifier is checked, the detail is removed from all of the specified
details.
"Change Author" is shown only if the current User belongs to the
Role defined by the "Worksheet Manager" property in the ELN
Policy. This opens a lookup that lets you choose a User who will become
the Author of the Worksheet, and thereby will be granted the User
Privilege of "Author".
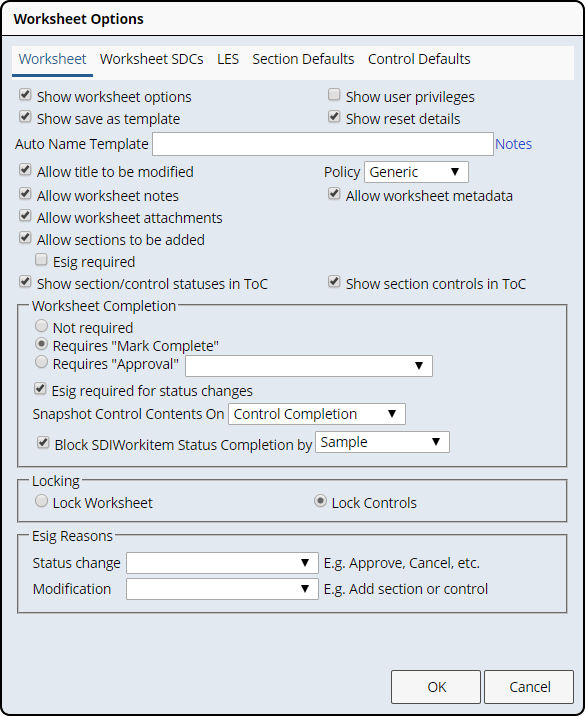
"Worksheet Options" define operations that can be performed with
respect to the entire Worksheet. When editing Worksheet Templates,
all operations are available and not constrained by the Worksheet Options
or User Privileges.
Some Worksheet Options are available only when editing Worksheet Templates.
The descriptions below identify these.
Select the Worksheet Title bar to access the Worksheet Options:
"Worksheet" options define the overall behavior of the Worksheet.
|
| Option
|
Description
|
| Show Worksheet options |
Shows/hides the "Worksheet Options" link in
the Actions Detail Panel.
| NOTE: | This option is available only when editing Worksheet
Templates. |
|
| Show User privileges |
Determines if the "User Privileges" link is
displayed in the Actions Detail Panel. See User
Privileges.
| NOTE: | This option is available only when editing Worksheet
Templates. |
|
| Show reset details |
Determines if the "Reset Details" link is displayed
in the Actions Detail Panel. See Reset Details.
| NOTE: | This option is available only when editing Worksheet
Templates. |
|
| Show Save as Template |
Determines if the "Save as Template" link is
displayed in the Actions Detail Panel. See Save
as Template.
| NOTE: | This option is available only when editing Worksheet
Templates. |
|
| Auto Name
Template
|
When you save a Worksheet from a Worksheet Template,
this option lets you specify the Title of the Worksheet that is created
from the Worksheet Template.
| NOTE: | This option is available only when editing Worksheet
Templates. |
You can enter free text and tokens. Click "Notes" to see
permitted tokens (they are also described below). | NOTE: | You can use this to automatically create a Worksheet
description based on Mandatory Worksheet metadata. See the example
in Meta Data. |
| Syntax Example: [templatename] - [currentuser]
- [template_seq;00000] generates a Worksheet titled BufferExperiment
- jsmith - 00001. |
| Token | Substitutes: | | templatename | Name of the Worksheet Template. | | templateid | Identifier of the Worksheet Template. | | templateversionid | Version of the Worksheet Template. | | worksheetid | Worksheet identifier. | | worksheetversionid | Worksheet version. | | currentdatetime;format | Current date and time with an optional format. | | currentdate;format | Current date with an optional format. | | currentuser | Identifier of the current User. | | currentuser.name | Current Users Full Name. | | worksheet_seq;format | Global sequence number for all Worksheets. | | template_seq;format | Sequence number for the Worksheet Template. | | metadataid | This token represents the identifier of one of the
mandatory metadata items assigned to the Worksheet Template. The
value of the metadata (which is a mandatory field when creating
the Worksheet) is substituted. |
|
| Allow title to be modified |
Allows/prevents editing of the Worksheet Title. When not
checked, clicking "Edit" does not permit modification. |
| Policy |
ELN Policy node
to which the Worksheet points, thus defining the set of ELN/LES Policy
properties that will be used. |
| Allow Worksheet Notes |
Determines if Notes can be added to the Worksheet. This
shows/hides Notes in the Detail Panel. |
| Allow Worksheet metadata |
Determines if metadata can be added to (or modified in)
the Worksheet. This shows/hides the "Add Meta Data" link in
the "Meta Data" area of the Detail Panel. |
| Allow Worksheet Attachments |
Determines if Attachments can be added to the Worksheet.
This shows/hides Attachments in the Detail Panel. |
| Allow Sections to be added
ESig Required |
Determines if new Sections can be added to the Worksheet.
Determines if an ESig is required when adding
the new Section. |
| Show Section/Control statuses in ToC |
Determines if the Contents panel shows the Section and
Control Status icons. |
| Show Section Controls in ToC |
Determines if the Controls are shown in the Contents panel. |
| Worksheet Completion |
Operation required as part of the Worksheet's life cycle.
This also determines which Status Transition button is shown on the Toolbar.
See ELN/ELS Life Cycles
→ ELN Status → ELN Worksheet Status for information regarding
status transitions and the corresponding Status Transition buttons that
are displayed on the Worksheet Toolbar.
| Option | Operation Required | | Not required | Neither "Requires 'Mark as Complete'"
nor "Requires 'Approval'" is required. | | Requires "Mark as Complete" | The Worksheet must be marked as "Complete". | | Requires "Approval" | The Worksheet must be Approved. You must choose
an Approval Type from the dropdown; otherwise, the dialog will not
close. If you are not familiar with LabVantage Approval processes,
see Concepts of SDI
Versioning and Approval and Approval
Types. | | ESig required for status changes | When checked, an ESig is required for any Worksheet
status change. | | Snapshot Control contents on | Determines when the snapshot is taken for the Control:
| Option | Description | | Control Completion | When a Control transitions to "Complete",
the generated HTML for the Control is saved (taken as a snapshot)
in the WorksheetItem table to facilitate efficient rendering. | | Worksheet Completion | This option is provided to defer saving of
the HTML until the Worksheet transitions to "Complete". |
The term "snapshot" is used because saving of the HTML
effectively freezes the display of the Control even if other changes
occur elsewhere. For example, a Sample description might change
in LIMS, but if the SDIViewer Control was snapshotted, the rendered
Control would not change. | | Block SDIWorkitem Status Completion by | When checked, prevents completion of an SDIWorkitem when the Worksheet has not yet been completed.
Choose to block SDIWorkitem status completion by either: | Option | Description | | Sample | When the Sample is linked to a Worksheet, and the worksheet is not "Complete", the SDIWorkItem does not complete. | | SDIWorkitem | When the SDIWorkItem is linked to a Worksheet and the Worksheet is not "Complete", SDIWorkItem does not complete. |
|
|
| Locking |
Defines the Worksheet Locking mechanism.
| Option | Description | | Lock Worksheet | When this option is selected, the Worksheet will
be locked by a single User when it is opened. Other Users attempting
to open the Worksheet while it is locked by another User will be
able to view the Worksheet only, and a red padlock icon will be
displayed in the toolbar. This mode allows only a single User to
edit the Worksheet at any single point in time. This is the default
(and only) behavior when editing Templates. | | Lock Controls | When this option is selected, individual Controls
will be locked when in Edit mode (Activated). Other Users attempting
to edit the same Control while it is locked by another User will
be warned and blocked from editing the Control. This mode allows
multiple Users to edit a single Worksheet simultaneously. |
|
| ESig Reasons |
Defines ESig behavior.
| Option | Description | | Status change | Defines the ESig Reason Reference Type containing
the Reference Values that will be available in the ESig dialog when
changing Worksheet, Section, and Control statuses that require ESig. | | Modification | Defines the ESig Reason Reference Type containing
the Reference Values that will be available in the ESig dialog when
modifying a Worksheet by adding or deleting a Section or Control. |
|
These options define the display columns and titles that are displayed in
the LIMS Data panel for SDCs associated with the Worksheet. If not specified,
the column values will default to the Id and Description columns for the SDC.
In general:
| 1. |
|
Select SDCs from the dropdown at the left. Click + or - to add or remove. |
| 2. |
|
Select the SDC column at the right. Click + or - to add or remove. |
| 3. |
|
Enter the "Title" to be displayed in the interface. |
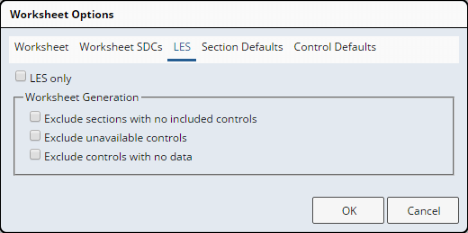
These options pertain only to LES Worksheet Generation.
| NOTE:
|
LES Options are available only when editing Worksheet
Templates. |
| Option
|
Description
|
| LES Only |
When checked, the Template applies only to LES Worksheets
and is not shown in the dropdown list of available Templates when creating
a new Worksheet. |
| Exclude Sections with no included Controls |
Determines if Sections will
not be included/visible in the generated Worksheet if the Section does
not have any included/visible Control. |
| Exclude unavailable Control |
Determines if Controls returning an "Unavailable"
status when retrieving data will not be included/visible in the Worksheet. |
| Exclude Controls with no data |
Determines if Controls returning a "No Data"
status when retrieving data will not be included/visible in the Worksheet. |
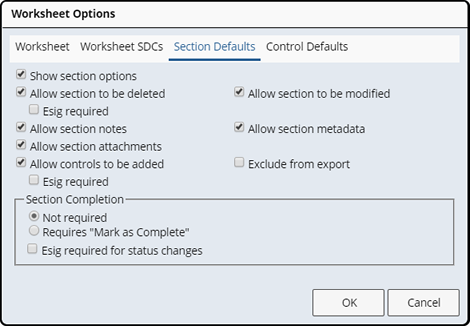
These options define the default set of properties assigned to a Section
when it is created. These properties can subsequently be overridden by options
for specific Sections (providing the "Show Section options" link
is displayed in the Detail panel).
|
| Option
|
Description
|
| Show Section options |
Determines if the "Section Options" link is
displayed in the Actions Detail Panel. |
| Allow Section to be deleted
ESig required |
Determines if the Section can be deleted.
Determines if an ESig is required to delete
Sections. |
| Allow Section to be modified |
Determines if the Section text can be modified. |
| Allow Section Notes |
Determines if Notes can be added to the Section. This
shows/hides Notes in the Detail Panel. |
| Allow Section metadata |
Determines if metadata can be added or modified for the
Section. This shows/hides the "Add Meta Data" link in the "Meta
Data" area of the Detail Panel. |
| Allow Section Attachments |
Determines if attachments can be added to the Section. |
| Allow Controls to be added
ESig required |
Determines if new Controls can be added to the Section.
Determines if an ESig is required when adding
a Control. |
| Exclude from export |
Determines if the Section is included in the Word or PDF
export. If a Section is excluded, all Controls and Sections within the
excluded Section are also excluded. The Worksheet Content panel shows
excluded Sections in grey italic font. |
| Section Completion |
Operation required as part of the Section's life cycle.
This also determines which Status Transition button is shown on the Section
Toolbar. See ELN/ELS
Life Cycles → ELN Status → ELN Section and Control Status
for information regarding status transitions and the corresponding Status
Transition buttons that are displayed on the Section Toolbar.
| Option | Operation Required | | Not required | "Requires 'Mark as Complete'" is not
required. | | Requires "Mark as Complete" | The Section must be marked as "Complete". | | ESig required for status changes | When checked, an ESig is required for any Section
status change. |
A Section that does not require "Mark as Complete" can be
Reverted to InProgress. All Controls in a Section are reverted to InProgress
when the Section is reverted to InProgress. |
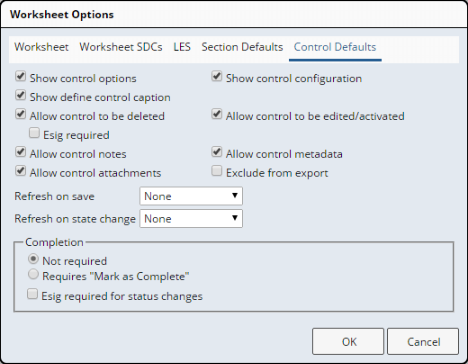
These options define the default set of properties assigned to a Control
when it is created. These properties can subsequently be overridden by options
for specific Controls (providing the "Show Control options" link
is displayed in the Detail panel).
 |
| Option
|
Description
|
| Show Control options |
Determines if the "Control Options" link is
displayed in the Actions Detail Panel. |
| Show Control configuration |
Determines if the "Advanced Configuration" link
is displayed in the Actions Detail Panel. |
| Show define Control caption |
Determines if the "Define a Caption" link is
displayed in the Actions Detail Panel. See Define
a Caption. |
| Allow Control to be deleted
ESig Required |
Determines if the Control can be deleted.
Determines if an ESig is required to delete
Controls. |
| Allow Control to be edited/activated |
Determines if the Control can be edited using the "Edit"
button on the Control toolbar or the "F2" key. The terms "Edit"
and "Activate" are used interchangeably in ELN/LES depending
on the context. |
| Allow Control Notes |
Determines if Notes can be added to the Control. This
shows/hides Notes in the Detail Panel. |
| Allow Control metadata |
Determines if metadata can be added or modified in the
Control. This shows/hides the "Add Meta Data" link in the "Meta
Data" area of the Detail Panel. |
| Allow Controls Attachments |
Determines if Attachments can be added to the Control.
This shows/hides Attachments in the Detail Panel. |
| Exclude from export |
Determines if the Control is included in the Word or PDF
export. The Worksheet Content panel shows excluded Controls in grey italic
font. |
| Refresh on... |
Determines what is refreshed based on the event.
| Option | Description | | Refresh on save | Determines what is refreshed (the "Current
Control", "LIMS Controls", or "Section Controls")
when the Control is saved. | | Refresh on state change | Determines what is refreshed (the "Current
Control", "LIMS Controls", or "Section Controls")
when a state change occurs. |
Note that "LIMS Controls" are all Controls in the Worksheet
that "support SDIs", i.e., drive their display using SDIs
associated with the Worksheet or Control. |
| Control Completion |
Operation required as part of the Control's life cycle.
This also determines which Status Transition button is shown on the Control
Toolbar. See ELN/ELS
Life Cycles → ELN Status → ELN Section and Control Status
for information regarding status transitions and the corresponding Status
Transition buttons that are displayed on the Control Toolbar.
| Option | Operation Required | | Not required | "Requires 'Mark as Complete'" is not
required. | | Requires "Mark as Complete" | The Control must be marked as "Complete". | | ESig required for status changes | When checked, an ESig is required for any Control
status change. |
A Section that does not require "Mark as Complete" can be
Reverted to InProgress. All Controls in a Section are reverted to InProgress
when the Section is reverted to InProgress. |
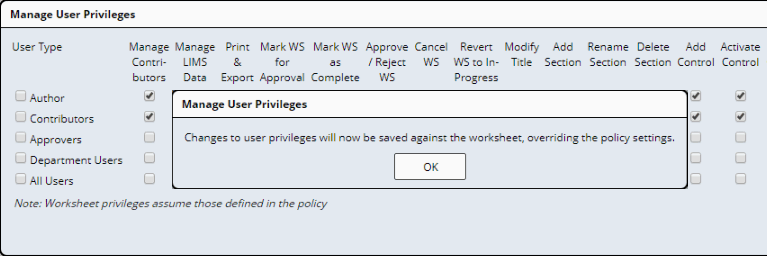
Whereas Worksheet Options define what can
be done on a Worksheet, "User Privileges" define who can perform
these operations. A User cannot perform an operation without having the User
Privilege to do so, even if the Worksheet Options allow the operation.
A default set of User Privileges can be defined in the ELN
Policy. Worksheets will assume these privileges unless they are overridden
by the User Privileges set in the Worksheet Template as shown below. The "Note"
at the bottom of the "Manage User Privileges" dialog informs you
of this.
| NOTE:
|
User Privileges configuration is available only when editing
Worksheet Templates. |
When a Worksheet is loaded, the User assumes a User Type and the privileges
corresponding to that User Type. Privileges are defined for five types of
Worksheet Users:
| User Type
|
Description
|
| Author |
In the context of ELN, the "Author" is the
User who created the Worksheet from a Worksheet Template. In the context
of LES, this is determined by the "LES Author Rule" for the
relevant Test Method (see LES Worksheet Generation). |
| Contributors |
"Contributors" are Users who have been assigned
as Contributors to the Worksheet. This is discussed in more detail below. |
| Approvers |
If a Worksheet is in a PendingApproval state, "Approvers"
are the Users who satisfy the criteria of the ApprovalType defined in
the Worksheet Options. |
| Department Users |
"Department Users" defines the condition where
both the User and the Author are in one or more of the same Departments. |
| All Users |
"All Users" defines Users who do not meet any
of the above criteria. |
After changing any of these privileges in this dialog (and saving), you are
informed that the changes you have made here will override the ELN Policy
and be saved with the Worksheet as shown below.
When the ELN Policy is overridden, a "Reset" link appears (below).
Clicking this resets the privileges to the ELN Policy settings.
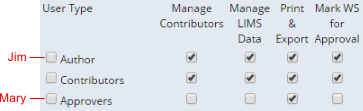
The Contributors panel shows all Users who have
had any interaction with the Worksheet. When a User accesses a Worksheet,
the User becomes a Contributor with only the User Privileges defined for his/her
User Type. However, this can be changed by making the User a "Nominated
Contributor". Nominated Contributors have all privileges defined for
the "Contributors" User Type.
Contributors with User Type "Manage Contributors" can add/remove
"Nominated Contributors" to/from the Contributors list. To see how
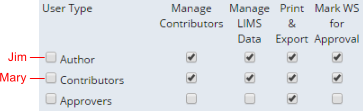
this could work, consider the two Users "Jim" and "Mary":
| • |
Jim is the author of the Worksheet. Authors can "Manage Contributors"
as shown above. |
| • |
Mary is an Approver (above left), so she has only a limited number of
privileges. |
| • |
Jim wants to give Mary a broader range of privileges. Rather than change
privileges for all Approvers, Jim adds Mary as a "Nominated Contributor". |
| • |
After Mary is added as a Nominated Contributor (above right), she gets
all Privileges defined for "Contributors". |
Certain privileges are always assigned to relevant User Types to prevent
nonsensical combinations. For example, an Approver should always be able to
Approve a Worksheet.

|
| Option
|
Description
|
| Show Section options |
Determines if the "Section Options" link is
shown in the Detail Panel.
| NOTE: | This option is available only when editing Worksheet
Templates. |
|
| Allow Section to be deleted |
Determines if the Section can be deleted. |
| ESig required |
Determines if an ESig is required to delete Sections. |
| Allow Section to be modified |
Determines if the Section can be edited. |
| Allow Section Notes |
Determines if Notes can be added to the Section. This
shows/hides Notes in the Detail Panel. |
| Allow Section attachments |
Determines if Attachments can be linked to the Section. |
| Allow Section metadata |
Determines if metadata can be added or modified in the
Section. This shows/hides the "Add Meta Data" link in the "Meta
Data" area of the Detail Panel. |
| Exclude from export |
Determines if the Section is included in the Word or PDF
export. If a Section is excluded, all Controls and Sections within the
excluded Section are also excluded. The Worksheet Content panel shows
excluded Sections in grey italic font. |
| Allow Controls to be added |
Determines if Controls can be added to Sections. |
| ESig required |
Determines if an ESig is required to add Controls to Sections. |
| Section Completion |
Operation required as part of the Section's life cycle.
This also determines which Status Transition button is shown on the Section
Toolbar. See ELN/ELS
Life Cycles → ELN Status → ELN Section and Control Status
for information regarding status transitions and the corresponding Status
Transition buttons that are displayed on the Section Toolbar.
| Option | Operation Required | | Not required | "Requires 'Mark as Complete'" is not
required. | | Requires "Mark as Complete" | The Section must be marked as "Complete". | | Requires Approval | The Section must be Approved. When checked, you must choose
an Approval Type from the dropdown; otherwise, the dialog will not
close. If you are not familiar with LabVantage Approval processes,
see Concepts of SDI
Versioning and Approval and Approval
Types.
| NOTE: | | Section Approvals do not support nesting Approvals; meaning that a subsection cannot have its own Approval Type if one of its parent Sections has an Approval Type. |
| | ESig required for status changes | When checked, an ESig is required for any Section
status change. |
A Section that does not require "Mark as Complete" can be
Reverted to InProgress. All Controls in a Section are reverted to InProgress
when the Section is reverted to InProgress. |
| LES
|
This is applicable to only LES
Worksheet Generation.
| Option | Description | | Repeat Sections Over | Allows the Section to be repeated in the generation
process based on the Test Method data.
| Option | Operation Required | | All Workitems | Repeats the Section once for each Test. This
is useful when a Sample has multiple Test Methods. | | Group Workitems | Repeats the Section once for each Child Test
Method that is defined in the Test Method Group.
Note that when the Test Method Group is added to a Sample,
this will actually repeat over Child Tests in the Test Group. | | Workitem Parameter Lists | Repeats the Section once for each Parameter
List defined in the Test Method. This can also be used to
repeat the Section over Parameter Lists defined in a Child
Test Method that is in a Test Method Group.
Note that when the Test Method is added to a Sample, this
will actually repeat over Data Sets in the Test (or Data
Sets in a Child Test that is in the Test Group). | | QC Batch Parameter Lists | Repeats the Section once for each Data Set
in the Test defined for the QC Method. |
For an example, see Repeating
Sections in LES Worksheets for Test Methods. |
| NOTE: | This option is available only when editing Worksheet
Templates. |
|
| Replicate |
Copies these Section Options to all other Sections in
the Worksheet.
| NOTE: | This option is available only when editing Worksheet
Templates. |
|

|
Each click of the left (or right) arrow selects the previous
(or next) Section, thus showing the options applicable to that Section.
This lets you "walk" up and down the Sections to examine and
set their options without clicking "OK".
| NOTE: | This option is available only when editing Worksheet
Templates. |
|
| Apply |
Applies changes made in this dialog without clicking
"OK". This is useful when used with the left/right arrows above
to quickly change options for multiple Sections.
| NOTE: | This option is available only when editing Worksheet
Templates. |
|
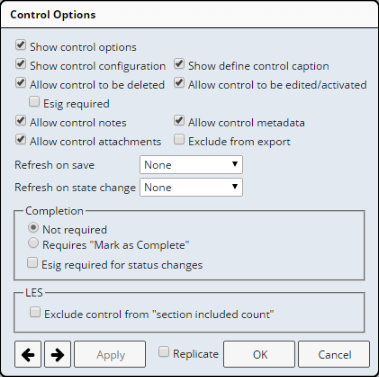 |
| Option
|
Description
|
| Show Control options |
Determines if the "Section Options" link is
shown in the Detail Panel.
| NOTE: | This option is available only when editing Worksheet
Templates. |
|
| Show Control configuration |
Determines if the "Advanced Configuration"
link is shown in the Detail Panel. |
| Show define Control caption |
Determines if the "Define a Caption" link is
displayed in the Actions Detail Panel. See Define
a Caption. |
| Allow Control to be deleted |
Determines if the Control can be deleted. |
| ESig required |
Determines if an ESig is required to delete the Control. |
| Allow Control to be edited/activated |
Determines if the Control can be edited using the "Edit"
button on the Control toolbar or the "F2" key. The terms "Edit"
and "Activate" are used interchangeably in ELN/LES depending
on the context. |
| Allow Control Notes |
Determines if Notes can be added to the Control. This
shows/hides Notes in the Detail Panel. |
| Allow Control metadata |
Determines if metadata can be added or modified in the
Control. This shows/hides the "Add Meta Data" link in the "Meta
Data" area of the Detail Panel. |
| Allow Control Attachments |
Determines if Attachments can be added to the Control. |
| Exclude from export |
Determines if the Control is included in the Word or PDF
export. The Worksheet Content panel shows excluded Controls in grey italic
font. |
| Refresh on... |
Determines what is refreshed based on the event.
| Option | Description | | Refresh on save | Determines what is refreshed (the "Current
Control", "LIMS Controls", or "Section Controls")
when the Control is saved. | | Refresh on state change | Determines what is refreshed (the "Current
Control", "LIMS Controls", or "Section Controls")
when a state change occurs. |
Note that "LIMS Controls" are all Controls in the Worksheet
that "support SDIs", i.e., drive their display using SDIs
associated with the Worksheet or Control. |
| Control Completion |
Operation required as part of the Control's life cycle.
This also determines which Status Transition button is shown on the Control
Toolbar. See ELN/ELS
Life Cycles → ELN Status → ELN Section and Control Status
for information regarding status transitions and the corresponding Status
Transition buttons that are displayed on the Control Toolbar.
| Option | Operation Required | | Not required | "Requires 'Mark as Complete'" is not
required. | | Requires "Mark as Complete" | The Control must be marked as "Complete". | | ESig required for status changes | When checked, an ESig is required for any Control
status change. |
A Section that does not require "Mark as Complete" can be
Reverted to InProgress. All Controls in a Section are reverted to InProgress
when the Section is reverted to InProgress. |
| LES |
This is applicable to only LES
Worksheets.
| Option | Description | | Exclude Control from "section
excluded count" | This option is used when you want to remove or
hide Sections that are empty (no content).
Assume a Section ("Buffer Solution Test") has these
two Controls: 2. Buffer Solution Test 2.1 Equipment [Rich Text Control]
"Enter the following equipment." [Equipment Control]
This shows Equipment associated with current Parameter List. Suppose the Sample has no Equipment. In this case, the [Equipment
Control] is actually empty, and therefore not included in the
Section. Should "2.1 Equipment" still be shown? This
is ambiguous, since the Section is not actually empty (it still
contains the Rich Text Control). In other words, when we count
the number of Controls included in the Section, we actually get
1. Using this option, you can "Exclude the Rich Text Control
from the Section included count". This means that the Rich
Text Control is ignored when counting the number of Controls in
the Section. Thus, if this option was enabled, Section 2.1 would
be assigned a value of 0 and would automatically disappear. |
| NOTE: | This option is available only when editing Worksheet
Templates. |
|
| Replicate |
Copies these Control Options to all other Sections in
the Worksheet.
| NOTE: | This option is available only when editing Worksheet
Templates. |
|
|
|
Each click of the left (or right) arrow selects the previous
(or next) Control, thus showing the options applicable to that Control.
This lets you "walk" up and down the Controls to examine and
set their options without clicking "OK".
| NOTE: | This option is available only when editing Worksheet
Templates. |
|
| Apply |
Applies changes made in this dialog without clicking
"OK". This is useful when used with the left/right arrows above
to quickly change options for multiple Controls.
| NOTE: | This option is available only when editing Worksheet
Templates. |
|
If a Control supports Captions, this inserts a caption in the selected Control. Enter
the Caption text, then select the text position with respect to the Control
(Above, Below, or Not Visible). The "Not Visible" option is provided
because Caption text is used in the Contents panel, and you may choose to
make it invisible there.
This opens the configuration properties for the selected Control. See ELN
Control Definitions for descriptions.
When defining configuration properties, you can use tokens to simplify modification
of the configuration:
| • |
To parameterize a configuration property, use $P{delimiters}. This is
automatically added to the database in WorksheetItemParam.ParamName. For
example, specifying $P{paramid} for the value of a Control property parameterizes
this as paramid in WorksheetItemParam.ParamName. |
| • |
To substitute a configuration property during Worksheet generation,
use $S{delimiters}. For example, specifying $S{paramid} for the value
of a Control property or a reference in the Worksheet substitutes the
actual ParamId for the token. |
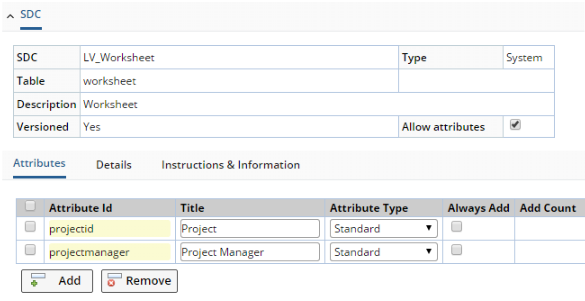
Worksheet Templates allow Metadata to be associated with the Template. Metadata
for Worksheets, Sections, and Controls is defined by Attributes
for the following SDCs:
| Metadata for:
|
Is defined by Attributes for this SDC:
|
| Worksheets |
LV_Worksheet |
| Sections |
LV_WorksheetSection |
| Controls |
LV_WorksheetItem |
Accordingly, if you want to add Metadata, you must add Attributes to the
Attributes Master List for the applicable SDCs. The example below shows two
Attributes defined for the LV_Worksheet SDC:
In the Worksheet Template, clicking "Add Metadata" opens a lookup
with the Attributes for the SDC. Select the desired Attributes.
Clicking the Metadata input field opens the Meta Data dialog. Here you can
manage Metadata options for the Worksheet Template.
Define Metadata as "Readonly". Any values entered in the Template default to the target Worksheet. Checking "Readonly" ensures that these values are not overridden. Attributes defined as "Readonly" cannot be deleted from a Worksheet on the Metadata Content panel.
Check "Remove" to remove individual Metadata from the Worksheet Template.
Define a default value for the Metadata (optionally) and flag it as "Mandatory" for completing a Worksheet. Mandatory Metadata is indicated by the red asterisk.
If the Metadata has not been flagged as "Mandatory" in the Worksheet
Template, Users can enter Metadata values in the same manner as the Template
by clicking the input field to popup the dialog. The "Mandatory"
checkbox is removed (visible only in the Template for configuration). In the
example below, Metadata has been added to the Worksheet, Section, and Control.
After the User enters values, they appear in both the Detail and Content Panels.
If Worksheet Metadata has been flagged as "Mandatory" in the Worksheet
Template, the Mandatory Metadata for the Worksheet must be entered when the
Worksheet is originally created from the Template as shown below.
For Sections and Controls, the Mandatory requirement is checked when the
Worksheet is "Marked as Complete" or "Submitted for Approval".
| NOTE:
|
Metadata can be published to Microsoft Word and Adobe PDF
formats. Metadata values are displayed as footnotes for the Control or
Section to which they belong. |
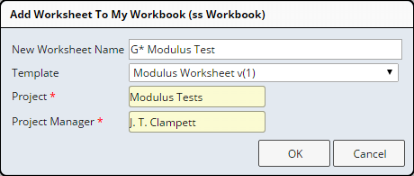
Using the Auto Name Template option, you
can automatically create a Worksheet Name based on Mandatory Worksheet Metadata.
Assume you have created a Worksheet Template with the two Mandatory Metadata
items "projectid" and "projectmanager", and with "Auto
Name Template" setup as shown below. Note the [projectid] token, which
will map onto the "projectid" Metadata (the Metadata identifier).
| Auto Name Template |
[projectid] [templatename] [template_seq;000000] |
When you add the Worksheet, you are prompted for the Mandatory Worksheet
Metadata.
The Worksheet description is generated according to the tokens.
Before proceeding, you should be familiar with Notes
functionality. This implementation is an extension of Notes functionality
that allows Notes to be added to Worksheets, Sections, and Controls.
In addition to features available with Notes,
you can also add "Follow-ups" to Worksheets, Sections, and Controls.
A "Follow-up" is an issue that is targeted to a specific User and
must be "Resolved" before the Worksheet Status can transition to
"Complete".
You cannot "Mark as Complete", "Submit for Approval",
or "Reject" if the Worksheet contains one or more unResolved Follow-up
Notes. If you attempt to "Reject" without an unResolved Follow-up,
you must repeat the "Reject" after creating the unResolved Follow-up.
See ELN/ELS Life Cycles →
ELN Status → ELN Worksheet Status for information regarding status
transitions.
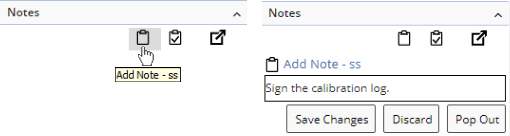
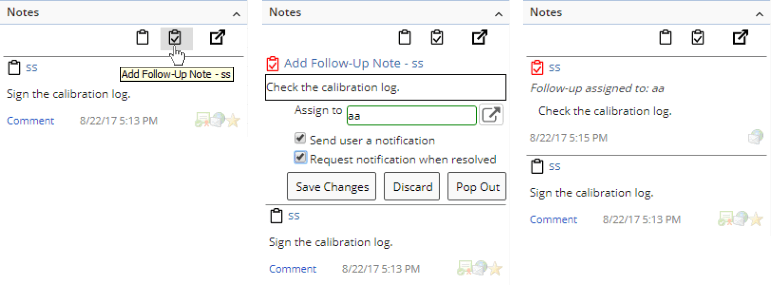
Clicking the icon opens Notification details:
|
|
In the "Assign to" lookup, choose the targeted User to whom
the Follow-up will be sent. The targeted User must be a Contributor to
the current Worksheet. This is the only User who can Resolve the Follow-up. |
|
|
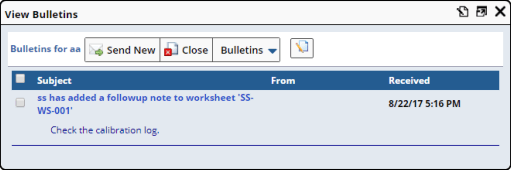
Checking "Send user a notification" sends a Notification
to the targeted User. As provided OOB, a Bulletin Gizmo
Notification is sent (example shown below).
|
Items having Notes are identified by these icons placed next to the item
in the Contents panel:

|
A Note exists on the item. |

|
A Follow-up exists on the item and must be Resolved. |

|
A Follow-up for this item has been Resolved. |
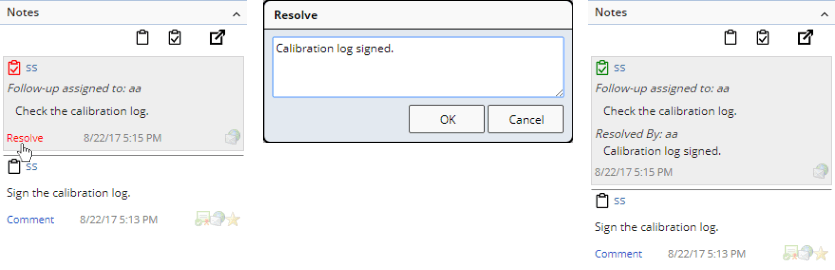
The targeted User clicks "Resolve", then enters the Follow-up reason
(below). This Resolves the Follow-up.
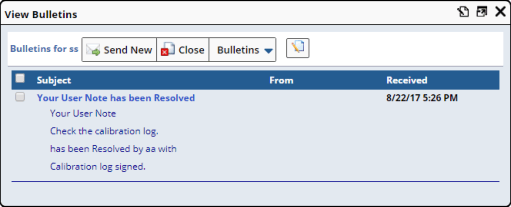
Checking "Request notification when resolved" sends a Notification
back to the creator of the Follow-up.
|

|
Once created, a Follow-up Note can only be modified by Users with the Role "Notes Administrator" (assuming they have access to the Worksheet).
|
|
Attachment Control options determine whether Attachments are shown and managed inline, directly within a Worksheet (or a Section or Control), or from the LIMS.
Worksheet Attachments Mode
|
|
|
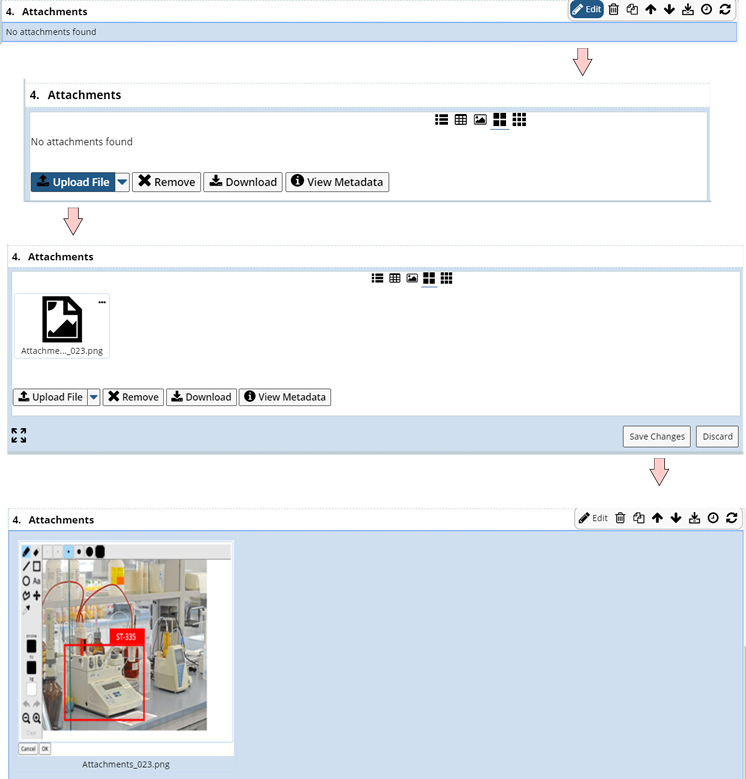
When in "Worksheet Mode", Attachments are linked to either the Worksheet (or a Section or Control) and can be managed inline, using the toolbar.
In the example below the Attachment Control is liked to the previous Section. With the Attachment control selected click "Edit" to manage Attachments.
Upon Saving the Control, the Attachment data is fetched from the Control and passed back as contents and saved inside the control using the FileManage.saveAttachments. The Respository Id and Node defined in the ELN Policy is passed to the Attachment Element.
Standard Attachments Mode
|
|
|
When in "Standard Attachments" mode, the "Attachments" Detail panel lets you add file Attachments to
the Worksheet, Section or Control as shown below.
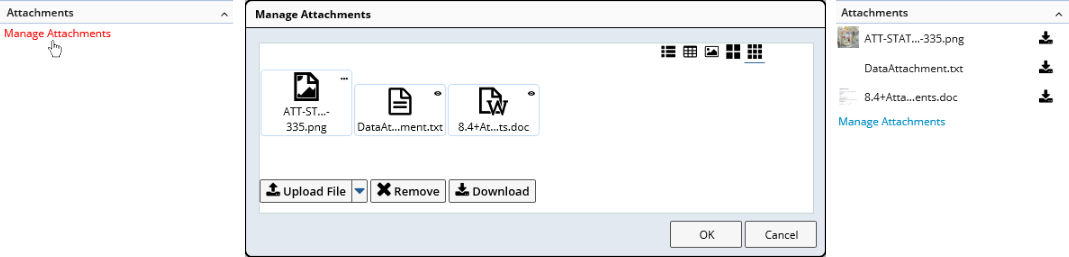
Clicking "Manage Attachments" in the detail panel opens the preconfigured attachment
Element in a dialog (see Attachments).
Attachments are uploaded as you select the files. Clicking "OK"
closes the dialog, refreshes the panel, and creates the Attachment records.
The save operation is controlled by the "Attachments" collection
in the ELN Policy. If not specified,
settings default to the Attachment
Policy settings for the Sapphire Custom node. The Attachment
Policy also specifies other behavior (such as allowed file types, Attachment
classes, renaming, etc.) on the Sapphire Custom node.
Thumbnails are shown for each Attachment. Names are shortened to 18 characters
(indicated by the ellipsis) to prevent panel resizing. A full description
can be seen by hovering over the name or thumbnail. Clicking the thumbnail
opens the Attachment.
The download icon  allows rapid download of individual Attachments.
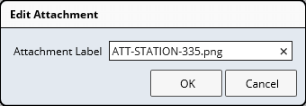
Clicking the Attachment name opens a dialog that allows changing the label:
Attachments can be removed only in the Attachments
Contents panel.
Dragging a Control from the
"Contents" section of the Information Panel into the "Dock"
area (or clicking the  icon on a Control toolbar as shown below) lets you view information regarding
the Control.
icon on a Control toolbar as shown below) lets you view information regarding
the Control.
 |
| Icon
|
Shows:
|

|
Current Version of the Control (shown in the example
above). |

|
History of changes to the Control.
|

|
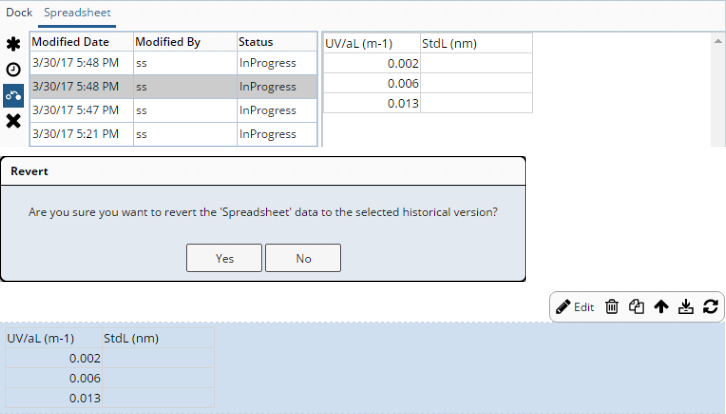
"Revert" is shown for Controls that support
history (currently only Form, Rich Text, Marvin, and Spreadsheet Controls)
when a historical row is selected.
Clicking this button will (after confirmation) revert the Control contents
to the data in the selected row. The contents data is copied from the
WorksheetItem audit table). The Control in the Worksheet (and potentially the Table of Contents
text) is refreshed if it is driven from the contents (such as for the
Rich Text Control). |

|
"Diff" shows the difference between the currently selected view, and the prior one.
Click the "Diff" icon to show the changes.
The following example shows changes made to a spreadsheet control. Changes such as Adding, Editing or Deleting a sheet, row, column or cell are reported. Formatting changes such as fonts, colors or cell formatting are not reported. Click the History icon to return to the History view. | NOTE: | | The Diff operation is only available for a subset of Controls. |
|

|
closes the Dock area. |