Introduction to LabVantage ELN/LES
| Top |
Introduction to LabVantage ELN/LES |
|
|
Content |
|||||||||||||||||||||||
|
LabVantage ELN/LES Implementation |
|
|
High-Level Definitions |
The LabVantage implementation of ELN and LES can be considered as two discrete technologies:
|
|
Electronic Laboratory Notebook (ELN) "Electronic Laboratory Notebook" (ELN) allows general information and LIMS data to be recorded in "Worksheets" using an interface that emulates paper documentation. |
|
|
|
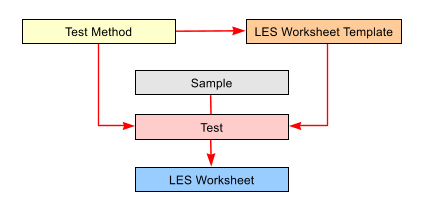
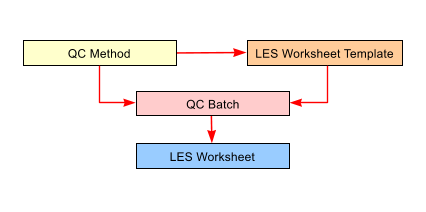
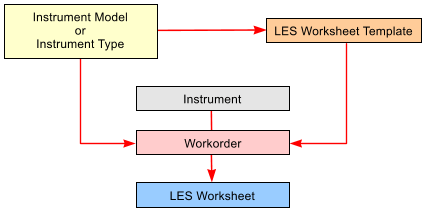
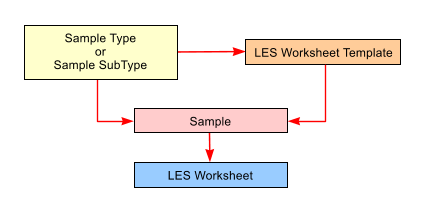
Laboratory Execution System (LES) "Laboratory Execution System" (LES) generates a Worksheet based on a Worksheet Template and a Test Method, QC Method, Instrument Model (or Type), or Sample Type (or SubType). |
ELN Structural Components |
The ELN structure is based on these LabVantage entities:
| Workbooks | "Workbooks" are the highest structural level. Each Workbook is typically owned by a LabVantage User. |
| Worksheets | Each Workbook contains "Worksheets", which form the organizational structure that groups related laboratory activities. A Worksheet is based on a Worksheet Template that contains predefined content. |
| Worksheet Manager | The "Worksheet Manager" provides a graphical user interface for creating and managing Worksheets. |
 |
LES Structural Components |
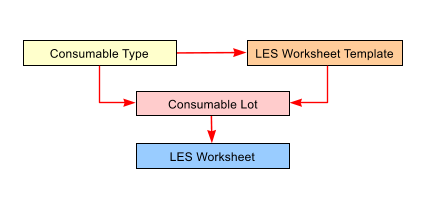
LES Worksheets are generated based on a Global LES Worksheet Template and a Test Method, QC Method, Instrument Model/Instrument Type, Sample Type/SubType, or Consumable Type. LES Worksheet generation is covered in LES Worksheet Generation.
|
|
|
|||||
|
|
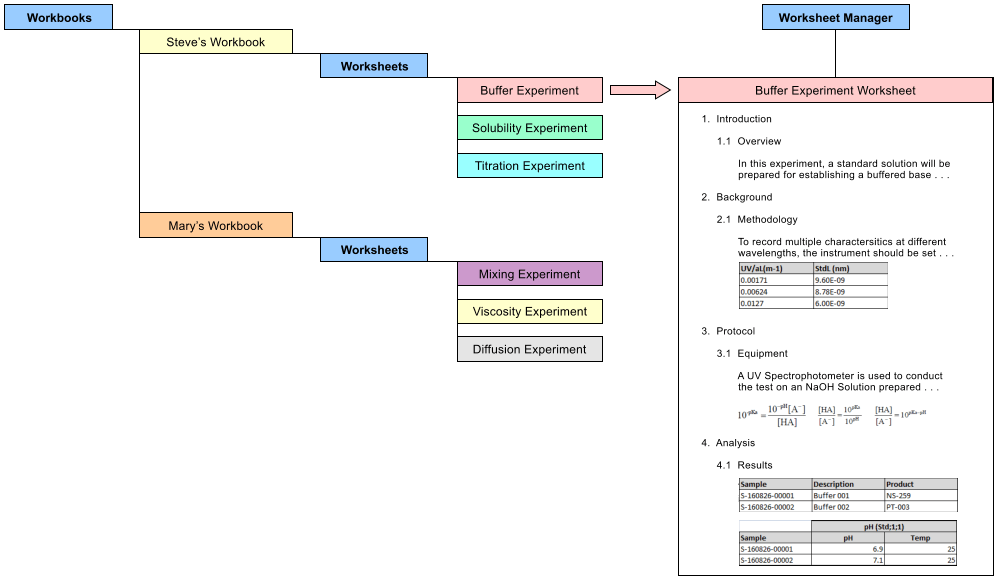
Worksheet Structure |
|
|
A Worksheet is constructed by inserting "Sections" and "Controls":
| Sections | "Sections" provide organizational structure. |
| Controls | "Controls" provide specialized functionality. |
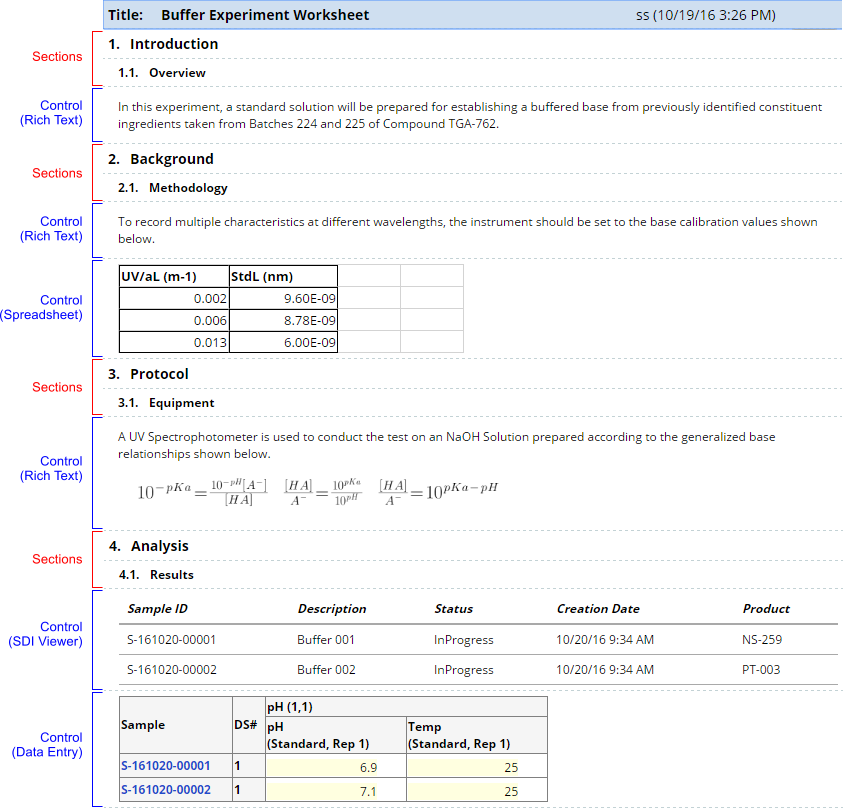
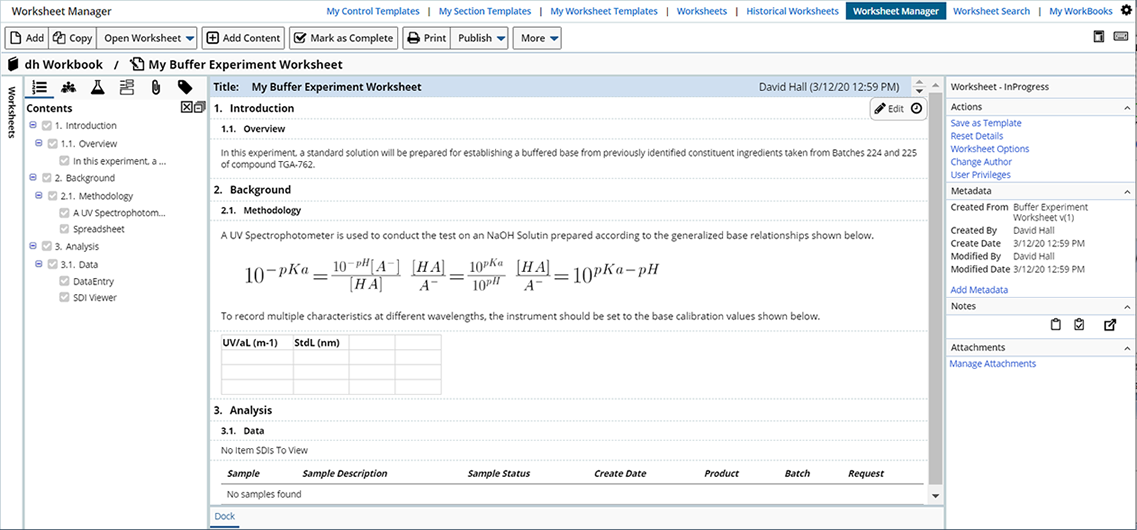
These are labeled in the example Worksheet below. Note that the Sections provide a paragraph structure with automatic numbering. Each Control has a unique purpose:
|
|
Each Section contains a "Rich Text" Control to provide textual content. | |
|
|
Section 2.1 contains a "Spreadsheet" Control that reflects data entered directly into the Worksheet or imported from Excel. | |
|
|
Section 4.1 contains an "SDI Viewer" Control that renders a list of SDIs, and a "Data Entry" Control that renders a Data Entry grid. Both Controls use live data from the LabVantage database. |
 |
Introduction to Templates |
|
|
All Worksheets must be created from Worksheet Templates. The idea is that System Administrators can create numerous Worksheet Templates containing predefined content for subsequent reuse. Other Users can then create Worksheets from these Templates and modify the contents as required. Numerous options in the Worksheet Manager allow the Template creator to specify what can be done with Worksheets created from the Template. Templates can also be created for Controls, along with options similar to Worksheet Templates. These options are covered in ELN Worksheet Manager.
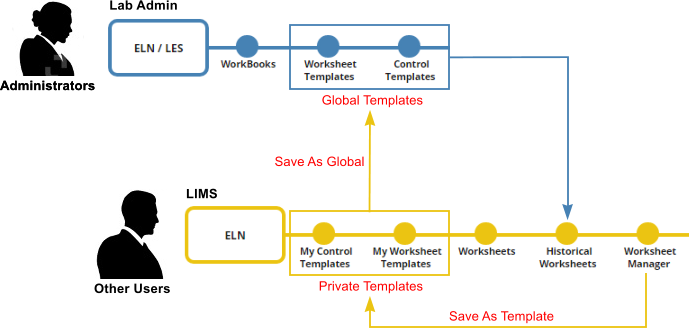
LabVantage provides the capability to generate two levels of Templates: "Global" and "Private":
 |
|
|
"Global Templates" are visible to all Users with access to ELN. These are typically created by Administrators. Other Users create their Worksheets using these Global Templates. | |
|
|
"Private Templates" are visible only to the User who created the Template. Other Users can create their own Private Templates by saving a Worksheet as a (Private) Template. These can then be saved as Global Templates if required. |
The examples that follow demonstrate basic Template creation. All options regarding Template creation and maintenance are described in ELN General Maintenance Pages.
Example Worksheet Template |
|
|
Overview |
To introduce fundamental mechanisms and provide a feel for the overall flow of Worksheet creation, we will build a simple Worksheet from scratch to help you get started and provide a degree of familiarity with ELN structure.
LabVantage provides a number of Global Templates that are ready to use out-of-the-box. However, to demonstrate an entire development cycle, this example shows the following operations:
| 1. | An Administrator creates a Worksheet Template ("Global Template"). |
| 2. | Another User then creates a Worksheet from this Template and adds Samples to a few of its Controls. |
Creating the Worksheet Template |
Open the Worksheet Templates List page at Lab Admin → ELN/LES → Worksheet Templates.
 |
Click "Add".
 |
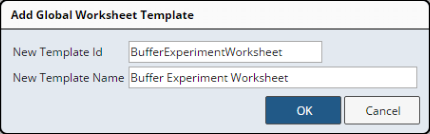
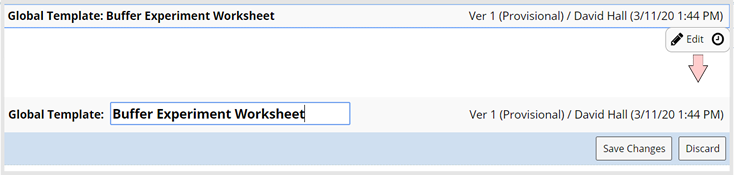
Choose a Template Id (used internally by the system to identify the Template) and a Template Name (name displayed in the "Template" column of the List page, and the Title of the Worksheet itself).
 |
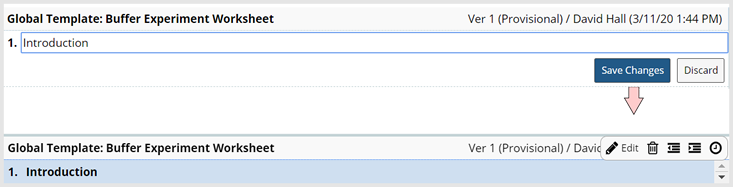
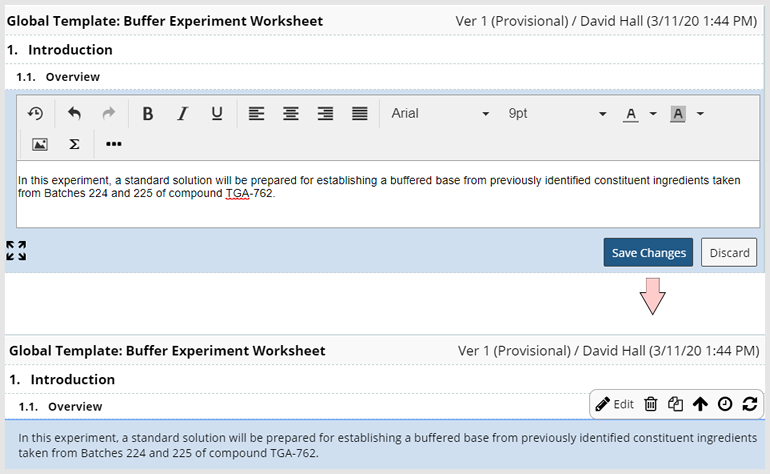
Use "Edit" if you want to change the Title. Note the "Save Changes" button. In general, modifications made to the Worksheet are automatically saved. If you see a "Save" or "Save Changes" button, you must save this particular item.
|
Adding Sections |
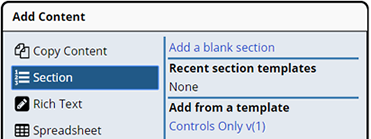
Click the "Add Content" button or press the "Insert" key. In the "Add Content" dialog, then click "Section → Add a new Section". Alternatively, you can simply press the "S" key.
| NOTE: | The appearance and rendering of the "Add Content" dialog depends on the ELN Policy node to which the Worksheet Template points. The node is set by the Worksheet Options → Policy option in the Worksheet Manager. |
|
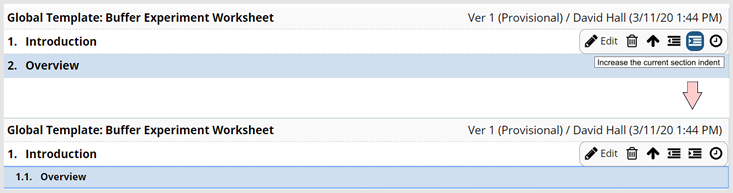
Provide the heading text for the new Section, then "Save Changes".
|
In a similar manner, insert another New Section. Make it a sub-heading of Section 1 by clicking the Increase Indent icon or pressing Ctrl-RightArrow. Note the adjustment in numbering. Sections maintain a paragraph structure with automatic numbering similar to ISO 2145 (1, 1.1, 1.1.1, 1.1.1.1, . . . , 1.1.1.n).
|
Adding Controls |
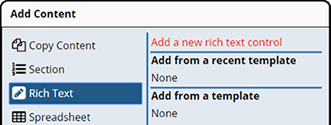
The simplest Control is the Rich Text Control. In a manner similar to adding Sections, insert a new "Rich Text" Control. In the resulting dialog, then click "Rich Text → Add a new Rich Text Control". Alternatively, you can simply press the "T" key.
|
This opens the HTML editor described in Rich
Text Control. Provide the body text for the new Rich Text Control,
then "Save Changes".
|
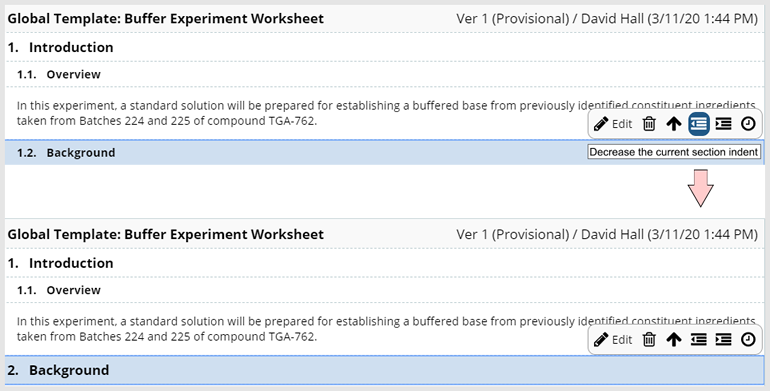
With the Rich Text Control selected, add another Section. Note that it is treated as another sub-section of heading 1, i.e., the current indent level is preserved. Make it a second heading by clicking the Decrease Indent icon. Note the adjustment in numbering. Sections maintain a paragraph structure with automatic numbering similar to ISO 2145 (1, 1.1, 1.1.1, 1.1.1.1, . . . , 1.1.1.n).
| NOTE: | When adding a Section Template to a Worksheet, the contents of the Section Template is inserted into the Worksheet immediately after the currently selected Control or Section. If the Worksheet title bar has focus, the content is added to the beginning of the Worksheet. Note that Sections are inserted at the same "level" (indentation) as they were defined. For example, if a "level 2" Section has focus, and a "level 1" Section is inserted, the "level 1" Section will be inserted after the "level 2" Section. This could result in Sections breaking up an existing hierarchies. Care must therefore be taken when choosing the insertion point before adding the Section Template. |
|
Add another Section and make it a sub-heading of Section 2 by clicking the Increase Indent icon as you previously did in Section 1.
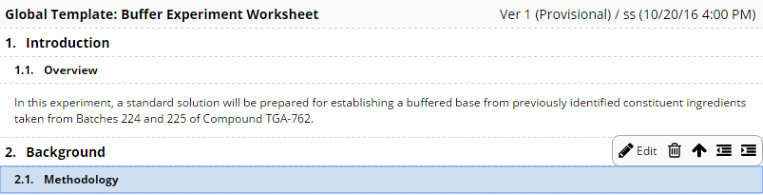 |
Add another Rich Text Control to describe the Section. Note the use of the equation editor in the Rich Text Control.
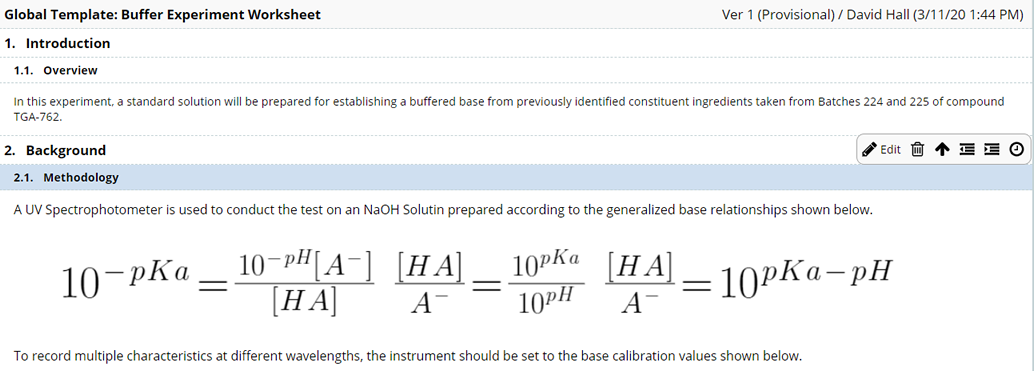
|
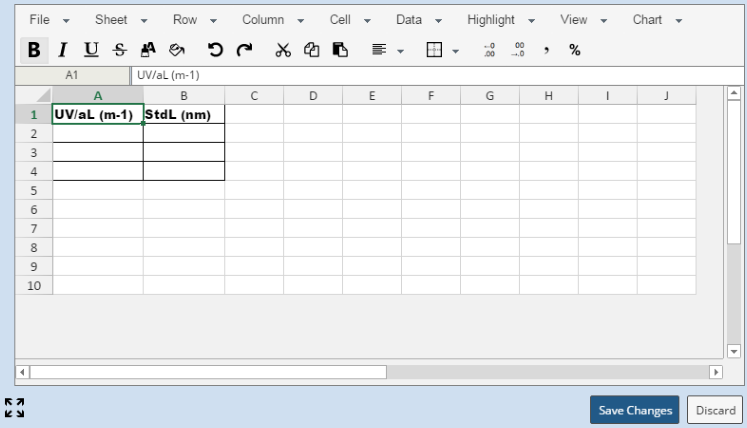
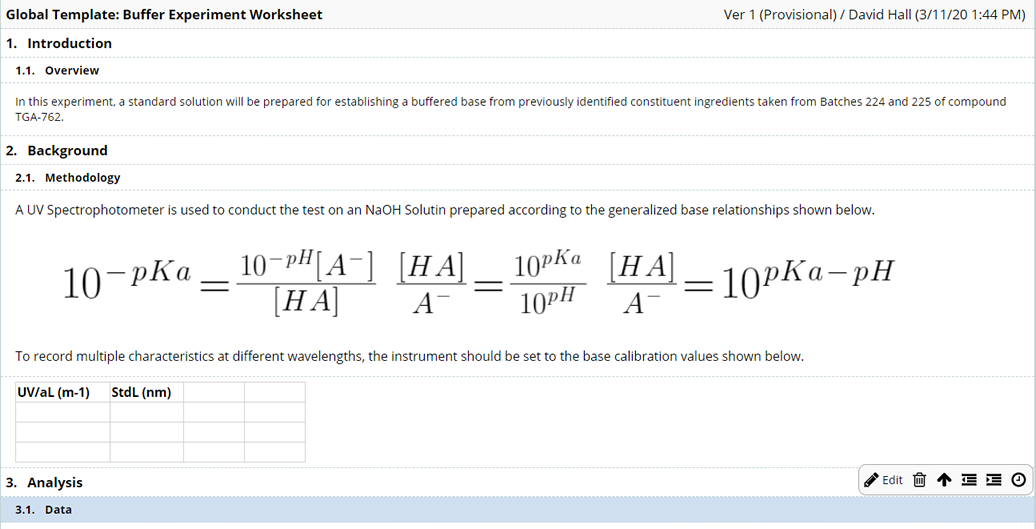
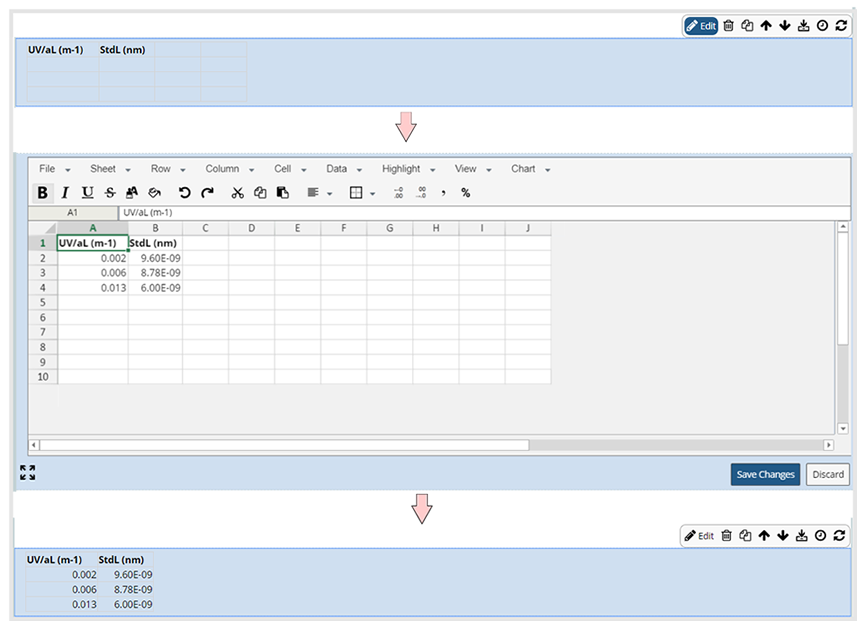
For demonstration purposes, we now add a slightly more complex Spreadsheet Control. With Section 2.1 selected, add a Spreadsheet Control as shown below.
|
This opens the Spreadsheet Control to provide a subset of Microsoft
Excel functionality. Here you can enter some column headings for future
data.
|
In the same manner as previously demonstrated, add two more Sections ("Analysis" and "Data") where we will show Data Entry.
|
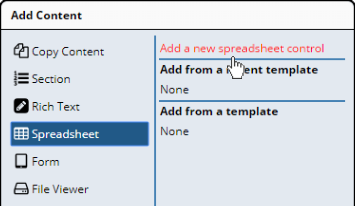
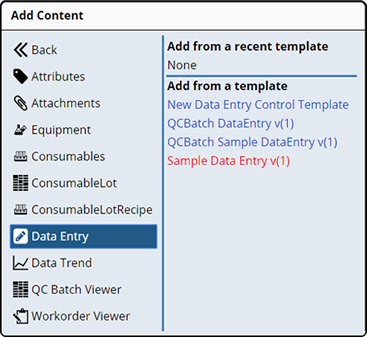
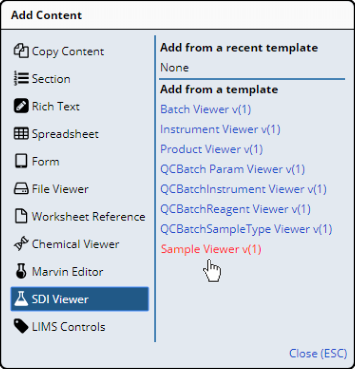
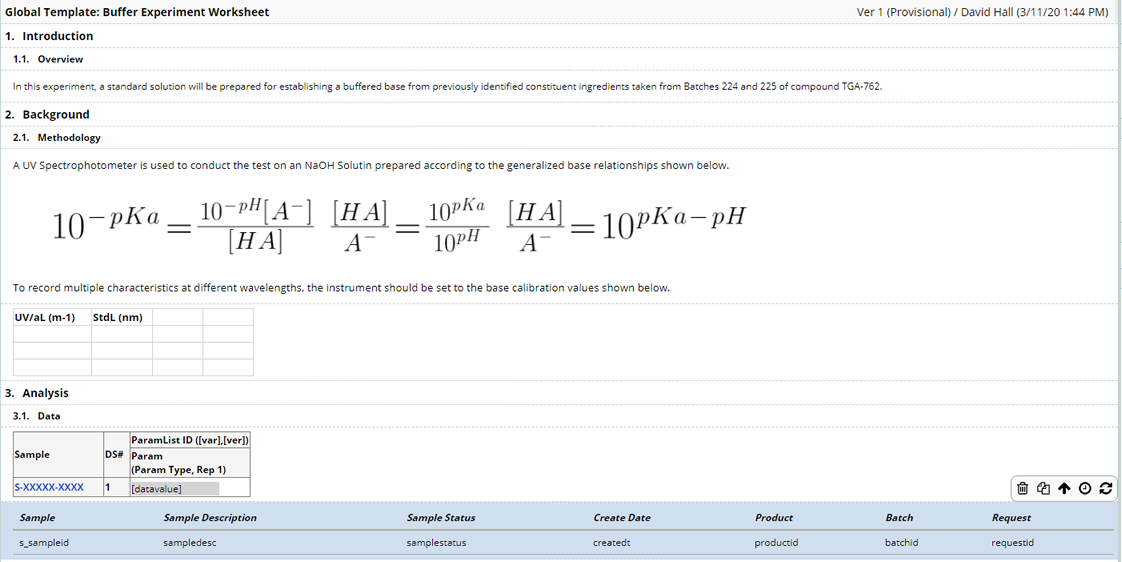
Next, to demonstrate the capability of bringing SDIs and their data into the Worksheet, we add a Data Entry Control and choose the "Sample Data Entry" Template because the SDIs we want to deal with are Samples. This Data Entry Control is under "Add from a Template" because it is a Global Control Template (as described in Introduction to Templates). The User will enter the data for the Samples. Note that the Data Entry Control (and all LIMS Controls) is added by first clicking "LIMS Controls", which changes the Add Content dialog to show all LIMS Controls.
|
Samples and Data will be entered by the User in the Worksheet that
is created from this Template.
Note that the Data Entry grid is rendered only if Samples qualified for Data Entry exist. |
Finally, we would like to show some details concerning the Samples. With the Data Entry Control selected, we add an SDI Viewer Control ("Sample Viewer") as shown below.
|
Samples will be added by the User in the Worksheet that is created
from this Template.
|
The Finished Worksheet Template |
Here is the Template we have just built.
|
Example Worksheet |
|
|
Now it is time for a User to create a Worksheet from the Template we have just built (below) and add Samples to a few of its Controls.
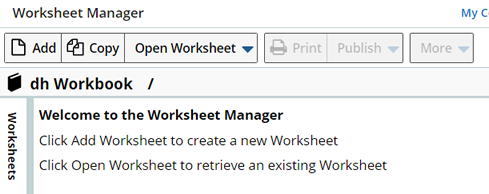
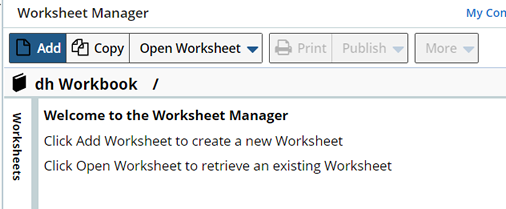
Open the Worksheet Manager at LIMS → ELN → Worksheet Manager.

|
| NOTE: | When a User enters the Worksheet Manager for the first
time, a "default" Workbook is automatically created for that
User (below). The User then becomes the "Owner" of that Workbook.
This initial Workbook creation is provided for convenience, as Users can create their own Workbooks as required. The "default" Workbook can be changed in the relevant User Profile. |
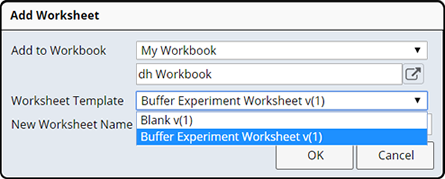
Click "Add".
|
For the "Worksheet Template", choose the one you just created
("Buffer Experiment Worksheet v(1)").
Note that Worksheets are Versioned SDIs. |
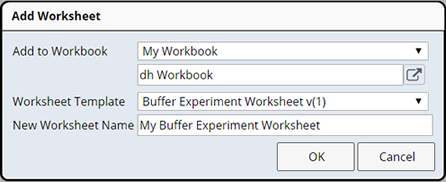
Enter a Name for the new Worksheet. We choose "My Buffer Experiment
Worksheet".
|
The Worksheet opens in the Worksheet Manager. Overall functionality is covered in ELN Worksheet Manager. Our purpose here is to show how the Worksheet is used based on the Template content.
|
Enter some values into the Spreadsheet Control: Click "Edit", enter the values, then "Save Changes".
|
Next, we want to enter data for the relevant Samples. In the Data Entry Control, click "Add", then select Samples that qualify for Data Entry.
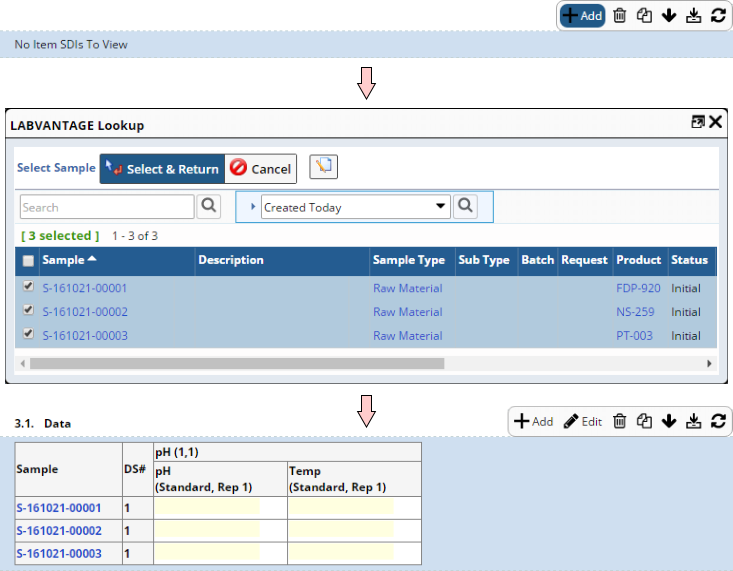 |
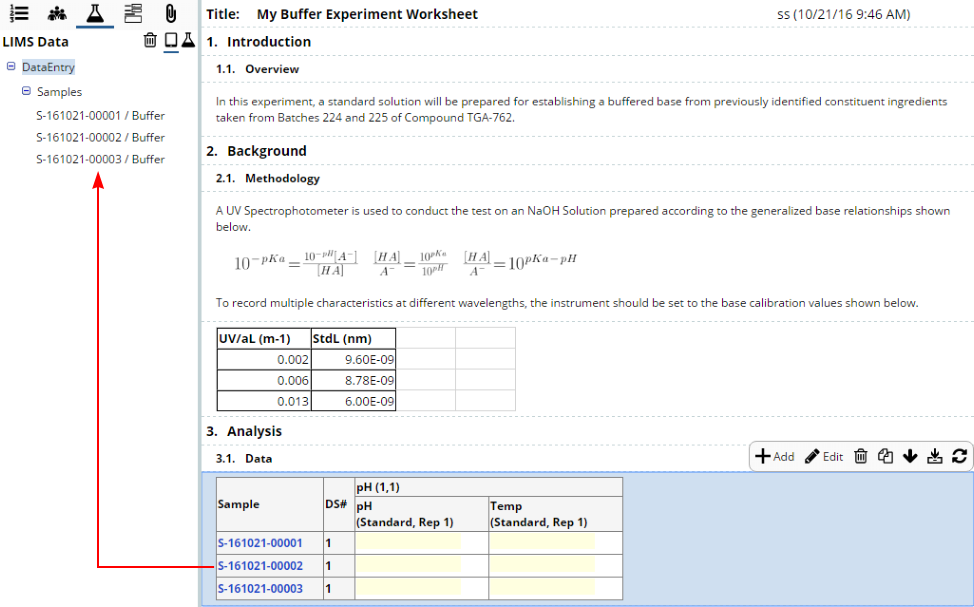
At this time, notice that the "LIMS Data" panel now shows the SDIs (Samples) that have been brought into the Worksheet.
 |
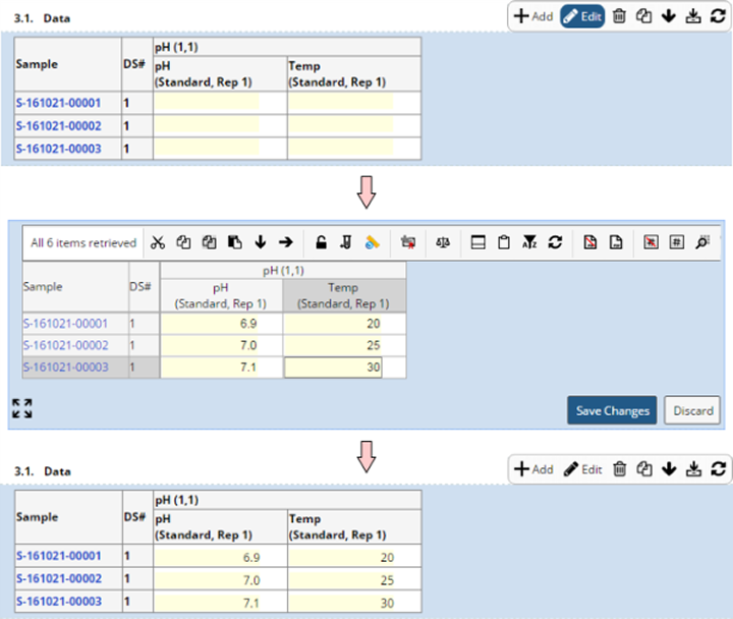
Enter data for the Samples in the Worksheet by clicking "Edit", then entering the data values. Click "Save Changes".
|
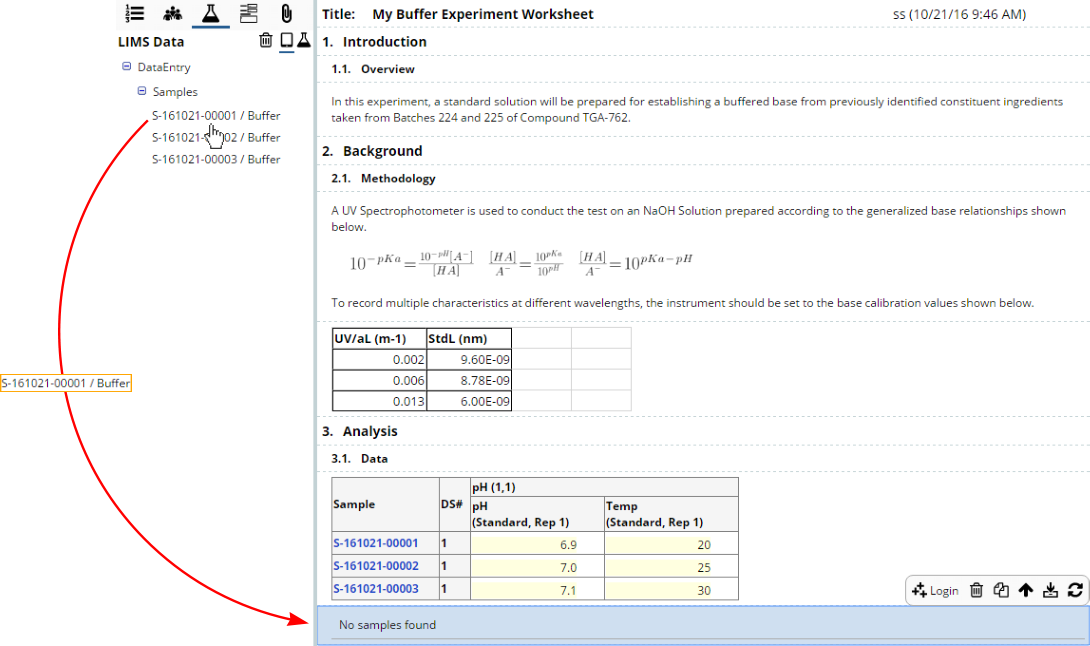
SDIs in the Worksheet can also be dragged and dropped into a Control. To demonstrate this, we use the "SDI Viewer" Control. Drag and drop each Sample into the SDI Viewer Control. Alternatively, you can also drag the "Samples" node into the SDI Viewer to associate all of the Samples in a single operation rather than individually.
|
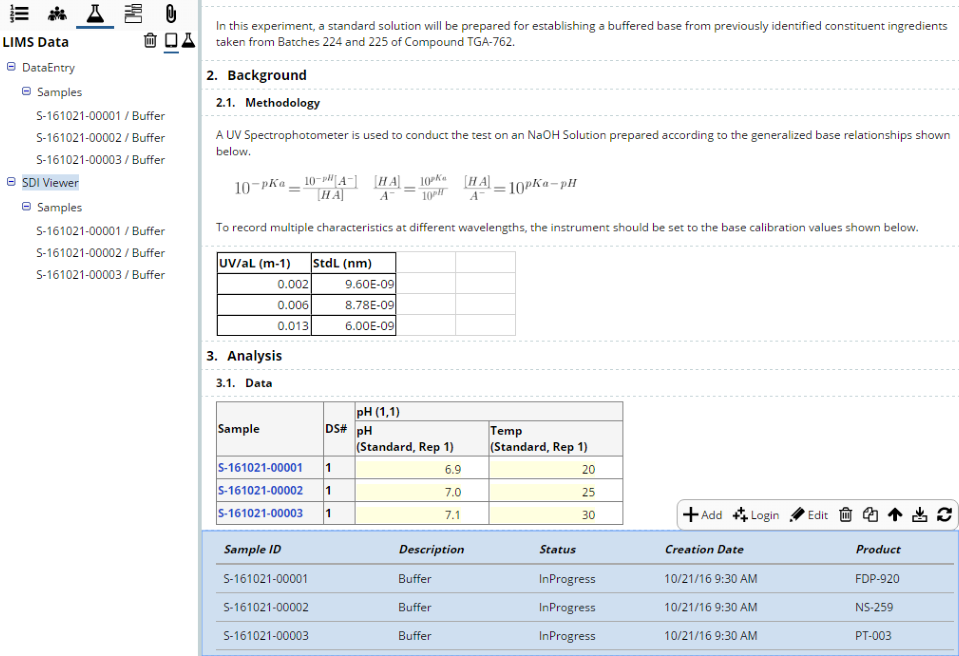
After dropping all Samples into the SDI Viewer, note that the "LIMS Data" panel shows the Samples grouped by Control. The LIMS Data panel is covered in ELN Worksheet Manager.
|
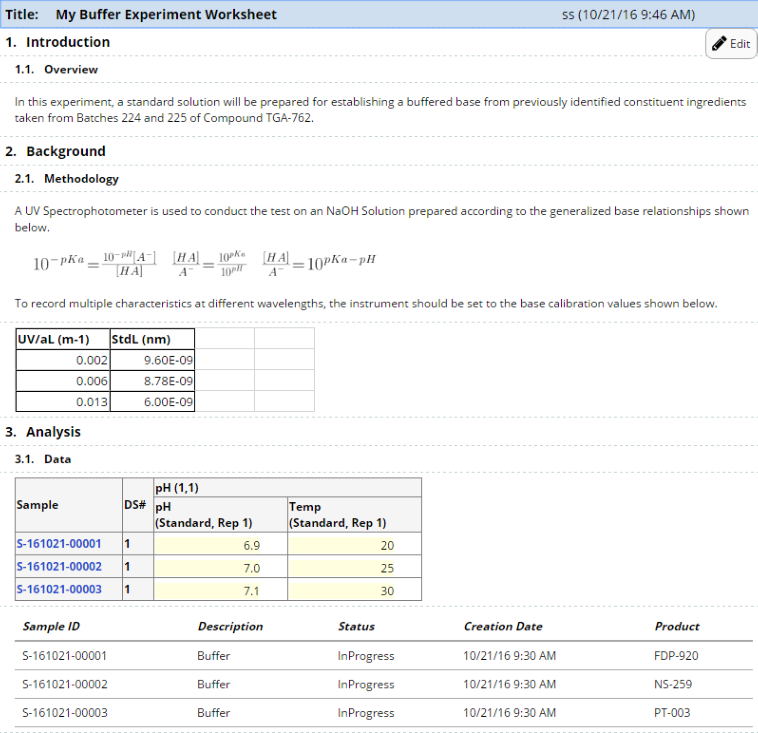
This is the result of what we have done with the Worksheet based on its Template:
|
Related Documents |
|
|
The ELN/LES concepts introduced above are detailed in these additional documents: