CMT Transfer
| Top |
CMT Transfer |
|
|
Content |
||||||||||||||||||||||
|
Overview |
|
|
When you are ready to transfer configuration changes to another system, you can do so using CMT Transfer.
Transfers (Export) can be initiated in two ways:
| • | From the respective SDI List Page. Choose either a "Full" or "Minimum" Transfer. |
| • | From the context of a Change Log or Change Request. When exporting from a Change Log or Change Request, only a "Minimum" transfer can be performed. Only the generated SDI Snapshot(s) is transferred. |
The Transfer process includes:
When configuration changes are complete, create the transfer package. You have two options:
| Full Transfer | Full Transfer is only available when Exporting from an SDI List page.
Choose Full Transfer when your objective is to replicate the source system on the target system. A Full Transfer might be used prior to going "Live", before a system is in production. Full Transfer includes all components of the SDI including any referenced SDIs (within the changed SDI). The exact content of the transfer package is determined using the CMT Policy. For example, when exporting a Product SDI in "Full" mode, in addition to the primary details, any referenced Sample Templates and Workitems are exported. Along with the Workitems, any referenced Parameter Lists are exported. Within the Parameter Lists, any referenced ApprovalTypes, Consumer Types, Parameters, and Units will be exported, and so on until the last reference. |
|||
| Minimum Transfer | Minimum Transfer is the transfer mode when exporting from a Change Log or Change Request (Full mode is not available).
Once the System is in production you might choose to be more selective about what is transferred. Choose to only transfer specific changed SDIs and not include referenced SDIs as they may have changed on the Target.
|
The transfer package includes:
| • | A collection of one or more Check In SDI Snapshots identifying the changes. |
| • | Optionally, the single "Check Out" (before changes) SDI Snapshot for reference. |
| • | Policy decisions that determine how data will be imported on the target system. |
Upon execution of the Export, the Export XML file is zipped (<Export>.zip) downloaded to the client.
Once exported, Import the transfer package to the target system. The Import process lets you:
| • | Configure Import behavior. |
| • | Visualize the changes using the Snapshot Viewer. |
| • | Address any Validation errors before importing the package. Choose to Ignore or Override portions of the Import. |
| • | Identify the UUIDs and Alternate Keys used to find matching SDIs on the target system. |
| • | Trace changes back to the Import using a Change Log added on the Target. |
Configure Transfer Options |
OOB, most SDCs have been configured in the CMT Policy accordingly. However, you may want to make changes such as include additional SDIs or specify available Import Options. See Configuring CMT for detailed information.
Special Transfer Considerations |
The following sections detail the Export and Import process using a simple SDC as an example. The section Special Transfer Considerations details the special handling of more complex SDCs (such as Property Trees, and Schedule Plans).
Export |
|
|
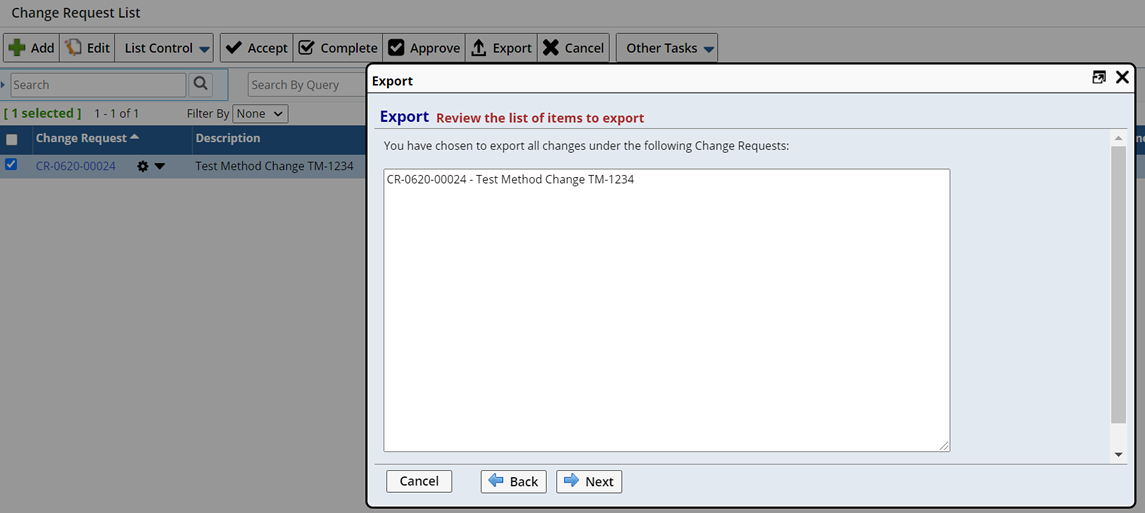
Choose to Export an entire Change Request, one or more individual Change Logs, or all Change Logs associated with an SDI. From either the Change Request List page, Change Log List page or the SDI list page, click "Export". This starts the Export Wizard.
Export a Change Request or Change Log |
Choose to Export all Change Logs associated with a single Change Request, or one or more Change Logs. From the Change Request List page or the Change Log List page click "Export". Exporting from a Change Request or Change Log exports the SDI Snapshot(s) of any associated Change Logs.
|
The Export Wizard walks you through the following steps:
| 1. | Set Export Options. |
| 2. | Preview and Resolve Validation Errors. |
| 3. | Set File Options. |
| 4. | Export. |
Click "Next" to set the Export options.
Set Export Options |
Choose to include additional details by checking "Verbose Log".
Decide whether or not to also export the original Check Out SDI Snapshot (before changes) for each SDI.
When "Yes" matching is initiated during Import. The Source and Target databases are "matched". Any differences between the target system, and the pre-change configuration on the source (Check Out SDI Snapshot) are identified so that you can manage the Import Options for each. This ensures you are aware of any changes made to the target system since Check Out.

|
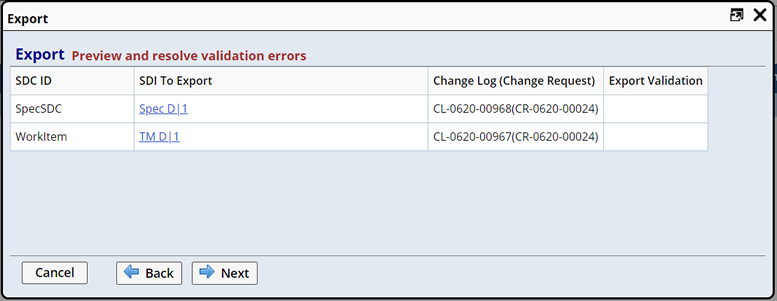
Clicking "Next" performs various validations against the Change Request and Change Logs.
Preview and Resolve Validation Errors |
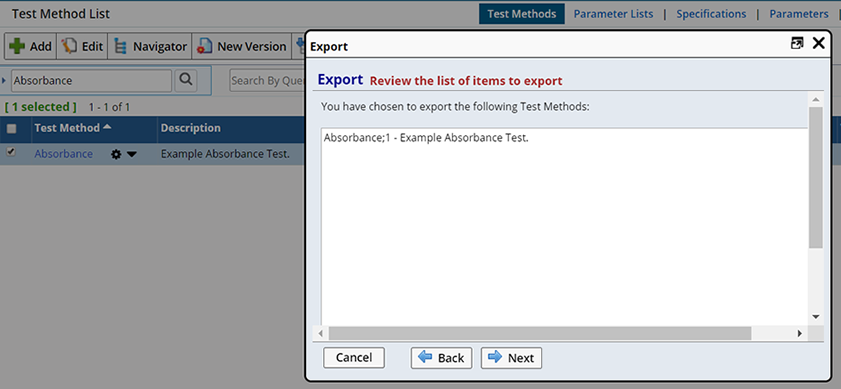
All items (SDIs) included in the transfer package are listed. This provides a preview of what will be exported and identifies any Validation errors.
|
| Option/Column | Description | ||||||
| SDC ID | The SDC of the SDI to be exported. | ||||||
| SDI To Export | The SDI being exported. Clicking the hyperlink opens the Checked In SDI Snapshot. This lets you visualize the contents of the SDI Snapshot to be exported. | ||||||
| Change Log (Change Request) | The Change Log and Change Request (if applicable) with which this change is associated. | ||||||
| Export Validation | Identifies any Export validation errors.
The following validations are performed:
|
||||||
| Attachment Icon | When Attachments are included for an SDI the Attachments icon is shown. Hovering over the icon details the Attachment size. |
| NOTE: | When exporting one or more Change Requests, the system will group all Change Logs present in the Change Requests for each SDI. There is no guarantee as to the order in which these items are imported. Since CMT import is done in one transaction, as long as any linked items are present in the transfer package, the Import will proceed. |
Click "Next" to set options that define the Export file details.
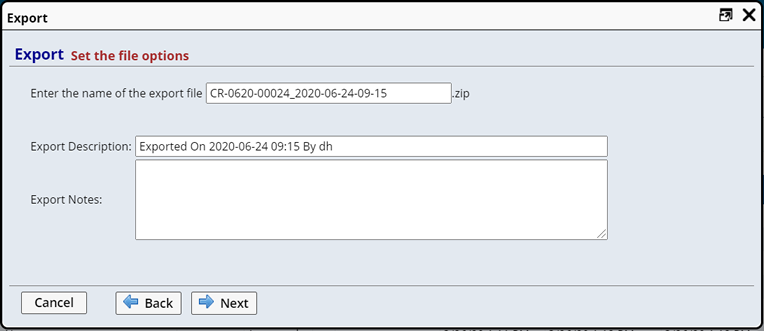
Set File Options |
Here you can change the Export file name. The default zip file name appends a current time stamp in the fixed format of yyyy-MM-dd-HH-mm. This ensures that if the same transfer package is exported repeatedly, the most recent file is easily distinguishable.
Optionally, add additional notes to describe the Export.
|
Clicking "Next" executes the Export SDI Action.
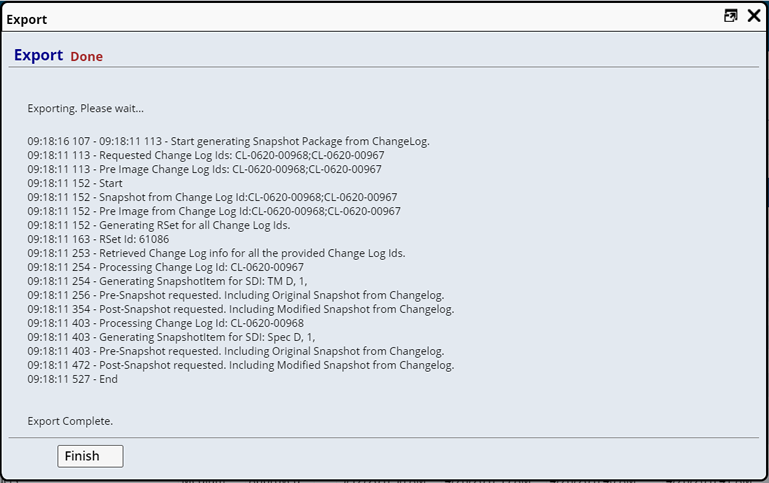
Exporting |
Export progress is shown.
|
Click "Finish" to close the dialog.
Export Complete |
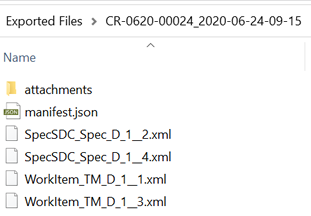
When finished, the Export zip file is downloaded to the client. Following is an example of the contents of the exported file.
|
| Content | Description | ||||
| attachments Folder | Contains any Attachments associated with the SDI.
|
||||
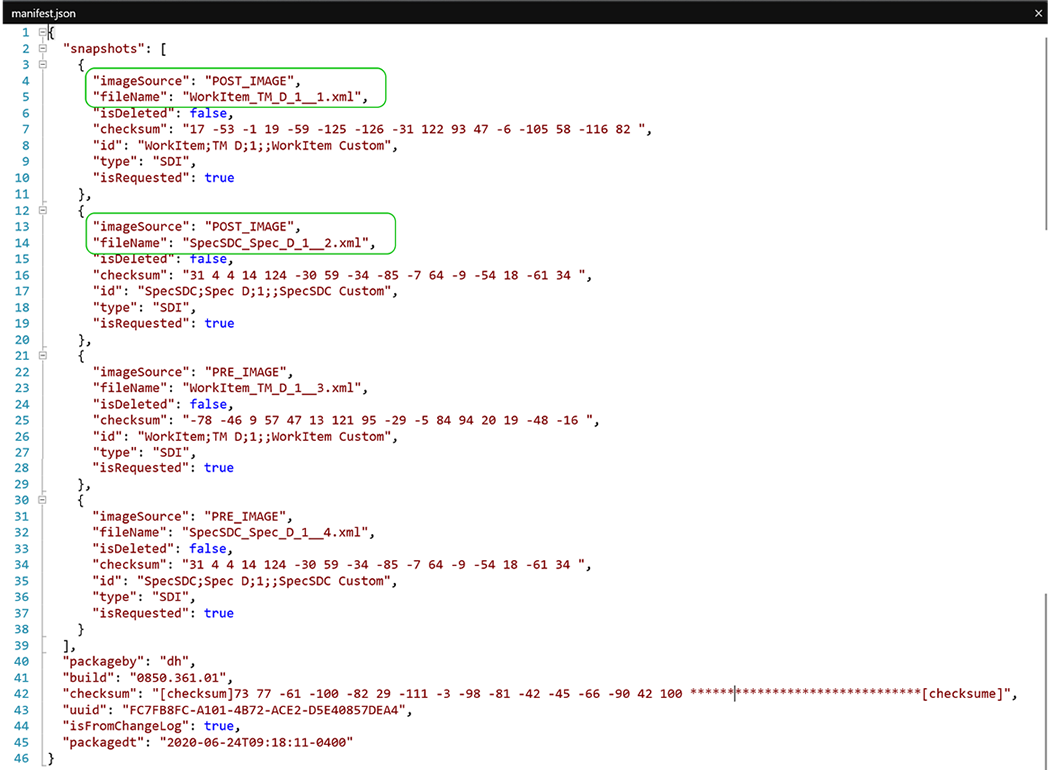
| manifest.json | Provides a manifest detailing the Transfer Package.
The two SDI Snapshot "Post_Image" details (the two SDIs included in the transfer package) are highlighted below.
|
||||
|
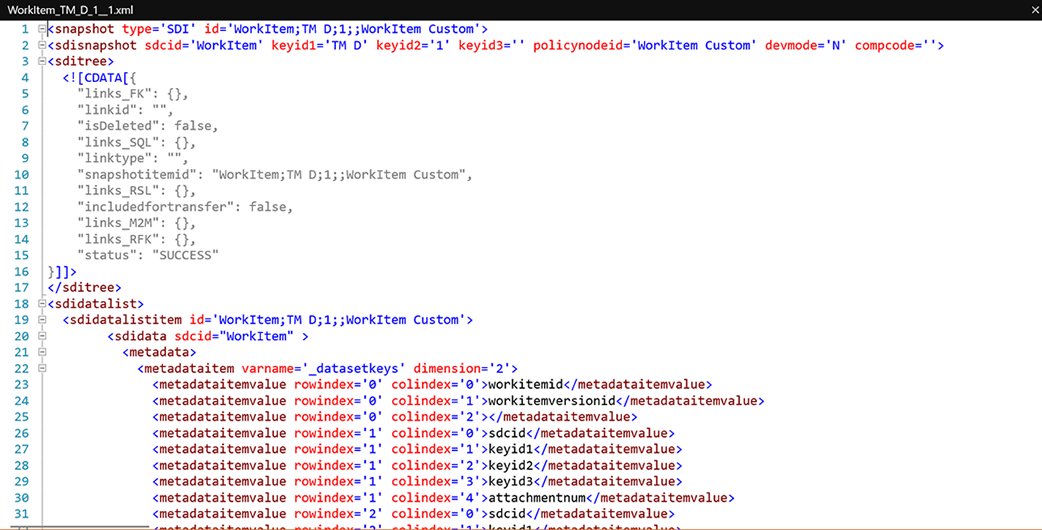
WorkItem_TM_D_1__1.xml SDI Snapshot (Check In) |
XML File
detailing the content of the Check In SDI Snapshot. When included (during Export), an XML file detailing
the pre-change SDI Snapshot is also included.
|
Checksum |
All transfer packages will by default have a Checksum generated on Export. This checksum is used during the Import process to validate the authenticity of the Package being imported.
There are 2 types of checksum present inside a transfer package.
| • | Checksum for the Manifest. |
| • | Checksum for each SDI Snapshot inside the Package. |
The "Global - Block Invalid Checksum" CMT Policy option determines whether or not to allow an Invalid Checksum Package to be imported. Regardless of the value selected, a warning will be displayed at Import if the Checksum validation fails. See Checksum Validation for more information.
Transfer Log |
As a result of exporting, the system creates a Transfer Log (System Admin → System Tools → Transfer Logs).
|
|
| Column | Description | ||||||||
| Transfer Id | Auto generated identifier for this Transfer. | ||||||||
| Transfer By | User who performed the Transfer. | ||||||||
| Transfer Date | Date on which the Transfer was performed. | ||||||||
| Transfer Name | Name that identifies the transfer. The combination of Transfer Type, Date and Transferred By User id creates a unique name for this transfer. | ||||||||
| Status | Status of the Transfer. Transfers with a status of "Started" have been started but not completed. If you had begun to address validation issues and clicked "Save for Later" your progress is saved. | ||||||||
| Checksum Icon | Displays the status of the Checksum. Since a Checksum validation is not performed on during Export these icons are meaningful for Import Transfer Types only. All Export Transfers will show the yellow clock icon.
|
||||||||
| Transfer Type | Type of Transfer, Whether the listed log is the result of an Import or Export.
In addition, remote server Check In, Check Out and Update are considered transfers (between the local server and the master repository). These transfers are listed accordingly (Remote Check In, Remote Check Out". |
||||||||
| Log Notes | Any defined Log Notes are displayed | ||||||||
| Last Transfer By | Identifies the User who performed the most recent (or last) transfer of the associated file. | ||||||||
| Last Transfer Date | Identifies the most recent (or last) time the associated file was transferred. | ||||||||
| File | Clicking the File icon displays a hyperlink. When clicked, the associated file is downloaded. | ||||||||
| Transfer UUID | The UUID generated to specifically identify this transfer. |
Export Changes for an SDI |
To Export all Change Logs associated with an SDI navigate to the SDI list page and click "Export" (Other Tasks menu).
| NOTE: | When exporting from an SDI List page, an SDI Snapshot is generated using the current data in the database. |
With the SDI selected, click "Export".
|
Verify that you are exporting the correct SDI and click "Next" to set the Export options.
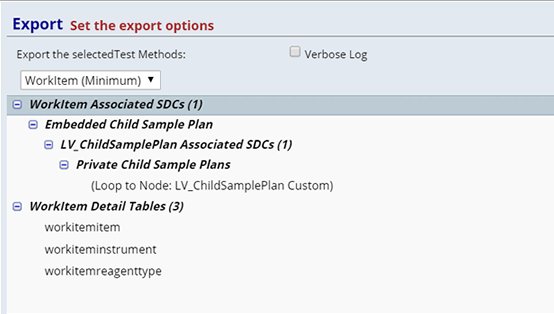
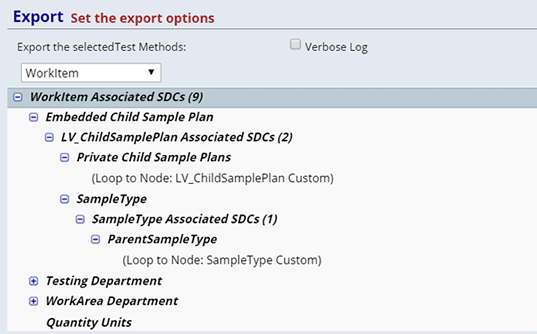
Set SDI Export Options |
Here you can choose to perform a "Minimum" transfer (SDI Snapshot only) or a "Full" transfer (configured in the CMT Policy).
|
Minimum Transfer |
Full Transfer |
|
|
|
Clicking "Next" brings you to the Preview and Resolve Validation Errors step. When performing a "Minimum" transfer the Export Wizard proceeds in the same way as described above.
The following sections describe additional features when performing a "Full" transfer.
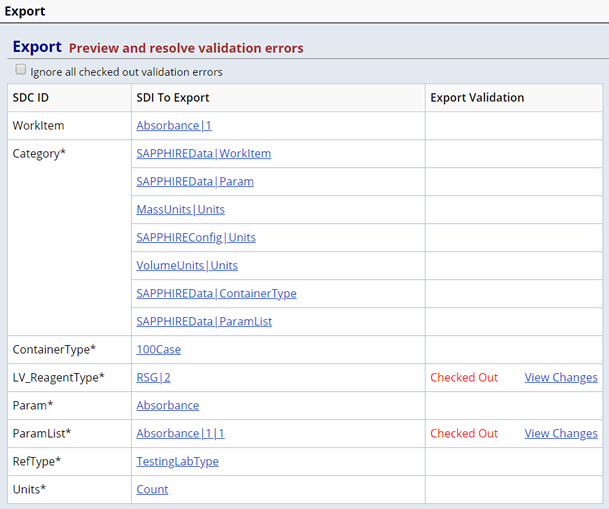
Preview and Resolve Validation Errors When Performing a Full Transfer |
When performing a "Full" transfer items linked (or referenced) to the selected SDI are identified with an "*", as seen in the example below.
|
Checking "Ignore all checked out validation errors" lets you proceed with the Export regardless of Check Out validation errors. Check In is required for Export, however you can choose to ignore those errors (Export anyway) by checking this option.
Exporting a Full Transfer |
Export progress shows the details of the full transfer.

Import |
|
|
Using the Import Wizard, Import the transfer package to another system.
Upon Import the following occurs:
| • | The Import Wizard examines the transfer package Checksum to ensure data integrity. |
| • | A preview (SDI Snapshots) is provided of each SDI to be transferred to the target. |
| • | If the Check Out (pre image) SDI Snapshot was included (matching is initiated), each Check In (before image) SDI Snapshot is compared to the target database. When a match is found, the matching SDI in the database is identified (lets you know which SDI on the target will be updated). If no match is found, you are presented with pre-determined options for resolving the error. |
A "Save for Later" option can be utilized allowing you to save Import options and return later to complete the Import.
To Import a transfer package navigate to System Admin → System Tools → Import, the Import Wizard displays.
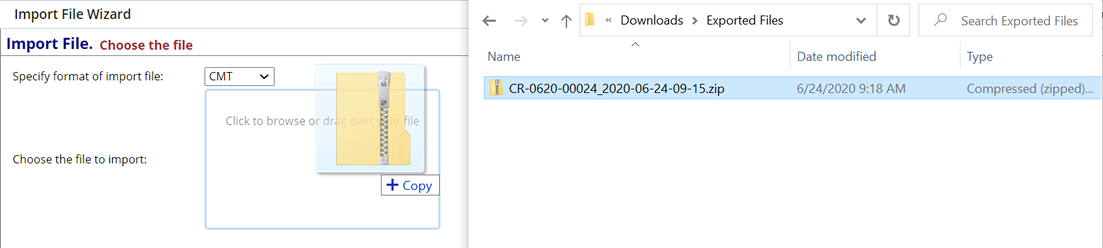
Choose the File to Import |
When importing a "CMT" transfer package ("CMT" is specified in the CMT Policy as the default Transfer Tool), choose "CMT" as the import file format in the "Specify format of import file" field.
Browse for, or Drag the exported transfer package into the Wizard.
|
| NOTE: | If you attempt to import SDCs to a controlled environment using CTT, a warning message indicates that any data imported using CTT will not be captured in a Change Log. |
Click "Next" to define options for parsing the Import File.
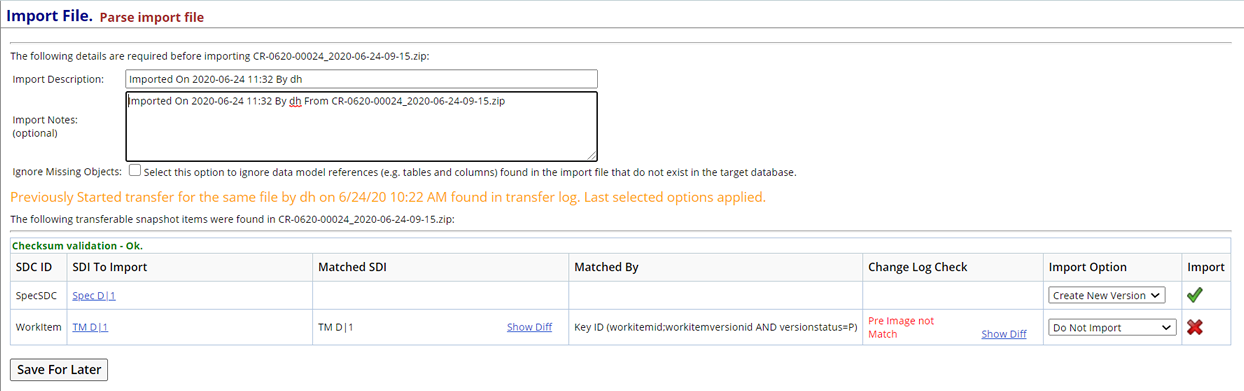
Parse the Import File |
Using the Parse Import File page verify the details of the Import file and manage Import Options.
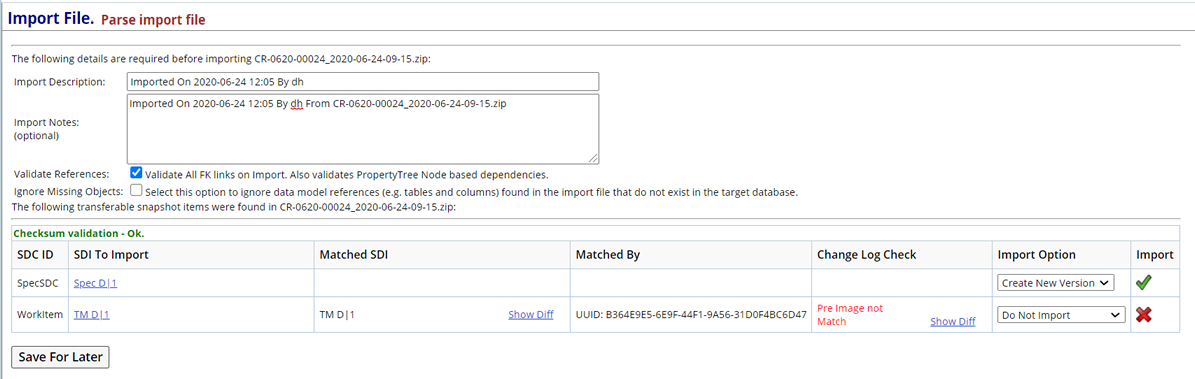
|
| Field | Description | |||||||||||||||||||
| Import Description
Import Notes |
The date on which the Import was performed and by whom.
|
|||||||||||||||||||
| Ignore Missing Objects | When checked, any data model references (such as tables or columns) found in the Import file, that do not exist on the target system, are ignored.
This is helpful when exporting from a system with User defined columns, and when importing to a system that does not have exactly the same schema. |
|||||||||||||||||||
| Checksum Validation | During Import, the system will check the authenticity of the package:
If no issues are found the following message is displayed: If issues are found the following message is shown with details about the error: The "Global - Block Invalid Checksum" CMT Policy option determines whether or not to allow an Invalid Checksum Package to be imported. Regardless of the value selected, a warning will be displayed at Import if the Checksum validation fails. |
|||||||||||||||||||
| Snapshot Items | Lists the contents of the transfer Package.
|
|||||||||||||||||||
| Import Option | The available Import options are determined by CMT Policy configuration for each SDC accordingly.
|
|||||||||||||||||||
| Import | A green check indicates the SDI will be included in the Import. | |||||||||||||||||||
| Save For Later | Allows you to save managed Import Options and complete the Import at a later date. The next time you attempt to Import the same file, any changes to Import details have been saved.
|
Import Foreign Key Validations |
The ImportSnapShot Action validates Foreign Keys (FK) at the end of the Import process (before commit) and generates an error message when the first foreign key validation is violated.
Each Import from a single file is in a single transaction, with deferred FK constraint in Oracle, and no database FK in MSS.
All FK links defined in DDT are validated including detail table FK links.
When you are satisfied with the data to be imported click "Next".
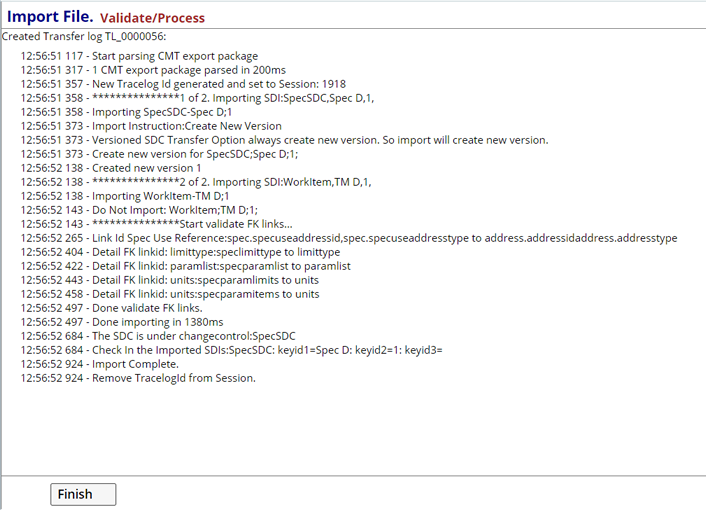
Import |
As the file is imported, progress is shown in the Validate/Process dialog.
| NOTE: | Esig is not required on Import as changes are tracked by CMT. |
|
Click "Finish" to close the dialog.
Import Complete |
Once the Import is complete, a Change Log is generated detailing the Transfer (when the target system is under Change Control). This Change Log provides full traceability as it tracks where new SDIs came from.

|
Clicking the From Transfer icon![]() opens the View Transferlog page.
opens the View Transferlog page.
|
|
The Import is also listed on the Transfer Log (System Admin → System Tools → Transfer Logs) of the Target system.

|
Special Transfer Considerations |
|
|
Following are the special considerations made when transferring the items using CMT.
Attachments |
Attachments stored in the sdiattachment table transfer like any other sdixxx table.
Attachment files (that may be located in the Attachment Repository) are included as part of the export. On import, that file is stored in a repository on the target system. The target system does not need to match the source system's repository.
Consider the following when transferring Attachments (along with an SDI).
| • | Snapshots included in a Change Log do not contain the physical Attachment file (only the sdiattachment rows). | ||||||||||||||||
| • | Attachments are only included when performing a Full Transfer using the Export Wizard. | ||||||||||||||||
| • | An icon is shown in the preview dialog when an Attachment is being transferred with an SDI. A black Attachment icon indicates the presence of Attachment under an SDI. Red indicates that the total size of all attachments are under 5 Mega Bytes. | ||||||||||||||||
| • | Attachment files are also secured via checksum during transfer. | ||||||||||||||||
| • | When transferring Attachments, the following columns are flushed:
|
||||||||||||||||
| • | When an Attachment is imported on the target system, the target systems AttachmentPolicy preferences are considered to determine the storage location for the files. |
Biobanking Study |
CMT can easily transfer a complex Biobanking Study. The Study, along with all of its details can be exported from the Study list page.
OOB, the Study node in the CMT Policy has been configured to include all necessary Embedded SDCs, Detail Tables and any Additional SDCs required to transfer a Study.
The following hierarchy is pre-configured in the CMT Policy.
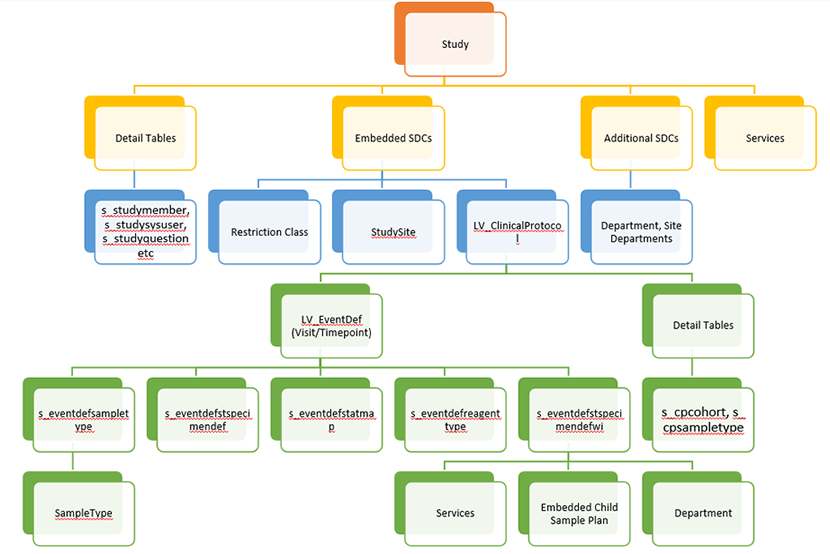
See CMT Policy to review the detailed OOB configuration of each node.
Gizmos |
At the time of this publication the link between the Group Gizmo and other Gizmos is defined within a Property Tree. This type of link is not currently supported by CMT. Therefore, when a Group Gizmo is transferred, any defined Gizmos within the Group are listed, but not created on the target.
Hierarchy Paths |
SDCs containing hierarchical paths (such as Anatomic Sites or Locations) offer additional options when transferring.
During Export, choose to:
| • | Export only the individual level of the hierarchy (the SDI Snapshot captured when the individual node was checked in). |
| • | Perform a Full Export. This includes all parent and children nodes above and below the the changed node. |
This applies to all hierarchical SDCs in the system.
Notes |
OOB, Notes associated with SDIs are not transferred. If you choose to configure the CMT Policy to include Notes when transferring an SDI, consider that any Notes found on the target system will be replaced. It will be up to the User to ensure that Notes are protected on the target.
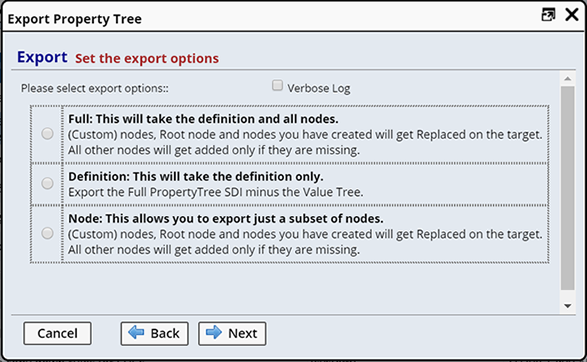
Property Trees |
Many configuration objects are stored in a Property Tree (such as Policies, Elements, Page Types, Gizmos). When transferring Property Trees you can transfer the entire Property Tree, individual Nodes, the Root node, and/or the Definition structure of the Property Tree.
Consider the following when transferring Property Trees.
Export Considerations |
| • | Different Export options are provided when exporting Property Trees and/or nodes.
|
||||||||||||||
| • | The following special handling is applied when in Dev/NonDev Mode:
When exporting from Dev Mode When exporting from Non Dev Mode |
||||||||||||||
| • | In some cases, Property Tree nodes may be transferred as Referenced items.
Property Tree options in CMT Policy → Transfer Additional SDIs provide configuration options for the specified SDI. |
||||||||||||||
| • | When exporting all changes from a Change Log, the following grouping logic is used:
|
Import Considerations |
| • | Property Trees are imported after any SDC Data Model changes, but before any other SDI is imported. | ||||||
| • | When importing a Full tree, the nodes are merged into the existing tree if available. | ||||||
| • | When importing Nodes:
|
Queries |
Since there is no need to transfer Adhoc Queries from the source system to the target system, Adhoc Queries cannot be exported.
SDCs |
When transferring an SDC (SDC definition) there are several things to consider during Export and Import.
Export Considerations |
When an SDC is exported, the following items are also included as Referenced Items:
| Table | Included Reference Item |
| sdc | Default LV_SecuritySet SDI Version ApprovalType SDI Reason RefType SDI |
| sdcattributedef table | All LV_EditorStyle SDIs.
All RefTypes linked to any attribute. |
| sdclink table | All RefTypes used as Link Reftype for any column. |
| sdcdetaillink table | All RefTypes used as Link Reftype for any column. |
| categoryitem table | All linked Category SDIs. |
| NOTE: | Primary SDCs are prioritized during Import to support future imported referenced items. |
Import Considerations |
Consider the following when importing SDCs:
| • | If an SDC SDI is present inside a transfer package, the Import Wizard makes sure that the SDC data model changes are carried out before any other SDI from that transfer Package is imported. |
| • | During the Import process, if the Import fails due to any error, the Data Model changes are not rolledback. |
| • | When importing SDC SDI Snapshots, unlike other normal SDI Snapshots, the detail tables are not flushed. Data is only added or edited if it already exists. As a result, any existing column, link or script etc. will not be deleted if the source SDC Snapshot does not contain that data. |
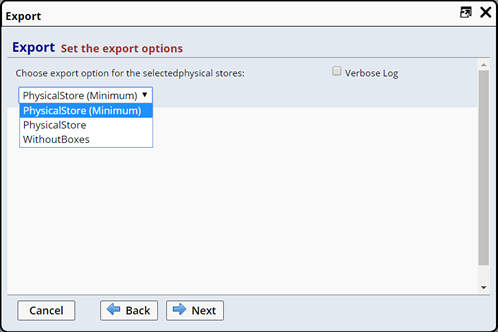
Storage Units |
The entire Storage Unit (Physical Store) structure can be transferred using CMT. This lets you easily configure a Freezer in a development environment then transfer the entire structure to a production environment.
Export Considerations |
Consider the following when exporting Storage Units:
| • | A Storage Unit is exported from either the Storage Explorer list page, or from the Physical Store list page. Only the Storage Unit structure is exported, you cannot transfer individual child storage units (such as an individual Rack or Shelf). This structure is used to recreate the Physical Store on the target system. Any Samples within the Physical Store are not exported. | |||||||||||
| • | Export options include:
|
Import Considerations |
Consider the following when importing Storage Units:
| • | Linked SDIs (such as PhysicalStore, LV_Box, StorageEnv, etc.) are created as required by the imported Physical Store. |
| • | StorageUnitType definitions are also imported. |
| • | Import always creates a new Physical Store. |
User SDIs |
Given the sensitive nature of the User SDI special care has been taken in CMT to ensure that a User's credentials are handled properly.
When transferring User SDIs the following exceptions are made:
| • | The Password column is never transferred. |
| • | A Default password is set based on the target system's default password configuration. |
| • | Upon Import the User may be disabled (determined by the "Global - Disable User on Import" property in the CMT Policy). |
| • | The User is forced to undergo the change Password process (the password is set to a default password on Import). |
| • | A User's Roles are not automatically synchronized between target and source systems. |
Note that the following tables are not transferred:
| Tables |
| Sysuserfavorite |
| Sysuserbucket |
| Sysuserfolder |
| Sysuserfolderitem |
| Webpageuseroverride |
The following User columns are not transferred:
| Columns |
| Lastsetuser |
| Lastdivide |
| Totalattempts |
| Lastjobtype |
| Failedattempts |
| Casesensitivepasswordflag |
| Cooloffenddt |
The following User Profile properties are included in the SDI Snapshot:
| • | Default Startup properties, if the values are safe (if not linked to a history URL). |
| • | Default Logon URL (if pointing to a Page). |
| • | All BO Overrides (except the BO password). |
| • | Notification Format. |
Versioned SDIs |
The following table describes what happens when exporting a versioned SDI (Provisional or Current) to the target system when the SDI version on the target is either Provisional or Current.
The "Target Import Versioned SDI Option" in the CMT Policy determines how versioned SDIs are handled during Import. Two cases are presented depending on the Version Handling Rule.
| From the Source System... | If on the Target System... | And the Target Import Versioned SDI Option is:
"Always Create new Version" |
And the Target Import Versioned SDI Option is:
"Update the Same Version on Target Only if Provisional" |
||||||||||
| Export Version n which is Provisional |
|
Import as Provisional version max+1 |
|
||||||||||
| Export Version n which is Current |
|
Import version n as Current Version max+1 and prior Current becomes Active as there can only be one Current Version. |
|
Matching/Generating UUIDs |
|
|
When supported, a UUID (universally unique identifier) column is added for an SDC. The UUID value is automatically generated and populated for an SDI on creation. This is done by the Audit trigger. The Audit Method must not be set to none for the SDC.
Whether or not UUID is supported for an SDC is determined by the "Support UUID" definition option for the SDC. This option is enabled automatically for Auto-keyed and versioned SDCs OOB. Therefore, all SDCs should have auditing enabled.
When transferring SDIs, this UUID is used first to match SDIs on the target system with SDIs from the source system when the Transfer Option is "Override Existing". If no match is found the imported SDIs keep the same UUID. This is useful when the same autokeyed SDI or versioned SDI is repeatedly transferred from the source system to the target system.
If the Transfer Option is "Always Create a New Version" or "Regenerate Auto Key", the source SDI UUID is ignored. New SDIs are created on the target system to avoid having the same UUID for different SDIs if the same SDI is imported multiple times.