Single Data Entry (SDE) |
|
|
Overview |
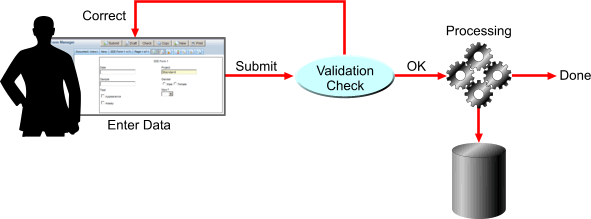
Single Data Entry (SDE) can follow scenarios that are much simpler than Double Data Entry (DDE). There are several possible scenarios. However, in general, SDE defines this sequence of events:
| 1. | A User enters data into a Document's Form Fields, then Submits the Document. |
| 2. | Any validation processes defined for the Form let the User correct these entries. |
| 3. | When resubmitted, the Document is processed according to the Form's Processing Rules. |
There is also an optional Approval process (for one or more "Approval" Users):
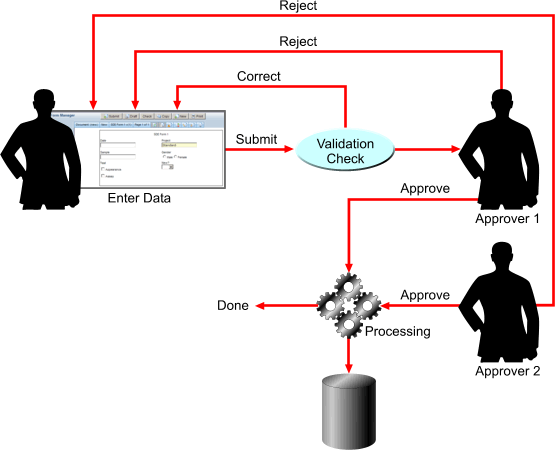
There is also an optional document management function (for a "Document Manager" user), and an optional followup process (for a "Followup" user).
The examples are provided for the purpose of demonstrating some data entry examples. They assume you are familiar with Form Definitions and the eForm Manager and the Document Life Cycle and Approval information (see Document Approval and Rejection in the eForms Document Reference).
Setup for Single Data Entry Example |
| Users |
| User | Description |
| SD | User who performs Single Data Entry (Role = LabDataEntry) |
| DR | Document Reconciler (Role = QA) |
| DA | Document Approver (Role = SupervisorApproval) |
| DM | Document Manager (Role=DataManager) |
| Form |
| Form | Setup | |||||||||||||||
| SDE Form 1 | Options enabled:
Either eForm page properties must define Approval User = DA, or the User query must be disabled. |
Single Data Entry Example |
This example of Single Data Entry shows data entry, Approval, and a Document Manager function.
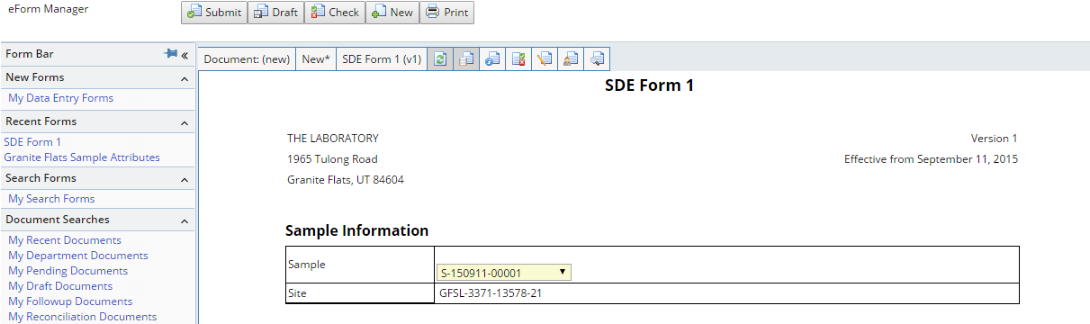
| Data Entry |
|
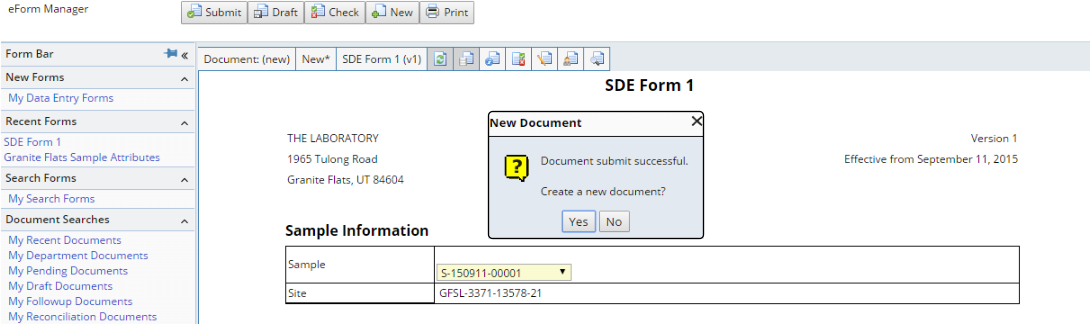
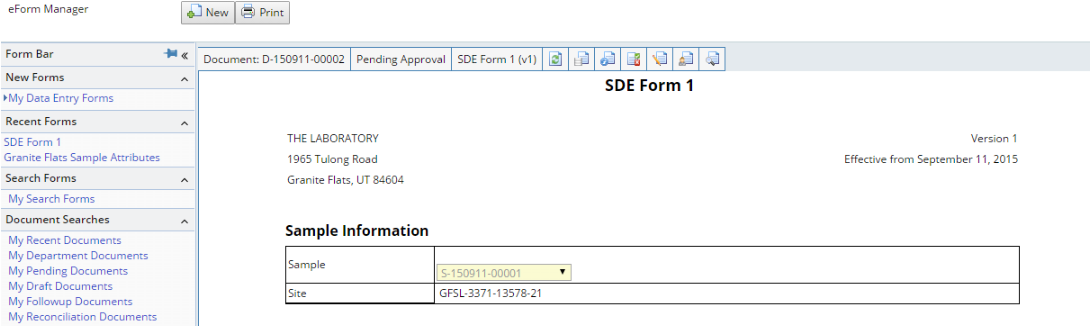
User SD enters valid data, then clicks "Submit".
A message indicates success and asks if User SD wants to create a new Document. User SD chooses "No", and the Submitted Document is rendered as readonly with only New and Print operations. Document Status changes to Pending Approval.
|
| NOTE: | Identity Fields are mandatory Fields and have a blue background. |
| NOTE: |
If two Documents each have an Identity
Field with the same Field identifier, and you enter the same value
for them, clicking "Submit" opens a dialog that tells you
not to do that, e.g.,
Buttons are provided to let you "Open" or "View" the Document, or simply to "Cancel" the Submit. |

| Approval |
See Conditions for Document Approval in the eForms Document Reference.
|
User DA logs on, opens the eForm Manager, uses the "My Approval Documents" query find User SD's data entry Document containing SDE Form 1, then opens the Document. Note that as an Approver, DA can edit data. Approve and Reject buttons are added. |

|
From here, the Approver can Approve or Reject in accordance with the Conditions for Document Approval (see Document Approval and Rejection in the eForms Document Reference). Status transitions occur as described in the eForms Document Reference. |
Double Data Entry (DDE) |
|
|
Overview |
Double Data Entry (DDE) is more complex than Single Data Entry (SDE). There are many possible scenarios. However, in general, DDE defines this sequence of events:
| 1. | User1 enters data into Form Fields. |
| 2. | User2 reenters data into the same Form Fields as User1. |
| 3. | For Fields marked as "Reconcilable" (using the Form Builder's "Reconcile" property), a reconciliation process determines if there are any discrepancies between the data entered by each user. The Form Definition determines if User2 can reconcile data discrepancies, or another User (the Document Reconciler) must do this. |

There is also an optional Approval process (for one or more "Approval" Users):
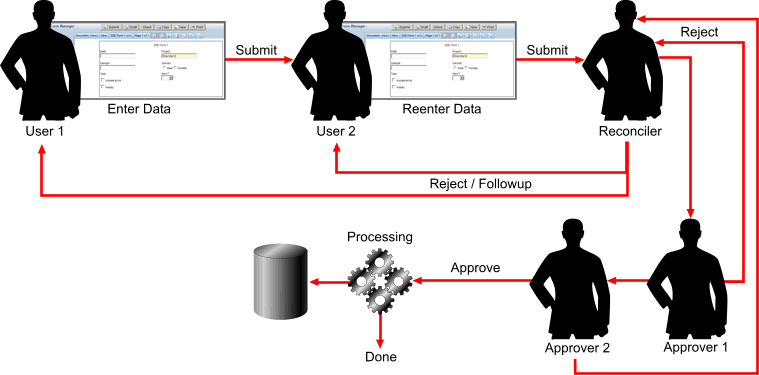
There is also an optional document management function (for a "Document Manager" user), and an optional followup process (for a "Followup" user).
The examples are provided for the purpose of demonstrating some data entry examples. They assume you are familiar with Form Definitions and the eForm Manager and the Document Life Cycle and Approval (see Document Approval and Rejection in the eForms Document Reference).
NOTE: If using an IE8 browser, you can have only one user logged on at any one time. It shares the cookie across browser instances. So you have to logout and login as a different user to simulate these examples (rather than just open another window and logon).
Setup for Double Data Entry Examples |
| Users |
| User | Description |
| User1 | User who performs the first data entry in the DDE process (Role = LabDataEntry). |
| User2 | User who performs the second data entry in the DDE process (Role = LabDataEntry). |
| DR | Document Reconciler (Role = QA). |
| DA | Document Approver (Role = SupervisorApproval). |
| Forms |
| Example | Form | Setup | ||||||||||||||
| 1 | DDE Form 1 | Options enabled:
Either the eForm page properties must define Approval User = DA, or the User query must be disabled. |
||||||||||||||
| 2 | DDE Form 2 | Copy of DDE Form 1 with this additional option enabled:
|
||||||||||||||
| 3 | DDE Form 3 | Copy of DDE Form 1 with these additional options enabled:
|
Double Data Entry: Example 1 |
This example uses DDE Form 1. This Form is not setup to notify User2 of discrepancies. User2 therefore has no idea what User1 entered, and does not know if User1's data conflicts with his.
| Data Entry |
|
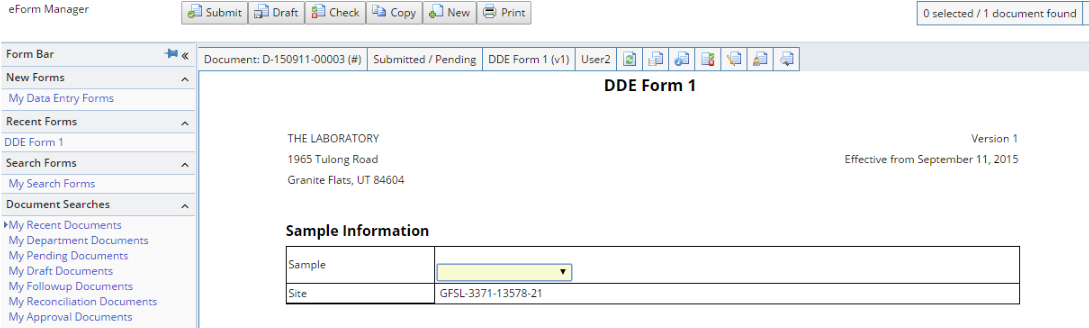
User1 logs on, opens the eForm Manager, then creates a new Document using DDE Form 1. |
|
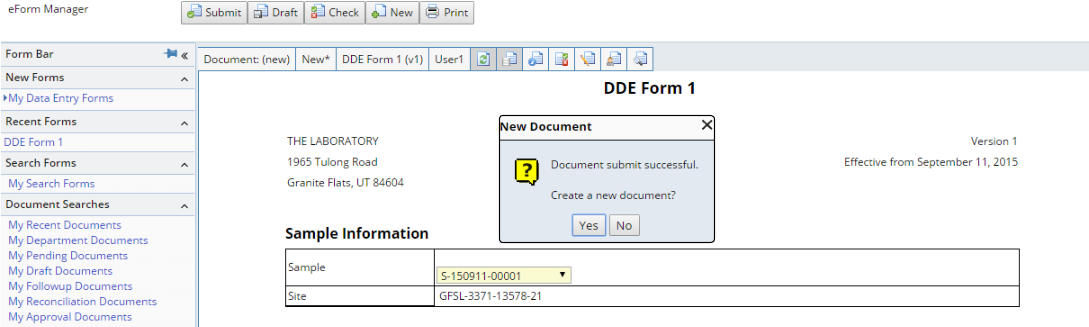
User1 enters valid data, then clicks "Submit".
A message indicates success and asks if User1 wants to create a new Document. User1 chooses "No", and the Submitted Document is rendered as readonly with only New and Print operations.
|


|
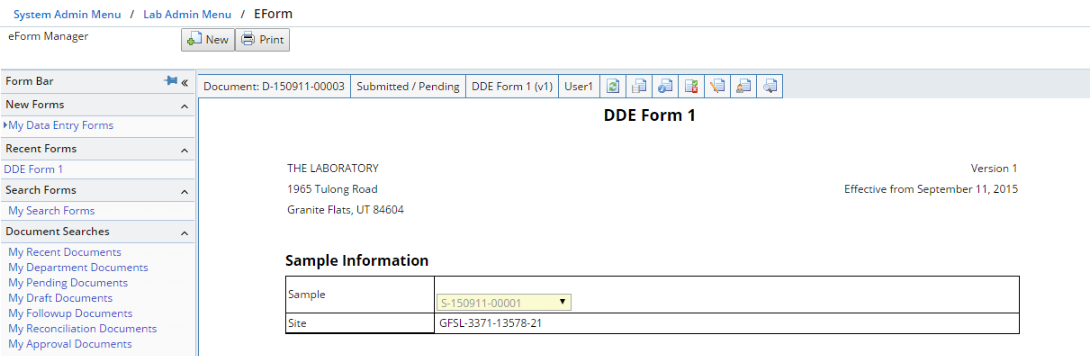
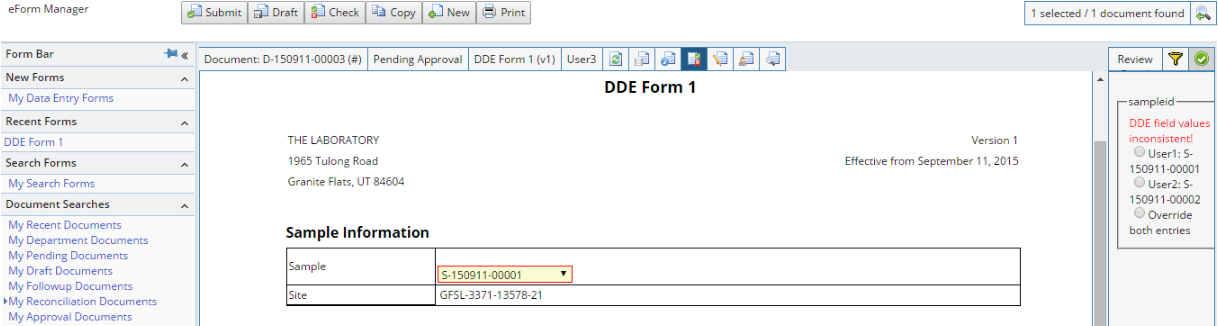
User2 logs on, opens the eForm Manager, and finds User1's DDE data entry Document containing DDE Form 1. After selecting the Document, a dialog asks if he wants to perform Second Data Entry. |
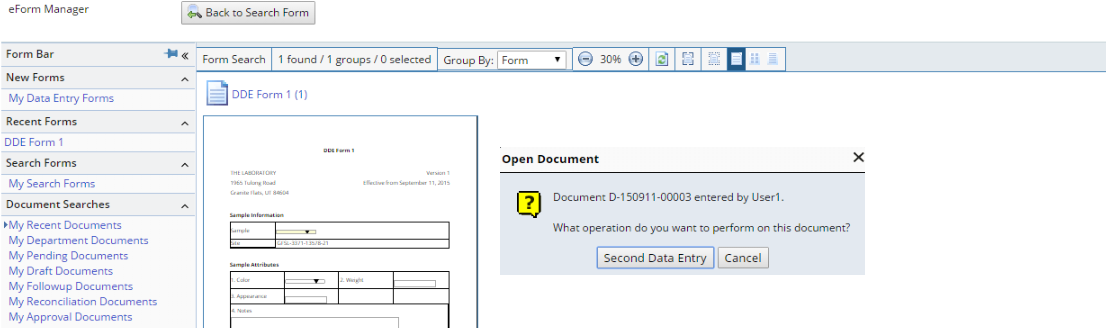
|
Choosing Second Data Entry loads the Document as it did for User1. The Document Panel shows the status as Submitted/Pending, i.e., User1 Submitted it, and it's Pending for User2. The # symbol is appended to the Document Id, indicating that a Submit was previously done on this Document. |
|
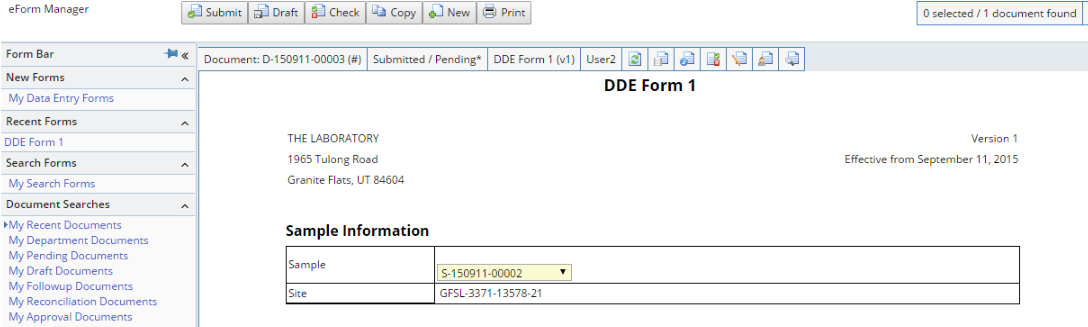
User2 enters a data value that conflicts with User1 (inducing a discrepancy), then clicks "Submit". Note that some values may always cause discrepancies, such as a Date Field. |
|
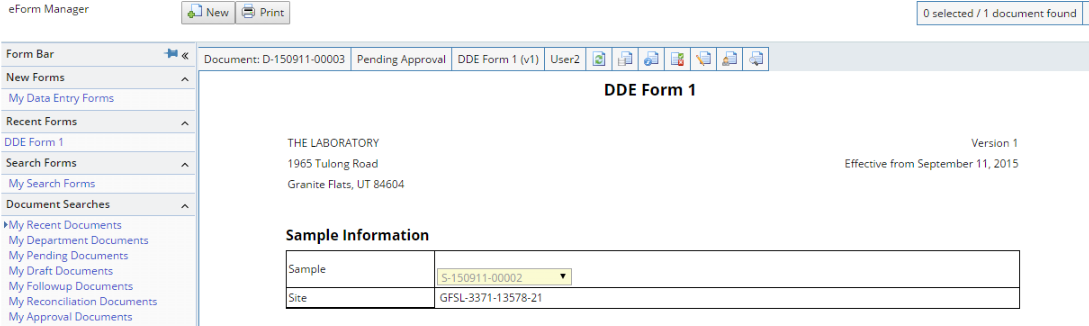
As was the case with User1, "Submit" validates the fields, and a message indicates success and asks if User1 wants to create a new Document. User2 chooses "No", and the Submitted Document is rendered as readonly with only New and Print operations. Because DDE Form 1 was configured to not provide discrepancy alerts to User2, User2 has no idea if he matches User1's data.
|
| Reconciliation |
Reconciliation of discrepancies can be performed by:
| • | Document Reconciler. |
| • | Document Approvers. |
| • | User2... but only if the Form Definition option is set to allow this. This is shown in Double Data Entry Example 3. |
| • | Document Manager. |
|
User DR logs on, opens the eForm Manager, uses the "My Reconciliation Documents" Query to find the Document, then opens it. |
|
The Document opens in reconciliation mode. the discrepancies outlined in red, and described in the Review Panel at the right. For each discrepancy, the Review Panel provides these choices:
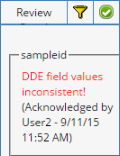
User DR can also Acknowledge the discrepancy (in which case, presumably the Approver deals with it). Note that Annotations and Followups can be made to the Fields and Document. After reconciliation, User DR clicks Submit. The Review Panel shows that the value was reconciled by DR. Note that Document Status is now "Pending Approval". |

| Approval |
The Approval process is the same as Single Data Entry.
Double Data Entry: Example 2 |
This example uses DDE Form 2. This Form is setup to notify User2 of discrepancies, but does not let User2 reconcile them. User2 therefore knows that discrepancies exist, but does not know what User1 entered.
|
User1 repeats steps 2 and 3 from DDE Example 1 (logs on and opens the eForm Manager), but then he creates a new Document using DDE Form 2. |
|
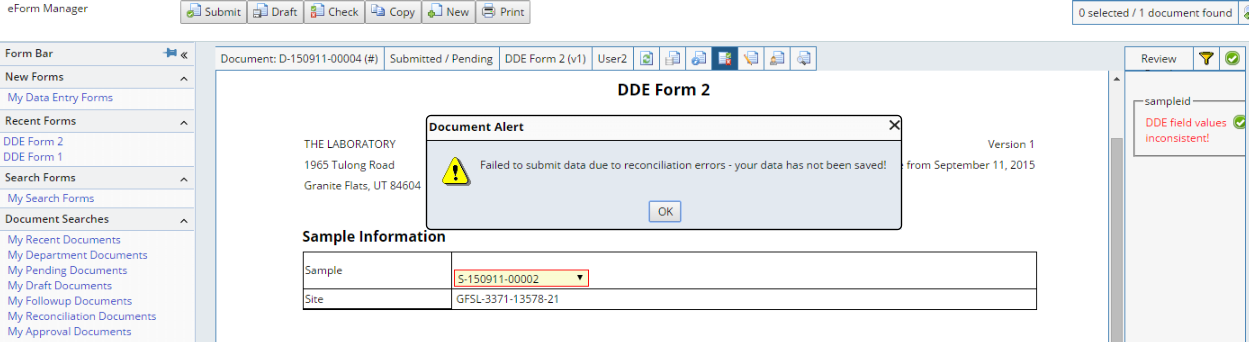
User2 repeats steps 3 through 5 from DDE Example 1 (enters conflicting data), but using DDE Form 2. |
|
A message is displayed to User2 indicating that it could not be Submitted because there are reconciliation errors. User2 is now getting feedback. This is in contrast to Example 1, where he was given no indication of reconciliation errors. User2 clicks OK. The Review Panel shows that discrepancies exist... but does not reveal User1's data. User2 cannot Submit data if discrepancies exist. He can "Acknowledge" (accept) existence of the discrepancies by clicking the green checkmark on the Review Panel tab. He is asked if he wants to override the discrepancies. User2 clicks Yes, and the Review Panel records the Acknowledgement. As in step 6 of DDE Example1, User2 clicks Submit, answers "No" to creating a New Document, and the Document transitions to "Pending Approval". |

The Approval process is the same as Single Data Entry.
Double Data Entry: Example3 |
This example uses DDE Form 3. This Form is setup to notify User2 of discrepancies and let User2 reconcile them. User2 therefore knows that discrepancies exist, and he also knows what User1 entered.
|
User1 repeats steps 2 and 3 from DDE Example 1 (logs on and opens the eForm Manager), but then he creates a new Document using DDE Form 3. |
|
User2 repeats steps 3 through 5 from DDE Example 1 (enters conflicting data), but using DDE Form 3. |
|
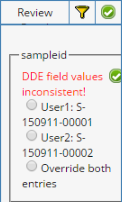
As in Example 2, a message is displayed to User2 indicating that it could not be Submitted because there are reconciliation errors. User2 clicks OK. The difference is that User2 is not only notified of discrepancies, he can also see User1's entered data in the Review Panel... as well as Reconcile the discrepancies. Here, User2 can choose either value, or choose "Override both entries" and enter a different value. Then, clicks the green arrow to Reconcile. Regardless of the choice, User2 is returned to the eForm Manager in Search mode with a status of Pending Approval (as in step 6 of Double Double Data Entry Example 1). |

The Approval process is the same as Single Data Entry.