Content |
||||||||||||||||||||||||||||||||||||
|
Overview |
|
|
This is conceptual information regarding Workflow Tasks.
Task Variables |
|
|
In a Task, Variables bind Steps together. Variables make it possible to:
| • | Pass lists of SDIs to and from Queues. |
| • | Pass information between Steps. For example, a NewKeyId1 output from an ActionBlockStep can be passed into the KeyId1 input of a MaintPageStep. |
In addition to the typical Task Variable that is used exclusively within a Task, there are two kinds of specialized Task Variables:
| • | "Setup Variables" pass information into a Task. |
| • | "Exposed Variables" (visible in the Workflow Definition) can shared their values with other Tasks. |
Tasks support these types of Variables:
| Type of Variable | Used for storing: |
| String | Single values (including dates and numbers). |
| SDIList | Lists of SDIs (such as those coming in from a Queue) |
| Form | Multiple values grouped into a single form. |
SDIList and Form Variables contain sub-variables (such as sdilist.keyid1, sdilist.keyid2, etc.).
Task Variables are used in two ways when configuring Steps:
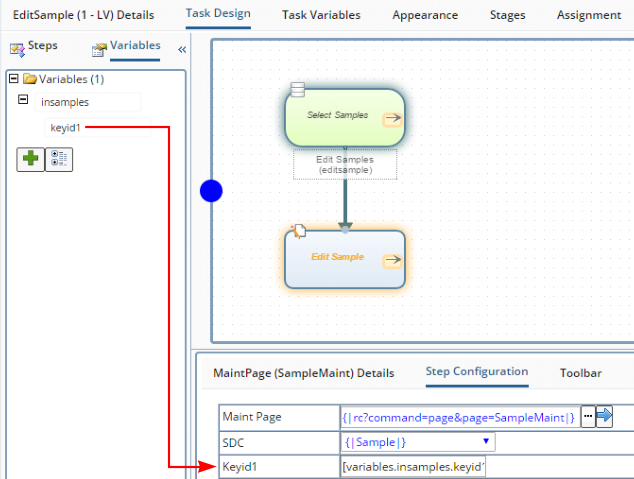
| • | Task Variables can be passed in as a substitute for a Step property. On the left (below), the variable [variables.insamples.keyid1] is pushed into the KeyId1 configuration property. |
| • | Task Variables can be passed out of the Step for use in downstream processing. On the right (below), the variable insample is pushed out to hold the Samples selected on a List page. |
|
|

You can create new Variables as needed by clicking the green "Add" button (above). The Variable Detail will appear after you add a Variable as described in Workflow Task Definition Maintenance Page.
|
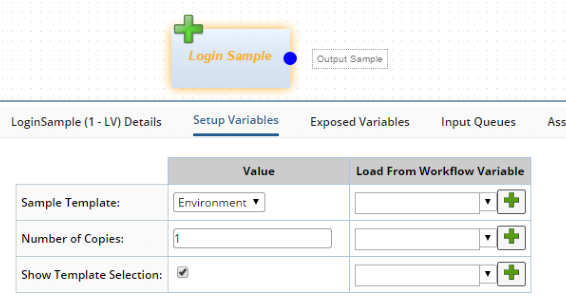
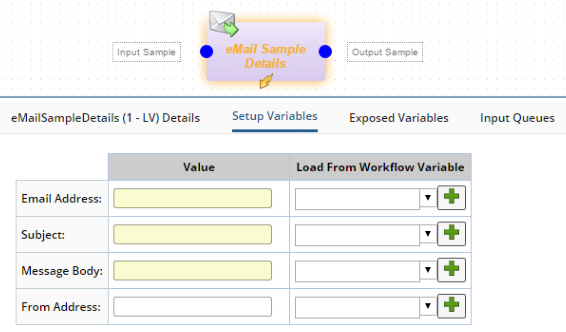
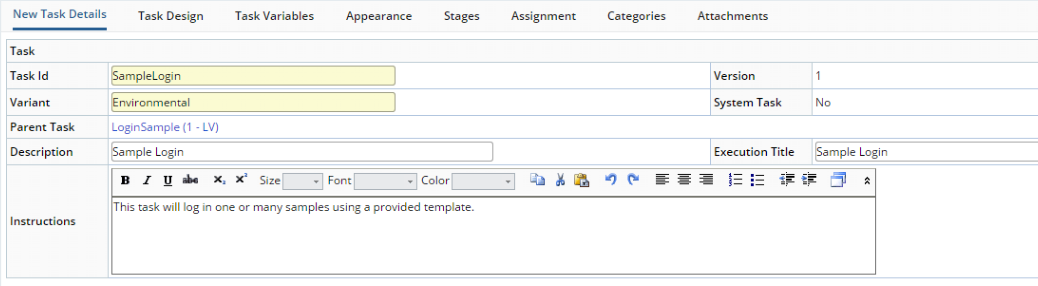
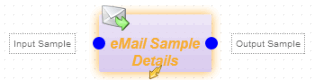
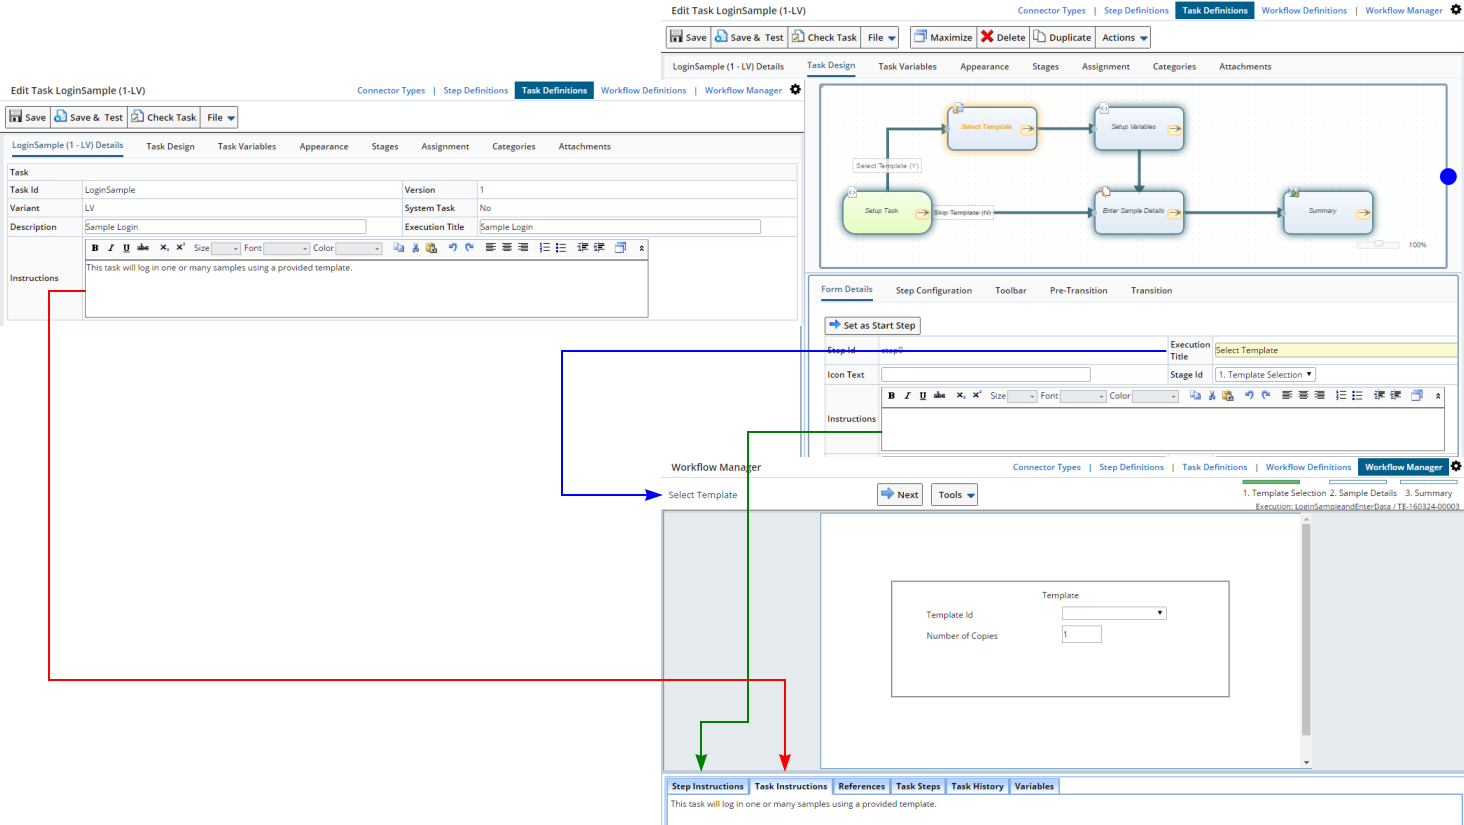
Note the reference to "Setup Variables" above. When building Tasks, you can expose a number of "Setup Variables" that can modify or control the Task's behavior. For example, "Login Sample" (below left) has the Setup Variables shown below. These let you specify the Sample Template to use, number of Samples, and whether or not to show the actual Sample template selection process (which can be de-selected to hide the first Step completely). As another example, "eMail Sample Details" (below right) lets you specify the address, subject and body of the email.
|
|
Descendant Tasks |
|
|
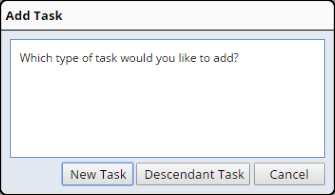
When you create a Task, you are asked if you want to create a "New Task" or "Descendant Task":
|
"Descendant Tasks" inherit all of their behavior from the parent, but can be specialized by adding values to Setup Variables. This allows you to create specialized copies of more generic Tasks. Property inheritance is used to process Descendant Tasks. The property list of a Descendant Task contains properties of both the parent and Descendant Task, thus allowing overrides. When saved, only the Descendant's properties are saved. On load, the properties of the parent and Descendant are merged together. This means that going forward we can enable other properties to be modifiable by turning off the view on only the field.
As an example, the "Login Sample" Task shown in the previous section has three Setup Variables:
| • | "Sample Template" specifies the type of Sample to create. |
| • | "Number of Copies" indicates the mumber of Samples to create. |
| • | "Show Template Selection" determines is the User is offered a choice of Templates. |
Suppose you want to create a Task that will create "Environmental" Samples, under these conditions:
| • | You do not want to prompt the User to choose a Template or number of copies. |
| • | You want the Workflow Designer to choose the number of copies, but not change the Template. |
| • | You want the Task to be a descendant of the Login Sample Task. |
In this case, you could create a Descendant Task of Login Sample. Do this by adding a "Descendant Task" as shown in Workflow Task Definition List Page → Toolbar Operations. Note that the "Parent Task" is shown. You will also find that most of the details under "Task Design" are read-only, since they are inherited from the "Parent Task".
|
Note how we setup this Descendant Task:
| • | We kept the same Task Id but chose a different VariantId. |
| • | We changed the titles, Description, and Instructions to reflect the behavior of the new Task. |
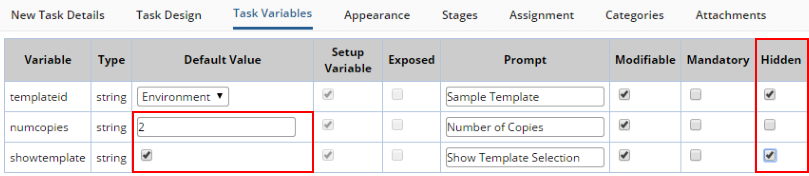
In the "Task Variables" tab, we then:
|
| • | Set the "templateid" and "showtemplate" Setup Variables to "Hidden". The Setup Variables will no longer be visible to the Workflow Designer. |
| • | Uncheck the "showtemplate" checkbox. This will hide the first prompt Step from the User. |
| • | Change the default number of copies to 2 (Environmental Samples usually come in pairs). |
Now that you have a new task, you can also change its appearance on the "Appearance" tab to make it unique.
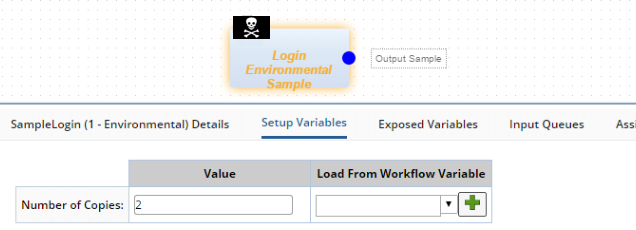
When the Descendant Task is added to the Workflow, only the "Number of Copies" Setup Variable is visible:
 |
You can also add buttons to Descendant Tasks. When you add buttons, the parent Task's buttons are shown with greyed text and a white background. You can also change the position (sequence) of the buttons using the left and right arrows.
With regard to the parent Task's buttons, you can change only the visibility (using the "Show" option) and the Role-Level Access (using the "Roles" option). See Button Security for more information.
 |
Note that in the Descendant Task, you can still edit the Description, Execution title, Instructions, Summary Statement, Icon Text, Task Variable Default Value/Setup Variable/Exposure, and Appearance.
Testing a Task |
| |
Although you can test a Task by placing it into a Workflow, a more efficient way to do a quick rough check is to test your Task directly in the Task Designer by clicking "Save and Test".
|
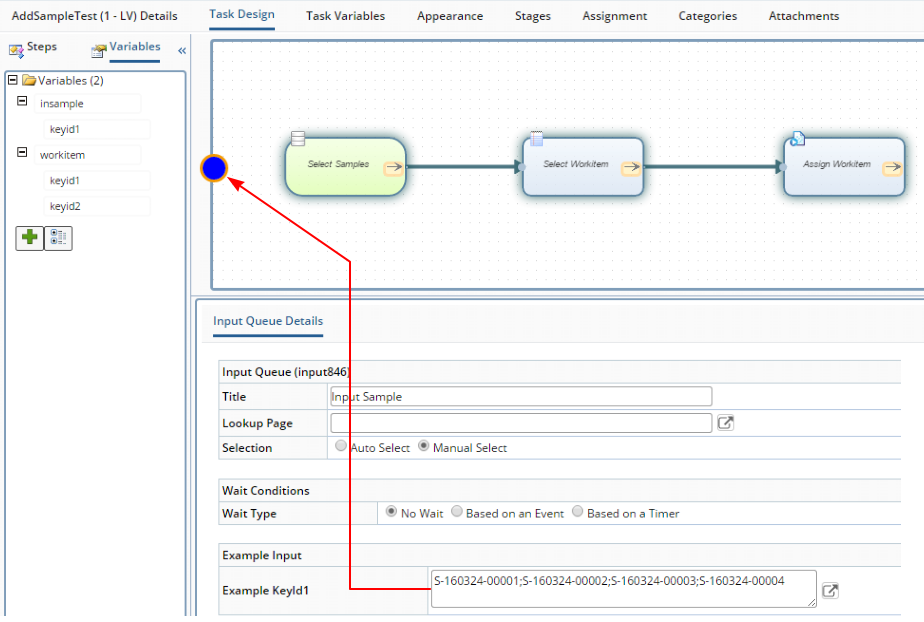
If your Task has Input Queues, you can use this method of testing by building a "dummy queue". Select (click) the Input Queue. In the "Input Queue Details", click the lookup icon for "Example KeyId1" and choose the SDIs to populate the Queue for the test (you can also enter a semicolon-separated list of SDIs into the field) . Click "Save and Test". The Task will run using those Samples as dummy Input Queue SDIs.
 |
When testing a Task in this manner, you get this additional functionality in the Toolbar:
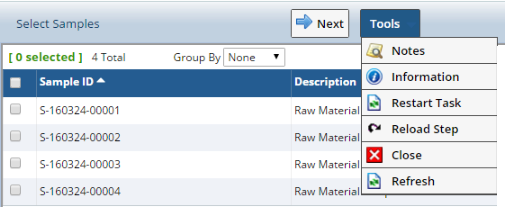 |
| Toolbar Button | Description |
| Restart Task | Restarts the Task from the beginning. |
| Reload Step | Reloads the current Step, which is useful to see configuration changes you made without having to restart the Task. |
| Close | Closes the test window. |
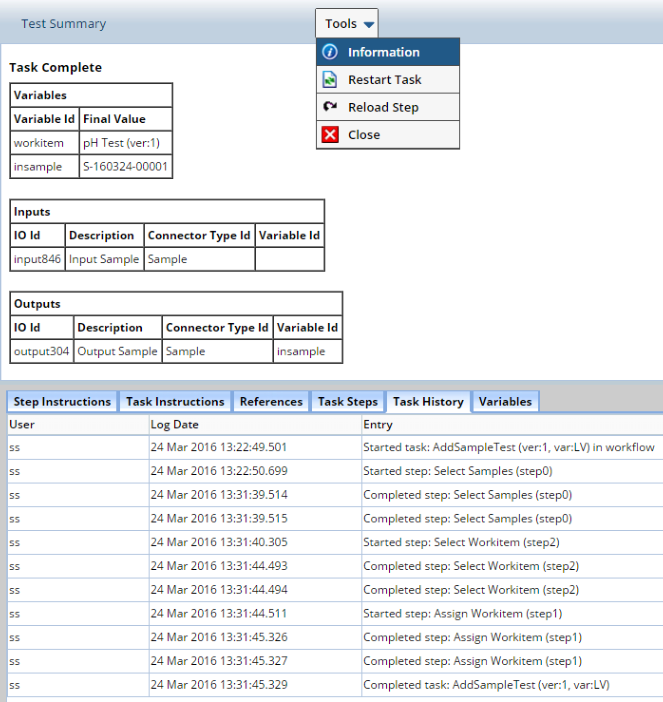
When the task completes, you are shown a "Test Summary" page that contains information about the final state of the Task, including the contents of the Variables. You can use this information to help diagnose problems. Note that the Test Summary information is available at any time by clicking "Information".
 |
Configuring Stages |
| |
Complex Tasks may require a progress bar to help Users understand where they are in the Task. You can do this by defining two or more "Stages" in your Tasks and assigning them to Steps. For particularly large Tasks, you can assign multiple Steps to a Stage to limit the number of Stages displayed. Use the "Stages" tab to create the stages. Drag-and-drop to change the order of the Stages in the list.
 |
Assign each Step to a Stage in the Step detail panel:
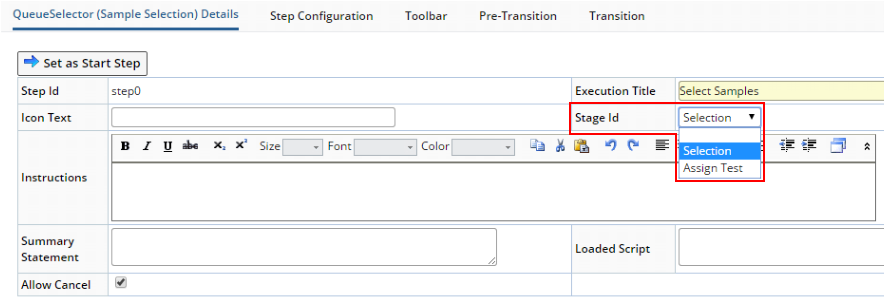 |
When the Task runs, green indicates the current Stage and brown indicates the completed Stages (as shown in the sequence below):
Auto-Execute Tasks |
| |
Auto-Execute Tasks require no manual intervention to start or execute. They are identified with a "lightening bolt" symbol:
 |
Note these points regarding Auto-Execute Tasks:
| • | Because they are automated, you must map the Queue onto a Variable in the Queue definition (rather than relying on a QueueSelectorStep). The Queue definition also defines whether the Task executes once for each SDI, or once for all SDIs. |
| • | Execution begins immediately when SDIs arrive in the Queue, or when they become available if they are in a "Wait State". |
| • | Auto-Execute Tasks are processed asynchronously (through the ToDoList) so there may be a delay before the Workflow Queue counters update. |
| • | Only ActionBlockStep and GroovyStep (or their derivatives) can be placed onto an Auto-Execute Task. |
Working with the Task Toolbar |
| |
Operations and Tools |
When running a Workflow, the Step Toolbar provides "Operations" and "Tools" buttons to help you control Task execution:
Common Operation buttons include:
| • | Navigation between Steps ("Next" and "Back"). |
| • | Completing a Task ("Complete"). |
| • | Page buttons (such as "Save'). |
| • | Custom Buttons (you can add custom buttons to replicate any functionality applicable to a Task, such as to Print Labels ot Jump to a Step). |
When wrapping OOB Web Page Designer pages (such as List, Maintenace, or Data Entry), the page is rendered without its toolbar.
Tool buttons provide access to standard tools during Task execution. Common Tool Buttons buttons include:
| • | "Notes" shows and hides the Notes panel (when supported by the Step Type). |
| • | "Information" opens a group on Information tabs that include access to Instructions, Reference Attachments and debugging information. |
| • | "Cancel" can be disabled from the Task primary tab. |
| • | "Pause" allows a Task to be paused during execution, then resumed later. |
| • | Test Buttons (such as "Restart Task" and "Reload Step") are used when building and testing a new Task. |
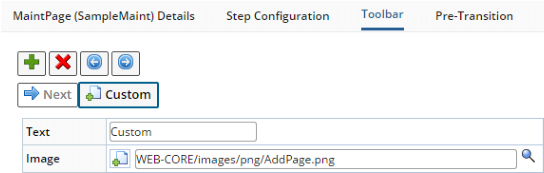
Adding Operation Buttons |
Most Steps come with a "Next" button by default. Click the "+" button to add a new button. The popup shows a list of preconfigured button templates. Choose "Custom" to build your own button.
When adding custom buttons, use the "Callbefore Action" JavaScript validate before running the button Action and:
| • | Return "true" to run the button Action. |
| • | Return "false" to abort the button click. |
In the example below, this JavaScript in "Callback Action" lets the user go to the "Next" Step only if he has provided a Description:
if ( sapphire.task.step.form.getFieldValue( 'description' ).length > 0 ) { return true; } else { sapphire.ui.dialog.show( 'Sample Details', 'Description not defined' ); return false; } |
The JavaScript method for the button itself goes in the "Action" field.
Here are some common JavaScript methods for button Actions:
| • | sapphire.task.setVariable( variableid, value ) |
| • | sapphire.task.getVariable( variable ) |
| • | sapphire.task.next() |
| • | sapphire.task.back() |
| • | sapphire.task.complete() |
| • | sapphire.task.gotoStep( stepid, noUnload )
stepId (String) is the identifier of the step to be executed next. noUnload (Boolean) is optional. If true, unload is not executed. If false (default), unload is nominally executed. |
| • | sapphire.task.processAction( actionid, actionprops, callback, operation, esigmessage, esigreasonrequired, esigreasontype, esigreasonreftypeid ) |
If the button script triggers an asynchronous event (such as through an Ajax call or a page round-trip), you can add JavaScript "Callback Action" in order to execute after the asynchronous event:
alert( 'saved') |
In the example above, an "alert" dialog is shown after the Maintenance Step completes its Save operation.
"Callback Operation" is an internal switch to indicate which event triggers the "Callback Action".
Although all Steps by default come with a "Next" button, you are free to add your own "Custom" buttons. Also, Common Step Definition Properties contain "Button Templates", which are preconfigured buttons defined as part of the Step definition. These Button Templates can be added to your Steps and are available from the "Add Button" dialog.
Processing Actions From a Button |
The sapphire.task.processAction method provides a simple way to process an Action from a Step Toolbar button:
sapphire.task.processAction( actionid, actionprops, callback, operation, esigmessage, esigreasonrequired, esigreasontype, esigreasonreftypeid )
Where:
| Property | Type | Description |
| actionid | String | Action to process (such as "AddSDI"). |
| actionprops | JSON Object | Object that defines the Action properties. Example:
{"sdcid": "Sample", "sampledesc": "a new sample", "sampletypeid": "Environment"} |
| callback | String | JavaScript method to call after Action processing has completed (such as sapphire.task.next). |
| operation | String | Audit operation saved along with the Action (such as "Edit"). This is applicable only if the Action supports operation auditing. |
| esigmessage | String | Prompt message of the ESig popup (such as "You are about to change the description of the selected Samples"). |
| esigreasonrequired | Boolean | Determines if a Reason is required for the Esig (defaults to true). |
| esigreasontype | String | Type of Reason required. "F" is Free Text (default), "S" is Standard. |
| esigreasonreftypeid | String | RefTypeId that populates the dropdown for Standard Reasons (such as "UpdateReasons"). |
Note that the ESig popup will be presented only if "operation" and "esigmessage" have a value.
For example, a button can be added to a QueueSelectorStep to update the description of selected items:
The "Callbefore Action" checks that at least one item is selected. The "Action" calls sapphire.task.processAction, with EditSDI as the ActionId, followed by the input properties for EditSDI. Note that the Action input properties can also be set using other API calls, such as sapphire.task.step.queueselector.getSelectedItems()). Variable substitutions (such as [variables.standarddesc]) can also be used.
The callback property references another JavaScript method. Note that this callback method does not (and cannot) have the parameters defined. To call multiple methods as the callback, it can be defined as an anonymous function. For example:
new function() {
sapphire.alert( 'Samples updated' );
sapphire.task.refresh();
}
The sapphire.task.refresh() method refreshes the current Step display. The following Steps respond to this call:
| • | JSPStep | • | MaintPageStep | • | WebPageStep | ||
| • | ListPageStep | • | QueueSelectorStep |
Button Security |
The Toolbar's "Show" checkbox lets you show or hide the selected button. The "Roles" option lets you associate buttons with Roles. If a User is not a member of a Role specified here, that User will not see the button. Roles specified here are copied-down to the "Button Templates" defined in the Step Definition node, and vice-versa (see Common Step Definition Properties). For a given button, the Roles defined in the Toolbar are therefore synchronized with the Roles defined in the Step Definition node.
Branching |
When a Step has only a single next Step, the "Next" function is unambiguous. However, if Steps must branch or loop, you can control the order of Steps using one of two methods:
| • | Use the sapphire.task.gotoStep( stepid, noUnload) command. |
| • | Use a "Transition Expression" and/or a "Pre-Transition Expression". |
"Transition Expressions" comprise a Groovy Expression that returns a value, plus case values to determine which branch to take. After entering your Groovy expression, the "Target Step" presents a dropdown containing linked Steps. Choosing a Target Step inserts the branch as shown below. Note that this mechanism also allows for existing Transitions to be changed using the dropdown to select a new target.
| |
Here are some example branching expressions:
| Type of Branching Expression | Example | Case on... |
| Boolean | return variables.samplelist.keyid1.length() > 0 | true or false |
| String | return variables.choosetests | Y or N |
| Complex | return variables.samplestatus = "Initial" || variables.samplestatus="In Progress" | true or false |
| return variables.samplestatus | All Sample statuses (one per branch) |
You can also use "Pre-Transition" to define a Pre-Transition Expression. This will be evaluated before Step execution begins. If an expression return value matches a defined transition case, the Step will effectively be "skipped". If returns are not matched, the Step executes nominally.
The Pre-Transition Groovy expression is evaluated during Task execution before the Step is displayed. If the expression returns a value, it is matched against the "Transition" case values to determine the destination Step of the transition, then execution transitions to that Step. If no value is returned or there is no match on the Transition cases, the current Step is shown. The dropdown mechanism for inserting the branch is the same as that used for a Transition Expression above.
| |
Note that you can also define Pre-Transition and Transition Expressions with cases at the Step level using the "Transitions" property for the Step (see Workflow Task Step Definitions → Common Step Definition Properties). The "Target Step" is a dropdown that lists the Execution titles of other Steps in the Task. Choosing a Step from the dropdown The for the step id (the step it is linked to). If you then set a step for the case it dynamically draws the link/transition. This also means that existing transitions can be changed in this way using the drop down.
Re-entering Steps |
There are two fundamental reasons to re-enter a Step in a Task:
| • | The User clicked the "Back" button. |
| • | The Task includes a loop. |
Entering a Step a second time requires special handling. Consider the Task below, which prompts for some SDI details, creates the SDI using an Action, then shows a summary:
| |
It would be inappropriate to add a "Back" button onto the final "Summary" Step, since this would result in running the Action a second time (probably not desirable). In this case, add a custom "Back" button to actually perform a "sapphire.task.gotoStep( 'task0' ), which will loop back to the beginning. Here is a variant of that same Task, with the AddSDIStep replaced by a MaintPageStep in "Add" mode:
| |
Once again, it is undesirable to have a "Back" button on the Summary Step in this case because the MaintPage will still be in "Add" mode. You need a way to change the mode of the page to "Edit" when returning using the "Back" operation. Certain Steps have special configuration options for handling this sort of re-entrant behavior.
| | The MaintPageStep has the "On Back" and "On Repeat" options to change the page mode depending on whether entering a second time using the "Back" operation or "Next" (loop) operation. |
| | The ActionBlockStep has similar options to control how it should behave when entering a second time. |
In general, you should not add a "Back" button to any Step following an ActionBlockStep. Consider this example as a guideline on button use. What are the valid buttons to have on each Step of the simple Task below?
| |
| Step | Valid Button | Reasoning |
| 1: Prompt for input variable. | Next | Nowhere else to go. |
| Complete | A"Complete" button could be included to skip the entire Step. | |
| 2: Show variable values and confirm before calling AddSDI. | Next | Proceeds to the next Step. |
| Back | Give the User a chance to change something. | |
| 3: Call the AddSDI Action. | N/A | This is a non-visual Task, so it automatically calls "Next". |
| 4: Show Summary. | Complete | Complete and closes the Task. It is important not to add a "Back" button here. |
Task Execution State |
Task execution state is preserved on each state transition. The only exception is when executing Standalone Tasks, in which case state cannot be preserved because there is no identifier for the Task execution. In the event of a catastrophic failure (suach as a power outage or network connectivity problem), Task execution automatically switches to a "recovery mode", which allows the Task to be resumed in a similar fashion to a paused task. Internally, the Task Manager automatically save the "state" of the current Task execution at the start of each Step. The "state" includes the Current Step, Step history, Task Variables, Task log, and the Cancellable flag.
Task executions also save the current User's ConnectionId in the Task execution while the Task is Active. If the Task is Completed, Paused or Cancelled, the ConnectionId is removed. Task executions will transition to an "Incomplete" status under the following circumstances:
| • | The User's ConnectionId recorded in an Active task execution is cleared by the system. This typically occurs if the User's session expires (such as due to a session timeout or system failure). | |
| • | The User attempts to navigate away (or refresh the browser) before
the Task has completed, in which case a warning to this effect is displayed:
|
Groovy Script Classes |
| |
The LabVantage Java Public API provides the context class sapphire.ext.BaseTaskScript, which can be extended to implement business logic called from Steps that support Groovy script, as well as expressions in a Task Definition. This context class provides these context variables and methods:
| Method | Description |
| getActionProcessor()
getQueryProcessor() getSDCProcessor() getSDIProcessor() getWorkflowProcessor() | LabVantage Java Public API accessor classes. |
| getDatabase() | Provides read-only access to the database using the DBRead Interface. |
| getM18N() | Provides access to the M18NUtil class. |
| getLogger() | Provides logging. |
| getTaskContext() | Provides access to the Task execution context. |
| getVariable( variableid ) | Gets a Task execution variable value. |
| setVariable( variableid, value ) | Sets a Task execution variable value. |
| getStepProperty() | Provides access to the properties of the current Step. |
| setOutput() | Puts values into the output map. |
For example, the Transitions class below extends BaseTaskScript and implements a getQueueSelect() method that uses the above context methods to check the size of the Task Queue and return a case option that is used in a Pre-Transition Expression.
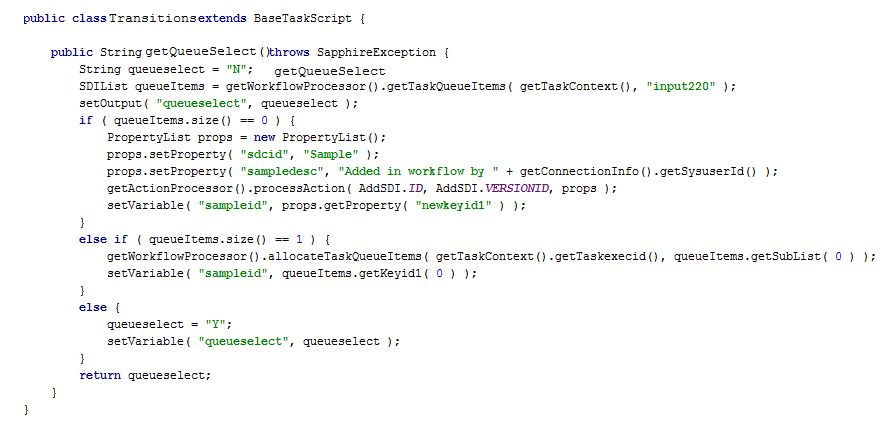 |
 |
The class is instantiated in the Groovy script using getScriptClass( class ) or getScriptClass( classname ). Any method defined on the class can then be called as in the example above.
Displaying Information |
| |
As shown below, you can specify information to be displayed while executing Tasks, when testing a Task in the Task Definition Maintenance page, and when executing the Task in the Workflow Manager page.
 |
Summary Statements |
| |
Each Task Definition (and each Step of a Task) provides a "Summary Statements" field that can be configured to create a statement of what happened during the Execution. For ease of reporting, the Task Summary Statement is written into the "SummaryStatement" column of the TaskExec table. You can use this to create a meaningful summary of what happened to a specific Sample, or as part of a Workflow Execution (experiment) report. Summary Statements support the same substitutions as the HTML Step. For example:
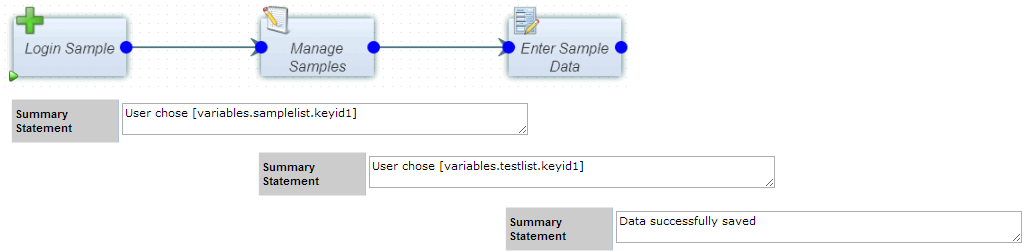 |
Substitution includes Groovy expressions, e.g.,
User $G{user.sysuserid} added tests $G{variables.testlist.toText()} to samples $G{variables.samplelist.toText()}
Variable drag-and-drop is not available for the Task Summary Statement.
Standalone Tasks |
| |
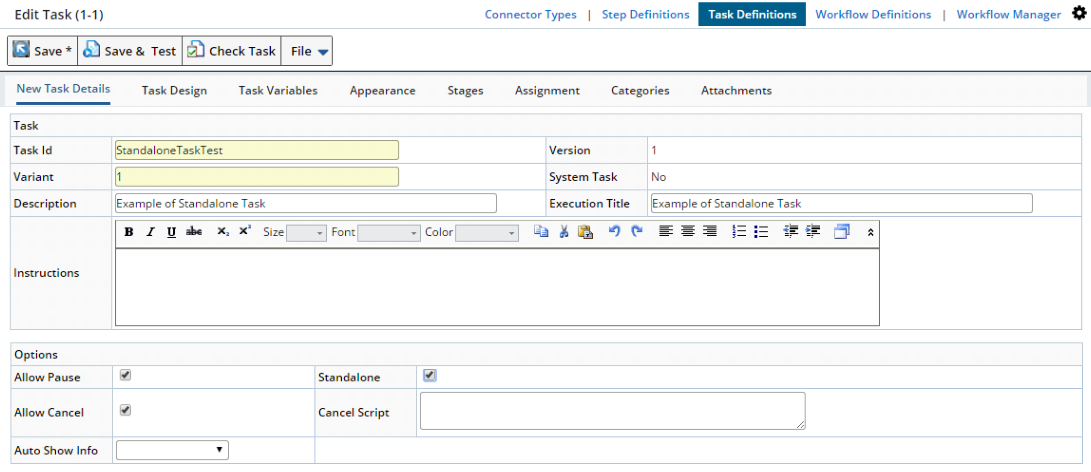
"Standalone" Tasks can be executed outside of a Workflow, such as from an advancedtoolbar Element button on an SDI List page. Here is an example of how to create one.
When creating the Task, select the "Standalone" option:
 |
In "Task Design", add an Input Queue. In the "Input Queue" details:
| • | Set "Connector" to "Sample". |
| • | Set "Selection" to "Auto Select". |
| • | Load the queued SDIs into a Variable by adding an SDIList variable (which we call "samplelist" in this example) as shown below in "Load to Variable". |
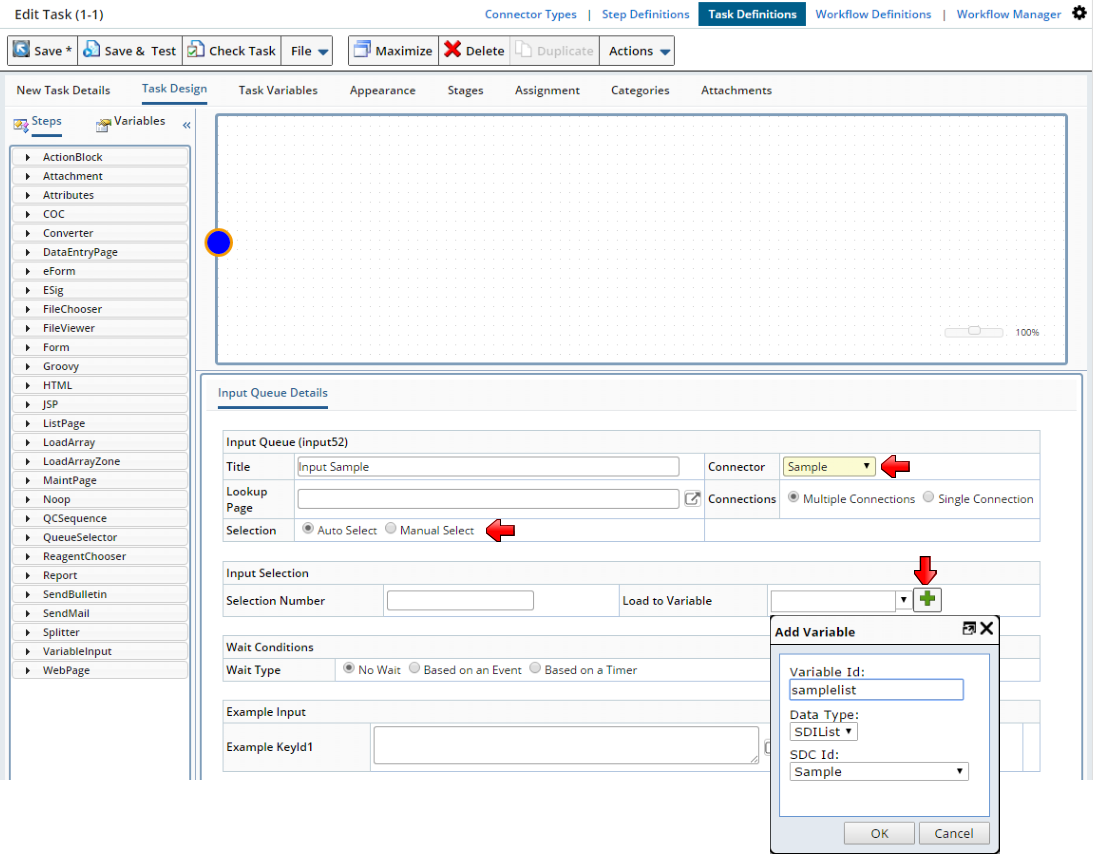 |
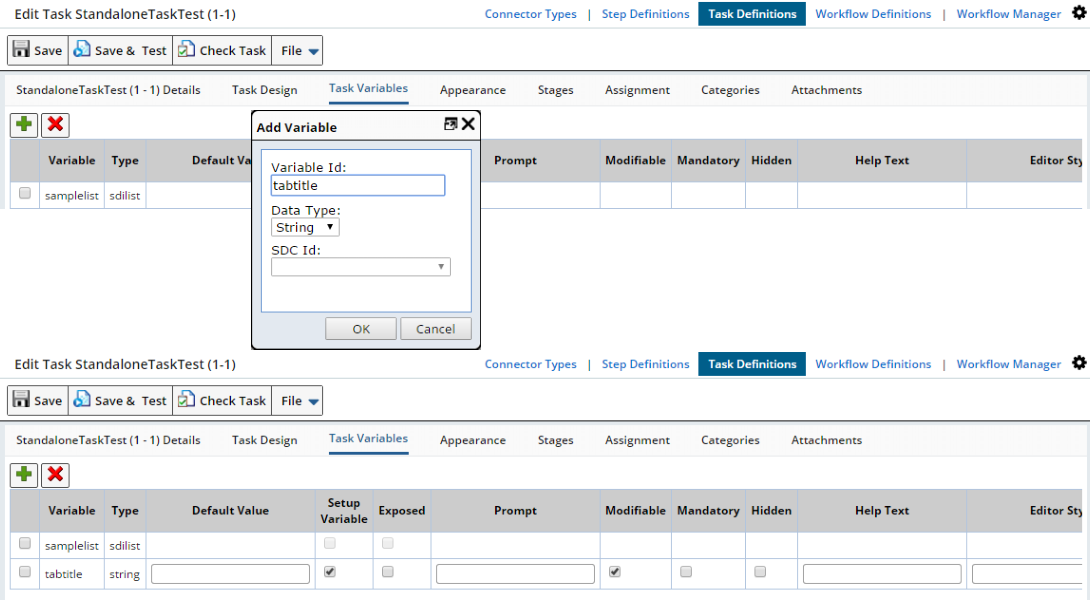
In "Task Variables", add a String Variable (which we call "tabtitle" in this example), then make it a "Setup Variable":
 |
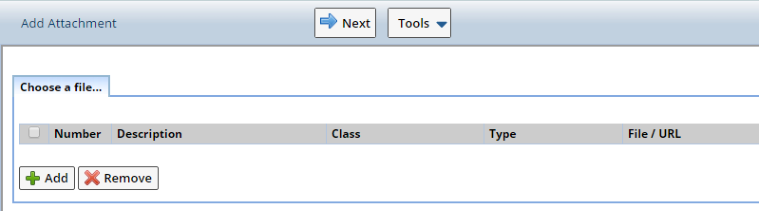
In "Task Design", add an "Attachment" Step. For the "Execution title", enter "Add Attachment". In the "Step Configuration":
| • | Set "SDI Id" to Sample. |
| • | Set "KeyId1" to [variables.samplelist.keyid1]. |
| • | Set "Tab title" to [variables.tabtitle]. |
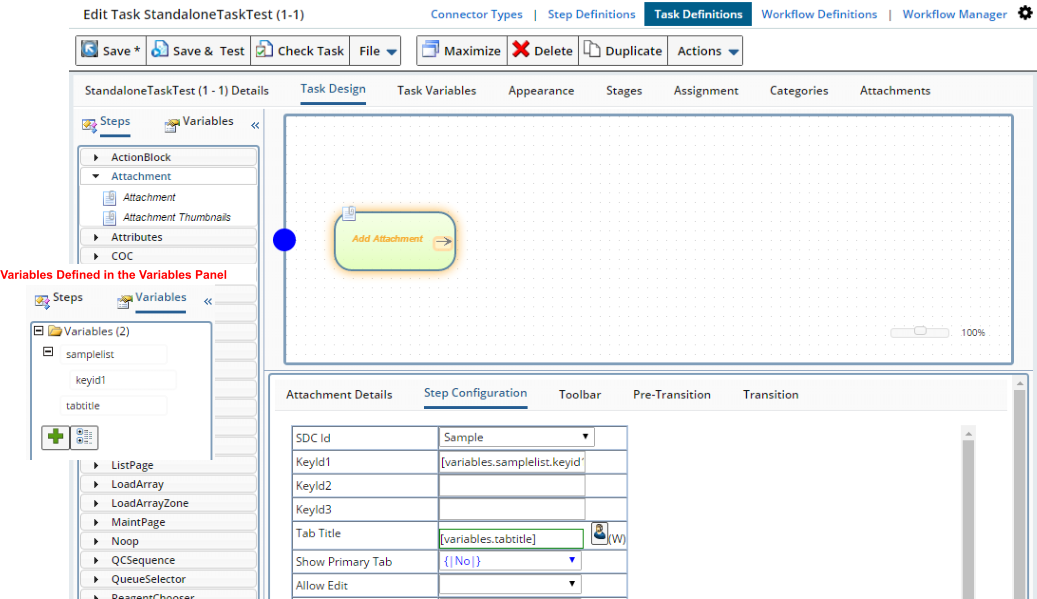 |
Open the advancedtoolbar Element for the Sample List page (LIMS → Samples → Manage).
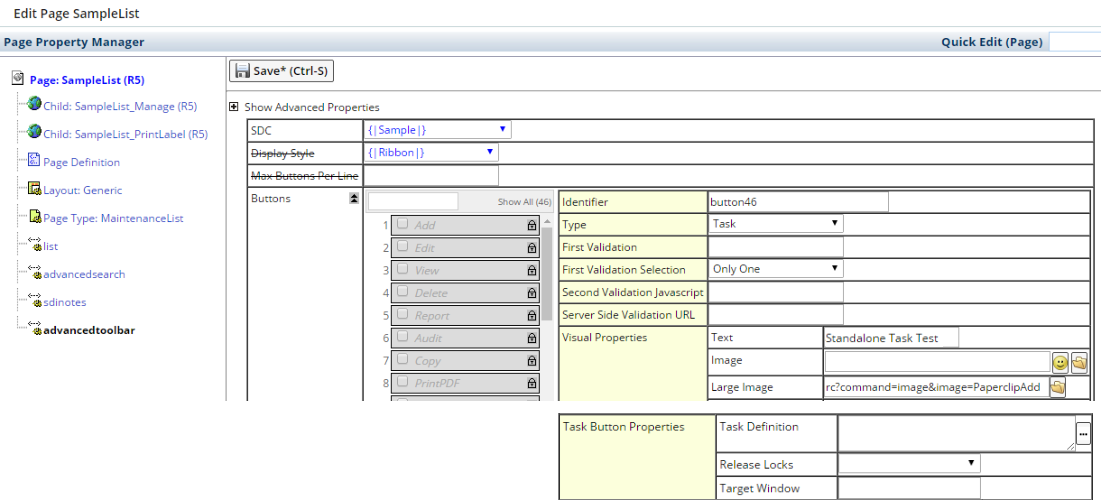 |
In the advancedtoolbar Element for the Sample List page:
| • | Create a button of Type "Task" with "First Validation Selection" set to "Only One". Provide button "Text" and "Large Image" as shown above. | |
| • | Add Text and Image for the button. | |
| • | Set "Tab title" to [variables.tabtitle]. | |
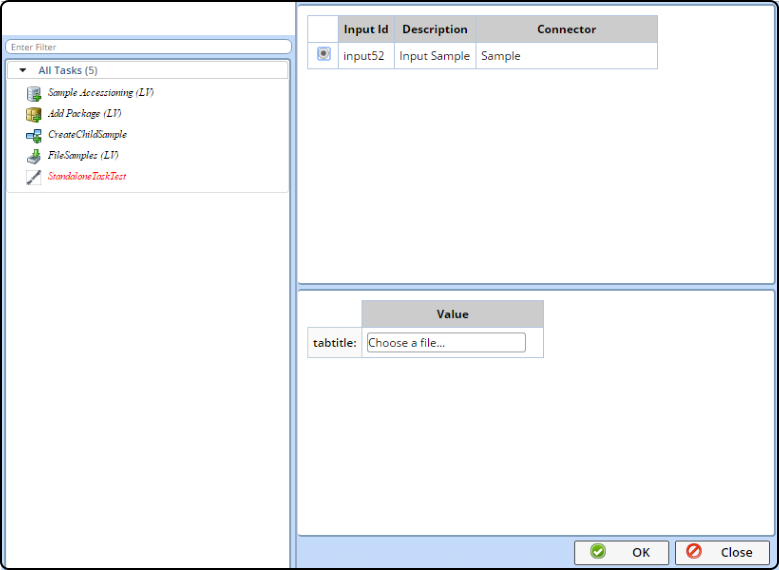
| • | In Task Button Properties → Task Definition, click the ellipsis.
In the popup window, select the StandaloneTaskTest. Select the Input Queue
and enter a title for the string held in the "tabtitle" variable.
Save all changes.
|
Go back to the Sample List page. The button to launch the Standalone Task should be in the toolbar ("Add Attachment" below):
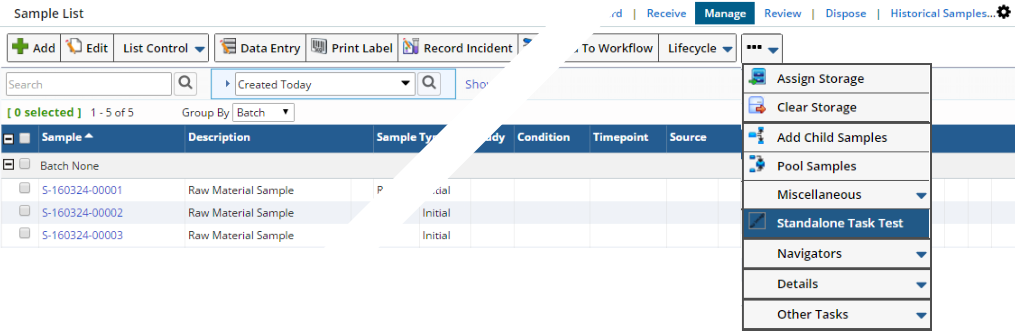 |
Clicking the button launches the Standalone Task as shown below:
 |