Launched from Task Definition
List page, the Task Definition Maintenance Page lets you configure and
maintain Workflow Task Definitions.
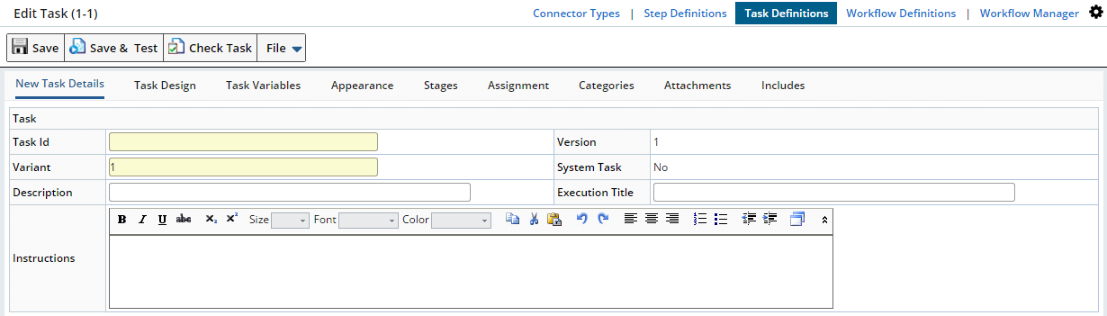
"New Task Details" defines identification and execution information
for the Task Definition.
|
| Field/Option |
Description
|
| Task Id |
Identifier of the Task SDI. |
| Version |
Version number of the Task SDI. |
| Variant |
Variant of the Task SDI. |
| System Task
|
Indicates whether this is a "System
Task" or "User Task":
| • | "Yes" indicates a "System Task" (flagged
in the TaskDef.CoreFlag table as "C"). "System Tasks"
cannot be edited and are maintained by LabVantage. They are therefore
upgraded during the LabVantage upgrade process. | | • | "No" indicates a "User Task" (flagged in the
TaskDef.CoreFlag table as "U" or "(null)").
"User Tasks" can be edited and are not maintained by LabVantage.
As such, changes made are not upgraded during the LabVantage upgrade
process. In general, these are installed as example data. Accordingly,
during LabVantage installation, you must choose to install example
data in order to use them. |
|
| Description |
Text description that is displayed on the
Task Definition List page. |
| Execution title |
Text that is displayed in the page header
when the Task executes (see Displaying
Information). |
| Instructions |
Rich-text instructions for the Task that
are displayed in the Information detail when the Task executes (see Displaying
Information). |
These buttons are available for use with the Task Detail:
| Button |
Description
|
| Save |
Saves changes made to the Task Definition. |
| Save & Test |
Saves changes made to the Task Definition
and provides a mechanism to test the Task (see Testing
a Task). |
| Check Task |
Performs a general validation check on the
Task by ensuring that the Task has a valid set of start/run conditions
and all mandatory fields have been populated. |
| File |
|
| Add Another |
If there are no unsaved changes to this Task
Definition , this opens a new Task Definition Maintenance page in which
you can define a new Task Definition. |
| Return |
If there are no unsaved changes to this Task
Definition , this returns you to the Task Definition List page. |
| Field/Option |
Description
|
| Auto Execute |
Sets the Task to be an Auto-Execute
Task and hides the Options detail. |
The "Options" detail is visible only when "Auto Execute"
is not selected in the Execution Detail.

|
| Field/Option |
Description
|
| Allow Pause |
Lets you Pause the Task during execution. |
| Standalone |
Sets the Task to be a Standalone
Task and shows the "Standalone" detail. |
| Cancel Options |
Determines if the Task can be Cancelled
and, if so, what to do with the items in a Task execution when the Task
is Cancelled from the "Tools"
menu button. When a Task execution is Cancelled at runtime, the "Cancel
Option" is used to determine what to to with the "allocated
items". "Allocated items" are items (such as Samples) that
have been added to the TaskExecItem table through the QueueSelectorStep
or through a custom allocation process using AllocateTaskQueueItems
Action.
This defines Cancellation behavior at the Task level. Choosing any
option other than "Cancel Not Available" also lets you Cancel
Task execution at the Step level using the "Allow Cancel"
option in the Step Details. | Option | Description | | Cancel Not Available | Prevents the Task from being Cancelled
while the Task is being executed. This disables the "Allow
Cancel" checkbox in the Step Details
and a "Cancel" button is not displayed in the "Tools"
menu. | | Cancel will return the allocated items
to the current task queue | Reverts the allocated status on the
Task Queue items back to "available". These items can
then be reselected in a subsequent Task execution. This is the default
option. | | Cancel will remove the allocated items
from the current task queue | Removes the allocated items from the
current Task's Input Queue. These items will not be available for
subsequent Task executions. | | Cancel will remove the allocated items
from all queues of the current workflow execution | Removes the allocated items from all
Input Queues of all Tasks of the current Workflow Execution. These
items will not be available for subsequent Task executions. | | Cancel will remove the allocated items
from all queues of the current workflow | Removes the allocated items from all
Input Queues of all Tasks of all Workflow Executions of the current
Workflow. These items will not be available for subsequent Task
executions. | | Cancel will remove the allocated items
from all queues of all workflows | Removes the allocated items from all
Input Queues of all Tasks of all Workflows. These items will not
be available for subsequent Task executions. |
|
| Cancel Script |
This lets you use a Groovy expression to
specify what happens when the Task is Cancelled. |
| Auto Show Info |
When you run a Task, the "Information"
button shows an information detail at the bottom of the screen (see Displaying Information).
If "Auto Show Info" is selected, this information detail is
shown automatically when the Task starts. You have these options to determine
what is displayed:
| Option | Description | | Step Instructions | Instructions that are specified as
part of the Step Definition. | | Diagram | Task diagram. | | Task Instructions | Instructions that are specified as
part of the Task Definition. | | Task History | History of Task execution. |
|
The "Standalone" options apply only to Standalone
Tasks and are visible only when "Standalone" is selected in
the "Options" detail.
| Field/Option |
Description
|
| Complete Action |
When the Standalone Task is Complete, the
advancedtoolbar Element
returns to the current page by default. If you want to change this, use
these options:
| Option | Description | | gotopage | Returns to the page specified by "Complete
Page" (below). | | restart | Restarts the Task. |
|
| Complete Page |
Return page if "Complete Action"
(above) is "gotopage". |
| Cancel Action |
If the Standalone Task is Cancelled, the
advancedtoolbar Element
returns to the current page by default. If you want to change this, use
these options:
| Option | Description | | gotopage | Returns to the page specified by "Cancel
Page" (below). | | restart | Restarts the Task. |
|
| Cancel Page |
Return page if "Cancel Action"
(above) is "gotopage". |
| Confirm Cancel |
Checking this issues a confirmation dialog
before Cancelling the Task. |
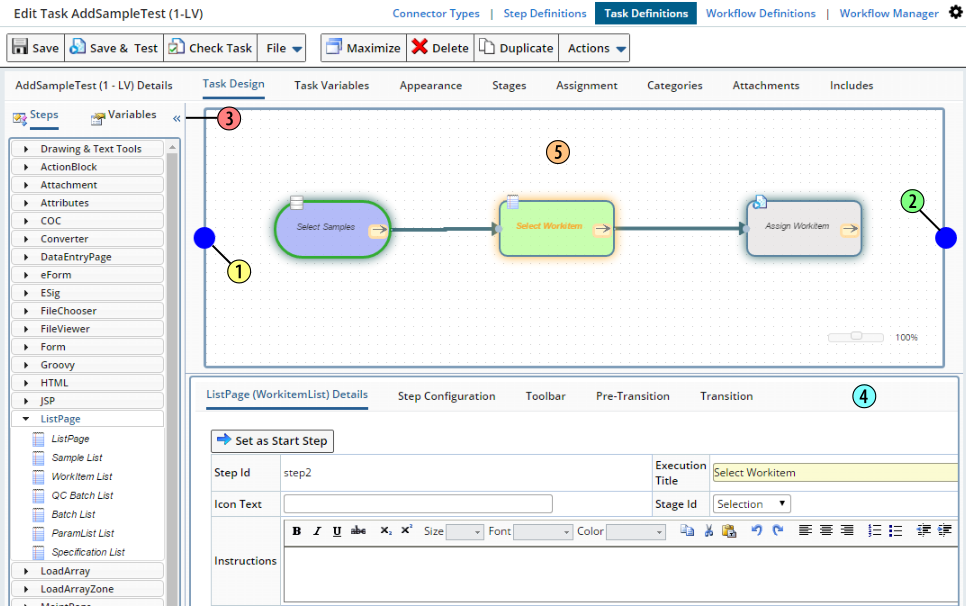
"Task Design" is where you actually build and configure a Task
Definition using Steps, Queues, and Variables.
These additional buttons are available when using the Task Design detail:
| Button |
Description
|
| Maximize/Restore |
"Maximize" enlarges the page to
fill the frame by hiding the Sidebar and Layout header. "Restore"
reduces the page to include the Sidebar and Layout header. |
| Delete |
Deletes the selected Step after issuing
a confirmation. |
| Duplicate |
Creates a copy of the selected Step and inserts
the copy into the Task Design Area. |
| Actions |
|
| Add Input |
Adds an Input Queue
to the Task. |
| Add Output |
Adds an Output Queue
to the Task. |
| Add Variable |
Add a Task
Variable to the Task. |
The "Steps" panel (below left) provides Steps that you can drag-and-drop
into the Task Design Area as shown in Introduction
to Workflows, as well as a set of "Drawing and Text Tools" that
lets you insert design and prototyping graphics into your Task. The "Variables"
panel (below right) provides Variables that you can drag-and-drop into the
Step Detail panel, and sort the presentation order using the up and down arrows
(this sort order is also reflected in the Task
Variables Detail). However, when the Variables Panel is sorted alphbetically,
the sort buttons are not displayed. For more information about Variable mechanics,
begin with Workflow
Task Conceptual Reference → Task Variables and Task
Variables.
|
|
|
|
Task Design: Step Details
|
|
|
|
|
|
"Step Details" provides operations that affect the Steps selected
in the Task Design Area. These override the settings in the Steps themselves.
"Step Details" identifies the selected Step by name in the tab
label.
| Button |
Description
|
| Set as Start Step |
Makes the selected Step the "Start
Step" for the Task. This is the first Step that will be executed
in the Task.
When a Step is set to be the "Start Step", the Step graphic
is displayed as a rounded rectangle (at 75% primary curvature ratio)
surrounded by a heavy green border, and the button is disabled. Note that the color of a Step can be changed using the "Background
Color" property of the Step (see Workflow
Task Step Definitions → Common Step Definition Properties). |
| Field/Operation
|
Description
|
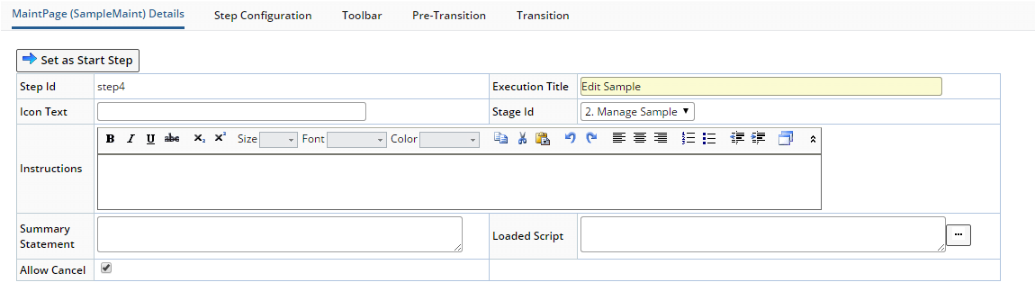
| Step Id |
Shows the identifier of the Step. |
| Execution title |
Text that is displayed in the page header
when testing a Task (see Displaying
Information). |
| Icon Text |
Text in the tooltip for the Step icon. |
| Stage Id |
If you have defined Stages
for this Task, this is the Stage that will be associated with this
Step (also see Configuring
Stages for an example). |
| Instructions |
Rich-text instructions for the Step that
are displayed in the Information bar when the Step executes (see Displaying
Information). |
| Summary Statement |
Summary
Statement for the Step. |
| Loaded Script |
JavaScript to execute when the Step is loaded.
For example, the script below sets a Form field variable that can be retrieved
within the Task:
sapphire.task.step.form.setFieldValue( 'templateid',
sapphire.task.getVariable('templateid')); |
| Allow Cancel |
Whereas the "Cancel Options" in
the Options Detail defines Cancellation behavior
at the Task level, "Allow Cancel" extends the "Cancel Options"
to define Cancellation behavior at the Step level. For example, checking
this on a Step can provide an early termination mechansim, or unchecking
this on a Step can prevent a Task execution from being Cancelled any time
after that Step has been executed. This checkbox is disabled if the "Cancel
Option" (ate the Task level) is "Cancel Not Available",
in which case this field displays "Not Cancellable Set At Task Level".
If a Task is Cancellable, a "Cancel" button is added to the
"Tools"
menu. This Cancel button is shown on each Step until the Task Manager
encounters a Step with the "Allow Cancel" option unchecked.
The Cancel button will then disappear for all subsequent Steps in the
Task execution. If the Task is terminated early by closing the browser, a warning message
is issued. If the Task is Cancellable, Task execution will be Cancelled.
If the Task is not Cancellable, the Task is placed in "Recovery
Mode" (see Workflow
Task Conceptual Reference → Controlling Transitions → Task
Execution State). |
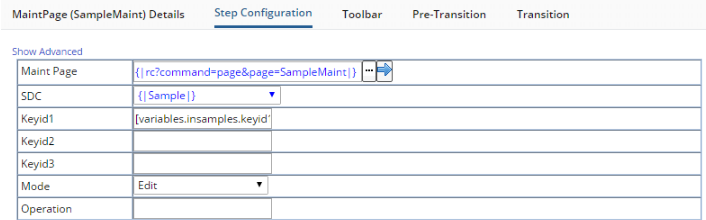
"Step Configuration" shows the properties of the Step Definition.
These override the properties in the Steps themselves.
"Toolbar" configures the buttons that are placed into the "Operations"
button collection when executing the Task. See Workflow
Task Conceptual Reference → Working with the Task Toolbar.
This lets you define a Transition Expression that will be evaluated before
Step execution begins. See Workflow
Task Conceptual Reference → Working with the Task Toolbar → Branching.
This lets you use a Transition Expression to control the order of Steps that
branch or loop. See Workflow
Task Conceptual Reference → Working with the Task Toolbar → Branching.
Input Queues are where SDIs enter a Task. A Task can have more than one Input
Queue, but each Input Queue can be an input for only a single SDC.

|
| Field/Option |
Description
|
| title |
Arbitrary name you want to use to identify
the Queue. |
| Connector |
Connector
Type to use for the Queue. |
| Lookup Page |
Page that is used by the "Example Input"
detail to lookup SDIs. |
| Connections |
Determines the number of Tasks that can
be connected to this Input Queue when building a Workflow Definition:
| Option | Description | | Multiple Connections | Lets you connect Output Queues from
multiple Tasks to this Input Queue. In other words, more than one
Task can feed this input. | | Single Connection | Lets you connect the Output Queue from
one (and only one) Task to the Input Queue of this Task. In other
words, only one Task can feed this input. |
|
| Selection |
Determines how SDIs are selected when the
Task starts:
| Option | Description | | Auto Select | The Task will automatically select
SDIs when it starts, and is typically used for "Auto Execute"
Tasks that have no UI component. This shows the "Input Selection"
options where you set the automatic selection details. | | Manual Select | The User will manually select SDIs
when the Task starts. An example is a Task that uses the QueueSelectorStep,
which requires the User to select SDIs from an SDI List page. This
hides the "Input Selection" options. |
|
"Input Selection" details are visible only when "Auto Select"
is selected in the "Input Queue" detail.
| Field/Option |
Description
|
| Selection Number |
Number of SDIs that will automatically be
selected when the Task starts. |
| Load to Variable |
Task
Variable into which the SDIs will be passed. |

|
| Field/Option |
Description
|
| Wait Type |
Determines if execution of the Task depends
on a set of Event conditions (see Event
Plans):
| Option | Description | | No Wait | Execution of the Task is independent
of any Event. | | Based on an Event | The Task will not execute until a set
of Event conditions is satisfied. This shows the "Event Definition"
and "Event Bypass" options where you can specify the Event
details. | | Based on a Timer |
After the SDI enters the Queue, the SDI will not be available
on the Queue until the specified time period has elapsed. In the
example below, the SDI will not become available until 5 hours
after it has entered the Queue.
|
|
| Event Definition |
This is displayed only if "Wait Type"
is "Based on Event". This specifies the Event details for the
"Based on an Event" option:
| Field/Option | Description | | Event Type | Event Type that triggers execution
of the Task for the specified "Conditions" (below). | | Conditions | Event conditions for the Event Type.
For eample, if the Event Type is "SampleStatusChanged",
the Conditions might be when Sample Status goes to "Received"
from "Initial". In this case, the Task will execute after
this transition. |
|
| Event Bypass |
This is displayed only if "Wait Type" is "Based on Event".
You may be looking for SDIs that have a specific condition such as SampleStatus
= Received. However, some SDIs will already be in that state, so the
check will not apply to them. In this case, enter an expression here
to indicate that such items should be bypassed. If the expression returns
true, SDIs matching the expression will be bypassed.
For example, to bypass Samples with a status of Received, you could
use the expression primary.samplestatus=="Received". Samples
returning "true" will be bypassed. |

|
| Field/Option |
Description
|
| Example KeyId1 |
Semicolon-delimited list of SDIs that will
be used to test the Task (see Testing
a Task). |
Each Input Queue and Output Queue is associated with a specific "Connector
Type" that defines the SDC and the corresponding identifying color in
the GUI. Connector Types are defined in System Admin → Workflows →
Connector Types.
A Connector Type is specific to a single SDC, and connected Queues must
be associated with the same SDC. Accordingly, you can connect one Queue to
another Queue only if both Queues are of the same Connector Type.
Output Queues are where SDIs exit a Task. A Task can have more than one Output
Queue, but each Output Queue can be an output for only a single SDC.

|
| Field/Option |
Description
|
| title |
Arbitrary name you want to use to identify
the Queue. |
| Connector |
Connector
Type to use for the Queue. |
| Type |
Determines how SDIs are handled in the Output
Queue:
| Type of Output
Queue SDI | Description | | Full Pass Though | All SDIs processed by the Task are
sent to the Output Queue. An example would be the DataEntryStep,
which accepts Samples as an input, then outputs those same Samples. | | Itemized Pass Though | Only some SDIs processed by the Task
are sent to the Output Queue. An example would be a "Splitter"
Task that sends only Samples having a status of "Complete"
to an Output Queue. | | Generated Items | The Task creates new SDIs that did
not come from an Input Queue. An example of the would be the LoginSampleStep,
which creates Samples and thus requires no Input Queue. |
|
| Connections |
Determines the number of Tasks that can
be connected to this Output Queue when building a Workflow Definition:
| Option | Description | | Multiple Connections | Lets you connect Input Queues from
multiple Tasks to this Output Queue. In other words, this output
can feed more than one Task. | | Single Connection | Lets you connect the Input Queue from
one (and only one) Task to the Output Queue of this Task. In other
words, this output can feed only one Task. |
|
| Variable |
Task
Variable into which the SDIs will be passed. |
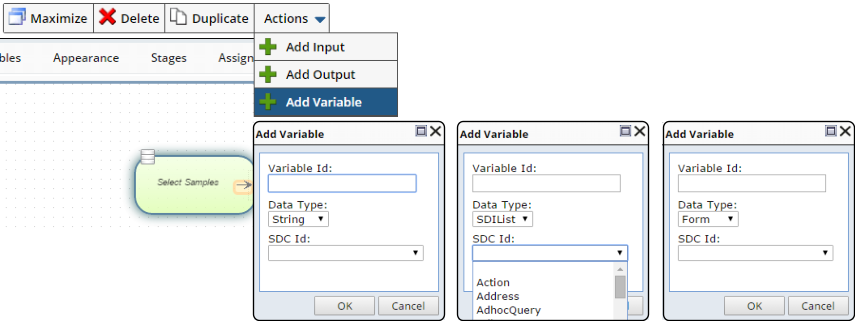
"Add Variable" opens a dialog that lets you create a Task
Variable:
Specify a "Variable Id" to provide a unique name for the Variable
within the Task.
| NOTE: |
|
Newly created Task Variables are forced
to lower case. |
Choose the "Data Type":
| Data Type |
Used for storing:
|
| String |
Single values (including dates and numbers). |
| SDIList |
Lists of SDIs (such as those coming in from
a Queue). You must select an SDC from the "SDC Id" list. |
| Form |
Multiple values grouped into a single Form. |
Note that "SDIList" and "Form" Variables contain sub-variables
(such as sdilist.keyid1, sdilist.keyid2, etc.).
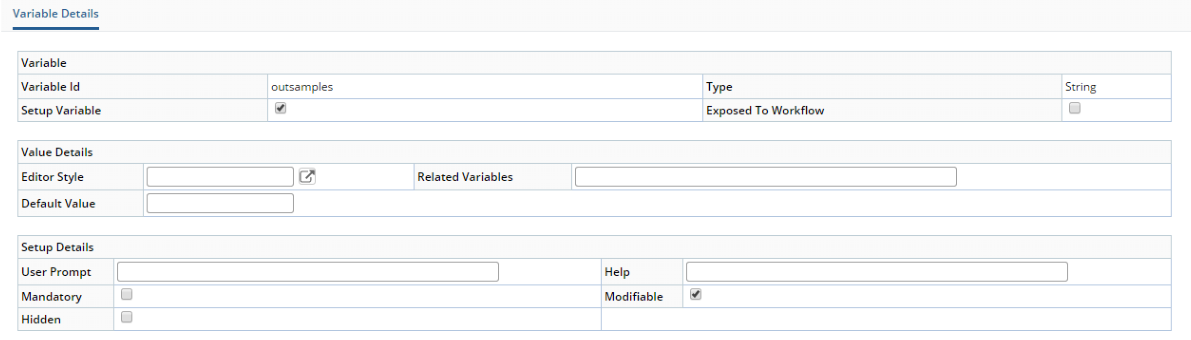
The Variable Details let you configure Task Variables.
| Field/Option |
Description
|
| Variable Id |
Unique Identifier for the Variable in the
Task. |
| Type |
Data Type for the Variable. This cannot
be changed after the Variable has been created. |
| Setup Variable |
Makes this a "Setup Variable" that
passes information into the Task (see Task
Variables). Setup Variables must be "String" Data Type only.
Selecting "Setup Variable" displays the "Setup Details"
detail. |
| Expose to Workflow |
Selecting this allows the Workflow to access
this Variable, such that the value of this Variable in this Task can be
accessed elsewhere in the Workflow to determine its value. Selecting "Expose
to Workflow" displays the "Exposed Details" detail. |
| Field/Option |
Description
|
| Editor style |
Determines how the prompt input field is
rendered in the Workflow Designer (see Editor
styles). |
| Related Variables |
This allows two Variables to be linked from
a Lookup page (such as Product and Product Version). This accepts a semicolon-delimited
list of the Variables that are related. For example, for the Product Variable,
the related variable would be productversion. This also returns the values
from the Lookup into those Variables as well. |
| Default Value |
Default value for the Variable. If this is
a Setup Variable, this is the default value when no setup value has been
provided. |
"Setup Details" are displayed only when "Setup Variable"
is selected.
| Field/Option |
Description
|
| User Prompt |
title for the Variable in the Workflow Designer. |
| Help |
Tooltip help for the input field in the Workflow
Designer. |
| Mandatory |
Specifies that a value for this Variable
must be supplied before you can create a Workflow Execution. |
| Modifiable |
Determines whether the default value can
be overridden (checked) or the Setup Variable value is displayed as readonly
for information purposes. |
| Hidden |
Determines if the default value is visible
in the user interface. Since the value is till defined in the code, this
is useful when copying a Task or creating a Descendant
Task. |
"Exposed Details" are displayed only when "Expose to Workflow"
is selected.
| Field/Option |
Description
|
| Description |
Tooltip displayed when hovering over the
field. |
The "Task Variables Detail" provides a read-only summary of the
above settings for existing Variables, as shown in the example below.
You can add (+) and delete (x)
Task Variables. When you add a Variable, you can apply the settings in the
Variables details previously described. Deleting a Task Variable issues a
confirmation that tells you which Steps and Queues are using the Variable.
The up and down arrows let you sort the presentation order of the Variables.
Holding Ctrl while clicking an arrow prompts for the number of rows to move
the variable. The new sort order is also reflected in the Variables
Panel.
| NOTE: |
|
Task Variables used in an Action Block
cannot be deleted unless you first remove the Variable from the Action
Block. |
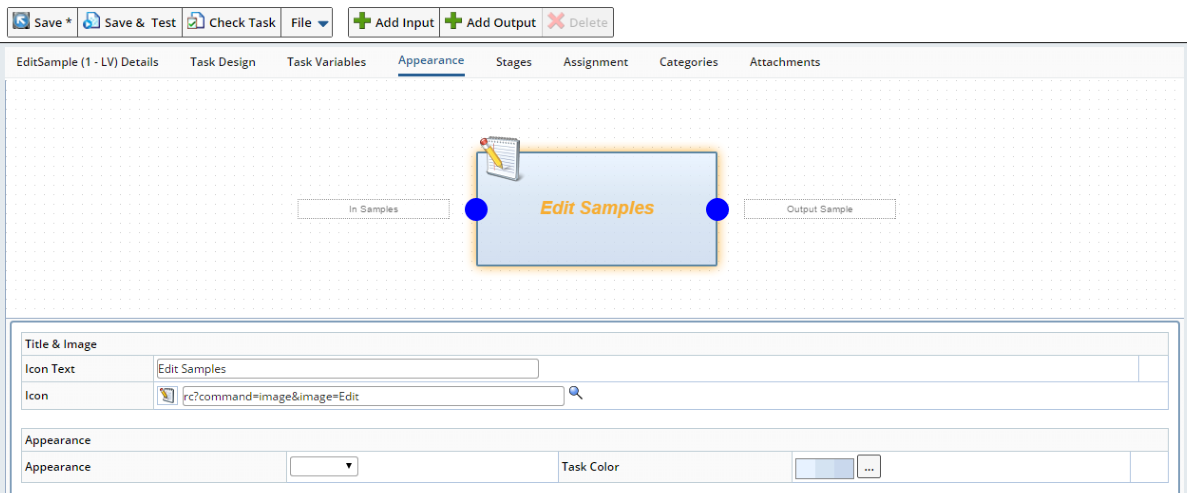
"Appearance" lets you control the label, icon, style and color
used to show the Task in a Workflow, plus has provisions to manage Queues.
| Field/Option |
Description
|
| Icon Text |
Text displayed on the Task graphic. |
| Icon |
Icon displayed on the Task graphic. |
| Appearance |
Determines the overall style of the Task graphic:
|
| Task Color |
Opens a dialog where you can set the background
color of the Task. |
The "Task IO" button collection offers these capabilities:
| Button |
Description
|
| Add Input |
Adds an Input Queue
with corresponding Input Queue details. |
| Add Output |
Adds an Output Queue
with corresponding Output Queue details. |
| Delete |
Deletes the selected Queue. |
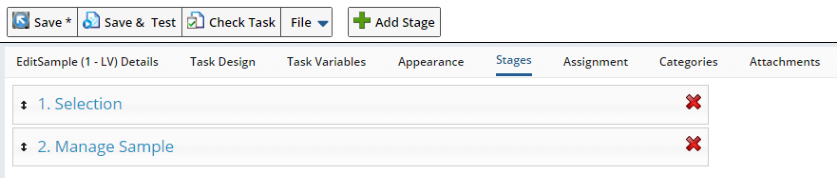
"Stages" lets you add, delete, and order Stages defined in each
Step (see Configuring
Stages).
Click "Add Stage" to add a new Stage as shown above. Click the
vertical arrows to the left of each Stage Id to change the display order of
the Stages in the progress bar. Click the red x and confirm to delete a Stage.
"Assignment" lets you specify the default "User", "Department",
and "Role" assigned to SDIs going into the Input Queue of this Task
when you first populate the Input Queue with the SDIs.
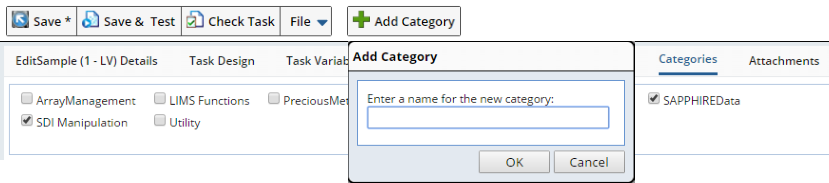
"Categories" lets you specify Categories to which the Task Definition
belongs.
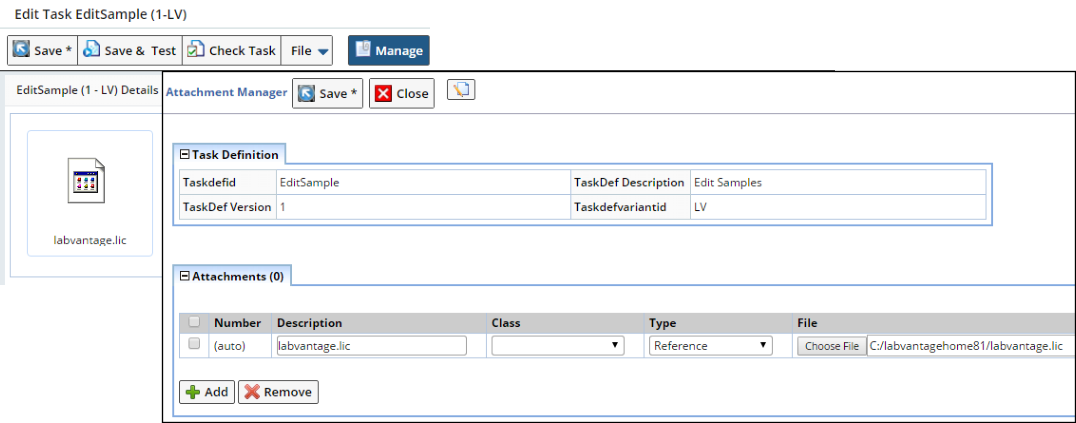
"Attachments" lets you add Attachments to the Task Definition.
"Manage" opens the Attachment
Maintenance page.
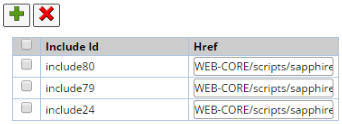
This specifies JavaScript includes for the Task. The IncludeId is automatically
assigned, and HRef points to the JS file. Both are stored in an Includes property
list collection on the Task property list.