The Check Out/Check In system provides control when making configuration changes.
| NOTE: |
|
Whether or not Check Out/Check In options are available for an SDC is determined by global, and SDC specific properties defined in the CMT Policy. |
Placing your environment under Change Control and enabling the Check Out/Check In system means that anytime you Add, Edit or Delete a controlled SDI it must be checked out. While checked out only eligible Users can make changes.
An SDI can be checked out to an individual User or a development team (defined as a "Development Group" Department). Once checked out, the SDI is unavailable to other Users (the SDI is shown as read only) until the SDI is checked back in. While working in change control mode Users can save changes as often as necessary without checking in.
Group Changes
Before initiating a controlled session consider adding a Change Request. Change Requests help to manage configuration changes by grouping all changes under one Change Request. This lets you specify who is responsible for making the changes, a date by which to complete the changes, and details about what prompted the change.
You then have the ability to transfer all changes associated with the Change Request to another system, at the same time.
Control and Track Changes
Upon Check Out the following occurs:
| • |
A Change Log is generated. Any changes are tracked and associated with this Change Log event. |
| • |
An SDI Snapshot is taken to retain a record of the initial configuration, before any changes are made. |
| • |
If defined, the Change Log and SDI Snapshots are associated with the specified Change Request. |
| • |
The SDI is shown in read only mode to any Users who are not either the Current User (who performed the Check Out) or if a Department was specified on a Change Request, a member of that Department. SDIs remain unavailable for editing until Checked In. |
| NOTE: |
|
Before you initiate a change control session, ensure that the CMTPolicy and each SDC is configured according to your requirements. |
Generating Change Logs at Check Out
|
|
Each time an SDI is checked out, a Change Log event is generated. Change Logs keep track of any changes made to the SDI between Check Out and Check In. A given SDC could have several Change Log events. The Change Log event status corresponds to the status of the changes. Changes Logs with a status of "Checked Out" indicates that changes are still in progress. "Checked In" indicates changes are complete.
See Change Logs for more detailed information.
Identifying Checked Out SDIs
|
|
When Change Control is enabled, icons are displayed on the various list and maintenance pages. These icons notify the User that the SDI is currently checked out, and whether or not the current User is eligible to make changes. The following icons are displayed:
| Icon |
The SDI is checked out to... |
|
|
The current User. The current User is allowed to make changes and Check In the SDI. |
|
|
A Department in which the current User is a member. The current User is allowed to make changes and Check In the SDI. |
|
|
Another User. The current User is shown a read only view and is not allowed to Check In the SDI.
Hovering over the icon shows the User to which the SDI has been checked out. |
|
|
A Department in which the current User is not a member. The current User is shown a read only view and is not allowed to Check In the SDI.
Hovering over the icon shows the Department to which the SDI has been checked out. |
|
|
One or more of the Property Tree nodes are checked out. |
Change Control is enabled globally using the CMT Policy "Global - Enable Change Control" property. This property turns Change Control on or off throughout LabVantage. When Change Control is turned on, each SDC further determines how Change Control impacts its SDIs.
OOB each SDCs Change Control setting is pre-defined according to the function of the SDIs. Typically SDCs that represent configuration or master data are under change control ("Yes"). SDCs that represent instance data are not ("No").
Depending on the function of the SDI, an SDC might also be set to either "Template Only" (for example, the Sample SDC is set so that only Sample Templates are under change control), or "Under Parent Change Control" (as an example, when changes are made to Product Variants, only the parent Product is checked out). See SDCs for more information.
When enabled, a Change Control menu is added to the list or maintenance pages of any controlled SDC. Choose to use the Check Out menu option to initiate a Change Control session or as you begin to make changes, upon Saving, a Check Out dialog is presented.
Remote Check Out/Check In
|
|
CMT provides an option to remotely Check Out, Check In and transfer directly from a remote server. You can also view comparison SDI Snapshots between the local system and the remote server. See CMT Remote Server for more information.
Any controlled SDI is eligible for Check Out (provided it is not already checked out by another User). Check Out is performed either manually using the "Check Out" button, or deferred. Deferred Check Out occurs when changes are made to a controlled SDC without first clicking the "Check Out" button. The Check Out process begins upon Saving.
Depending on the complexity of the SDI, Check Out may have a different effect. In simple cases the entire SDI is checked out and unavailable to ineligible Users. Complex SDIs (such as Property Trees and SDIs with many detail tables) might offer Check Out of specific nodes or detail items individually. In these cases an additional deferred Check Out, or a Check Out menu is presented. See Special Change Control Handling for details.
Check Out vs RSet Locking
SDI Check Out serves the same purpose as locking an SDI during edit (to prevent data collision by multiple users). However, unlike RSet, Check Out is persistent until the SDI is checked back in. The purpose of both is to disallow edit, not only when the SDI is locked in another RSet but also when checked out to a different User/Department group.
Presenting the Check Out Dialog
|
|
The start of a Check Out session is typically indicated when the Check Out dialog is presented. However, several factors determine at what point the Check Out dialog is presented during a change control session.
The Check Out dialog is presented when:
| • |
A User manually clicks the Check Out button, the Check Out dialog displays. |
| • |
A User makes changes to an SDI before clicking the Check Out button. The Check Out dialog displays upon saving (Deferred Check Out). |
| • |
A User is managing an SDI that contains multiple SDIs (such as a Biobanking Study or Schedule Plan), some of which are independently controlled. The Check Out dialog is automatically presented each time an independently controlled SDI is modified. |
Under certain conditions the Check Out dialog is not presented when changes have been made:
| • |
A Perpetual Check Out session has been started. Changes made to controlled SDIs are automatically checked out using the details of the initial (first check out of the perpetual check out session) Check Out. |
| • |
The SDC is determined be under Parent Change Control. SDIs who are solely dependent on their parents are not checked out independently. When modified, only the parent SDI is checked out. |
Deferred Check Out occurs any time a change is made to a controlled SDI and the "Check Out" button has not been specifically used.
When using Deferred Check Out mode, the checkout is performed as a separate transaction, prior to starting the save transaction. As a result, if the save transaction fails due to a validation error, the SDI will be checked out, and you can then either resolve the validation error or undo the checkout.
Perpetual Check Out allows each new change (across multiple SDIs) to reference the initial Check Out details. The Check Out dialog is not displayed each time you make a change.
As you begin the perpetual Check Out session, in the first Check Out dialog presented, check "Do not prompt again".
While in Perpetual Check Out mode, you are free to make changes across multiple SDIs. Aside from the presence of the Check Out Options indicator in the layout status bar you will not be prompted or reminded that you are in perpetual check out mode. As you move about the system and edit SDIs, they are checked out to you and associated with the initial Check Out details.
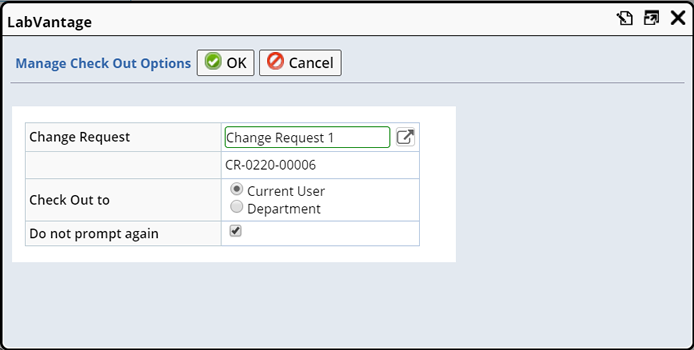
Manage Perpetual Check Out
|
|
|
The perpetual Check Out session ends when either the current User logs out, or perpetual Check Out is turned off.
Clicking "Check Out Options" in the layout status bar opens the Manage Check Out Options dialog.
Here, you can uncheck "Do not prompt again" to end a Perpetual Check Out session, or make changes to the Check Out details (such as switch to a different Change Request).
Checking Out a Simple SDI
|
|
To begin a change control session, navigate to the list or maintenance page of any controlled SDC. The Change Control menu options are available. For details about checking out a Property Tree see Checking out a Property Tree SDI.
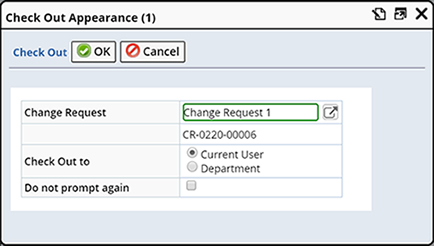
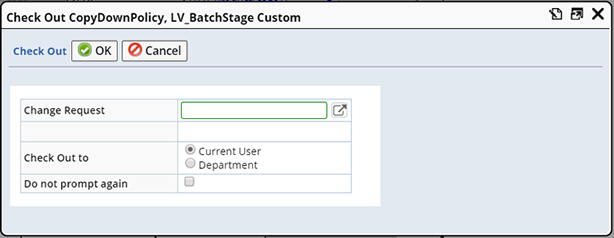
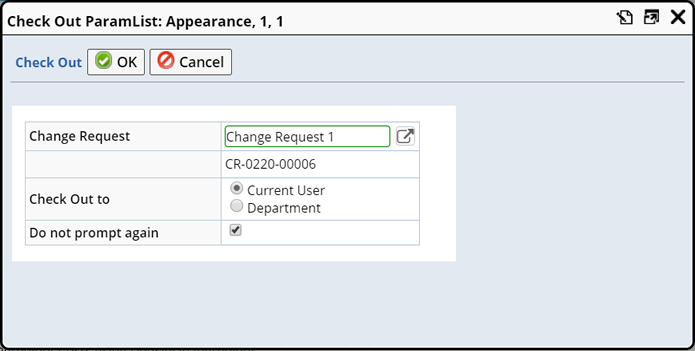
Choose one or more SDIs and click "Check Out", the Check Out dialog displays.
Check Out can be associated with a Change Request, or independent (a single Change Log will be associated with the changes).
| Field |
Description |
| Change Request |
Choose the Change Request under which you would like to Check Out this SDI. Whether or not a Change Request is required is determined by the "Mandatory for Check Out" property in the CMT Policy.
See Configuring CMT for details.
The lookup opens the Select Change Request dialog. Only "Accepted" Change Requests are shown. The previously selected Change Request is remembered and defaults (when the "Auto Populate Check Out Dialog" CMT Policy property is set to "Yes"). |
| Check Out To |
Associate these changes with the Current User, or choose a specific "Development Group" Department (when selected, a Department Lookup is provided). Choosing a Development Group Department allows any User within that Department to make changes to this SDI while checked out.
| NOTE: | | The current User does not need to be a member of the Development Group, and retains rights as the user who performs the Check Out regardless of membership to the Dev elopement Group. |
Consider defining a team of Users responsible for making configuration changes. Add a "Development" Department and check the "Development Group" option. When checking out an SDI to a Department, the list of available Departments is restricted to those with the "Development Group" option checked. These Departments are excluded from use by Department Security. |
| Do not prompt again |
When checked, the Check Out dialog will not be presented again upon clicking Save during the current session.
If you expect to make changes to several different SDIs consecutively (within the same session), choose to indicate a perpetual Check Out. Meaning that for each SDI you change in this session there is no need to present the Check Out dialog. Each change will be associated with values specified on the initial Check Out until the perpetual session is ended. See Perpetual Check Out for more information. |
Click "OK" to "Check Out" the SDI.
Upon Check Out, the CheckOutSDI Action checks out the SDI (making it unavailable to ineligible Users) and creates a Change Log entry with a status of "Checked Out".
A Check Out SDI Snapshot is taken of the SDI to preserve the original configuration, before changes are made.
When a simple SDI is checked out, the entire SDI including all primary information, any embedded SDCs and any included details are checked out. A singe Change Log is generated.
Actions that Initiate Change Control
|
|
|
Any action that results in adding, changing or deleting primary SDI information or associated SDI information will initiate the change request process. This includes operations such as Copy, Save as Template, Delete and Import. New SDIs are added in the "Checked Out" state. They can be reviewed, edited, and finally checked in.
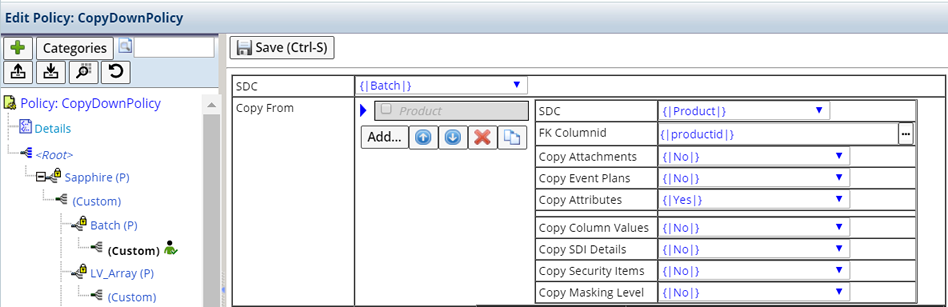
Checking Out a Property Tree SDI
|
|
Enabling Change Control on the PropertyTree SDC enables Change Control for all types of Property Trees (such as Policies, Elements, Page Types, Gizmos, etc.). CMT supports checking out either the entire Property Tree, only the Definition Tree (Details, Property Definition and Required Elements), or individual nodes of the Property Tree including the root node. These are covered in the following sections.
When Change Control is enabled, Check Out and Check In buttons are available on both the List and Property Tree pages.
Check Out the Entire Property Tree
|
|
|
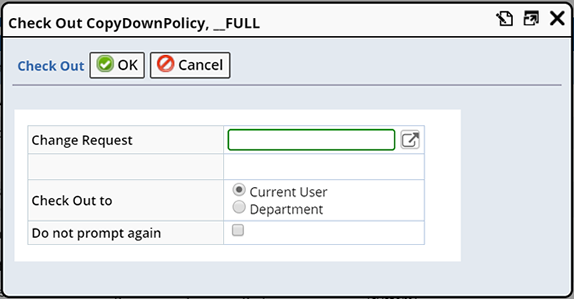
Check Out the entire Property Tree using the Check Out button on the list page. This protects the entire Property Tree, preventing other Users from making changes to any of the nodes while checked out.
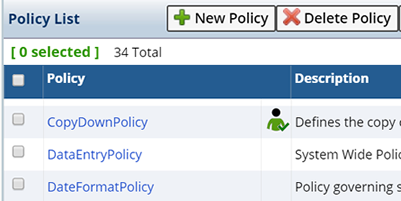
From the list page, Select one or more SDIs and click "Check Out".
The example below shows the Policy List, however Check Out applies to all the different types of Property Trees.
Note that the Check Out dialog title indicates you are checking out the Full Property Tree.
Once Checked Out, an icon on the list page indicates that the SDI (the entire Property Tree) is checked out.
The icon is also shown within the Property Tree at the top level.
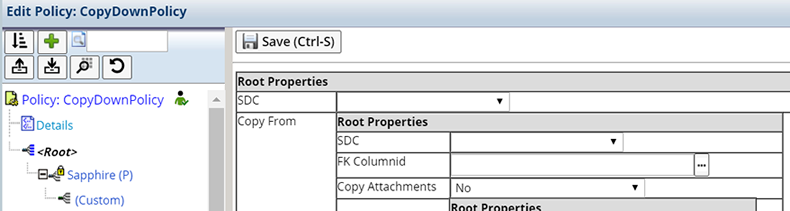
Check Out Individual Nodes
|
|
|
If you know you are only making changes to specific nodes within the Property Tree, choose to Check Out only those nodes, individually. This ensures that the other nodes are available to other Users. While an individual Node is checked out you cannot check out the entire Property Tree.
| NOTE: |
|
Certain Property Trees do not allow modification of the nodes (such as Password Validate, External Authentication, ELN Control Definitions). The change control buttons for these Property Trees are shown in the right hand side of the Property Editor frame.
In these cases, the FULL Property Tree is always checked out. |
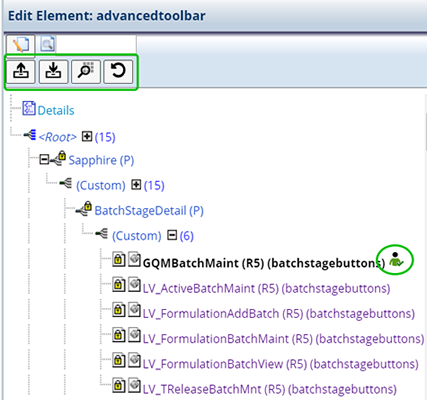
To Check Out an individual node within the Property Tree, from the list page, select the SDI and click "Edit". Once within the Property Tree, select a particular node and click the "Check Out" icon  . Depending on which Node is currently selected, Change Control acts accordingly.
The Check Out Dialog title identifies the specific node to be checked out.
Once checked out the icon is shown next to the checked out node.
When individual nodes of a Property Tree are checked out, the nodes Check Out Icon is shown on the list page.
Actions that Initiate Change Control
|
|
|
Performing any kind of activity on a node (such as adding, deleting or modifying) will require the corresponding node to be checked out.
Most changes to a Property Tree node require Check Out, however there are some exceptions:
| • |
Move up, Move Down, and AutoSort
Changing the location of a node in the Property Tree is not considered a change to the node data. Therefore, it does not trigger a Change Control check.
|
| • |
Copying a Node
When copying a node, the selected (existing) node is not checked out. Only the new node is checked out.
|
| • |
Rename
When renaming a node, the existing node is checked out, a Change Log is generated with a status of "Renamed". The new node (with the new name) is also checked out and a Change Log is generated.
|
| NOTE: |
|
When a node is deleted or renamed, the change must be transferred using the Change Log. Once a node is renamed or deleted, it is no longer visible on the Property Tree. |
When checking out a Property Tree, the following validations are applied:
| • | When performing a Full checkout, the system checks if the Full Tree or any node of the tree is already checked out. If so, then check out is not allowed. |
| • | When performing a Check Out on a Node, the system checks if the Full tree of that specific node is already checked out. If so, then check out is not allowed. If the current User has the full tree checked out, then no other checkout of any Node is required. |
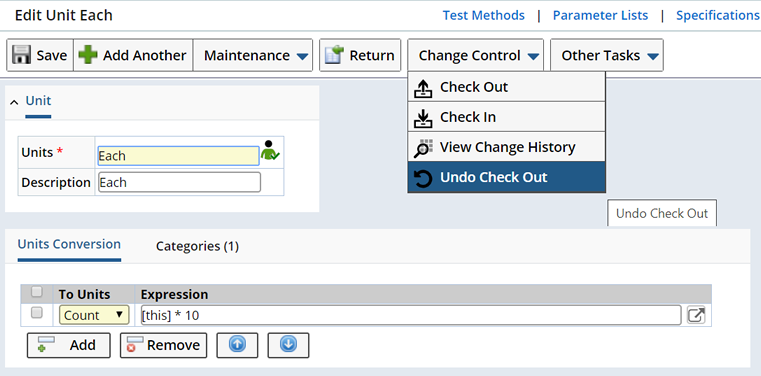
Lets you undo (or roll back) any changes made since Check Out. This is useful If you checked out the wrong SDI, or wish to revert any changes already made back to the original (before Check Out) configuration. Undo Check Out honors all validations performed by a typical Edit SDI operation.
Only changes made since the most recent Check Out will be rolled back. Undo Check Out cannot rollback to a previous Check Out.
| NOTE: | | Undo Checkout does not revert back any other linked data which may have been generated as the result of changes to the selected SDI. |
Undo Check Out is only available on the SDI Maintenance page, within the Change Control Menu.
Upon clicking Undo Checkout, you are prompted to confirm the rollback. Undo Check Out calls the UndoCheckOutSDI Action.
Deleting a Controlled SDI | |
An SDI under change control must be checked out before it can be deleted.
| NOTE: | | If you begin the process of deleting an SDI, continue through the Check Out dialog and press "OK", then decide not to delete the SDI, the SDI may have moved into the Check Out process and will need to be checked back in. |
When an SDI is deleted, and Change Logs exist for the SDI:
| • | If the latest Change Log has a status of "Checked Out" the Change Log will be Checked In and the Change Log status will be changed to "Deleted". |
| • | If the latest Change Log has a status of "Checked In", the status is changed to "Deleted". |
When you are finished making all expected changes, check the SDI back in. You have the following options:
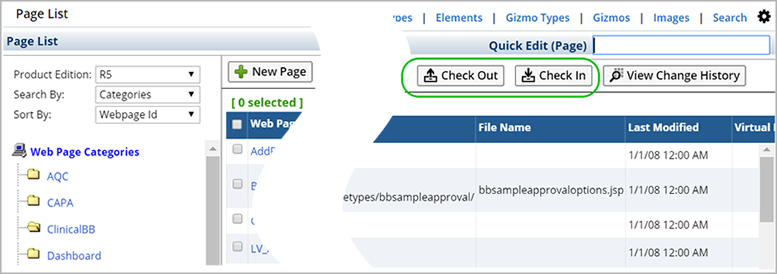
| • | Use the "Check In" button on the SDI or Property Tree list or maintenance pages. |
| • | From the Change Log List page, Check In all checked out SDIs associated with a Change Log. |
During Check In,
a check is made to ensure that the SDI is checked out to the current User (or their Department), if so the Check In SDI dialog displays.
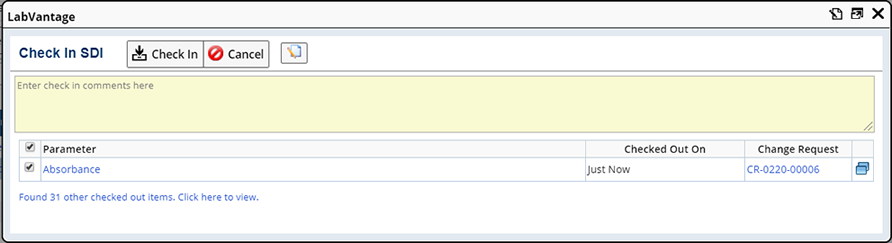 |
| Field | Description |
| Comments | OOB, you are required to provide an explanation of the change (Check In Comments). Choose to make these comments optional by setting the "Check In Comments Mandatory" property (CheckISDIDialog Page Type) to "No". |
| SDI to Check In | The SDIs to be checked
in.
A hyperlink is provided where you can view the SDI.
| NOTE: | | In some cases (certain SDIs) there is no page on which to view the SDI. In that case, no link is provided. |
|
| Checked Out On | Date on which the SDI was checked out. |
| Change Request | A link is provided to the associated Change Request. |
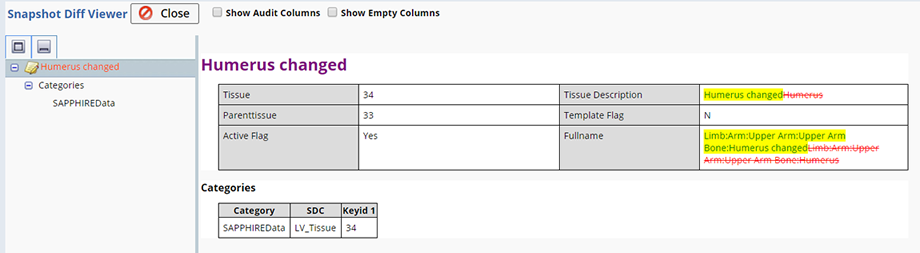
 | View a comparison of the original SDI Snapshot and the current state of the SDI by clicking the View Changes icon. |
| Found - Additional Checked Out items | In addition to the selected SDI, any additional SDIs checked out by you (the current User) are also shown and available for Check In (by clicking the "Found n other checked out items. Click here to view." hyperlink).
Choose to filter the list of available SDIs using the "SDC" and "Change Request" dropdown options. |
Upon clicking "Check In" a Check In SDI Snapshot is taken of the changed SDI(s), the Change Log status is updated to "Checked In" and the maintenance page is refreshed.
The Check In dialog is configurable using the CheckISDIDialog Page Type.
| |
| |
Special Change Control Handling | |
| |
| |
Change Control is supported for most SDCs with the following exceptions:
| • | LV_ChangeRequest, LV_ChangeLog |
| • | All D-type SDCs |
| • | Any OOB SDC whose "Change Control" option is set to "No" (OOB) |
| • | Adhoc Queries |
In addition, certain SDCs require special Change Control handling. The following sections detail these special circumstances.
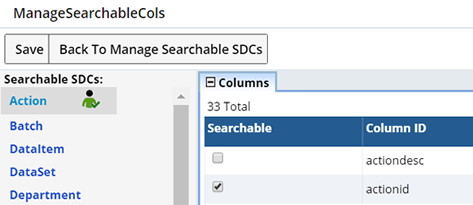
The Adhoc Searchables page (Edit SDC) is a standard SDC maintenance page and is supported by Change Control. Choose to either manually Check Out a Searchable SDC before making changes, or upon saving after managing searchable columns (deferred Check Out is initiated).
| Check Out an SDC manually on the Edit SDC page.
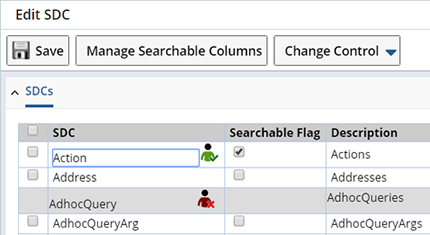
| Deferred Check Out occurs upon clicking Save when managing searchable columns (if not already checked out manually).
|
If an SDC is currently checked out to another User, the SDC is read only (the checkbox is unavailable).
Adhoc Query is not currently supported by Change Control.
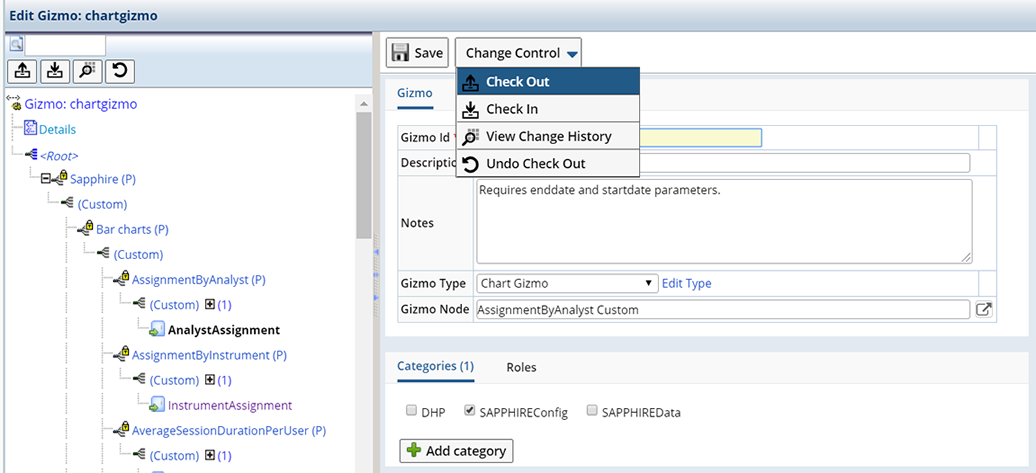
Change Control for Gizmos is the same as for other SDCs with the following exceptions:
| • | Change Control in the Gizmo SDC must be set to "Yes". |
| • | When viewed within a Gizmo Type Tree, the entire Gizmo can be checked out using the Check Out and Check In buttons in the left pane.
However, to Check Out a Gizmo Component, use the Change Control menu provided in the Gizmo maintenance page (in the right frame). |
| • | Change Control for a Gizmo Type is the same as any other Property Tree. Please see Checking Out a Property Tree SDI for detailed information. |
SDIs within hierarchical structures are checked out independently within the hierarchy.
When checked out and displayed within an SDI Snapshot the hierarchy path is included for reference.
Many to many tables provide relationships between two primary SDIs. For example:
| • | departmentsysuser provides a relationship between the User and Department SDC. |
| • | Jobtypesysuser provides a relationship between the User and LV_JobType SDC. |
Since many to many pages represent multiple SDIs that may be managed from the perspective of either SDI, LabVantage has pre-determined (depending on the relationship) which SDI to check out when changes are made.
For example:
| • | Departmentsysuser changes are captured in the User Snapshot. Not in the Department Snapshot. |
| • | Jobtypesysuser changes are captured in the User Snapshot. Not in the Jobtype Snapshot. |
If the associated SDIs are managed, the SDI is checked out accordingly and rendered as read only when displayed.
Multi Attribute Page Types | |
When multiple SDIs are represented in a single view (Multi Attribute page types), and the Primary SDI is not checked out, or is checked out by another User, any associated SDIs that have been checked out are identified using the various Check Out icons, and are read only. The checked out status is indicated in the heading.
To make changes to a multi attribute maintenance grid the Primary SDI must be checked out to the Current User.
Deferred Check Out is not available. This means that until the SDI is first Checked Out, the multiSDIAttributeMaint page is read only.
When and SDI under Change Control includes associated Notes, those Notes are not controlled. Notes can be edited. Keep in mind however, that when transferred, any Notes that exist on the target (for the SDI) will be replaced.
Schedule Plans and Schedule Plan Items can be managed independently when under Change Control.
The Schedule Plan itself references Master Data or primary information. Any time primary information is modified the primary Schedule Plan is checked out.
Schedule Plan Items might represent a schedule for a defined Source SDC (such as a Sample Point). Schedule Plan Items are managed independently when each of the following is true for the Source SDC:
| • | The SDC Definition Option "Change Control" is "Yes". |
| • | The SDC Definition option "May be Scheduled" is checked. |
| • | The Source SDC Policy Node in CMT Policy defines SchedulePlanItem as an Embedded SDC. |
When all of the above is true, those Source SDCs are controlled independently from the Schedule Plan's primary data. When modified, only that Schedule Plan Item is checked out. When the Schedule Plan is viewed by an unauthorized User the Schedule Plan Item is shown as readonly.
However, within those Schedule Plan Items certain information may be considered instance data. Since these columns may need to be managed from the perspective of the Schedule Plan, you have the option to exclude those columns from Change Control within the CMT Policy. This allows Schedule Plan Item columns to be editable despite being checked out to another User. See Excluding Columns from Change Control for more information.
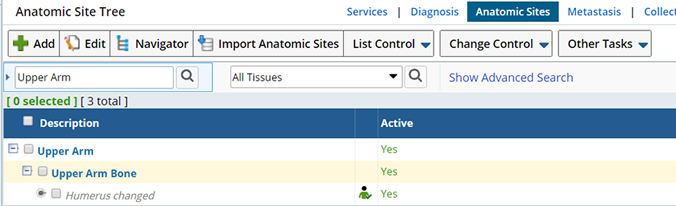
Following is an example of a Schedule Plan whose Schedule Plan Items are in various states of control.
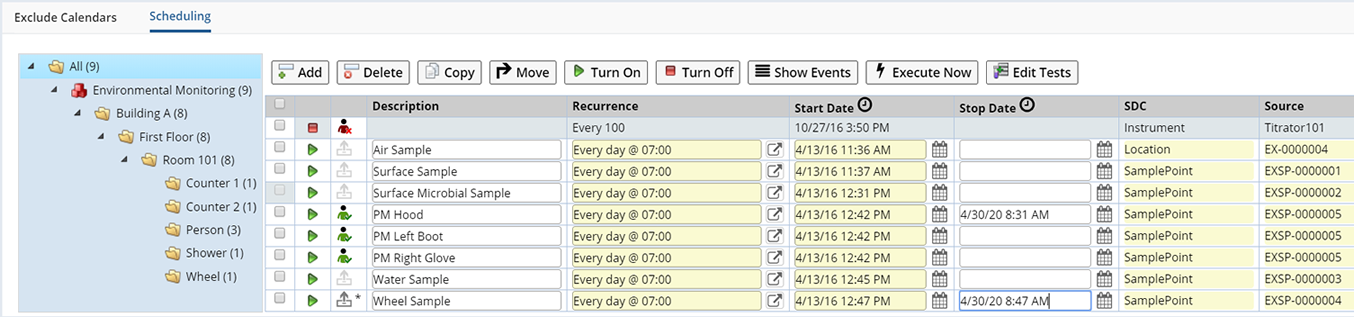
Each Schedule Plan Item is controlled accordingly as described above. In this example the entire Schedule Plan is not checked out. Each Schedule Plan Item identifies its own state of control from the current User's perspective.
The primary Schedule Plan is only checked out when changes are made to primary information. Otherwise, when changes are only made to independently controlled Source SDCs, only those Schedule Plan Items are checked out. If both primary information and an independently controlled Schedule Plan Item is modified, a single Check Out dialog is presented but a Change Log is generated for both.
Note that columns excluded from independently controlled SDCs are considered primary data and will not initiate Change Control (for the Source SDC) when modified. Upon saving, the entire Schedule Plan will be checked out. These changes are included in a Change Log generated for the Schedule Plan.
Schedule Plan Items that reference Source SDIs that are not under change control, or are not part of the Source SDIs SDI Snapshot are automatically checked out (deferred) with the Parent Schedule Plan SDI upon saving.
The Schedule Plan "Start" and "Stop" operations can always be modified.
Note that when viewing Change History (for the Schedule Plan) you will only see Change Logs for the Schedule Plan.
Excluding Columns from Change Control |
|
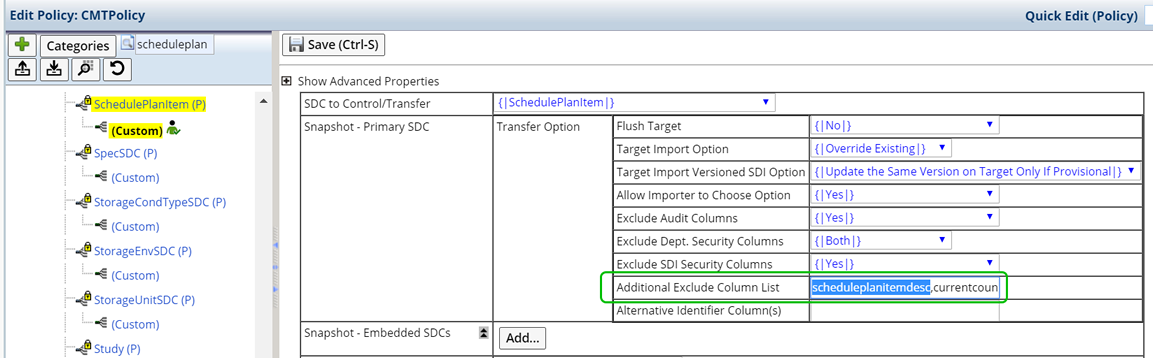
Specify certain columns as always editable (even when checked out by another User), and not under change control. These columns can be changed without the need to check out the independent SDI. Specifically list them in the "Additional Exclude Column List" property on the CMT Policy.
Note that the Schedule Plan Item is rendered as read only with the exception of the excluded columns. These are highlighted in green.
Certain columns are always rendered as editable as they are considered Schedule Plan item instance
data even if the master data has been checked out by another user (such as Start Date and Stop Date).
Storage Units and Physical Stores | |
Storage Units can be Exported and Imported using CMT but are not supported by Change Control.
Change Control for SDC SDIs is the same as other SDCs. There are however some special considerations:
| • | In addition to the primary and detail tables of the SDC SDC, the following tables are also included in the SDI Snapshot:
| systable Contains information about all the tables present in the SDC. It can be a primary table or a detail or detail of detail table. | | sysref Contains information about all the references from any table of the SDC. | | sysref Columncontains information about the columns used for references for any table of the SDC. | | sysextendedcolumn Contains information about all extended columns for any table of the SDC. | | sdcproperty |
|
| • | Special handling is provided for Component development mode for the following tables.
| • | syscolumn | | • | syscolumnproperty |
When in Component mode, only the component column information is stored in the SDI Snapshot. |
| • | The SDC SDI of the SDC SDC cannot be modified and an SDI Snapshot cannot be captured. |
| • | Undo Check Out cannot be performed on the SDC SDI. |
Change Control for Web Pages is essentially the same as other SDCs with a few exceptions.
Check Out and Check In are available on both list and maintenance pages.
Consider the following when making controlled changes to Web Pages:
| • | Web Pages are always checked out as a whole including all elements. PageType and Layout configurations are present inside the WebPage. |
| • | Webpages can be controlled when viewed under the context of a Property Tree, such as an Element or Page Type property tree.
|
| • | Check Out is required when adding or removing an element. |
| • | When adding an element to a Webpage, you can Check Out any additional pages added to the tree. In such cases, the selected Webpage is also checked out. |
| • | During new Webpage creation, you are prompted to Check Out the Webpage. |
Change Control is only supported on Worksheet Templates. Since Worksheets are "Save" as you go, deferred Check Out is not provided. A Worksheet must be manually checked out prior to making any changes. Upon Check Out, the checked out icons are displayed on the list and maintenance pages accordingly.