Overview
| Top |
|
Navigator Policy |
Content |
|||||||||||||||||
|
Overview |
|
|
The Navigator is a Policy-driven feature that has two functional variants:
| • | Tree View lets you view an entire SDI hierarchy as a tree of associated
objects, then perform operations on them from within the tree view. This
is an efficient alternative to using menus and tabs to access each object
in a hierarchy. The Navigator allows three types of trees to be built based
on the LabVantage data model:
|
||||||||
| • | Edit Set lets you build a structure that allows a preselected list of items to be edited individually or by subset from the Navigator frame without repetitively revisiting the List page after each save. |
Tree View |
|
|
The Navigators provided OOB require that you configure some rather complex modules and understand their data models. You may not even have these modules. Accordingly, our example uses the simple relationship that exists among Samples and Tests, with settings provided OOB.
Tree Dataset |
The Tree Dataset property collection defines:
| • | A SQL query that builds the initial tree structure. Note that this is not required if the initial tree structure follows a strict foreign key relationship. |
| • | The SDC defined by the page from which the tree is generated. This lets you use the same SQL to enter the Navigator from pages that support different SDCs, as one query determines how the top-level SDIs are retrieved for a given SDC. |
After using Tree Dataset properties to retrieve the data, you will define Reference Nodes that define the tree nodes as columns retrieved by the query.
These properties define how to retrieve Top SDIs:
| Entry SDCId |
This is the SDC defined by the page from which the tree is generated. For example, if you want to generate a tree from a MaintenanceList page, this would be the SDC Id of the list Element on that page (such as "Sample" for the "SampleList" page).
| Top SDI SQL |
This is a SQL statement that defines data that are retrieved to build the tree for a specific "Entry SDC", which defines SDIs that are loaded with the page. For example, the "Entry SDC" for a SampleList page is "Sample". You can define these data in either of two ways:
| • | Using the parameterized tokens [keyid1],[keyid2], and [keyid3] to retrieve selected SDIs from the page. The token in the Top SDI SQL is generated by the JavaScript call sapphire.page.getSelectedKeyid1List(). So, [keyid1] would be SampleId for a SampleList page, or SDIWorkitemId for a WorkitemList page. |
| • | Using a SQL query to retrieve a result set called the "Top SDI". You then reference the Top SDI result set using the tokens [topkeyid1], [topkeyid2], and [topkeyid3] in another SQL query that you specify using the "Initial Tree SQL Based on Entry or Top SDIs" property, which is the query used to build the tree regardless of the page that is loaded. |
| Example |
We begin by adding a Navigator Policy called "My Test Navigator". Our example starts with the Tree Dataset collection. In the example below, "Define How to Retrieve Top SDIs" loads the selected SampleId from a Sample List page when the "MyTestNavigator" page loads.

The "Initial Treee SQL Based on Entry or Tops SDIs" query always retrieves data used to build the tree, regardless of the page that is loaded. You can use the tokens [topkeyid1], [topkeyid2], and [topkeyid3] to reference the "Top SDIs" defined by the "Top SDI SQL" properties. In this example, the initial tree is built by returning SampleId, SampleStatus, and SampleType for the selected Sample.
Initial Tree Structure |
The Initial Tree Structure property collection defines the initial structure of the tree by creating a node for each Reference Node you define. The sequence of the nodes defined here determine the hierarchy of the tree structure.
| Reference Node Id |
This is the Reference Node that defines this node in the tree.
| Parent Column Id |
This is the SDC column that defines the parent of this node. This column must also be defined in the corresponding Reference Node. Leave this blank for the top node.
| Is Self Link |
If the parent column is linked to another row in the same table, setting "Is Self Link" to "Yes" establishes that relationship. An example of this is the can be found in the StorageUnit table, where both the the ParentId and AncestorId columns have a Foreign Key constraint to the StorageUnit table. For simplicity, "Is Self Link" does not apply to this example. There is an example of it in the OOB Storage Unit List page.
| Example |
Again, this example extends the previous examples. The Sample node will be a child of the parent (SDIWorkitem), so we specify "workitemid" as its Parent Column Id.

Reference Nodes |
Each of these defines a node in the tree (as specified by a Reference Node Id). You can create multiple Reference Nodes, then use any of them to define the nodes of the Initial Tree Structure or a Child Node. The idea here is to create a collection of predefined nodes (with optional child nodes) that can not only be used to build the initial tree, but can also be reused in a child node definition.
| Node Id |
Identifier of the Reference Node. There must be a Node Id for each Reference Node Id.
| SDCId Id |
SDC Id for the node. Leave this blank if you are not retrieving from an SDI.
| Columns |
Columns used in the header Node Label or header Node Image. Must be retrieved.
| Operations |
Operations that can be performed from the node (such as listing Samples in a SampleList page or entering data in a DataEntry page).
| Child Nodes |
Child nodes allow re-use of a Reference Node configuration, as well as to achieve a recursive parent - child - child structure. Child nodes use lazy data loading that can be defined using three options (below). These nodes are rendered initially collapsed, and will retrieve data only when expanded. When adding a Child Node, do not leave its "Reference Tree Node Id" blank. The Layout will malfunction, and you will get no error message. Empty Child Nodes are not displayed.
| • | Reference Tree Node Id
These show the Reference Nodes you have defined. In the examples, these are SDIWorkitem, Sample, and Specifications. Here, we choose Specifications (see below). |
||||||
| • | Define Child Data
You have three options for retrieving the child data. They are mutually exclusive:
|
||||||
| • | Auto Open on Parent Open
Determines if the child node is automatically opened when the parent node is opened. Be advised that opening too many child nodes when the parent node is opened will result in poor performance. |
|
Refresh on Maint Page Save Determines if the node is refreshed when the Maintenance page is saved |
| Example |
Extending the previous examples, the properties below show the Reference Nodes provided OOB:

This is configured OOB for:
| Reference Nodes |
|
Additional Properties |
These are additional properties that offer options, but were not required to build our example:
| Navigator Width | Width of the Navigator frame in pixels. | |
| Reference Nodes | Node Image | In addition to the "Node Label" demonstrated in the Reference Nodes Example, this also lets you display an image to identify the node. |
| header Node Image | In addition to the "header Node Label" demonstrated in the Reference Nodes Example, this also lets you display an image to identify the header node. | |
| Columns | Display Reference Type
Reference Type that defines the icon displayed. "Display Reference Type" overrides the "Display Value" configuration (below). Display Value takes effect only if the icon is not found in the Reference Type. |
|
| Display Value Value displayed in place of the corresponding retrieved value. |
||
| Operations | Image Image to display with the Operation in the dropdown list. |
|
| URL: target Name of the window in which the linked page opens. You can enter any name here, and the new window (browser instance) will automatically assume that name. If you do not specify a target, the linked page opens in the current window. |
||
| URL: tip Popup text displayed onmouseover. |
||
| Security Operation This has not yet been implemented. |
||
| Show Shows/hides the operation choices. |
||
| Apply to Set
When set to "Yes", this indicates that multiple sibling nodes can be selected, and the Operation will be performed on all selected sibling nodes. Multiple selection of non-sibling nodes cannot be done. Note that only Operations with Apply to Set = Yes will be available in the Edit Set context menu. Departmental security checks are supported. When multiple nodes are selected, the Operation is checked for all selected items after the user clicks an Operation. If any node has Apply to Set = No, an alert box indicates the Operation is not available. |
||
| Is header Node Operation
Determines if the operation applies to only header nodes. The URL has access to either parent or child node values and allows navigation to the page operating on the detail element of the parent or a collection of children. |
||
| Is Add New Node Operation
Used primarily in Master Data Setup, this renders a root placeholder node with the Operation name as the node label (such as "New Product"). The URL should navigate to a QuickCreateSDI page. |
||
| Child Nodes | header Node Image In addition to the "header Node Label" demonstrated in the Reference Nodes Example, this also lets you display an image to identify the header node. |
|
| Show Shows/hides the child node. Supports Groovy expressions and primary/user variables. Empty Child Nodes are not displayed. |
||
| Max Initial SDI Rows Limit | Limits both the Initial Tree SQL and child node data retrieval to this number of rows. Generates an error when reached to avoid overloading both server and client. | |
Navigator JavaScript APIs |
These Navigator JavaScript APIs are available:
| • | sapphire.page.getSelectedKeyid1List() generates the token in the Top SDI SQL. |
| • | sapphire.navigator.open( policynodeid, pageidtocopyoriginalmenus, sdcid, keyid1, keyid2, keyid3 ) opens the Navigator layout. |
Using the Edit Set Navigator |
|
|
Edit Set Example |
This shows the OOB implementation of the Navigator in "Edit Set" mode. This allows a preselected list of items to be edited individually or by subset from the Navigator frame without repetitively revisiting the List page after each save.
| NOTE: | As provided OOB, the "Navigators" button open Navigators that have been preconfigured for both Edit Set and Master Data Setup. |
|
Select two Samples with Tests, then click "Edit". |
|
The Navigator Tree shows the Sample as the parent with the Test beneath it. The Sample Maintenance page loads. For selection of multiple items:
When a single item is selected, a special Navigation group toolbar shows when the "Show" property is set to "Yes". This lets you walk through items and supports these shortcut keys:
The group title shows the current selection status (such as "No. 1 of 6"). |
|
Clicking the Test loads Data Entry By Test for the Sample. |
|
Clicking the Data Set loads Data Entry By Data Set for the Sample. |
|
Clicking the down-arrows open the Edit Set context menus defined by the Operations in the Reference Nodes. This lets you perform these predefined operations from the Navigator. |
|
Selecting multiple Samples and clicking the "Edit" button renders a Maintenance Grid, which allows all Samples to be edited. Clicking a column header selects the entire column. Clipboard functionality is browser-dependent:
If the clipboard contains a line break in the text, the text is pasted into multiple cells. The maint Element offers additional configuration options such as Maintenance Grid Copy and Fill Features, Editable Foreign Key Columns and Tab Groups in Maintenance Grids. |
Navigator Toolbar |

| 1. | Expand the tree under the selected node. |
| 2. | Edit the selected SDIs. |
| 3. | Open Data Entry for the SDI on the selected node. |
| 4. | Edit the Attributes of the SDI on the selected node. See Attributes → Attribute Integration in Edit Set. |
| 5. | Manage Tests for the SDI on the selected node. |
| 6. | Manage Data Sets for the SDI on the selected node. |
| 7. | Manage Specifications for the SDI on the selected node. |
| 8. | Exit the Navigator and return to the previous page. |
Edit Set Page Button Configuration |
There are several options for configuring Standard Edit Buttons on the advancedtoolbar Element to achieve Edit Set functionality:

| • | To configure a Standard Edit Button on the advancedtoolbar Element for
Edit Set, add the Link URL property multisdimode=EditSet as follows:
rc?command=page&page=[sdcid]Maint&multisdimode=EditSet When more than one item is selected on the List page, the Edit Set Navigator opens with first item open in Form mode in the right panel. When only one item is selected, the standard SDI Maintenance page opens. To achieve better control of the Edit Set Navigator, a navigatornodeid can be specified in the Link URL property as follows: rc?command=page&page=[sdcid]Maint&multisdimode=EditSet&navigatornodeid=EditSet |
| • | You can also use singlesdimode=EditSet as follows:
rc?command=page&page=[sdcid]Maint&multisdimode=EditSet&singlesdimode=EditSet This always opens the Edit Set Navigator regardless of whether one or more items are selected. |
| • | This is the backward-compatibility mode:
rc?command=page&page=[sdcid]Maint |
| • | Note that the Navigator can also be entered by specifying the URL of
the "Add" or "Edit" button on the advancedtoolbar
Element as in the example below for the Product SDC:
rc?command=page&page=LV_Navigator&navigatornodeid=ProductList&pageid=ProductList |
To configure User buttons, use Navigator Javascript API function sapphire.navigator.editset( editpageid , navigatornodeid).
When opening the Navigator, the passed-in SDI node will be the default (selected) node. For example, you can use the QM Navigator in the Sample Maintenance page to select a set of Samples that belong to Batches. When you open the Navigator, the first Sample in the list is selected. During development, remember to pass back the SDI KeyId1 if the "Return To" page is not an SDI List page.
This cannot be tested using the OOB navigators.
Special Edit Set Properties |
Two special properties configure the Navigator Policy for Edit Set mode:

| Is Edit Set Mode |
Setting "Is Edit Set Mode" to Yes hides the "Tree View" properties that are not relevant to Edit Sets. This allows easier configuration of Edit Sets.
| Apply to Set |
"Apply to Set" is available on a per-Operation basis. Set this to "Yes" to indicate that the Operation applies only to selection of multiple items. For example, if the "Edit", "Data Entry" , and "Edit Attributes" Operations in the Edit Set context menu have "Apply to Set" = Yes, you would be able to perform these Operations on multiple items (edit multiple SDIs, Data Entry on multiple SDIs, and edit Attributes of multiple SDIs).
Master Data Setup |
|
|
Throughout LabVantage, Master Data is typically created and configured from the bottom upward. For example, creating a Product with associated Tests and Specifications requires creating these associated SDIs prior to creating the Product.
"Master Data Setup" is a feature that offers an alternate "top-down" approach. For example, you can create the Test Methods and Specifications while you are creating the Product. When editing the Product, you can then manage the Master Data hierarchy of SDIs related to the Product.
|
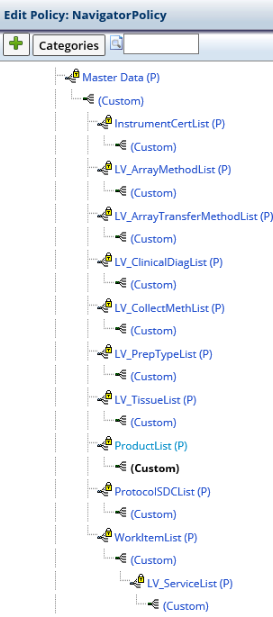
The OOB Navigator Policy has a "Master Data" node from which Master Data Navigators inherit as shown at the left. Each node beneath "Master Data" is identified by the SDI List page that launches the Navigator using a "Navigator" button that is configured on the page's advancedtoolbar Element. Note that these nodes provided OOB are subject to change, so make certain you check the nodes that are actually defined on your system. |
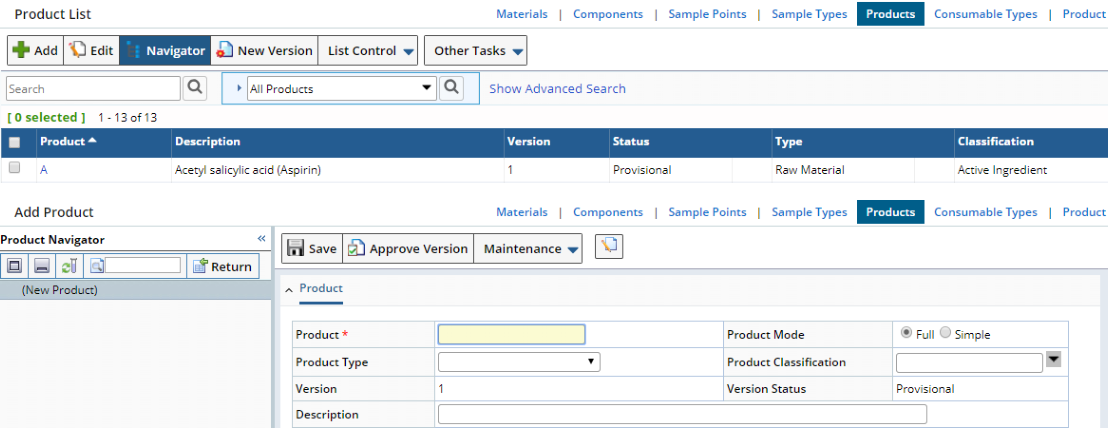
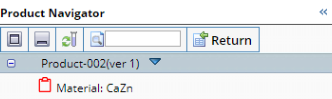
If no SDIs are selected on a List page that is defined by a Master Data node, clicking "Navigator" displays a (New SDI) branch that lets you create a new SDI. As an example, we use the Product SDC. As shown in the Master Data node hierarchy above, one of the SDC Lists configured for Master Data Setup is ProductList (P). If no Products are selected in the Product List page, clicking "Navigator" adds a (New Product) branch as ahown below. This functionality is configured in the Navigator Policy by setting "Reference Nodes → Operations → Is Add New Node Operation" to "Yes" on the relevant SDC's reference node.
Note that if SDIs are selected on the List page, clicking "Navigator" opens the Navigator for that SDC showing the Master Data hierarchy of objects for the selected SDIs.
 |
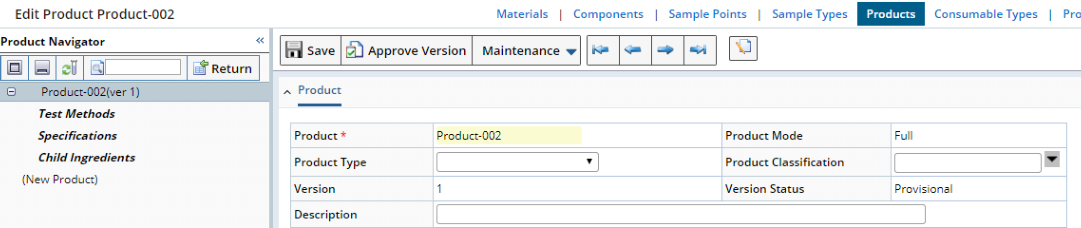
After saving, the tree is automatically refreshed to render the Product Master Object hierarchy.
 |
You can then begin building the Product Master Data hierarchy. Note that the Quick Create SDI feature saves time when working within the Master Data hierarchy. For example, you can use Quick Create SDI to create a new Material from within the Product Maintenance page.
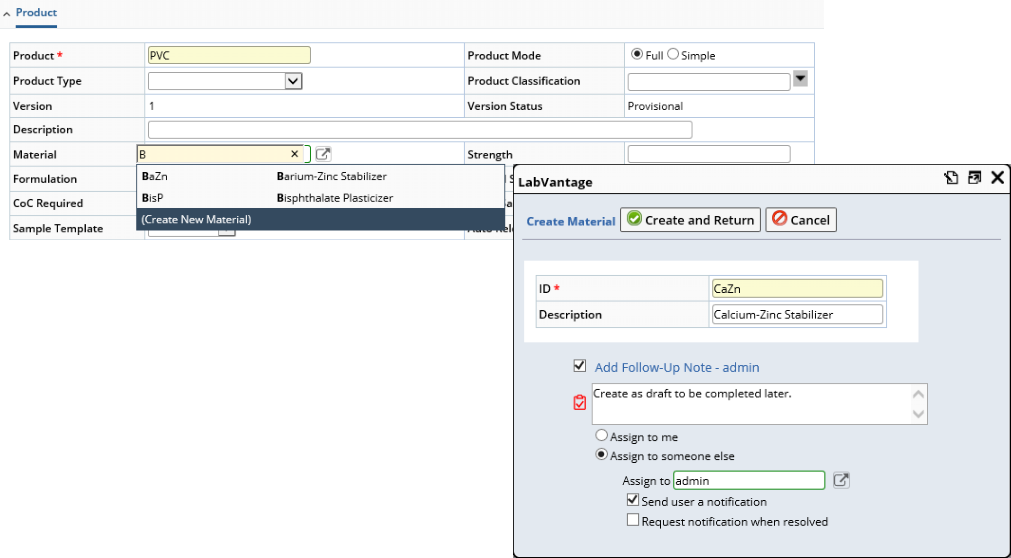 |
After saving, the tree refreshes to show the newly created Material. Follow-Ups are identified by the Follow-Up icon.
 |
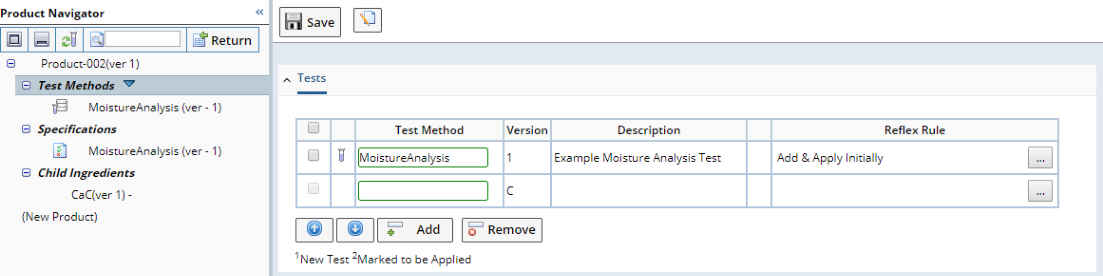
The Quick Create SDI feature speeds further construction of the hierarchy. In the example below, an existing Test Method can be selected or a new one can be created.
 |
The same methodology is used for Specifications and Child Ingredients. You can therefore build the Product Master Data hierarchy without tediousy navigating through the interface.
 |