Overview |
|
|
Overview |
|
|
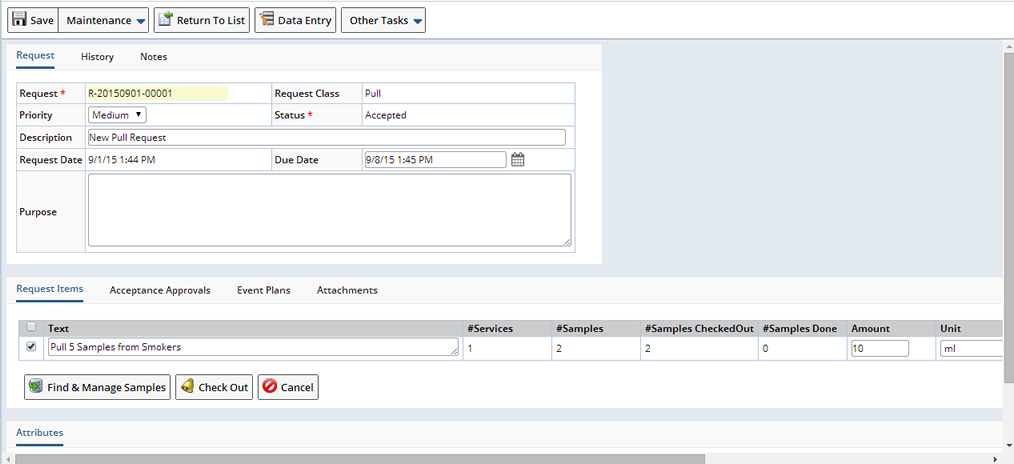
Using the Request Module create requests of the Biorepository (such as from a scientist). These Requests could be to Pull Biobanking Samples for shipment or for disposal. Pull to ship requests can be general in nature such as Pull 5 Samples from Smokers and 5 Samples from Non Smokers. Dispose Requests might include any Samples exp ring within the month. Requests can include the following:
| • | Requests can contain multiple Request Items. Use Request Items to identify the different kinds of Samples you want to ship or dispose, (such as Pull 5 Samples from Smokers). A Request can include upwards of 2500 of samples. |
| • | Choose to require Acceptance Approvals. Require acceptance of the Request before it is fulfilled. Optionally Accept or Reject individual Request Items. |
| • | Search for and associate Samples to Request Items. Choose to do so while adding a Request or during Request Acceptance. |
| • | View and/or print a Pull Request PickList (separated by Freezer) for each Request Item. |
| • | Fulfill Requests using Request Item Checkout. Bar code Scanning of the Sample Id ensures the correct Sample is referenced. |
Once Samples are identified and the Request is Accepted you can choose to ship the Samples directly from the Request or using Advanced Storage and Logistics.
See Request Management for detailed information about defining common Request functionality.
Adding and Drafting Requests |
|
|
To Add (or draft) a Request navigate to:
| LIMS | → | Requests | → | Add Request |
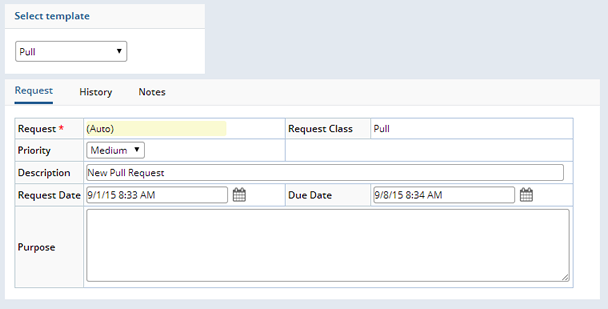
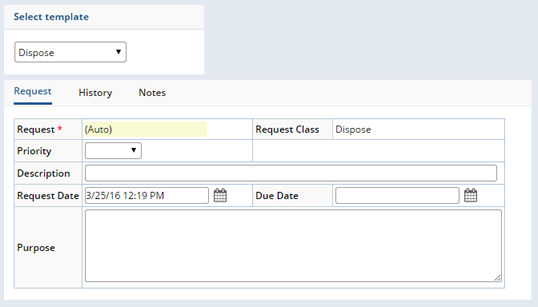
The Add Request Page displays. Choose either the Pull (Pull to ship) or Dispose template.
| Pull to Ship | Pull to Dispose | |
|
|
Any information defined at the template level defaults to the Request. See Request Management for detailed information about the fields and tabs in the Add Requests page.
Enter general information about the request and "Save".
Once Saved the detail tabs display. When adding a Request it is the Request Items that determine which Samples to pull, the amount, and any testing to be performed. Details are different depending on the type of Request you are creating. The following sections define each, the Pull to ship and the pull to Dispose Request types.
Pull to Ship Request Items |
Request Items identify the specific types of Samples you need pulled.
| Field | Description |
| Text | Describes the criteria of the Sample to be pulled, such as Pull 5 Samples from non smokers. |
| #Services | The number of Services added to this Request Item. These Services are associated to the pulled sample at the time they are checked out. |
| #Samples | The number of selected Samples. See Find and Manage Samples for more information. |
| Amount | The physical size of the amount of Sample to be pulled. |
| Unit | The unit of the Amount pulled. |
| Status | The status of the Request Item. |
| Ship to Location | The Location to which to send the Pulled Sample. |
| Ship to Contact | The Contact in that Shipping location to whom the Sample will be sent. |
Using the "Ship to Location" lookup choose the Shipping Location to which you are Shipping the Samples and define a "Ship to Contact" in that Shipping location.
"Save" the Request Item.
Once a Request Item is defined you can perform any of the following operations.
Select the Request Item and click the "Services" button. The Manage Services dialog opens where you can add Services such as "testing" or "cut slides". Services defined here are added to any Samples associated with this Request Item. Select the Request Item and click "Services". The Manage Services dialog displays.
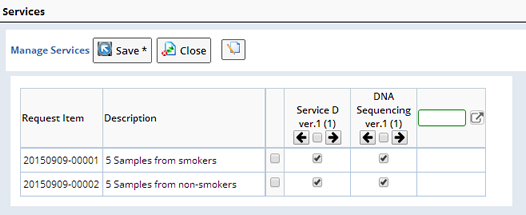
Use the lookup to find additional Services. Check or uncheck a Service to include it for a Sample. "Save" your changes. Upon saving a count of associated Services is displayed in the "# of Services" field within the Request Item.
Either the Requestor or the person approving the Request can find and include the specific Samples to be pulled for this Request.
The "Find & Manage Samples" button opens the Find Samples dialog where you can choose from a list of available Samples. In order for a Sample to appear on this list it must include a Study (be a Biobanking Sample), and not be Allocated.
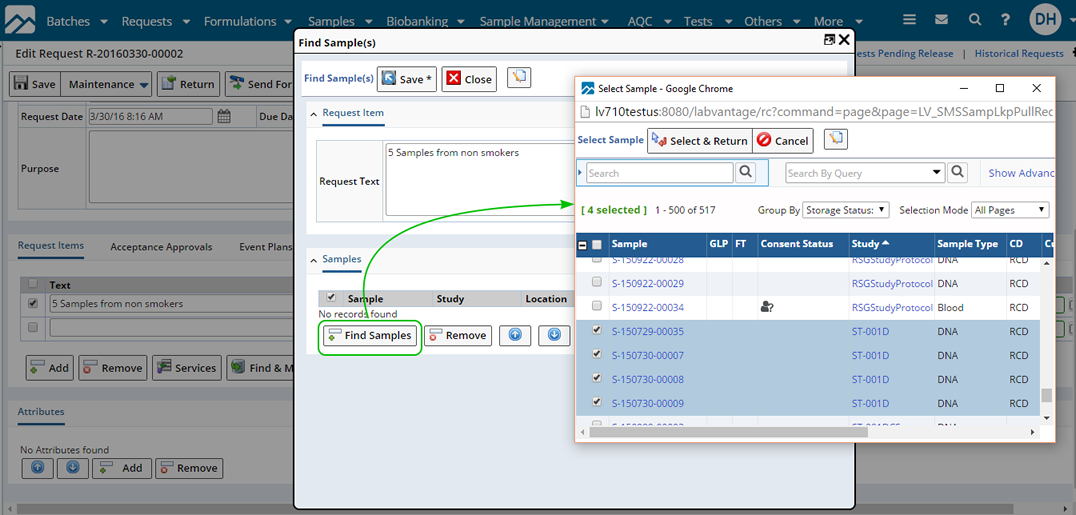
Select the Samples you want to pull for this Request Item. Click "Select & Return". The selected Samples are added.
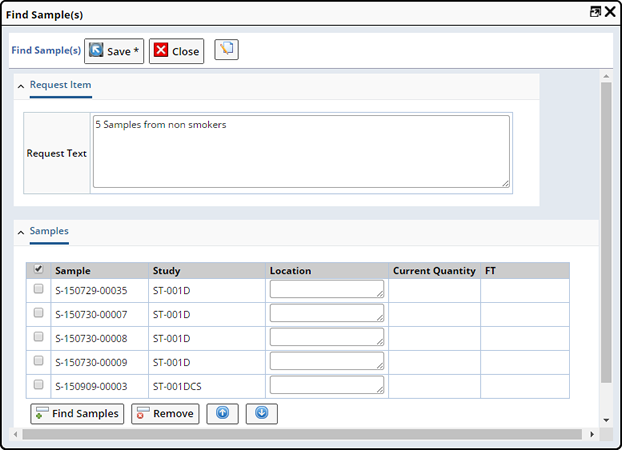
"Save" the Samples. Upon Saving the Current Quantity fills in based on the Sample amount.
In the Request Item tab, the number of Samples associated with this Request Item ("# Samples") field is updated to include the Samples.

See Pull Request fulfillment for details about Checking Out and shipping Samples.
Once a Request is Accepted and becomes an active Request you can no longer add Request Items, only Edit existing.
Once the Pull Request has been Added and Edited to include all components, it will need to be Accepted. Whether you have defined Acceptance Approvals or not you need to send the Request for Acceptance.
You can send a Request for Acceptance from the Edit Request Page or the New Requests List page. See Request Management for more information about Accepting Requests. After Acceptance, you can print the Pull Report, and use that report to help fulfill the request. See Pull Request Fulfillment for more information.
Pull to Dispose Request Items |
When adding a Dispose Request use text to describe the Samples you intend to dispose. Choose to "Add" new Request Items and/or "Remove" any that defaulted from the Template.

Once you have defined the Request Item you can search for, and manage the Samples to be Disposed. Select the Request Item and click "Find and Manage Samples". The Find Samples Dialog displays, from there click the "Find Samples" button to open a lookup where you can select Samples for disposal. See Find and Manage Samples for more details.
Once you have identified the Samples to dispose you will need to check them out of the biorepository. Select the Request Item for which you want to check out Samples and click "Check Out". The Disposal Fulfillment Dialog displays. These services are associated to the pulled Sample at the time they are checked out.
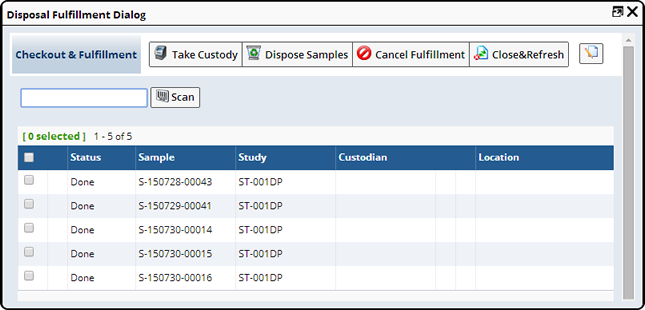
Select the Samples you want to Dispose and click "Dispose Samples". The Status changes to "Done". When all Samples are "Done" the Request Item Status changes to "Done".
Optionally choose to Cancel Fulfillment on the selected Samples. The Status changes to "Cancelled". All Samples must have a Status of either "Done" or "Cancelled" before the Request Item is considered "Done". This is used when Samples originally thought would be disposed will not be. Therefore, the Cancel Fulfillment button will cancel those selected samples, allowing the entire Request Item and Request to be considered done.
Finished Disposal Requests that require Release Approvals move to the Pending Release Request list. See Releasing Requests for more information. Those without Release Approvals move directly the Historical Request List.
Once a Request is Accepted and becomes an active Request you can no longer add Request Items, only Edit existing.
Once the Dispose Request has been Added and Edited to include all components, it will need to be Accepted. Whether you have defined Acceptance Approvals or not you need to send the Request for Acceptance.
You can send a Request for Acceptance from the Edit Request Page or the New Requests List page. See Request Management for more information about Accepting Requests. After Acceptance, choose to print a Pull Report to help fulfill the request.
Pull Request Fulfillment |
|
|
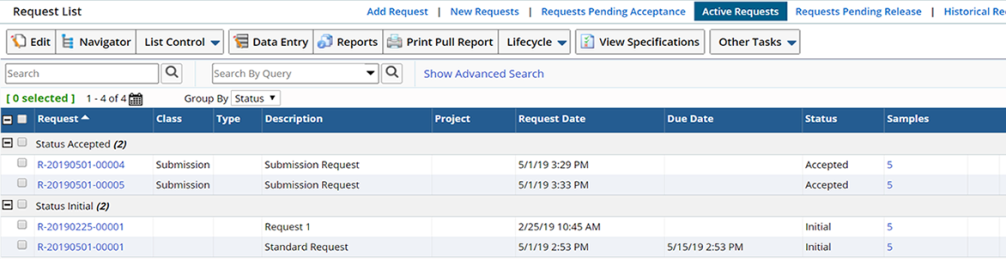
Accepted Requests display on the Active Request list and are ready for "Fulfillment", which essentially means that the Request contains all items required to fulfill the Request.
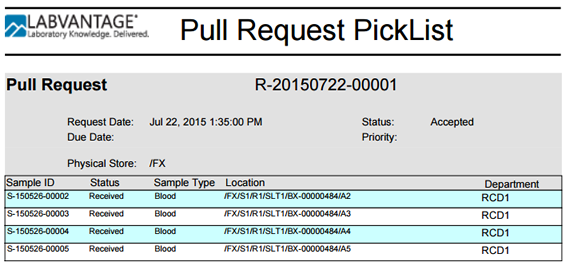
When fulfilling a Pull Request you have the option to print a Pull Report that details the samples to be pulled. Click "Print Pull Report" to view and then print the Pull Request PickList.
Ship Pulled Samples |
When the Request is Accepted Samples can be be shipped according to the details of the Request. From the Active Request List select the Request and click "Edit". The Edit Request page displays.
Select the Request Item whose Samples you intend to Ship and click "Check Out". The Checkout Fulfillment Dialog displays.
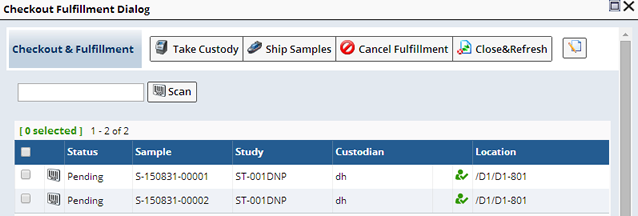
Choose to Scan Sample Id (Sample is automatically selected in the list) or select a Sample in the list. Should you enter or scan a Sample ID more than once or Scan a Sample that is not included with the Request an audible alarm will sound indicating a problem with the scanned Sample. The scan icon![]() will appear next to scanned Samples after taking custody.
will appear next to scanned Samples after taking custody.
Use the "Take Custody" operation to remove the selected Samples from their current Storage Location and place them in "your" custody. Upon saving, the Location is cleared.
The "Ship Samples" operation opens the Add Package dialog.
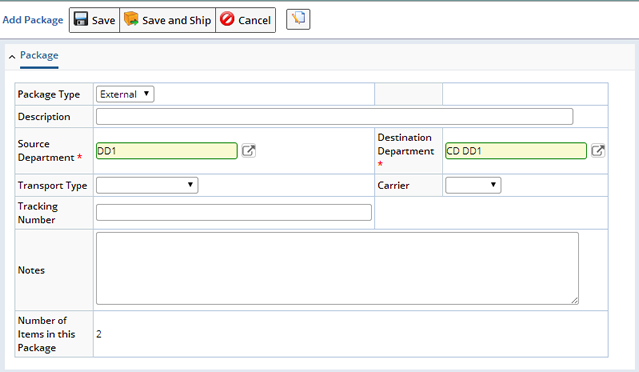
Enter details about the Package.
| Field | Description |
| Package Type | Define the Type of Package. Choose Internal or External. |
| Description | Describe the Package. |
| Source Department | Using the Lookup select the Department from which the Package is being shipped. |
| Destination Department | Using the lookup choose the Department to which the Package is being shipped. |
| Transport Type | Choose how the Package will be shipped. |
| Carrier | Identify the Carrier to be used. |
| Tracking Number | Text to identify the tracking number assigned to the Package. |
| Notes | Include any Notes with the Package. |
| Number of Items in this Package | The number of Items (or Samples) to be included in the Package. |
When you are finished defining the Package click "Save and Ship". Once shipped, the Sample is marked as "Done".
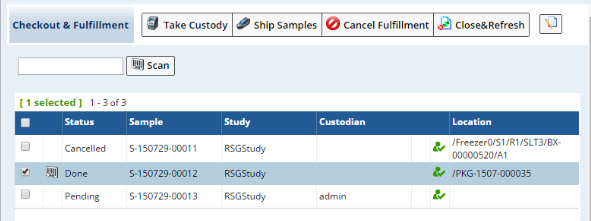
The Cancel Fulfillment operation Cancels Fulfillment of the selected Sample. When a Fulfillment is Cancelled for a selected Sample, this means that the Sample is no longer required to fulfill the Request. Note that the actual Sample Status within the Sample Life Cycle remains unchanged.
Close the Checkout and Fulfillment dialog and refresh the Request page to display the current Status of the Request Item.
Ship Pulled Samples Using Advanced Storage and Logistics |
|
|
If you would prefer to ship the Samples within a Package or need to include Samples from more that one Request Item in the Package, use Advanced Storage and Logistics.
Navigate to LIMS → Packages & CDTs → Add Package for Shipment.
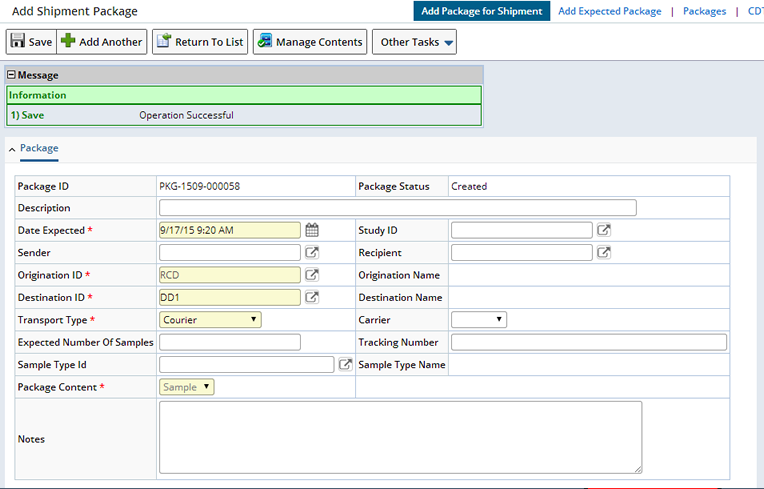
Enter details about the Package you intend to create. See Add Package For Shipment for detailed information about adding Packages. "Save" the Package. Upon Saving the detail tabs display.

The Contents tab displays any Samples included in the Package. To add Samples to the Package click the "Manage Contents" button. The Manage Package Contents (TISM) page displays.
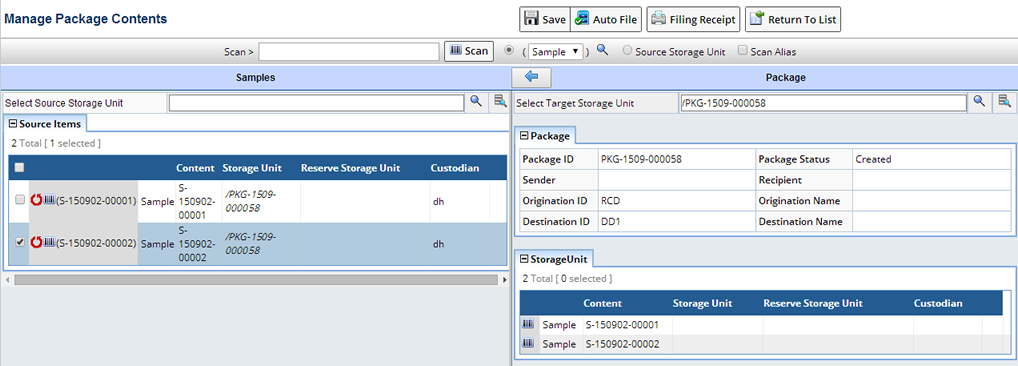
Here you can scan the Samples or search within selected Source Storage Units to find the Samples you want to include. See the TISM Page for detailed information about using the Manage Package Contents page.
Once you have selected the Samples to include click "Save". Return to the Package List page where you can Ship the Package.
Completing the Request |
|
|
A Pull Request is considered Complete when all Request Items are Done. Request Items are considered Done when they are Shipped according to the Request. As Request Items are started (at least one Request Item is Done) the Status becomes "InProgress". When all Request Items are Done the Request is "Released".