Overview |
|
|
|
Request Management |
Overview |
|
|
The Request Management module provides the opportunity to create requests of the laboratory. Create Submission Requests, defining a Product from which you would like to obtain a Sample and define testing, as well as Requests that Pull and ship Biobanking Samples or pull to Dispose Biobanking Samples.
For each of these kinds of Requests you have the following capabilities:
| • | Requests are entered initially as drafts which are then sent for Acceptance. |
| • | Requests can be accepted automatically or with Approvals. |
| • | You can associate Samples with Requests and synchronize Request Status with Sample Status. When associated Samples are complete the Request is Released either automatically or with Release Approvals. |
| • | When entering Samples outside of Request Management you have the option to associate the Sample with a Request. |
Use the LIMS menu to navigate Requests.
| Menu Item | Description |
| Add Request | Add a new Request. |
| New Requests | View a list of Requests that have been added but not yet sent for Acceptance. These Requests are in the Draft state. From this list you can send a Request for Acceptance. |
| Requests Pending Acceptance | View a list of Requests that have been sent for Acceptance but require Acceptance Approvals and have not yet been Approved. |
| Active Requests | Requests that are in progress. They have been Accepted and are waiting for associated Samples to be completed. |
| Requests Pending Release | Requests that that have been Completed but are awaiting Release Approval. |
| Historical Requests | Requests that have been completed and or Released. Rejected and Cancelled Requests are also listed here. |
The following chart shows the flow of Requests.

The following table describes Request States:
| Request State | Description |
| Draft | The first state of the Request after it is entered. A Request is in the Draft state until it is sent for Acceptance. |
| Pending Acceptance | If Acceptance Approvals are required, the State Changes to Pending Acceptance when submitted. |
| Accepted | The Request has been Approved/Accepted. |
| Denied | Request did not pass Approval. Returns to the New Request List with a Status of Denied. |
| Initial | The Request has been sent for Acceptance and Approvals are not required. |
| Received | Rolled up status once all associated Samples have been Received. |
| Open | Rolled up status once Testing on any associated Sample has started. |
| Completed | Rolled up Status of the Request indicating that all Testing has finished. |
| Released | All Samples have completed and (if required) Request Release is Approved. Final disposition and Terminal Status. |
| Rejected | Request Release is not approved. Final disposition and Terminal Status. |
| Cancelled | The Request is manually Cancelled. Terminal status. |
| OnHold | The Request is manually placed OnHold. Testing on samples is not affected. |
Preparing to Use Requests |
|
|
When preparing to use Requests consider pre-defining the following:
There are four User Roles associated with Requests, Request Submitter, Request Acceptor, Request User and Request Releaser. Be sure to include Request Roles for users who will be using, submitting, accepting and releasing Requests. See User Roles for details about Request Roles.
Edit the RequestType Reference Type to define Reference Values (types of Requests, R&D or Customer for example) that will default as options into Templates. Request Types are used when creating Submission Requests.
Templates are strongly recommended when defining Requests. Many essential details are defined at the Template level and cannot be added or changed at the Request level. Plan to define Templates if you intend to do any of the following:
| • | Require Acceptance or Request Approvals |
| • | Automatically Release Requests |
| • | Define when in the Request life Cycle Samples will be created |
Pre-define Projects with which you can associate Requests.
For backward-compatibility, you can choose not to synchronize the Sample State chart with Requests. See Batch Sample Policy for more information.
Defining Projects |
|
|
Projects allow you to group Requests into a defined Project. New Requests are included in the referenced Project.
| LIMS | → | Others | → | Projects |
The Project List Page displays.

Click the "Add" button to add a new Project. The Add Project page displays.
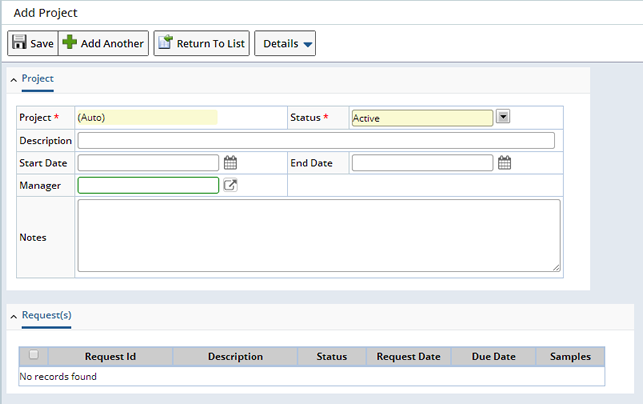
The following table describes the filed's on the Add Project page:
| Fields | Description | ||||||||
| Project | The Project Id is automatically generated. | ||||||||
| Description | Describe the Project. | ||||||||
| Status | Choose the current Status of the Project:
|
||||||||
| Start Date | The Date the Project will begin. | ||||||||
| End Date | The Date the Project will end. | ||||||||
| Manager | The Manager assigned to the Project. | ||||||||
| Notes | Detail any notes related to the Project. |
Click "Save" to Save the Project, the Requests Tab displays.

Once a Project is referenced on a Request, the Request will be listed here. You can view all Requests associated with a Project.

Clicking the Request Id opens a view of the Request. Clicking the Sample (number) opens the Sample List page where you can perform data entry.
Adding and Drafting Requests |
|
|
Adding a new Request is essentially drafting a request that will need to be Accepted to move forward.
Note: Before adding a Request it is important to define a Request Template. Many components are defined at the template level only, see Request Templates for details about defining a Request Template.
Drafting a Request is the process of determining the type of Request you intend to create, then specifying the kinds of Samples needed to fulfill the Request. Depending on the type of Request, different information must be provided. Chose to create one of the following types:
| • | Submission
Submission Requests identify a LabVantage Product for which you would like Samples for testing. Define details of the Sample needed and the testing required. |
| • | Pull to ship(Biobanking)
Pull Requests can be general in nature such as Pull 5 Samples from Smokers and 5 Samples from Non Smokers. Using this criteria, the Request is fulfilled by selecting Samples within the biorepository that meet this criteria, then shipping them accordingly. |
| • | Pull to Dispose
(Biobanking)
Dispose Requests identify a group of Samples to be disposed. These requests are also general in nature, such as "All Samples expiring within the month". |
Submission Requests |
To Add (or draft) a Submission Request navigate to LIMS → Requests → Add Request.
The Add Request Page displays.
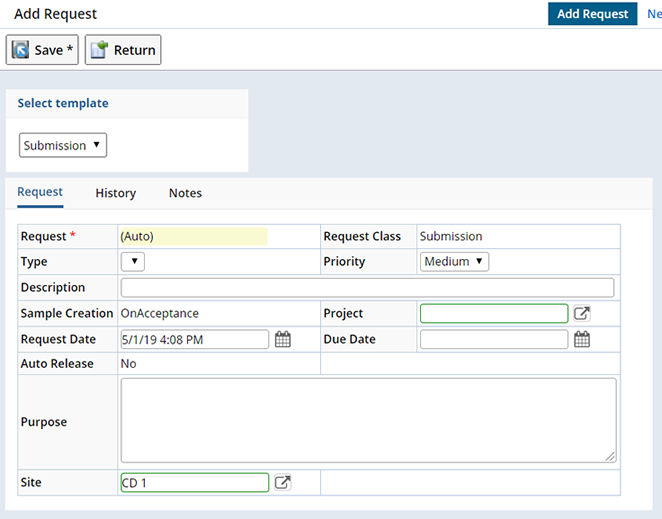
Select the Submission template. Information defined within the Submission Request Template will default to the new Request.
Note: If you do not choose a template the Sample Creation and Auto Release fields default to "OnSubmit" and "No" and are not editable.
| Request Tab |
Fields on the Request Tab define information about the Request.
| Fields | Description | ||||||||
| Request | Automatically generated Request ID. | ||||||||
| Request Class | The Request Class defaults from the selected Request Template and is not editable.
The Request Class (Submission, Pull or Dispose) determines the type of Request and therefore which detail tabs to display. |
||||||||
| Type | Choose the Request Type. If you defined REquest Type Reference Types they will display here as options. | ||||||||
| Priority | Identify the Priority of the Request. Choose Low, Medium or High. | ||||||||
| Description | Describes the Request. | ||||||||
| Sample Creation | Determines when Samples
for this Request are Created. Defined in the Request Template and is not editable, or if a template is not defined, defaults to "OnSubmit".
|
||||||||
| Project | The Project with which this Request should be associated. Use the Lookup to find a pre-defined Project. | ||||||||
| Request Date | Defaults to the current date or select a date using the calendar. | ||||||||
| Due Date | Optionally enter a due date for the Request. When a Request has not been Released by the due date the Due Date Icon |
||||||||
| Auto Release | Determines whether or not the Request is automatically released when all associated Samples are Complete.
Defaults from the Request Template and is not editable. If no template is selected, the default is "No". If "Yes", automatically Release the Request. If "No", the Request is sent for Approval before Release. |
||||||||
| Purpose | Describe the purpose of the Request. | ||||||||
| Site | Site associated with this Request (see Departments). |
| History Tab |
The History Tab displays historical date and User information about Requests. Received Date, Started Date and Completed Date refer to the life cycle of Samples associated with the Request.

| Notes |
Use the Notes tab to add notes about the Request.
"Save" the Request, the Request Id fills in and the detail tabs display.
The following detail Tabs become available.
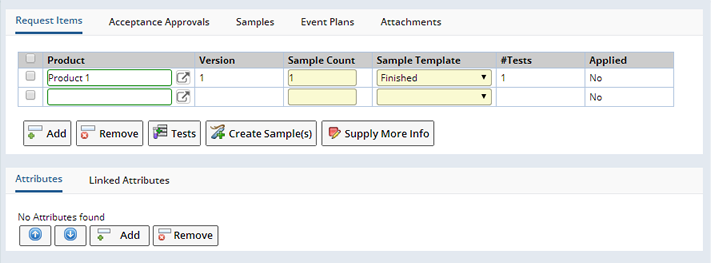
| Request Items |
Request Items specify details about Samples needed. Choose to "Add" new Request Items and/or "Remove" any that defaulted from the Request Template.

| Field | Description | |||
| Description | Generally describes the request. | |||
| Product | If the request is for a LabVantage Product, specify the Product for which you would like to create Samples. Use the lookup to choose a Product.
|
|||
| Version | The Version of the Product selected. When empty the current version of the Product will be used. | |||
| Sample Count | Number of Samples you want to create for the defined Product. | |||
| Sample Template | Sample Template to be used. | |||
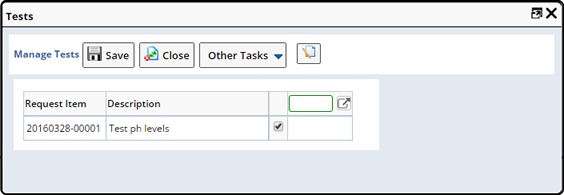
| #Tests | Displays the number of Tests associated with this Request Item. See Tests below for details about defining Tests. | |||
| Applied | Read only, whether or not the Samples have been Applied (Created). |
You can also perform the following operations by selecting the Request Item and clicking any of the following buttons.
Add and manage the Tests associated with this Request Item. Select the Request Item to which you want to add the tests and click "Tests". The manage Tests dialog displays. Using the lookup choose the Tests to add.
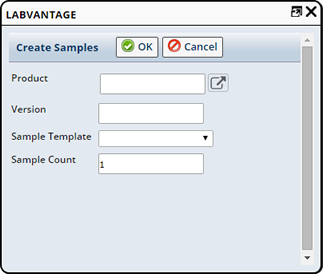
Create Samples On Demand. If, when adding the Request, you chose "On Demand" in the Create Samples field, the Create Samples button is available. Click "Create Sample(s)" to add the defined Samples immediately. A message displays indicating that the Samples were created successfully.
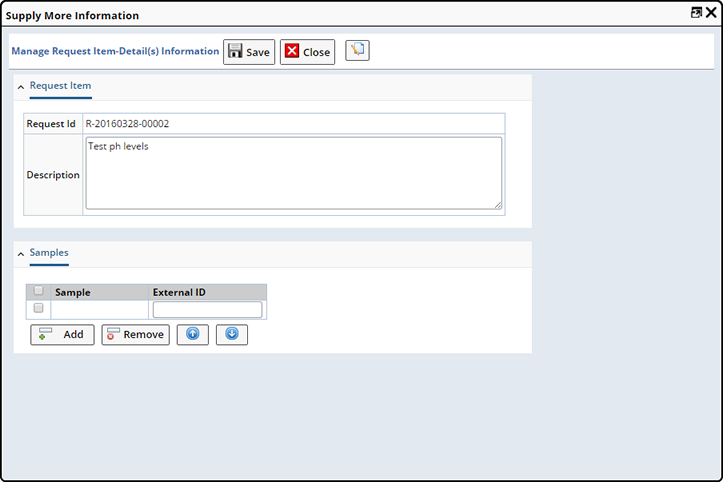
Provide additional details about the Request Item including an External Id for associated Samples.
| Acceptance Approvals |
Acceptance Approvals defined at the template level will display here and cannot be changed. See Acceptance Approvals (Template) for more information.

| Samples |
Displays Samples associated with the Request.

Any Samples defined for Request Items are listed here. Depending on the Sample Creation field (defined in the Request Template) Samples are created as follows:
| Sample Creation Value | Description |
| OnSubmit | Samples are created when the Request is Sent for Acceptance |
| OnAcceptance | Samples are not created until the Request is Accepted. Choosing to defer Sample creation until the Request is Accepted ensures that no Samples are created in the event that the Request is denied. |
| OnDemand | When the "Create Samples" in the Request Items tab button is clicked. If not created manually Samples are created when the Request is sent for Acceptance. |
Once the Samples are created they will display in the Samples Tab.
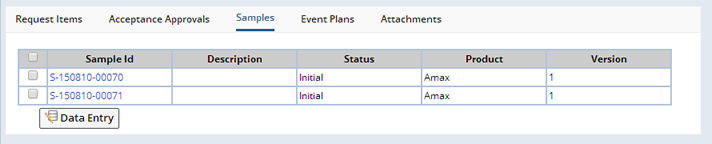
Clicking the Sample Id allows you to view Sample information.
| Event Plans |
Event Plans perform functions when "Events" occur, define event plans for Requests to inform Approvers when a Request is on the pending Approval list for example.

Clicking "Add Event Plan" opens a window where you can select an Event Plan. See Event Plans for information about defining Event Plans.
| Attachments |
Adds Attachments to the Request.

Clicking the "Manage" button opens the Attachment Manager Page where you can associate Attachments with the Request. See Attachments for detailed information about Attachments.
| Attributes and Linked Attributes |
Attributes are selected at the Template level and default into the Request.

You can optionally Add or Remove Attributes. See Template Attributes for more details about adding Attributes to Requests.
Biobanking Pull Requests |
Pull Requests are used to pull Samples from the bioreposiory for shipping (Pull) or disposal (Dispose). See Pull Requests for specific information about defining a Pull or Dispose Request. Pull Requests take the request a step further by providing methods for fulfilling a Request such as selecting the specific Samples you want to pull then defining pack and ship information.
Accepting Requests |
|
|
Once a Request has been added it will need to be Accepted. Whether you have defined Acceptance Approvals or not you need to send the Request for Acceptance. You can send a Request for Acceptance from the Edit Request List Page and the New Request List Page.
Click the "Send for Acceptance" button to either automatically Accept the Request when no Request Approvals are defined, or to place the Request on the Requests Pending Acceptance list page.
Note: Once the Request is sent for Acceptance and the status becomes Pending Acceptance, users with Request Submitter Role Access will not be able to Edit the Request. However, they can Cancel the Request.

The Request will either:
| • | Move directly to the Active Request Page (If you have not defined Acceptance Approvals). The Status changes to Initial. |
| • | Move to the Requests Pending Acceptance list page. The Status changes to Pending Acceptance. |
The New Request List Page displays Requests that are still in the Draft State. These Requests may have been drafted and Saved, but not yet sent for Acceptance. Requests that were denied during Acceptance Approval will also display here with a Status of "Denied". You can make any necessary adjustments to the Request and then send it for Acceptance.
Navigate to the New Requests List Page LIMS → Requests → New Requests.
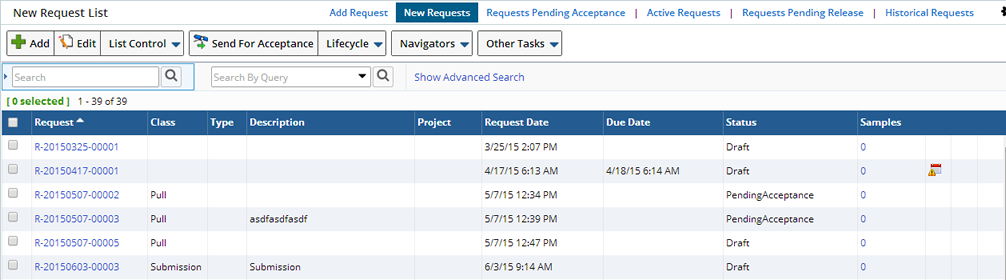
Select the Request and click "Send For Acceptance". The Status changes (and moves to the appropriate list page) depending on whether or not Acceptance Approvals have been defined.
When Acceptance Approvals have been defined the Request must be accepted from the Pending Acceptance Request List. Select the Request you want to Accept and click the "Edit & Accept" button.
Note: In order to Accept Requests you must have Request Acceptor Role Security.
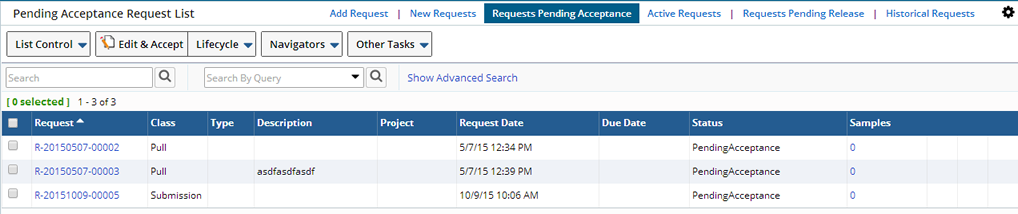
The Accept Request Page displays.
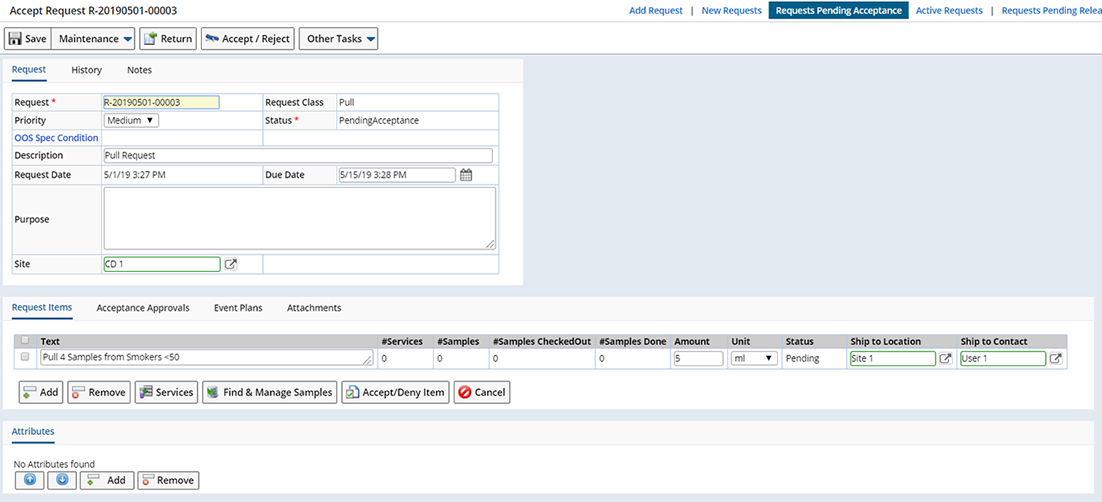
If the Request Type is "Pull" or "Dispose" you can optionally Accept or Deny individual Request Items. Select the Request Item and click "Accept/Deny Item", you are prompted for your Esig information. The Status changes from "Pending" to "Denied".

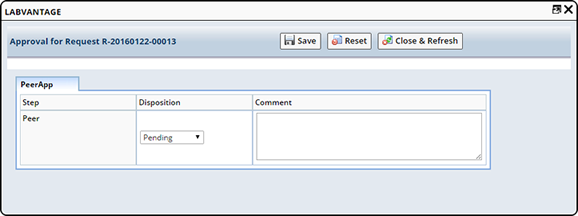
To Accept the entire Request click the "Accept/Reject" button. The Approval window opens.
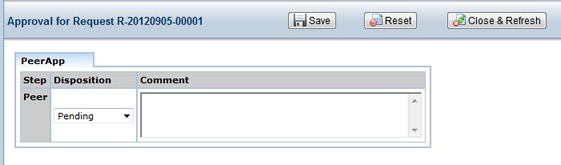
Choose a disposition (Pending, Accepted or Rejected), add any Comments and click "Save" to Accept or Reject the Request. You will be prompted to enter your Esig information. The "Close & Refresh" button closes the Approval for Request window and refreshes the Request, the Status changes to Accepted (or Denied) and the Request moves to the Active Requests List. Rejected Requests will have a Status of Denied and move back to the New Requests list page.
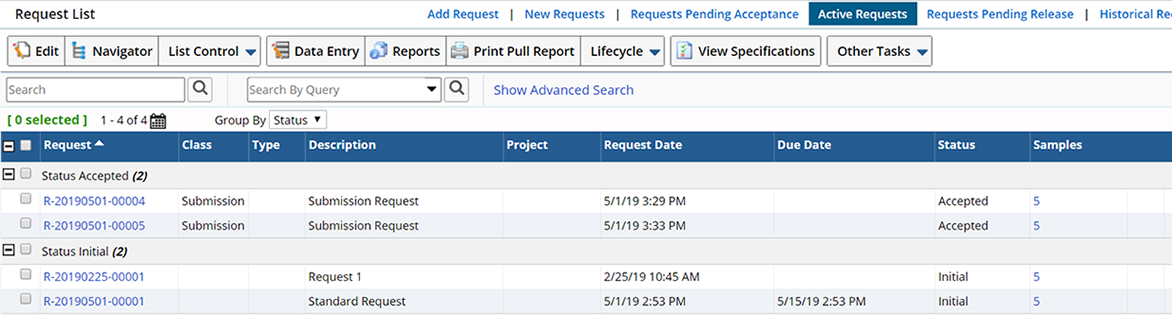
Active Requests |
| |
Once a Request is in Progress it is shown on the Active Request List. At this point Active Requests can have several possible statuses.
| Status | Description |
| Accepted | The Request required Acceptance Approvals and has passed Approval. |
| Initial | The Request did not require Acceptance Approval and was automatically Accepted. |
| Received | One or more associated Samples have been Received. |
| Open | Testing on associated Samples has started but not yet been Reviewed (Completed). |
| Buttons on the Active Request List |
Following is a description of the the Buttons available on the Active Request List page. Select a Request and click the button to:
| Button | Description |
| Edit | Edit Request information. |
| View (List Control Menu) | View the Request. |
| Delete (List Control Menu) | Delete the Request. Note: Associated Samples will not be deleted. |
| Data Entry | Opens the Data Entry page where you can perform Data Entry on associated Samples. See Enhanced Data Entry Pages for information about entering data. |
| Print Pull Report (Dispose or Pull Requests only) | Prints a report detailing the samples to be pulled.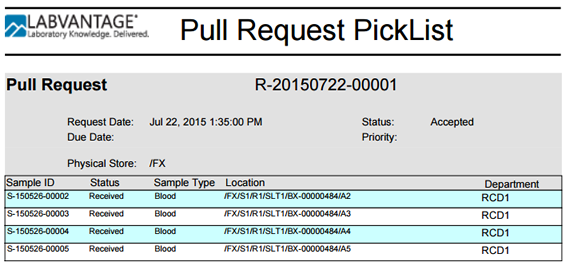 |
| View Specifications | Opens a page to view SDI Conditions (see Specifications → Viewing SDI Conditions). |
| Clear Approval (Lifecycle Menu) | Clears the Acceptance Approval, returns the Status to Pending Acceptance and moves the Request back to the Requests Pending Acceptance list. |
| Hold (Lifecycle Menu) | Places the Request on Hold. The Request remains on the Active Request list but the Status changes to OnHold. |
| Release Hold (Lifecycle Menu) | Releases the Hold on the Request, the Status returns to its previous State. |
| Create Adhoc Samples (Lifecycle Menu, Submission Requests only) | Create Adhoc Samples for Submission Requests. 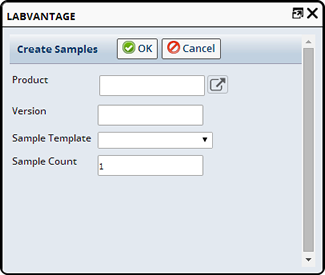 |
| Cancel | Cancels the Request. Associated Samples are cancelled based on your Batch Sample Policy decision, Cancel Action Behavior decision. See Batch Sample Policy for more information. The Request moves to the Historical Requests list. |
| Fields Displayed on the Active Request List |
| Field | Description |
| Request | Request Id. Click the ID to view the Request. |
| Class | Request Class. Submission, Pull or Dispose. |
| Type (Submission Requests only) | The Type of Request. |
| Description | A description of the Request. |
| Project (Submission only) | The Project with which the Request has been associated. Click the Project to view details about the Project. |
| Request Date | The Date the Request was entered. |
| Due Date | The Date the Request is Due. |
| Status | Current Status of the Request. |
| Samples | Lists the number of associated Samples. Click the number to view the Samples. |
The following Icons appear on Request Lists:
| Icon | Description |
| The Request has passed the defined Due Date and has not yet been Released. Rolling over the icon displays the Due Date. | |
| Indicates there has been a Specification Failure. Clicking the Icon opens the Sample List page where you can see Spec Failure Icons. |
Managing Active Requests |
From the Active Requests list page select the Request and click "Edit". The Edit Active Request page displays.
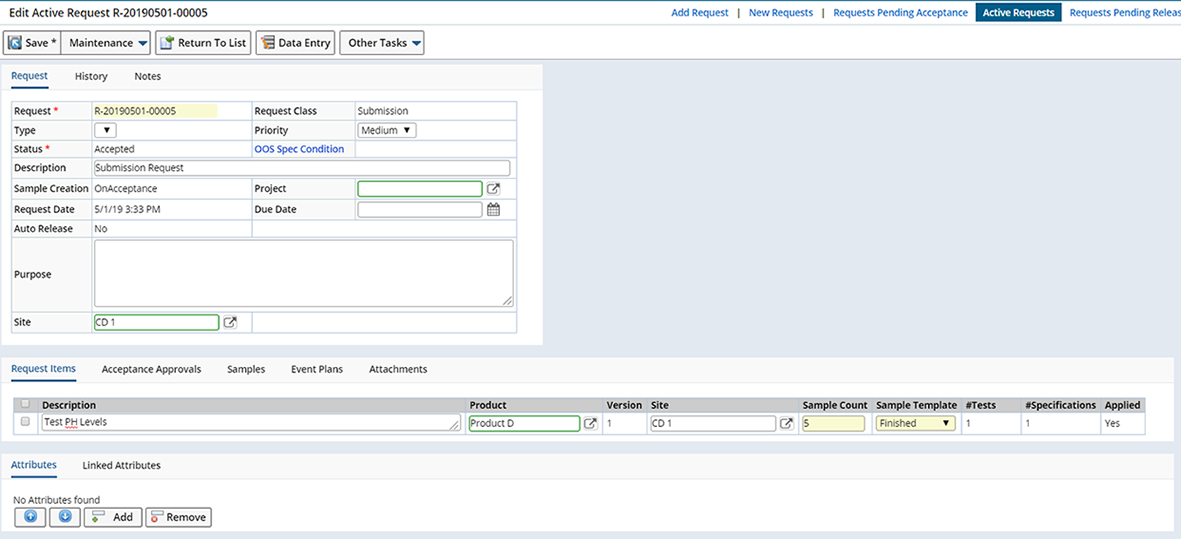
Upon Sample creation, the OOS Spec Condition field is displayed. This indicates the OOS SDI Condition for the Sample (see Specifications for more information).
Once a Request is Active you can no longer add Request Items, only edit existing. See Pull Request for details about managing Active Pull and Dispose Requests.
Click "Data Entry" to perform Data Entry on Samples associated with the Request Items.
Releasing Requests |
| |
A Request can be Released in two ways:
| • | Automatically, when no Release Approvals have been defined and all Samples have been completed and the Auto Release option is checked. Once all Samples are Complete the Request status becomes Released and the Request moves to the Historical Request List. See Auto Release for automatic Release criteria. |
| • | With Approval, when all Samples are Complete, the Auto Release option is No, and you have defined Release Approvals. The Request moves to the Pending Release Request List where you can manually Release the Request. |
Note: In order to release Requests you must have Request Releaser Role Security.
Access the Pending Release Request list:
| LIMS | → | Requests | → | Requests Pending Release |
The Pending Release Request list displays.

You have the following options from this List.
| Button | Description |
| View | View the Request. |
| Delete | Delete the Request. Note: Associated Samples will not be deleted. |
| Release | Opens the Review Request page where you can review the Request and view associated Sample Data. Clicking the Release Button opens the Approval for Request window where you can Release the Request. |
| View Data | View Sample Data Entry. |
| Hold | Places the Request on Hold. The Request returns to the Active Request list and the Status changes to OnHold. |
| Release Hold | Releases the Hold on the Request, the Status returns to its previous State. |
| Cancel | Cancels the Request. Associated Samples are cancelled based on your Cancel Action Behavior decision in Batch Sample Policy. |
| Adhoc Samples | Add Adhoc Samples to the Request. Upon clicking the AdHoc Samples button the Create Samples window displays:
Define Sample information and click "OK" to add the Sample(s). The Request returns to the Active Request list with a Status of Open. |
Select the Request you want to Release and click the "Release" button. The Review Request page displays.

Verify the Request information, you can view Sample Data Entry, Attributes, Attachments, then click the "Release" button to display the Approval for Request window.
Choose a disposition (Accepted or Rejected), add any Comments and click "Save" to Accept or Reject the Request. You will be prompted to enter your Esig information. The "Close & Refresh" button closes the Approval for Request window and refreshes the Request.
If Approved the Request Status becomes Released and the Request moves to the Historical Requests list.
If Rejected the Request Status becomes Rejected and the Request moves to the Historical Requests list. See Historical Requests List for details about UnRejecting a Request.
Whether or not you can Release Requests if associated Samples have Open Incidents depends on your decision in Batch Sample Policy, Release Requests with Open Incidents. See Batch Sample Policy for more information.
Canceling Requests |
| |
Cancel a Request from any of the following List Pages:
| • | Pending Acceptance List Page |
| • | Request List Page |
| • | Pending Release List Page |
Select the Request you want to cancel and click the "Cancel" button. The Request Status changes to Cancelled and moves to the Historical Request List page.
Whether or not associated Samples are cancelled is determined by your Cancel Action Behavior policy decision in Batch Sample Policy.
A Request can be un-cancelled if it was cancelled in error. Once the cancelled Request moves to the Historical Request List you have the option to un-cancel it. Select the Request and click the "UnCancel" button. The Request returns to the State it was when it was Cancelled.
Historical Requests |
| |
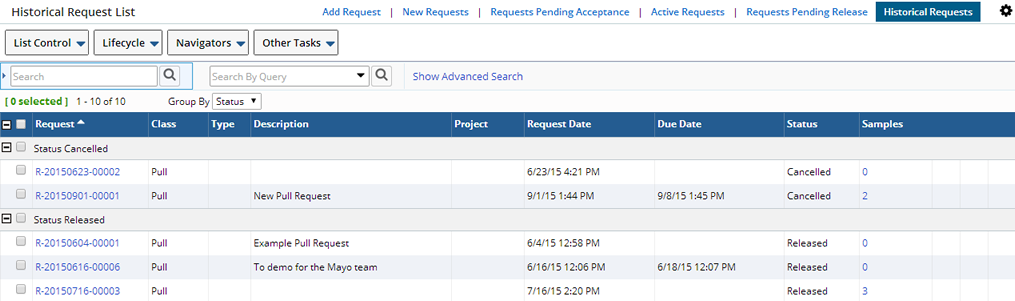
Requests move to the Historical Requests list when they are Released, Cancelled or Rejected.
You have the following options from this List.
| Button | Description |
| View | View the Request. |
| Delete | Delete the Request. Note: Associated Samples will not be deleted. |
| UnCancel | UnCancel a Request. The Request Status returns to its previous state. Note: Only users with Request Submitter, Request Acceptor, and Request Releaser Role Security will be able to UnCancel a Request. |
| UnRelease | Returns the Request Status to its previous State. If Auto Release was selected the Request moves back to the Active Request list. Note: Must have Request Releaser Role Security. |
| UnReject | Returns the Status to Completed and moves the Request back to the Requests Pending Release list. |
Fields displayed on the Historical Request List:
| Field | Description |
| Request | Request Id. Click the ID to view the Request. |
| Type | The Type of Request. |
| Description | A description of the Request. |
| Project | The Project with which the Request has been associated. Click the Project to view details about the Project. |
| Request Date | The Date the Request was entered. |
| Due Date | The Date the Request is Due. |
| Status | Current Status of the Request. |
| Samples | Lists the number of associated Samples. Click the number to view the Samples. |
Associating Requests with Samples |
| |
When adding or editing a Sample you can optionally associate the sample with a Request.
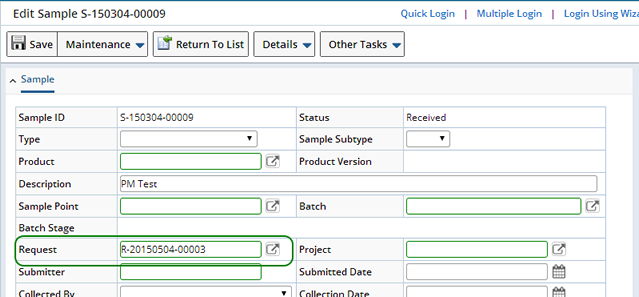
Clicking the lookup icon opens the Select Request window where you can choose a Request.
Using the Request Navigator |
| |
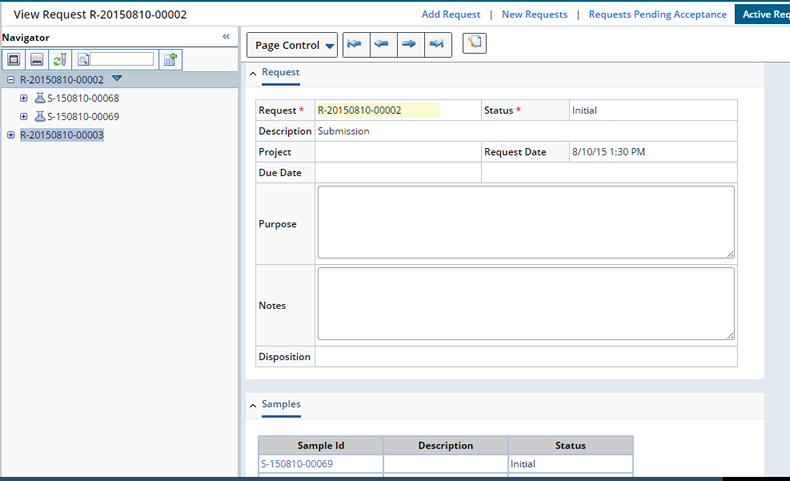
Use the Request Navigator to easily view and manage Requests and associated Samples. Click "Request Navigator" in the Navigators Menu. See Navigator for details about using the Navigator.
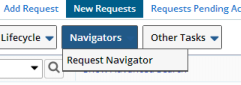 | The Request Navigator Displays.
The Navigator displays the Request and any associated Samples. You can further expand to view the Samples and perform Data Entry. |
Defining Request Templates |
| |
Request Templates allow you to pre-define typical Request information including when to create Samples, define Approvals and associate Products. When the Template is referenced in a Request the information defined here will default to the Request. LabVantage supplies three pre-defined Templates for Submission Requests, Pull Requests, and Dispose Requests. You are strongly encouraged to use Templates as many options are only defined at the Template level and cannot be changed at the Request level.
| Lab Admin | → | Templates | → | Request Templates |
Add a Template
From the Request Template List page click the "Add" button, the Add Request Template page displays.

| Fields | Description | ||||||||
| Request | Upon saving you will be asked to enter a Template ID, enter this ID to reference this Template when adding Requests. | ||||||||
| Request Class | The Request Class (Submission, Pull or Dispose) determines the type of Request to be created and therefore which detail tabs display.
Depending on the Request Class different fields and options are available. | ||||||||
| Type (Submission Class only) | Choose the Request Type. If you defined Request Type Reference Types they will display here as options. | ||||||||
| Priority | Identify the Priority of the Request. Choose Low, Medium or High. | ||||||||
| Description | Describe the Request. | ||||||||
| Sample Creation (Submission Class only) | Defines when samples will be created. Note: Samples are determined by the Request Item tab in the either in the Template or the Edit Request page. See Request Items for more information.
| ||||||||
| Auto Release (Submission Class only) | Check this box to automatically Release the Request when all associated
Samples are complete.
Requests are automatically Released when the Auto Release flag is yes (checked) and the Request is complete, meaning all Sample testing and any associated Specifications have passed and are complete. See Releasing Requests for more information. | ||||||||
| Purpose | Describe the purpose of the Request. |
Saving the Template
You will be prompted to enter a Template ID when you click "Save". The Save As Template window displays. When associating a Request Template with a Request this is the value that will identify this template.
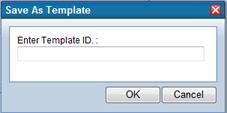
Once you click "OK" and the Template is saved additional tabs become available.

| Request Items |
Typically Request Items are entered when drafting a Request however you do have the option to define them at the template level. See Request Items in Adding and Drafting Requests for more information.
| Acceptance Approvals |
Define approvals for accepting the Request. Clicking the "Add Type" button opens the Select Approval Type window where you can select an Approval process. Select the Approval you want to use and click the "Select and Return" button. You will not have the option to add Acceptance Approvals at the Request level.
The Approval will appear in the Approvals tab. Assign a User to the Approval in the Assigned To field.

Note: You can not use the same Approval for both Acceptance Approvals and Release Approvals.
When no Acceptance Approvals are defined, when the the Requestor submits the Request for Acceptance, the Request moves to the Active Request list and the Request Status becomes Initial.
| Release Approvals |
Define approvals for Releasing the Request. You will not have the option to add Release Approvals at the Request level.
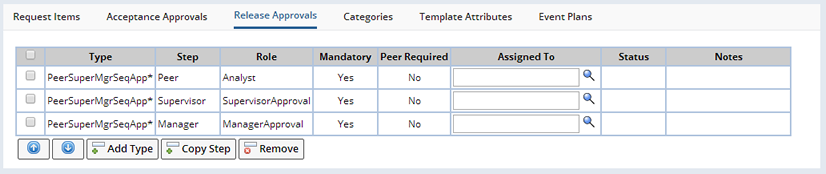
Note: You cannot use the same Approval for both Acceptance Approvals and Release Approvals.
When no Release Approvals are defined the Request is automatically Released when Complete, the Request Status transitions to Released.
| Categories |
A Category allows you to group Requests into Categories you define. Defining a Category here will group any Request referencing this Request Template into the defined Category. See Categories for details about defining Categories. You will not have the option to add Categories at the Request level.

| Template Attributes |
Attributes define additional information that can be included with a Request. Attributes are associated with the Request SDC at the System level and will display in the Template Attributes Tab. Select the Attributes you want to include with the Request and "Save".
Note: If Attributes are not allowed (OOB Attributes are allowed), the Attributes Tab will display the message "SDC Request does not allow attributes". See Attributes for detailed information about establishing and defining Attributes.

| Event Plans |
Event Plans perform functions when "Events" occur, define event plans for Requests to inform Approvers when a Request is on the pending Approval list for example.

See Event Plans for information about defining Event Plans.