Introduction
| Top |
|
Formulation Project |
Content |
|||||||||||||||||||||
|
Introduction |
|
|
Different Formulation iterations are grouped together within a Formulation Project for evaluation. Ingredient, equipment, and processing costs are considered, and totals are calculated real time, as values are changed.
For each Project define:
| • | The Formulation Method. A Formulation Method is a collection of ParamLists used to perform "Ingredient" or "Aggregate" calculations. See Formulation Methods for more information about Calculations. |
| • | A Template on which all new Formulations are based. |
Both the Formulation Template and new Formulations define:
| • | Formulation Ingredients and their proportional parts or quantities (as expressed in the recipe). Identify Ingredient Source Batches to control Ingredient Inventory. |
| • | Different Stages to process within each Formulation. Include any additional costs associated with the Stage. |
| • | Any Equipment needed for the Formulation. Include any additional costs associated with using the Equipment. |
| • | Batches to be created for each Formulation. |
| • | Any testing to be done on the Batch Samples. |
| • | Any Specifications to include on the Batch Samples. |
Define the Formulation Project |
|
|
This section describes how to define a simple Formulation Project within LabVantage. Later sections describe in detail how to manage and evaluate a Project.
To begin, navigate to LIMS → Formulations → Formulation Projects. The Formulation list page opens.

From the List page you can "Add" a new Project or "Edit" existing Projects.
To add a new Project click "Add", the Create New Formulation Project dialog opens. You have several options from which you can create the Project.

| Option | Description | ||||||||||
| New Formulation Project Id | Enter a unique identifier for this Project. |
||||||||||
| Formulation Type | The type of Formulation to create. "Development Formulation"
and "Pilot Formulation" are provided OOB.
Typically, the initial Formulation Type would be Development to see how a recipe performs in small scale. Only when successful, typically, the formulation is repeated in a Pilot run as the quantities and process is scaled up. |
||||||||||
| From Scratch | Opens a blank Formulation Project with a blank Formulation Template. |
||||||||||
| From existing Formulation Project | Use an existing Formulation Project as a base for the new Project. Choose to include any of the following
from the existing Formulation Project:
|
||||||||||
| From Existing Product | A Formulation Project can be started based on an existing Product in order to research product improvement or cost reduction. Using the lookup select an existing Product, the selected product is used as the template for the new Formulation Project. |
Enter a Project Id and decide how to create the new Project. Click "OK". The Edit Formulation Project page opens. Depending on how you chose to define the Project you may or may not see previously defined Formulation Templates and Formulations. In our example we will define a Project from scratch.

Define general information about how the project will be managed and the objective.
| Field | Description | ||||||
| Formulation Type | Read only field identifying the type of Formulation being created. Selected during Project definition. | ||||||
| Description | Briefly describe the Project. |
||||||
| Start Date | The date the project is expected to start. This field is for documentation purposes only and is not used in the workflow of the Formulation Project. |
||||||
| Manage Formulation Recipe | Determine how the quantities in Recipes are managed:
|
||||||
| Support Individual Stages | Determines whether or not Stages are managed along with Batches.
|
||||||
| Status | The Status of the Project. Choose "Active", "Completed" or "Cancelled". Typically the Formulation Project is Active. Here you can mark a Formulation Project "Completed" or "Cancelled". Completed and Cancelled formulation Projects can be accessed by specific queries on the Formulation Project List page. | ||||||
| Tabs | Description | ||||||
| Formulation Method | Click "Add" to choose the Formulation Method(s) to include for this Project. Methods with the same recipe type (Proportional or Absolute) are available. See Formulation Methods for detailed information about defining Methods and Calculations. | ||||||
| Attachments | Include Attachments to the Project. |
||||||
| Categories | Assign the Project to a Category. |
Using the Objective detail define the Formulation Project.
The History detail tab lists Project Start and End dates and if Cancelled, the date on which the Project was Cancelled.

As you get further into project definition, the LV Navigator helps you view all Levels of the Project and easily switch between Formulations. Add and manage individual Formulations, viewing each within the context of the others.
As you select a Level, details of that level display in the right pane.

At each Level you can perform different operations. As you begin to define and manage a Project you will find you need to move between Formulations and make changes.
Clicking the dropdown arrow to the right of the level opens the operation menus. The following diagram shows all possible levels and the operations available at each. See Add New Formulations for detailed information about each of these operations.
| Level | Operations | ||||||||||||||||||||||||||||||||||||||||||||||||
| Project | The following Operations are available at the Project Level.
|
||||||||||||||||||||||||||||||||||||||||||||||||
| Formulation | Operations at the Formulation level depending on Status.
|
||||||||||||||||||||||||||||||||||||||||||||||||
| Batch | Operations at the Batch level.
|
||||||||||||||||||||||||||||||||||||||||||||||||
| Stage | Operations at the Stage level.
|
| NOTE: | As you move between levels the Navigator remembers which operation you were performing on the previous level. If you wish to perform a different operation you will need to select it from the dropdown menu. |
Create the Formulation Template |
|
|
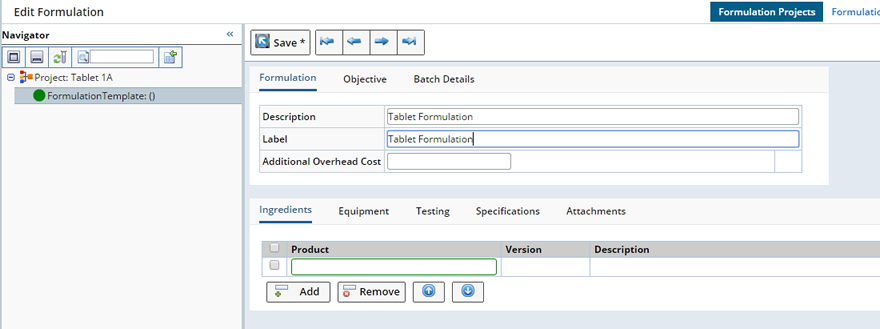
After defining general information about the Project you will create the Formulation Template. A Template is essentially the initial Formulation. As new Formulations are added they are based on this Template. Details defined in the Template default to new Formulations eliminating the need to define these details each time a Formulation is added. Click the Formulation Template Level to display the Formulation detail tabs.
Using the detail tabs define the Formulation.
Formulation |
In the Formulation tab provide a brief description and a Label to identify the Formulation. The Template Label field determines how individual formulations are automatically labeled when added. The format for auto-labeling is to use the "Template Label X", where X is an auto-incremented number (starting with 1) over the last Formulation defined.
Define any Additional Overhead Costs associated with this Formulation Project. These costs are used in Formulation Calculations.
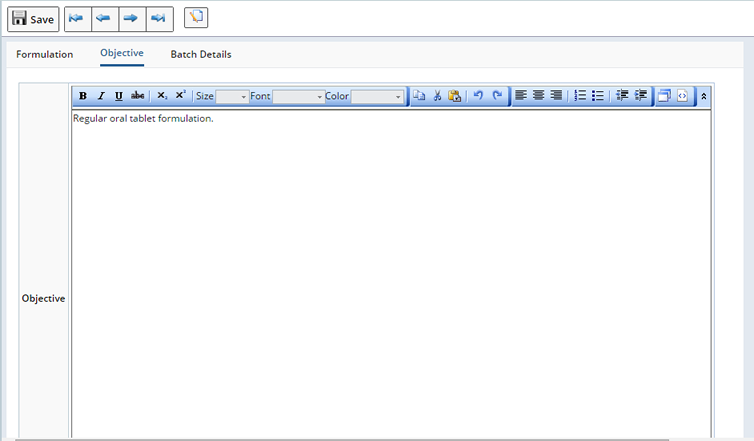
Objective |
This detail lets you provide text to describe the Formulation.
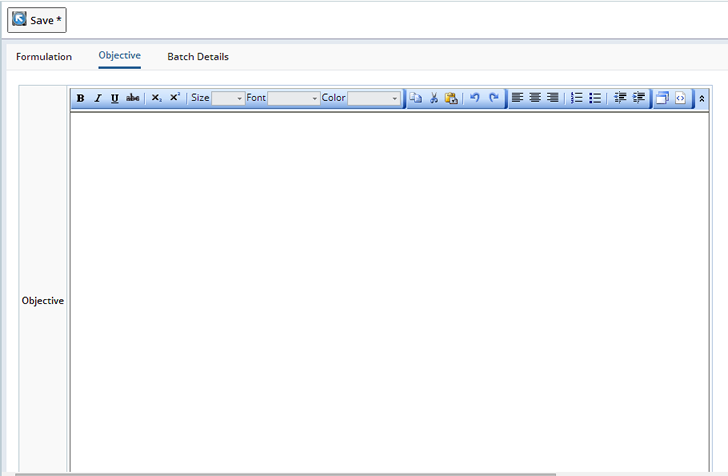
"Save" the Objective when finished.
Batch Details |
This detail defines the Batches you intend to create for this Formulation. Once the Formulations have been designed and reviewed a Batch can be created, as well as any associated Samples. Here you can define the Batches to be created and the Samples needed.

| Option | Description |
| Mixing Batch Size Units |
Enter the total mixing volume or weight and units of the Batches you would like to create for this Formulation. This is used to calculate an Ingredient's recommended amounts during Batch creation. This value will default when adding a Batch, you can make changes if needed. The Mixing Batch Size Units are used to express all raw material ingredients. Mixing Batch Size is also considered when Stage Calculations are included. See Stage Calculations for more information. |
| Batch Sample Count | The number of Samples to include for the Batch. If Individual Stages are supported these fields are not available, the Sample Count and Template are defined on the Stage. |
| Sample Template | Which Sample Template to use when creating Batch Samples. Choose a Sample Template from the dropdown list. If Individual Stages are supported these fields are not available, the Sample Count and Template are defined on the Stage. |
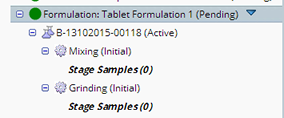
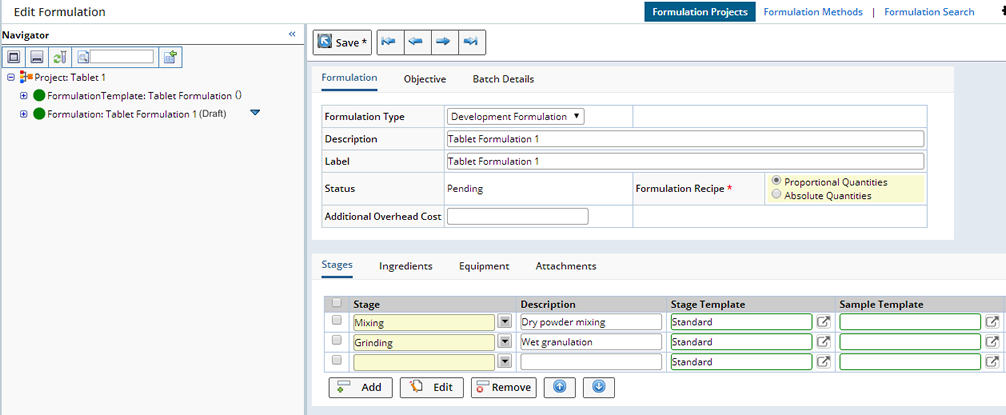
Stages |
Depending on whether or not you choose to include Stages when initially defining the Project, the Stages tab displays. Stages allow you to vary the processes used when creating the different Formulations. For example, in the first Formulation you might mix the first five ingredients, then cure, then do something else. In the second Formulation you might mix all ingredients in the first stage, then cure and be finished. Defining Stages lets you modify these processing stages on a Formulation by Formulation basis.
When Stages are defined, Tests and Specifications are defined at the Stage Level, not for the Formulation as a whole. Defining Stages also provides the opportunity to indicate which Ingredients and/or which equipment is used during which Stage.

| Option | Description |
| Stage | Name the Stage. Values available in the dropdown list are defined as Reference Types, but may be overridden here. |
| Description | Describes the Stage. |
| Stage Template | Choose a Stage Template to apply to Samples created by this Stage. The Stage Template is used to define the release behavior if you choose to include a formal Batch Stage Release. |
| Sample Template | Choose a Sample Template to apply to any Samples created by the Stage. The Sample template may define tests and specifications for the samples, or they may be defined when editing the stage itself. |
| # Samples | The number of Samples to create for this Stage. |
| Overhead Cost | Define any additional costs associated with this Stage. There are two means of specifying cost per stage.
Specify a numeric value here in the Overhead cost, or utilize Stage Data to calculate the additional cost per stage. See Formulation Methods, Stage Calculations, for details. |
Selecting a Stage and clicking "Edit" opens the Stage maintenance page where you can add Tests and make any necessary changes. See Add a Stage to a Formulation for more information.
Stage Calculations allow you to calculate additional costs for a each Stage, based on the Mixing Batch size. Considering entered values (such as Efficiency per hour, hours, and cost per hour) a more accurate Stage Cost can be calculated. See Formulation Methods, Stage Calculations, for details.
Included Stages display in the Navigator when a Batch is created.
Ingredients |
Define the Ingredients of the Formulation. Ingredients are Products defined within LabVantage. Clicking the "Add" button opens the Select Product dialog, choose the Product you want to include as an Ingredient. Add as many Ingredients as necessary.

| Option | Description | |||
| Product | Choose a previously defined Product. |
|||
| Version | The version of the Product. |
|||
| Description | A description of the Product. |
|||
| Classification | The Product Class with which this Ingredient (Product) is associated (such as Dry Ingredient or Filler). See Products for information about defining a Product Class.
|
|||
| Stage | Optionally associate a Stage with an Ingredient (when Support Individual Stages is checked). Choose from a list of Stages associated with the Formulation. If a Stage is removed this association will be cleared. |
At any point while defining a Formulation Project you can add Ingredients to the list. Removal of Ingredients is only allowed when the Ingredient has a zero quantity in all Formulations, or when none of the Formulations have been released for Batching. There is no limit to the number of Ingredients that can be added.
Equipment |
Choose any Equipment needed for the Formulation.

| Option | Description |
| Equipment Class | The type of Equipment (Instrument Type) to be used. These values are defined as Instrument Types. |
| Model | The Equipment (Instrument Model) Model. These values are defined as Instrument Models. If you choose the Equipment Class first, Model lookup is restricted to Equipment within that Class, otherwise the Class is filled in when you choose an Equipment Model. |
| Equipment Id | The specific piece of Equipment being used. Typically the specific Equipment ID is chosen later during Batch processing when given the Equipment Type and Class. However during Formulation definition, if you know the specific piece of equipment to be used, it may be specified here. |
| Stage | Optionally associate a Stage with Equipment (when Support Individual Stages is checked). Choose from a list of Stages associated with the Formulation. If a Stage is removed this association will be cleared. |
| Overhead Cost | Any additional costs involved in using this Equipment. This cost can be considered by Formulation Calculations. |
Testing |
The Testing detail is available when Stages are not included (Support Individual Stages not checked). Tests are either defined here, when Stages are not included, or at the Stage level. In both cases, the Tests can be defined at the Formulation Template Level, or within Stages defined in the Formulation Template.
Define the Tests to perform on Batch Samples taken for this Formulation. The Testing tab lets you "Add" and "Remove" Tests and provides a simplified Specification implementation. See Products Tests and Specifications Simple Mode for more detailed information about defining Tests.

Specifications |
The Specifications tab is available when Stages are not included. See Specifications for more information about defining Specifications.
Specifications are either defined here, when Stages are not included, or at the Stage level. In both cases, the Specification can be defined at the Formulation Template Level, or within Stages defined in the Formulation Template. The Specifications are then copied down to the Formulations (or the stages of the Formulations) when a new formulation is added.

Clicking "Add" opens the Select Specification Dialog. Select the Specification you want to include.
| Option | Description |
| View Results | Once Specification Results are entered for associated Samples you can view the Results by clicking the View Results icon |
| Specification Version |
The selected Specification. Version of the Specification. |
| Description | A description of the Specification. |
Attachments |
Add an Attachment to the Formulation.
Add New Formulations |
|
|
Once you have defined the Template you can begin to add New Formulations to evaluate costs and efficiency. Make changes to the Formulation as needed, create new Formulations, compare each and evaluate the effects of the changes.
Adding New Formulations |
When adding a new Formulation you are making a copy (new iteration) of the Template. With the Project highlighted click the drop down menu icon ![]() and click "Add New Formulation".
and click "Add New Formulation".

Choose a Formulation Type (defined as Reference Types). Enter the Label you want to appear with the new Formulation in the Navigator. The default is to use the Template Label and a number, automatically incremented as new Formulations are added. However, you can change the Label to meet your needs. "Save" the new Formulation. The new Formulation displays in the Navigator, the details inherited from the Template display in the right panel.
Make the necessary changes. Using the Formulation Level Dropdown Menu, choose to perform any of the following to manage the new Formulation.
| Option | Description |
| Edit | lets you view and/or make changes to the Formulation. |
| View | A read only view of the Formulation. |
| Add Stage | Adds a Stage to this Formulation. |
| Manage Proportions | Opens the Formulation Grid where you can view and make changes to costs with real time data updates. See Using the Formulation Grid below for more information. |
| View Proportions | A read only view of the Proportions. |
| Copy | Makes a copy of the Formulation. You will be prompted to add a new Description and label. |
| Copy to Child | Creates a child of the Formulation. The child will display as a Level under the Parent Formulation. |
| Finish Draft | Concludes the draft process (only available when Formulation is in the Draft state), you can no longer make changes to the Formulation. The Status changes from "Draft" to "Pending". |
| Create Batch | Once a Formulation is Finished the Create Batch option displays. Choose to Create a trial Batch for this Formulation. |
| Cancel | Cancels the Formulation. The Status changes to "Cancelled". Once cancelled the Un Cancel option displays in the list. Un Cancel returns the Formulation to a draft state. |
Add a Stage to the Formulation |
Select the Formulation to which you want to add a Stage, open the dropdown menu and click "Add Stage".
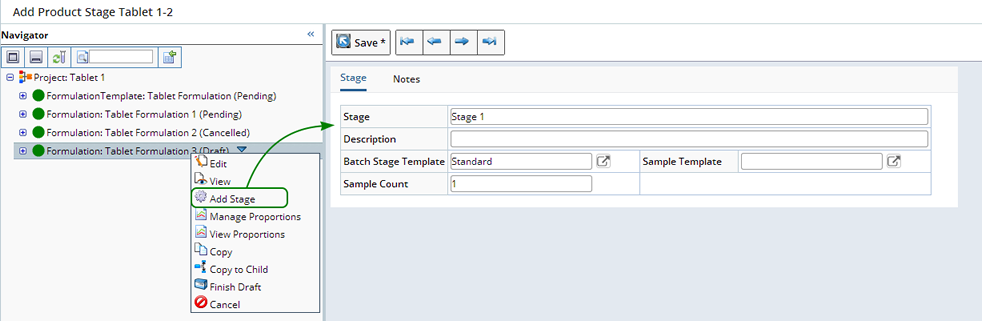
Define the Stage you want to Add.
| Field | Description |
| Stage | Enter a name for the Stage you want to add. This name appears in the Navigator. |
| Description | Describe the Stage. |
| Batch Stage Template | Choose a Template for the Batch Stage. See Batch Stages for more information. |
| Sample Template | The Sample Template to apply to Samples created for this Stage. |
| Sample Count | The number of Samples to include for this Stage. |
"Save" the Stage. The detail tabs display.

The Testing tab lets you "Add" and "Remove" Tests (this Stage only) and provides a simplified Specification implementation. See Products Tests and Specifications Simple Mode for more detailed information about defining Tests.
Add (this Stage only) Specifications to the Stage. Clicking "Add" opens the Select Specification Dialog. Select the Specification you want to include.
| Option | Description |
| View Results | Once Specification Results are entered for associated Samples you can view the Results by clicking the View Results icon |
| Specification Version |
The selected Specification. Version of the Specification. |
| Description | A description of the Specification. |
Attributes are used for defining specific processing values. For example, if you have a mixing stage, an attribute can define a nominal duration or speed of the mixer. Later during batch creation you are able to specify the actual attribute value.
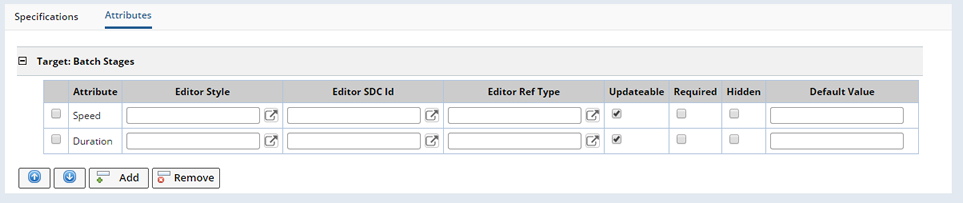
See Adding Linked Attributes for more information.
Stage Calculations allow you to calculate additional costs for a each Stage, based on the Mixing Batch size. Considering entered values (such as Efficiency per hour, hours, and cost per hour) a more accurate Stage Cost can be calculated. See Formulation Methods, Stage Calculations, for details.
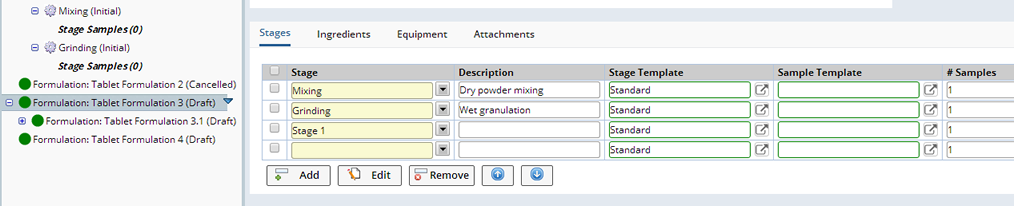
"Save" the Stage. Upon Saving, the new Stages are added to the Stage Tab.
Using the Formulation Grid (Manage Proportions) |
The Formulation Grid is where you define Formulation Quantities or Proportions (as determined by the Formulation Method) for the associated Ingredients. When Managing and Evaluating a Formulation, the Data Entry page opens the data set created when the Formulation is added. The fields of the data set are determined by the Parameters included within the Parameter List(s) associated with the Formulation Method.
Initially only the Parts or Quantities fields are displayed. The Show dropdown is a data entry feature that allows configurable filters which filter on any row or column. Applied here, in the Manage Formulation data entry page, it is used to choose the different parameters to display in the grid.

In this example we included the IngredientParts and Ingredient Cost Parameter Lists which include the following Parameters:
| • | Cost (calculated based on the cost defined in the Product) |
| • | Fraction (calculated) |
| • | Lower Limit (entered) |
| • | Parts (entered) |
| • | Percentage (calculated) |
| • | Upper Limit (entered) |
When evaluating Formulations, two types of Calculations are used:
| • | Ingredient calculations determine the contribution of the ingredient to the formulation in terms of Fraction/Cost. |
| • | Aggregate calculations can simply sum the total of the Ingredient Calculations, or be extended to utilize additional cost values from processing Stages, Equipment used during manufacturing, or from columns like cost or the expected batch size of the Formulation (Product SDI). |
Values entered in the Parts field are used by the Ingredient calculations. The Fraction and Percentage values are calculated based on the Part values entered.
The Upper and Lower Limit values are entered here, then referenced when a Batch is created. These tolerances ensure that only acceptable quantity /part variations are allowed when adding Ingredients to a Batch. When Actual quantities are entered outside these limits a warning message displays. See Create a Formulation Batch for more information.
The FormulationTotalParts and FormulationTotalCost Parameter Lists provide the Aggregate Calculations that determine the Total and Savings values. See Formulation Methods for detailed information about defining these Parameter Lists and Calculations.
When managing the Formulation Grid, using the Show dropdown you can choose to show:
| Option | Description |
| Proportions/Quantities | Show only the Proportions or Quantities for each Ingredient. (editable) |
| With Tolerances | In addition to the Proportions or Quantities show Tolerances (editable). |
| With Cost | In addition to the Proportions or Quantities show Costs as determined by the Parameter List selected in the Formulation Method. (Calculated) |
| With Specific Gravity | In addition to the Proportions or Quantities show the Specific Gravity. (Calculated) |
| All | Shows all of the above. |
Data Entry is updated real time as you make changes to the quantities or proportions (Parts). The Formulation Grid is an Enhanced Data Entry page, see Data Entry for more information about the functionality of the Data Entry page.
For a detailed description of how the Calculations are defined see Formulation Calculations.
When you have defined several Formulations you may want to view and compare them all at once. From the Project Level open the operation menu and click "Manage Proportions". All Formulations within the Project display in the Formulation Grid. Optionally select multiple formulations in the Navigator to open them side by side in the Formulation Grid.

As you manage the Calculations you have the opportunity to view a report of the Calculations performed. Move your cursor over the "Data Entry" button then click "Calculation Report".
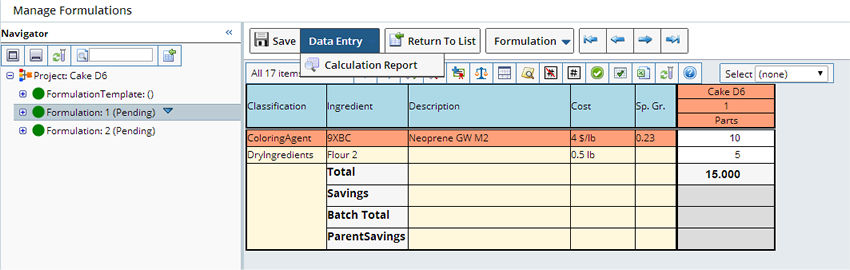
The Calculation Report displays details about the Calculation and the result.

The Formulation options include "Cancel Formulation" and "Mark Formulation as Base".
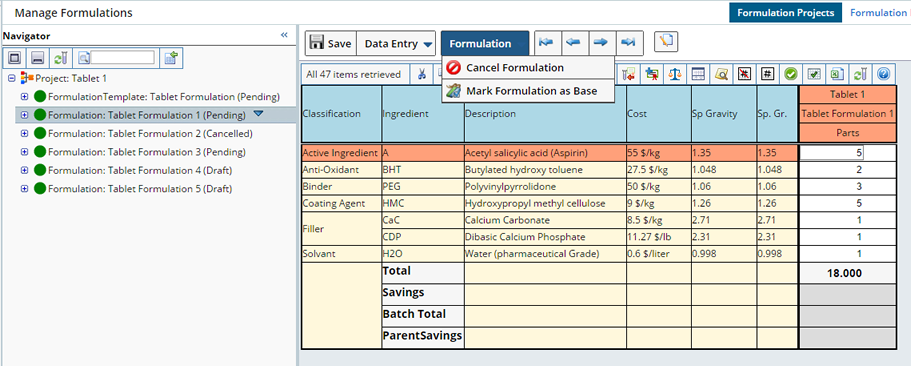
| Operation | Description |
| Cancel Formulation | Cancels the Formulation. See Cancel a Formulation for more details. |
| Mark Formulation as Base | Marks this Formulation as the new Base Formulation. When comparing Formulations at the Project Level changing the Base Formulation changes the Formulation on which the Comparator Calculations are based. Built into the formulation module is the ability to compare the formulation parameters from one to another, by presenting a delta against a base formulation. The base formulation is elected by selecting that formulation and using the option "Mark Formulation as Base". Then the Savings row would automatically be calculated. |
Copy a Formulation |
When necessary you can choose to copy existing formulations, creating either a sibling, or a new child formulation. With the Formulation you want to copy selected, open the dropdown menu and click "Copy" to create a sibling or "Copy to Child" to create a Child.
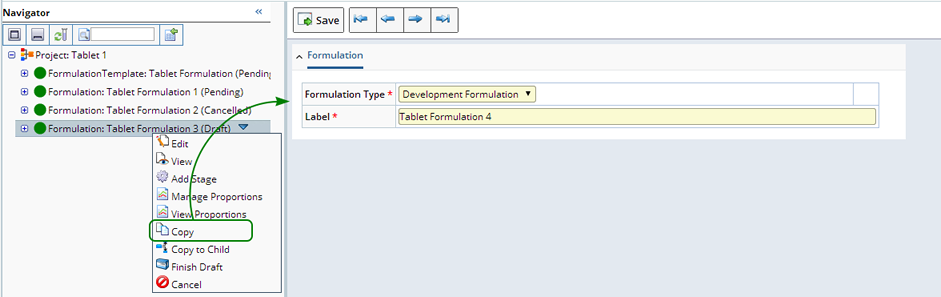
The Label will default to the next consecutive number for Siblings (as if you were adding a new Formulation), and to a sub level for a Child.
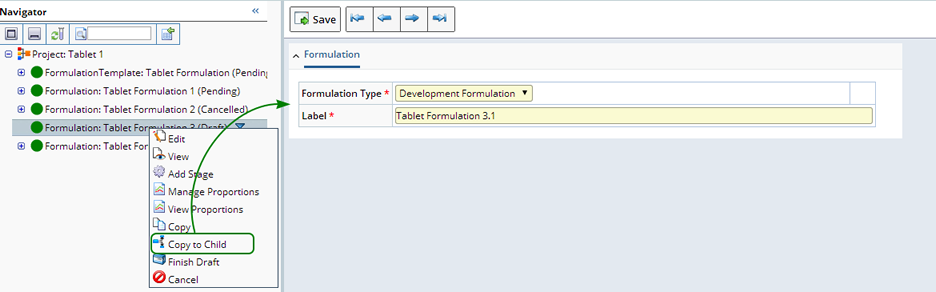
Once created, Children and Siblings display in the Navigator.
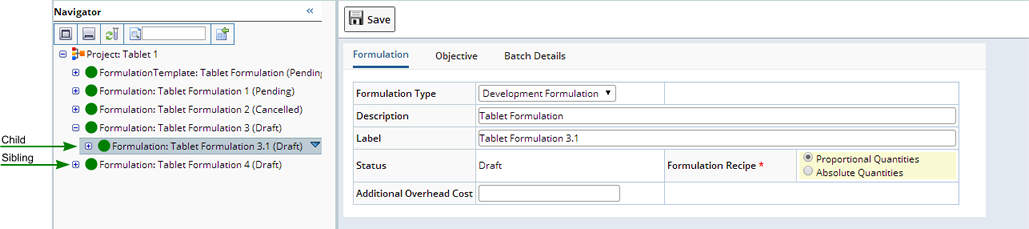
Child formulations may themselves have their own child formulations.
Batches and Samples are not copied.
Finish the Draft Process |
Once you are satisfied with a Formulation and are ready to create a Batch for testing, you will need to Finish the Draft. With the Formulation selected, open the dropdown Menu and click "Finish Draft".
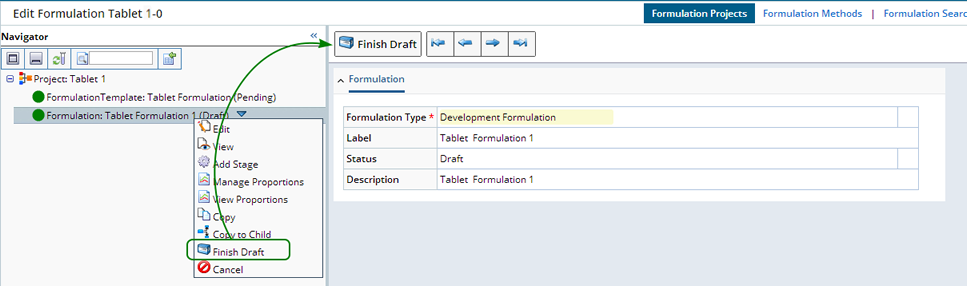
Confirm by clicking the "Finish Draft" button. The Formulation changes from "Draft" to "Pending".
While the Formulation is Pending you can still make changes. You now have the option to "Create a Batch" for the Formulation which may create BatchStages and Samples for evaluation. See Formulation Batches for more information.
Cancel a Formulation |
Cancel a formulation is used when the formulation is faulty from the outset. Cancelled Formulations are automatically hidden in the Manage Formulation data entry page.
Choose to Cancel a Formulation in either the Formulation Grid or from the Navigator. Canceling a Formulation changes the Status to "Cancelled". Once Cancelled the "Un Cancel" operation becomes available in the dropdown menu of the Navigator. Un Canceling returns the status to its previous state.
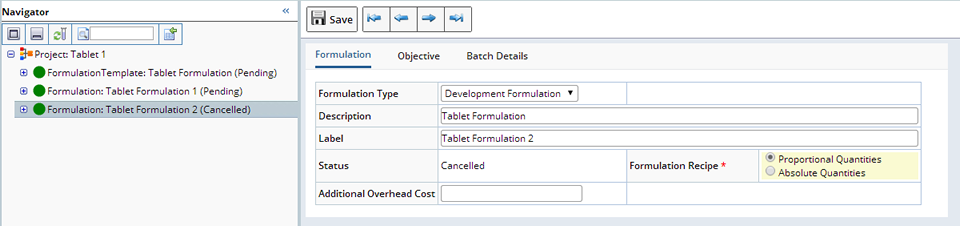
You can Cancel any Formulation with a Status of Draft or Pending. While a Formulation has a status of Cancelled you can no longer view it in the Formulation Grid. Any batches and Samples associated with the formulation are also cancelled.
Review a Formulation |
|
|
When a Formulation is "Complete" you can Review results and choose to Accept or Reject the Formulation.
From the Formulation level of the Navigator, with the Formulation selected, open the dropdown menu and click "Review". This opens a read only Data Entry page showing all Samples for all Batches for the current Formulation. You can also choose to view Sample data across multiple Formulations.

Upon reviewing the data in the Review Formulation page, depending on whether or not the data matches the target specifications, and the goals of the formulation, you can either Accept or Reject the Formulation.
| Option | Description |
| Accept | This is a good Formulation, Accepted Formulations are typically promoted to a new scaled up Formulation or to a full Product. |
| Reject | This formation is no good, Rejected Formulations are hidden on the Review Formulation page. |
Click "Accept Formulation" to accept the Formulation changing the status to "Accepted", or "Reject Formulation" to reject the Formulation.
Once a Formulation is reviewed you still have the option to "Create Batch", adding a new Batch to the Formulation. You can also "Copy" or "Copy to Child" to create a new Sibling or Child Formulation.
Promote the Formulation |
|
|
Once a Formulation is Complete and Accepted optionally choose to Promote the Formulation to a Product. See Promote Formulations for more information.