|
Batch Operations |
Content |
|||||||||||||||
|
Batch Templates |
|
|
Batches are based on Batch Templates. Batch Templates are used to determine the different Batch Type (typically "Raw Material" or "Finished") and to set the Initial status of a Batch.
Typically, Raw Material batches start with a status of Initial, whereas Finished Batches start with Active. However, any other fields can be set in the Template, then copied when creating new Batches.
| • | Create and maintain Batch Templates from the Batch Template List page at Lab Admin → Templates → Batch Templates. |
| • | Approvals are required for Releasing a Batch (below). After saving a Batch Template, specify the Approval Types to be used for the SDI Approval process. |
Batch List Pages |
|
|
Active Batch List Page |
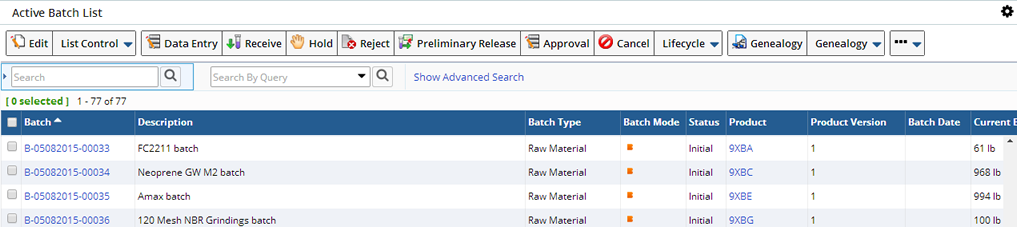
Purpose |
Lists Batches having these Statuses:
| • | Initial | • | Active | |
| • | Received | • | OnHold |
Location |
| LIMS | → | Batches | → | Batches |
Columns |
| Column | Description | ||||||||||||
| Batch | Automatically-generated identifier of the Batch. | ||||||||||||
| Description | Text description of the Batch. | ||||||||||||
| Batch Type | Batch Type (as determined by the Batch Template, e.g., Raw Material or Finished). | ||||||||||||
| Batch Mode |
Indicates the Batch Genealogy.
|
||||||||||||
| Status | Current Status of the Batch (see Batch Life Cycle). | ||||||||||||
| Product | Product associated with the Batch. | ||||||||||||
| Product Version | Version of the Product. | ||||||||||||
| Batch Date | Date the Batch was created. | ||||||||||||
| Current Batch Quantity | Current Quantity of the Batch. | ||||||||||||
| Samples | Number of Samples in the Batch. | ||||||||||||
| Stages | Number of Stages in the Batch. | ||||||||||||
| Attachment Icon |
|
||||||||||||
| Report Status
Icons |
Indicates that the COA Controlled Report has
been printed and Confirmed.
|
||||||||||||
| Batch Incident Icons | Indicates that Samples in the Batch have had
Lab Investigations Incidents.
|
||||||||||||
| Specification Icons |
Indicates Specification
status of Samples.
|
Buttons |
See Batch Life Cycle for information concerning the Batch Statuses described below.
| Button | Description |
| Edit | Opens an editable Batch Maintenance page for the selected Batch. |
| View (List Control Menu) | Opens a read-only Batch Maintenance page for the selected Batch. |
| Delete (List Control Menu) | Deletes the selected Batches. |
| Data Entry | Opens a Data Entry page for Samples in the selected Batch and lets you enter data for Samples in the Batch. |
| Receive |
Receives the selected Batches, i.e., receipt of Raw Materials at the
loading dock for receipt of the Batch.
This is not to be confused with Sample Receipt, which is the process of Receiving Samples into the lab. |
| Hold | Puts the selected Batches On Hold. There are no restrictions while a Batch is On Hold. |
| Reject |
Rejects the selected Batches and moves them to the Historical Batch
List page with a Batch Status of "Rejected".
Typically, the Batch is rejected during manual Batch Release, but a Batch can be rejected at any time. |
| Preliminary Release | Nominates the selected Batches for Release
and moves them to the To Be Released Batch List page with a Batch Status
of "Preliminary Release".
This is used to release a Batch before all testing is completed. Batches that have been Preliminary Released still require to be "fully" released. |
| Approval | Approve the selected Batch. |
| Cancel | Cancels the Batch. The Status changes to Cancelled.
Note: Your selection in the Batch Sample Policy's "Cancel Action Behavior" determines how associated Samples are affected. See Batch Sample Policy for more information. |
| UnReceive (Lifecycle Menu) | Reverses the "Receive" operation for Received Batches and reverts back to the prior Batch Status. |
| UnHold (Lifecycle Menu) | Reverses the "Hold" operation for Received Batches and reverts back to the prior Batch Status. |
| Genealogy | View the entire Genealogy of the selected Batch with the Genealogy Viewer. |
| Link Batches (Genealogy Menu) | Creates a new linked batch from one or more heterogeneous Batches. The new Batch is simply a link between the existing Batches, no tests are associated with it. |
| Create Composite Batch (Genealogy Menu) | Creates a new Composite Batch from existing homogeneous Batches. You can optionally select a level, if not, no sampling plan will be used. |
| Split Batch (Genealogy Menu) | Splits an existing Batch into one or more new Batches. You can optionally select a level, if not, no sampling plan will be used. Define the maximum number of Batches to be created by a split in BatchSamplePolicy. |
| NOTE: | UnReceive and UnHold execute the UndoSDIColumnValue Action, which gets the value of the specified column from the Audit table and validates the current column value with the input. |
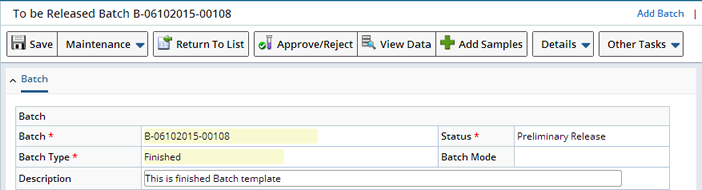
To Be Released Batch List Page |

Purpose |
Lists Batches having these Statuses:
| • | Pending Release | • | Preliminary Release |
Location |
| LIMS | → | Batches | → | Batches Pending Release |
Columns |
In addition to the columns described in the Active Batch List page, the "No Batch Approval" icon ![]() indicates that a Batch has no Approval requirements, however an open Incident exists. Whether or not to allow a Batch to be Released with open Incidents is determined in the Batch Sample Policy, "Release Batches with Open Incidents" property.
indicates that a Batch has no Approval requirements, however an open Incident exists. Whether or not to allow a Batch to be Released with open Incidents is determined in the Batch Sample Policy, "Release Batches with Open Incidents" property.
Buttons |
See Batch Life Cycle for information concerning the Batch Statuses described below.
| Button | Description | ||||||||
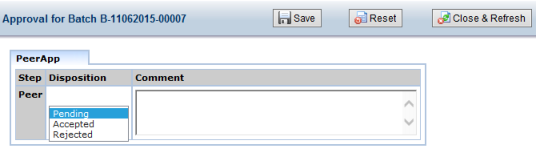
| Review and Release |
Applies to a Batch that has Approval Types
specified. Opens a dialog that lets you "Release" or "Reject"' the Batch
using the "Approve/Reject" button to access the Approval Types:
Choose the "Disposition", click "Save", then "Close and Refresh".
Approved Batches transition to "Released". Approval Type status for the Batch changes from "Pending" to the chosen disposition (such as "Accepted"). All "Released" and "Rejected" Batches are listed in the Historical Batch List page.
|
||||||||
| Preliminary Release |
For a Batch with a Status of "Pending Release", nominates the selected Batches for Release and changes Batch Status to "Preliminary Release". | ||||||||
| View | Opens a read-only Batch Maintenance page for the selected Batch. | ||||||||
| Reject | Rejects the selected Batches and moves them
to the Historical Batch List page with a Batch Status of "Rejected".
|
||||||||
| View Results | Opens a Data Entry page for Samples in the selected Batch and lets you view data that have been entered for Samples in the Batch. |
Historical Batch List Page |
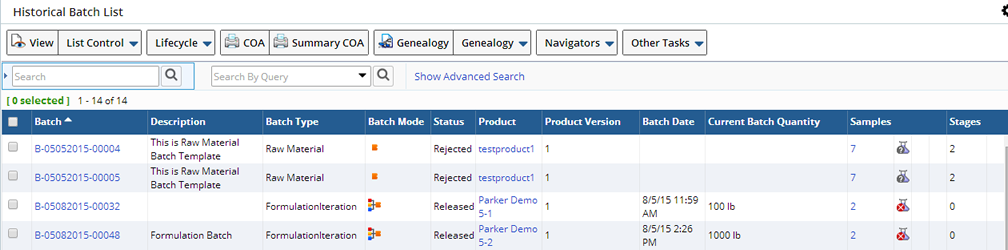
Purpose |
Lists Batches having these Statuses:
| • | Released | • | Rejected |
Location |
| LIMS | → | Batches | → | Historical Batches |
Columns |
Same as Active Batch List page.
Buttons |
See Batch Life Cycle for information concerning the Batch Statuses described below.
| Button | Description |
| View | Opens a read-only Batch Maintenance page for the selected Batch. |
| UnReject (Lifecycle Menu) | Reverses the "Reject" process for the selected Batch. |
| UnRelease (Lifecycle Menu) | When Released in error, reverses the Release process for the selected Batch. When "Unreleased", all Approvals should transition to back to "Pending". |
| UnCancel (Lifecycle Menu) | Returns the status of the Batch and its Samples to the prior status. |
| Delete (List Control Menu) | Deletes selected Batches. |
| Print COA | See Printing COAs. |
| Print Summary COA | See Printing COAs. |
Printing COAs |
The Print COA operations let you print a Certificate of Analysis for all Samples in a selected Batch:
| Operation | Description | Location |
| Print Preliminary COA | Prints the BatchPrelimCOA Report for the Batch. |
Active Batches List page: "Print Preliminary COA" sidebar operation. |
| Print Summary COA | Prints the BatchSummaryCOAReport
for batch. The Batch must have been "Released".
Multiple samples are merged together showing the aggregate values for Average, minimum, and maximum values across multiple Samples. Non-numeric results are excluded from this report. |
Historical Batches List page: "Print Summary COA" button. |
| Print COA |
This is the "full" COA. The Batch must have been "Released".
This functionality also exists on the Historical Samples List Page (LIMS → Samples → Historical Samples). |
Historical Batches List page: "Print COA" button. |
These are Controlled Reports. Each of is generated using a separate Jasper Report (giving 3 OOB Jasper Reports for printing COAs).
The Active Batches List page uses icons to show the status of each Report (see Report Status Icons).
A warning is issued when printing any of the COAs if there are samples that have failed conditions. The user is alerted to this before printing the COA.
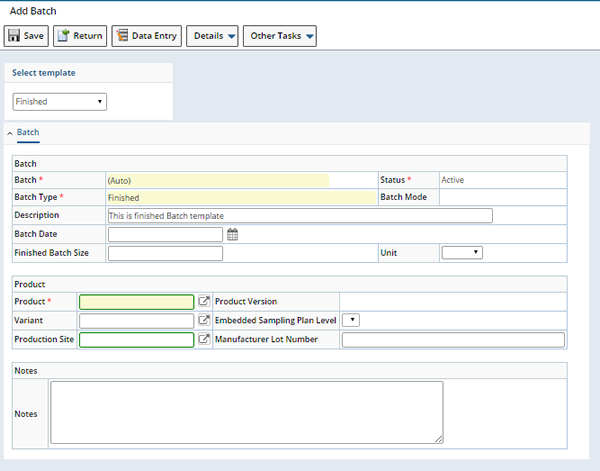
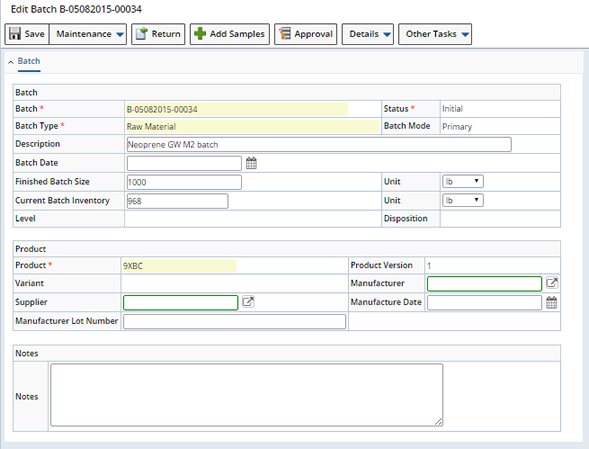
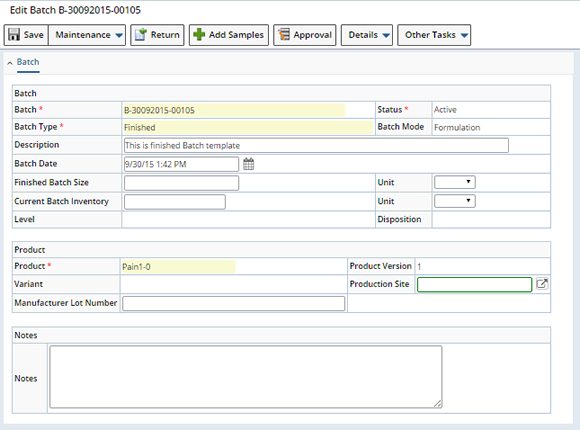
Batch Maintenance Pages |
|
|
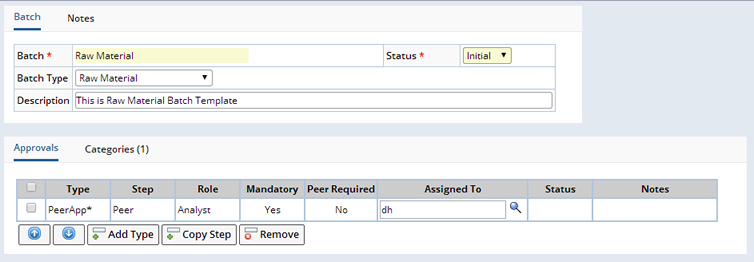
Overview |
The following images show the fields when adding or editing a Raw Material Batch and a Finished Batch.
| Add Raw Material Batch | Add Finished Batch |

|
|
| Editing a Raw Material Batch | Editing a Finished Batch |
|
|
Purpose |
| • | Add Batches (Add Batch pages shown above). |
| • | View and edit Batch information (Edit Batch pages shown above, View Batch is read-only). |
| • | View information about Samples and Stages in the Batch, conduct Data Entry on the Samples, and add Samples and Stages to the Batch. |
| • | View Approval Types associated with the Batch, and add/remove Approval Types to/from the Batch. |
Location |
Batch Maintenance pages are accessed from LIMS → Batches → Add Batch (when adding Batches) and from the "Edit" and "View" buttons on the Batch List pages (when editing and viewing Batch information). Fields on Batch Maintenance pages differ slightly depending on the Batch Type (as shown in the images above). These differences are noted below.
Primary Form |
| Field | Description |
| Batch | |
| Batch | Automatically-generated identifier of the Batch. |
| Batch Type | Batch Type. |
| Status | Current Status of the Batch (see Batch Life Cycle). |
| Batch Mode | Indicates whether or not the batch has been Split, Combined (Composite), Linked (Link) or contains a Formulation. Primary Batch Mode indicates no Genealogy. |
| Description | Text description of the Batch. |
| Finished Batch Size | Physical size of the Finished Batch. |
| Batch Size Unit | Units of measure for the "Batch Size" above. |
| Current Batch Inventory | Current amount of Batch Inventory. As Ingredient Batches are used within a Formulation the Actual Amount used is deducted from Current Batch Quantity. |
| Current Batch Inventory Unit | Unit of the Current Batch Inventory. |
| Level | Level of the Batch. |
| Disposition | Current Batch Disposition. |
| Product | |
| Product | Product
associated with the Batch. The Product Type must match the Batch Type.
If the Product Mode is "Simple", the Variant (below) becomes readonly, as the "Simple" Product defines the Levels, not the Product Variant). The Embedded Sampling Plan Level then becomes a mandatory dropdown list of Levels specified in the "Simple" Product. Selecting a Level sets this as the Batch level. If the Product Mode is "Full", you can select the Product Variant. After the Batch has been created, you cannot change the Product. |
| Variant | Product Variant associated with the Batch. |
| Manufacture Lot Number |
Provided only for your information. Depends on the Batch Type.
For "Raw Materials", this may be the Lot Number of the Manufacturer of the Batch. For "Finished", this is the Lot Number that will be assigned to this Batch. |
| Manufacturer | "Raw Material" Batch Type only. Used to identify the vendor of the material. |
| Supplier | "Raw Material" Batch Type only. "Supplier" is actually an "Organization" SDI that is used to identify the vendor of the material. |
| Manufacture Date | "Raw Material" Batch Type only. Date of manufacture. |
| Production Site | "Finished" Batch Type only. Used to identify the production site of the Batch. |
| Notes | |
| Notes | Area for additional textual addendums. |
Details |
Samples |
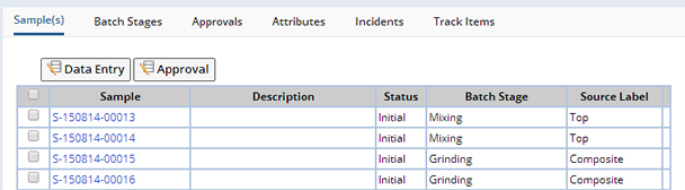
For all Samples in the Batch, the Samples detail shows the Sample identifier, Description, current Sample status, Batch Stage and Source.
To conduct Data Entry on selected Samples, use the Data Entry button (above), which opens a Data Entry page.
Batch Stages |
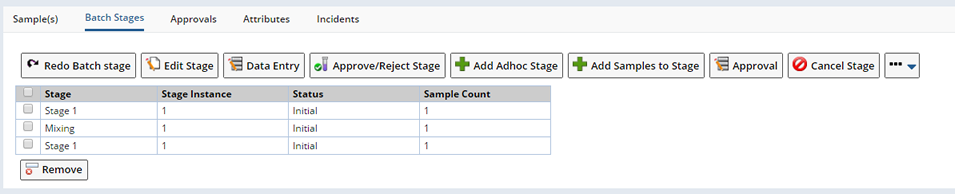
From the Batch Stages detail you can do any of the following to manage a Batch Stage:
| Button | Description |
| Redo Batch Stage | Creates another instance of the Stage (including Samples). Enter the number of instances you would like to create. |
| Edit Stage | Make changes to the selected Stage. Here you will be able to change the Stage Label, Notes, Approve or Reject the Stage, and manage Approvals, you can not add Approvals. Approvals can only be defined in the Batch Stage Template. |
| Data Entry | Opens a Data Entry page displaying Samples for the selected Batch Stage. You can enter Data for those Samples. |
| Approve/Reject Stage | Approve or Reject the Stage. All Samples associated with the Stage must be completed. If there are no Samples associated with the Stage the Stage will not need to be Approved and it will not impact Batch Release. If you selected "Yes" in the Synchronize Batch Status with Batch Stage Status Policy option in BatchSamplePolicy all Stages must be approved before a Batch can be released. |
| Add Adhoc Stage | Add a Stage to an existing Batch. See Add Adhoc Stages for more information. |
| Add Samples to Stage | Add Samples to a Stage. See Add Samples to a Stage for more information. |
| Approval | Approve Testing for Samples associated with the Stage. |
| Cancel Stage | Cancels the Stage. The Status changes to Cancelled. Your selection in BatchSamplePolicy, Cancel Action Behavior, determines how associated Samples are affected. See BatchSamplePolicy for more information. |
| Un Cancel Stage | Un-Cancel a Stage, the status returns to the status prior to canceling. |
See Batch Stages for detailed information about adding Stages to a Batch.
Approvals |

The Approvals detail lets you add Approval Types ("Add Type"), Copy Approval Steps ("Add Step"), and remove selected Approval Types ("Remove").
See Approval Types and SDI Approval for details on the SDI Approval process and how to use this detail.
Incidents |

The Incidents detail displays any open Incidents for Samples in the Batch.
Ingredients, Child Batches and Genealogy |
From the Ingredients detail you can view and manage the Ingredients included in this Batch. Remove non mandatory Ingredient batches or add batches that are not already in the hierarchy of the Batch and not Rejected. The Ingredients detail is particularly helpful when trying to release Formulated Batches and Formulation Batches. All associated Batches must be released before the Formulated Batch or Formulation can be released. Here you can identify any associated Batches.

| NOTE: | Defining an Instrument (using the "Instrument Type", "Instrument Model" and "Instrument Field" fields) on the Product (Ingredient), enables LabVantage to utilize the SimpleInstrument API to record the actual Amount Used for a Batch. When defined, a lookup to the Instrument Popup is provided (next to the Amount Actual field). |
In the Child Batches detail you can view related Child Batches.

The Genealogy tab displays a graphical view of the Genealogy for the Batch.
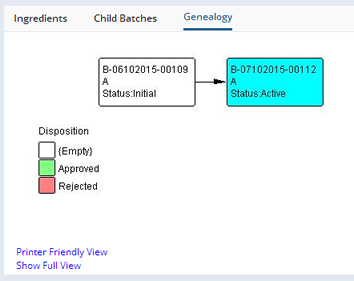
See Batch Genealogy for more information about Batches with Genealogy.
Adding Samples to Existing Batches |
The "Add Samples" button in the page header lets you add Samples to an existing Batch.
Note: If you are using a Version older than R5.1 you will not be able to use the "Add Samples" to Batch button. The Add Sample functionality uses the Batch's Sampling Plan which was not introduced until R5.1.

Clicking "Add Samples" opens the "Add Samples to Batch" page:
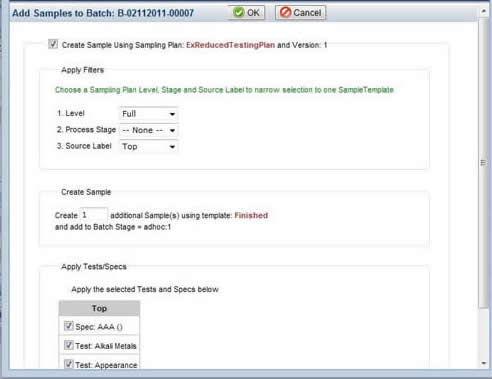
This page lets you add Samples to a Batch that is based on a Sampling Plan, a Product, Both... or neither (it can be used to add Samples to a Batch that does not use the Batch Management functionality at all). The "Sample Creation Policy" property of the BatchSamplePolicy determines what this page displays:
| Sample Creation Policy | Displays options to... |
| Using Sampling Plan | Create Samples Using Sampling Plan |
| Using Product | Create Samples Using Product |
| Both | Create Samples Using Sampling Plan and Create Samples Using Product |
| None | This setting disables the Batch Management functionality. However, you can still add Samples to a Batch. See Creating Samples Using a Product that does not have a Batch Sample Template. |
| Create Samples Using Sampling Plan |
This lets you create Samples that are based on a Sampling Plan. LabVantage automatically finds any Sampling Plan that is associated with the Batch and displays the identifiers of the Sampling Plan and Sampling Plan Version in red text in the header.
Apply Filters
Choose values for the fields and dropdowns below:
| Level | Level to which the new Samples will be set. | |
| Process Stage | = | Optionally associate the Samples with a Process Stage |
| Source | = | Source of the new Sample. |
Create Sample
Choose values for the fields and dropdowns represented by the square brackets below:
Create [n] additional Sample(s) using template:
[TemplateId]
and set Level = [Level] and Source Label = [Source] on the newly
created Sample(s)
| where | ||
| n | = | Number of Samples to create. |
| [TemplateId] | = | Sample Template used to create the Samples. |
| [Level] | = | Level to which the new Samples will be set. |
| [Source] | = | Source of the new Sample. |
Selecting a Level or Source changes Tests and Specifications shown in the Apply Test/Specs detail below to show only the Tests and Specifications that apply to the selected Level and Source. If Tests or Specifications do not exist for the selected Level and Source, a message is displayed to that effect.